1
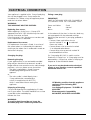
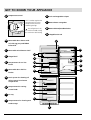
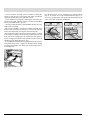
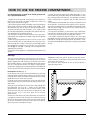
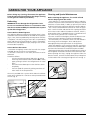
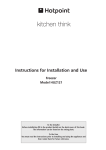
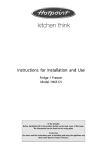
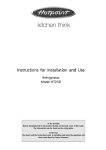
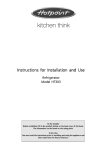
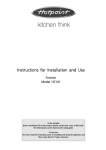
Instructions for Installation and Use
Refrigerator
Model HM315I
CONTENTS
Product Safety
Installation
Electrical Connection
Get to Know your Appliance
Getting your Appliance ready for use
How to use the Refrigerator Compartment
Storage Guide
How to use the Freezer Compartment
Energy Saving Tips
Food Storage
Caring for your Appliance
Troubleshooting
Notes
After Sales Service
Hotpoint Guarantee
Key Contacts
3
3
4
5
6
6-7
7
8
8
9-10
11
12
13
14
15
Back Cover
Retention of this Instruction Book
This Instruction Book must be kept handy for reference as it contains important details on the safe and proper use of the
appliance.
If you sell or pass the appliance to someone else, or move house and leave it behind, make sure this Book is also provided
so the new owner can become familiar with the appliance and safety warnings.
If the Book is lost or damaged a copy may be obtained from:
Merloni Elettrodomestici UK Ltd. Morley Way, Peterborough, PE2 9JB
2
PRODUCT SAFETY
ATTENTION
Read your manual carefully since it contains instructions which
will ensure safe installation, use and maintenance of your
appliance.
Your Refrigerator is built to International safety standards
(EN60) and has been awarded the European approval mark
(IMQ) for compliance with UK electrical safety requirements.
It also meets the EC standards on the prevention and elimination of radio interference (EC directive 87/308 - 02.06.89).
1. This appliance must not be installed outdoors - not even in
an area protected by a roof. It is extremely dangerous to
leave it exposed to rain or storms.
2. It must only be used by adults and exclusively to refrigerate and freeze foodstuffs, following the instructions for use
contained in this manual.
3. Do not ever touch or handle the appliance with bare feet
or with wet hands or feet.
4. It is highly recommended that you do not use extension
cords or multiple socket adapters. If the refrigerator is installed between cabinets, make sure that the cord is not
bent or dangerously pinched or compressed.
5. Never pull on the cord or the refrigerator to remove the
plug from the wall socket - this is very dangerous.
6. Never touch the cooling components within the appliance,
especially with wet hands because this could result in injury.
7. Never put ice cubes just removed from the freezer into
your mouth because they could stick to your mouth and cause
burns.
8. Never clean the appliance or perform maintenance without
first disconnecting it from the electrical mains. Turning the
thermostat knob to the
setting does not suffice to break
all electrical contact with the mains.
9. Before having your old refrigerator picked up for disposal,
remove or make inoperable any locking devices to prevent
children who might play in or around the appliance from
being locked inside.
10. Before calling for service/assistance in the case of malfunction, consult the chapter entitled “TROUBLESHOOTING"
to determine whether it is possible to eliminate the problem.
Do not try to repair the problem by trying to access the internal components of the appliance.
11. If damaged, the power supply cord on this appliance
must necessarily be replaced by our service centre because
special tools are required for replacement.
12. Do not use electric appliances inside the compartment
for food storage, if these are not those recommended by the
manufacturer.
13. At the end of the functional life of your appliance –
containing cyclopentane gas in the insulation foam and
perhaps gas R600a (isobutane) in the refrigeration circuit –
the latter should made safe before being sent to the dump.
For this operation, please contact your dealer or the Local
Organisation in charge of waste disposal.
INSTALLATION
To ensure that the appliance operates properly and to reduce
energy consumption, it is important that the appliance is
installed correctly.
Ventilation
The compressor and condenser generate heat and, therefore,
need to be ventilated properly. Areas not adequately ventilated
are not suitable for this appliance. Therefore it should be
installed in a room with an opening (eg. window) that provides
the appropriate amount of air re-circulation. It is also important
that the room is not too humid.
Away from Heat
Avoid positioning the appliance in a place where it is directly
exposed to sunlight or near an oven, hob or the like.
Electrical Connection and Earthing
Before proceeding with the electrical connection, make sure
that the voltage indicated on the rating plate, located within
the freezer, corresponds to the mains voltage in your homeand
that the socket is fitted with a standard earthing wire in ac-
cordance with safety standards for 46/90 systems. If the socket
is not fitted with an earthing wire, the manufacturer will not
be held liable for any damages and/or injuries arising out of
the use of the appliance. Do not use multiple sockets or
adapters.
Position the appliance in such a way that you can access
the socket where it is plugged in.
Insufficient power?
The electrical socket must be able to handle the maximum
power load of the appliance, which is indicated on the rating
plate located within the freezer.
Before making the electrical connection ...
After the appliance has been delivered, place it in the vertical upright position and wait at least 3 hours before inserting
the plug into the socket in order to ensure that it functions
properly.
3
ELECTRICAL CONNECTION
Fitting a new plug
Your appliance is supplied with a 13amp fused plug
that can be plugged into a 13amp socket for
immediate use. Before using the appliance please
read the instructions below.
IMPORTANT:
WIRES IN THE MAINS LEAD ARE COLOURED IN
ACCORDANCE WITH THE FOLLOWING CODE...
WARNING:
THIS APPLIANCE MUST BE EARTHED.
Green and Yellow
Blue
Brown
Replacing fuse covers:
When replacing a faulty fuse, a 13amp ASTA
approved fuse to BS 1362 should always be used
and the fuse cover re-fitted.
If the fuse cover is lost, the plug must not be used
until a replacement is obtained.
- Earth
- Neutral
- Live
As the colours of the wires in the mains lead may
not correspond with the coloured markings
identifying the terminals in your plug, proceed as
follows:
- Connect Green and Yellow wire to
terminal marked 'E' or
or coloured
Green and Yellow.
- Connect Brown wire to terminal marked
'L' or coloured red or brown.
- Connect Blue wire to terminal marked 'N'
or coloured Black or Blue.
Replacement fuse covers:
If a replacement fuse cover is fitted, it must be of
the correct colour as indicated by the coloured
marking or the colour that is embossed in words on
the base of the plug.
If a 13amp plug (BS 1363) is used it must be
fitted with a 13amp fuse. A 15amp plug must be
protected by a 15amp fuse, either in the plug or
adaptor or at the distribution board.
Changing the plug:
Removing the plug
If your appliance has a non-rewireable moulded
plug and you should wish to remove it to add a
longer cable or to re-route the mains cable through
partitions, units etc. please ensure that either:
- The plug is replaced by a fused 13amp rewireable plug bearing the BSI mark of
approval.
or
- The mains cable is wired directly into a
13amp cable outlet, controlled by a
switch (in compliance with BS 5733)
which is accessible without moving the
appliance.
If you are in any doubt about the electrical
supply to your machine, consult a qualified
electrician before use.
CE Marking certifies that this appliance
conforms to the following EEC
directives :
Low Voltage Equipment - 73/23/EEC &
93/68 EEC
Electromagnetic Compatibility
89/336/EEC, 92/31/EEC & 93/68/EEC
Disposing of the plug
Cut off and dispose of the supplied plug if it does
not fit your socket. The cable should be cut as close
as possible to the moulded plug.
Remove the fuse.
WARNING:
To avoid a shock hazard do not insert the
discarded plug into a socket anywhere else.
4
GET TO KNOW YOUR APPLIANCE
A
Temperature control
This is used to regulate the
temperature in the two
compartments with the
following settings:
The refrigerator is off;
1 = minimum cold setting
5 = maximum cold setting
B
K
Fruit and Vegetable Crispers
L
Meat/cheese storage box
M
Removable/Adjustable Shelves
N
Hinged bottle rack
A
Removable door shelves with
lid, with egg tray and lidded
butter dish
C
M
D
Hinged shelf
E
Compartment for a 2 litre
C
N
bottle
F
B
Removable miscellaneous shelf
Removable door shelf for
D
M
L
E
K
F
bottles
G
Drain system for drawing off
defrost water from freezer
compartment
H
Compartment for storing
frozen foods
I
J
I
H
I
H
Ice tray
H
J
Compartments for freezing and
food storage
G
5
GETTING YOUR APPLIANCE READY FOR USE
NOTICE
After the appliance has been delivered, stand it in the
upright position and wait approximately 3 hours before connecting it to the electrical outlet to guarantee
that it operates properly.
Before placing foodstuffs in the refrigerator or freezer, clean
the interior well with warm water and baking soda.
After plugging in an switching on at the socket, make sure
the light is on inside the refrigerator compartment.
Then turn the temperature control (A) to the 3 setting.
After a few hours, you can place fresh food inside the
refrigerator and frozen food inside the freezer.
Fill ice trays and put them in compartment'H'.
HOW TO USE THE REFRIGERATOR COMPARTMENT
Do not be concerned about this! The refrigerator is operating normally.
The temperature control automatically regulates the
temperature inside the appliance
1 = minimum cold temperature
5 = maximum cold temperature
It is recommended that a medium setting be used.
To increase the amount of space, optimize arrangement and
improve appearance, this appliance has a “cooling area”
located within the back panel of the refrigerator compartment. When the appliance is operating, this panel may be
covered with frost or droplets of water depending on whether
the compressor is operating or not.
If the temperature control is positioned on higher settings
while the refrigerator is heavily filled and the ambient temperature high, the appliance may run continuously, resulting
in the formation of frost on the back cooling area. This will
lead to an increase in energy consumption.
To avoid this situation, just turn the temperature control
to a lower setting so that the appliance defrosts automatically.
Storing Food in the Refrigerator Compartment
Food
Storage Time
Location in the Refrigerator
Wrapped meat and cleaned fish
(use cling
filmwrap
or pack
plastic
(use
plastic
orinpack
in bags)
plastic bags)
2 or 3 days
On the shelf above the vegetable crisper
(which is the coldest area).
Fresh cheese
3 or 4 days
On the shelf above the vegetable crisper
(which is the coldest area).
Eggs
1 month
In special egg rack on door.
Butter, margarine
On any shelf.
Cooked or precooked food
(packed
containers
and when
store
(placer ininair-tight
air-tight
containers
and cool
when
cool store
in refrigerator)
3 or 4 days
On any shelf.
Sausages, salami, sandwich meats in general, fresh
pasta, custards,puddings, chocolates, cream
pastries, bread, dry pastries, red tomatoes
3 or 4 days
On any shelf.
in refrigerator)
Bottled products, milk, drinks, yoghurt
On special door shelves.
Fruits
Fruits and
andvegetables
legumes
In vegetable crisper.
What Not to Store in the Refrigerator
Garlic (transmits odour), onions and leeks.
Bananas (they will turn black).
Citrus fruits.
Potatoes and root vegetables (store in dark, dry places).
6
- The air circulates naturally, with the colder air falling because it is heavier. This is the reason why meat and cheese
should be placed above the vegetable crisper.
- Please follow our instructions carefully on maximum storage time: any food, even the freshest, will not remain edible
for any extended amount of time.
- Contrary to popular belief, cooked foods do not store any
longer than raw food.
- Do not store liquids in containers without covering them
because this will lead to an increase in the level of moisture
within the refrigerator, causing the formation of frost.
- Be careful not to place containers (plastic or glass), food or
other objects in direct contact with the cooling area of the
back wall of the refrigerator. This could harm the food, increase energy consumption and facilitate the formation of
condensate (on food, containers, etc.).
- The refrigerator compartment is equipped with convenient,
removable shelves (Fig. 1) which can be adjusted for height
using the shelf guides. This allows you to place large items in
the refrigerator.
The side bottle rack can be used either for storing a bottle
(Fig. 2) or several cans (2-4) placed horizontally (Fig. 3). If
not in use, the bottle/can rack can be tipped up and away to
make more room inside the refrigerator.
Fig. 2
Fig. 1
7
Fig. 3
HOW TO USE THE FREEZER COMPARTMENT...
For the preparation of food to be frozen, please consult a specialized manual.
- Food that has be thawed, even partially, must not be refrozen: you must cook it in order to consume it (within 24
hours) or to freeze it once again.
- When freezing fresh foods, remember that they should not
touch other previously frozen or deep frozen foods. Place
the food that you wish to freeze in the top compartment,
where the temperature will fall below -18°C, which is ideal
for freezing food properly. Remember that proper conservation depends on the speed of freezing.
-The maximum amount of food you can freeze per day is
indicated on the rating plate situated inside the refrigerator
compartment.
- When using the appliance for the first time, or after it has
been turned off, you can place food into it only after it has
been running for 6-8 hours. Then put the fresh food into the
the appropriate compartments and turn the temperature
control (A) to setting 3. Freezing will be complete after
approximately 24 hours.
- During the freezing process, avoid opening the door of the
freezer.
- In order to freeze and then thaw foods optimally, it is recommended that you divide food into small portions so that
they freeze quickly and uniformly. The packages should be
clearly marked with the content and the date they were
frozen.
- Do not open the freezer door in the event of a power failure
or malfunction. This precaution will slow the rise in temperature within the compartment. If the door is not opened, frozen
and fast-frozen foods will remain in their current state for
approximately 9-14 hours.
- Do not place full bottles in the freezer: they could easily
burst because all liquids increase in volume when they freeze.
- Fill ice trays so that they are no more than 3/4 full.
- If the room temperature remains below 14°C for a long
peraiod of time the freezer will not reach the temperatures
required for storage and storage life will be shorter. In this
case frozen food should be used within a relatively short period
of time.
Ice trays
WARNING: every time you fill up the ice tray with water ,
make sure that it is completely empty and that there are no
traces of ice left inside it.
The minimum time required for ice to form properly is
approximately 8 hours.
This new ice tray concept is exclusive to us. The ice tray is
situated on the top part of the freezer drawers to ensure
greater ergonomics and cleanliness and leave more room
free inside the drawers : the ice no longer comes into contact
with the food placed inside the freezer compartment;
furthermore, dripping of water during filling is avoided (a lid
to cover up the hole after filling with water is also provided).
Instructions for use (Fig. 4)
Fill up the tray with water via the special hole up to the level
indicated (MAX WATER LEVEL), taking care not to overfill,
inserting excess water will lead to the formation of ice which
could obstruct the exit of the ice cubes.
If you do use an excessive amount of water, you will have to
wait until the ice has melted, empty out the tray and re-fill it
with water.
Once you have filled the ice tray up with water through the
hole indicated, turn it by 90 °. Thanks to the connected
compartments, the water fills up the special shapes, after
which you can cover the hole up with the special cap and
place the ice tray in the inner door of the freezer
compartment.
Once the ice has formed, all you need to do is to knock the
tray against a hard surface so that the ice cubes come away
from their housing and come out of the same hole used to
fill the tray with water. To make it easier for the ice cubes to
come out, wet the outside of the tray.
MAX
WATER LEVEL
WATER LEVEL
8
MAX
Fig. 4
ENERGY SAVING TIPS
- Install the Appliance Correctly
- Check the Door Seals
Keep the seals clean and make sure that they fit tightly against
the door. This alone will ensure that no cold air escapes.
This means that the appliance should be installed away from
heat sources or direct sunlight in a well ventilated room.
- No Hot Foods
A container of hot food in the refrigerator will increase the
temperature significantly, allow food to cool to room
temperature before storing.
- Correct temperature settings
Set the refrigerator temperature to one of the middle settings.
Very cold temperature settings will not only consume a great
deal of energy but will neither improve nor lengthen the
storage life of the food. Excessively cold temperatures may
ruin vegetables and cheese.
- Check you appliance for build up of ice
Check the thickness of the frost on the walls of the freezer
and immediately defrost it if the layer becomes too thick.
(see CARING FOR YOUR APPLIANCE).
- Do not Overfill
Remember that proper storage of food requires good air circulation. Overfilling your appliance will hamper proper air
circulation and overwork the compressor.
- Keep the Door Closed
Open your doors only when necessary, remember that every
time you open the door most of the cold air will be lost. To
bring bring the temperature back to the proper level, the
motor must run for a considerable amount of time, consuming a substantial amount of energy.
9
FOOD STORAGE
Meat and Fish
Tenderising
(days)
Storage
(months)
Tinfoil
2/3
9 / 10
Not required.
Lamb
Tinfoil
1/2
6
Not required.
Pork Roast
Tinfoil
1
6
Not required.
Veal Roast
Tinfoil
1
8
Not required.
Veal/Pork Chops
Each piece wrapped in cling film and
then in tinfoil (4 to 6 slices)
6
Not required.
Veal/Lamb Cutlets
Each piece wrapped in cling film and
then in tinfoil (4 to 6 slices)
6
Not required.
Minced Meat
In aluminium containers covered with
cling film.
2
Slowly in refrigerator.
Heart and Liver
Plastic Bags
3
Not required.
Sausages
Cling film or Tinfoil
2
As necessary.
Chicken and Turkey
Tinfoil
1/3
9
Very slowly in
refrigerator.
Duck and Goose
Tinfoil
1/4
6
Very slowly in
refrigerator.
Pheasant, Partrige
and Wild Duck
Tinfoil
1/3
9
Very slowly in
refrigerator.
Hare and Rabbit
Tinfoil
3/4
6
Very slowly in
refrigerator.
Venison
Tinfoil or Cling Wrap
5/6
9
Very slowly in
refrigerator.
Large Fish
Tinfoil or Cling Wrap
4/6
Very slowly in
refrigerator.
Small Fish
Plastic Bags
2/3
Not required.
Crustaceans
Plastic Bags
3/6
Not required.
Shellfish
Store in salted water in aluminium
containers or plastic containers.
3
Very slowly in
refrigerator.
Boiled Fish
Tinfoil or Cling Wrap
12
In hot water.
Fried Fish
Plastic Bags
Food
Wrapping
Beef Roast
Freshly
minced
4/6
10
Thawing Time
Directly in pan.
FOOD STORAGE
Fruits and Vegetables
Food
Preparation
Apples and Pears
Peel and cut into slices.
Apricots, Peaches,
Cherries and Plum s
Peel and pit.
Strawberries
Blackberries and
Raspberries
Blanching
Tim e
W rapping
Storage
(m onths)
Thaw ing Tim e
2’
In Containers (cover
with syrup)
12
In refrigerator very
slowly.
1’ / 2’
In Containers (cover
with syrup)
12
In refrigerator very
slowly.
Rinse and dry.
In Containers (cover
with sugar)
10 / 12
In refrigerator very
slowly.
Cooked Fruit
Cut, cook and strain.
In Containers (add
10% sugar)
12
In refrigerator very
slowly.
Fruit Juice
Wash, cut and crush.
In Containers (sugar
to taste)
10 / 12
In refrigerator very
slowly.
Cauliflower
Rem ove leaves, cut head
into sm all pieces and blanch
in water and a little lem on
juice.
Cabbage and
Brussel Sprouts
Wash and cut into sm all
pieces.
Peas
2’
Plastic Bags
12
1’ / 2’
Plastic Bags
10 / 12
Shell and wash.
2’
Plastic Bags
12
Not required.
French Beans
Wash and slice if required.
2
Plastic Bags
10 / 12
Not required.
Carrots, Peppers
and Turnips
Peel, wash and slice if
necessary.
3’ / 4’
Plastic Bags
12
Not required.
M ushroom s and
Asparagus
Wash, peel and cut up.
3’ / 4’
Plastic Bags or
Containers
6
At room tem perature.
Spinach
Wash and m ince.
2’
Plastic Bags
12
At room tem perature.
Vegetable for
Soups
Wash and cut up in sm all
pieces.
3’
Plastic Bags or
Containers
Various Foods
Preparation
Blanching
Tim e
6/7
Not required.
At room tem perature.
Not required.
W rapping
Storage
(m onths)
Bread
Plastic Bags
4
At room tem perature
and in the oven.
Cakes
Plastic Bags
6
About 10 m inutes at
room tem perature,
cook at 100/200°C.
Cream
Plastic Containers
6
At room tem perature
or in refrigerator.
Butter
In original wrapping
or tinfoil
6
In refrigerator.
Boiled Food or
Vegetable Soup
Plastic or Glass
Containers
Eggs
Freeze without shells
in sm all containers
11
Thaw ing tim e
3/6
At room tem perature
or in hot water.
10
At room tem perature
or in refrigerator.
CARING FOR YOUR APPLIANCE
Before doing any cleaning, disconnect the appliance
from the electricity (by pulling out the plug or turning
off the general switch in your home).
Defrosting
WARNING: do not damage the refrigeration circuit.
Do not use mechanical devices or instruments other
than those recommended by the manufacturer to speed
up the defrosting process.
How to Defrost the Refrigerator
This appliance defrosts automatically and the water is channelled to the back toward the drain installed for this purpose
(fig. 5). Here, the heat produced by the compressor will make
it evaporate. The only thing you must do is to periodically
check and clean the hole of the drain, which is located behind the fruit and vegetable crisper, keeping it clear so that
the water drains properly.
How to Defrost the Freezer
- Remember to regularly remove the frost with the scraper
provided (do not use knives or metal objects).
- If the frost is more than 15 mm thick, the freezer must be
defrosted.
Proceed as follows:
Turn the temperature control (A) to the setting.
Then wrap all the frozen and fast-frozen food in news
paper, placing it either in the refrigerator or in a cool
place.
Leave the freezer door open so that the frost thaws
completely.
You can speed this process by placing containers of
warm water in the compartment.
Cleaning and Special Maintenance
Before cleaning the appliance, first switch off and
remove the plug from the socket.
- Your appliance is manufactured with hygienic, odourless
materials. To preserve these characteristics, always use sealed
containers to store foods, in order to prevent spills which
could stain and cause unpleasant, difficult to remove odours.
- Use a water and bicarbonate solution to clean the appliance. Cean the interior and exterior with a sponge soaked in
warm water and a sodium bicarbonate solution, which is,
among other things, a good disinfectant. If you do not have
any in the house, you can use a neutral soap.
- DO NOT use abrasive detergents, bleach or deterents containing ammonia. NEVER use solvent based products.
- All removable parts should be taken out and soaked in
warm soapy water or detergent. Rinse and dry them
thoroughly before putting them back in the appliance.
- When the appliance is not used for a long time, remember
to clean the interior and dry thoroughly, leave the doors open
to prevent the formation of mould and unpleasant odors.
- Replacing the light bulb. The bulb for lighting the interior of
the refrigerator is located at the back of the thermostat box.
When replacing the lamp, unplug the appliance from the
electrical socket, unscrew the burned out lamp and replace
it with another with a wattage no higher than 15W (fig. 7).
The unit is provided with a system which allows the defrost
water to be collected in a container to be placed beneath
the unit (fig. 6).
Fig. 7
Fig. 5
Fig. 6
12
TROUBLESHOOTING
Nothing works
Check that:
• The mains switch in your home is on.
• There has not been a power cut.
• The plug is properly inserted in the socket and is switched
on.
• The socket is working; try another appliance in the socket
to check.
• The fuse in the plug is ok - if not replace it,
(see ELECTRICAL CONNECTION).
If after all the checks, the appliance still does not operate or
the problem persists, call Hotpoint Service (see KEY
CONTACTS, back page) and inform them of: the type of
problem, the abbreviation of the model name (Mod.) and
the relative numbers (S/N) written on the rating plate located
at the bottom left next to the vegetable crisper.
Never call on unauthorized technicians and always
refuse spare parts which are not originals.
The refrigerator and the freezer do not cool
properly.
Check that:
• The doors close well and that the seals are not damaged
• The doors have not been left open too long.
• The thermostat knob is on the correct setting.
• The refrigerator or freezer is not overfilled.
The food inside the refrigerator is too cold
Check that:
· the temperature setting is too low (or not the best).
• The food is not in contact with the back wall - which is the
coldest part.
The motor runs constantly
Check that:
· the temperature control is on the correct setting.
· the doors have not been open continuously.
• The room temperature is too high.
The appliance makes too much noise.
The gas refrigerant produces a slight noise even when the
compressor is not running (this is not a defect).
Check that:
• The refrigerator is level.
• The appliance was installed between cabinets or objects
that vibrate and make noise.
There is water on the bottom of the
refrigerator.
Check that:
• The defrost drain is clear from any blockage (see fig. 5).
13
After Sales Service
"No company is better positioned to offer an after sales service on a
Hotpoint appliance than us - the manufacturer"
As part of our commitment to you, all Hotpoint appliances have the added benefit of a fully inclusive parts
and labour guarantee for the first 12 months. In addition to this you also have the advantage of free
replacement parts for the first 5 years when fitted by a Hotpoint
engineer. When the 12 months parts and labour guarantee expires we offer the following after sales
service options:
Repair Service and Information Help Desk
UK: 08709 066066
www.theservicecentre.co.uk
Republic of Ireland: 1850 302 200
Note: Our operators will require the Model number and the Serial number of your appliance
Available 364 days a year with a fast, effective and value for money service. We have the largest white
goods repair service in the UK with over 1200 of our own fully trained engineers. All repairs include a parts
and labour guarantee for 12 months from the date of the repair.
If you require any information or have any questions about your appliance, our operators are on hand with
help and advice.
All this ensures that you will receive the best available after sales service possible.
Extended Warranties
UK: 08709 088 088
www.theservicecentre.co.uk
Republic of Ireland: 1850 502 200
Whether you have just one or a number of Hotpoint appliances in your kitchen, we offer two service cover
plans to give you total peace of mind.
- Repair Protection Plan
FREE service repairs for a single Hotpoint appliance during the
period
of cover.
- Kitchen Cover
FREE service repairs for all your Hotpoint appliances less than 8
years old.
Genuine Parts and AccessoriesUK: 08709 077 077
www.theservicecentre.co.uk
Republic of Ireland: (01) 842 6836
A wide range of genuine parts and accessories are available from our hotline or through our web site.
Genuine parts and accessories, extended warranties and service repairs are all
available on our web-site at:
www.theservicecentre.co.uk
GB
14
Guarantee
"Satisfaction guaranteed or your money back"
We give you a unique 'satisfaction guaranteed' promise - valid for 90 days - after you have
purchased your Hotpoint appliance. If there is a technical problem simply call Hotpoint Repair service or
visit our web-site at www.theservicecentre.co.uk and where necessary, we will arrange for an
engineer to call. If the technical problem is not resolved under this guarantee, we will replace your
machine or, if you prefer, give you your money back.
All Hotpoint appliances carry a fully inclusive 12 month parts and labour guarantee as well as free
replacement parts for the first 5 years (except microwaves, selected integrated appliances and cooker
hoods, which have a one year guarantee) provided that they are fitted by a Hotpoint engineer.
Guarantee terms and conditions
Your guarantee is only applicable in the United Kingdom or Republic of Ireland and is subject to the
following provisions that your appliance:
Has been installed and used correctly in accordance with this instruction booklet.
Has been used solely for domestic purposes and is located on domestic premises (ie. not for
commercial or trade use).
Has been properly connected to a suitable electrical supply voltage as stated on the appliance
rating plate.
Has not been subject to misuse, accident, modified or repaired by anyone other than one of our
own service engineers.
For pre purchase information on any other Hotpoint product call: 08701 50 60 70
or visit: www.hotpoint.co.uk
Recycling & Disposal Information
As part of Hotpoint's continued commitment to helping the environment, Hotpoint reserves the right to
use quality recycled components to keep down customer costs and minimise material wastage.
Please dispose of packaging and old appliances carefully.
To minimise risk of injury to children, remove the door, plug and cut mains cable off flush with the
appliance. Dispose of these parts separately to ensure that the appliance can no longer be plugged into
a mains socket, and the door cannot be locked shut.
15
GB
Key Contacts
After Sales Service
Over 1200 trained specialists, directly employed by us, ensure that you can have complete confidence in
both the appliances and services we offer.
Repair Service and Information Desk
UK: 08709 066 066
(Open 8 to 8 Mon - Fri, 8 to 6 Sat, 10 to 4 Sun & Bank Holidays)
www.theservicecentre.co.uk
Republic of Ireland: 1850 302 200
Note: Our operators will require the following information:
Model number:
Serial number:
Extended Warranties
UK: 08709 088 088
(Open 8 to 8 Mon - Sun)
www.theservicecentre.co.uk
Republic of Ireland: 1850 502 200
Genuine Parts and Accessories
UK: 08709 077 077
(Open 8-30 to 5-30 Mon - Fri & 9 to 12 Sat)
www.theservicecentre.co.uk
Republic of Ireland: (01) 842 6836
Merloni Elettrodomestici UK Ltd. Morley Way, Peterborough, PE2 9JB.
195.042.775.01
July 2004