1
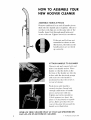
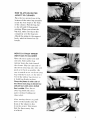
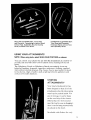
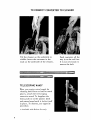
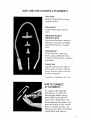
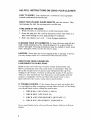
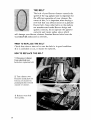
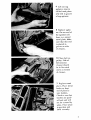
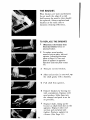
Hoover,®
Convertible
Cleaner
Model U4001
Owners
Manual
HOW TO ASSEMBLE YOUR
NEW HOOVER CLEANER
ASSEMBLE
HANDLE
PIECES
Remove cardboard
from end of handle pieces.
Slide the two handle pieces together.
Check to
see that cord clips are on the same side of the
handle. Insert bolt through small holes and
secure with nut. Tighten nut with screwdriver.
If the nut and bolt are not
assembled
as shown in the
illustration,
the holes in the
handle pieces are not lined
up correctly.
ATTACH
HANDLE
Unscrew
TO CLEANER
nut and remove
bolt and
plate from handle socket. Place
handle so that the holes in the
bottom of the handle are directly
in line with the electrical
prongs
and make sure the handle is
positioned
so that
to rear of cleaner.
Push
down
until
handle
securely
in place.
through
small
pieces
Tighten
If boll
and
the switch
secure
nut
bolt
of handle
with
with
appears'
is
Insert
holes
nut.
screwdriver.
too
short,
plate is on backwards
down.
Make sure that
the
or upside
the con-
tour of the plate fits around
handle
as in illustration.
OPERATE
THIS CLEANER
ONLY AT VOLTAGE
DATA PLATE ON BOTTOM OF CLEANER.
is
SPECIFIED
(c The Hoover
the
ON
Company
197
HOW TO ATTACH
OUTER
JACKET TO CLEANER
Place the two
bottom
of the
inside the wire
of the cleaner.
to tile left and
opening. When
bag clip, make
projections
at the
outer bag assembly
loops at the back
Pull the bag clip
fit bag against
you release the
sure that it fits
completely
over the bag lock.
Attach the spring to the support
hook, which is located on tile
handle.
HOW
TO ATTACH
AWAY
BAG
Open
the
TO
outer
THROWCLEANER
jacket
and
pull
out tube. Roll rubber
bag
retainer
down the tube toward
the
cleaner.
the
throw-away
push
the
open
end
of
bag
onto
tube
and
as [!ar back
sure
bag
Slip
to match
with
Unroll
the
it holds
Grasp
the
as possible.
mark
rubber
bag
on
tube.)
so
in place.
the pleats on each side of
bag at dotted
and pull out until
is visible.
entire
Place
dotted
throw-
away
bag inside
the
jacket
without
folding
close
the
bag retainer
firmly
the throw-away
line
or1 throw-away
arrow
0
(Be
outer
and
jacket.
After turning cleaner on, push
down on the handle until the
front of the cleaner is free
from the carpet. This insures
that the throw-away
bag
is inflated.
line
To turn
cleaner
push
on,
_
switch
down.
\
\
To
turn
off,
d.p,,
\
\
cleaner
pull
switch
the|
up.
._
HANDLE
ADJUSTMENTS
The handle on your cleaner has three positions
storage, operating,
and low (for reaching under low furniture).
The handle can be
lowered by stepping on pedal at the left rear of cleaner. The handle
stiould always be in storage position
when cleaning tools are used.
RUG ADJUSTMENTS
The
rug adjustment
lever
rear of the cleaner
for better
cleaning
four positions
are:
and SHAG.
located
on
the right
offers
four different
positions
on a wide range of carpet.
The
LOW, NORMAL,
HIGH
To select the desired rug position,
tilt the cleaner
forward and adjust the lever until it "clicks"
into the desired position.
For best results the lever is conveniently
adjusted
by hand.
Select
the
LOW
the nozzle
pile height,
setting
of the
select
to push,
move
position
for cleaning
Note:
cleaner
lowers
When
for
cleaning
cleaner
is flush
the NORMAL
the
lever
removing
to the
very
loose
long
dirt
Indoor/Outdoor
with the
position.
HIGH
or shag
from
carpet.
carpet.
If the
position.
Choose
pile
carpet.
hard
surface
to the NORMAL
position.
The LOW setting
the nozzle
to the carpet
for effective
cleaning
However,
be certain
or shag pile carpet,
or shag pile carpet,
is greatly
increased.
Notice
that
For rugs of normal
cleaner
is difficult
the
floors,
SHAG
adjust
the
on the cleaner
of LOW carpet.
to change
the rug position
when cleaning
normal
if the LOW setting
is used when cleaning
normal
there is an increase
in the belt load and pushing
effort
WARNING:
ELECTRIC
SHOCK COULD OCCUR
IF USED OUTDOORS
OR ON WET SURFACES.
STANDARD
CLEANING
SET:
Vinyl Hose and Converter,
Extension Wand, Crevice Tool,
and Upholstery Brush.
DELUXE CLEANING
SET: Vinyl Hose
and Converter, Telescoping Extension Wand,
Crevice Tool, Upholstery Nozzle, Dusting
Brush, and Bare Floor Brush.
USING
YOUR
ATTACHMENTS
NOTE; When using tools, select SHAG RUG POSITION on cleaner.
You can convert your cleaner for use with the attachments
seconds, and you will find a tool for almost every cleaning
home.
in a matter
job in your
of
The Upholstery
Nozzle or Upholstery
Brush conveniently
cleans upholstered
furniture,
draperies,
tapestries,
mattresses,
clothing, carpeted
stairs and automobile
interiors.
The Crevice Tool is most useful for hardto-reach areas, edges of wall-to-wall
carpeting,
between appliances
and
crevices of wooden furniture.
STORING
ATTACHMENTS*
Your vinyl attachment
been
designed
kit has
so that all of the
attachments
plus the telescoping
wand can be packed inside. For
ease in storage,
it can be hung
on the cord clip of the cleaner.
(The kit has two slots located
near the top for ease in hanging.)
Also it can be hung conveniently
on a hook in the closet.
*A vailable
with
Deluxe
Set
only.
TO CONNECT
Tilt the
visible.
track
CONVERTER
cleaner
so the underside
is
Insert
the converter
in the
on the underside
TELESCOPING
of the
cleaner.
WAND*
When you require
extra length
for
cleaning
bare floors or hard to reach
places,
attach
extension
wand, push
and extend
in place.
wand.
the telescoping
To lengthen
in on the plastic
latch
wand until it locks itself
To shorten,
use
opposite
procedure.
* Available
the
with
Deluxe
Set
only
TO CLEANER
Push
way
converter
all
in to the red
It is not necessary
remove
the belt.
the
line.
to
MANY USES FOR CLEANING ATTACHMENTS
Vinyl
Hose
Hose has vinyl jacket
trouble-free
life.
for long,
Floor Brush*
All hard
stairs.
floors
Upholstery
Upholstery
and carpeted
Nozzle or
Brush
Upholstered
furniture,
draperies,
tapestries,
mattresses,
clothing,
automobile
interiors,
carpeted
stairs.
Dusting
Brush*
Carved furniture,
table tops,
books, lamps, lighting fixtures,
Venetian
blinds, shutters,
registers,
baseboards.
Crevice Tool
Upholstered
furniture,
edges of
wall-to-wall
carpeting,
radiators,
dresser drawers, spaces between
kitchen
equipment.
*A vail_tble with Deluxe
Set only.
HOW TO CONNECT
ATTACHMENTS
To connect
attachments
the cleaning
to either
the
telescoping
wand or hose,
press
down on the plastic
latch.
(See illustration.)
Fit
the attachment
sure the button
into place.
Be
on the attach-
ment is locked
in place.
To
release,
press
down on plastic
spring
latch and remove.
HELPFUL
EASY
located
INSTRUCTIONS
TO CARRY.
underneath
ON USING YOUR
Your cleaner
has
the handle
bail.
a convenient
CLEANER
carrying
handle
DON'T PICK UP HARD, SHARP OBJECTS. with the cleaner. They
may damage the belt, the moving parts, and the bag.
TAKE
CARE
1.
Wind
2.
Grasp
may
3.
Don't
OF THE
it loosely
the
run
on cord
plug
cause
CORD
(not
damage
cleaner
hooks
the
cord)
to cord,
over
to avoid
unnecessary
to disconnect
plug,
cord
prongs
it may
from
strain.
wall
outlet
as it
or receptacle.
damage
insulation.
CLEANING
YOUR
ATTACHMENTS.
To clean the hose wipe off dirt
with a cloth dampened
with a liquid
detergent.
Use a damp cloth to
remove
detergent.
Cleaning
attachments
may be washed
in warm water
with a detergent.
Rinse and let dry before
using.
CAUTION:
Never turn the cleaner upside down or attempt
to service
it in any manner while it is connected
to the electrical outlet.
HOW TO USE YOUR CLEANER ON
LIGHTWEIGHT
FLEXIBLE
RUGS
Stand
Before
on one end of the rug and move cleaner
toward
other
end.
reaching
the other end, push down
on the handle.
This will
lift up the nozzle
(front
clinging
to the cleaner.
when you have reached
cleaner
is completely
again and lower
the
of cleaner)
and will prevent
the rug from
Continue
to lift up the nozzle
of the cleaner
the end. Push down
on the handle
until tile
off the rug.
nozzle,
using
Move the cleaner
back
only forward
strokes.
to start
IF TROUBLE OCCURS. If the cleaner does not pick up surface dirt,
it is an indication
that something
is wrong. Here are some of the things
you should check before calling the service man.
1.
CHECK
BAG
2.
CHECK
BELT
3.
CHECK
AGITATOR
4.
CHECK
RUG
If you need further
Dealer.
help,
(SEE
(SEE
PAGES3
PAGE
AND
10)
BRUSHES
ADJUSTMENT
call your
9)
(SEE
(SEE
Hoover
PAGE
PAGE
Service
12)
4)
Station
or Hoover
NOTE: Disconnect
cord before replacing parts.
THE BAG
Your Hoover cleaner has a durable outer jacket which covers the
throw-away
bag. A light wiping with a damp cloth will keep this
outer jacket clean.
To assure that your Hoover cleaner operates at peak performance
it is imperative
that you use only genuine Hoover throw-away
filter bags made by The Hoover Company.
Genuine Hoover bags
can be identified
by the Hoover Medallion.
These
bags are made from special material which is
scientifically
formulated
to filter out dust while
allowing air to flow through freely.
WHEN
TO REPLACE
Check the bag from
line printed on the
If you let more dirt
operate efficiently.
time to time. When dirt reaches the dotted
throw-away
bag, the bag should be changed.
than this accumulate,
your cleaner will not
Discard used bag.
CAUTION:
Very fine materials,
such as face powder, cornstarch,
fireplace ashes or fireplace
soot, may seal the throw-away
bag and
may cause it to burst even though it is only partially
full of dirt.
When the cleaner is used to remove material of this nature, the bag
should be changed frequently.
WHERE
TO BUY BAGS
Bags may be purchased
from your local Authorized
er, or from Hoover Factory Service Stations listed
insert.
Hoover Dealon the white
WHEN ORDERING
BAGS BE SURE TO MENTION
THE MODEL
OF YOUR CLEANER.
This is located on the bottom side of the
main casting at the opening where the
cleaning tool converter
is inserted.
THE BELT
The
belt
of your
Hoover
cleaner
controls
the
speed
of the rug agitator
and is important
for
the efficient
operation
of your cleaner.
Because
of this,
it is important
when buying
a
new belt that you always
insist
on a genuine
Hoover
belt. Some other belts
on the market,
not manufactured
under Hoover
design
and
quality
controls,
do not operate
the agitator
correctly
and create
undue stress
which
will damage
your Hoover
word HOOVER
embossed
WHEN
TO REPLACE
Check
from time
If it is stretched
THE
to be sure
or cut,
it should
THE BELT
1 Disconnect
cleaner
from electrical outlet before replacing
belt.
2 Turn cleaner over.
Remove metal plate on
bottom
of cleaner by
pushing latches toward
outside of cleaner.
10
belt
Hoover
belts
have
BELT
to time
HOW TO REPLACE
3 Release worn
from pulley.
cleaner.
Genuine
on the belt.
the
belt
be replaced.
is in good
condition.
the
4 Lift out rug
agitator,
remove
old belt and place
new belt in groove
of rug agitator.
5 Replace
agitator. On one end of
the agitator
roll
there is a raised
metal platb.
Make
sure that this end
is placed
in
groove
on side
of cleaner.
6 Place
belt
on
pulley.
Side of
belt nearest
cleaner
should
be in line
with
arrow on bottom
of cleaner.
7
Replace
plate.
knobs
metal
Place
metal
on front
end of plate in
wire holders.
Check to see that
latches
ed back
are pushand will
not be covered
by
plate.
Place
plate
in position
and
latch securely.
THE BRUSHES
When brushes are worn and bristles
do not touch the edge of a card
held across the nozzle,
they should
be replaced.
Always replace both
brushes at the same time to
maintain
cleaning efficiency.
TO REPLACE THE BRUSHES
1
(Disconnect
Electrical
placing
the Cleaner
Outlet)
before
from
re-
brushes.
To replace worn brushes,
remove bottom
plate, belt and
agitator,
following
directions
given on Page 10. Turn end
plate of agitator in opposite
direction
until one plate comes
off.
3
Then
pry out end section.
4
After end section
is removed,,
tap
the shaft gently
with a hammer.
5
Pull
shaft
from
agitator.
Remove brushes by forcing out
with screwdriver.
Replace with
new brushes.
Slide them into
the channel
as possible.
and push
in as far
Replace
shaft, lining up the
locator on shaft with slot on the
agitator.
Replace
other end
section and end plate and
tighten° Replace
agitator in
cleaner.
(See Page 11.)
12
SERVICE
Service and genuine Hoover replacement parts may be obtained from
Hoover Factory Service Stations, or Authorized
Warranty Service
Dealers, as listed on white insert.
For service in Warranty,
When
number
ordering
new parts,
follow
make
instructions
sure that
set forth
you
always
in Guarantee.
mention
the
model
of the product.
Lubrication:
The
bearing.
ball bearing
The
motor
is equipped
should
sleeve bearing
takes
bearing
cause damage.
could
no lubricant.
with
one ball bearing
be lubricated
The addition
The agitator is equipped with two ball
periodically.
Lubrication
of these ball
Hoover Factory Service Station or the
Service Dealer, as listed on the white
13
periodically,
of lubricant
and one sleeve
but
the
to the
sleeve
bearings that should be lubricated
bearings should be done by The
Authorized
Hoover Warranty
insert.
UPRIGHT
VACUUM
WARNING:
ELECTRIC
IF USED
picking
cleaner.
They
COULD
OR ON WET
up hard,
sharp
may damage
OCCUR
SURFACES.
objects
the belt,
with
the
moving
and the bag.
• Do not use cleaner
arette butts.
• Change
fine
SHOCK
OUTDOORS
• Avoid
parts,
CLEANER
bag frequently
materials
• Instruct
children
• Keep feet,
up matches
when
picking
or cig-
up very
such as powder.
not
and to stay clear
cleaner
to pick
to play with
of cleaner
hands
when
and hair clear
the
cleaner
it is in use.
of agitator
when
is in operation.
TAKE CARE OF THE CORD
1. Wind it loosely on cord hooks to avoid unnecessary strain.
2. Grasp the plug (not the cord) to disconnect
from wall outlet as it may cause damage to
cord, plug, prongs or receptacle.
3. Don't run cleaner over cord - it may damage
insulation.
• The
use of an extension
cord
is not
recom-
mended.
• Unplug
cleaner
• Always
disconnect
before
servicing
• If cleaner
when
not
cord
in use.
from
electrical
outlet
the cleaner.
is in disrepair,
do not
attempt
to
operate.
• Have repairs
made
Hoover
Factory
Hoover
Warranty
by the qualified
Service
Service
Stations
Dealers.
personnel
or Authorized
at
INDEX
ADJUSTING
CLEANER
ASSEMBLING
TO RUG ........................
CLEANER
ATTACHMENTS
.............................
2-3
....................................
5-7
BELT ............................................
BRUSHES
HANDLE
HELPFUL
ORDERING
SERVICE
HINTS
..............................
................................
13
13
BAG ................................
COMPANY,
Litho
4
8
...........................................
THE HOOVER
1-74
12
.....................................
PARTS.,
THROW-AWAY
R1
10-11
..........................................
ADJUSTMENTS
4
NORTH
U.S.A.
3, 9
CANTON,
OHIO 44720
165938