1
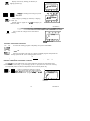
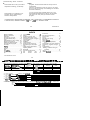
, DISPLAY WINDOW
See pages 1-3 for
description of keys.
.!
I PROGRAM EACH DAY DIFFERENTLY OR copy
THE FIRST DAYS PROGRAM TO ALL 7 DAYS
,30, ,
SIMPLE PROGRAMMING
It’s easy to program the thermostat to fit your lifestyle.
1. Move the power switch to ON.
2. Hold MODE key until 12:00 AM shows in display.
3. Use SLOW key to set the time of your first program. Hold to go forward; tap to go back.
4. Use HEAT and COOL keys to set temperatures for your first program. For heat, hold
HEAT key to go higher, tap to go lower. For air conditioning, hold COOL to go lower, tap to go
higher.
5. Set all other programs by repeating steps 3 & 4. Press MODE to lock in for all 7 days.
6. Hold MODE until SET CLOCK shows in display. Use FAST, then SLOW to move to
current time and day. (Clock only accurate to within 10 minutes. ) Tap MODE to lock in (temperature and set point indicators will appear).
7. To review programs, hold FAST or SLOW key.
—..
_.
TABLE OF CONTENTS
Maintaining Your Thermostat . . . . . . . . . . . . . . . . ...28
Replacing the Battery . . . . . . . . . . . . . . . . . . . . . . . . . . . ...28
Recalibrating the Thermostat . . . . . . . . . . . . . . . ...29
The “Waiting” Indicator During
Air Conditioning . . . . . . . . . . . . . . . . . . . . . . . . . . . . . . . ...30
Quick Reference to the Keys . . . . . . . . . . . . . . . . . . . . .. I
Installing the Battery . . . . . . . . . . . . . . . . . . . . . . . . . . . . . . . . ...4
Programming Your Thermostat . . . . . . . . . . . . . . . ...5
Set the Program Schedule and
Temperatures . . . . . . . . . . . . . . . . . . . . . . . . . . . . . . . . . . . . ...5 Your Personal Program . . . . . . . . . . . . . . . . . . . . . . . . . . ...31
Set the Current Day and Time . . . . . . . . . . . . . ...10
Check Your Settings . . . . . . . . . . . . . . . . . . . . . . . . . . . . . ..I2 Troubleshooting Guide . . . . . . . . . . . . . . . . . . . . . . . . . . ...32
Option—Adding an Extra Nighttime
Set Point . . . . . . . . . . . . . . . . . . . . . . . . . . . . . . . . . . . . . . . . . . ...l3 index . . . . . . . . . . . . . . . . . . . . . . . . . . . . . . . . . . . . . . . . . . . . . . . . . . . . . . . . . ...36
Set the Fan Switch . . . . . . . . . . . . . . . . . . . . . . . . . . . . . . . ...14
Relay Ordering Information . . . . . . . . . . . . . . . . . . . . ...37
Changing Your Program . . . . . . . . . . . . . . . . . . . . . . . . . ...15
Making Permanent Program Changes . ...15
Limited One-Year Warranty . . . . . . . . . . . . . . . . . . . . . . . 41
Erasing the Entire Program . . . . . . . . . . . . . . . . . . ...18
Making Temporary Program Changes . ...19
Changing for Daylight-Saving or
Standard Time , . . . . . . . . . . . . . . . . . . . . . . . . . . . . . . . . ...25
I
Welcome to the world of comfort and energy savings with your new Honeywell Magic Stat@
electronic thermostat. The Magic Stat@ name is synonymous with innovation and state-of -the-arl
electronic controls.
Your new thermostat will automatically control the temperature in your home, keeping you
comfortable while saving energy when programmed according to the instructions in this manual.
This thermostat includes the Weather Monitor@ feature. The operation of your furnace or air
conditioner is started early enough to reach the desired temperature at the times you set. There
is no need for you to guess when the system should turn on to reach the desired temperature.
When the outside temperature drops or rises dramatically, the thermostat activates earlier or
later to meet the next programmed setting,
- ——
TABLE OF CONTENTS
Quick Reference to the Keys . . . . . . . . . . . . . . . . . . . ...1
Maintaining Your Thermostat . . . . . . . . . . . . . . . . ...28
Replacing the Battery . . . . . . . . . . . . . . . . . . . . . . . . . . . ...28
Recalibrating the Thermostat . . . . . . . . . . . . . . . ...29
The “Waiting” Indicator During
Air Conditioning . . . . . . . . . . . . . . . . . . . . . . . . . . . . . . . . ..3o
Installing the Battery . . . . . . . . . . . . . . . . . . . . . . . . . . . . . . . . ...4
Programming Your Thermostat . . . . . . . . . . . . . . . ...5
Set the Program Schedule and
Temperatures . . . . . . . . . . . . . . . . . . . . . . . . . . . . . . . . . . . . ...5 Your Personal Program . . . . . . . . . . . . . . . . . . . . . . . . . . ...31
Set the Current Day and Time . . . . . . . . . . . . . ...10
Check Your Settings . . . . . . . . . . . . . . . . . . . . . . . . . . . . ...12 Troubleshooting Guide . . . . . . . . . . . . . . . . . . . . . . . . . . ...32
Option—Adding an Extra Nighttime
Set Point . . . . . . . . . . . . . . . . . . . . . . . . . . . . . . . . . . . . . . . . . . ...l3 index . . . . . . . . . . . . . . . . . . . . . . . . . . . . . . . . . . . . . . . . . . . . . . . . . . . . . . . . . ...36
Set the Fan Switch . . . . . . . . . . . . . . . . . . . . . . . . . . . . . . . ...14
Relay Ordering information . . . . . . . . . . . . . . . . . . . . ...37
Changing Your Program . . . . . . . . . . . . . . . . . . . . . . . . . . .15
.
Making Permanent Program Changes . ...15 Limited One-Year Warrant y . . . . . . . . . . . . . . . . . . . . . . . 41
Erasing the Entire Program . . . . . . . . . . . . . . . . . . . . . 18
Making Temporary Program Changes . ...19
Changing for Daylight-Saving or
Standard Time . . . . . . . . . . . . . . . . . . . . . . . . . . . . . . . . . ...25
I
QUICK REFERENCE TO THE KEYS
Use to program heating temperatures. To raise the temperature by 2° increments,
press and hold the key. To lower the temperature, tap the key.
Heat
Use to program air conditioning temperatures. To lower the temperature by 2°
increments, press and hold the key. To raise the temperature, tap the key.
cool
ON allows for thermostat operation. OFF erases any program and disables the
On
Off
m—l furnace and air conditioner.
Power
AUTO sets the fan to turn on and off with the heating or air conditioning system.
Auto On
m—[ ;~i~~~ the fan to run continuously. (Applicable only to systems with more than
Fan
1
60-8026—2
Before the thermostat is programmed, holding this key sequences through
PROGRAM and SET CLOCK. After the thermostat is programmed, holding this key
Mode sequences through the 4 functions; release when desired function is reached. The
four functions include:
PROGRAM—allows you to program the heating and cooling temperature points,
at 2 to 6 different times per day, for each day of the week.
SET CLOCK—allows you to enter the current time to within 10 minutes.
HOLD—allows you to set and hold one temperature until you choose to change
it. This feature can be used only after the thermostat has been programmed. See
page 20.
HOLD UNTIL—allows you to set and hold one temperature for up to a week; it
will return to your normal schedule at a time and day you set. This feature can be
used only after the thermostat has been programmed. See page 22.
Tapping the Mode key interrupts function sequencing, and returns to display of
present room temperature.
2
Fast
When in SET CLOCK mode, hold key to advance clock time in 4 hour increments. To step the clock backward by 4 hour increments, tap the key.
When in PROGRAM mode, use to review entered programs. Hold key to
advance to next programmed temperature range; tap to back up.
slow
When in SET CLOCK mode, hold key to advance clock time in 10 minute
increments. To step the clock backward by 10 minute increments, tap the key.
When in PROGRAM mode, hold key to advance program time in 30 minute
increments. To step the time backward by 30 minute increments, tap the key.
69-8026-2
.LOvbw
r--AM 311V8 3N11V)11V /
AH3..LV83H1 9N111V1SNI
PROGRAMMING YOUR THERMOSTAT
You may program this thermostat either before or after installation. See installation manual
form number 69-8025 for installation instructions.
If you are programming the thermostat before installation, be sure the battery is installed (see
page 4). During programming, if you leave the thermostat for a few minutes, it will go blank to
save battery power. This does not affect your program; hold HEAT key to relight the display.
STEP 1
SET THE PROGRAM SCHEDULE AND TEMPERATURES
Before you begin... The schedule form on page 31 provides an opportunity to plan your
schedule. Please fill it out before you begin.
On
Off
Open right-hand door of thermostat. Switch to OFF to clear the thermostat.
Power
69-8026—2
5
On
Off
Switch ON. The display shows this test position.
60 70 80 90
=
1111111111111111111
mmmmmmmm mmmmmmmmmmm
18:80
:y&kyMK
AM PM ~~};~nL
■
■
■
■
■
■
■
3
S M T W T F S
A few seconds later, the display looks like this.
60 70 80 90
1111111111111111111
■ mmmmn
70
Y
■ m m m n m m
S M T W T F S
z~
3
ROOM
TEMPERATURE OISPLAYEO
6
-—To begin programming, press and hold until the
display looks like this. If you pass this display,
‘ode continue to hold key until this display comes back.
NOTE: All seven day indicators are onto tell you that
you are programming every day of the week the
same. You will be able to change individual days
later.
To set the first time program, press and hold until
the display shows the time you want to wake up (6:00
“ ow A M s h o w n ) .
The time advances in 30-minute intervals. You can
back up by tapping the key; go forward by holding the
key.
60 70 80 90
~1111 ,1111,11,1,11111
12:00
AM
PROGRAM
60 70 80 90
,1,1,,,,1,,,,1,,,,1
6:00 P R O G R A M
AM
■
■
■
■
■
■
■
n
S M T W T F S
69-8026—2
To set the first temperature program, press and
hold until the display shows the temperature you want
when you wake up during the heating season (72°
Heat shown) .Youcan backup bytapping thekey.
TEMPERATURE SET POINT INDICATORS
60 70 80 90
111111111111111 II
¤~~~~~ ■ m w
6:00 P R O G R A M
The LEFT temperature set point indicator should be stopped
under the heating temperature you desire when you wake up, with ■‘Mm m m m n m
a maximum of 80° F,
S M T W T F S
m
If you have air conditioning, press and hold until
the display shows the temperature you want when
you wake up during cooling season (76° shown). You
COOi can backup by tapping the key. You must have a 6°
or greater difference between heat and cool temperature settings.
8
m
TEMPERATURE SET POINT INDICATORS
60 70 80 90
1111111111
●
1111111
m
6 :~ PRCGRAM
AM
■ m m m u m m
S M T W T F S
The RIGHT temperature set point indicator should be stopped under the cooling temperature
you desire when you wake up, with a minimum of 62° F.
To set additional program times and temperatures, repeat steps starting on lower
half of page 7 through here. First set a time, then enter heating and cooling temperatures desired at that time.
You must set at least one more time/temperature schedule, and may set up to a total of 6 per
day. They must beat least 30 minutes apart.
After programming is complete, hoId to lock in
place. It is now copied into all 7 days of the. week. If
M o d e YOU want different programs for different days, s e e
page 15.
60 70 80 90
1111111 llllllllilll
SET CLOCK
12:30
AM
El
;MTwITFs
n
69-8026—2
STEP 2
SET THE CURRENT DAY AND TfME
BI
60 70 80 90
1111111111111111111
Now you will set the current day and time of day.
sET CLOCK
12:30
AM
Press until the display looks like this.
Mode
;MTWTFS
Press until you reach the correct day (Wednesday
shown) and approximately the correct time, within 4
‘ast hours. (Hold the key to advance the time in 4 hour
increments, tap the key to back up. )
60
70
80
90
1111111111111111111
8:00
PM
SET CLOCK
m
F
S M T
T F S
D
WEDNESDAY SHOWN’
10
/
■
Press until you reach the exact time, within 10
minutes. (Hold the key to advance the time in 10“o w minute increments, tap the key to back up. )
c1
H
60 70 80 90
1111111111111111111
SET CLOCK
8:20
PM
n
SMT; TFS
Tap to store the time and date in the thermostat’s
Mode memory. The normal room temperature display will
return.
60 70 80 90
1111111111111111111
● .mmmm
70
S M T W T F S
ROOM TEMPERATURE
DISPLAYED
11
69-8026—2
STEP 3
CHECK YOUR SETIINGS
Press until PROGRAM shows in the display.
Mode
60 70 80 90
1111111 lllllllillll
■
6:00 PROQRAM
AM
■ n m n m m m
n
S M T W T F S
Press to review each program you have set.
Fast
12
. -
—
Press until normal temperature display returns.
Mode
60 70 80 90
1111111111111111111
■ mmmmm
70
S M T W T F S
D
ROOM TEMPERATURE
DISPLAYED
STEP 4
OPTION-ADDING AN EXTRA NIGHITIME SET POINT
If you have not used all 6 set points in any given day, consider programming a second
nighttime set point.
For example, if your regular bedtime is 10:30 p.m., put in a 1:00 a.m. set point that is the
same temperature as the 10:30 p.m. set point. The entry of the second set point ensures that
even if you stay up past your bedtime and override your program, you won’t have to remember
to set the thermostat back when you go to bed.
13
69-8026—2
STEP 5
SET THE FAN SWITCH
FAN AUTO: Normal or energy saving setting for most homes. The fan goes on
Auto On
m—l and off with the air conditioner in summer. In winter, the fan on most systems starts
a few minutes after the furnace comes on. tt stops a few minutes after the furnace
Fan
goes off. The fan starts and stops with the furnace in some electric heat systems.
FAN ON: The fan runs continuously. Use for improved air circulation during
Auto On
1- speci aI occasions or for more efficient electronic air cleaning.
Fan
14
—
CHANGING YOUR PROGRAM
MAKING PERMANENT PROGRAM CHANGES
Press until display shows PROGRAM.
60
Mode
70
80
90
1111111111111111111
a
slvf-rw TFs
15
Press to review programs; notice the day of the
week indicator position change as you review the
Fast programs. When the day and time you want to
change is displayed, release.
69-8071i-9
60 70 80 90
1111111111111111111
■■■
6:00
AM
PROGRAM
SMTWTF;
a
THE DAY INOICATOR MOVES
AS YOU REVIEW
■■
Heat
To erase a program, hold both buttons
down until set point indicators disappear.
60 70 80 90
1111111111111111111
cool
6:00 P R O G R A M
AM
n
SMTWTF;
n
M1421
16
Display new time by holding (to advance) or
tapping (to back up).
60 70 80 90
1111111111111111111
8:00 P R O G R A M
AM
n
sMTWTF;
9 9‘ouwant
Hold to set heating and cooling set points
al
● mmmmm
cool
Heat
60 70 80 90
,,,1,,,,1 ,111111111
Verify change by holding (to advance) or tapping
~=t (to back up).
Repeat steps on pages 15-17 until all changes you
want are made.
8:00
AM
PROGRAM
SMTWTF~
69-8026-2
17
Mode
Tap to store the changes in the thermostat’s
memory.
60 70 80 90
1111111111111111111
● mmm. m
70
J=
S M T W T F S
RCQM TEMPERATURE
DISPLAYED
ERASING THE ENTIRE PROGRAM
On
Off
To erase the existing program completely, turn power switch OFF...
pmuuJl
On
Off
S
. ..then ON.
Until you reprogram (see page 5), a factory-installed program will operate the
heating system at 68° F, the cooling system at 78° F.
18
MAKING TEMPORARY PROGRAM CHANGES
The “shotl term hold” feature lets you custom-tailor the program for those times when
someone comes home early, or you’re staying up late, or you plan to be out for the evening.
To temporarily raise or lower the temperature for the current period only:
■ orm
Heat
Press to change the heating or cooling
set point (shown with heat setting holding at
62°).This change will stay in eff~ only ~ntil
C O OI the next scheduled program change.
I
60
70
80
90
1111111111111111111
●
m.......
I
70
Ir
1
ROOM TEMPERATURE
DISPLAYED
19
69-8026-2
The “long term hold” feature is particularly useful when you go on vacation or other extended
cancel your program.
absence. It ~oes not
Press and hold until the display shows HOLD.
Mode
60
70
80
90
1111111111111111111
■■■■
70
NOLD
n
n
S M T W T F S
Heat
Tap or hold until temperature indicators
show the range at which you want the
thermostat to maintain the heating and
cooling temperatures.
cool
60 70 80 90
1111111111111111111
■ mmmmmmwm
70
HOLD
n
S M T W T F S
20
~+
Mode
To cancel HOLD, press and hold until HOLD
disappears from display. Continue to hold until you
see the normal room temperature display.
Your regular program will resume at the next
programmed time.
DI
60 70 80 90
,,,1,,,,1,,,,1,,,,1
● mmmmm
70
S M T W T F S
ROCJM TEMPERATURE
DISPLAYED
69-8026—2
21
The “HOLD UNTIL” feature holds the temperature range for up to a week, and then cancels
it, returning control to your program so your home is at the comfort level you want when you
ret urn.
Press until HOLD UNTIL is displayed.
60 70 80 90
Mode
■
Heat
1111111111111111111
● mmm
Use to change heating and cooling set
points as desred (shown with heat setting
‘ r ~ h~dingat~p:).
70
NOLD UNTIL
~
S M T W T F S
cool
22
Press and hold to step through your weekly
program until you reach the day and time at which
‘ast you want the thermostat to resume normal programmed operation (shown holding until 10:30 PM 011
Sunday).
60 70 80 90
Illlill llllllllllll
.m. m.m. mmm.
Press once,
60 70 80 90
Mode
1111111111111111111
.mam
70
NOLD UNTIL
n
S M T W T F S
23
To cancel HOLD UNTIL early, hold key until the
display cycles through the various displays. Release
Mode the key when it cycles to the normal display of room
temperature.
69-8026—2
60 70 80 90
11111,,111,,111,,11
.mmm. m
70
Your regular program will resume at the nexl
programmed time.
/b
S M T W T F S
ROOM TEMPERATURE
DISPLAYED
24
CHANGING FOR DAYLIGHT-SAVING OR STANDARD TIME
To move clock ahead an hour in spring, hold key
until SET CLOCK shows.
Mode
60
70
80
90
1111111111111111111
SET CLOCK
10:30
PM
■
n
S M T W T F S
Press and hold until clock advances 1 hour.
d
60
70
80
90
1111111111111111111
slow
SET CLOCK
11:30
PM
SMTWTF;
25
69-8026-2
Tap to lock in change.
60 70 80 90
Mode
1111111111111111111
■ nmmmm
70
SMTWTFS
Jz2
ROOM TEMPERATURE
DISPLAYED
Mode
T o move the clock back
SET CLOCK shows.
one hour in fall, hold key
60 70 80 90
until
1111111111111111111
10:30
PM
SET CLOCK
■
S M T W T F S
b
26
Tap 6 times to back up the clock one hour.
slow
60 70 80 90
1111111111111111111
SET CLOCK
9:30
PM
~
SMTWTF;
Tap to lock in change,
60 70 80 90
Mode
,111111111111111111
. . . . . .
70
S M T W T F S
a
RiX)M TEMPERATURE
DISPLAYED
27
69-8026-2
MAINTAINING YOUR THERMOSTAT
REPLACING THE BATTERY
Your thermostat uses a 9 V alkaline battery as backup to hold
the program in case of a power outage. For best results, replace
battery every 5 years.
To replace:
❑ Open right-hand thermostat door.
❑ Remove battery from battery holder and battery connector.
❑ Press battery connector onto a fresh 9 V alkaline battery. Place
battery in the battery holder as shown.
❑ Close the
door.
28
BATTERY
CON
RECALIBRATING THE THERMOSTAT
Your thermostat should normally display the correct room
TEMPERATURE ADJUSTMENT
SCREW
temperature. Intherare event ofaninmrred display, thethermostat can berecalibrated as follows:
❑ Make sure the thermostat has been on for at least 2 hours.
❑ Place an accurate room thermometer near the left side of the
thermostat. Be careful not to touch thermometer or breathe on it.
❑ Open the left door of the thermostat.
•l Locate the temperature adjustment screw.
❑ Use a flat blade screwdriver to turn the screw slightly clockwise
to increase, or counterclockwise ~ to decrease the
indicated
~emperature.
❑ After each turn, allow the thermostat to stabilize about 30 seconds.
❑ Continue this procedure until the thermostat has the same temperature reading as the room
thermometer.
29
69-8026—2
THE “WAITING” INDICATOR DURING AIR CONDITIONING
To prevent possible damage to your compressor, and to maximize the efficiency of your air
conditioning system, no controls can be activated for approximately 6 minutes after the compressor shuts off. If you try to override the temperature during this time, the display will show
WAITING until the 6 minutes pass.
30
YOUR PERSONAL PROGRAM
Use the table below to plan your schedule before you begin programming. If you are programming a different schedule for each day of the week, fill out-a different table for each day.
Desired Temperatureb
Typical Activitya
Wake up
Leave home
Arrive home
After dinner
Retire
Extra Nighttime
Set Point (see
page 13)
Heating
Your Start Time
,
Cooling
I
a
You may program between 2 and 6 typical activity times.
You may program up to 8 different heating/cooling temperature combinations over the duration
of a week.
b
31
69-8026—2
TROUBLESHOOTING GUIDE
IF...
THEN...
Thermostat loses program.
❑ Check for loose battery.
❑ Check that power switch is ON.
Thermostat shows no display,
unless HEAT or COOL key is held.
❑ Check that power switch is ON.
•l Check main switches, fuse and circuit breakers
on heating equipment to make sure the thermostat
has power. The heating control circuit powers the
thermostat even when it is controlling air conditioning equipment.
❑ Check the wiring connections to the thermostat.
❑ Make sure your system uses 24 Vat. The
thermostat will not operate on a millivolt system.
❑ Jumper RC & Y or RH & W. If system comes on,
thermostat needs replacement. If system does not
come on, a problem exists in the system (such as
transformer, relay or valve).
32
Troubleshooting Guide continued
IF...
THEN...
Display goes blank less than 30
seconds before or after a furnace
burn cycle.
❑ Your furnace is interrupting power to the
thermostat. This is not a problem, as the 9 V
alkaline battery will be adequate to carry the
program for the entire heating season. Do NOT
use a rechargeable battery.
Display goes blank for several
minutes during a long furnace burn
cycle.
❑ Check for dirty air filters or blocked registers. If
registers are not blocked and the air filter is clean,
an isolating relay probably needs to be installed on
your heating system. See Table 1 in the installation
manual, form number 69-8025.
Temperature display is incorrect.
•l See “Recalibrating the Thermostat,” page 29.
33
69-8026—2
Troubleshooting Guide continued
IF...
THEN...
Furnace or air conditioner
operates continuously.
❑ Check the thermostat to see if it is wired properly.
❑ Check the furnace and air conditioning systems to
make sure they are operating correctly.
Thermostat will not turn heat or
air conditioner on.
•l Check circuk breaker on heater or air conditioner
to make sure it has power.
❑ Check that pilot light/power is on; this thermostat
“steals” power from the heating circuit.
❑ Verify wiring.
Thermostat will not let you make
a temperature setting.
❑ Check if you have already made 6 settings. A
maximum of 6 settings per day are available. The
thermostat will not accept a seventh setting.
❑ Check if you have used all 8 available temperature
combinations. A maximum of 8 heating and cooling
combinations are allowed in total in your weekly
34
Troubleshooting Guide continued
THEN...
IF...
Thermostat will not let you make a
temperature setting. (continued)
Thermostat is not following your
program, but is maintaining a
constant temperature.
program. The thermostat will not accept a ninth
combination.
(Use the programming chart on page 31 to make
sure you do not use any more settings or combinations than allowed.).
•l Your program has probably been lost. The
thermostat will maintain the factory-set program
(68° heat, 78° cool) until you reenter a new
program.
IF ADDITIONAL ASSISTANCE IS NEEDED, CALL HONEYWELL CONSUMER AFFAIRS AT
1-800-468-1502, MONDAY-FRIDAY, 7:30 a.m. -4:OO p.m., CENTRAL TIME.
69-8026-2
35
INDEX
Batteries, installation . . . . . . . . . . . . . . ...4
Batteries, replacement . . . . . . . . . . ...28
Blank display . . . . . . . . . . . . . . . . . . . . . . . . ...33
Changing your program . . . . . . . . ...15
Consumer Affairs Group . . . . . . . ...39
Cool key . . . . . . . . . . . . . . . . . . . . . . . . . . . . . . . . . . . . . 1
Daylight-Saving Time change.. 25
Energy savings, typical.. . . . . . . . ...42
Erasing the entire program . . . ...18
Factory-installed program . . . . . ...18
Fan switch . . . . . . . . . . . . . . . . . . . . . . 1
Fastkey . . . . . . . . . . . . . . . . . . . . . . . . . . . . . . . . . . ...3
Features . . . . . . . . . . . . . . . . . . . . . . . . . . . . . . . . . . ...”
Heat key . . . . . . . . . . . . . . . . . . . . . . . . . . . 1
HOLD . . . . . . . . . . . . . . . . . . . . . . . . . . . . . . . . ...2. 20
HOLD UNTIL . . . . . . . . . . . . . . . . . . . . . ...2. 22
Incorrect display . . . . . . . . . . . . . . . . . . . ...33
Keys . . . . . . . . . . . . . . . . . . . . . . . . . . . . . . . . . . . . . . . . . ..l
Long term hold . . . . . . . . . . . . . . . . . . . . . . . ..2O
Mode key . . . . . . . . . . . . . . . . . . . . . . . . . . . . . . . . ...2
Nighttime set point, extra . . . . . . ...13
Ordering information, relay . . . ...37
Permanent program changes.. 15
Personal program . . . . . . . . . . . . . . . . . ...31
Power switch . . . . . . . . . . . . . . . . . . . . . 1
PROGRAM ., . . . . . . . . . . . . . . . . . . . . . . . . . . . ...2
Program changing . . . . . . . . . . . . . . . . ...15
Quick reference to the keys . . . . . . . 1
Recalibrating the thermostat . . . . 29
Relay . . . . . . . . . . . . . . . . . . . . . . . . . . . . . . ...33. 37
Relay ordering information . . . ...37
Replacing batteries ... . . . . . . . . . . . . ...28
SET CLOCK . . . . . . . . . . . . . . . . . . . . . ...2. 11
Set cooling temperatures . . . . . . . . ...8
Set
current
day
10
Set
current
time
11
Set fan switch , . . . . . . . . . . . . . . . . . . . . . . ...14
Set heating temperatures . . . . . . . ...8
Short term hold . . . . . . . . . . . . . . . . . . . . . ...19
Slow key . . . . . . . . . . . . . . . . . . . . . . . . . . . . . . . . . ...3
Standard Time change . . . . . . . . . ...26
Switch, fan . . . . . . . . . . . . . . . . . . . . . . . . 1
Table of mntents . . . . . . . . . . . . . . . . . . . . . . ..i
Temperature adjustment
screw . . . . . . . . . . . . . . . . . . . . . . . . . . . . . . . ...29
Temperature set point indicator. 8
Temporary program changes ..19
Time . . . . . . . . . . . 11
Troubleshooting . . . . . . . . . . . . . . . . . . . . ...32
“Waiting” indicator during air
conditioning . . . . . . . . . . . . . . . . . . . . . ...30
Warranty . . . . . . . . . . . . . . . . . . . . . . . . . . . . . . . ...41
Weather Monitor@ . . . . . . . . . . . . . . . . . . . ...*
“See inside front cover.
36
— ——— ——— ——— ——— ——— ——— ——— ——— ——— ——— -
RELAY ORDERING INFORMATION
Send orders to: Honeywell Inc., Consumer Affairs MNIW1 462, 1885 Douglas Dr. N., Golden Valley, MN 55422-3992.
I
Total
Shipping/
Quantity
Price
Oeacription
Price Ea.
Handling
Parl No.
Isolatina“,
Relav Kit
MSICOQ
$10
$3.00
$20
MS101Q
Isolating Relay &24 V
$3.(33
Transformer Kit
Subtotal
Your bcal sales tax
Total
❑ Money order enclased
❑ Check enclosed
❑ Charge ta my Visa card #
signature
exp. date
❑ Charge ta my MasterCard #
signature
exp. date
❑ Charge ta my Discaver Card #
signature
exp, date
NOTE: Credit card orders may also be made by calling 1-800-468-1502 Manday-Friday 7:30 a.m.-4:OO p.m., Central rime.
Send ta:
Name
Address
zip
City
State
Your daytime phone number
37
69-8026—2
1
Toll-free Installation and Programming Assistance
For all questions concerning this thermostat, please read and follow the instructions. If
additional assistance is needed, call our toll-free Consumer Affairs group number at 1-800-4681502, Monday-Friday, 7:30 a.m. -4:00 p.m., Central time.
r
NOTICE
This equipment is a Class B digital apparatus which complies with Canadian Radio
Interference Regulations, CRC c.1374.
f
This thermostat is manufactured under one or more of the following patents; U.S. Patent No
4,172,555; RE32,960; 4,314,665; 4,335,847; 4,356,962. Other Patents Pending.
69-8026—2
39
LIMITED ONE-YEAR WARRANTY
Honeywell warrants all products fisted in this book to be free from defects in workmanship or materials, under normal use
and service, for a period of one (1) year from the date of purchase by the consumer. If, at any time during the warranty
period, the product is defective or malfunctions, Honeywell shall repair or replace it (at Honeywell’s option) within a
reasonable period of time.
If the product is defective,
(i) return it, with a bill of sale, receipt or other dated proof of purchase, to the retailer from whom you purchased it, or
(ii) package it carefully, alon9 with a Ml of sale, receipt or other dated proof of purchase and a short description of
the malfunction, and mai I it, postage prepaid, to the following address:
Honeywell Inc.
Return Goods
1050 Berkshire Lane
Plymouth, MN 55441-4437
This warranty does not cover removal or reinstallation costs. This warranty shall not apply if it is shown by Honeywell that
the defect or malfunction was caused by damage which occurred while the product was in the possession of a consumer.
Honeywell’s sole responsibility shall be to repair or replace the product within the terms stated above. HONEYWELL SHALL
NOT BE LIABLE FOR ANY LOSS OR DAMAGE Of ANY KIND, INCLUDING ANY INCIDENTAL OR CONSEQUENTIAL
DAMAGES RESULTING, DIRECTLY OR INDIRECTLY FROM ANY BREACH OF ANY WARRANTY, EXPRESS OR
IMPLIED, OR ANY OTHER FAILURE OF THIS PRODUCT. Some states do not allow the exclusion or limitation of
incidental or consequential damages, so this limitation may not apply to you.
THIS WARRANN IS THE ONLY EXPRESS WARRANTY HONEYWELL MAKES ON THIS PRODUCT. THE DURATION
OF ANY IMPLIED WARRANTIES, INCLUDING THE WARRANTIES OF MERCHANTABILITY AND FITNESS FOR A
PARTICULAR PURPOSE, IS HEREBY LIMITED TO THE ONE YEAR DURATION OF THIS WARRANTY. Some states do
not allow limitations on how long an implied warranty lasts, so the above Umitation may not apply to you.
This warranty gives you specific legal rights, and you may have other rights which vary from state to state.
If you have any questions mncerning this warranty, please write our Consumer Affairs Department, Honeywell Inc. 18S5
Douglas Drive North, Golden Valley, MN 55422-3992, or call 1 -S00-468-1 502, Monday-Friday, 7:30 to 4:0I3 Central time.
■
TYPICAL ENERGY SAVINGS FOR REPRESENTATIVE CITIES IN THE U.S.
■
%Sw.g5forOnee4.Oay, 10T .ffset
■
%SavinmforTwiceA-Oay, 10Ydf5et”
❑
%Savingsfor5T surnrneroff*t
30%
m
-
~ 2s%
.
; 26%
~
“
>
P
:
.
~
24%
22%
2M
18%
: 16%
:
5 14%
f?
% 12%
g 10%
.E
;
&
6%
8%
;
4%
2%
Minmupolis
St Paul
BuwdO
Dmvm
Boston
Cinciniuti
Chnlmd
DU Moines
Omthc
Chicw
Ssh Lake
cm
mlIbul#l
Indialllpolh
Kwnm City Phihddphi,
St LouiI
Semrh
Columbus
Mtlwwkw
S.M.
Rev. 7-90
Oafmk
NW
YorkLo”M1l,‘..
PwOmd
-
~“
Fm.cism
-..
Lmlml
..”
La R“sW@I
-.
M“ U,sqo
AdInfI
Wash., O C
%ased on 1(TF offset-( 5°F offset giw
arwr... 5 5 wce.t of 6=.3 savinpd ,.,850S
Form Number 69-8026—2
OHoneywell Inc. 1990