1
Thank you for buying a SOUNDSTREAM VIR.Ja8OTS .
Tnis user's manual covers the VIR-7MOTS rndel
Please mad through this use& manual before using the prduct.
IAfter reading this manual. please keep it within easy reach
This usefs manual includes instrucflons on how to use the DVDED. TV tuner. radio tuner and CI
&anger .
.
Table of Contents
.
Prucautlm
......................................
Precautions Far handling discs . . . . . . . . . . . . . . . . . . . . . . . . . . .
Playable dlses and reglon . . . . . . . . . . . . . . . . . . . . . . . . . . . . .
Basic unll opention . . . . . . . . . . . . . . . . . . . . . . . . . . . . . . . . . .
Power an/otf . . . . . . . . . . . . . . . . . . . . . . . . .
.. . . . .
Selecllng a source . . . . . . . . . . . . . . . . . . . . . . . . . . . . . . . . .
Adjuging the volume . . . . . . . . . . . . . . . . . . . . . . . . . . .
Display with the LCD panel closed . . . . . . . . . . . . . . . . . . . . . . . . . .
Qpemng and tuning on ihe display . . . . . . . . . . . . . . . . . . . . . . . . .
Opening up the LCD panel . . . . . . . . . . . . . . . . . . . . . . . . . .
Madng me LCD panel go horizontal . . . . . . . . . . . . . . . . . . . . . . . .
Tuning the monitor on and off . . . . . . . . . . . . . . . . . . . . . . . .
Mute
......................................
Wmzobperatetha LCDwpanel .............................
How to use the buttons . . . . . . . . . . . . . . . . . . . . . . . . . . . . . . . .
Intormation lndlcation wlndow . . . . . . . . . . . . . . . . . . . . . . . . . . . . .
How 20 use the remote controller . . . . . . . . . . . . . . . . . . . . . . . . . . . .
How to use this unit . . . . . . . . . . . . . . . . . . . . . . . . . . . . . . . . .
How to use the radio . . . . . . . . . . . . . . . . . . . . . . . . . . . . . . . .
How to use the TV . . . . . . . . . . . . . . . . . . . . . . . . . . . . . .
How to play DVO videos ....................... .
.
.
...
How to play audio and video CDs . . . . . . . . . . . . . . . . . . . . . . . . .
How to play VP3 discs . . . . . . . . . . . . . . . . . . . . . . . . . . . . .
How to use the CD Changer . . . . . . . . . . . . . . . . . . . . . . . . . . .
How to select a visual screen during audio pbybadc . . . . . . . . . . . . . .
How ta set the system up . . . . . . . . . . . . . . . . . . . . . . . . . . . . . . .
Main setup . . . . . . . . . . . . . . . . . . . . . . . . . . . . . . . .
Sound setup . . . . . . . . . . . . . . . . . . . . . . . . . . . . . .
DVD setup . . . . . . . . . . . . . . . . . . . . . . .
.
.........
Tuner setup . . . . . . . . . . .
. . . . . . . .. . . . . . .
Multi-zone setup . . . . . . . . . . . . . . . . . . . . . . . . . . . . . . . .
frwbleshcmting . . . . . . . . . . . . . . . . . . . . . . . . . . . . .
Error m e s s a g e s . . . . . . . . . . . . . . . . . . . . . . . . . . . . . . . . . .
Installtlon . . . . . . . . . . . . . . . . . . . . . . . . . . . . . . . . .
Package contmk . . . . . . . . . . . . . . . . . . . . . . .
lnstallrng the main unit . . . . . . . . . . . . . . . . . . . . . . . . . . . . .
lrlstalling the bmer/arr@unit . . . . . . . . . . . . . . . . .
Removing lne main unlt . . . . . . . . . . . . . . . . . . . . . . .
..
..
System connection . . . . . . . . . . . . . . . . . . . . . . . . . .
Power eonnect~on . . . . . . . . . . . . . . . . . . . . . . . . . . .
SpeeHieatlon . . . . . . . . . . . . . . . . . . . . . . . . . . .
Recautionsforhandlingdiscs
<
>
Playable dlscs and region
>
Playable disc
Handling
-
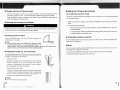
The edges around new U i i may be rough. When using disc with rough edges. the player
OVD Video disc
may not work normally, or the sound may skip. Use a ballpoint pen or other similar too! to
remove any roughness around the edges of the discs before uslng them.
.
Pa not attach labels to the surface of the disc, or mark me surface with a penerl or p n .
r
Do not phy discs that have scotch tape or other a d m s on Mem. or from which the surface has
peeled. Using such discs may prevent the disc ejecting f r m the DVD player or may damage it.
*
Single or double-slded disc
Single or double-layered disc
DVD Yldeo stored In DVD-R, DVD-RW, DVD+R, DVD+'RW d f s a
Do not use discs that are badly scratched. deformed or crackd. Using such discs may cause
the product to operate abnormally or 'be damaged.
CO, VCD, MP3 audfo files stored h CD-R, CQ-RW dl-
!Ahen removing a disc from its storage case, press the center of the case, hold the disc by the
edges and lift it cardully.
r Use neither commercially a ~ i l a b l 0
CD protection sh&s
nor disc stabilizers. They may damage
the discs or came breakdown of the internal mechanism.
..
Storage
Do not expose discs to direet sunlight or radiators.
Do not expose d i m to moisture or dus2.
I
Region code
Do not exrxrse discs lo direct heat from heaters.
DVD video systems assign a specific region a l e to each DVD video player and DVD d i x according
to sales regions. For example, DVD video players sold in the United States a n only play discs suited
to the U.S. region code ('I".
'ALL', or a combination of n u m k r s including 'I1,
'ALL').
Cleanlng
Use a soft cloth to wipe discs, worksng from the center of the asc out towards the circumference.
Do not wipe discs with cornrnercialty available cleaners, anti-static spray or thinners.
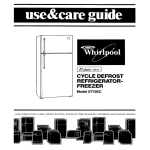
The DVD region code is indicated on the disc jacket. as the following picture shows.
.
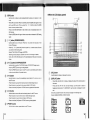
Inserting discs
If the LCD panel IS open. load discs with care.
When a disc IS loaded, do not remove the unit from the car. Or ?urnoff the power.
The region d e s of each country are as follows. Refer to them when purchasing BVD titles.
-,
f
Wflh the LCD panel open, H is not easy to see the disc insertion slot. For the
sake of safety, the driver should Insert dlscs with the LCD panel closed.
L
,
'
7V color system
Basic
The OVO player plays NTSC or PAL discs only, and cannot play SECAM discs.
TV tuner o f this unlt is only compaufible with NTSC mlor system.
About the registered trademark
- This product includes copyright protection technology that is protected under certain U.S.
-
-
patents. and other lnteflectual property rights owned by Macrovis~onConporation. Unless
authorized by Macrovision Corporation, this copyfight protection technology can be used only at
home or in other limited places. Disassembly and reverse engineering are prohibited.
Manufactured under license from Dolby Laboratories.
'Dolby" and the double-D symbols are register4 trademarks cd Dolby Laboratories.
"DTS is the registered trademark of Digital Theater Systems, hc.
For s a f e drlving, adjust the volume to a level that allows you to hear sounds outside
the car. When you turn on the power, the volume Is adjusted to 10, the maximum
volume level for safety.
Power onloff
1. Press the 1 * !SRC I button, and the unit's initial display lights up. The main unit remembers the
last operation swrm used and displays it accordingly.
2. In the case of a DVD source, it automatically plays back fnwn the point of the last operation.
3. Press the [ " %RC ] b m n for 3 seconds or longer to turn off the power. Even after the power
is turned offfli.
the buttons are illuminated when the car sidelights are switched on.
I;Selecting a
source
1. Press briefly the 1 'SRC]button to change the source.
2. When you press the [ 7 ERC] button, the sources are selected in the following order.
Radio b TV b OVD (b CD Changer). b EXTERU
The CD Changer is indicated only ifone is connected.
E Adjusting the volume
Press POL] to adjust the volume.
- '+' increases the volume.
'-'decreases the volume.
- The volume level i n d ' i t d on the display is in 32 steps from 0 to 31.
f
I
a Use thls unit while the engine is running.
La.-
r*.
If you use this wit f o a~ long tame with the engine atoppeU. you may nn be
able l o stan the engine agaln, due to a discharged battery. or you may
shorten the service Ille of the battery. If you intend to use this product for
prolonged p e w s . please make sure that you use it only when the engine is
running.
/
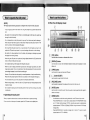
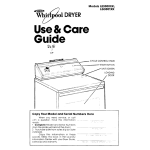
How to use the buttons
How to operate the LCD panel
2
IIWhen the LCD display closed
WOTU
Please read the following precautions to lengthen the sewice life of the LCD panel.
-
If you are golng to park the car mtdwrs for a long the, keep the LCD panel inside the
min
unit.
-
Be careftll not to let any liquid from d r i m or wet umbrellas get into the main unit. Liquids may
damage the internal circurry.
-
Do not disassemble w modify Ihe p W c t in any way. Such actions may lead to damage, in
which case you may have to pay for an AIS service. Please have the product repaired In the
slow of purchase w ofher designated
-
agency
Do not pull the LCD panel out by force, or use the back af the LCD panel as a tray. Do not
subject Ihe LCD panel to any impact. It may muse breakage. deformation or ather damage.
Be careful not to allow cigarettes to bum the display. Any breakage or damage may prevent
the display from working normally.
-
+
-
Use thrs button to increase or decrease the volume.
When tilting the LCD panel, do not place any forelgn objects between the LCD panel and the
main unit. Failure of the panel may result.
-
@ WOL] button
@
Do not place anything an the display when tilting the LCD panel.
(DISPLAY] button
Use this button to switch the InfomatIan indication window panel to playback or clock
status. etc.
When it is cold, the display movement may slow down,the display may darken, and a afterimage may be visible. This is not a rnahriction. When the temperature of the main unit and ils
sunourdings increases, the unit wtll work normally again
@ [OPEN] button
However. if the unit does not work properly in n o m l temperatures, it m y be malkinctioning.
Please have the product repaired in the store of purchase or other designated N S agency.
@
The small brack shiny spots in Ihe LCD panel are a ternpray phenomenon.
When the engine stops, or when it is cold, the LCD panel may stop working ternprarily while
- Do not press the casing around the touchkey pand with Ica much force. Doing so may result
Use this button to eject a disc fMm the unR
@ (RELEASW bulton
@ MUT TI^ button
Use this bunon to mule the sound. When the sound is muted, press this button again to
obtain sound output.
In malfuncl~on.
panel
When you press the relevant icons, the touch panel allows them to operate acoordingly
If these
[ - . ] bmon (EJECT)
Use this button to separate the burglarproof front panel from the main unit.
it opens or closes.
IOperating the touch
Use this button to open and close the LCD panel.
@ [BAND] button
-
Use this button 40 switch the receiving bandwidth In radiorrVlertemal input mode.
Pfess t b fBAND] bunon in radlo mode to switch Mween FM1iFM2FM3AM. Do~ng
so in TV m d e switches between TVlITlr2, wh~lethe same action lo exlemal input
icons do not show up on the screen, press the LCD screen once to display them
-
switchss between, EXTERNI,' EXTERN3 EXTERM3 Using the bWon in CD Changer
changes distls.
Press the [BAND] butlon 3 seconds or longer when in radr, or TV source to switch
channel search to AUTO or MANUAL.
@
IWhen the LCD display opened
IQSR] bunon
-
Use this button to listen to radio broadcasting that has been set in advance. in radio
-
mode.
While QSR (Quick Station Recall) is activated, presa the IQSR] button again to move
into the pr&SR source. When you press the . TSFIC ] bullon as W d l as the
buaon, the same prwedure follows.
Press and hold the [QSR] button in radio mode to save a broadcasting station in the
QSR m e w .
Press the IQSR] button for longer h other source m d e s to release the QSR setting
Iosa]
-
saved;.
@ [ - ~ R C button
]
(POWERISOWRCE)
-
US$ this button to turn on the power. Press the [ P/$RC ) buttonfor 3 seconds or more
to turn of#the power.
Press the [ FISRC ] button h e w , when the power is on. to switch sources. Swrces
are switched lrl tHe IbllOwrlg Order:
Radio b TV b DVD (bCD Changer) EXTERH
Switching to the CD Changer IS available only when a CD Changer 6s installed.
lnsen a CD or DVD wh~lethe p w e r ts off to aulumaticalty turn the power on and play
it back.
@I [PffU/O] button (PLAYPAUSUSTOP)
- Use this bunon to smtch to PIAYIPAUSE rn& n CDlOVOlCD Changw source.
-
@
[MU] button
-
@
Use this button to move the broadcasting channel back to the previous one in
r a d i m source.
Press this bunon to go back to the previous track in CDED Changer source.
Press this button to move back to the previous chapter Ih OVD Source.
Press and hold the [W]
button in CDlOVD source to playback with last-rewind.
[DM] Button
-
-
@
P r e s the [D[10/0] bunon longer to stop playback.
Press the IDQO/O]button lmger in radiTTV source 10 automatically search stations
or store a current staCon in the preset rnernorj.
Use th~sbutlon lo move to the nem broadcastingchannel in radiorrV source.
Press this button to move to the next track in CD/CD Changer swrce.
Press thrs bYnon to move to the next chapter in DVD wurce.
Press and hold the [M)
button in CDmVD source to get fast playback.
PRESETJ button
-
Use t%s bunon to select a preset station rn radiarlV source.
@ [VOY button
Use this button to increase or dsrease the volume.
[DISPUV b d o n
-
Press briefly: Use this bunon to display, it displays the status of the current source on
the screen.
-
Press and hold: For the radio and CD Changer, use this button to select a
background mwie screen. For DVDNCDm. use this button to change the screen
size.
Every time you press this button. the screen s ~ changes
e
in the following order:
FULL P CINEMA b NORMAL b WIDE t ZOOM.
@
[OPENICLOSE] button
-
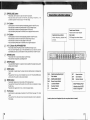
Information indimtion window
Press bnefly. Use th~sbutton to open and close Ihe LCD panel.
Press and hold: Use Ihls button to make the LCD panel go horizontal , or air
conditioner operation mode, see page 11 for detail usage.
[Md] bmon
-
-
-
Use th~sbutton to move to the previous broadcasting channel in r a d i o m source.
Press this button to move to the previous track in CDGD Changer swrce.
Press this button to move to the previous chapter In DVD source.
Press and hold the 1-1
button in CDlDVD source to playback wilh fast-rewind.
[MIbutton
Opentlanal status lndimtw
Indicate frequency, playback time
and clock.
- Use rhls button to move to the next broadcasting channel in r a d i o m source.
- Press this bunon to move to the next track in CDICD Changer source.
- Press thls butlon to move to the next chapter in DVD source
-
Press and hold the (W]button in CDlOVD source to get fast playback.
PresM channel Indicator
Preset channel number ind~cation
Dlse number
CD Changer d i x number indicator
I
C
I
>
[POO/Q] Button (PUY/PAUSE/STOP)
- Press bnefly: Switch to Play/Pause mode rn CDIDVQICD Changer source.
- 'Press and hold: Playback stops In Ihe CDIDVDICD source. Searches stations
automatically and stores a current station into the preset memory in radiom source.
[SOUND] button
- Press brief&: Move to swnd setup status in system setup.
-
Press and hold: Change the Loud setting On10ff.
[SETUP]button
-
Press the [SETUP] button for 1 second or more to switeh to the screen where system
settings can be changed.
[ZONE] 'button
-
-
Press briefly: In sysfem setup, the screen and audio setting screen are displayed by
reglon.
Press and hold: The main unk LCD indication turns on or off, Press the [ZONE] button
w~ththe LCD off to swrtch into the screen indication.
[MENU] button
-
Press briefly: Display the root menu whlle a DUD video plays back.
Press and hotd: Press and hold this button whtle a DVD video IS in playback to dlsplay
the tide menu.
Press the button again while in menu. D return to playback status.
r
DAB
C
SAT
MAN
LD
EQ
ST
QIgHaI broadestlnql indicator'
QEsc Indicator
Satellite radlo indicator'
Manual tuning indicator
Loudness i n d h t o r
Equalizer Indicator
Stereo indEcator
I
7
RPT
SCN
RDM
Repeat indicator
Scan Indicator
Random indicator
lndlwtion when the RDS
function is supported*
(TlLf] button
-
-
Use this button b adjust angle and position of the LCD Panel. See page 70 fordeta~l
usege.
Press and hold: The LCD panel moves forward and backward and can be adjusted to
Ihree stages.
(' mark is optlonal. so Is displayed Only when an optional d w l c e Is loaded.)
A
( How to use the remote controller
@
[PWRERC] button
Performs the same function as the [WVWSRC]button in the main unit.
(3 [BANDKlISC] button
Performs the sane function as the [BANDIDISCJbutton in the main unit.
@
[NUMBER KEYS] 'button
-
@)
For the radiorrV source, the preset numbers are selected. Only buttons 1 to 6 out of
the numeric buttons are valid.
For DVDICDNCDIMPS playback, playback occurs from each selected chapter and
track number.
For radrofW source, press and hold this button to store a current broadcastingstation
In the sermed key number preset memorj. (Use preset numbers 1 to 6.)
€ M W button
Use this button to mute the sound. When Ihe sound is muted, press this button again to
release mullng.
(3[DIRECV button
-
-
OR GENERATOR]
m e infrared remote controtter operatea within a range of 30"In all directions.
Inserting the batteries
1. Turn the remote controller over and slide the rear
cover in the direcfion of fhe a m .
-
@
a
direction ind'mtedin Ihe figure.
VOLUME DOWNRIP] button
--
[UPIDOWNRETTJRIGT button
-
.....
-
q
Incorrect use of the banerles may cause explosion. Please check the following points.
If you are replacing batteries, replace both ~atteneswRh new ones.
- Da not disassemble or heat batlerws
Do not expose batteries to fire or flames.
Dtspose spent banenes properly.
-
-
a18
playback time & location. chapter playback time C lwation, and repeat
playback, etc when a DVD is being played back.
: Display a screen where you can change the track, disc playbadc time 8
VCD
location. track playback time & lowtion, and repeat playback sethng. etc.
CDMP3 : Display a screen where you can change the track number to play back.
Selm your cho*s by using the a m w bmorts while the relevant screen is
displayed. Then enter the numb6-r you want by using the [NUMBER KEYS]
bufton.
Usa th~sbunon to Increase Or decrease the volume.
I
2. Close the m r after inserting the M A (AM4 1.5V)
batteries. enclosed wilh the remote controller. in the
R a W : Qispby numeric window for direct frequency, channel input.
DVD
: Display a screen where you can change the tltte, audio, subtitle, angle. title
For radioil%' source. use [UPIDOWN] key to inireas? or decrease preset nvmbr.
When play~ngback a DVDNCD, m w e the curser on the screen with the [DIRECT] w
[MENU] button.
When playing back MP3, seleet the track to play by vsing the [UPIWWN] key. Use
the [LEFTIRIGHTJkey lo move the track title by page.
[ENTER] button1
-
Deternine the function in setup.
D V D S e k t and determine each tumlon n setup.
p,[RETURN] button
Execute the return function, in setup.
@
ZMENU] button
When playing back DVD. m w e to h e root menu. Whi!e the root menu is activated, return
to ptayback mode.
f-,
i
[k/Il] button(PLAYIPAUSE)
Perfoms the same function as the [PLAYtPA'USE] button in the main unit.
@ 3_-11mon
Performs Ihe same function as the [W]button in the main unit.
53 I m l b m ~ n
Performs the same function as tha [W]
button in the maln unit.
[ E ] button (STOP)
-
-
Execute the stop wmmand In CDNCDMP3/TSVD source playback
When stopped, lpress this button again to cancel the resume playback.
$3 IRDM] buttan
Play back a chapter or a track randomly in DVD source.
[SCAM] button
Search the track you want by playing back only the first part of the track in CD playback.
[RPT] button
Repeat a chapterltrack or a tideffolder in DVD svurm.
$3 [SUBTI button
Change the method for indicating titles.
3 [AUDIO] button
Change the method for playing back audio when playing back a DVD.
;blTLE]button
When playing back a DVD, switch to !he lille menu.
4
HOW to use this unit
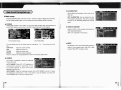
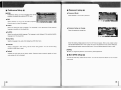
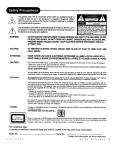
Mow to use the radio
? ?
?
@ Show the contents of the sourn in current use.
@
8
Touch the h to switch to the next source.
@ Show the frequency band in current use. On
touching this icon, the frequency bands are
changed in the order FM1. FM2, FM3 and AM.
@ Show the frequency of the station you are
currently listening to. Touch this icon to display a
screen where you can enter the frequency directly
$1 (See Figure below).
Q Show the preset number, H the station IS stored In preset. Each time you touch this icon. il
changes to the next preset station.
@ Display the name infomaion desig~tedat NAME SET in Setup.
@ Switch lo a screen where you can change settings related lo radio reception.
Indicate the current tirne.
@ Show the current audio satting stalus, and information felatted to broadcasting reception.
@ This window displays the current sound status in graphics. Long press the [DISPLAY] buffon
on the upper part ot [he LCD panel to change the graphics indmion m e W .
@ Thls icon is for muting saund. The speaker ~ndicatorts displayed when sound is not muted.
Touch the speaker indicator to mute the sound. Touch the muting indicator to have sound
ourput again
@ Thls icon is for adjustfng the audio volume. Touch the '+' and '-' icons to increase or decrease
the volume.
2!
-
a
[ANGLE] button
After touching 'FREQ' in radio. use this m e n to enter a frequency drrwly.
In the case of a multi-angle recording, change the playback angle.
@ Enler a desired frequency by touching the relevan!
3 [SLOW button
Plays back the DVD slowly. Each tirne you Dress the button, the playback speed
decreases by 112.1f4, 118 and 1!16 respectneiy.
# [DISP] button
Use this buaon to change the display mode
@ [fONE] button
Swilch to the setting mode where you can set multi-zone functions.
numbers.
@! Thls Icon Is used to delete the entered numbers.
After number entry. set the frequency.
@ This Icon is used to cancel the enlered numbers
and return to the orig~nalstatus
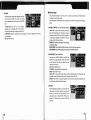
Selecting 'NAME SET on the radio setup screen displays a screen where you can designale a
Alter touching 'Setup' i w n In radio, use thts screen to change radio senings.
@ R m m to Ihe p r m u s screen for radm raption.
@ Change the frequency band for senlng.
@ Dkplay the screen where you a
n enter a frequency
Station name.
directly.
@ Used to change the preset.
@ Display the status of preset. scan. automatic
storage, name setting, etc, You can move to a preset
number directly. by. touching the line of preset
number.
5,
+'
8
PI
@ Th~sfunction enables you to listen to preset broadcasting for a short lime and move to the
next preset autornatiealy. so that you can check what is being broadcast in the saved
presets. While the preset scan is under way, p m the 'PRESET SCAN icon again to end
scanning.
@) Search all the frequencies in the relevant frequency band and save nhem in the preset
memory.
This unit can tune in to staiions with good m i o n signak and store them automatlealiy.
While auto saving is under way. press the 'AUTO SAVE' icon to end automatic saving.
@) Swnch to a screen where you can assign rrarnes to the selected stations.
@ SeM the method for searching stations: manual or automatic.
[MI)bunon in the radio source, the
When selecting 'AUTO': m e n pressing the (-](or
frequen6y increases (ordecreases) automallcally and stops at the next broadwing statm.
When selecting 'MANUAL: When pressing the [Hl]
button in the mdio sou=, the frequency
increase3 by fregu~reystep. CwwerrAy. p m i n g the [[HI]button. d w s e s b freguency
by lreguency step.
n
as
01
Return to the previous screen for radio setup.
@ U w this icon to move the curser left and ngM in the
window.
@I Designed t o display the contents entered . A
maximum ot 8 characters can be entered.
@ This icon is for switching to other character sets.
@ Touching tha character icon displays that character in
"8(,
9
#,
>,
the window.
@ Touch this to enter spaces between characters.
@ Usethis to delete characters one by m e in the chamEter window.
@ Use this to delete the characters placed under the cursor in the character wndow.
@ Use this to m f i r m the mntents thal h a w been entered in the window and end charader
entwing.
=
m s
(D
5.
0
g
&
8
4
c
m
2
PO,
m
Z Ql ' o?
G S ? ,
=
C
n g g
0 "
tn
$sg
(D
3
sari
' 3 8
4
2
9
F
7
g
Y
C
Dl
5
m
2
c
3
2
8@080 0
5
@
When touching the 'GOTO' icon w h ~ l ea DVD is
playing, this screen appears. allowing you to adjust the
DVD playback status.
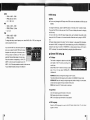
E How to play audio and video CDs
Touch the LCD panel in Audio or video CD source to display a screen designed to set 6D player
functions.
(iJ
Show the source contents in current use. Touch the
icon to switch to the n e x t source.
@ Indicate the track number of the currently playing
CD. Touch the icon to display a number window
&ere ym can move to the & g i r d track within the
? ?
currently played disc.
I n d i t e pkayback time information.
This adjustment icon appears when touching the
'MENU CTRL' icon in 'GOTO' status while a DVD is
playing.
End the 'MENU CTRL' screen.
@ Use this to view the DVD disc main menu screen.
@ Use this icon to move the cursor in the DVD
screen.
@
@ U s e this to select an item p r a m under the cursor.
'Use the remote controller number keys 20 enter the numbers mulred.
QShonrIhemethodsofindrdng~time.Twch
the icon to change the method of indicating time
nformatiwLThememodsoftimidMkmareasf~
0
SNGt-ELAPSE : Indicaies the elapsed time of the current track.
SNGh-REMAIN : I n d i t e s the remaining time of the current track.
TOR-EiAPSE . lndrcates the total elapsed tlme af a disc.
TOfL-REMAIN : lndpcates the total remaining time of a disc.
M i t e dsc playtack methods. Touch the icon to change the method of disc playback. The
methods of dise playback are as follows :
NORMAL : Normal playback.
RPT
: Repeats the currently played track.
D.RPT
: Repeats an entlre disc playback.
RQM
: Plays .chapters randomly.
@ Select playback and pause.
O CDww=knaps.
@ Touch the icon while the CO is praymg to get fast mind. Evev time yw touch the icon, the
rewind speed lmeases by 2 , 4 , 8 . 1 6 and 32 t i m .
@ T m h the Icon while tlae CQ is playing to get fast playback. Each time yw Z m h the ic0n. the
playback speed increases by 2,4,8.16 and 32 tlmes.
@ Touch the Icon while the CD is playing to go back to and play the beginning of the current
track. Touch t again to play from the beginnmg of me previous [rack.
(@ Touch the icon whrle the CD is playing b play from the beginning of the next track.
m
o
5
z
0,
ln
U,
n ru
g2
a
IU
pi
3
$ m4
$5"
E. ?
a
gz
g
s
s
C D m w
2
nplg
Z g n
' E
o
r 3
n p 2
p q m
~T ~p
m o
e 2 5
w
rnrn
mg
+
w
z
a
rn
0
0
3
$
=
F
$
2
u3'
2.
3
5
0- Q
4
n_
C
0
w
2 w
U,
- 2?
<
c 0
ID,
aB
V3
3 2;2
0
m
I
I
=g
VI
$-. -!VI+
28
2 2
2a,2
*
Pr
I?.
G- 2
z6
5g
4~
x 3
z
I7
m
2 F g
:g a
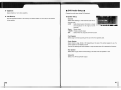
+ CLOCK
R Sound setup
,,
You can set fithe current tlme. Adjust me hour wrth
lhe up and down HOUR icons. whilst the rnrnutes
can be adjusted with the up and down MINUTE
icon.
,
.,
12-HRS DISP: Used for the 12 hour display.
D~splaysicons for selectin9 AM or PM. Each time
you touch the arrow icon. it changes to AM Or PM.
24-HRS QtSB: Set when using the 24 hour clock display. The Icon for selection of AM or PM
is not displayed.
SFT: Save the lime set.
Press the [SETUP] button on the main unit for 1 second or longer and touch the SOUND tab
to display the sound setup s c r m .
Also bnefty press the [SOUND] button at the bottom of the monitor to display the sound setup
screen.
+AUDIO CONTROL: You can set audio effects-
, .
, ,
LOUD: Make a natural zone by twxrsting Treble and
Bass. Recommended when listen~ngto music at
low volume. When LOUD is set to ON, the LOUD or
LD indicator is disptayed at the h t t o m of tlw LCD
acreen and the informationwindow.
BASS EX: Set when listening to loud sounds,
boosting the Bass.
BAUFADER: Set the right and lefl volumes, and front and rear speakers.
NON FADER: Use when adjusting the volume of the NON FADER.
+EQ SELECT: Set the equalizer.
Fixed MIfor JAZZ. CLASSICAL and ROCK are
provided in the basic equalizer. Three user m d e s
are aFso provided, that users can adiust and save
according to their w e .
1
JAZZ: Most suaable for Jazz.
I
CLASSfCAL: M M suitable for classical music.
ROCK: Mas? suitaMe for ruck.
USER 1 B : For saving the choices made by users according to taste. All the frequencies are
set to WB,MiCh is the factory default value. Set thesevalues in MY EQ.
DEPEAT: Press when not using h e equalizer Touch the iwn to delete the EQ indicator from
the LCD screen and the Infomtion window.
.-
Set the equalizer according to your own taste. This
unit prwides a parametric equalizer setup function
where you can make fine adjustments. Sound
setup allows you to adjust GAIN. FREQ and Q
values in the three frequency areas BASS. MID
and 'TRE.
-
L
BASS
- GAIN: +lMB -12dB
- FREQ: 50,80.120HZ
- Q: 1, 1.25,1.5,2
DVD setup
-
MID
TRE
-
VOTE1
+You can only change the DVD sdup when OVD sources are selected and DVD discs are
inserted.
-
GAIN: +12dB -12dB
FREQ: 7MHz, 1,2 kHz
Q: 1.5,2
To change the D M setup, press the tSETFP] button on the main unit for 1 second or longer.
n w r select the DVD tab at the upper part of the LCD screen to display the screen for changing
the DVD setup.
To move to the menu in the OVD setup change screen. use the direction move button at the
lower part d the LCD screen or in the remote controller. Select the menu by using the 'ENTER'
-
GAIN: +12dB -12dB
FREQ: 8,12kHz
To change the setup in each frequency area. select BASS. MID or TRE and change the
value by using the arrow icon.
If you touch the 'MID' icon, this %wen appears and
p
. . ,.
allows you to adjust the GAIN, FREQ and Q values
displayed when sening the mid frequency area of
'MY EW. Select the 'BASS' and 'TRE' icons to
adjust the Treble and Bass tlreas in [he same way.
Press the number corresponding to 'SAVE TO
USER' in order to save the adjusted value into
USER 1,2 or 3. t h e setup cantents are saved into the user area.
You can select the saved user setup in EO SELECT.
I
1
I
icon.
DVD setup change consists QI
fm items. The first is 'General", to set general DVD information,
the second is rAUDIO', to change the OVD sound-related setup, the third is 'PREFERENCE', to
change the user setup. the fourth is 'PASSWORD', to change password setup, and the last is
'EXIT to end setup. You can select these ilems by using the nght and left anow Icon.
General DVD setup
em Display
this function is designed to adjust the ratio (width
and height) of the TY screen according to the
monitor lype.
Select 'WIDE' iff the TV monitor for movies is a wide
type. If it is a ' 4 3 type. select 'NORMAUPS' or
'NORMAUL&'.
NORMALIPS: Select for viewing the full image on the TV screen.
The right and left side 01 the image may not be visible in the NORMAWS screen mode.
NORMAUNB: Select for viewing the original image ratio (width and height). In some cases.
a black stripe can appear at the top and bnom of the screen.
WPDE: Selecr when the TV monitor used is a wide type.
I1
+ Angle Mark
Use when displaying angle information an the screen.
ON: Display angle informationon disc playback.
OFF: Do not display angle information on disc playback.
+ OSD Language
Select the OSD language to be used in lhe DVD setup change screen. You can select
English or Chinese.
a0
3
c
=
0
0
?
3
c"
i
F
B
z
(D
7
", s
5'G
5 8
2 a
3
C
m
= l o u
s g g vE
O
- C5 'S > Z
g e m -
.. z
. .-
20
0 < 9
+Selecting a digltal output method (SPDIF Setup)
When playing DVD aud~ousing other avdio playback devices, s e l m SPPDIF for the audio
signal output method,
+Channel Delay time setup
Set the delay time by channel according to the speaker setup I m t i o n .
+Equalher setup
SPDlF Output
SPDlF OFF:Stop external digital signal output.
SPDIFIFIAW: D ~ r m
Dolby Olgnal or DTS bit stream output. Select when the exlernal audio
playback device has a Why Digital decoding function.
SPDIFIPCU: Decoded Dolby Digital or DTS b
i
t stream omput. Selea when the external
dev~ceis a 2channel digital stereo amp, On selecting this item, DVD video d ~ x s
reaarded in
the Dolby Digital. MPEGl. or MPEGP methods ara generated in the X M 2channel type.
MANUAL: Designate each digital output method manually.
EQ Type
This product allows you to enjoy a 3 0 surround function by using 3D surround sound
technology in DVD playback.
The preset equalizers provided are as follows :
Rock, pop. dance. techno. classical and soft.
CO
Supsr Bass B&
Boost the super bass sound without distortion for other trequency areas.
Select the CD sound digital output method. n i s item is activated only when SPDlF Output is
Bass.Bmst
Boost the bass sound without distortion brother frequency areas.
set to MANUAL.
Dolby Digltal
Select the digital output methwl for sound recorded in Qolby digital. This item is activated
only when SPDlF Output is set lo MANUAL.
Treble Boost
Boast the Treble sound without distortion for other frequency areas.
+ 3D sound e M x t p r o w i n g
Set a Reverb Mode.
DTS
Select the dgnal output lnethd for sound recorded in DTS. This item is activated only when
SPDIF Output is set to MANUAL.
MPEG
Select the digital output method for sound recorded in MPEG. Illis item is aflivated only
when SPDlF Output IS set to MANUAL.
LPCM Out
S e l m the digital output method for wurtd racordd in LPCM. You can select a 48K or 96K
bit rate.
+ Dolby Digital Setup
Dual Mono setup
Select the method of Dolby digital audio ouwut.
Sterea: Stereo output.
L-Mono: Left side output
R-Mono: Right side output.
Mlx-Mono: Left and right side outputs mixed.
You can s e l c t and enjoy the various sound effects as f o l b s :
Concert, Living room, Hall, Bathroom. Cave, Arena, and Church
m Multl-zone setup
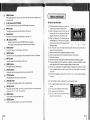
ITuner setup
To set the tuner, press the [SETUP]button on the main unit for 1 second or longer. When
seleaing the tuner tab on the LCD screen. the tuner adjusting screen appears.
+ RADIO: Set h e radio frequency unit changes 1 a
by region. Each time you press the button,
The multi-zone tuntion separates the inferior of a car into front seats and back seats, in
which users can enjoy separate video and audio.
To enjoy separate images in front and back areas, it is necessary to install a separate
monitor for the back seats.
Press the [SETUP] button on the main unit for 1 second or longer and -1the ZONE tab.
Also briefly press the [ZONE] bunon to display the multi-zonesetup screen.
setup is changed.
Areal (America) :A M l O k H z l F M l ~ H z
4 ZONE ONIOFF: Set whether to have the multizone function available or not.
Area2 ('Europe) :AMSkHdFM50kMz
Area3 (KorealJapanlAvstraIia)
SINGLE ZONE: You can enjoy the same video and
audio in both front and back car seats.
MULTI ZONE: You can enjoy different video and
audio in front and back seats according to the
: AM9kHzmA100kHz
Area4
:AM9kHzlFM2QQkHz
4
c
ZONE SET setup.
Changing the frequency setup deletes the
contents of the preset memory.
,
. ..
m
,
+TV: Set the status of a diversity antenna.
When ON, the diversity antenna changes the
connection by automatically searching for the
antenna with the best reception, from among
4 channels. This function is only applied when a diversity antenna is connected.
When set fo OFF, only the antenna connected lo antenna connmor No. 7 is used.
I
+ZONE SET
Image-related rnultl-zone setup
Select ZONE SET and touch the MONITOR icon.
You c a n select the source to be displayed in the
back seat monitor. The sources to be selected
include DVD, TV and external input signals.
Audio-related multi-zone setup
Select ZONE SET and touch the Speaker icon.
When it comes to audio, you can select one of two methods; one Is to listen to only one
audio source inside a wr, and the other is to listen to audio from the front and rear speakers
correspondingto the audio selected for the front and rear monitors.
Select 'SINGLE AUDIO' when listening to only one aud~osource.
Select 'FRONT SRC' to have audio output corresponding to the contents displayed on !ha
from monrtor.
Select 'REAR SRC' to have audio output corresponding to the contents displayed on the rear
monitor.
Select 'DUAL AUDIO' when listening to audio ftom each monitor. Ihat corresponds to the
selection made for each of the front and rear monitors.
[NOTE]
a You are not atlow& to change setups such as the vohme from the back seats. After
switching to the appropriate source in the main unit on the fmnt panel, you can change
setups such as the volume.
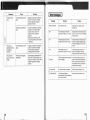
lbuble shooting
2
Initializing the Touch Screen
When tcm buttons do not operafe properly in The touch screen functions.
Check that appropriate Icon is pressed for the fumtronyou intend.
Check that area of the icon Is pressed correctly.
If problem persists. re-initialize the touch streen with the following sequences:
1. Enter SETUP mode by pressing [SETUP] bvnm on the main unit for 1 second
or longer.
2. Press the [MENU]button an the main unit for 3 seconds or longer. And display for the
touch screen initializationwill appear.(= picture bellow)
3. Press upper left comet of the d~splaywhich is indicated by a crosshair and '1st'.
4. Press upper right comer of the display whlch is indited by a crosshar and '2nd'.
5. Press lower nghr comer of !he display which is indicated by a crosshair and '3rd'.
6.Press lower lefi corner of the display which is indicated by a crosshair and "4th'.
7. Press wnter of the display which IS indicated by a crosshair and '5W.
8, Press WENVI button in 'the main unit or [RETURN] button on the remote
controller to finish the initializatbn.
A fusehas blown.
'Replace rhe fuse aRer determining
-
an air conditioner or wr heater.
sharplpointed as shown in the
bstacle between the unit and the
\
cause
Symptoms
Solutions
Cause
SymPtOnrS
Solutions
p
p
p
D i does not play.
Disc IS badecl the wrong way
round.
Load the disc with the printed pan
facing upwards.
No sound is heard.
Clean the disc.
Ifa disc is heavily scratched
Increase the speaker volume.
The speaker lead is not
connected properly.
Connec?the speaker lead properly.
The sound is muted.
Check If the sound is in mute
Replace it with a normal disc.
-m
Dew has m d e n s e d on a
The speaker lever Is tm
low.
mode.
t
Check if dew has condensed on the
d~sc.If there is dew on the d~sc.dry
it off before use.
S
The Speaker IS set to OFF
in the DUD setup.
Set the size of the DVD speaker to
LARGE or SMALL.
No sound is heard
from a pa-lar
speaker.
The rlgha and lefl BAUFAD
setup IS wrong.
Chmelc the BAUFAD setup in
AUDIO SETUP.
Swnd oulputs from
the front and rear
speaker are
The center speaker is set to
SMALL or LARGE. but no
center speaker is installed.
Set the mnter speaker to OFF in
the DVD speaker setup.
P
2
4.
Eject the existing disc M o r e
h d h g Ihe new one.
I
fhe disc will not
e~en.
The screen image i
s
I
There are foreign bodies
present.
Remove the foreign bodies.
R communication error
m u r s due to surrounding
interference,
Press the [EJECV bunon for 1
second or ronger to eject the disc by
The parking brake lead is not
connected.
Connect the unWs parking brake
lead to the parking brake.
The wrking brake is n08
applied.
To view the lV.DVD. VIDEO and
VCD weens, it is n-ry
for the
different.
force.
The souroes corresponding
to the front and rear
speaker are set dilfersntry
in the mum-zone.
used.
Replace the D M disc with a new
one that has an area code that IS
displayed on the main unit.
The parental lock
mode is on, and the
disc w ~not
l play.
The parental lock mode is
set.
Turn off the parental lock m d e or
change the level.
Alpauseocarw
during DVD pbybadr.
It is a dud layer disc.
It is normal that a dual layer disk
pauses for a while and then starts
playing again during playback.
An MP3 file will not
The specifications for dise
recording a n wrong.
Check if the disc on which the MP3
file IS stored complies w~thIS09660
levellAeve12.
Check if the file name extension is
The DUD will not
play.
parking brake to ba applied.
C
.-O
5
u
.Q
C
.-
The screen is dark.
The monitor is set to OFF.
Press the [ZONEJ button to release
the monitor OFF mode.
The brightness oonhol is dm
Increase the BRIGHT value in the
m e e n setup in main setup.
low.
The temperature of the unit
is tm low.
C
m
2
$
The screen appears
ronger, or different,
~nterms of rha ratio
of width to helght.
\
Screen setup is not
appropnate.
0
When the ~nteriortemperature of a
car is too low, the screen can be too
dark or changes slugg~shly.Check it
again after Fncreaslng the
temperature.
Press and hold the [DISPLAY]
bunon to change the screen setup
to an appropriare mode.
Change the Tv Disptay setup in the
General Setup item in DVD setup.
A DVD video with a
different area setup is W i g
Press the PONE] button to check if
it is set to 'MULTF ZONE'.
Switch to 'SINGLE ZONE'
.rnp3.
J
,'
'
I
f
Solutions
Cause
Symptoms
TV soreen is not
cleac.
The reception sratus is not
g d .
Signals are weak due to obstacles
such as mountains or buildings.
Check rt again after changing
Focation or directton.
The anienna conneclion is
Check fi the antenna is connected
Poor-
properly. For an antenna with a
b s t e r function, check ~f the
Wster lpower is connected
I
properly.
c
When antenna diversity IS OFF,
connect the anrenna to the Number
1 connector.
0
.EZ
w
0
P
The reception status ISnot
Signals are weak due lo obstacles
such as mountains or buildings.
Check operation again after
changing l m t i o n or dlrectlon.
TV screen has
There is electromagnetic
spots or lines in the
image.
interference.
Electromagnetic interference from
other cars. wemead cables, neon
signs, etc. may be muning. Check
operation again after changlng
Imt~on.
TV screen IS
ghosting (showing
overlapping
m.
pictures).
\
'
he problems continue, consuR the
senrice cemer for repair.
2
@ Input Invalid
An lncorrea b u ~ o n
is pressed.
Press the correct button or icon.
p
p
p
Play Back Only
C
You entered a playback
command that IS not provided for
in the cument mode.
Press the correct button or icon.
J
lnformat~onon the ~nstallationof th~sunlt has not been deslgned for non-profess~onals,but for
sk~lledprofessional technicians. Therefore it does n d include any warnings or mlrtFons !hat might
be relevant to non-professionalsduring installation.
Secure all the wires safely with wring clamps or ~nsulatingtape. Do rot leave bare wires twisted
together.
De not drill through the engine parthion in order to connect the yellow wire with the vehicle battery.
This is because the insulation status of the partition is likely to deteriorats as a resrrH of engine
vibration. Therefore care should be taken with the engine partitionarea.
It is very dangerous to allow the wiring of the main unif to become entangled with the steering
mcolurnn or gear shift. Complete the wiring of the maln unit so as not to interfere with driving.
Be careful not to allow the wiring to interlere with moving parts such as the gear shift. parking
brake, seat sliding mechanism. Me.
Oo not randomly cllZ any wires short. Doing so may prevent the protection circuit from working
Pmperf~.
Precautions:
This unit is designsd for wrs with 12V DC batteries and negative ground. Before connecling this
unit to recreational vehicles, trucks or buses. be sure to check the battery voltage.
To avoid short circuits in the electrical system, be sure to dismnneCt the (-) battery cable before
f i i n g the unit.
Secure all the wires so that they cannot wme into contact with moving parts within a vehicle,
such as the gearshift, parking brake, sheet rail. etc. Do not 1e
wires next to heat sources
such as heaters. If the installed wring is melted or damaged, a short ciccuit may resull,
Do not supply p w e r to any other equipment by stripping the insulation from power supply wires.
a When replacing a fuse. it is necessary to use a fuse of the
~ndicatedon the fuse holder.
The speaker connected with this unit should be a high power type. For the speaker
specifications, the Impedance value should be b?tween 4 and 8 R and should be at least 50
Watts. If you use a speaker with different output or Impedance values from those specified here.
problems may result.
When the power of this prduct is turned on, the automatic antenna control signals are generated
through the blue wire. Connea the blue wire to a vehicle antenna relay control terminal. Be
wreful not to connect the blue wire to the power terminal of the automatic antenna. Ooing so
may cause excessive current use and malfunction.
I
l
m When the power of this product IS turned on, the control signals of the external power amp are
generated via ttte bluehrrhite wires. Be careful not to connect the bluelwhfie wires to the power
terminal of the external p e r amp.
Protea exposed wlring with insulation tape to avoid short circuits. Take particular care It0 insulate
the wiring of any unused speaker. If the wires are not insulated, they might cause a short circuit.
m This unit cannot IMfitted to vehicles that have no ACC (accessories)and ON.
The Mack wire is the ground. Earth the black wire separatefy from units such as power amps that
consume high current. Having a common earth with high currentconsuming products may harm
the product d the ground is damaged. Also there is a danger of fire.
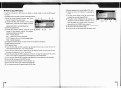
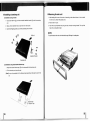
Removing the maln unit
Installing a tunerlamp unit
1. After dealing with
(1) Tnstallatlon using a 'bracket
1. Use a x r e w (M4x 4(@)) to fix the enclosed installation bracket (@) onto the twnertamp
the rear of the main unia accord~ngto the methd shown in <How to install
the main un1t7.unfasten the special screw.
2. Remove the thm cover.
unit.
3. Insert the bar split between the spring and the universal mounting bracket. Then pull the
2. Make a 3.5mm diameter hole to match the hole in the 'bracket.
main unit oul using the bar split.
3. Use the self-tappingscrew (0)
to fix h e tunerlamp unit to the Roor.
[NOTE]
You cannot remove the main unfi without the bar split. So keep it in a safe place.
Get-
*
lnstarlatIon Bracket
Tunerlamp unit
(2) llnstallation mlng double-sided adhesive tape
1. M a c h the enckxosed Velcro tape
(a)
to the underneath of the tunerlamp unil.
2. Fix the tunerlamp unit under the seat.
potel It may not be possible to fix the adhesive tape depending on the type of Earpet in the
car.
I..
I
Main speclflcation
Mmltor
Screen size:
7 inch-wide format
154.08rnm (mde) X 86.58mm (high)
T!7 active matrix LCD
336.960 [I ,440 (wide) X 234 (high)]
NTSC
Display method:
Pixel count:
Color system:
QVD driver
Playable disc:
Frequency charactetistics:
Ditortion:
Signal vs. noise:
Digital output format
DVPvldeo. CD-DA, MP3. Video CD
Sampling frequency 96KHz: 20Hz 44KHz
Sampling frequency 48KHz: 20Hz 22KHz
Sarnpllng frequency 44.1 Hz: 20Hz - 20KHz
0.3% or Fess ( 7 KHz)
70dB(IKHz) or more
Dolby DigltaWDTSRPCM
FM tuner
Receiving frequency
Usable Semitiiity:
Stereo Separation:
Frequency Response:
AM tuner
Receiving frequency:
Usable Sensitivity:
T V tuner
Color system:
Receiving channel:
Antenna nnput:
Audlo amp
Power Output (THD=lQ%):
Maxbmum wtput:
Speaker Impedance:
-
(Japan): 76.OMHz 9Q.OMHz
(U.S.A.): 87.5MHz 107.9MHz
12dBp or less
25dB(98.1MHz) or more
30th 15KHz
-
-
530KHz I710KHz
22dBp
NTSC
VHF 2-13Ch. UHF T 4 - S h
75Q. 4-43 Diversity
29W X 4 (1KHz. 40)
48WX4
4-8 fl
General
Power input voltage:
Power consumption:
Operating temperatures:
Storage temperatures:
S~ze
Main unit:
Tunerlamp unit
We~ght:
Maln unit:
Tunerlampliier unit:
t4.4V (10.5-16V Allowable)
4.OA ( 1 W)
-15°C 4 ° C
-30°C +85'C
-