1
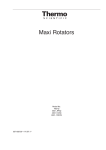
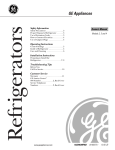
PERFECT CHILL™
WINE CHILLER
USE AND CARE MANUAL
MODEL 88013 – 35 Bottle
SAFETY INFORMATION------------------------------------------------------------ 2
WELCOME------------------------------------------------------------------------------------ 2
IMPORTANT SAFETY INSTRUCTIONS--------------------------------------------------- 2
DISPOSAL OF OLD WINE CHILLER------------------------------------------------------ 3
GROUNDING-------------------------------------------------------------------------------- 4
PRODUCT DIAGRAM----------------------------------------------------------------------- 5
CONTROL ADJUSTER PANEL------------------------------------------------------------- 5
SPECIFICATIONS--------------------------------------------------------------------------- 5
OPERATING THE WINE CHILLER------------------------------------------------- 6
SETTING UP THE WINE CHILLER-------------------------------------------------------- 6
UNPACKING--------------------------------------------------------------------------------- 6
PLACING THE WIRE RACKS IN THE CHILLER----------------------------------------- 6
LOCATION OF THE CHILLER-------------------------------------------------------------- 6
INSTALLATION INSTRUCTIONS---------------------------------------------------------- 6
ADJUSTING THE LEGS--------------------------------------------------------------------- 7
TURNING ON THE POWER---------------------------------------------------------------- 7
PLACING THE WINE IN THE CHILLER-------------------------------------------------- 7
INTERIOR LIGHT--------------------------------------------------------------------------- 7
USING THE WINE CHILLER--------------------------------------------------------------- 8
ADJUSTING THE TEMPERATURE--------------------------------------------------------- 8
SETTING THE TEMPERATURE------------------------------------------------------------ 8
IDEAL SETTING FOR DIFFERENT WINES---------------------------------------------- 8
CARE AND CLEANING-------------------------------------------------------------- 9
CLEANING THE INTERIOR AND EXTERIOR-------------------------------------------- 9
DEFROSTING THE WINE CHILLER------------------------------------------------------- 9
IN THE EVENT OF A POWER FAILURE-------------------------------------------------- 9
PREPARING FOR VACATION-------------------------------------------------------------- 9
TRANSPORTING THE WINE CHILLER--------------------------------------------------- 9
TROUBLESHOOTING--------------------------------------------------------------- 10-11
CONSUMER SUPPORT------------------------------------------------------------- 12
WARRANTY------------------------------------------------------------------------- 12
The Honeywell Trademark is used under license from Honeywell Intellectual Properties Inc.
WELCOME!
Congratulations, you have acquired a high quality Honeywell Wine Chiller. This unit is
packed with many features that you will find convenient to use. An easy-to-use
temperature adjuster can be used to find the perfect setting for your wine.
Follow the safety precautions and operating instructions provided in this easy-to-use
manual. Please take the time to read it, and save these instructions for future use.
Please also remember to record the model number and the factory number which is
placed on the back of the unit. Save your receipt by stapling it to this manual for
convenient access.
Model number: 88013
Date of purchase__________________
Manufacturer number _____________
Store Location____________________
!! IMPORTANT SAFETY INSTRUCTIONS !!
Please Read Before Using
When using electrical appliances, basic safety precautions must
be followed, including the following:
WARNING - To reduce the risk of injury please follow these
important guidelines:
1)
This appliance must be grounded. Connect only to properly grounded outlet.
See “IMPORTANT GROUNDING INSTRUCTIONS” on page 4.
2)
Install or locate this appliance only in accordance with the provided
installation instructions.
3)
This chiller is specifically designed to chill beverages only. Use this appliance
only for its intended use as described in the manual. Do not use corrosive
chemicals or solvents in this appliance.
Note: This appliance is not designed for industrial or laboratory use.
4)
The wine chiller is not a refrigerator. Do not store perishable food in the unit.
2
5)
As with any appliance, close supervision is necessary when used by children.
6)
Do not attempt to service the appliance. This appliance must be serviced only
by a qualified technician.
7)
Do not operate this appliance if the power cord or plug has been damaged.
8)
Do not operate if the appliance has been damaged or dropped.
9)
Do not use this product near water – for example, near a kitchen sink, in a
wet basement, near a swimming pool, or similar locations.
10)
Do not immerse cord or plug in water.
11)
Keep this appliance away from hot surfaces and open flames.
12)
This appliance is intended for household use only. Do not use this
appliance outdoors.
13)
Safely unplug the appliance before cleaning or wiping up spilled liquids.
14)
Do not allow children to climb, stand or hang on the outside of this appliance,
or on the shelves inside the unit. This could tip the appliance over and
seriously injure them. Children must be supervised by an adult when using
this product.
15)
Save these Instructions!
DISPOSAL INSTRUCTIONS
If you are getting rid of your old wine chiller, please follow these instructions
to help prevent accidents.
BEFORE YOU THROW AWAY YOUR OLD WINE CHILLER:
1) Take off the doors and discard separately.
2) Leave the shelves in place so that children may not easily climb inside.
REFRIGERANT DISPOSAL (applies only to Compressor Cooling units):
Your old wine chiller may have used a regulated refrigerant in its cooling system.
These refrigerants are believed to harm Stratospheric Ozone. If you are throwing
away your old chiller, make sure the refrigerant is removed and recovered for
proper disposal by an EPA-certified technician. If you intentionally release this
refrigerant, you can be subject to fines and imprisonment under provisions of
environmental legislation.
If the chiller door has a lock, please disable.
3
IMPORTANT GROUNDING INSTRUCTIONS
and use of extension cords
The Wine Chiller must be grounded. In the
event of an electrical short circuit,
grounding reduces the risk of electric shock
by providing an escape wire for the electric
current. This appliance is equipped with a
cord having a grounding wire with a
grounding plug. The plug must be plugged
into an outlet that is properly installed and
grounded. If the outlet is a standard 2prong wall outlet, it is your personal
responsibility and obligation to have it
replaced with a properly grounded 3-prong
wall outlet. Do not under any
circumstances cut or remove the third
(ground) prong from the power cord.
WARNING-Improper use of grounding
can result in a risk of electric shock.
Consult a qualified electrician or serviceman
if the grounding instructions are not
completely understood, or if doubt exists as
to whether the appliance is properly
grounded and either:
1.
If it is necessary to use an extension
cord, use only a 3-wire extension
cord that has a 3-prong grounding
plug, and a 3-slot receptacle that will
accept the plug on the appliance. The
marked electrical rating of the
extension cord shall be equal to or
greater than the rating of the
appliance, or
2.
If the power supply cord is too short,
have a qualified electrician or
serviceman install an outlet near the
appliance.
4
PRODUCT DIAGRAM
1.
1.
BODY
2.
FAN COVER
3.
TEMPERATURE
CONTROL ADJUSTER
4.
ADJUSTABLE LEGS
5.
LIGHT SWITCH
6.
DOOR
7.
DOOR HANDLE
8.
SHELVES
6.
2.
7.
8.
3.
4.
5.
5.
CONTROL ADJUSTER UNDER THE DOOR OF THE CHILLER
Bottom on 88013
Light Switch
(directly below the door)
Temperature
Control Adjuster
SPECIFICATIONS
Model…………………………………. 88013
Power Source……………………… 120V ~ 60Hz
Capacity………………………………. 35 Wine Bottles
Temperature Range……………… 50°F (10°C) to 65°F (18.3°C)
Chiller Dimensions…………….…. 16.1 (L) x 24 (D) x 33.9 (H) inches
41 (L) x 61 (D) x 86 (H) cms
Net Weight………………………….. 61 lbs (27.7 kgs)
5
SETTING UP THE WINE CHILLER
UNPACKING
Remove all packing materials and accessories. Examine the chiller for any damage such as
dents or broken door. Do not install if chiller is damaged.
Allow the chiller to stand upright for approximately 2 hours before connecting the power
source.
If discarding an old chiller, please see “Disposal Instructions” on page 3.
PLACING THE WIRE RACKS IN THE CHILLER
Carefully place the racks in the appropriate grooves. Notice the racks slide in and out
easily, so do not pull them out completely when in use.
LOCATION OF THE CHILLER
Find a suitable area for your wine chiller. Do not place the chiller outside, or any other
place where the chiller will be exposed to water or other harsh weather conditions. The
chiller must not be placed in environments where the ambient temperature drops
below 65°F (18.3°C) degrees or goes above 85°F (29.4°C) degrees. The ideal
ambient temperature is 72°F (22.2°C).
INSTALLATION INSTRUCTIONS
The wine chiller is a free standing appliance, but can
be installed next to counters and walls – but must not
be placed under a counter.
For the chiller to function properly, it is important to
have a clearance of at least 10 centimeters from the
back of the chiller to any surface next to it. Also, there
needs to be a clearance of at least 5 centimeters from
the sides of the chiller next to it.
10 cm
wall
back
5 cm
Top of
the chiller
front
NOTE: THE SPACING IS NECESSARY FOR PROPER VENTILATION
6
SETTING UP THE WINE CHILLER
ADJUSTING THE LEGS OF THE CHILLER
ADJUSTABLE LEG
Screw Nut
The wine chiller has adjustable legs on the front of the unit.
The legs are preset by the factory to a specific height with a
screw nut for proper height. Please make sure this screw nut
is in place at all times. Do not remove it under any
circumstances.
To lengthen the leg turn the leg counter-clockwise and to
shorten the leg turn clockwise.
TURNING ON THE POWER
CONTROL PANEL
Unpack the power cord from the back of the wine chiller. Safely
plug the chiller into a suitable 120V three prong power outlet. The
chiller will immediately start running and the interior light will
initially turn on.
Light
switch
To turn the light ON or OFF press the switch directly above the
temperature control adjuster. To turn ON the light press the
side. To turn OFF the light press the
(O) side.
(l)
INTERIOR LIGHT
The interior light source of the wine chiller consists of LED lighting which is long lasting
and very energy efficient. LED lights will last for many years. It is not replaceable.
PLACING WINE IN THE CHILLER
Allow the wine chiller to cool for up to 3 – 4 hours before loading.
After three hours of cooling the chiller will reach an approximate
temperature of 55°F (12.7°C) degrees.
5 bottles per rack
BACK
Five bottles fit on each rack – 3 facing one direction and 2 facing the
opposite direction in between.
When placing both white and red wine into the chiller, please keep in
mind that the top of the chiller is the warmest area and the bottom of
the chiller is the coolest area.
NOTE: WHEN USING THE RACKS, CAREFULLY PULL OUT THE
RACKS AS THEY SLIDE EASILY IN AND OUT.
FRONT
7
SETTING UP THE WINE CHILLER
ADJUSTING THE TEMPERATURE
The internal temperature range of the wine cooler is intended for 50°F (10°C) to
65°F (18.3°C). To adjust the temperature please follow these instructions.
SETTING THE TEMPERATURE
The temperature of the wine cooler can be set anywhere between 50°F (10°C) to 65°F
(18.3°C). by turning the temperature control adjuster.
Turn the adjuster to “LOW” to decrease the internal temperature and turn the adjuster to
“HIGH” to increase the internal temperature.
CONTROL PANEL BELOW THE DOOR OF THE WINE CHILLER
NOTE: Cooler temperatures will be obtained in the bottom of the chiller.
The internal temperature of the wine chiller may fluctuate depending on whether the interior
light is on or off. Please make sure the light is turned off when not necessary.
Seasonal Changes:
If the outside temperature is warmer, such as the case in the summer season, the internal
temperature of the wine chiller becomes warmer – set the wine chiller to a lower temperature.
Furthermore, if the outside temperature is cooler, such as the winter season, the internal
temperature becomes cooler and can freeze – set the wine chiller to a higher temperature.
NOTE: PLEASE BE CAUTIOUS OF THE OUTSIDE TEMPERATURE OF THE WINE
CHILLER
IDEAL SETTINGS FOR DIFFERENT WINES
Red wines……………………….. 59°F - 64°F (15°C – 18.2°C)
Rosés………………………………54°F (12.2°C)
White wines / Champagnes… 50°F - 52°F (10°C – 11.2°C)
8
CARE AND CLEANING
TO CLEAN THE INSIDE AND THE EXTERIOR OF THE WINE
CHILLER
Always safely unplug the chiller before cleaning. Do not use a hard brush or sponge. To clean
the outside of the unit, use light soapy water with a cloth. When cleaning the inside DO NOT
use soap or any detergent products. Use only a dry soft cloth or towel.
DEFROSTING THE WINE CHILLER
If frost builds up in and around the chiller, that means there is too much humidity near the
unit. Safely unplug the chiller and once the frost melts, carefully wipe down the outside or
inside of the chiller. Then, move the unit to a less humid location.
NOTE: DO NOT USE A HEATER OR A SHARP UTENSIL TO REMOVE THE FROST.
IN THE EVENT OF A POWER FAILURE
In the event of a power failure, do not open the wine chiller door too frequently to
ensure the internal temperature remains the same. A slight and gradual increase in
temperature should have no effect on the wine.
If the ambient temperature is very hot, remove the wine from the chiller and place in a
cooler environment.
PREPARING THE WINE CHILLER FOR VACATION
For long vacations or absences, remove all bottles from the wine chiller and safely unplug the
power supply. Move the thermostat to the lowest temperature setting before cleaning the
interior and leave the door open.
TRANSPORTING THE WINE CHILLER
For transporting the wine chiller, secure all loose items, such as shelves by taping them
securely in place to prevent damage.
NOTE: BE SURE THE WINE CHILLER ALWAYS STAYS IN AN UPRIGHT POSITION
DURING TRANSPORTING.
9
TROUBLE SHOOTING
PROBLEM
1) The Wine Chiller cooling is
POSSIBLE CAUSES
WHAT TO DO
1) No Power Supply
1) Make sure the wine chiller
not working
is safely plugged into a 3 prong
outlet.
1a) Low voltage
1a) Make sure the chiller is safely
plugged into a proper 120V outlet.
1b) Blown fuse
1b) Change fuse. It is recommended
a qualified electrician change the
fuse on the chiller.
2) The wine chiller is not reaching
2) The chiller is placed too close
the desired temperature.
to a heat source.
2a) Poor ventilation
2) Keep the chiller away from
sun light and other heat sources.
2a) Make sure the chiller is
ventilated properly and make sure
that loose debris and other objects
are away from the internal fan.
2b) The fan is not working
properly.
2b) Make sure the power cable is
properly connected. If the fan needs
to be changed please contact a
qualified technician.
2c) The door is opened too
2c) Make sure the door is properly
frequently or for a long period of
closed tight and do not open the
time or the door was not
door frequently.
properly shut.
2d) The temperature adjuster is
2d) Make sure the temperature
set too high.
adjuster is properly set. It may need
to be set to a cooler temperature.
10
TROUBLE SHOOTING
PROBLEM
3) The wine chiller is too cold
POSSIBLE CAUSES
3) The temperature adjuster
is set too low.
WHAT TO DO
3) Adjust the temperature setting
to a higher temperature.
3a) The ambient temperature is too
3a) Make sure the chiller is in a
low.
location where the ambient
temperature is between 65°F
(18.3°C) and 85°F (29.4°C). If
the chiller is in a cooler location, the
chiller’s internal temperature can
decrease.
4) There is too much frost or
moisture forming in and around
4) There is too much humidity or the
4) Wipe the surface dry. If frost
ambient temperature is too low.
builds up, safely unplug the chiller to
defrost. Once defrosted, wipe the
the chiller.
moisture, then safely plug back in
the chiller.
5) The wine chiller makes too
5) It is placed on an uneven or
5) Place the wine chiller on a
much noise.
unleveled surface.
leveled surface or adjust the legs
accordingly.
11
CONSUMER SUPPORT
Questions? How to contact:
Telephone:
1-800-579-7990
(Monday – Friday 8:30 AM –
5:30 PM PST)
Email:
[email protected]
[email protected]
Website:
www.honeywell-compactappliances.com
LIMITED 1-YEAR WARRANTY
How do I make a warranty claim?
What does this warranty cover?
- Any defect in materials or workmanship in the manufactured
product
- Missing parts for a period of 90 days from the date of purchase
What does this warranty not cover?
- Service trips to your home to teach you how to use the product.
- Improper installation
- Failure of the product if it is abused, misused, altered or used for
other than the intended purpose
- Products that are used outside a residential or office areas
- Replacement of house fuses or resetting of circuit breakers
- Damage to the product caused by accident, fire, floods, power
surges or acts of God
- Any unauthorized service to the product
-Incidental or consequential damage caused by possible
defects with this appliance, its installation or repair.
Some states do not allow limitations on incidental or
consequential damages, so the foregoing limitations may
not apply to you.
- Return to the retailer from which it was purchased, along
with a copy of the store receipt within the given period of time
allowed for returns by the retailer (i.e. 90 days). The retailer
will provide a new unit or a refund. After this period of time,
contact TTI Appliances at 1-800-579-7990 for further
instructions as to how to receive a new unit or a refund. This
warranty excludes the cost of shipping to or from TTI
Appliances.
How does state law relate to this warranty?
- This warranty is extended to the original purchaser only for
products purchased for household use within the country of
purchase. This warranty gives you specific legal rights,
and you may also have other rights which vary from
state to state or province to province. To know what
your legal rights are, consult your local state consumer
affairs office or your state’s Attorney General.
- Exclusion of implied warranties: Except where
prohibited or restricted by law, there are no warranties,
whether express, oral or statutory which extend
beyond the description on the face hereof, including
specifically the implied warranties of merchantability or
fitness for a particular purpose.
For how long after the original purchase?
- One (1) year
Warrantor:
TTI Appliances
11100 Santa Monica Blvd. Suite 560
Los Angeles, CA 90025
Please complete and return warranty registration card.
12