1
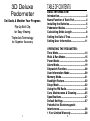
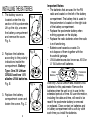
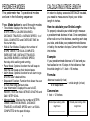
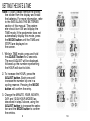
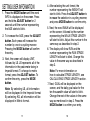
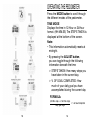
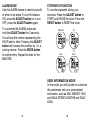
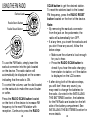
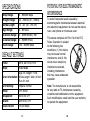
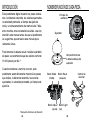
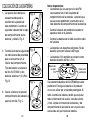
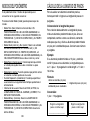
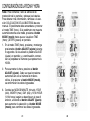
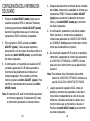
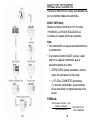
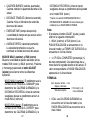
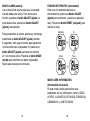
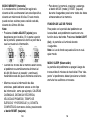
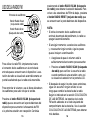
M
ake A omen
tN
eT
as
Register
ow
Pl
e
3D Deluxe
Pedometer
Your Product At:
www.homedics.com/register
Your valuable input regarding this
product will help us create
the products you will
want in the future.
El manual
en español
empieza en
la página 32
PDM-200B
3D Deluxe
Pedometer
Set Goals & Monitor Your Progress
Flip-Up Belt Clip
for Easy Viewing
Triple-Axis Technology
for Superior Accuracy
1
TABLE OF CONTENTS
BASIC INFORMATION:
Introduction.................................................3
Name/Function of Each Part......................4
Installing the Batteries...............................5
Pedometer Modes......................................7
Calculating Stride Length..........................8
Setting the Date & Time.............................9
Setting User Information..........................11
OPERATING THE PEDOMETER:
Time Mode.................................................14
Walk & Run Modes...................................15
Pacer Mode...............................................18
Alarm Mode...............................................19
Stopwatch Function..................................20
User Information Mode............................20
Memory Mode...........................................21
Backlight Feature......................................22
Sleep Mode...............................................22
Using the FM Radio..................................23
Care, Maintenance & Cleaning................25
Specifications...........................................27
Default Settings........................................27
Potential for Electromagnetic
Interference...............................................28
1 Year Limited Warranty...........................30
2
Name/Function of Each Part
INTRODUCTION
This digital pedometer displays steps
taken, distance traveled, Calories burned,
average speed, total exercise time, and
30-day memory storage, among many
other useful features. Please read this
manual carefully before using this pedometer. We suggest you keep this manual for
future reference.
Earbud
Jack
Clip
For promoting good health, including
weight-loss, it is recommended that adults
should walk 10,000 steps a day.*
3
*(American Heart Association)
Adjust
Button
T
HT
Volume
Control
LIG
ADJU
ST
Mode Reset
Button Button
RESE
When you start to walk or run, this
pedometer will automatically begin
displaying your steps taken, distance
traveled, Calories burned, average speed,
and exercise time.
Battery Compartment
Under Clip
Light
Button
4
INSTALLING THE BATTEries
1. The battery cover is
Fig. A
located under the clip
section of this pedometer.
Lift up the clip, unscrew
the battery compartment
and remove the cover.
Fig. A
2. Replace the batteries
according to the polarity
indications inside the
compartment. Battery
Type: One 3V Lithium
CR2032 and two 1.5V
alkaline LR44 batteries.
Fig. B
3. Replace the battery
compartment cover and
fasten the screw. Fig. C
5
Fig. B
Important Notes:
• The batteries that are used for the FM
radio are located on the left of the battery
compartment. The battery that is used for
the pedometer is located on the right side
of the battery compartment.
• Replace the pedometer battery when
nothing appears on the display.
• Replace the radio batteries when the radio
is not functioning.
• Batteries are hazardous waste. Do
not dispose of them together with the
household garbage.
• LR44 batteries are also known as AG13 or L1154 button cell batteries.
Radio
Batteries
Fig. C
Pedometer
Battery
Use only CR2032 Lithium and Alkaline LR44
batteries for this pedometer. Remove the
batteries when the unit is not in use for the
extended periods of time. All user information,
including the date and time, will need to be
reset if the pedometer battery is removed
or replaced. Clean contact on batteries and
in battery compartment with a soft dry cloth
each time you install the batteries.
6
Pedometer modes
This pedometer has 7 operational modes
and are in the following sequence:
Press Mode button to scroll through modes:
• Time Mode: Displays the time of the day, STEPS TAKEN, CALORIES BURNED, DISTANCE TRAVELED, AVERAGE SPEED, % of GOAL COMPLETED and EXERCISE TIME for the current day.
• Walk & Run Modes: Displays the number of STEPS TAKEN, % of GOAL COMPLETD, EXERCISE TIME, DISTANCE TRAVELED, CALORIES BURNED, AVERAGE SPEED,
that day while walking and running.
• Pacer Mode: Optional function that will beep to help the user keep up their desired pace.
• Alarm Mode: Optional function for an alarm to go off at the user’s desired time.
• Stopwatch Function: Function that allows the user to track how long workouts take.
• User Information: Displays the user’s AGE, WEIGHT, RUN and WALK STRIDE LENGTHS and DAILY STEP GOAL.
• Memory Mode: Displays the number of STEPS
TAKEN, CALORIES BURNED, DISTANCE TRAVELED, AVERAGE SPEED and % of GOAL COMPLETED for the past 30 days.
7
CALCULATING STRIDE LENGTH
In order to display accurate DISTANCE traveled,
you need to measure and input your stride
length in inches.
How to calculate your Stride Length:
To properly calculate your stride length, measure
a predetermined distance in feet. Once completed,
either walk or run that distance, counting each step
you take, and divide your predetermined distance
in feet by the number of steps. Convert this number
into inches.
Example:
If your predetermined distance is 15 feet and you
had walked or ran 10 steps in that distance, then
the stride length is 1½ feet = 18 inches.
Formula:
distance traveled (in feet)
# of steps taken
= stride length (in feet)
Conversion:
1 foot = 12 inches
Record your walking stride
length here:
Record your running stride
length here:
_______________________
_______________________
8
Setting the Date & Time
Note: To start, please remove the protective sticker from the display and install
the batteries. For more information, refer
to the INSTALLING THE BATTERIES
section of this manual. The pedometer should turn ON and display the
TIME mode. If the pedometer does not
automatically display this mode, press
the MODE button until the TIME and
STEPS are displayed on
the screen.
1. While in TIME mode, press and hold
the ADJUST button for 2 seconds.
The word ADJUST will be displayed,
followed up the number representing
the HOUR will start to blink.
2. To increase the HOUR, press the
ADJUST button. Each press will
increase the number by one in a
cycling manner. Pressing the MODE
button will confirm the entry.
3. Change the MINUTE, YEAR, MONTH,
DAY and 12/24 HOUR MODES as
described in step 2 above, using the
ADJUST button to increase the selection and the MODE button to confirm
the entries.
9
10
Setting User Information
1. Press the MODE button until the word
INFO is displayed on the screen. Press
and hold the ADJUST button for 2
seconds until the number representing
the AGE starts to blink.
2. To increase the AGE, press the ADJUST
button. Each press will increase the
number by one in a cycling manner.
Pressing the MODE button will confirm
the entry.
3. Next, the screen will display UNIT,
followed by LB. LB represents all of the
information in the pedometer being in
Imperial format. To change to metric
format, press the ADJUST button. To
confirm the entry, press the MODE
button.
Note: By selecting LB, all information
will be displayed in the Imperial format.
By selecting KG, all information will be
displayed in Metric format.
11
4. After selecting the unit format, the
number representing the WEIGHT will start to blink. Press the ADJUST button to increase the selection in a cycling manner, and press MODE button to confirm entry.
5. Next, the word WALK will be displayed on the screen, followed by the number representing the WALK STRIDE LENGTH will start to blink. Adjust this number in the same way as described in step 2.
6. The display will show RUN and the number representing the RUN STRIDE LENGTH will start to blink. Change this value in the same way as described in step 2.
Note: For more information on how to calculate STRIDE LENGTH, see CALCULATING STRIDE LENGTH section.
7. Next, GOAL will be displayed on the screen, and the daily goal value for the ten thousandth value will start to blink. Change the rest of the values in the same way as mentioned in step 2. Press the MODE button to confirm your entry.
12
Operating the Pedometer
Press the MODE button to scroll through
the different modes of the pedometer.
TIME MODE
Displays the time in 12-Hour or 24-Hour
format. (HH:MM.SS) The STEPS TAKEN is
displayed at the bottom of the screen.
Note:
•This information automatically resets at
midnight.
•By pressing the ADJUST button,
you can toggle through the following
information beneath the time:
>STEPS TAKEN: How many steps you
have taken in the current day.
>% OF GOAL COMPLETED: How
much of your daily goal you have
accomplished during the current day.
FORMULA:
(#of Run steps + # of Walk steps)
Daily goal target
13
14
= % of Goal Completed
> CALORIES BURNED: How many
Calories have been burned during the
current day.
> DISTANCE TRAVELED: How many Miles or Kilometers traveled during the current day.
RUN STRIDE LENGTH* to determine
CALORIES BURNED and DISTANCE
TRAVELED. Before running, make sure
your pedometer is set to RUN mode.
*Refer back to the SETTING USER INFORMATION
section of this manual to set your STRIDE LENGTHS.
> EXERCISE TIME: The length of time
you were active during the current
day.
Note:
•By pressing the ADJUST button,
you can toggle through the following
information:
> AVERAGE SPEED: The average speed
at which you had walked or ran during
the current day.
>WALK or RUN: STEPS TAKEN is on
the middle line, and EXERCISE TIME
is on the bottom line.
WALK & RUN MODES
Displays the number of STEPS taken
while in RUN and WALK modes. Press
and hold the ADJUST button to switch
between the different options:
>% OF GOAL COMPLETED: How
much of your daily goal you have
accomplished during the current day. STEPS TAKEN will be on the bottom line.
FORMULA:
WALK MODE: The pedometer uses the
WALK STRIDE LENGTH* to determine
CALORIES BURNED and DISTANCE
TRAVELED. Before walking, make sure
your pedometer is set to WALK mode.
RUN MODE: The pedometer uses the
15
(#of Run steps + # of Walk steps)
Daily goal target
= % of Goal Completed
>KCAL: CALORIES BURNED is on the
middle line, and STEPS TAKEN is on
the bottom line.
16
>MILE: DISTANCE TRAVELED is on the
middle line, and STEPS TAKEN is on
the bottom line.
>ML/H or KM/H: AVERAGE SPEED is
on the middle line, and STEPS TAKEN
is on the bottom line.
•While on any of the above screens,
pressing and holding the RESET
button for 3 seconds will clear all of the
following information for the current day:
STEPS TAKEN, CALORIES BURNED,
DISTANCE TRAVELED, AVERAGE
SPEED, % of GOAL COMPLETED and
EXERCISE TIME.
PACER MODE
This function will help motivate you to
keep walking or running at the same pace
you want during exercising, by using
a repeating beep sound. This beeping
represents the number of beeps/steps per
minute. The default is 80 beeps per minute.
To turn this feature ON, press the ADJUST
button.
To customize this setting, press and hold
the ADJUST button for 2 seconds. You
will see the number representing the
beeps per minute start to blink. Press the
ADJUST button to increase the selection
in a cycling manner. Press the MODE
button again to confirm entry.
Note: You can continue to use PACER
mode while using other modes.
On
17
Off
18
ALARM MODE
Use this ALARM feature to remind yourself
of when to be active. To turn this feature
ON, press the ADJUST button (or to turn
OFF, press the ADJUST button again).
To customize the ALARM, press and
hold the ADJUST button for 2 seconds.
You will see the number representing the
HOUR start to blink. Pressing the ADJUST
button will increase this number by 1 in a
cycling manner. Press the MODE button
to confirm entry. Repeat this step for the
MINUTES.
STOPWATCH FUNCTION
To use the stopwatch during your
workouts, Press the ADJUST button to
START and PAUSE the clock. Press the
RESET button to RESET the clock.
Stopwatch
On
Clear
Pause
USER INFORMATION MODE
In this mode, you will be able to customize
this pedometer with your personalized
information, such as AGE, WEIGHT, RUN
and WALK STRIDE LENGTHS and DAILY
GOAL.
19
20
MEMORY MODE
At midnight, the information recorded
during the day will be stored into this
device, for up to 30 days. In this mode,
you can review how many steps you took
each day, for the past 30 days.
Note:
•Press the ADJUST button to scroll
through the days. The top of the display
will show the date from which the
information is being displayed.
•When the 30 days of memory is full, the
pedometer will automatically delete day
30 (30 days in the past) and continue
doing so each day the memory is full.
•While viewing the information from
past days, other information such as
CALORIES BURNED, DISTANCE
21
TRAVELED, AVERAGE SPEED,
EXERCISE TIMER and % OF GOAL
COMPLETED can be accessed in a
cycling manner by pressing the RESET
button.
• To clear the memory, press and hold
the MODE and RESET buttons for 3
seconds to erase all data stored in
memory.
BACKLIGHT FEATURE
To help view the pedometer screen in
darker lighting conditions, this pedometer
comes equipped with a backlight function.
Press the Light button and the display will
be illuminated for 4 seconds.
Note: The backlight can be used in any mode.
SLEEP MODE
The pedometer display will turn off after
3 minutes of inactivity. Pressing a button,
plugging in the earbuds or moving around
will wake the pedometer.
22
USING THE FM RADIO
Earbud Jack
Radio Scan Button
Radio Reset Button
To use the FM Radio, simply insert the
earbud connector into the jack located
on the device. The radio station will
automatically be displayed on the screen
indicating that the radio is ON.
To control the volume, use the dial located
on the earbuds to make the sound louder
or softer.
Press the RADIO SCAN button located
on the front of the device to increase FM
frequency to the next FM station with
reception. Continue to press the RADIO
23
SCAN button to get the desired station.
To reset the stations back to the lowest
FM frequency, press the RADIO RESET
button located on the front of the device.
Note:
• By removing the earbuds connector from the jack on the pedometer, the radio will automatically turn OFF.
•If at any time, you insert the earbuds and
you don’t hear any sound, follow the
below steps:
>Make sure the volume is loud enough
for you to hear.
>Press the RADIO SCAN button to
check if you hear the radio changing
from station to station, or if the station
is displayed on the LCD screen.
•If after doing both of the above steps,
you still don’t hear any sound, you
may need to change the batteries for
the radio. As noted in the INSTALLING
THE BATTERIES section, the batteries
for the FM Radio are located on the left
side of the battery compartment. See
INSTALLING THE BATTERIES section for
more details.
24
Care, Maintenance & Cleaning
•Do not disassemble the pedometer. If
in need of repair, refer to the warranty
section of this manual.
•Do not subject the device to extreme
shocks (do not drop on the floor).
•Do not subject the device to extreme
temperatures, humidity, moisture, or
direct sunlight. Protect from dust.
•Do not expose the device to strong
chemicals such as gasoline, clean
solvents, acetone, alcohol, or insect
repellents as they may damage the
device’s seal, case, or finish.
•If the unit is stored near freezing, allow it
to acclimate to room temperature before
use.
•Do not immerse the unit in water as this
will result in damage to the unit.
•Do not wrap the earbuds around any
part of the body.
•To avoid accidental strangulation, keep
this product away from children. Do not
drape around the neck.
•This device may not meet its
performance specifications if stored or
used outside of these temperature and
humidity ranges:
•Leaky batteries can damage the unit.
Remove the battery when the unit will
not be used for a long time.
•Storage/
Transportation
Environment
•Operating
Environment
•Follow local ordinances and recycling
instructions regarding disposal or
recycling of the device and device
components, including batteries.
Temperature:
41°F~95°F
(5°C~35°C)
Humidity:
less than 70%
Temperature:
32°F~122°F
(0°C~50°C)
Humidity:
less than 90%
25
26
Specifications
Step Range:
0 – 999,999 Steps
Weight Range:
44 – 498 lbs (20 – 226KG)
Stride Length:
12 – 84” (30 – 213 cm)
Age Range:
5 – 99 Years
Distance Range:
0 – 9,999.99 Mile / KM
Calories Range:
0 – 99,999.9 Kcal
Goal Range:
100 – 99,999 Steps
default settings
Time:
2013, AM 12:00, 12Hr
Step:
Walk Mode
Age: 25, Weight: 110lb,
User Information: Stride Length: Walk: 28 inch
Run: 31 inch
Unit Setting:
Imperial Format
Pace:
OFF, 80HZ
Stopwatch:
00:00.00, OFF
Alarm:
AM 12:00, OFF
Goal Default:
10,000 Steps
27
POTENTIAL FOR ELECTROMAGNETIC
INTERFERENCE
To avoid inaccurate results caused by
electromagnetic interference between electrical
and electronic equipment, do not use the device
near a cell phone or microwave oven.
This device complies with Part 15 of the FCC
Rules. Operation is subject
to the following two
conditions: (1) this device
may not cause harmful
interference, and (2) this
device must accept any
interference received,
including interference
that may cause undesired
operation.
Note: The manufacturer is not responsible
for any radio or TV interference caused by
unauthorized modifications to this equipment.
Such modifications could void the user authority
to operate the equipment.
28
Note: This equipment has been tested and found
to comply with the limits for a Class B digital
device, pursuant to Part 15 of the FCC Rules.
These limits are designed to provide reasonable
protection against harmful interference in a
residential installation. This equipment generates,
uses and can radiate radio frequency energy
and, if not installed and used in accordance with
the instructions, may cause harmful interference
to radio communications. However, there is no
guarantee that interference will not occur in a
particular installation. If this equipment does
cause harmful interference to radio or television
reception, which can be determined by turning
the equipment off and on, the user is encouraged
to try to correct the interference by one or more of
the following measures:
• Reorient or relocate the receiving antenna.
• Increase the separation between the equipment
and receiver.
• Connect the equipment into an outlet on a
circuit different from that to which the receiver
is connected.
• Consult the dealer or an experienced radio/TV
technician for help.
LIMITED ONE YEAR
WARRANTY
For service or repair,
do not return this unit
to the retailer. Contact
HoMedics Consumer
Relations at:
Email:
cservice@
homedics.com
Phone:
1-800-466-3342
Business Hours:
8:30am-7pm ET
Monday-Friday
Distributed by
HoMedics, LLC.
3000 Pontiac Trail
Commerce Township
MI 48390
Printed in China
29
HoMedics sells its products with the intent
that they are free of defects in manufacture
and workmanship for a period of one year
from the date of original purchase, except
as noted below. HoMedics warrants that its
products will be free of defects in material
and workmanship under normal use and
service. This warranty extends only to consumers and does not extend to Retailers.
To obtain warranty service on your
HoMedics product, contact a Consumer
Relations Representative by telephone at
1-800-466-3342 for assistance. Please
make sure to have the model number of the
product available.
HoMedics does not authorize anyone,
including, but not limited to, Retailers,
the subsequent consumer purchaser of
the product from a Retailer or remote
purchasers, to obligate HoMedics in any
way beyond the terms set forth herein. This
warranty does not cover damage caused by
misuse or abuse; accident; the attachment
of any unauthorized accessory; alteration to
the product; improper installation; unauthorized repairs or modifications; improper use
of electrical/power supply; loss of power;
dropped product; malfunction or damage
of an operating part from failure to provide
manufacturer’s recommended maintenance;
transportation damage; theft; neglect;
vandalism; or environmental conditions;
loss of use during the period the product
is at a repair facility or otherwise awaiting
30
parts or repair; or any other conditions whatsoever that are beyond the control
of HoMedics. This warranty is effective only if the product is purchased and
operated in the country in which the product is purchased. A product that
requires modifications or adoption to enable it to operate in any other country
than the country for which it was designed, manufactured, approved and/
or authorized, or repair of products damaged by these modifications is not
covered under this warranty.
THE WARRANTY PROVIDED HEREIN SHALL BE THE SOLE AND EXCLUSIVE
WARRANTY. THERE SHALL BE NO OTHER WARRANTIES EXPRESS OR
IMPLIED INCLUDING ANY IMPLIED WARRANTY OF MERCHANTABILITY OR
FITNESS OR ANY OTHER OBLIGATION ON THE PART OF THE COMPANY
WITH RESPECT TO PRODUCTS COVERED BY THIS WARRANTY. HOMEDICS
SHALL HAVE NO LIABILITY FOR ANY INCIDENTAL, CONSEQUENTIAL OR
SPECIAL DAMAGES. IN NO EVENT SHALL THIS WARRANTY REQUIRE
MORE THAN THE REPAIR OR REPLACEMENT OF ANY PART OR PARTS
WHICH ARE FOUND TO BE DEFECTIVE WITHIN THE EFFECTIVE PERIOD OF
THE WARRANTY. NO REFUNDS WILL BE GIVEN. IF REPLACEMENT PARTS
FOR DEFECTIVE MATERIALS ARE NOT AVAILABLE, HOMEDICS RESERVES
THE RIGHT TO MAKE PRODUCT SUBSTITUTIONS IN LIEU OF REPAIR OR
REPLACEMENT.
This warranty does not extend to the purchase of opened, used, repaired,
repackaged and/or resealed products, including but not limited to sale of
such products on Internet auction sites and/or sales of such products by
surplus or bulk resellers. Any and all warranties or guarantees shall immediately cease and terminate as to any products or parts thereof which are
repaired, replaced, altered, or modified, without the prior express and written
consent of HoMedics.
This warranty provides you with specific legal rights. You may have additional
rights which may vary from state to state. Because of individual state regulations, some of the above limitations and exclusions may not apply to you.
For more information regarding our product line in the USA, please visit:
www.homedics.com.
HoMedics is a registered trademark of HoMedics, LLC.
© 2013 HoMedics, LLC. All rights reserved.
IB-PDM200B
n momento
eu
ah
es
o
m
Registre
ra
Tó
Podómetro De Lujo
Tridimensional
su producto en:
www.homedics.com
Su valioso aporte sobre este
producto nos ayudará a
crear los productos que
desee en el futuro.
PDM-200B
Podómetro de lujo
tridimensional
Establezca metas y controle sus avances
Sujetador para cinturón abatible para
fácil visualización
Tecnología de tripe eje para una
precisión superior
ÍNDICE
INFORMACIÓN BÁSICA:
Introducción...................................................................35
Nombre/función de cada pieza.....................................36
Colocación de las baterías............................................37
Modos del podómetro...................................................39
Cálculo de la longitud de pasos...................................40
Configuración de la fecha y hora.................................41
Configuración de la información
de usuario.........................................................................43
MANEJO DEL PODÓMETRO:
Modo Hora......................................................................46
Modos Caminar y Correr...............................................47
Modo Marcar pasos.......................................................50
Modo Alarma..................................................................51
Función Cronómetro......................................................52
Modo Información de usuario......................................52
Modo Memoria...............................................................53
Característica de luz de fondo.....................................54
Modo Sleep (hibernación)............................................54
Uso de la radio FM........................................................55
Cuidado, mantenimiento y limpieza.............................57
Especificaciones............................................................59
Configuración predeterminada.....................................59
Potencial de interferencia e
lectromagnética.............................................................60
Garantía limitada por 1 año..........................................62
33
34
NOMBRE/FUNCIÓN DE CADA PIEZA
INTRODUCCIÓN
Este podómetro digital muestra los pasos realizados, la distancia recorrida, las calorías quemadas,
la velocidad promedio, el tiempo de ejercicio
total y un almacenamiento de memoria de 7 días,
entre muchas otras características útiles. Lea con
atención este manual antes de usar el podómetro.
Le sugerimos que conserve este manual para
referencia futura.
Entrada de
audífonos
Sujetador
Para fomentar la buena salud, incluida la pérdida
de peso, se recomienda que los adultos caminen
10 000 pasos por día.*
*Asociación Americana del Corazón
35
T
LIG
HT
Botón Reset
(reajuste)
RESE
ST
Botón Mode
(modo)
ADJU
Cuando comience a caminar o correr, este
podómetro automáticamente mostrará los pasos
que realiza, la distancia recorrida, las calorías
quemadas, la velocidad promedio y el tiempo de
ejercicio.
Compartimiento de
la batería debajo del
sujetador
Botón Adjust Botón Light
(ajuste) (luz)
36
Control de
volumen
COLOCACIÓN DE LAS BATERÍAS
1. La tapa de las baterías se
encuentra debajo de la
sección del sujetador de
este podómetro. Levante el
sujetador, desatornille la tapa
del compartimiento de las
baterías y retírela. Fig. A
Fig. A
• Cambie la batería del podómetro cuando no
aparezca nada en la pantalla.
• Cambie las baterías de la radio cuando la radio
no funcione.
2. Cambie las baterías siguiendo Fig. B
las indicaciones de polaridad
que se encuentran en el
interior del compartimiento.
Tipo de batería: una batería
de litio 3V CR2032 y dos
baterías alcalinas 1,5V LR44.
Fig. B.
Fig. C
3. Vuelva a colocar la tapa del
compartimiento de la batería y
ajuste el tornillo. Fig. C.
37
Notas importantes:
• Las baterías que se usan para la radio FM
se encuentran en el lado izquierdo del
compartimiento de las baterías. La batería que
se usa para el podómetro se encuentra en el
lado derecho del compartimiento de las baterías.
• Las baterías son desechos peligrosos. No las
deseche junto con la basura del hogar.
• Las baterías LR44 también se conocen como
baterías de botón AG13 o L1154.
Batería de
la radio
FM
Batería del
podómetro
Use solamente baterías de litio CR2032 para este
podómetro. Extraiga las baterías si el producto
no se va a utilizar por un período prolongado. Si
retira o cambia las baterías, tendrá que reajustar
toda la información de usuario, incluida la fecha
y hora. Limpie el contacto de las baterías y del
compartimiento de las baterías con un paño seco
suave cada vez que instale las baterías.
38
MODOS DEL PODÓMETRO
CÁLCULO DE LA LONGITUD DE PASOS
Este podómetro tiene 7 modos de operación que se
encuentran en la siguiente secuencia:
Para visualizar una distancia recorrida precisa,
tiene que medir e ingresar su longitud de pasos en
pulgadas.
Presione el botón Mode (modo) para desplazarse por los
modos:
• Modo Time (hora): Muestra la hora del día, LOS
PASOS REALIZADOS, LAS CALORÍAS QUEMADAS, LA
DISTANCIA RECORRIDA, LA VELOCIDAD PROMEDIO, EL
PORCENTAJE (%) DE META COMPLETADO y EL TIEMPO
DE EJERCICIO del día.
• Modos Walk (caminar) y Run (correr): Muestra la cantidad
de PASOS REALIZADOS, EL PORCENTAJE (%) DE
META COMPLETADO, EL TIEMPO DE EJERCICIO, LA
DISTANCIA RECORRIDA, LAS CALORÍAS QUEMADAS y LA
VELOCIDAD PROMEDIO de ese día al caminar y correr.
• Modo Pacer (marcar pasos): Función opcional que emitirá
un sonido para ayudar al usuario a mantener su paso
deseado.
• Modo Alarm (alarma): Función opcional que permite activar
una alarma a la hora que desee el usuario.
• Función Stopwatch (cronómetro): Función que permite al
usuario realizar un seguimiento del tiempo que demora el
entrenamiento.
• Información de usuario: Muestra la EDAD, el PESO, las
LONGITUDES DE PASOS AL CAMINAR y CORRER, Y LA
META DE PASOS DIARIA.
• Modo Memory (memoria): Muestra la CANTIDAD DE
PASOS REALIZADOS, LAS CALORÍAS QUEMADAS, LA
DISTANCIA RECORRIDA, LA VELOCIDAD PROMEDIO y EL
PORCENTAJE (%) DE META COMPLETADO durante los
últimos 30 días.
39
Cómo calcular la longitud de pasos:
Para calcular adecuadamente su longitud de pasos,
mida una distancia predeterminada en pies. Una vez
completado, camine o corra esa distancia, contando
cada paso que da, y divida su distancia predeterminada
en pies por la cantidad de pasos. Convierta este número
a pulgadas
Ejemplo
Si su distancia predeterminada es 15 pies y caminó o
corrió 10 pasos en esa distancia, la longitud de pasos
es 1½ pies = 18 pulgadas.the stride length is 1½ feet =
18 inches.
Fórmula:
distancia recorrida (en pies)
cantidad de pasos realizados
= longitud de pasos (en pies)
Conversión:
1 pie = 12 pulgadas
Registre su longitud de
pasos al caminar aquí:
Registre su longitud de
pasos al correr aquí:
_______________________
40
CONFIGURACIÓN DE LA FECHA Y HORA
Nota: Para comenzar, retire el adhesivo de
protección de la pantalla y coloque las baterías.
Para obtener más información, remítase a la sección COLOCACIÓN DE LAS BATERÍAS de este
manual. El podómetro debe encenderse y mostrar
el modo TIME (hora). Si el podómetro no muestra
automáticamente este modo, presione el botón
MODE (modo) hasta que se visualicen TIME
(hora) y STEPS (pasos) en pantalla.
1. En el modo TIME (hora), presione y mantenga
presionado el botón ADJUST (ajuste) durante
2 segundos. Se visualizará la palabra ADJUST
(ajuste) en pantalla y, a continuación, comenzará a parpadear el número que representa la
HORA.
2. Para aumentar la hora, presione el botón
ADJUST (ajuste). Cada vez que lo presione
aumentará en uno el número de manera
cíclica. Al presionar el botón MODE (modo),
se confirmarán los datos ingresados.
3. Cambie los MODOS MINUTE (minuto), YEAR
(año), MONTH (mes), DAY (día) y 12/24 HOUR
(12/24 horas) según se describe en el paso 2
anterior, utilizando el botón ADJUST (ajuste)
para aumentar la selección y el botón MODE
(modo) para confirmar los datos ingresados.
41
42
CONFIGURACIÓN DE LA INFORMACIÓN
DE USUARIO
1. Presione el botón MODE (modo) hasta que se
visualice la palabra INFO en pantalla. Presione y
mantenga presionado el botón ADJUST (ajuste)
durante 2 segundos hasta que el número que
representa la EDAD comience a parpadear.
2. Para aumentar la EDAD, presione el botón
ADJUST (ajuste). Cada vez que lo presione,
aumentará en uno el número de manera cíclica. Al
presionar el botón MODE (modo), se confirmarán
los datos ingresados.
3. A continuación, en la pantalla se visualizará UNIT
(unidad) seguido de LB. LB indica que toda la
información del podómetro se introducirá en
formato anglosajón. Para cambiar al formato
métrico, presione el botón ADJUST (ajuste). Para
confirmar la entrada de datos, presione el botón
MODE (modo).
Nota: Si selecciona LB, toda la información aparecerá en formato anglosajón. Si selecciona KG, toda la información aparecerá en formato métrico.
43
4. Después de seleccionar el formato de las unidades
de medida, comenzará a parpadear el número que
representa el PESO. Presione el botón ADJUST
(ajuste) para aumentar la selección de manera
cíclica, y el botón MODE (modo) para confirmar
los datos ingresados.
5. A continuación, aparecerá en pantalla la palabra
WALK (caminar) y comenzará a parpadear el
número que representa la LONGITUD DE PASOS
AL CAMINAR. Modifique este número de la misma
forma que se describió en el paso 2.
6. Se visualizará la palabra RUN (correr) en pantalla y
comenzará a parpadear el número que representa
la LONGITUD DE PASOS AL CORRER. Cambie
este valor de la misma forma que se describió en
el paso 2.
Nota: Para obtener más información sobre cómo calcular la LONGITUD DE PASOS, remítase a la sección CALCULAR LONGITUD DE PASOS.
7. Luego, aparecerá la palabra GOAL (meta) en
pantalla y comenzará a parpadear el valor de la
meta diaria correspondiente al valor de las diez
milésimas. Cambie el resto de los valores de la
misma manera que se mencionó en el paso 2.
Presione el botón MODE (modo) para confirmar
los datos ingresados.
44
MANEJO DEL PODÓMETRO
Presione el botón MODE (modo) para desplazarse
por los distintos modos del podómetro.
MODO TIME (hora)
Muestra la hora en formato de 12 o 24 horas.
(HH:MM.SS) Los PASOS REALIZADOS se
visualizan en la parte inferior de la pantalla.
Nota:
•Esta información se reajusta automáticamente a
la medianoche.
•Si presiona el botón ADJUST (ajuste), puede
alternar la siguiente información que se
encuentra debajo de la hora:
> STEPS TAKEN (pasos realizados): cuántos pasos ha realizado en el día actual.
> % OF GOAL COMPLETED (porcentaje (%) de meta completado): qué porcentaje
de su meta diaria ha logrado durante el día actual.
FÓRMULA:
Cant. de pasos corridos + cant.
depasos caminados
= Porcentaje (%) de
Meta diaria objetivo
meta completado
45
46
> CALORIES BURNED (calorías quemadas): Cuántas calorías ha quemado durante el día actual.
DISTANCIA RECORRIDA. Antes de correr,
asegúrese de que su podómetro esté ajustado
en el modo RUN (correr).
> DISTANCE TRAVELED (distancia recorrida): Cuántas millas o kilómetros ha recorrido durante el día actual.
*Vuelva a la sección CONFIGURACIÓN DE LA
INFORMACIÓN DE USUARIO de este manual para
establecer sus LONGITUDES DE PASOS.
> EXERCISE TIME (tiempo de ejercicio): La cantidad de tiempo en que estuvo activo durante el día actual.
Nota:
•Si presiona el botón ADJUST (ajuste), puede
alternar la siguiente información:
> WALK (caminar) o RUN (correr): Los
PASOS REALIZADOS se encuentran en la
línea del medio y el TIEMPO DE EJERCICIO se
encuentra en la línea inferior.
> AVERAGE SPEED (velocidad promedio):
La velocidad promedio a la que ha caminado o corrido durante el día actual.
MODOS WALK (caminar) y RUN (correr)
Muestra la cantidad de pasos realizados en los
modos RUN (correr) y WALK (caminar). Presione
y mantenga presionado el botón ADJUST
(ajuste) para alternar entre las diferentes
opciones:
MODO WALK (caminar): El podómetro usa la
LONGITUD DE PASOS AL CAMINAR* para
determinar las CALORÍAS QUEMADAS y la
DISTANCIA RECORRIDA. Antes de caminar,
asegúrese de que su podómetro esté en el
modo WALK (caminar).
MODO RUN (correr): El podómetro usa la
LONGITUD DE PASOS AL CORRER* para
determinar las CALORÍAS QUEMADAS y la
47
> % OF GOAL COMPLETED (porcentaje (%)
de meta completado): Qué porcentaje de su
meta diaria ha logrado durante el día actual. El
valor correspondiente a PASOS REALIZADOS
aparecerá en la línea inferior.
FÓRMULA:
Cant. de pasos corridos + cant.
depasos caminados
= Porcentaje (%) de
Meta diaria objetivo
meta completado
> KCAL: Las CALORÍAS QUEMADAS se encuentran en la línea del medio y los PASOS REALIZADOS se encuentran en la línea inferior.
48
> MILE (milla): La distancia RECORRIDA se encuentra en la línea del medio y los PASOS REALIZADOS se encuentran en la línea inferior.
> MPH o KM/H: La VELOCIDAD PROMEDIO se encuentra en la línea del medio y los PASOS REALIZADOS se encuentran en la línea inferior.
•Mientras se encuentre en cualquiera de las
pantallas anteriores, al presionar y mantener
presionado el botón RESET (reajuste) borrará
toda la información correspondiente al día
actual: PASOS REALIZADOS, CALORÍAS
QUEMADAS, DISTANCIA RECORRIDA,
VELOCIDAD PROMEDIO, PORCENTAJE
(%) DE META COMPLETADO y TIEMPO DE
EJERCICIO.
MODO PACER (marcar pasos)
Esta función ayudará a motivarlo para que continúe caminando o corriendo al paso que desea
durante el ejercicio, por medio de una señal
sonora repetida. Esta señal sonora representa la
cantidad de señales/pasos por minuto. La configuración predeterminada es 80 señales por minuto.
Para activar esta función, presione el botón
ADJUST (ajuste).
Para personalizar esta configuración, presione y
mantenga presionado el botón ADJUST (ajuste)
durante 2 segundos. Verá que el número que
representa las señales por minuto comienza a
parpadear. Presione el botón ADJUST (ajuste)
para aumentar la selección de manera cíclica.
Presione el botón MODE (modo) para confirmar
nuevamente los datos ingresados.
Nota: Puede continuar usando el modo PACER (marcar pasos) mientras usa otros modos.
En
49
De
50
MODO ALARM (alarma)
Usa la función de alarma para que le recuerde
cuándo debe estar activo. Para activar esta
función, presione el botón ADJUST (ajuste) (o
para desactivarla, presione el botón ADJUST
[ajuste] nuevamente).
Para personalizar la alarma, presione y mantenga
presionado el botón ADJUST (ajuste) durante
2 segundos. Verá que el número que representa
la hora comenzará a parpadear. Al presionar el
botón ADJUST (ajuste) aumentará el número
en 1 de manera cíclica. Presione el botón MODE
(modo) para confirmar los datos ingresados.
Repita este paso para los minutos.
FUNCIÓN STOPWATCH (cronómetro)
Para usar el cronómetro durante su
entrenamiento, presione el botón ADJUST
(ajuste) para comenzar y colocar en pausa el
reloj. Presione el botón RESET (reajuste) para
reiniciar el reloj.
Cronógrafo
En
Limpiar
Pausa
MODO USER INFORMATION
(información de usuario)
En este modo, podrá personalizar este
podómetro con su información, como la EDAD,
el PESO, la LONGITUD DE PASOS CORRIDOS y
CAMINADOS, y la META DIARIA.
51
52
MODO MEMORY (memoria)
A la medianoche, la información registrada
durante el día se almacenará en este dispositivo,
durante un máximo de 30 días. En este modo,
puede revisar cuántos pasos realizó cada día,
durante los últimos 30 días.
Nota:
•Presione el botón ADJUST (ajuste) para
desplazarse por los días. En la parte superior
de la pantalla, aparecerá la fecha a partir de la
cual se muestra la información.
•Cuando los 30 días de la memoria estén llenos,
el podómetro automáticamente eliminará el
día 30 (30 días en el pasado) y continuará
haciéndolo cada día que la memoria esté llena.
• Mientras revise la información de días
anteriores, podrá obtener acceso a otro tipo
de información, como por ejemplo, CALORÍAS
QUEMADAS, DISTANCIA RECORRIDA,
VELOCIDAD PROMEDIO, TIEMPO DE
EJERCICIO Y PORCENTAJE (%) DE META
COMPLETADO de manera cíclica, presionando
el botón RESET (reajuste).
53
• Para borrar la memoria, presione y sostenga
el botón MODE (modo) y RESET (reajuste)
durante 3 segundos para borrar todos los datos
almacenados en la memoria.
FUNCIÓN DE LUZ DE FONDO
Para poder ver la pantalla del podómetro en
la oscuridad, este podómetro cuenta con una
función de luz de fondo. Presione el botón LIGHT
(luz) y la pantalla se iluminará durante
4 segundos.
Nota: La luz de fondo se puede utilizar en cualquier modo.
MODO SLEEP (hibernación)
La pantalla del podómetro se apagará luego de
transcurridos 3 minutos de inactividad. Para “despertar” el podómetro, deberá presionar un botón,
enchufar los audífonos o moverse.
54
USO DE LA RADIO FM
Entrada de audífonos
Botón Radio Reset
(reajuste de radio)
Botón Radio Scan
(búsqueda de radio)
presionando el botón RADIO SCAN (búsqueda
de radio) para obtener la estación deseada. Para
volver a las estaciones de FM más bajas, presione
el botón RADIO RESET (reajuste de radio) que
se encuentra en la parte delantera del dispositivo.
NOTA:
• Si retira el conector de los audífonos del enchufe de entrada del podómetro, la radio se apagará automáticamente.
• Si en algún momento, se coloca los audífonos y no escucha ningún sonido, siga los pasos que se incluyen a continuación:
Para utilizar la radio FM, simplemente inserte
el conector de los audífonos en el enchufe de
entrada que se encuentra en el dispositivo. La estación de radio se visualizará automáticamente en
pantalla señalando que la radio está encendida.
Para controlar el volumen, use el disco ubicado en
los audífonos para subir o bajar el sonido.
Presione el botón RADIO SCAN (búsqueda de
radio) que se encuentra en la parte delantera del
dispositivo para aumentar la frecuencia de FM
a la próxima estación con recepción. Continúe
55
> Asegúrese de que el volumen esté lo suficientemente fuerte como para escuchar.
> Presione el botón RADIO SCAN (búsqueda de radio) para verificar si escucha la radio cuando cambia de una estación a otra o si se visualiza la estación en la pantalla LCD.
•Si después de seguir los dos pasos anteriores,
sigue sin escuchar ningún sonido, tal vez
tenga que cambiar las baterías de la radio.
Según lo indicado en la sección COLOCACIÓN
DE LAS BATERÍAS, las baterías de la radio
FM están ubicadas en el lado izquierdo del
compartimiento de las baterías. Vea la sección
COLOCACIÓN DE LAS BATERÍAS para obtener
más detalles.
56
CUIDADO, MANTENIMIENTO Y LIMPIEZA
•No desarme el podómetro. Si necesita
reparación, consulte la sección de la garantía
de este manual.
•No exponga el dispositivo a golpes fuertes
(no lo deje caer al suelo).
•No exponga el dispositivo a temperaturas
extremas, humedad o a la luz solar directa.
Protéjalo del polvo.
•No exponga el dispositivo a químicos agresivos
como gasolina, solventes de limpieza, acetona,
alcohol o insecticidas, ya que pueden dañar el
sello, la cubierta o el acabado del dispositivo.
•Las baterías con pérdidas pueden dañar la
unidad. Extraiga la batería si la unidad no se
va a utilizar por un período prolongado.
•Si la unidad se guarda cerca de lugares
fríos, permita que se adapte a la temperatura
ambiente antes de usarla.
•Cumpla con las ordenanzas locales y siga las
instrucciones de reciclaje relacionadas con
el desecho o reciclaje del dispositivo y de los
componentes del dispositivo, incluidas las
baterías.
57
•No sumerja la unidad en agua ya que puede
dañarla.
•No enrolle los auriculares en cualquier parte
del cuerpo.
•Para evitar una estrangulación accidental,
mantenga este producto fuera del alcance
de los niños. No lo cuelgue del cuello.
•Es posible que este dispositivo no cumpla con
sus especificaciones de funcionamiento
si se guarda o se utiliza fuera de los siguientes
rangos de temperatura y humedad:
•Ambiente de
•Ambiente para
funcionamiento
guardar/transportar
la unidad
Temperatura:
Temperatura:
32°F~122°F
41°F~95°F
(0°C~50°C)
(5°C~35°C)
Humedad:
Humedad:
menos de 90%
menos de 70%
58
ESPECIFICACIONES
Rango de pasos:
0 a 999,999 pasos
Rango de peso:
44 a 498 lb (20 a 226 kg)
Longitud de pasos:
12 a 84” (30 a 213 cm)
Rango de Edad:
5 a 99 años
Rango de distancia:
0 a 9999,99 millas/km
Rango de calorías:
0 a 99 999,9 Kcal
Rango de metas:
100 a 999,99 pasos
CONFIGURACIÓN PREDETERMINADA
Hora:
2013, 12:00 a. m., 12 horas
Paso:
Modo Caminar
Información de
usuario:
Edad: 25, Peso: 110 lb,
Longitud de pasos: Caminar:
28 pulgadas, Correr: 31
pulgadas
Configuración de
unidades:
Sistema anglosajón
Ritmo:
Apagado, 80 HZ
Cronómetro:
00:00.00, apagado
Alarma:
12:00 a. m., apagada
Meta predeterminada
10,000 pasos
59
POTENCIAL DE INTERFERENCIA
ELECTROMAGNÉTICA
Para evitar resultados inexactos debido a la
interferencia electromagnética entre los equipos
eléctricos y electrónicos, no use el dispositivo
cerca de un teléfono celular o un horno
microondas.
Este dispositivo cumple
con la sección 15 de las
normas de la FCC. El
funcionamiento está sujeto
a las dos condiciones
siguientes: (1) este
dispositivo no puede
causar interferencias
perjudiciales y (2) este
dispositivo debe aceptar cualquier interferencia
que reciba, incluso la interferencia que pueda
causar un funcionamiento no deseado.
NOTA: El fabricante no se responsabiliza por
ninguna interferencia de radio o televisión
provocada por modificaciones no autorizadas que
se realicen a este equipo. Tales modificaciones
podrían anular la autoridad del usuario para
utilizar el equipo.
60
NOTA: Este equipo ha sido probado y se ha
comprobado que cumple con los límites para
un dispositivo digital de Clase B, conforme a la
sección 15 de las normas de la FCC. Estos límites
están diseñados para proporcionar protección
razonable contra interferencias perjudiciales en
una instalación residencial. Este equipo genera,
utiliza y puede irradiar energía de radiofrecuencia,
y si no se instala y se utiliza de acuerdo con
estas instrucciones, puede causar interferencia
perjudicial en las comunicaciones de radio. Sin
embargo, no existe ninguna garantía de que
no se producirá interferencia en una instalación
particular. Si este equipo causa interferencia
perjudicial a la recepción de radio o televisión,
lo cual puede determinarse encendiendo y
apagando el equipo, se recomienda que el
usuario intente corregir la interferencia mediante
una o más de las siguientes medidas:
•Vuelva a orientar o ubicar la antena de
recepción.
•Aumente la distancia entre el equipo y el
receptor.
•Conecte el equipo en un tomacorriente de
un circuito diferente al que esté conectado el
receptor.
•Consulte con el distribuidor o con un técnico
experto en radio/televisión para obtener ayuda.
GARANTÍA LIMITADA
DE UN AÑO
vende sus productos con la intención
Por servicio o reparación, HoMedics
de que no tengan defectos de fabricación ni de
no devuelva esta unidad mano de obra por el plazo de un año a partir de
la fecha de compra original, con las siguientes
al distribuidor. Póngase
en contacto con Relacio- excepciones. HoMedics garantiza que sus
productos no tendrán defectos de material ni de
nes con el Consumidor de mano de obra en condiciones de uso y servicio
normales. Esta garantía se extiende únicamente
HoMedics por el:
a consumidores y no a minoristas.
Para obtener servicio de garantía en su proCorreo electrónico:
ducto HoMedics, póngase en contacto con un
[email protected] Representante de Relaciones con el Consumidor
por el teléfono 1-800-466-3342 para obtener
asistencia. Asegúrese de tener a mano el
Teléfono:
número de modelo del producto.
1-800-466-3342
HoMedics no autoriza a nadie, incluyendo,
Horario comercial:
pero sin limitarse a, distribuidores, posteriores
consumidores compradores del producto a un
8:30am a 7pm Hora
distribuidor, o compradores remotos, a obligar
del Este
a HoMedics de forma alguna más allá de las
De lunes a viernes
condiciones aquí establecidas. La garantía de
este producto no cubre daños causados por
uso inadecuado o abuso, accidente, conexión
Distribuido por
de accesorios no autorizados, alteración del
producto, instalación inadecuada, reparaciones
o modificaciones no autorizadas, uso inadecuado de la fuente de energía/electricidad,
HoMedics, LLC
cortes de energía, caída del producto, funcio3000 Pontiac Trail
namiento incorrecto o daño de una pieza de
Commerce Township, MI funcionamiento debido al no cumplimiento del
mantenimiento recomendado por el fabricante,
48390
daños durante el transporte, robo, descuido,
Impreso en China
vandalismo, condiciones climáticas, pérdida de
uso en el período durante el cual el producto
está en una instalación de reparación o a la
espera de piezas o reparación, o cualquier otra condición, sin importar cual sea, que
se encuentre fuera del control de HoMedics.
Esta garantía es válida únicamente si el producto es comprado y operado en el
país en el cual se compró el producto. Un producto que requiera modificaciones o
adaptación para habilitar su funcionamiento en cualquier país que no sea aquél para
el que fue diseñado, fabricado, aprobado y/o autorizado, o la reparación de productos
dañados por estas modificaciones no están cubiertos bajo esta garantía.
LA GARANTÍA AQUÍ ESTABLECIDA SERÁ LA ÚNICA Y EXCLUSIVA GARANTÍA. NO
HABRÁ NINGUNA OTRA GARANTÍA EXPRESA NI IMPLÍCITA, INCLUYENDO NINGUNA
GARANTÍA DE COMERCIALIZACIÓN O APTITUD NI NINGUNA OTRA OBLIGACIÓN
POR PARTE DE LA COMPAÑÍA CON RESPECTO A PRODUCTOS CUBIERTOS
POR ESTA GARANTÍA. HOMEDICS NO TENDRÁ RESPONSABILIDAD ALGUNA
POR NINGÚN DAÑO INCIDENTAL, CONSECUENTE NI ESPECIAL. BAJO NINGÚN
CONCEPTO ESTA GARANTÍA REQUERIRÁ MÁS QUE LA REPARACIÓN O CAMBIO DE
ALGUNA PIEZA O PIEZAS QUE SE HALLEN DEFECTUOSAS DENTRO DEL PERÍODO
DE VIGENCIA DE ESTA GARANTÍA. NO SE EFECTUARÁN REEMBOLSOS. SI NO HAY
PIEZAS DE REPUESTO DISPONIBLES PARA LOS MATERIALES DEFECTUOSOS,
HOMEDICS SE RESERVA EL DERECHO DE REALIZAR SUSTITUCIONES EN VEZ DE
REPARAR O CAMBIAR.
Esta garantía no se extiende a la compra de productos abiertos, usados, reparados,
embalados otra vez y/o abiertos y vueltos a cerrar, incluyendo entre otras cosas la
venta de dichos productos en sitios de remate por Internet y/o la venta de dichos
productos por revendedores o mayoristas. Todas y cada una de las garantías cesarán
y terminarán inmediatamente con respecto a cualquier producto o pieza del mismo
que estén reparados, cambiados, alterados o modificados sin el consentimiento
previo explícito y por escrito de HoMedics.
Esta garantía le proporciona derechos legales específicos. Es posible que usted
tenga derechos adicionales que pueden variar de un estado a otro. Debido a las regulaciones de ciertos estados, es posible que algunas de las limitaciones y exclusiones
mencionadas arriba no se apliquen en su caso.
Para obtener más información con respecto a nuestra línea de productos en los EE.
UU., visítenos en: www.homedics.com.
HoMedics ® es una marca registrada de HoMedics, LLC.
© 2013 HoMedics, LLC. Todos los derechos reservados.
IB-PDM200B
IB-PDM200B