1
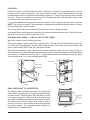
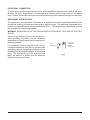
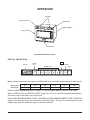
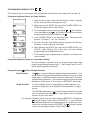
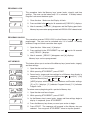
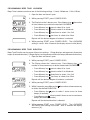
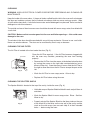
PROG
POWER
12
STAGE
HIGH
DEFROST
LEVEL
1
2
3
4
5
6
X2
STOP/
RESET
START
HM1200
MICROWAVE OVEN
MODEL HM1200
MICROWAVE OVEN
ML-126824
701 S. RIDGE AVENUE
TROY, OHIO 45374-0001
937 332-3000
www.hobartcorp.com
FORM 34726 (Nov. 2001)
IMPORTANT SAFETY INSTRUCTIONS
When using electrical appliances, basic safety precautions must be followed, including the following:
WARNING: TO REDUCE THE RISK OF BURNS, ELECTRIC SHOCK, FIRE, INJURY TO PERSONS
OR EXPOSURE TO EXCESSIVE MICROWAVE ENERGY:
1. Do not use metal utensils in this oven. No aluminum foil or aluminum pie pans. No metallic
decorations on dishware. No lead crystal glassware.
2. Read all instructions before using oven.
3. Read and follow PRECAUTIONS TO AVOID POSSIBLE EXPOSURE TO EXCESSIVE
MICROWAVE ENERGY on the next page.
4. This microwave oven must be grounded. Connect only to a properly grounded outlet. Refer to
ELECTRICAL CONNECTION and GROUNDING INSTRUCTIONS (page 6).
5. Locate or install this oven only in accordance with the instructions provided.
6. Some items, such as whole eggs or sealed containers, may explode and should not be heated in
this oven. Example: Closed glass jars.
7. Use this microwave oven only for its intended use as described in this manual. Do not use
corrosive chemicals or vapors in this oven. This type of oven is specifically designed to heat, cook
or dry food. It is not designed for industrial or lab use.
8. As with any appliance, close supervision is necessary when used by children.
9. Do not operate this microwave oven if it has a damaged cord or plug, if it is not working properly
or if it has been damaged or dropped.
10. This microwave oven should be serviced only by qualified service personnel. Contact your local
Hobart Service Office for examination, repair or adjustment.
11. Do not cover or block any openings on the microwave oven.
12. Do not use this oven outdoors. Do not use this product near water — for example, near a kitchen
sink, in a wet basement, or near a swimming pool, etc.
13. Do not immerse cord or plug in water.
14. Keep cord away from heated surfaces.
15. Do not let cord hang over edge of table or counter.
16. When cleaning surfaces of the door and oven that come in contact when the door is closed, use
only mild, non-abrasive soap or detergent applied with a sponge or soft cloth. Refer to CLEANING
(page 15).
17. To reduce the risk of fire in the oven cavity:
(a) Do not overcook food. Carefully attend the oven if paper, plastic or other combustible materials
are placed inside the oven to facilitate cooking.
(b) Remove wire twist-ties from paper or plastic bags before placing bag in oven.
(c) If materials inside the oven should ignite, keep oven door closed, turn oven off and disconnect
the power cord, or shut off power at the fuse or circuit breaker panel.
(d) Do not use the cavity for storage purposes. Do not leave paper products, cooking utensils or
food in the cavity when not in use.
© HOBART CORPORATION, 2001
–2–
PRECAUTIONS TO AVOID POSSIBLE EXPOSURE TO EXCESSIVE MICROWAVE ENERGY
1. Do not attempt to operate this oven with the door open since open-door operation can result
in harmful exposure to microwave energy. It is important not to defeat or tamper with the safety
interlocks.
2. Do not place any object between the oven front face and the door or allow soil or cleaner residue
to accumulate on sealing surfaces.
3. Do not operate the oven if it is damaged. It is particularly important that the oven door close
properly and that there is no damage to the:
(a) Door (bent),
(b) Hinges and latches (broken or loosened) or
(c) Door seals and sealing surfaces.
4. The oven should not be adjusted or repaired by anyone except properly qualified service
personnel.
CAUTIONS
1. Do NOT attempt to tamper with or make any adjustments or repairs to door, control panel
housing, safety interlock switch or any other part of the oven. Do NOT remove outer panel from
oven. Repairs should only be done by a qualified service person.
2. Do NOT operate the oven when it is empty. The microwave energy will reflect continuously
throughout the oven if no food or water is present to absorb energy.
3. If a fire occurs in the oven, touch the STOP/RESET key and LEAVE THE DOOR CLOSED.
Disconnect the power cord, or shut off power at the fuse or circuit breaker panel.
4. Do NOT attempt to dry clothes, newspapers or other materials in the oven. They may catch fire.
5. Do NOT use recycled paper products, as they may contain impurities which may cause sparks
and/or fires.
6. Do NOT use newspapers or paper bags for cooking.
7. Do NOT hit or strike control panel. Damage to controls may occur.
8. Pot holders may be needed when removing food from the oven. Heat is transferred from the hot
food to the container.
9. Do NOT store flammable materials next to, on top of or in the oven. It could be a fire hazard.
10. Do NOT operate the oven without the splatter shields (located in the top of the inner cavity) in
place.
–3–
Installation, Operation and Care of
MODEL HM1200 MICROWAVE OVEN
SAVETHESE INSTRUCTIONS
GENERAL
Microwave heat is generated inside the food rather than being conducted through the food as in
conventional methods. Time is used to control the amount of heating that occurs.
Microwave energy is absorbed in proportion to the moisture content of the food. The microwave energy
causes water molecules to vibrate at high speeds, resulting in friction (HEAT).
The Model HM1200 produces microwave energy in a magnetron where an electric current is changed
to microwave energy by large magnets. From the magnetron, microwave energy is transmitted to the
oven cavity where it is reflected, transmitted or absorbed.
Microwaves are reflected by metal (on interior walls and the rotating waveguide located underneath the
ceramic tray). This assures that the microwaves are well distributed within the oven cavity and
produces even heating or cooking of foods.
Microwaves pass through paper, glass and plastic much like sunlight shining through a window.
Because these substances do not absorb or reflect the microwave energy, they make ideal food
containers for microwave cooking.
Microwaves penetrate the food to a depth of about 3/4 to 1 1/2 inches where they excite molecules –
especially water, fat and sugar. The excited molecules vibrate at a rate of 2.45 billion cycles per second
which causes friction and produces heat. The internal heating of larger food volumes is done by
conduction. The microwave heat produced in the outer 1 1/2 inches is conducted to the center of the
food. Food continues to heat by conduction after microwave production has stopped. Microwaves
dissipate and cannot be stored in food.
RADIO INTERFERENCE
There is a possibility of a small amount of interference with weak broadcast signals if the microwave
oven is too close to a radio or TV or similar equipment. If interference is present, it may be reduced
by: 1) Cleaning the door and sealing surface of the oven, 2) Increasing the separation of the oven from
the receiving device or 3) Using an antenna to obtain stronger signal reception for the receiving device.
INSTALLATION
UNPACKING
Immediately after unpacking the microwave oven, check it for possible shipping damage. If this oven
is found to be damaged, save the packaging material and contact the carrier within 15 days of delivery.
Before installing the oven, test the electrical service to make sure it agrees with the specifications on
the data plate on the right side of the oven.
–4–
LOCATION
Place the oven on a suitable countertop, shelf or table with a smooth, flat and stable surface. Do not
place the oven in a hot or damp area, near a gas or electric range. The microwave oven must not be
located above or next to sources of excessive heat or greasy air. Clean air must be free to flow around
the oven. There is a possibility of a small amount of interference with weak broadcast signals if the
microwave oven is too close to a radio or TV.
It is recommended that the microwave oven be located so the housing can be removed for service.
NOTE: The housing should NOT be removed by anyone except qualified service personnel. A Hobart
service technician is recommended.
The air filter MUST be in place whenever the microwave oven is being operated.
A protective film is used to prevent scratching of the outer case during transportation. Peel the film from
the exterior of the oven before installation or use.
STACKING TWO OVENS — ONE ON TOP OF THE OTHER
Ignore this section if only installing one oven.
Disconnect electrical power cord before stacking ovens. Use the Joint Plate enclosed with the unit.
The maximum stacking height is the total height of the two units. Be sure the oven cavity is empty. Be
sure surfaces where ovens meet are clean and sanitized.
Stack the two microwave ovens. Remove five screws marked (a) and loosen the screw (b) (Fig. 1).
The projection on the Joint Plate must face away from the oven. Place the middle slot on the Joint Plate
over screw (b). Attach the Joint Plate (Fig. 2): Tighten the five screws (a) and tighten screw (b). Make
sure the upper oven is at a safe and workable height.
JOINT PLATE
(b)
JOINT PLATE
PROJECTION
PROJECTION
(a)
Fig. 1
Fig. 2
SEAL OVEN BASE TO COUNTERTOP
Thoroughly clean the bottom perimeter of the microwave
oven and the countertop area around the perimeter of the
microwave oven. Remove the air filter from the front of the
oven (refer to page 15). Apply a bead of silicone sealant
around the entire perimeter of the microwave oven. Smooth
the silicone seal into the crevice with finger or tool to
provide a cove seal. Re-install the air filter after applying
the silicone sealant. This procedure applies equally to a
single oven or to stacked ovens.
–5–
SILICONE
SEALANT
COUNTERTOP
Fig. 3
ELECTRICAL CONNECTION
The cord and plug of this microwave oven must be connected to a separate circuit rated at 120 Volts,
60 Hertz, 20 Amps, Single Phase. No other appliance should share the circuit with this microwave
oven. If it does, the branch circuit fuse may overload and cause either reduced heating or a blown fuse.
GROUNDING INSTRUCTIONS
This appliance must be grounded. In the event of an electrical short circuit, grounding reduces the risk
of electrical shock by providing an escape wire for electric current. This appliance is equipped with a
cord having a grounding wire with a grounding plug (Fig. 1). The plug must be connected to an outlet
that is properly installed and grounded.
WARNING: IMPROPER USE OF THE GROUNDING PLUG CAN RESULT IN A RISK OF ELECTRIC
SHOCK.
Consult a qualified electrician or service person if
these grounding instructions are not completely
understood or if there is doubt that this appliance is
properly grounded.
If it is necessary to use an extension cord, use only
a three-wire extension cord that has a three-blade
grounding plug and a properly grounded three-slot
receptacle that will accept the plug on the microwave
oven. The marked rating of the extension cord
MUST be equal to or greater than the electrical
rating of the microwave oven.
–6–
120 V, 20 A
GROUNDED
OUTLET
NEMA 5-20R
PLUG NEMA 5-20P
Fig. 4
OPERATION
KEYPAD
DIGITAL DISPLAY
TIMER DIAL
DOOR HANDLE
PROG
12
STAGE
HIGH
DEFROST
POWER
LEVEL
1
2
3
4
5
6
X2
STOP/
RESET
START
CAVITY LIGHT
AIR FILTER
Model HM1200 Microwave Oven
DISPLAY AND KEYPAD
X2
POWER
LEVEL
DISPLAY
STOP/RESET
START
MEMORY KEYS
PROG
POWER
LEVEL
12
STAGE
HIGH
1
2
3
4
5
6
X2
STOP/
RESET
START
DEFROST
Memory Keys are preset at the factory to HIGH power level and single stage cooking for these times:
Memory Key
A1
A2
A3
A4
A5
A6
Preset Time
10 seconds
20 seconds
30 seconds
40 seconds
50 seconds
1 minute
Refer to PROGRAMMING MEMORY (pages 9 – 10) to program Memory Keys to other times.
Refer to PROG LOCK and PROG UNLOCK (page 12) to Lock or Unlock the programming function.
The oven is set at the factory on Prog Unlock.
Refer to PROGRAMMING BEEP TONE: LOUDNESS and PROGRAMMING BEEP TONE: DURATION
(page 13) to adjust the alarm that sounds when cooking is done. The oven is set at the factory for the
loudest beep tone (#3) and three beeps (3 seconds) duration.
–7–
MANUAL HEATING
When the oven is connected, a beep sounds. The display remains idle (blank) until you open the door
and [ 0 ] displays for 1 minute. While [ 0 ] is displayed, the Memory keys or the Power Level key and
Timer Dial allow the time and power level to be set for a cooking cycle. Manual Heating uses the Power
Level key and Timer Dial to set the cooking cycle.
•
Place the food in a suitable container inside the oven.
•
Close the door.
•
Touch the POWER LEVEL key as many times as necessary to
select the Power Level: [ HIGH ] or [ DEFROST ]. [ 1 ] blinks above
STAGE to indicate first-stage cooking.
•
Turn the TIMER DIAL until the desired time displays.
•
Press START. The oven starts cooking, and the cavity light and fan
come on. The power level indicator blinks and the time display
counts down, second by second.
•
You may interrupt cooking to check progress by opening the door.
As soon as you pull the door open, the microwave energy stops, the
timer stops counting down and the stage and power level indicators
stop blinking.
1
STAGE
HIGH
1
STAGE
HIGH
1
STAGE
HIGH
1
STAGE
HIGH
• To adjust the time remaining, turn the TIMER DIAL.
• To resume cooking, close the door and press START.
1
STAGE
•
After the timer counts down to [ 0 ] — three beeps sound*, the oven
stops and the cavity light goes off. The [ 0 ] time display blinks.
•
Open the door and remove the food. When you open the door, the
Display returns to the previously selected time, power level and
stage. The fan and display continue for 1 minute to allow an
immediate repeat of the previous cooking cycle.
HIGH
* This assumes that the beep tone duration was not changed.
NOTES: 1. For two-stage cooking: First select the power level and time for the first stage; then select
the other power level and set the time for the second stage. Press START. The total time
for both stages is calculated. The first stage and its power level blink while the first stage
time interval counts down. Then the second stage and its power level blink while the second
stage time interval counts down. When done, three beeps sound.
2. During heating, touch STOP/RESET to stop the microwave. You can restart by pressing
the START key, or you can press STOP/RESET twice to cancel the selected program.
3. While the oven is not heating, touch the STOP/RESET key to cancel the selected program.
4. To repeat a manually selected heating program, touch the START key within 1 minute if the
door has been closed or within 3 minutes if the door has been open. After 1 minute of nonuse with the door closed or 3 minutes with the door open, the oven returns to the idle display
(blank).
5. Beep Tone Loudness and Beep Tone Duration can be changed (refer to page 13).
–8–
PROGRAMMING MEMORY KEYS 1 – 6
The oven must be set on Program Unlock to perform the functions on this page (refer to page 12).
Programming Memory Keys for Single Portions
1. Keep the door closed. Make sure the Display is blank. Program
Unlock must be active (not Program Lock).
2. While pressing the START key, press the POWER LEVEL key.
PROG will begin to blink in the Display.
PROG
3. Press the Memory key you wish to program 1 – 6 . For example,
if you press Memory key 2 , [ A2 ] displays with the other currently
programmed information for Memory key 2 .
PROG
1
STAGE
HIGH
PROG
4. Press POWER LEVEL to set the power level. The power level
displays. Example: [ HIGH ] or [ DEFROST ].
1
STAGE
DEFROST
5. Turn the Timer Dial until the desired time appears in the Display.
Example: [ 14 00 ] indicates 14 minutes.
PROG
1
STAGE
DEFROST
PROG
1
STAGE
DEFROST
6. While pressing the START key, press the POWER LEVEL key.
[ PROG ] stops blinking. This means that you have finished
programming the selected Memory key.
7. Three seconds after programming is complete, the Display will
return to blank.
Programming Memory Keys for Two-Stage Cooking
Use the procedure outlined above for programming single stage
cooking and proceed through step 5. Then, repeat steps 4 and 5
before continuing with steps 6 and 7.
Programming the X2 Pad for Multiple Portions
Small Portions
The X2 key is set at the factory to double the programmed time — this
is the correct setting for heating double portions of most small food
items such as sandwiches, bowls of soup or slices of pie. No further
programming is necessary. The maximum amount of time that can be
doubled on HIGH power is 15 minutes; on DEFROST, 30 minutes.
Larger Portions
To heat multiple portions of large platters or bulk food loads, set
the time for slightly less than double the time required for a single
portion.
The HM1200 incorporates a X2 Custom Program feature that allows
you to customize the heating time and/or power level for multiple
portions of your menu items.
For example: If Memory key 3 is set for 6:00 minutes on DEFROST, touching the
X2 key will display 12:00 minutes at DEFROST. If your own tests
have determined that the correct heating time for two portions is only
10 minutes and 30 seconds on DEFROST, the X2 Custom Program
feature can be programmed for 10:30 at DEFROST.
–9–
Custom Programming the X2 Key for Multiple Portions
The oven must be set on Program Unlock to perform functions on this page (refer to page 12).
a. Keep the door closed. Make sure the Display is blank.
PROG
b. While pressing the START key, press the POWER LEVEL key.
[ PROG ] blinks in the Display.
PROG
DEFROST
PROG
c. Press the Memory key you wish to program 1 – 6 . For example, if
you press Memory key 2 , [ A2 ] displays with the other currently
programmed information for Memory key 2 : (14 minutes, DEFROST).
d. Touch the X2 key. The letter [ b ] and the selected Memory key number
display. The previously programmed Stage, Power Level and time
cease being displayed.
PROG
1
STAGE
HIGH
e. Press the POWER LEVEL key until the desired power level [ HIGH ] or
[ DEFROST ] displays. For example: [ HIGH ] displays.
PROG
1
STAGE
HIGH
f.
PROG
1
STAGE
Turn the Timer Dial until the desired time for multiple portions displays.
Example: [ 20 00 ] indicates 20 minutes.
HIGH
g. While pressing START, press POWER LEVEL. [ PROG ] stops
blinking — this means you have successfully programmed your
customized multiple portion heating time and power level in the X2
key.
h. Three seconds after programming is completed, the Display goes
blank.
NOTES: 1. To program another Memory key or to reprogram any key, complete steps 2 through 7
(page 9).
2. To change or customize the multiple portion heating time of another Memory key, complete
steps b through h on this page.
3. If the key number, power level and heating times are not all programmed as required, the
START key and POWER LEVEL key will not accept the program (at step 6 and step g) and
[ PROG ] will not stop blinking.
4. When you touch an already programmed Memory key (in step 3 and step c), the previously
set program information displays. You can cancel the program by touching STOP/RESET.
[ 0 ] displays and you will have to start from step 2 to program for single portions or step b
to custom program the X2 key for multiple portions. Otherwise, you may save the current
program by pressing and holding down the START key and then pressing POWER LEVEL.
– 10 –
COOKING USING A PROGRAMMED MEMORY KEY AND THE X2 (DOUBLE PORTION) KEY
This example shows how the oven runs after a Memory key has been programmed for 14 minutes at
HIGH (refer to pages 8 – 9). This example requires that a large amount of food be placed in the oven.
1. Open the door; [ 0 ] displays.
2. Place the food in a suitable container inside the oven. Close the door.
3. Press the desired Memory key. The time and power level display. For
example: [ 14 00 ] indicates 14 minutes and [ HIGH ] is the power level.
PROG
1
STAGE
HIGH
PROG
1
STAGE
HIGH
PROG
1
STAGE
HIGH
4. If cooking multiple portions, touch the X2 key. Unless the X2 key has
been custom programmed, the time is doubled and the power setting
stays the same. The Display shows [ 28 00 ] indicating 28 minutes,
and [ HIGH ] is the power level.
5. Press START. The oven starts cooking, and the cavity light and fan
come on. The power level indicator blinks and the time display counts
down second by second.
You may interrupt cooking to check progress by opening the door. As
soon as you pull the door open, the microwave energy stops, the timer
stops counting down and the power level status stops blinking.
To resume cooking, close the door and press START.
6. After the time counts down to [ 0 ] — the oven stops, the cavity light
goes off, the power level stops blinking, [ 0 ] starts to blink and three
beeps sound.
7. Open the door and remove the food. [ 0 ] displays.
NOTES: 1. After touching a Memory key, manual cooking operations such as setting the power level
or time are not accepted.
2. You are permitted to change from one Memory key to another if the change is made before
you press START.
3. If you touch the STOP/RESET after touching a Memory key, the Timer goes to [ 0 ].
4. On HIGH power level, the maximum time that the timer can count down is 30 minutes. If
the Memory key is programmed for HIGH power and the time is 16 minutes or greater, the
X2 key cannot be used unless it has been custom programmed so the total time is less than
30 minutes (refer to page 10).
– 11 –
PROGRAM LOCK
This procedure locks the Memory keys' power levels, stage(s) and time
settings. The oven can be locked only if it is unlocked. If already locked,
Program Lock cannot be done again.
PROG
1. Close the door. Make sure the Display is blank.
PROG
2. Press and hold in the
X2
key for 10 seconds until [ PROG P L ] displays.
3. After 3 seconds, [ PROG P L ] disappears and the Display goes blank.
Memory keys cannot be reprogrammed until PROG LOCK is deactivated.
PROGRAM UNLOCK
This procedure reverses PROG LOCK to allow Memory keys 1 – 6 to be
programmed. The oven can be unlocked only if it is locked. If already
unlocked, Program Unlock cannot be done again.
PROG
1. Open the door. Make sure [ 0 ] displays.
2. Press and hold in the STOP/RESET key and
until [ PROG P ] displays.
X2
key for 10 seconds
3. After 3 seconds, [ PROG P ] disappears and [ 0 ] displays.
Memory keys can be reprogrammed.
LIST MEMORY
This feature allows you to review all the Memory keys' power levels, stage(s)
and time settings.
1. Open the door and leave it open.
PROG
2. While pressing STOP/RESET, press START.
1
STAGE
HIGH
PROG
2
STAGE
DEFROST
3. Power levels, stages and time settings for all Memory keys display in
sequence: [ A1 ] – [ A6 ] represent Memory keys 1 – 6 and [ b1 ] – [ b6]
represent Memory keys 1 – 6 with X2 .
[ bEEP] displays with the Beep Tone Loudness and Duration settings.
PROG
1
STAGE
HIGH
[ P ] or [ P L ] displays: [ P ] indicates Program Unlock; [ P L ] indicates
Program Lock.
PROG
To review memory beginning with a particular Memory key:
1
STAGE
2
STAGE
HIGH
1. Open the door and leave it open.
2. While pressing STOP/RESET, press START.
3. As the Memory keys' power levels, stages and time settings begin to
display in sequence, press STOP/RESET.
4. Press the Memory key where you want your review to begin.
5. Press START. The sequence will proceed at the Memory key you
selected. You may press STOP/RESET twice to stop the process.
– 12 –
PROGRAMMING BEEP TONE: LOUDNESS
Beep Tone Loudness can have one of the following settings: 3 Loud, 2 Moderate, 1 Soft, 0 Silent.
1. Open the door and leave it open.
2. While pressing START, press POWER LEVEL.
PROG
1
STAGE
PROG
1
STAGE
3. The Display has the 1 above STAGE. Press Memory key 1 the number
of times necessary to obtain the desired LOUDNESS.
•
Press Memory key
1
once to select 3 for Loud.
•
Press Memory key
1
twice to select 2 for Moderate.
•
Press Memory key
1
three times to select 1 for Soft .
•
Press Memory key
1
four times to select 0 for Silent.
Repeat until the desired degree of loudness is selected.
4. While pressing START, press POWER LEVEL. The LOUDNESS
setting is saved. After 3 seconds the display returns to idle (blank).
PROGRAMMING BEEP TONE: DURATION
Beep Tone Duration can have one of these two settings: 1 Stage displays and represents three short
beeps (3 seconds duration); 2 Stage displays and represents continuous beeps (60 seconds duration).
1. Open the door and leave it open.
2. While pressing START, press POWER LEVEL.
3. The Display shows the 1 above STAGE. Press Memory key 1 the
number of times necessary to obtain the desired LOUDNESS.
PROG
•
Press Memory key
1
once to select 3 for Loud.
1
•
Press Memory key
1
twice to select 2 for Moderate.
•
Press Memory key
1
three times to select 1 for Soft .
•
Press Memory key
1
four times to select 0 for Silent.
STAGE
PROG
Repeat until the desired degree of loudness is selected.
2
STAGE
4. While pressing START, press POWER LEVEL.
PROG
2
STAGE
5. Within 3 seconds, press Memory key
to obtain the desired DURATION.
1
the number of times necessary
once to select 1 above STAGE for three
•
Press Memory key
beeps (3 seconds).
•
Press Memory key 1 twice to select 2 above STAGE for continuous
beeps (60 seconds duration).
1
Repeat until the desired duration is selected.
6. While pressing START, press POWER LEVEL. The LOUDNESS
and DURATION settings are saved. After 3 seconds the display
returns to [ 0 ].
– 13 –
DISPLAYING THE CYCLE COUNT
The model HM1200 Microwave Oven incorporates a cycle counter which keeps track of the total number
of cycles that the oven has operated.
1. Open the door and leave it open.
2. While pressing START, press Memory key
4
.
3. The Display shows the total number of cycles that the oven has run.
For example: [ 99999 ].
4. Close the door. The cycle count disappears. The oven is ready for
normal operation.
When the total number of cycles exceeds 99,999 the counter begins
again at 0.
DISPLAYING THE TOTAL HOURS
The model HM1200 Microwave Oven incorporates an hour meter which keeps track of the total number of
hours that the oven has operated.
1. Open the door and leave it open.
2. While pressing START, press Memory key
3
.
3. The Display shows [ H ] and the total number of hours that the oven
has run. For example: [ H 20 ] means the oven has been run for 20
hours.
4. Close the door. The [ H "number of hours" ] disappears. The oven is
ready for normal operation.
BRINGING A CUP OF WATER TO BOIL
1
STAGE
HIGH
1
STAGE
HIGH
•
Open the oven door. [ 0 ] displays.
•
Place a cup of water in a suitable container inside the oven.
•
Set the oven to HIGH power level and 1 46 (1 minute 46 seconds).
•
Press START.
•
When the beeps sound, the water should be just coming to a boil.
•
Open the door and carefully remove the hot water.
– 14 –
CLEANING
WARNING: UNPLUG ELECTRICAL POWER CORD BEFORE PERFORMING ANY CLEANING OR
MAINTENANCE.
Keep the inside of the oven clean. If pieces of food or spilled liquids stick to the oven walls or between
the door seal and door surface, they will absorb microwaves and may cause arcing or sparks. Wipe
all spills with a damp cloth. A solution of warm water and mild detergent may be used. Do not use harsh
detergents or abrasive cleaners.
The outside surface of the microwave oven should be cleaned with warm soapy water, then dried with
a soft cloth.
CAUTION: Make sure that no water goes into the rear ventilation openings — this could cause
damage to the oven.
The window in the door should be washed with very mild soap and water. Be sure to use a soft cloth.
Never use window cleaner. The door can be scratched by harsh soap or cleaners.
CLEANING THE AIR FILTER
The Air Filter is located at the front under the door (Fig. 5).
AIR FILTER
Fig. 5
Clean the Air Filter regularly. If the Air Filter becomes clogged with
dirt, the oven may overheat, preventing the oven from working
properly.
• Remove the Air Filter from the recess at the bottom below the door
by turning the screw on the right side counterclockwise (use a
dime to fit the slot). Once the screw is loose, slide the Air Filter to
the right to allow the slot on the Air Filter to escape the post on the
left.
• Wash the Air Filter in warm soapy water. Allow to dry.
• Replace Air Filter before using the oven.
CLEANING THE SPATTER SHIELD
The Spatter Shield is located at the top of the cavity, inside the oven (Fig. 6).
• Hold side snaps of Spatter Shield with both hands and pull them in
and down.
• Wash the Spatter Shield in warm soapy water. Rinse. Sanitize.
Allow to dry.
SPATTER
SHIELD
Fig. 6
• Properly reinstall the Spatter Shield so the three studs on the rear
of the shield fit in the holes on the rear wall of the cavity and the
studs on the side snaps (one on each side) fit in their intended
holes — before using the oven.
– 15 –
MAINTENANCE
REPLACING THE CAVITY LIGHT BULB
If the Cavity Light Bulb burns out, you can replace it yourself.
CAVITY LIGHT COVER
WARNING: UNPLUG ELECTRICAL POWER CORD BEFORE
PERFORMING ANY CLEANING OR MAINTENANCE.
• Unscrew the screw on the Cavity Light Cover located on the left
side of the cabinet (Fig. 7).
• Replace the old bulb with a new 115 – 125 V, 20 W bulb. Use same
size and type.
• Replace the Cavity Light Cover (turn screw until snug).
Fig. 7
TROUBLESHOOTING
FAILURE CODES
POSSIBLE CAUSE
SUGGESTED ACTION
F01
Overcooked food.
Exhaust air temperature too
high.
Unplug oven to stop beep. Wait for oven to cool
and reset. If food ignites, do not open door.
If normal operation does not resume, contact
service and report the Failure Code number.
F05, F33, F34, F44,
F81, F82, F86, F87
Problem with circuit.
Unplug. Wait at least 1 minute. Reconnect.
If normal operation does not resume, contact
service and report the Failure Code number.
NOTE: The above codes do not indicate all the possible failures.
SERVICE
Contact your local Hobart-authorized service office for any repairs or adjustments needed on this
equipment. Service contracts are available on this and other Hobart products.
FORM 34726 (Nov. 2001)
– 16 –
PRINTED IN U.S.A.