1
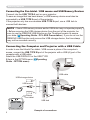
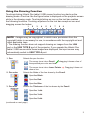
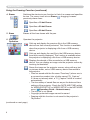
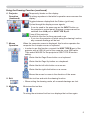
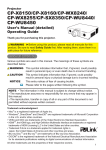
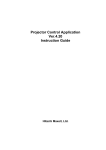
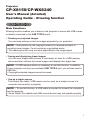
Projector
CP-X8150/CP-WX8240
User's Manual (detailed)
Operating Guide – Drawing function
Drawing function
Main Functions
Drawing function enables you to draw on the projector’s screen with USB mouse
or tablets connected to the USB TYPE A ports.
üD
rawing on projected images
You can draw pictures or text on images projected by our projectors.
NOTE • Authorization by the copyright owner(s) is required pursuant to
including visual images, if such works are copyrighted works.
• This drawing function may not work depending on the image signal.
üS
aving and displaying drawn images
You can save images with pictures or text drawn on them to a USB memory
device and then retrieve the saved images and display them again later.
NOTE • A USB memory device is necessary to use this function. In addition,
if your projector only has one available USB TYPE A port, you will also need a
USB hub.
• Copyright protected images cannot be saved.
üU
se as a simple mouse
The Hitachi Pen tablet / USB mouse can be used as a simple mouse of a
computer connected to a projector.
NOTE • To use this function, a USB cable is required to connect the computer
and the projector.
• Some Hitachi Pen tablets and USB mouse devices may not operate properly.
1
Drawing function
Connecting the Pen tablet / U
SB mouse and USB Memory Devices
Connect into the USB TYPE A port on your projector.
To save an image that has been drawn, a USB memory device must also be
connected to a USB TYPE A port of the projector.
If the projector only has one availabe USB TYPE A port, use a USB hub to
connect both devices.
NOTE • Some USB memory devices and/or USB hubs may not operate properly.
• Before removing the USB storage device from the port of the projector, be
sure to use the REMOVE USB function on the Thumbnail screen to secure
your data (&Operating Guide - PC-LESS Presentation). If you do not run the
REMOVE USB function and remove the USB storage device, the time stamp
may not be recorded correctly.
Connecting the Computer and Projector with a USB Cable
In order to use the Hitachi Pen tablet / USB mouse in place of the computer’s
mouse, connect the USB TYPE B port of the projector with a USB (A) port of the
computer with a USB cable.
Select the USB DISPLAY for the USB TYPE
B item in the OPTION menu (&Operating
Guide - OPTION menu).
USB cable
USB storage device
USB mouse
Hitachi
Pen tablet
2
USB hub
Example of connections
Drawing function
Using the Drawing Function
Touching/clicking Hitachi Pen tablet / USB mouse function key starts up the
drawing mode. A tool bar like the figure below is displayed on the projector screen
while in the drawing mode. Touching/clicking an icon on the tool bar enables
the following functions. Touching anywhere on the tool bar except an icon and
dragging moves the toobar.
1
2
3
4
5
6
7
8
9
NOTE • Images may be copyrighted, in which case, permission from the
copyright holder is necessary for use, in accordance with the copyright act and
other applicable laws.
• The drawing function does not support drawing on images from the LAN
port or the USB TYPE B port of the projector. If you operate the Hitachi Pen
tablet / USB mouse while these images are displayed, the input source may
automatically switch to USB TYPE A port.
1.Pen
Selects the pen function.
The cursor turns into a Pencil
; dragging it draws a line of
the specified pen color and size.
2.Pen color
The cursor turns into a Laser Pointer . Dragging it does not
draw a line.
Selects the Color of the line drawn by the Pencil.
Specifies Black.
Specifies Red.
Specifies Blue.
3.Pen size
Selects the Thickness of the line drawn by the Pencil.
Specifies 1-dot.
Specifies 3-dot.
Specifies 5-dot.
(continued on next page)
3
Drawing function
Using the Drawing Function (continued)
4. Eraser
Switches the electronic pen function to that of an eraser and specifies
its size. The cursor turns into an Eraser ; dragging it erases
previously drawn lines.
Specifies a 12-dot Eraser.
Specifies a 20-dot Eraser.
Specifies a 28-dot Eraser.
5. Erase
Erases all the lines drawn with the pen.
6.Projector
Operation
Operates the projector.
(continued on next page)
4
Calls up and display the previous file in the USB memory
device from that currently selected. This function is available
when the projector is displaying a file from a USB memory
device.
Calls up and display the next file in the USB memory device
from that currently displayed. This function is available when
the projector is displaying a file from a USB memory device.
Displays thumbnails of files recorded on a USB memory
device. You can display an image onto the projector screen by
touching its thumbnail.
Saves the image on the projector screen, along with any text
or pictures drawn, onto a USB memory device connected to
the projector.
• Files are saved with the file name “Pxxx.bmp” (where xxx is
a consecutive number) into a folder named “PJ_Capture”.
If it does not already exist, a “PJ_Capture” folder is created
automatically.
• The time stamp of saved files are as per the date and time
settings of the projector. Check the DATE AND TIME setting
for WIRELESS SETUP or WIRED SETUP in the NETWORK
menu (&Operating Guide - Network menu).
• The tool bar is not saved.
• Copyright protected images cannot be saved.
• Drawing with this function is not saved to the projector’s
“MyScreen”.
Drawing function
Using the Drawing Function (continued)
6.Projector
Operation
(continued)
Temporarily blanks out the display.
Touching anywhere in the tablet’s operation area recovers the
display.
Toggles between display/hide the Pattern (grid lines).
7.Mouse
Operation
Cycles through the display source signals.
• It can be used in the same way as the INPUT button on
the projector’s control panel. However, images cannot be
selected from LAN port or USB TYPE B port.
Turns off the projector.
Touch/click the icon for three seconds or so.
• If you turn the projector off while using the drawing function,
any unsaved drawings will be lost.
When the computer screen is displayed, this function operates the
computer like a simple mouse or keyboard.
• In order to use this function, connect the USB TYPE B port of the
projector with a USB (A) port of the computer via a USB cable.
Then select MOUSE for the projector’s USB TYPE B function
setting.
Works like the Page Down button on a keyboard.
Works like the Page Up button on a keyboard.
Works like the left-click button on a mouse.
Works like the right-click button on a mouse.
Moves the mouse’s cursor in the direction of the arrow.
8.Exit
Closes the tool bar and exits the drawing function.
• When exiting the drawing mode, all unsaved drawings are lost.
9.Minimize
Minimizes the tool bar.
Touching the minimized tool bar icon displays the tool bar again.
5