1
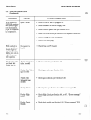
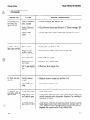
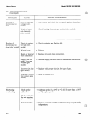
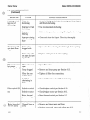
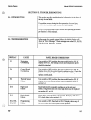
This section provides troubleshooting information in the form of
an easy-to-readtable.
If a problem occurs during the first operation of a new fryer,
recheck the installation per Section 2 of this manual.
Before troubleshooting, always recheck the operating procedure
per Section 3 of this manual.
eT
In the event of a control systemfailure, the digital display will
show an “Error Message.” These messagesare coded: E5, E4, E6,
ElO, E15, E41, E50, E51, and E53.
LES
en turn switc
display shows E4, the control board is getting too hot. Check the
louvers on each side of the unit for obstuctions. If E4 persists,
Turn switch to OFF position, then turn switch back to ON. If
display shows E6, thermal sensormust be replaced. Refer to
section 6-4.
button. If high limit does not reset, high limit must be replaced
per section 6-5, or 6-6.
El5
Drain Switch
Failure
Close drain, using the drain valve handle. If display still shows
E 15 check drain valve section 6- 13.
E41, E50,
E5 1, E53
Programming
Failure
Turn switch to OFF, then back to ON. If display shows any of
the error codes,the control panel needsreplaced.
NG
LE
With switch in
POWER position
and switch light
not illuminated,
fryer is complete
ly inoperative.
Open Circuit
Check to see if unit is plugged in.
Check breaker or fuse at supply box.
Check control panel fuse per Section 6-12.
@ Check POWER switch per Section 6-14. Replace if defective.
.Check voltage at wall receptacle.
Check cord and plug.
With switch in
power position,
switch light is
on, but all other
lights are out ex
cept the pump
will operate.
No power to
board
Shortening will
not heat but
lights are on.
Faulty Contactor
(elec. model)
Check fuse on PC board.
Faulty Gas Valve
(gas model)
Check gas valve per Section 6-11.
Faulty Gas
Solenoid (gas
model)
Check gas solenoid, per Section 6-19.
Faulty Probe
Check probe per Section 6-4. “Error
Faulty High
Limit
Check High Limit per Section 6-6, or 6-7. “Error message”
ElO.
Faulty Drain
Switch
Check drain switch per Section 6-13. “Error message” E15.
message” E6.
Shortening will
not heat, but
lights are on.
A. Pilot will not
light (gas model)
B. Pilot will not
stay lit.
Faulty Contactor
(elec. model)
Check contactor per Section 6-8.
Faulty Thermal
Sensor
Check thermal sensor per Section 6-4. “Error message” E6.
Faulty High
Limit
Check high limit control switch per Section 6-6 or 6-7.
Pilot not lit
* Light pilot per Section 2-9.
Plugged pilot
orifice, and/or
pilot supply tube
* Unplug pilot orifice and/or pilot supply tube.
Gas supply off
Turn ON gas supply.
Faulty gas control valve
Replace gas control valve.
Air in gas supply
line
Bleed air from supply line.
Faulty therm0
couple
Replace therm0 couple per Section 6-10.
Pilot magnetic
Service per Section 6-11.
PlW
C. Burner will
not light, pilot li
(gas model)
Drain valve open
Close drain valve.
High Limit control switch open
With power removed from fryer, check across high limit
switch terminals with ohmmeter. Replace if no reading is
indicated on meter.
Possible faulty
gas control valve
With power removed from fryer, check across electrical
leads of gas control valve with ohmmeter, and gas valve in
“ON” position. Ohm reading should be 234 ohm resistance.
Replace the control valve if not within 10%.
5-2. T
LES
(Continued)
_%
Heating of
shortening too
slow
Heating of
shortening too
slow (elec. model
Shortening
overheating
NG
Low or improper
voltage (elec.
model)
Use a meter and check the receptacle against data plate.
Weak or burnt
out elements
(elec. model)
Check heating elements per section (elec. model).
Points in contactor bad (elec.
model)
Check contactor per Section 6-8.
Wire(s) loose
Tighten
Burnt or charred
wire connection
Replace wire and clean connectors.
Supply line too
small - low gas
volume (gas
model)
Increase supply line size. Refer to installation instructions.
Incorrect jet size
(gas model)
Replace with proper size jet for type of gas.
Improper ventilation system (gas
model)
Refer to Section 2-5.
Check probe
calibration
Calibrate probe if + 10°F or “C off. If more than + 10°F
or “C, replace probe.
Check contactor
for not opening
(elec. model)
Bad Controller
Replace control board if heat indicator stays on past ready
temperature.
odel
Foaming or boiling over of
shortening.
Shortening will
not drain from
frypot
Filter motor rum
but pumps
shortening slowly
Filter switch ON
motor does not
run
.“Y Motor hums but
Lb,&> will not pump
Water in
shortening
At end of frying cycle, drain shortening and clean frypot.
Add fresh shortening.
Improper or bad
shortening
Use recommended shortening.
Improper
filtering
Refer to the procedure covering filtering the shortening.
Improper rinsing
after cleaning the
fryer
@ Clean and rinse the frypot. Then dry thoroughly.
Drain valve
clogged with
crumbs
8 Open valve force cleaning brush through drain opening.
Drain valve will
not open by turning handle
a Replace cotler pins in in valve capling.
Filter valve not
open
Open filter valve.
Pump clogged
Remove and clean pump per Section 6-15.
Filter line connection loose
Tighten all filter line connections.
Solidified
shortening in
lines
Clear all filter lines of solidified shortening.
Defective switch
Check/replace switch per Section 6-15.
Defective motor
Check/replace motor per Section 6-15.
Motor thermal
protector tripped
Reset thermal switch per Section 3-7.
Clogged lines or
pump
Remove and clean pump and lines.
Replace pump seal, rotor and rollers per 6-15.
5-5