1
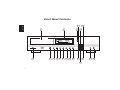
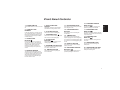
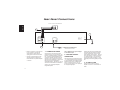
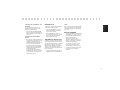
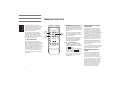
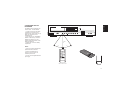
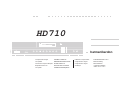
ENGLISH
HD710
Open/Close
DISC
TRACK
INDEX
STEP
MIN
INTRO
MEMORY
REMAIN
TOTAL
EACH
SEC
REPEAT
ALL ONE
1
2
3
4
5
6
7
8
9
10
AUTO
SPACE
RANDOM
A↔B
11
12
13
14
15
16
17
18
19
20
OVER
Display
Power
Sensor
Program
Random
Level
Stop/Clear
Headphones
harman/kardon
COMPACT
Time
Check
Repeat
DIGITAL AUDIO
Compact Disc Player
CD-Spieler
Lecteur de compact-disques
Reproductor de CD
CD-speler
OWNER’S MANUAL
BEDIENUNGSANLEITUNG
MODE D’EMPLOI
MANUAL DEL USUARIO
GEBRUIKSAANWIJZING
Lettore di Compact Disc
Compact Disc Player
Compact Disc Player
CD Player
ISTRUZIONI PER L’USO
Bruksanvisning
KÄYTTÖOPAS
GREEK
ENGLISH
FCC Information for 120V Only
CAUTION
CAUTION
RISK OF ELECTRIC SHOCK
DO NOT OPEN
CAUTION: TO REDUCE THE RISK OF ELECTRIC SHOCK, DO NOT REMOVE COVER (OR BACK). NO USERSERVICEABLE PARTS INSIDE. REFER SERVICING TO QUALIFIED SERVICE PERSONNEL.
The lightning flash with arrowhead
symbol, within an equilateral triangle, is
intended to alert the user to the presence
of uninsulated "dangerous voltage" within
the product's enclosure that may be of
sufficient magnitude to constitute a risk
of electric shock to persons.
The exclamation point within an
equilateral triangle is intended to alert
the user to the presence of important
operating and maintenance (servicing)
instructions
in
the
literature
accompanying the appliance.
WARNING: TO REDUCE THE RISK OF FIRE OR ELECTRIC SHOCK, DO NOT EXPOSE THIS APPLIANCE TO
RAIN OR MOISTURE.
Thank you for choosing a Harman Kardon
compact disc player. This is a superb piece of
high fidelity equipment that has been meticulously designed to provide you with thousands
of hours of enjoyment.
To appreciate the full performance of this
sophisticated unit, please be sure to read this
owner’s manual and use your CD player only in
accordance with its instructions. Keep the
manual in a safe place for future reference.
1
CLASS 1 LASER PRODUCT
Product complies with DHHS rules
CFR subchapter J part 1040:10 at date of
manufacture.
DANGER: Invisible laser radiation when
opened and interlock failed or defeated.
Avoid direct exposure to the beam.
This equipment has been tested and found to
comply within the limits for a Class B digital
device, pursuant to Part 15 of the FCC Rules.
These limits are designed to provide reasonable protection against harmful interference in
a residential installation. This equipment
generates, uses and can radiate radio
frequency energy and, if not installed and used
in accordance with the instructions, may cause
harmful interference to radio communications.
However, there is no guarantee that
inteference will not occur in a particular
installation. If this equipment does cause
harmful interference to radio or television
reception, which can be determined by turning
the equipment off and on, the user is encouraged to try to correct the interference by one
or more of the following measures:
•
•
Reorient or relocate the receiving antenna.
•
Connect the equipment into an outlet on a
circuit different from that to which the
receiver is connected.
•
Consult the dealer or an experienced radio
TV technician for help.
Increase the separation between the
equipment and receiver.
CAUTION: Any changes or modifications
in construction of this device which are not
expressly approved by the party responsible for compliance could void the user's
authority to operate the equipment.
CAUTION: USE OF ALL CONTROLS,
ADJUSTMENTS OR PERFORMANCE OF
PROCEDURES OTHER THAN THOSE
SPECIFIED HEREIN MAY RESULT IN
HAZARDOUS RADIATION EXPOSURE.
TO PREVENT ELECTRIC SHOCK, MATCH
WIDE BLADE OF PLUG TO WIDE SLOT,
FULLY INSERT.
This digital apparatus does not exceed the
Class B limits for radio noise emissions from
digital apparatus as set out in the Radio
Interference Regulations of the Canadian
Department of Communications.
CARE OF THE LASER PICKUP
The HD710 is fully shielded and may be
placed on top of or under other stereo
components as long as the “feet” provide
sufficient clearance for cooling of the component below. Please make sure that the HD710
receives adequate ventilation. It should
always be located away from heat sources
such as radiators, fireplaces, stoves, and other
appliances that produce heat. Avoid placing
the unit in locations that receive prolonged
direct sunlight or extremely low temperatures.
While your compact disc player is designed to
be vibration-resistant, excessive shocks or
placement too close to large speakers can
cause “stuttering” or skipping. When choosing
a place for your new CD player, take the same
precautions you would with a turntable.
The laser pickup that detects the music
recorded on a CD is located under the
compact disc drawer. The laser pickup,
especially its precision lens, is particularly
sensitive to dust. Keep the disc drawer closed
when the unit is not in use, and do not put your
hand inside the unit.
GENERAL CONNECTION HINTS
As you connect your compact disc player,
carefully connect the plugs to the output jacks,
being sure to push the plugs in all the way.
Loose connection of a plug can cause hum or
other intermittent noise. Take care to match
the left and right plugs on the CD player with
the left and right input jacks on the back of the
receiver/preamplifier/integrated amplifier.
Common practice is to use the red plug as
right, and the white, gray, or black plug as left.
Do not wind the cables with the power cord;
doing so may degrade the sound quality.
When you have finished connecting your
HD710 to your receiver/preamplifier/integrated
amplifier, plug the power cord of the CD player
either into a power outlet on the back of
another component, or into the power outlet in
the wall.
INTERFERENCE
This compact disc player uses high-frequency
signals that can sometimes interfere with
reception in tuners and televisions. If you start
to experience reception problems after
connecting and turning on your CD player,
move the CD player farther away from your
tuner or television set or turn the CD player off
when it is not in use.
ENGLISH
PLACEMENT
TABLE OF CONTENTS
Front Panel Controls . . . . . . . . . . . . . . . . . . . . . . . . . . . . . . . . . . . . . . . 3
Rear Panel Connections . . . . . . . . . . . . . . . . . . . . . . . . . . . . . . . . . . . . 5
Operation. . . . . . . . . . . . . . . . . . . . . . . . . . . . . . . . . . . . . . . . . . . . . . . . 6
HD710 Remote Control . . . . . . . . . . . . . . . . . . . . . . . . . . . . . . . . . . . . . . .9
Troubleshooting Guide . . . . . . . . . . . . . . . . . . . . . . . . . . . . . . . . . . . . . 11
Specifications . . . . . . . . . . . . . . . . . . . . . . . . . . . . . . . . . . . . . . . . . . . . .12
POWER CORD PROTECTION
WATER AND MOISTURE
TO OBTAIN WARRANTY SERVICE
The power cord should be routed in such a
way that it is not likely to be walked on or
pinched by items laying on or against it. Any
power cord is susceptible to stress at the point
where it joins the plug and the point where it
exits from the back of the unit, so take care not
to fold or bend it excessively at those points.
Never pull or stretch the cord. The CD
player’s power cord should be unplugged from
the outlet when the unit is left unused for a
long period of time.
Do not operate this compact disc player
around water (e.g., near a swimming pool,
sink, or in a wet basement).
If you require warranty service, please return
the product to your dealer. If this is not
possible, please call 1-800-422-8027, for
information on how to obtain service or
replacement. If purchased outside the United
States, contact your local dealer for repair or
replacement. Your bill of sale will be required
to obtain warranty service and to establish
date of purchase.
CLEANING
Use only a clean dry cloth to clean your
compact disc player. Do not use solvents
such as alcohol, benzine, gasoline, etc. Take
care that excessive dust does not accumulate
on your unit, and that objects are not dropped
inside or liquids spilled into the unit.
ABNORMAL SMELLS
If you detect an abnormal smell or smoke,
immediately turn the compact disc player off
and pull out the power cord. Contact your
dealer or nearest Harman Kardon service
center.
PACKING MATERIAL
Your box and packing material are custom
designed to provide optimum protection for
your compact disc player. Be sure to save the
box and packing material in case you need to
transport or ship the unit at some future time
(e.g., service or moving).
2
Front Panel Controls
9
ENGLISH
14
2
harman/kardon
3
5
11
HD 710
Open/Close
DISC
TRACK
INDEX
STEP
MIN
INTRO
MEMORY
REMAIN
TOTAL
EACH
SEC
REPEAT
ALL ONE
1
2
3
4
5
6
7
8
9
10
AUTO
SPACE
RANDOM
A↔B
11
12
13
14
15
16
17
18
19
20
OVER
Display
Power
Sensor
Program
Random
Stop/Clear
Level
Headphones
20
19
COMPACT
COMPACT
DIGITAL AUDIO
Time
Check
Repeat
DIGITAL AUDIO
1
4
6
8
7
15
16
17
18
13
10
12
3
Front Panel Controls
The POWER switch turns the unit on and
off.
2. COMPACT DISC
DRAWER
Load a disc (full-size or 3-inch/8 cm) into
your compact disc player by placing it in
this drawer with the label side up. Open
and close the drawer using the OPEN/
CLOSE button (3).
3. OPEN/CLOSE
BUTTON ( )
Press this button to open or close the
compact disc drawer. The drawer will
also close if you press the play button or
push the drawer gently toward the
chassis of the player; however, we
recommend that you do not push the
drawer.
4. REMOTE SENSOR
This area receives the signal from the
remote control unit. Make sure this area
of the front panel is kept free from dirt or
other obstructions that might prevent
proper reception of the infrared signal
from the remote control.
5. MULTI-FUNCTION
DISPLAY
This display shows the corresponding
information according to each mode.
6. PLAY BUTTON ( )
This button is used for starting play.
7. PAUSE BUTTON ( )
This button is used for holding play at the
start of a track or interrupting play.
8. STOP/CLEAR
BUTTON ( )
This button is used for stopping play or
clearing programmed tracks.
9. RANDOM PLAY BUTTON
This button is used for playing the tracks
on a disc in random order.
10. REPEAT BUTTON
This button is used for repeating one
track or all tracks.
11. PROGRAM BUTTON
16. FORWARD SEARCH
BUTTON ( )
This button is used for storing the tracks
in the Program mode.
This button is used for searching for a
particular passage in fast forward.
12. PROGRAM/CHECK
BUTTON
17. BACKWARD SKIP
BUTTON (
)
This button is used for checking the
stored tracks.
This button is used for replaying from the
beginning of the current track or returning
to a previous track.
13. TIME BUTTON
This button is used for checking the
elapsed playing time from the beginning
of current track or remaining playing time
of current track or remaining playing time
of disc.
14. DISPLAY BUTTON
This button is used to dim the display
lighting, if desired.
15. BACKWARD SEARCH
BUTTON ( )
This button is used for searching for a
particular passage in fast reverse.
ENGLISH
1. POWER SWITCH
18. FORWARD SKIP
BUTTON (
)
This button is used for moving onto the
next track.
19. HEADPHONE JACK
This JACK is used for listening with
headphones.
20. HEADPHONE VOLUME
This is used for the adjustment of the
headphone listening level.
4
Rear Panel Connections
TO INPUT JACKS OF AMP/RECEIVER
ENGLISH
INPUT
1
3
DIGITAL
OUTPUT
REMOTE
LEFT
IN
MODEL NO.: HD710
HARMAN/KARDON
NORTHRIDGE
CALIFORNIA U.S.A.
OUT
AC
INPUT
RIGHT
2
• Before you begin to connect this unit
to your system, be sure that all
components are turned off and
unplugged from the electrical outlet.
• See the connection diagram in the
operating instruction manual of a
Harman/Kardon compatible amplifier
or receiver.
5
TO REMOTE OUT OF HARMAN/KARDON
REMOTE CONTROL AMPLIFIER,
RECEIVER OR TAPE DECK
1. CONNECTION CORDS
On the back of your HD710 are output
jacks that connect your CD player to your
receiver, integrated amplifier, or preamplifier. Using the supplied shielded cords,
connect the left and right output jacks on
the back of the CD player to the left and
right input jacks marked CD or AUX on the
back of your receiver/preamplifier/
integrated amplifier. Alternatively, you can
also use the TAPE INPUT or TAPE PLAY
jacks on your receiver/preamplifier/
integrated amplifier.
Note: NEVER connect your CD player
to the PHONO inputs.
2. OPTIONAL DIGITAL
CONNECTION
The HD710 also has a digital output jack
— a single electrical RCA-type connector.
If your preamplifier has a digital-to-analog
decoder and can accept a digital signal
from a compact disc player, you can
connect your CD player to your preamplifier using this digital jack.
Please note that using the digital output
will bypass the internal D/A conversion
circuitry and therefore miss one of the
major benefits of this machine. The best
use of this output is for direct connection
to a digital recorder, a very high performance external D/A Converter, or a true
Digital Signal Processing (DSP) Preamplifier.
3. AC INPUT CORD
Plug this cord into the AC outlet of
amplifier or receiver or a household AC
outlet.
Operation
LOADING AND UNLOADING
disc tray slides out automatically.
• Take care that the tray is not obstructed. If it is obstructed in opening,
it will be closed after about five
seconds. If it is obstructed in closing,
it will be opened automatically after
about five seconds.
•
Load a disc with the labelled side up
after the disc tray is opened completely.
as it can damage the mechanism.
• To prevent dirt and dust from
entering the mechanism, do not
leave the disc tray open.
NORMAL PLAY
PLAYING A DISC
• Press the POWER switch to turn the
unit on.
• Open the disc tray, load a disc and
the tracks and the total playing time of
the disc, and the music calendar
displays the number of tracks. When
the total number of tracks is more
than 19, OVER will appear next to
19 as indicated below.
LABELLED
SURFACE
DISC
TRACK
MIN
SEC
• If you want to take a disc out of the
• Remove a disc from the tray in the
same way as loading to avoid leaving
fingerprints on the disc surface.
• After putting a disc into its storage
case, close the disc tray by pressing
the OPEN/CLOSE button.
CAUTION IN LOADING AND
UNLOADING
•
• Press the PAUSE button to temporarily interrupt play. The disc continues to spin but the sound stops, and
appears on the display. To
continue playing, press the PLAY or
PAUSE button again.
STOPPING PLAY (STOP MODE)
• Press the STOP/CLEAR button to
stop play before the end of the disc is
reached.
close it.
• The display shows the total number of
tray, press the OPEN/CLOSE button.
INTERRUPTING PLAY (PAUSE MODE)
1
2
3
4
5
6
7
8
9
10
11
12
13
14
15
16
17
18
19
20
OVER
STOP MODE
• Press the PLAY button. Play starts
and the first track number, elapsed
playing time, and
appear in the
display.
• After the last track has been played
the unit switches to the stop mode.
MUSIC SEARCH
OPERATION
SELECTING A PREVIOUS TRACK IN
PLAY MODE
• If a track is playing, press the BACKWARD SKIP BUTTON (
) to
return to the beginning of the track.
ENGLISH
• Press the OPEN/CLOSE button. The
• Do not insert any objects into the tray
• Press the BACKWARD SKIP button
before a track begins playing to move
to the beginning of the previous track.
• During normal play, if the BACKWARD SKIP button is pressed at the
beginning of the first track, the first
track is skipped to the last track.
• During random or programmed play,
the BACKWARD SKIP button can be
pressed only to return to the beginning
of the first track.
SKIP
SELECTING A HIGHER NUMBERED
TRACK IN PLAY MODE
• Press the FORWARD SKIP button
(
) to advance to the beginning of
the next track.
• During normal play, if the FORWARD
SKIP button is pressed when playing
the last track, the last track is skipped
to the first track.
BEGINNING AT A SPECIFIC TRACK IN
STOP MODE
1. Repeatedly press the FORWARD or
BACKWARD SKIP button (
/
)
until the desired track number appears on
the display.
DISC
TRACK
1
2
3
4
5
6
7
8
9
10
11
12
13
14
15
16
17
18
19
20
OVER
• During random or programmed play,
if the FORWARD SKIP button is
pressed when playing the last track,
the “End” sign appears on the display
and the last track continues to be
played.
2. Press the PLAY button
DISC
TRACK
11
12
INDEX
13
14
MIN
15
16
17
8
9
10
18
19
20
SEC
OVER
Do not tilt the unit while the disc tray is
opening or closing because the disc
could fall off.
6
ENGLISH
SEARCH
REPEAT PLAY
PROGRAMMED PLAY
SEARCHING A SPECIFIC PASSAGE IN
PLAY MODE
REPEAT ALL TRACKS
You can program up to 20 tracks to play
in any sequence you choose.
• Press the REPEAT button before or
• Press and hold down the FORWARD
• If the CD player reaches the end of
the last track during forward search,
the unit switches to the stop mode.
• If the CD player reaches the beginning of a CD during backward search
in normal play mode, play restarts at
this point.
If the CD player reaches the beginning of a track during backward
search in random or programmed play
mode, play restarts at this point.
•
appears on the display
and all tracks of the CD will be
repeated.
REPEAT ALL
• If the CD player reaches the end of
the last track during forward search,
the unit goes back to the beginning of
the first track and continues to search
forward.
REPEAT ONE TRACK
• After selecting a desired track with the
appears on the display
and the selected track will be repeated.
ONE
• If the REPEAT button is pressed once
PROGRAMMING
1. In the stop mode, press the PROGRAM button, the MEMORY light in the
display will start blinking.
DISC
TRACK
MIN
SEC
MEMORY
1
2
3
4
5
6
7
8
9
10
11
12
13
14
15
16
17
18
19
20
OVER
2. Select the desired track with the SKIP
buttons or NUMERIC buttons on the
remote.
DISC
MEMORY
TOTAL
9
TRACK
MEMORY
TOTAL
4
8
17
5. Press the PLAY button.
• After the last programmed track has
been played, the last programmed
track number and the total playing time
of the programmed tracks are shown
on the display.
• During program play, if you want
normal play, select the desired track
with the NUMERIC buttons, then
normal play will start that track.
• If you want program play again, press
TRACK
MEMORY
4
3. Press the PROGRAM button. The
TOTAL light and the program number
(1-20) in the display will illuminate.
DISC
INDEX
STEP
4
DISC
Example: If you wish to program the
tracks 4, 8 and 17, the programming
procedure is as follows.
again in this mode, repeat play mode
is canceled.
TRACK
MEMORY
TOTAL
4
7
TRACK
If you exceed 20 tracks, the “Full” sign
appears to remind you that the memory is
full and cannot accept any more tracks.
FORWARD or BACKWARD SKIP
button, press the REPEAT button
twice before or during play.
• REPEAT
DISC
➡
or BACKWARD SEARCH button
(
/
) and release the button
when the desired point has been
reached.
during play.
4. Repeat steps 2 and 3 to complete
programming.
the PROGRAM button in the stop
mode, then the unit switches to the
program mode.
You can check the contents of the
program during programming or after
completion of programming.
• Each time the PROGRAM/CHECK
button is pressed, the programmed
tracks will appear in the programmed
sequence.
CLEARING THE PROGRAMMED
TRACKS
• Each time the STOP/CLEAR button is
pressed during programming or after
completion of programming, the
programmed tracks are cleared one
by one in the opposite sequence.
• If you wish to clear a specific track,
find that track with the PROGRAM/
CHECK button and clear with the
STOP/CLEAR button.
• By pressing the OPEN/CLOSE or
STOP/CLEAR button over 4 seconds
in the stop mode, all programmed
tracks will be cleared.
RANDOM PLAY
NOTE:
In this mode, CD player plays the tracks
on the CD in random sequence.
When a track of which number is greater
than 30 is programmed or being played,
or during random play, the time display
may show “– –:– –”.
• Press the RANDOM PLAY button.
The unit automatically selects and
plays tracks at random.
• If the RANDOM PLAY button is
pressed during random play, random
play is canceled and normal play
starts at the present track.
TIME DISPLAY SELECTION
In addition to displaying the elapsed time
of the currently playing track, this unit has
two other time display modes. One mode
will indicate the total time remaining on
the disc (TOTAL will light in the display).
The other mode will indicate the time
remaining on a specific track (EACH will
light in the display).
• Change the time display selection by
ENGLISH
CHECKING THE CONTENTS OF THE
PROGRAM
DISPLAY DIMMING
• Pressing the DISPLAY button deletes
all indicators in the display, only the
(selected) track indication remains in
STOP or PAUSE mode.
• While running even this track
indication is deleted, leaving only a
small dot in the display as reminder
that the unit is still running.
In that mode if any button (except
PLAY) is pressed, the track is
indicated again for a short moment.
• Pressing the DISPLAY button again
returns to the normal display
indication.
repeatedly pressing theTIME button.
AUTO EDIT IS COMPLETED
8
ENGLISH
Remote Control
2. NUMERIC BUTTONS (0 - 9)
The remote control for the HD710
provides the same functions found on the
front panel of the compact disc player
itself. In addition, the remote control
provides some functions that are not
found on the front panel.
The functions found on the remote
control that are not found on the front
panel are INTRO, A
B, and the
1-10 keys. These three functions are
described below (for other functions, see
the descriptions on page 4.)
• If you press the number that correPower ON
2
1
2
3
4
5
6
7
8
9
0
Intro
Repeat
Random
Program
• To select a two digit track number, the
3
A
B
Time
1
Clear
Check
second digit must be pressed within
about 2 seconds after the first digit
has been pressed.
• During programming, if you select the
desired track with the NUMERIC
buttons, that track is programmed
without the PROGRAM button.
Display
1. INTRO BUTTON
This button puts your compact disc
player in and out of INTRO SCAN mode.
When INTRO SCAN is on and you press
PLAY, the unit plays only the first 15
seconds of each track before moving on
to the next. Press the button once to turn
on INTRO SCAN mode; press again to
turn it off and stop the scanning. When
the unit is in INTRO SCAN mode, the
FUNCTION indicator (5) will display the
word INTRO.
sponds to your desired track with the
NUMERIC buttons, the unit plays that
track immediately without the PLAY
button.
Power Off
3. A
B BUTTON
• Press the A
harman/kardon
B BUTTON at the
beginning of the passage you want,
then REPEAT appears on the display
and A ↔ blinks.
• Press this button again at the end of
the passage, then A ↔ B appears
on the display and the specific
passage is being played repeatedly.
• If you want to cancel repeat A
play, press the A
CLEAR button.
9
B or STOP/
B
HD710 REMOTE CONTROL
OPERATION
The remote control operates within a
30° angle and 23 ft. (7 m) range of the
remote sensor on the front panel of the
unit. Make sure that the remote's front
projection “lens” as well as the REMOTE
SENSOR area on the front panel of the
unit are kept free from dirt to ensure
proper transmission and reception of the
infrared beam. Also make sure that no
objects (e.g., stereo cabinet doors, end
tables) block the path from the remote
control to the REMOTE SENSOR area.
Avoid using the remote control near
fluorescent lamps, as they may shorten
its operating range.
If your remote control will sit unused for a
long period of time, remove the batteries
to prevent damage from corrosion.
REAR PANEL REMOTE
JACKS
The remote control input jack allows
remote control of this unit via a cable.
This cable can be connected to the
remote control output jack of another
Harman Kardon product. Alternatively, it
can be connected to an accessory device
that converts infrared remote control
signals into detected pulses. While all
Harman Kardon products with remote
control jacks are compatible with one
another, not all accessory devices or
other manufacturer’s products are.
However, it is safe to experiment.
harman/kardon
HD 710
Open/Close
DISC
Two batteries are provided with your
remote control. To load batteries:
1. Locate the cover over the battery
compartment on the back of the
remote control. Remove the cover by
sliding it in the direction of the
embossed arrow.
ENGLISH
CONCERNING USE OF
BATTERIES
TRACK
INDEX
STEP
MIN
INTRO
MEMORY
REMAIN
TOTAL
EACH
SEC
REPEAT
ALL ONE
1
2
3
4
5
6
7
8
9
10
AUTO
SPACE
RANDOM
A↔B
11
12
13
14
15
16
17
18
19
20
OVER
Display
Power
Sensor
Program
Random
Level
Stop/Clear
Headphones
COMPACT
COMPACT
DIGITAL AUDIO
Time
Check
Repeat
DIGITAL AUDIO
2. Insert the two AA (1.5V/R6/UM3)
batteries. Make sure you insert the
batteries according to the + and –
polarity symbols at the bottom of the
battery compartment.
23 FEET
7M
3. Replace the cover of the battery
compartment.
30°
30°
NOTE:
1. When you replace weak batteries,
replace both at the same time.
2. Remove the batteries if the
remote is not to be used for an
extended period of time.
Power ON
Power Off
1
2
3
4
5
6
7
8
9
0
Intro
Repeat
Random
Program
A
B
Clear
Time
Check
Display
3. Do not use rechargeable batteries
(Ni-Cd type).
harman/kardon
REMOTE CONTROL UNIT
10
ENGLISH
Troubleshooting Guide
If your HD710 does not operate as
expected, first check the items in the
following list. If you cannot determine the source of the problem,
contact your dealer or authorized
Harman Kardon service representative.
NO LIGHTS ON THE FRONT
PANEL
• Power cord is not plugged into
power outlet.
• Wall outlet or extension cord is
faulty. Check for poor connections.
• Breaker on plug strip has tripped.
Reset breaker.
FRONT PANEL LIGHTS ARE ON,
BUT THE CD DOES NOT PLAY
• The disc may have been inserted
upside down. Make sure the label
side is facing up.
• Moisture may have formed on the
laser/receptor inside the unit.
This sometimes occurs in damp
climates or when the unit is
moved from a cold to a warm
area. Leave the unit turned on at
room temperature for 30 minutes
to allow the moisture to evaporate, then play your disc.
11
THE PLAY INDICATOR LIGHTS,
BUT NO SOUND IS HEARD
• The wrong SOURCE has been
selected on your integrated
amplifier/receiver/preamplifier.
Make sure you have selected the
SOURCE where your CD player is
connected.
THE SOUND SKIPS OR STUTTERS
DURING PLAYBACK
• The disc may be dirty or damaged.
• The unit may have been placed on
an unstable surface. Isolate the
unit from excessive vibration by
placing it on a firmer surface or
farther away from your speakers.
THE SOUND IS CONTINUOUSLY
DISTORTED
• The cables from the HD710 have
been plugged into the wrong input
jacks on your integrated amplifier/
receiver/preamplifier. Make sure
you have not plugged the unit into
the PHONO jacks.
NOTHING HAPPENS WHEN
FUNCTION KEYS ARE PRESSED
• Turn the power to the unit off, then
back on again.
THE DISPLAY SHOWS BROKEN
CHARACTERS
• Turn the power to the unit off, then
back on again.
THE REMOTE CONTROL DOES
NOT FUNCTION CORRECTLY
• Make sure you are using the
remote control within the 30° angle
and 23 ft. (7 m) range described in
this manual.
• Make sure the remote transmitter
lens and the front panel REMOTE
SENSOR window are clean and
that no objects are blocking the
path from the remote control to the
REMOTE SENSOR area on the
front panel.
• Make sure that no strong fluorescent lights are being used in the
listening room.
• Check that the batteries inside the
remote control are fresh.
Specifications
ENGLISH
• SIGNAL FORMAT
DECLARATION OF CONFORMITY
Sampling Frequency
44.1 kHz
D/A Conversion
1 bit (Bit Stream Conversion)
Oversampling
4 times
We, Harman Marketing Europe a/s
• Discrete Analog Output Section
Error Correction
CIRC System
Frequency Response
8 Hz to 20 kHz ±1.0 dB
Total Harmonic Distortion (THD)
0.005%
Dynamic Range
96 dB
Signal to Noise Ratio
100 dB
Channel Separation
95 dB
Line Output Level
2.0 V RMS
Power Consumption
18 Watts
Dimensions (W x H x D)
17 5/16 in. x 3 3/4 in. x 13 in.
(440 mm x 95 mm x 330 mm)
Weight
10.1 lbs (4.6 kg)
Kongevejen 194B
DK-3460 Birkerød
Danemark
declare that the product described in
this owner's manual is in compliance
with technical standards:
EN 55013/6.1990. EN 55022/4.1987
EN 60555/4. 1987
Accredited test laboratory:
MIKES PRODUCT SERVICE GmbH
Ohmstrasse 2-4
D-94342 Strasskirchen
Germany
Steen Michaelsen
harman marketing europe a/s
Note: Specifications and features are subject to change without notice.
The appliance conforms with EEC directive
87/308/EEC regarding interference suppression
(For 230 V Only)
12