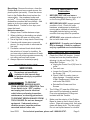
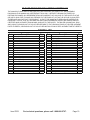
1
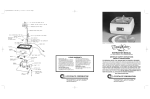
Owner’s Manual & Safety Instructions
Save This Manual Keep this manual for the safety warnings and precautions, assembly,
operating, inspection, maintenance and cleaning procedures. Write the product’s serial number in the
back of the manual near the assembly diagram (or month and year of purchase if product has no number).
Keep this manual and the receipt in a safe and dry place for future reference.
REV 15d
Visit our website at: http://www.harborfreight.com
Email our technical support at: [email protected]
When unpacking, make sure that the product is intact
and undamaged. If any parts are missing or broken,
please call 1-888-866-5797 as soon as possible.
Copyright© 2009 by Harbor Freight Tools®. All rights reserved.
No portion of this manual or any artwork contained herein may be reproduced in
any shape or form without the express written consent of Harbor Freight Tools.
Diagrams within this manual may not be drawn proportionally. Due to continuing
improvements, actual product may differ slightly from the product described herein.
Tools required for assembly and service may not be included.
Read this material before using this product.
Failure to do so can result in serious injury.
SAVE THIS MANUAL.
IMPORTANT SAFETY
INFORMATION
General Tool Safety Warnings
WARNING Read all safety warnings
and instructions. Failure to follow the
warnings and instructions may result
in electric shock, fire and/or serious
injury.
Save all warnings and instructions
for future reference.
In this manual, on the labeling, and
all other information provided with
this product:
This is the safety alert
symbol. It is used to alert
you to potential personal
injury hazards. Obey all
safety messages that follow
this symbol to avoid possible
injury or death.
1.
KEEP WORK AREA CLEAN. Cluttered
areas and benches invite accidents.
2.
DANGER indicates a
hazardous situation
which, if not avoided, will result
in death or serious injury.
DON’T USE IN DANGEROUS
ENVIRONMENT. Don’t use power tools
in damp or wet locations, or expose them
to rain. Keep work area well lighted.
3.
KEEP CHILDREN AWAY. All visitors
should be kept safe distance from work
area.
4.
MAKE WORKSHOP KID PROOF
with padlocks, master switches, or by
removing starter keys.
5.
DON’T FORCE TOOL. It will do the job
better and safer at the rate for which it
was designed.
6.
USE RIGHT TOOL. Don’t force tool or
attachment to do a job for which it was
not designed.
WARNING indicates a
hazardous situation
which, if not avoided, could
result in death or serious injury.
CAUTION, used with
the safety alert
symbol, indicates a hazardous
situation which, if not avoided,
could result in minor or moderate
injury.
RECOMMENDED MINIMUM WIRE
GAUGE FOR EXTENSION CORDS
NOTICE is used to
address practices not
related to personal injury.
(120 VOLT)
NAMEPLATE
AMPERES
CAUTION, without the
safety alert symbol, is
used to address practices not
related to personal injury.
(at full load)
EXTENSION CORD
LENGTH
25’
50’ 100’ 150’
0–6
18
16
16
14
6.1 – 10
18
16
14
12
10.1 – 12
16
16
14
12
12.1 – 16
14
12
Do not use.
TABLE A
7.
Item 67631
USE PROPER EXTENSION CORD.
Make sure your extension cord is in good
For technical questions, please call 1-888-866-5797.
Page 2
condition. When using an extension
cord, be sure to use one heavy enough
to carry the current your product will
draw. An undersized cord will cause a
drop in line voltage resulting in loss of
power and overheating. Table A shows
the correct size to use depending on
cord length and nameplate ampere
rating. If in doubt, use the next heavier
gauge. The smaller the gauge number,
the heavier the cord.
8.
WEAR PROPER APPAREL. Do not wear
loose clothing, gloves, neckties, rings,
bracelets, or other jewelry which may get
caught in moving parts. Nonslip footwear
is recommended. Wear protective hair
covering to contain long hair.
9.
ALWAYS USE SAFETY GLASSES. Also
use face or dust mask if cutting operation
is dusty. Everyday eyeglasses only have
impact resistant lenses, they are NOT
safety glasses.
properly and perform its intended
function – check for alignment of moving
parts, binding of moving parts, breakage
of parts, mounting, and any other
conditions that may affect its operation.
A guard or other part that is damaged
should be properly repaired or replaced.
GROUNDING INSTRUCTIONS
TO PREVENT
ELECTRIC SHOCK
AND DEATH FROM INCORRECT
GROUNDING WIRE
CONNECTION
READ AND FOLLOW THESE
INSTRUCTIONS:
110-120 VAC Grounded Tools: Tools
with Three Prong Plugs
1.
In the event of a malfunction or
breakdown, grounding provides a path
of least resistance for electric current
to reduce the risk of electric shock.
This tool is equipped with an electric
cord having an equipment-grounding
conductor and a grounding plug. The
plug must be plugged into a matching
outlet that is properly installed and
grounded in accordance with all local
codes and ordinances.
2.
Do not modify the plug provided – if it will
not fit the outlet, have the proper outlet
installed by a qualified electrician.
3.
Improper connection of the equipmentgrounding conductor can result in a risk
of electric shock. The conductor with
insulation having an outer surface that
is green with or without yellow stripes is
the equipment-grounding conductor. If
repair or replacement of the electric cord
or plug is necessary, do not connect the
equipment-grounding conductor to a live
terminal.
10. MAINTAIN TOOLS WITH CARE. Keep
tools sharp and clean for best and safest
performance. Follow instructions for
lubricating and changing accessories.
11. DISCONNECT TOOLS before servicing;
when changing accessories, such as
blades, bits, cutters, and the like.
12. REDUCE THE RISK OF
UNINTENTIONAL STARTING. Make
sure switch is in off position before
plugging in.
13. USE RECOMMENDED ACCESSORIES.
Consult the owner’s manual for
recommended accessories. The use of
improper accessories may cause risk of
injury to persons.
14. CHECK DAMAGED PARTS. Before
further use of the tool, a guard or other
part that is damaged should be carefully
checked to determine that it will operate
Item 67631
For technical questions, please call 1-888-866-5797.
Page 3
4.
5.
6.
Check with a qualified electrician or
service personnel if the grounding
instructions are not completely
understood, or if in doubt as to whether
the tool is properly grounded.
Use only 3-wire extension cords that
have 3-prong grounding plugs and
3-pole receptacles that accept the tool’s
plug.
Repair or replace damaged or worn cord
immediately.
move when placed on a smooth, slippery
surface.
4.
Use only in a safe, accessible location
(such as a garage floor) near a power
outlet.
5.
Do not use near flammable materials.
6.
Do not use in a closet or drawer; the
Tumbler requires proper ventilation.
7.
Avoid extreme temperatures. Do not
let Tumbler freeze as the water in the
Rubber Barrel (12) will freeze and
become unbalanced. This can overload
the motor.
8.
Do not touch motor immediately after
use. Motor becomes hot to the touch
during operation.
9.
Maintain labels and nameplates on
the tool. These carry important safety
information. If unreadable or missing,
contact Harbor Freight Tools for a
replacement.
Grounding
Pin
125 VAC 3-Prong Plug and Outlet
(for up to 125 VAC and up to 15 A)
7.
This tool is intended for use on a circuit
that has an outlet that looks like the one
illustrated above in 125 VAC 3-Prong
Plug and Outlet. The tool has a
grounding plug that looks like the plug
illustrated above in 125 VAC 3-Prong
Plug and Outlet.
8.
The outlet must be properly installed and
grounded in accordance with all codes
and ordinances.
9.
Do not use an adapter to connect this
tool to a different outlet.
Tumbler Safety Warnings
1.
DO NOT USE OUTDOORS.
2.
DO NOT USE WITH SAND.
3.
Do not place Tumbler on a table. The
unit’s vibration may cause the Tumbler to
Item 67631
10. Avoid unintentional starting. Prepare to
begin work before turning on the tool.
11. People with pacemakers should
consult their physician(s) before use.
Electromagnetic fields in close proximity
to heart pacemaker could cause
pacemaker interference or pacemaker
failure.
12. WARNING: Some dust created by
power sanding, sawing, grinding,
drilling, and other construction activities,
contains chemicals known to the State
of California to cause cancer and birth
defects or other reproductive harm.
Some examples of these chemicals are:
• Lead from lead-based paints
• Crystalline silica from bricks and
cement or other masonry products
• Arsenic and chromium from chemically
treated lumber
For technical questions, please call 1-888-866-5797.
Page 4
Your risk from these exposures varies,
depending on how often you do this type
of work. To reduce your exposure to
these chemicals: work in a well ventilated
area, and work with approved safety
equipment, such as those dust masks
that are specially designed to filter out
microscopic particles. (California Health
& Safety Code § 25249.5, et seq.)
13. WARNING: The cord of this product
contains lead and/or di (2-ethylhexyl)
phthalate (DEHP), chemicals known to
the State of California to cause cancer,
and birth defects or other reproductive
harm. Wash hands after handling.
(California Health & Safety Code
§ 25249.5, et seq.)
14. The warnings, precautions, and
instructions discussed in this instruction
manual cannot cover all possible
conditions and situations that may occur.
It must be understood by the operator
that common sense and caution are
factors which cannot be built into this
product, but must be supplied by the
operator.
SAVE THESE
INSTRUCTIONS.
Specifications
Motor
120 VAC / 60 Hz
Capacity
3 lb.
Barrel Type
Rubber (allows for
quieter operation)
UNPACKING
When unpacking, make sure that
the item is intact and undamaged. If any
parts are missing or broken, please call
Item 67631
Harbor Freight Tools at 1-888-866-5797 as
soon as possible.
HOW TUMBLER WORKS
Read the ENTIRE IMPORTANT
SAFETY INFORMATION
section at the beginning of this
manual including all text under
subheadings therein before set up
or use of this product.
TO PREVENT
SERIOUS INJURY
FROM ACCIDENTAL
OPERATION: Turn the Power
Switch of the tool to its “OFF”
position and unplug the tool from
its electrical outlet before
assembling or making any
adjustments to the tool.
Note: For additional information regarding the
parts listed in the following pages, refer
to the Assembly Diagram near the end of
this manual.
The motion in the Barrel of a Tumbler simulates
the natural action of flowing water or ocean
waves. Beaches and riverbeds contain rocks
and pebbles smoothed by water and the
abrasive sand it carries. As rocks grind upon
one another with constant water and sand in the
mix, they begin to round and smooth. Although
this is a constant process, it does not however,
naturally polish the rocks.
The Tumbler uses an abrasive media instead
of sand. It is graded by grain size, from fine
powder sized grains, up to large sized grains.
By changing (usually by weekly intervals) the
grain size, rotating from coarse, medium, to fine,
the rock or gemstone is smoothed much more
quickly than the natural process.
To polish using a Tumbler, add a metallic
oxide compound (not included). The complete
For technical questions, please call 1-888-866-5797.
Page 5
process for a gemstone or rock to go from rough
to a smooth, polished finish, usually takes from
4-6 weeks.
Note: An Abrasive Kit (Item 30956) is available
from Harbor Freight Tools. The kit includes 4
oz. of coarse grit abrasive, 4 oz. fine grit, 2 oz.
of pre-polish abrasive and 2 oz. of polish.
creating a tripping hazard or exposing
the power cord to possible damage. The
power cord must reach the work area
with enough extra length to allow free
movement while working.
General Operating Instructions
1.
CAUTION! Always check the Tumbler
on a regular basis to make sure the
unit is running properly and is not
over-heating. Make sure that conditions
around the tumbler are unchanged, and
that the tumbler continues to operate in a
safe location.
2.
Before the first use, and once a month
thereafter, put a few drops of oil on the
Driving Shaft (42) bearings.
3.
Check the V-Belt (40) tension. It must
be kept as loose as possible without
allowing it to slip on the Pulley (36).
Check before each use.
4.
Make sure the exterior of the Rubber
Barrel (12) is clean so that it doesn’t slip
on the rollers. Wipe it with a soapy cloth,
then wipe it clean with a damp cloth,
and dry thoroughly. Do not use liquid
cleaners or solvents.
5.
Make sure that the Stop (6) is lightly
touching the Barrel Lid (9). This will
prevent the Barrel Lid from rubbing
against the housing and will reduce
friction.
6.
To open the Rubber Barrel, remove the
Barrel from the unit and then remove
the Knurled Nut (7) and the Washer (8).
Next, remove the Barrel Lid (9).
7.
Note: It is imperative to load the
Tumbler with the proper amount of
materials, or the process will not be
successful, and the motor could be
damaged. An underloaded barrel will not
lift rocks up the inner side walls allowing
OPERATING INSTRUCTIONS
Read the ENTIRE IMPORTANT
SAFETY INFORMATION
section at the beginning of this
manual including all text under
subheadings therein before set up
or use of this product.
Tool Set Up
TO PREVENT
SERIOUS INJURY
FROM ACCIDENTAL
OPERATION:
Turn the Power Switch of the tool
to its “OFF” position and unplug
the tool from its electrical outlet
before performing any
inspection, maintenance, or
cleaning procedures.
TO PREVENT SERIOUS INJURY:
DO NOT OPERATE WITH ANY
GUARD DISABLED, DAMAGED,
OR REMOVED. Moving guards
must move freely and close
instantly.
Work Piece and Work Area Set Up
1.
2.
Designate a work area that is applicable
for prolonged Tumbler use. The work
area must not allow access by children
or pets to prevent distraction and injury.
Route the power cord along a safe
route to reach the work area without
Item 67631
For technical questions, please call 1-888-866-5797.
Page 6
the cascading effect. Also, the abrasive
material in an underloaded Tumbler
will tend to form a slurry and will not be
effective. An overloaded Tumbler will not
allow the rocks to cascade. Lastly, too
much water will cause the abrasives to
float and not do their job.
8.
“Charging” a barrel means loading it.
Charge your barrel from 1/2 to 3/4 full.
More pointed or abrasive rocks or stones
will require closer to 3/4 full, leaving
a 1/2 full barrel when it comes time to
polish.
9.
Note: During tumbling, the stones will
be somewhat reduced in size.
10. Choose stones that are similar in nature.
They should have a mix of sizes ranging
from small (3/16” to 3/8”) to large (3/4”
to 1”). 25% of the stones should be in
the smaller range. Split the remaining
volume between medium sized (3/8” to
5/8”) and large sized (5/8” to 1”) stones.
13. Seal the Rubber Barrel and replace the
Barrel Lid, Knurled Nut and the Washer.
14. Set the Rubber Barrel on the rollers and
turn on the Power Switch (27). Make
sure to check the Lid seal during the first
ten minutes to make sure the tumbler
isn’t leaking.
Note: You can use this Tumbler to work with
metal and metal jewelry (without gemstones).
This Tumbler may be used to take the jagged,
sharp edges off of small metal parts. To polish
brass, gold, silver, or copper, use polishing
media designed for that specific purpose.
Note: For more in-depth information on
polishing jewelry, we recommend you
purchase a jewelry polishing handbook.
11. For best results use a four step polish
process. First, use a silicon carbide
grain, 60-90 grit size. Second, use a fine
silicon carbide grain, 220 grit or a little
finer. Next, use a 600 grit silicon carbide
grain or a pre-polish. Lastly, use a polish
of Tin Oxide, Cerium Oxide, or Titanium
Dioxide. When tumbling hard materials,
it might be necessary to repeat the
steps.
Amounts of abrasive
(for 3 lb. Tumblers):
Coarse Grind: 4 Tbsp.
Medium: 4 Tbsp
Pre-polish: 6 Tbsp.
Polish: 6 Tbsp.
Burnish (soap): 1 Tbsp.
Plastic Pellets
12. Add enough water to reach the bottom of
the top layer of rocks.
Item 67631
For technical questions, please call 1-888-866-5797.
Page 7
First Grind, Pre-Polish, Polish and
Burnishing
First Grind: Run the Tumbler for 24 hours,
checking for gas build-up at the first twelve
hours. Slowly open the Barrel Lid, releasing
the small amount of gas that builds up during
the process. Check the stones, they should
show slightly rounded edges.
Clean the seals and close the Lid. It is
important to release the gas, otherwise it will
thicken the abrasive slurry. After another 24
hours check again. If the slurry is thickening,
add a little water.
Run for one hour and check again. If it is still
thick, add some more water. Let the Tumbler
run continuously, but check daily. Continue
this process for 7-10 days to remove the
sharp edges and rough areas. Be patient.
This is the most important step. When all of
the edges are rounded you are ready for the
next step.
Note: Between steps you must clean the
Rubber Barrel and stones. Pour off the slurry
into a disposable container (such as a milk
carton) and take care that the stones remain
in the
Rubber Barrel.
WARNING! Never pour the slurry into your
home plumbing system.
Next, place the stones into a clean container
or plastic bag. Fill the Rubber Barrels 1/2 full
with water and clean out the remaining slurry
and grit. Wipe and dry with a paper towel. To
clean the stones, gently slosh them around
in clean water and remove them a few at a
time checking for breaks or cracks. Discard
broken or cracked stones. Place the stones
in a plastic colander, or old nylon sock and
rinse them completely off. There should be no
slurry or grit remaining on the stones.
Item 67631
Second Grind: Carefully replace stones into
the Rubber Barrel. If the Barrel is less than
1/2 full, add plastic pellets (not included) to
help cushion the stones. Then add medium
grit (see page 5) and water up to the bottom
of the top layer of rocks. Reseal and tumble.
Run it for 2-3 days before checking. They
will begin to smooth. After seven days they
should have a smooth finish. If not, let them
go another 2-3 days. Clean again as you did
after the first grind.
Pre-polish: Place stones into the Rubber
Barrel adding the correct amount of prepolish water and plastic pellets (not included)
if necessary. Let it run for a week, checking
every other day. After a week take out 2-3
stones to test the progress. On a dampened
piece of leather, old rug, or towel, sprinkle a
small amount of polishing compound, and rub
the stone vigorously with it. You should see a
definite shine in a few moments. If they shine,
clean the Rubber Barrel and you are ready for
the last step. If not, pre-polish and check in
24 hours.
Polish: Gently set the stones in the Rubber
Barrel. Charge the tumbler with fresh water
polishing compound and plastic pellets (if
needed). Make sure the volume is at least 1/2
full, preferably 3/4 full. Tumble for 5 to 7 days.
If they look the same dry as they do wet, then
they are finished. If they have a slight film,
they need to be burnished.
For technical questions, please call 1-888-866-5797.
Page 8
Burnishing: Remove the stones, clean the
Rubber Barrel and remove and recover the
plastic pellets (set aside). Place the stones
back in the Rubber Barrel and replace the
same pellets. Use powdered soap such
as Ivory®. Do not use liquid detergents or
dishwasher powders that have bleach. Add
water as in previous steps and seal the
Rubber Barrel. Tumble for four days, and
clean the barrel.
Notes to remember:
1. Always clean Tumbler between steps.
2. When polishing or burnishing use plastic
pellets (they will wear out during use).
3. Use a log book to keep track of each step.
4. If starting with stream-worn or smooth
stones, you may be able to eliminate the
first step.
5. Purchase a mineral book which details
the selection of stones for tumbling. As
you learn about relative hardness of each
stone you will achieve greater success by
not mixing soft and hard stones.
6. Always dispose of material properly.
Cleaning, Maintenance, and
Lubrication
1.
BEFORE FIRST USE and once a
month following, put a few drops of oil
on the Driving Shaft Bearing (42).
2.
BEFORE EACH USE, inspect general
condition of tool. Check for loose
hardware, misalignment or binding of
moving parts, cracked or broken parts,
damaged electrical wiring, and any
condition that may affect its operation.
3.
AFTER USE, wipe external surfaces of
the tool with clean cloth.
4.
WARNING! If supply cord of power
tool is damaged, it must be replaced
only by a qualified service technician.
V-Belt Inspection and Tensioning
1.
Check the V-Belt (40) tension. It must
be kept as loose as possible without
allowing it to slip on Pulley (36). To
Adjust Belt Tension:
a.Unplug the Power Cord (28) from its
outlet.
b.Turn unit over.
c.Loosen the Screws (35) and remove
the Screen (34).
d.Check V-Belt for cracks, tears or
other damage. If needed, replace
V-Belt. Replacement V-Belts are
sold under Sku 93835.
e.Reinstall the Screen and four
Screws.
2.
The O-Ring (37) near the V-Belt may
also need to be replaced as needed.
Five extra replacement O-Rings are
included with this Tumbler.
3.
Make sure the exterior of the Rubber
Barrel is clean so that it doesn’t slip on
rollers. Wipe with soapy cloth, then wipe
clean with damp cloth. Dry thoroughly.
Do not use liquid cleaners or solvents.
MAINTENANCE AND
SERVICING
Procedures not specifically
explained in this manual must
be performed only by a qualified
technician.
TO PREVENT
SERIOUS INJURY
FROM ACCIDENTAL OPERATION: Turn
Power Switch to its “OFF” position
and unplug tool from its electrical
outlet before performing inspection,
maintenance, or cleaning procedures.
TO PREVENT SERIOUS INJURY FROM
TOOL FAILURE: Do not use damaged
equipment. If abnormal noise or
vibration occurs, have the problem
corrected before further use.
Item 67631
For technical questions, please call 1-888-866-5797.
Page 9
PLEASE READ THE FOLLOWING CAREFULLY
THE MANUFACTURER AND/OR DISTRIBUTOR HAS PROVIDED THE PARTS LIST AND ASSEMBLY
DIAGRAM IN THIS MANUAL AS A REFERENCE TOOL ONLY. NEITHER THE MANUFACTURER OR
DISTRIBUTOR MAKES ANY REPRESENTATION OR WARRANTY OF ANY KIND TO THE BUYER THAT HE
OR SHE IS QUALIFIED TO MAKE ANY REPAIRS TO THE PRODUCT, OR THAT HE OR SHE IS QUALIFIED
TO REPLACE ANY PARTS OF THE PRODUCT. IN FACT, THE MANUFACTURER AND/OR DISTRIBUTOR
EXPRESSLY STATES THAT ALL REPAIRS AND PARTS REPLACEMENTS SHOULD BE UNDERTAKEN BY
CERTIFIED AND LICENSED TECHNICIANS, AND NOT BY THE BUYER. THE BUYER ASSUMES ALL RISK
AND LIABILITY ARISING OUT OF HIS OR HER REPAIRS TO THE ORIGINAL PRODUCT OR REPLACEMENT
PARTS THERETO, OR ARISING OUT OF HIS OR HER INSTALLATION OF REPLACEMENT PARTS THERETO.
PARTS LIST
Part
1
2
3
4
5
6
7
8
9
10
11
12
13
14
15
16
17
18
19
20
21
Description
Screw (M3x5)
Shaft Cover
Bushing Set
Shaft A
Idler Shaft Set
Stop
Knurled Nut
Washer
Barrel Lid
Boot Gasket
Inner Lid
Rubber Barrel
Top Cover
Screws (M3x16)
Middle Plate
Spacers (B)
Fan
Square Nuts
Motor
Motor Connectors
Spacers
Item 67631
Qty.
5
2
4
1
2
1
1
1
1
1
1
1
1
4
1
4
1
2
1
2
4
Part
22
23
24
25
26
27
28
29
30
31
32
33
34
35
36
37
38
39
40
41
42
Description
Inner Nut
Adjusting Plate
Washers (Ø4)
Spring Washers (Ø4)
Screws (M4x50)
Power Switch
Power Plug/Cord
Plug
Outer Nut
Small Set
Nuts Connector
Foot A
Screen
Screws (M4x8)
Pulley
O-Ring (Ø8)
Washer (Ø8)
Foot B
V-Belt
Base
Driving Shaft Bearing
For technical questions, please call 1-888-866-5797.
Qty.
1
1
4
4
4
1
1
1
1
1
1
4
1
6
1
6
1
2
1
1
1
Page 10
ASSEMBLY DIAGRAM
Please note: Not all parts are washable.
Record Product’s Serial Number Here:
Note: If product has no serial number, record month and year of purchase instead.
Note: Some parts are listed and shown for illustration purposes only, and are not available
individually as replacement parts.
Item 67631
For technical questions, please call 1-888-866-5797.
Page 11
LIMITED 90 DAY WARRANTY
Harbor Freight Tools Co. makes every effort to assure that its products meet high quality
and durability standards, and warrants to the original purchaser that this product is free from
defects in materials and workmanship for the period of 90 days from the date of purchase. This
warranty does not apply to damage due directly or indirectly, to misuse, abuse, negligence or
accidents, repairs or alterations outside our facilities, criminal activity, improper installation,
normal wear and tear, or to lack of maintenance. We shall in no event be liable for death,
injuries to persons or property, or for incidental, contingent, special or consequential damages
arising from the use of our product. Some states do not allow the exclusion or limitation of
incidental or consequential damages, so the above limitation of exclusion may not apply to
you. THIS WARRANTY IS EXPRESSLY IN LIEU OF ALL OTHER WARRANTIES, EXPRESS
OR IMPLIED, INCLUDING THE WARRANTIES OF MERCHANTABILITY AND FITNESS.
To take advantage of this warranty, the product or part must be returned to us with
transportation charges prepaid. Proof of purchase date and an explanation of the complaint
must accompany the merchandise. If our inspection verifies the defect, we will either repair or
replace the product at our election or we may elect to refund the purchase price if we cannot
readily and quickly provide you with a replacement. We will return repaired products at our
expense, but if we determine there is no defect, or that the defect resulted from causes not
within the scope of our warranty, then you must bear the cost of returning the product.
This warranty gives you specific legal rights and you may also have other rights which
vary from state to state.
3491 Mission Oaks Blvd. • PO Box 6009 • Camarillo, CA 93011 • 1-888-866-5797