1
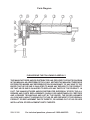
Item 92188 Angle Drill With Keyless Chuck Operating Instructions 3491 Mission Oaks Blvd., Camarillo, CA 93011 'LVWULEXWHGH[FOXVLYHO\E\ +DUERU)UHLJKW7RROV Copyright© 2004 by Harbor Freight Tools®. All rights reserved. No portion of this manual or any artwork contained herein may be reproduced in any shape or form without the express written consent of Harbor Freight Tools. For technical questions and replacement parts, please call 1-800-444-3353. Thank you for choosing a Harbor Freight Tools product! For future reference, please complete the owner’s record below: Model:___________________ Purchase Date:__________________ Save the receipt, and these instructions. It is important that you read the entire instruction sheet to become familiar with this product before you begin using it. Technical Specifications: Angle Drill includes 3/8” Shaft Attachment Hex Shaft Size: 5/16” Spindle Thread: 3/8” - 24 Maximum Speed: 6000 RPM Safety Warnings and Precautions WARNING: When using tool, basic safety precautions should always be followed to reduce the risk of personal injury and damage to equipment. Read all instructions before using this product! 1. Do not exceed 6,000 RPM maximum speed. 2. Avoid working alone. If an accident happens, an assistant can bring help. 3. Keep work area clean. Cluttered areas invite injuries. 4. Keep children away. Children must never be allowed in the work area. Do not let them handle machines, tools, or extension cords. REV 09b Safety Warnings and Precautions (continued) 5. Store idle equipment. When not in use, tools must be stored in a dry location to inhibit rust. Always lock up tools and keep out of reach of children. 6. Dress properly. Do not wear loose clothing or jewelry as they can be caught in moving parts. Protective, electrically nonconductive clothes and nonskid footwear are recommended when working. Wear restrictive hair covering to contain long hair. 7. Use eye and ear protection. Always wear ANSI approved impact safety goggles. 8. Do not overreach. Keep proper footing and balance at all times. 9. Use the right tool for the job. Do not attempt to force a small tool or attachment to do the work of a larger industrial tool. There are certain applications for which this tool was designed. Do not modify this tool and do not use this tool for a purpose for which it was not intended. 10. Stay alert. Watch what you are doing, use common sense. Do not operate any tool when you are tired. 11. Check for damaged parts. Before using any tool, any part that appears damaged should be carefully checked to determine that it will operate properly and perform its intended function. Check for alignment and binding of moving parts; any broken parts or mounting fixtures; and any other condition that may affect proper operation. Any part that is damaged should be properly repaired or replaced by a qualified technician. Do not use the tool if any switch does not turn On and Off properly. 12. Replacement parts and accessories. When servicing, use only identical replacement parts. Use of any other parts will void the warranty. 13. Do not operate tool if under the influence of alcohol or drugs. Read warning labels on prescriptions to determine if your judgment or reflexes are impaired while taking drugs. If there is any doubt, do not operate the tool. 14. Use proper size and type extension cord. If an extension cord is required, it must be of the proper size and type to supply the correct current to the tool without heating up. Otherwise, the extension cord could melt and catch fire, or cause electrical damage to the tool. This tool requires use of an extension cord of 0 to 10 amps capability (up to 50 feet), with wire size rated at 18 AWG. Longer extension cords require larger size wire. If you are using the tool outdoors, use an extension cord rated for outdoor use (signified by “WA” on the jacket). 15. Take caution as some woods contain preservatives such as copper chromium arsenate (CCA) which can be toxic. When drilling these materials extra care should be taken to avoid inhalation and minimize skin contact. 16. Maintenance. For your safety, maintenance should be performed regularly by a qualified technician. 17. Read and understand all warnings and instructions provided in the instruction manual of the drill being used to power this Angle Drill attachment. Warning: The warnings, cautions, and instructions discussed in this instruction manual cannot cover all possible conditions and situations that may occur. It must be understood by the operator that common sense and caution are factors which cannot be built into this product, but must be supplied by the operator. Unpacking When unpacking, verify against the Parts List and Parts Diagram on the next page, that all parts are included. If any parts are missing or broken, please call Harbor Freight Tools at the number on the cover of this manual. SKU 92188 For technical questions, please call 1-800-444-3353. Page 2 Assembling and Operating the Angle Drill 1. Unplug the electric drill or disconnect the air hose on the air powered drill before attempting to attach the Angle Drill. The drill used to power the Angle Drill should also be turned OFF. 2. Insert the Shaft (#13) of the Angle Drill into the chuck of the drill being used to power this attachment. Properly align and tighten the Shaft in place (read instructions provided with the drill being used to power this attachment). 3. Insert the bit of choice into the Chuck Casing (#12) of the Angle Drill and tighten in place (the chuck is keyless). 4. Properly grip the Drill/Angle Drill Attachment. One hand will operate the power drill and the other hand will wraparound the Spindle Case (#2) of the Angle Drill attachment, to support the tool while it is being used. 5. Before using the Angle Drill on the workpiece, turn on the drill and test its operation. Make sure the Angle Drill is properly aligned for maximum leverage. Check that the drill bit is properly inserted. 6. The Angle Drill is now ready to be used. Align the drill bit on the workpiece. While firmly holding the power drill and the Angle Drill, turn on the power drill and begin drilling. Caution: Always unplug the power drill or disconnect the air hose on air powered drills, before changing bits or making adjustments to the Angle Drill. Parts List # 1 2 3 4 5 6 7 8 9 10 11 12 13 Description Needle Bearing Spindle Case1 Clutch Pin Ball Bearing Bevel Gear Ball Bearing Angle Head Key Bevel Gear Bearing Cap Chuck Casing Chuck Screw Shaft Qty 1 1 2 1 1 1 1 1 1 1 1 1 Note: Some parts are listed and shown for illustration purposes only and are not available individually as replacement parts. SKU 92188 For technical questions, please call 1-800-444-3353. Page 3 Parts Diagram PLEASE READ THE FOLLOWING CAREFULLY THE MANUFACTURER AND/OR DISTRIBUTOR HAS PROVIDED THE PARTS DIAGRAM IN THIS MANUAL AS A REFERENCE TOOL ONLY. NEITHER THE MANUFACTURER NOR DISTRIBUTOR MAKES ANY REPRESENTATION OR WARRANTY OF ANY KIND TO THE BUYER THAT HE OR SHE IS QUALIFIED TO MAKE ANY REPAIRS TO THE PRODUCT OR THAT HE OR SHE IS QUALIFIED TO REPLACE ANY PARTS OF THE PRODUCT. IN FACT, THE MANUFACTURER AND/OR DISTRIBUTOR EXPRESSLY STATES THE ALL REPAIRS AND PARTS REPLACEMENTS SHOULD BE UNDERTAKEN BY CERTIFIED AND LICENSED TECHNICIANS AND NOT BY THE BUYER. THE BUYER ASSUMES ALL RISK AND LIABILITY ARISING OUT OF HIS OR HER REPAIRS TO THE ORIGINAL PRODUCT OR REPLACEMENT PARTS THERETO, OR ARISING OUT OF HIS OR HER INSTALLATION OF REPLACEMENT PARTS THERETO. SKU 92188 For technical questions, please call 1-800-444-3353. Page 4