1
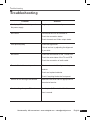
Important Safety Instructions Warning! Important Safety Instructions CAUTION RISK OF ELECTRIC SHOCK DO NOT OPEN CAUTION: TO REDUCE THE RISK OF ELEC TRIC SHOCK, DO NOT REMOVE COVER (OR BACK). NO USER SERVICEABLE PARTS INSIDE. REFER SERVICING TO QUALIFIED SERVICE PERSONNEL. This symbol indicates high voltage is present inside. It is dangerous to make any kind of contact with any inside part of this product. This symbol alerts you that important literature concerning operation and maintenance have been included with this product. Note to CATV system installer: This reminder is provided to call CATV system installer’s attention to Article 820-40 of the national Electrical Code that provides guidelines for proper grounding and, in particular, specifies that the cable ground shall be connected to the grounding system of the building as close to the point of cable entry as practical. Caution : Any changes or modifications in construction of this device which are not expressly approved by the party responsible for compliance could void the user’s authority to operate the equipment. Caution : To prevent electric shock, match the wide blade of plug to the wide shot, and fully insert the plug. Splashing water warning as follow Caution : The apparatus shall not be exposed to water (dripping or splashing) and that no objects filled with liquids, such as vases, should be placed on the apparatus. Important : One Federal Court has held that unauthorized recording of copyrighted TV programs is an infringement of U.S. copyright laws. To prevent damage which may result in fire of electric shock hazard, do not expose this appliance to rain or moisture. Always be careful when using this product. To reduce the risk of fire, electrical shocks, and other injuries, keep these safety precautions in mind when installing, using, and maintaining your Receiver. Information to User This equipment has been tested and found to comply with the limits for A Class B digital device, pursuant to part 15 of the FCC rules. These limits are designed to provide reasonable protection against harmful interference in a residential installation. This equipment generates, uses and can radiate radio frequency energy and, if not installed and used in accordance with the instructions, may cause harmful interference to radio communications. However, there is no guarantee that interference will not occur in a particular installation. If this equipment does cause harmful interference to radio or television reception, which can be determined by turning the equipment off and on, the user is encouraged to try to correct the interference by one or more of the following measures: - Reorient or relocate the receiving antenna. - Increase the separation between the equipment and receiver - Connect the equipment into an outlet on a circuit different from that to which the receiver is connected. - Consult the dealer or an experienced radio or TV technician for help. - Explanation of disconnection from mains supply as follow, or equivalent, To disconnect power from the mains, pull out the mains cord plug. When installing the product, ensure that the plug is easily accessible. 2 English 'LVWULEXWHG%\:6,QWHUQDWLRQDOaZZZZVLGLJLWDOFRPaVDOHV#ZVLGLJLWDOFRP Important Safety Instructions Important Safety Instructions 1) Read these instructions. 2) Keep these instructions. 3) Heed all warnings. 4) Follow all instructions. 5) Do not use this apparatus near water. 6) Clean only with dry cloth 7) Do not block any ventilation openings. Install in accordance with the manufacturer’s instructions. 8) Do not install near any heat sources such as radiators, heat registers, or other apparatus. [including amplifies] that produce heat. 9) Do not defeat the safely purpose of the polarized or grounding-type plug. A polarized plug has two blades with one wider than the other. A grounding type plug has two blades and a third grounding prong. The wide blade or the third prong are provided for your safety. If the provided plug does not fit into your outlet, consult an electrician for replacement of the obsolete outlet. 10) Protect the power cord from being walked on or pinched particularly at plugs, Convenience receptacles, and the point where they exit from the apparatus. 11) Only use attachments/accessories specified by the manufacturer. 12) Use only with cart, stand, tripod, bracket, or table specified by the manufacturer, or sold with the apparatus. When used, caution when moving the cart/apparatus combination to avoid injury from tip-over. 13) Unplug this apparatus during lightning storms or when unused for long periods of time. 14) Refer all servicing to qualified service personnel. Servicing is required when the apparatus has been damaged in any way, such as power-supply cord or plug is damaged, liquid has been spilled or objects have fallen into the apparatus, the apparatus has been exposed to rain or moisture, does not operate normally, or has been dropped. This device complies with part 15 of the FCC Riles. Operation is subject to the following two conditions. (1) This device many not cause harmful interference, and (2) This device must accept any interference that may cause undesired operation. This satellite receiver provides display of television closed caption in According with §15.119 of the FFC rules. 'LVWULEXWHG%\:6,QWHUQDWLRQDOaZZZZVLGLJLWDOFRPaVDOHV#ZVLGLJLWDOFRP English 3 Important Safety Instructions A vertissement! Consignes de sécurité importantes MISE EN GARDE RISQUE D’ÉLECTROCUTION, NE PAS DÉMONTER L’APPAREIL. ATTENTION : POUR PRÉVENIR LES RISQUES D’ÉLECTROCUTION, NE PAS DÉMONTER LE COUVERCLE (NI LE PANNEAU ARRIÈRE). L’UNITÉ NE CONTIENT PAS DE PIÈCES RÉPARABLES PAR L’UTILISATEUR. S’ADRESSER À UN SERVICE APRÈS-VENTE QUALIFIÉ. Ce symbole avertit l’utilisateur de la présence d’une tension très élevée à l’intérieur de l’appareil. Il est très dangereux d’entrer en contact avec toute pièce à l’intérieur de cet appareil. Ce symbole informe l’utilisateur que l’emballage est accompagné d’un document important sur le fonctionnement et l’entretien de ce produit. Avis aux installateurs de systèmes de câblodistribution Ce rappel vise à attirer l’attention de l’installateur de systèmes de câblodistribution sur la clause 820-40 du Code national de l’électricité. Il y trouvera des consignes sur la question de la mise à la terre. Il faut, en particulier, que la connexion se fasse aussi près que possible du point d’entrée du câble. Mise en garde : Toute modification à la construction de ce dispositif qui n’a pas été expressément approuvée par la partie responsable des questions de conformité aux normes pourrait annuler le droit de l’utilisateur de se servir de l’équipement. Mise en garde : Pour éviter les décharges électriques, veillez à introduire la lame la plus large de la fiche dans la fente correspondante de la prise et assurez-vous de pousser la fiche jusqu’au fond. Avertissement concernant les éclaboussures d’eau Mise en garde : Veillez à ne pas exposer l’appareil à l’eau (gouttes ou éclaboussures) et ne pas y déposer des objets remplis d’eau, comme des vases. Important : Selon le décret d’une des cours fédérales, l’enregistrement non autorisé des émissions télévisées protégées par le droit d’auteur constitue une violation des lois américaines sur les droits d’auteur. Afin de prévenir tout dommage pouvant provoquer des risques d’incendie et d’électrocution, veillez à ne pas exposer cet appareil à la pluie ou à l’humidité. Usez toujours de prudence lorsque vous utilisez ce produit. Pour réduire tout risque d’incendie, de chocs électriques et d’autres blessures, n’oubliez pas ces consignes de sécurité lorsque vous installez, utilisez ou faites l’entretien votre faites l’entretien. Avis à l’intention de l’utilisateur Cet appareil a été soumis à des tests qui ont établi sa conformité aux limites d’émission d’énergie des appareils numériques de la classe B définies dans la Section 15 des règlements du FCC. Ces limites sont destinées à offrir une protection raisonnable contre les interférences nuisibles dans des installations résidentielles. Cet appareil génère, utilise et peut émettre une énergie de fréquence radio. S’il n’est pas installé et utilisé conformément aux instructions, il peut causer des interférences nuisibles aux communications radio. Cependant, il n’existe aucune garantie qu’il n’y aura pas d’interférence dans une installation particulière. Si cet équipement cause des interférences nuisibles à la réception télé et radio, ce qui peut être déterminé en mettant l’équipement hors puis sous tension, l’utilisateur est invité à éliminer ces interférences sur l’aide de l’une ou de l’autre des méthodes décrites ci-dessous : - Réorienter ou déplacer l’antenne de réception. - Augmentez la distance entre le matériel et le récepteur. - Brancher l’appareil à une prise située sur un autre circuit que celui auquel le récepteur est branché. - Contacter le revendeur ou un technicien radio/télé expérimenté pour obtenir une assistance. - E xplication du débranchement de l’alimentation secteur comme suit, ou l’équivalent : Pour couper le courant au niveau de l’alimentation secteur, retirez la fiche du cordon branchée à l’alimentation secteur. Lorsque vous installez l’appareil, assurez-vous que la fiche est facilement accessible. 4 English 'LVWULEXWHG%\:6,QWHUQDWLRQDOaZZZZVLGLJLWDOFRPaVDOHV#ZVLGLJLWDOFRP Important Safety Instructions Consignes de sécurité importantes 1) Lisez les consignes ci-dessous. 2) Conservez ces consignes en lieu sûr. 3) Faites attention à tous les avertissements. 4) Suivez toutes les instructions. 5) N’utilisez pas cet appareil près de l’eau. 6) Utilisez un chiffon sec seulement pour épousseter l’appareil. 7) N e bouchez pas les ouïes de ventilation. Installez l’appareil conformément aux instructions du fabricant. 8) N e placez pas l’appareil près d’une source de chaleur, telle qu’un radiateur, un registre de chaleur ou tout autre appareil électrique qui dégage de la chaleur (y compris les amplificateurs). 9) N e contournez pas les dispositifs de sécurité des fiches polarisées ou dotées d’une mise à la terre. On distingue une fiche polarisée par ses deux lames, dont l’une est plus large que l’autre. Une fiche du type mise à la terre comporte deux lames et une broche de mise à la terre. L a lame large des fiches polarisées et la broche de mise à la terre sont fournies par mesure de sécurité. S i la prise murale ne correspond pas à l’une ou à l’autre de ces fiches, consultez un électricien à des fins de remplacement de la prise désuète. 10) P rotégez le cordon d’alimentation contre le piétinement et le coincement par des objets. Faites attention en particulier à la fiche, aux prises de courant et au point de sortie de l’appareil. 11) N’utilisez que les accessoires indiqués par le fabricant. 12) P lacez l’appareil uniquement sur un chariot, un socle, un trépied ou un support recommandé par le fabricant, ou vendu avec l’appareil. Si vous déplacez la combinaison chariot-appareil, usez de précaution afin d’éviter des blessures si elle venait à basculer. 13) D ébranchez cet appareil en cas d’orages ou durant de longues périodes de non-utilisation. 14) Confiez toutes les réparations à un technicien qualifié. Cet appareil doit être réparé dans des cas suivants : endommagement du cordon d’alimentation ou de la fiche, pénétration d’un liquide ou d’un objet dans l’appareil, exposition de l’appareil à la pluie ou à l’humidité, mauvais fonctionnement ou chute de l’appareil. Ce périphérique est conforme à la Section 15 de la réglementation du FCC. Son utilisation est assujettie aux deux conditions suivantes : (1) Ce périphérique n’est pas censé causer d’interférences nuisibles. (2) Ce périphérique doit accepter de recevoir toute interférence, y compris des interférences non désirables qui pourraient en perturber le fonctionnement. Ce récepteur de signaux satellite permet l’affichage des sous-titres codés des émissions télévisées conformément aux règlements de la Section 15.119 du FCC. 'LVWULEXWHG%\:6,QWHUQDWLRQDOaZZZZVLGLJLWDOFRPaVDOHV#ZVLGLJLWDOFRP English 5 Safety Instructions Safety Instructions This product has been manufactured to satisfy the international safety standards. Please read all of safety and operating instructions before operating the product and keep this manual for future reference. MAIN POWER SUPPLY AC 100-240V~, 50/60Hz. Operate your product only from the type of power supply indicated on the marking label. If you are not sure of the type of power supplied to your home, consult your local power company. Disconnect the STB from the mains before you start any maintenance or installation procedures. OVERLOADING Do not overload a wall outlet, extension cord or adapter as this may result in electric fire or shock. LIQUIDS The product should not be exposed to any liquids such as dripping or splashing. No objects filled with liquids, such as vases, should be placed on the apparatus. CLEANING Before cleaning, disconnect the product from the wall outlet. Use a cloth lightly dampened with water (no solvents) to clean the exterior. VENTILATION The slots on top of the product must be left uncovered to allow proper airflow to the unit. Do not stand the product on soft furnishings or carpets. Do not expose the product to direct sunlight, place it near a heater. Do not stack electronic equipment on top of the product. ATTACHMENTS Do not use any attachment that is recommended by the manufacturer; it may cause a hazard or damage the product. CONNECTION TO THE SATELLITE DISH LNB Disconnect the product from the mains before connecting or disconnecting the cable from the satellite dish. Failure to do so can damage the LNB. CONNECTION TO THE TV Disconnect the product from the mains before connecting or disconnecting the cable from the satellite dish. Failure to do so can damage the TV. LOCATION Place the product indoors in order not to expose to lightning, rain or sunlight. Do not install near any heat sources such as radiators, heat registers, stoves, or other apparatus (including amplifier) that product heat. LIGHTNING, or NOT IN USE Unplug the produce from the wall outlet and disconnect the cable during a lightning storm or when unused for a long time. SERVICING Do not attempt service this product yourself, as opening or removing covers may expose you to dangerous voltage or other hazard. Refer all servicing to qualified service personnel. “The mains plug is used as the disconnect device. The disconnect device shall remain readily operable.” 6 English 'LVWULEXWHG%\:6,QWHUQDWLRQDOaZZZZVLGLJLWDOFRPaVDOHV#ZVLGLJLWDOFRP Contents Contents Safety Instructions................................. 2 Chapter 5 Chapter 1 Menu Map................................................ 19 Main Menu............................................... 20 Installation............................................. 20 Before You Begin.................................... 8 General Features.................................. 8 Accessories........................................... 8 Chapter 2 Controls and Functions......................... Front Panel........................................... Rear Panel............................................ Remote Control Unit............................. 9 9 9 10 Chapter 3 Connections............................................ 11 Location of your receiver......................... Connecting your receiver with dish system............................................. Connecting your analog receiver ........... Connecting your receiver to TV............... Connecting external audio/Hi-Fi system. Connecting digital audio system............. 11 11 12 12 12 12 Chapter 4 Initial Settings and Operations.............. 13 Menu Information.................................. 13 Getting Started...................................... 13 Antenna Setting...................................... Motor Setting........................................... Auto Scanning......................................... Manual Scanning.................................... Blind Scanning........................................ Defaults Setting....................................... 20 22 25 25 27 28 Language Setting.................................... OSD Setting............................................ Media Settings........................................ Time Setting............................................ Reservation Setting................................. System Information................................. 28 29 29 30 30 30 Delete Channel....................................... Delete All Channels................................. Favorite Channels................................... Edit Channels.......................................... SW Upgrade........................................... 31 31 31 32 32 System Setup........................................ 28 Channel Setup...................................... 31 Parental Lock........................................ 33 Channel Lock.......................................... 33 Lock Control............................................ 33 Change Pin Code.................................... 34 Game.................................................... 34 Troubleshooting.................................. 35 Specifications...................................... 36 Selecting the On Screen Display (OSD) Language................................................ 13 Selecting the Antenna Setting................. 14 Auto Scanning......................................... 14 Basic Operation.................................... 15 Switching Channel.................................. Volume Control....................................... Info Bar................................................... Selecting the soundtrack . ...................... MoSAic . ................................................. Sleep Timer Function.............................. Zoom Function........................................ Channel List............................................ To view channel list in specific order (Alphabet/Satellite/Provider/Favorites)....... Electronic Programme Guide (EPG)....... 15 15 16 16 16 17 17 17 18 18 'LVWULEXWHG%\:6,QWHUQDWLRQDOaZZZZVLGLJLWDOFRPaVDOHV#ZVLGLJLWDOFRP English 7 Chapter 1 >> Before You Begin Before You Begin General Features •Accurate, Brilliant Friendly OSD with Full Function •MPEG-2 & Fully DVB Compliant •MPEG-2 Video (MP@ML), MPEG-1 Audio Layer1, Layer2 •RF-Modulator CH3 or CH4 •LNB Controlling Logic (0/22kHz Tone) •SCPC/MCPC Receivable from C /Ku-Band Satellites •Digital Tuner with Loop-through •Wide Symbol Rate 1~45Mbps & Frequency Input 950~2150MHz •DiSEqC 1.0, 1.1 & 1.2 Supported (Go to X function) • Y,Pb,Pr Video or S-Video OUT •256 Colors Graphic User Interface •Multi-language Menu •4-digit 7-segment LED Display •Installation by Easy Setup Guide •8,000 Channels Storing •User-friendly Data Editing Function •Favorite Channel and Parental Lock Function •RS232C for Additional Information Services and Upgrading System Software Accessories •User’s Manual •Remote Control Unit •Batteries (AAA) •RCA Cable (Optional) 8 English 'LVWULEXWHG%\:6,QWHUQDWLRQDOaZZZZVLGLJLWDOFRPaVDOHV#ZVLGLJLWDOFRP Chapter 2 >> Controls and Functions Controls and Functions Front Panel 11 Power ( ) button Turns your receiver On/Off. 2 Arrow (◄/►) buttons (Optional) Adjusts the volume and moves the cursor left/right on the menu. 3 Arrow (▲/▼) buttons Changes channels or moves the cursor up/down on the menu. 4 MENU button (Optional) Displays the menu. Exits from the current menu or goes to the previous menu. 5 OK button (Optional) Confirms selection. 6 DISPLAY (Optional) Displays channel information. Displays local time in Standby mode. Rear Panel 1 RS-232C (Only for installation) Connects to a PC. RS232C trans data to the external computer. 2 RF IN Connects to the TV antenna. 3 RF OUT Connects a RF signal from yours STB to RF (ANT)input jack on the TV. 4 AUDIO OUT (LEFT/RIGHT) Connects to audio jack on the TV or any extenal audio system. 5 0/12V 50mA Max. Connects to the external switch box. 6 VIDEO OUT 7 Connects to video input jack on TV. 8 S-Video Connects to video input jack on the TV 9 S/PDIF OUT (COAXIAL) Connects to a digital audio amplifier with coaxial cable. 10 S/PDIF OUT (OPTICAL) Connects to a digital audio amplifier with optical cable. 11 LOOP Loop out is an output port of the DISH INPUT 12 DISH INPUT Connects to the satellite dish. 13 Switch To provide power to the main unit. COMPONENT OUT (Y/Pb/Pr) Connects to video input jack on the plazma TV. 'LVWULEXWHG%\:6,QWHUQDWLRQDOaZZZZVLGLJLWDOFRPaVDOHV#ZVLGLJLWDOFRP English 9 Chapter 2 >> Controls and Functions Remote Control Unit 11 Power ( ) button Turns your receiver On/Off. 13 VOL +/- buttons Adjusts the volume level. 2 Numeric (0~9) buttons Controls the number entry and changes programme channel directly. 14 Zoom ( ) button (Optional) Zooms in the selected screen. The zooming location changes by pressing direction buttons. (x2 → normal) 3 TV/Radio ( ) button Switches between TV and Radio Channel list. 4 Sleep ( ) button Shows the time setting for the sleep-timer. 5 MoSAic ( ) button Displays multi picture section. 6 Arrow (◄/►) or OK buttons Adjusts the volume level or moves the cursor left or right on the menu. Arrow (▲/▼) or OK buttons Changes channels or moves the cursor up or down on the menu. 7 Menu ( ) button Displays the menu. Exits from the current menu or goes to the previous menu. 8 Mute ( ) button Mutes audio output. 9 Last button Shows Viewed Channel List. 10 Audio ( ) button Shows the Input Audio information. 11 OK button Shows Channel list while watching TV or listening to the Radio. 15 Text ( ) button N / A. 16 INFO ( ) button Displays program information in the screen. 17 Back or Exit ( ) button Goes to previous menu. The changed values are to be saved. 18 SAT ( ) button Shows satellite channel list. 19 PR +/- buttons Changes channel up or down. 20 Page ( / ) buttons Moves up or down pages on the menu and TV/Radio List. 21 FAV (♥) button Go to the last channel you’ve watched in the Favorite Channel List 1. And if pressed again, you can see the last channel you’ve watched in the next Favorite Channel List 2. Repeat pressing the button until no more Favorite Channel is found. Then it returns to the current channel. 22 F2 NTSC / PAL Conversion. 12 EPG ( ) button Shows the TV programme guide. 10 English 'LVWULEXWHG%\:6,QWHUQDWLRQDOaZZZZVLGLJLWDOFRPaVDOHV#ZVLGLJLWDOFRP Chapter 3 >> Connections Connections Computer for download Location of your receiver •Install your receiver in horizontal position. •Do not put any heavy stuff such as a TV on your receiver. •Do not install your receiver in the places as follows: Vibrating place, direct sunrays, Humid place, too high or low temperature, and no ventilated place. Connecting your receiver with dish system After installing your antenna system, connect the coaxial cable from the LNB of your antenna to “DISH INPUT” terminal marked at the rear panel of your receiver. All cable connectors should be finger-tightened; do not use any kind of wrench while tightening connectors. The cable should be 75 ohm impedance coaxial twisted at the end with an “F” type connector. 'LVWULEXWHG%\:6,QWHUQDWLRQDOaZZZZVLGLJLWDOFRPaVDOHV#ZVLGLJLWDOFRP English 11 Chapter 3 >> Connections Connecting your analog receiver To facilitate the user using analog receiver to view analog channels, this product has been provided with a loop through terminal marked as “LOOP.” Connect the coaxial cable from this terminal to the IF input terminal of your analog receiver. Now by keeping your receiver in standby, you will be able to tune and view analog channels from your analog receiver. Connecting your receiver to TV To connect your receiver with your television, you can use three different methods; via RF cable, RCA cable , S-Video or Y,Pb,Pr cable. Connect the RF cable to the terminal marked “RF OUT” on the rear panel of your receiver and its other end to the TV RF input socket. Connect the Video/Audio RCA cables from the VIDEO OUT/AUDIO OUT (LEFT, RIGHT) on the rear of your receiver to the VIDEO INPUT/AUDIO INPUT (LEFT, RIGHT) jacks on the TV. In the case of connecting your TV through S-Video or Y,Pb,Pr cable, connect the S-Video or Y,Pb,Pr connector marked TV to the respective S-Video or Y,Pb,Pr port on the TV. (depend on model) Connecting external audio/Hi-Fi system To connect any external Audio Hi-Fi system, your receiver has been provided with two RCA connectors at the rear panel of your receiver, marked with AUDIO L and R respectively to connect the left and right Audio on the external audio/Hi-Fi system. Connecting digital audio system Connect a coaxial and optical cable cable between S/PDIF OUT coaxial and optical at the rear panel of your receiver and S/PDIF INPUT coaxial and optical on the Digital Audio System. 12 English 'LVWULEXWHG%\:6,QWHUQDWLRQDOaZZZZVLGLJLWDOFRPaVDOHV#ZVLGLJLWDOFRP Chapter 4 >> Initial Settings and Operations Initial Settings and Operations Menu Information A menu is a field of text shown on the TV screen. Selectable lines are generally activated (highlighted). No-activated lines cannot be selected. Most of menus show short information at the bottom of the screen. This menu consists of 7 main menus: •Installation •Game •System Setup •Channel Setup •Parental Lock 1 Using the Arrow (▲/▼) buttons you can move upwards and downwards on the menus. On the menus, you can search channels using this button. 2 When you have reached the required subject menu, press the OK button to confirm your choice. 3 On the menus, you can select menu items using the Arrow (◄/►) buttons. 4 When you want to return to the previous menu with saving the change, press the Back or Exit ( ) button. 5 When you want to exit from the current menu, press the Menu ( ) button. Getting Started To start your receiver for the first time, you must select the language for displaying menus and you should set parameters for system configuration and scan satellite channels. Perform the following setup procedure for scanning the satellite. Follow the instructions below to scan satellite channels. You can enjoy watching TV or listening to the Radio after the procedure completes. 1 Turn on your TV and receiver. Language Setting menu will appear automatically. OSD Language is highlighted. Selecting the On Screen Display (OSD) Language 2 Select the OSD language of your choice using the Arrow (◄/►) buttons. You will see the selected language on the OSD menu. 3 Select Installation using the Arrow (◄/►) buttons. 'LVWULEXWHG%\:6,QWHUQDWLRQDOaZZZZVLGLJLWDOFRPaVDOHV#ZVLGLJLWDOFRP English 13 Chapter 4 >> Initial Settings and Operations Selecting the Antenna Setting 4 Select Antenna Setting using the Arrow (▲/▼) buttons and press the OK button. Antenna list and option list will appear. 5 Select the desired satellite using the Arrow (▲/▼) buttons or Page ( / ) buttons and press the Arrow (►) or OK button to move through the option list. 6 Set the option list using the Arrow buttons. 7 Select options and press the RED(MoSAiC), OK or Menu button to save the changes. •RED(MoSAiC): Save •OK: Save and move to the satellite list •Menu: Save the changes to exit for AV mode •Select one or more satellites according to the direction of your satellite dish. You can select many satellites depending on the direction to the satellites. 8 Press the Back or Exit ( ) button to return to the Installation menu. Auto Scanning 9 Select Auto Scanning using the Arrow (▲/▼) buttons and press the OK button. The preprogrammed satellite lists will appear. 10 Select an appropriate satellite using the Arrow (▲/▼) buttons and set the channel options using the Arrow (◄/►) buttons. •Off: Scanning is disabled. •All: Scan all the free and scrambled channels. •Free: Scan free channels only. •NIT: Scan all mode with TP network scanning •You can set Off, All, Free or NIT to each satellite. 11 Press the OK button, Auto Scanning will start. All the channels in the list from the selected satellite will be automatically downloaded. 12 Press the OK button to save the changes. 13 Press the Back or Exit ( ) button to exit from the menu and press the Arrow (▲/▼) buttons to select the desired channel. Now you can watch TV or listen to the Radio. 14 English 'LVWULEXWHG%\:6,QWHUQDWLRQDOaZZZZVLGLJLWDOFRPaVDOHV#ZVLGLJLWDOFRP Chapter 4 >> Initial Settings and Operations Basic Operation This section explains various functions while watching TV or listening to the Radio. Switching Channel You can switch the current channel by three different methods. •Method 1: Press the Arrow (▲/▼) buttons or PR+/- buttons. •Method 2: To select a channel directly, select a channel using the Numeric (0~9) button. •Method 3: 1 To display the channel list, press the OK button. 2 Select a channel you want to watch using the Arrow (▲/▼) buttons and then press the OK button. •If there are multiple channels, use the Page ( / ) or the Arrow (◄/►) buttons to move to channels by page. •Press the TV/Radio ( ) button to switch between the TV and Radio channel. •Method 4: In case of more than two scanned satellites 1 Press the SAT( ) button to show satellite list. 2 Move the cursor to the satellite of a channel to watch with the Arrow (◄/►) buttons and then press OK button. 3 You can follow the method 3 instruction for channel selecton. •Method 5: How to move to the watched channel. 1 Press the last button with RCU. 2 Press OK button after a channel selection by using the Arrow (▲/▼) with RCU. 3 Press OK button to exit. Volume Control To control the volume: •Press the VOL+/- or the Arrow (◄/►) buttons. •Press the Mute ( ) button to turn the sound off. •Press the Mute ( ) button again or the VOL+/- or Arrow (◄/►) buttons to cancel muting. 'LVWULEXWHG%\:6,QWHUQDWLRQDOaZZZZVLGLJLWDOFRPaVDOHV#ZVLGLJLWDOFRP English 15 Chapter 4 >> Initial Settings and Operations Info Bar Channel information always appears for a specific period of time whenever you switch channels. General Information Press the INFO ( ) button; you can see general information of the current channel. 1 Channel number and name 2 Current time 3 Signal Level 4 Signal Quality 5 Icons: Favorite channel, Locked channel, Radio Channel, Scrambled channel, Subtitle, Teletext information, 6 EPG information. 7 Conditional Access Detailed Channel Information You can see detailed channel information pressing the INFO ( ) button again. 8 Detailed channel information 9 Satellite, Frequency, Symbol Rate, FEC, Polarity, Video PID, Audio PID, PCR PID, Transponder 10 Display the stream information. Selecting the soundtrack You can select the audio language, soundtrack, or sound mode. 1 Press the Audio (Yellow) button. 2 Press the Arrow (▲/▼) buttons to select the audio language or soundtrack and press the OK button. 3 Press the Arrow (◄/►) buttons to select the sound mode from Stereo, Mono left, or Mono Right. 4 Stream information. MoSAic You can see multi picture by pressing the RED(MoSAic) button. 16 English 'LVWULEXWHG%\:6,QWHUQDWLRQDOaZZZZVLGLJLWDOFRPaVDOHV#ZVLGLJLWDOFRP Chapter 4 >> Initial Settings and Operations Sleep Timer Function Press the GREEN(Sleep) button, you will see the time set for the sleep timer if already set from the Time Setting menu. Zoom Function You can make the picture appear larger on the screen pressing the Zoom ( ) button. 1 Press the Zoom ( ) button. 2 Select the area you want to zoom using the Arrow buttons and then press the OK button. Picture is enlarged two times. 3 Each time you press the Page ( / ) buttons, the picture is enlarged two or four times. Press the Arrow (▲/▼/◄/►) buttons to change the location at the lower right of display. 4 To cancel the Zoom function, press the Zoom ( ) button twice or Back or Exit( ) button. Channel List You can see the TV or Radio Channel List pressing the OK button while watching TV or ) button. The icon (€) listening to the Radio. Switch the channel list pressing the TV/Radio ( behind the channel name symbolises scrambled channel, and the ( ) icon behind the channel name symbolises indicates a locked channel. Select channel using the Arrow (▲/▼/◄/►), PR+/-, or Page ( / ) buttons and press the OK button to watch. Press SAT button to show CH list for each satellite. The colored buttons show the channel lists as follows: •RED(MoSAic) button: by alphabetical order (alphabetical A -Z) •GREEN(Sleep) button: by satellites (all/searched satellites) •YELLOW(Audio) button: by names of broadcasting providers •BLUE(INFO) button: by Favorite groups •F1 button: New Channel Scanning Function 'LVWULEXWHG%\:6,QWHUQDWLRQDOaZZZZVLGLJLWDOFRPaVDOHV#ZVLGLJLWDOFRP English 17 Chapter 4 >> Initial Settings and Operations To view channel list in specific order (Alphabet/Satellite/Provider/Favorites) 1 Press the Coloured (Red /Green/ Yellow/Blue) button. Channel list is highlighted. 2 Select Alphabet, Satellite, Provider, or Favorites using the Arrow (▲/▼) buttons. The channel list is sorted automatically by your selection. 3 Select the channel pressing the Arrow (▲/▼) or Page ( / ) buttons and press the OK button to watch it. Note • Favorite group must be set to choose. Electronic Program Guide (EPG) EPG displays program information such as program titles, broadcasting schedule, Program synopsis and such EPG service differ depending on the service provider. 1 Press the EPG ( ) button while watching TV or listening to the Radio EPG information appears. 2 Select a program for further more information. •Arrow (▲/▼) buttons: Selects a program by channel •Arrow (◄/►) buttons: Selects a program by time & date within the same channel. It displays the program list at 30 minutes intervals. •You can see the detailed information by pressing Page ( / ) buttons with RCU. 3 Press the OK button, detailed information on the selected event appears. 4 To exit from the Guide mode, press the Back or Exit ( ) button. 18 English 'LVWULEXWHG%\:6,QWHUQDWLRQDOaZZZZVLGLJLWDOFRPaVDOHV#ZVLGLJLWDOFRP Chapter 5 >> Main Menu Menu Map Installation Antenna Setting Motor Setting Auto Scanning Manual Scanning Blind Scanning Defaults Setting System Setup Language Setting OSD Language / Audio 1st Language / Audio 2nd Language / EPG 1st Language / EPG 2ndLanguage OSD Setting Transparency / Windows Transparency / Banner Timer / Screen saver Timer / VFD Module / Display in StandBy Media Settings TV System / TV Aspect Ratio / Video Aspect Ratio / Video Signal Type / RF Channel / Close caption / Video Freeze Time Setting GMT time/ Local time/Set time mode (Auto/Manual) / Time zone / Time Set / Summer time (On/Off) Reservation Setting ON Time / Off time / Repetition Type / Program System Information Channel Setup Delete Channels Delete All Channels Favorite Channels Edit Channels SW Upgrade Parental Lock Channel Lock Lock Control Change PIN Code Game A B C D 'LVWULEXWHG%\:6,QWHUQDWLRQDOaZZZZVLGLJLWDOFRPaVDOHV#ZVLGLJLWDOFRP English 19 Chapter 5 >> Main Menu Main Menu The menu has been carefully designed from user-friendly point of view to assure easy operation to your receiver. The main menu is classified into 7 sub menus that will carry out the various operations individually. Installation In the Installation menu, you can customise antenna setting, channel scanning, and software upgrade. Press the Menu ( ) button. Select Installation using the Arrow (◄/►) buttons on the main menu. Installation >> Antenna Setting Antenna Setting You can set antenna and LNB information for scanning channels. If antenna is not correctly set, you cannot scan channels, therefore you cannot watch any programmes. 1 Select Antenna Setting using the Arrow (▲/▼) buttons and press the OK button. Antenna setting menu appears. 2 Select satellite for channel scan using the Arrow (▲/▼) or Page ( / ) buttons and press the Arrow (◄/►) button to select at option. 3 Select an option using the Arrow buttons. LNB Power Set LNB Power On. Longitude If you know the exact longitude of your location, use the Numeric (0~9) buttons. Toggle between E (East) and W (West) using the Arrow (◄/►) buttons. LNB Type(Unicable) Select the LNB type by pressing Arrow (◄/►) button - Universal 1 (9750 / 10600) - Universal 2 (9550 / 10750) - Unicable (1210 IF / 1420 IF / 1680 IF / 2040 IF) • Select the Unicable and press OK Button to choose one IF by Auto detection (When you use Unicable, Blind Scan function will be not supported) - User Define (LNB Low / LNB High) • LNB IF Frequency can be input with numerique key with RCU - Standard (5150 / 9750 /10000 / 10600 / 10750 / 11250 /11300 / 11475) 20 English 'LVWULEXWHG%\:6,QWHUQDWLRQDOaZZZZVLGLJLWDOFRPaVDOHV#ZVLGLJLWDOFRP Chapter 5 >> Main Menu Note • What is Low Noise Block (LNB)? The LNB is located at the satellite dish antenna. It amplifies the very weak received satellite signal then converts the received microwave satellite signal so that the signal may not decrease the gain between the dish and your receiver. DiSEqC (Digital Satellite Equipment Control) Port You can select DiSEqC using the Arrow (◄/►) buttons. You can select one mode among DiSEqC Port1~4 for 1.0 and Tone Burst 1~2 and Off. Tone 22kHz In case you are using a dual LNB or two antennas connected to a 22kHz Tone Switch Box, with 22kHz Tone Switch (On, Off, or Auto) you can switch between LNB or antenna. Switch 0/12V(Optional) Switch should be set to 12V or 0V. Motor Select motor setting from DiSEqC, USALS, Positioner, and No. DiSEqC 1.1 In case of DiSEqC 1.1 usage, select port 1~16 for the satellites by using the Arrow (◄/►) button Signal Status Press the blue button, you can check the signal status for each TP and Satellite with the Arrow(◄/►▲/▼) buttons. You can scan the selected satellite and TP and Save the changes. - Green(sleep) button : Satellite Auto Scan - Yellow(Audio) button : TP Scan. 4 After setting the options, press the OK or RED(MoSAiC) button to save. 5 •Select satellite(s) according to the direction of your satellite dish. You can select many satellites depending on the direction to the satellites. Press the Back or Exit ( ) button to return to the Installation menu. Note • DiSEqC™ is the registered trademark of Eutelsat Communications. A standard through which it is possible to let a DiSEqC compatible receiver send a signal over the RF cable to a switching device to switch between different LNBs or dishes. The DiSEqC uses the 22kHz signal to control the switching device. 'LVWULEXWHG%\:6,QWHUQDWLRQDOaZZZZVLGLJLWDOFRPaVDOHV#ZVLGLJLWDOFRP English 21 Chapter 5 >> Main Menu Installation >> Motor Setting Motor Setting DiSEqC 1.2 When Motor is set to DiSEqC 1.2 in the Antenna Setting menu. 1 Select Motor Setting using the Arrow (▲/▼) buttons and press the OK button. 2 Select a satellite using the Arrow (▲/▼) buttons and press the OK button. Satellite list appears. Select satellite using the Arrow (▲/▼) buttons and press the OK button Bulleted list indicates selected satellites. 3 Press the RED(MoSAic) button to save selected satellites and then press the Back or Exit ( ) button. 4 If you press the YELLOW(Audio) button, on-screen navigation menu is highlighted. Use the Arrow buttons to move the motor to the west, east, north, and south in order. The position of the motor can be restricted to the software setting limits (West/East) using the RED(MoSAic)/BLUE(INFO) buttons. 5 Press the YELLOW(Audio) button to highlight Satellite. 6 Press the OK button on the Go to satellite menu. Dish changes its position to the direction of satellite (depending on the types of motor, dish changes its position to the default-direction of satellite for the maximum 28 satellites). 7 Press the OK button on the Save Current Position menu. Current position of the motor is saved according to the selected satellite. 8 You can change the Function Menu(Go to Ref. Position / Reset Position / Calculate Positions) by using the Arrow (◄/►) button, activate the function with OK button - Go to Ref. Position: Press the OK button in the Go to Ref. Position menu. Motor changes its position to the zero longitude/ latitude where the count begins. - Reset Position: Reset Positioner initialises the position of motor to the default value. - Calculate Positions: Calculate Positions selects one satellite to revise the position of motor and saves the changes. Changed position of the motor also applies to the directions for other satellites. 22 English 'LVWULEXWHG%\:6,QWHUQDWLRQDOaZZZZVLGLJLWDOFRPaVDOHV#ZVLGLJLWDOFRP Chapter 5 >> Main Menu 9 Confirm the Enable Limits/Disable Limits function pressing the OK button. You will be prompted to decide whether to use the West/East Setting Limits setting value. 10 The method to position motor is selected in the Continuous/Step(Impulses)/ Time(Seconds) menu. If you press the Arrow (◄/►) buttons once in the Continuous mode, selected TP signal of the satellite is locked or the motor stops to move. In the Step(Impulses) mode, you can select steps (pulse) from 1 to 10. The motor changes its position according to the selected step if moved to the left or right (depending on the motor). In the Time(seconds) mode, you can select time (seconds) from 1 to 20. The motor changes its position according to the selected step if moved to the left or right (depending on the motor). USALS When Motor is set to USALS on the Antenna Setting menu. 1 Select Motor Setting using the Arrow (▲/▼) buttons and press the OK button. 2 Select Satellite menu using the Arrow (▲/▼) buttons and press the OK button. Satellite list appears. Select satellite using the Arrow (▲/▼) buttons and press the OK button. Bulleted list indicates selected satellites. 3 Press the RED(MoSAic) button to save selected satellites and then press the Back or Exit ( ) button. 4 If you press the YELLOW(Audio) button, on-screen navigation menu is highlighted. Use the Arrow buttons to move the motor to the west, east, north, and south in order. Position of the motor can be restricted to the software setting limits (West/East) using the RED(MoSAic)/BLUE(INFO) buttons. 5 Press the YELLOW(Audio) button to highlight Satellite. •This function may not work depending on the types of USALS programme. 6 Enter the value of 000.0 E/W (Latitude) and 000.0 N/S (Longitude) and then press the OK button on the Go to X menu. Motor changes its position according to the selected satellite 7 Confirm the Enable Limits/Disable Limits function pressing the OK button. You will be prompted to decide whether to use the West/East Setting Limits setting value •This function may not work depending on the types of USALS programme. •Press OK in Go to Reference menu, the motor moves at zero longtitude/latitude. 'LVWULEXWHG%\:6,QWHUQDWLRQDOaZZZZVLGLJLWDOFRPaVDOHV#ZVLGLJLWDOFRP English 23 Chapter 5 >> Main Menu Positioner 1 This function is used when receiving DiSEqC 1.2 Command with the adaptor that controls positioner antenna. Select a satellite using the Arrow (▲/▼) buttons and press the OK button. Satellite list appears. On the satellite list, you can select satellites pressing the OK button. Press the RED(MoSAic) button to save the selected satellites. 2 If you press the YELLOW(Audio) button, on-screen navigation menu is highlighted. Use the Arrow (▲/▼/◄/►) buttons to move the motor to the west, east, north, and south in order. Position of the motor can be restricted to the software setting limits (West/East) using the RED(MoSAic)/BLUE(INFO) buttons. 3 Press the OK button on the Go to satellite menu. Dish changes its position to the direction of satellite. 4 Press the OK button on the Save Current Position menu. Current position of the motor is saved according to the selected satellite. 5 Press the OK button on the Go to Ref. Position menu. Motor changes its position to the zero longitude/latitude where the count begins. (this function is not supported by the adaptor that controls positioner antenna) 6 Go to Reference changes the position of control adaptor. 7 Reset Positioner initialises the position of motor to the default value. 8 You can change the Function Menu(Go to Ref. Position / Reset Position / Calculate Positions) by using the Arrow (◄/►) button, activate the function with OK button - Go to Ref. Position: Calculate Positions selects one satellite to revise the position of motor and save the changes. - Reset Position: Changed position of the motor also applies to the directions for other satellites. - Calculate Positions: Confirm the Enable Limits/Disable Limits function pressing the OK button. This function may not be supported depending on the model. 9 The method to position motor is selected on the Continuous/Step(Impulses)/ Time(Seconds) menu, If you press the Arrow (◄/►) button once on the Continuous mode, selected TP signal of the satellite is locked or the motor stops to move. On the Step(Impulses) mode, you can select steps (pulse) from 1 to 10. The motor changes its position according to the selected step if moved to the left or right (depending on the motor). On the Time(Seconds) mode, you can select time (seconds) from 1 to 20. The motor changes its position according to the selected step if moved to the left or right (depending on the motor). If you have a Motek motor plz use positioner menu instead of Diseqc 1.2. to make sure that your motor is working correct. 24 English 'LVWULEXWHG%\:6,QWHUQDWLRQDOaZZZZVLGLJLWDOFRPaVDOHV#ZVLGLJLWDOFRP Chapter 5 >> Main Menu Installation >> Auto Scanning Auto Scanning If you select the satellite to scan channel according to the antenna setting, your receiver can automatically scan the satellite without entering any other information. 1 Select Auto Scanning using the Arrow (▲/▼) buttons on the Installation menu and press the OK button. 2 Select satellite to scan channels using the Arrow (▲/▼) buttons and select scan mode (All ,Free or NIT) using the Arrow (◄/►) button or Page (◄/►) button. •All: Scans all channels. •Free: Scans free channels only. •NIT: Scan All mode with TP network scanning. 3 Press the OK button, then it starts scanning. After Auto Scanning completes, you can see TV and Radio channels in the list. Installation >> Manual Scanning Manual Scanning You can scan channels of the selected satellites by transponders if you know the transponder information. 1 Select Manual Scanning using the Arrow (▲/▼) buttons on the Installation menu and press the OK button. 2 Set the following options to complete Manual Scanning. Satellite: Select the satellite by using Arrow (▲/▼ ◄/►) buttons or Page ( / ) buttons. Transponder: Sets the transponder for the selected satellite. Select a transponder using the Arrow (◄/►) buttons. 'LVWULEXWHG%\:6,QWHUQDWLRQDOaZZZZVLGLJLWDOFRPaVDOHV#ZVLGLJLWDOFRP English 25 Chapter 5 >> Main Menu If you cannot find your desired transponder, select New to change transponder information as follows: •Frequency Displays the selected TP Frequency. •Symbol Rate Displays the selected TP Symbol Rates. •FEC (Forward Error Correction) Select a FEC option Auto, 1/2, 2/3, 3/4, 5/6, and 7/8 using the Arrow buttons. •Polarity Select a polarity value among Horizontal, Vertical, Circular Left, and Circular Right using the Arrow buttons. •Horizontal output is 18V and Vertical output is 13V via LAN. Note • What is Transponder? A wireless communications device usually attached to a satellite. A transponder receives and transmits incoming signals with in a prescribed frequency range. After receiving the signals the transponder will broadcast those signals with different frequencies. Scan Mode Decide whether to find free channels only or all the channels including scrambled ones. Select a scan mode using the Arrow (◄/►) buttons. •All: Scans all types of channels. •Free: Scans free channels only. NIT Search You will be asked whether to search channels for another transponder. Select either Yes or Off using the Arrow (◄/►) buttons. Select Yes to run Network Search. PID Search You can manually scan channels by entering individual Packet Identifier (PID) values. Enter the PID the Numeric (0~9) buttons. First, select a PID type (Video PID, Audio PID, or PCR PID) using the Arrow (◄/►) buttons, then enter the PID value by pressing the Numeric (0~9) buttons. 26 English 'LVWULEXWHG%\:6,QWHUQDWLRQDOaZZZZVLGLJLWDOFRPaVDOHV#ZVLGLJLWDOFRP Chapter 5 >> Main Menu 3 Press the OK button, then starts scanning. After Auto Scanning is complete, you can see TV and Radio channels found from Auto Scanning. 4 Press the RED(MoSAiC) button on the Manual Scan menu •Satellite: Select the satellite by using Arrow (▲/▼ ◄/►) buttons or Page ( / ) buttons •Transponder: Change the TP with the Arrow (◄/►) buttons •Frequency: Displays the current Frequency •Symbol Rate: Displays the current Symbol Rarte •FEC (Forward Error Correction): Displays the current FEC •Polarity: Displays the current Polarity •Add TP: Press the Green(sleep) button for a new TP add •Del TP: Delete the current TP with Yellow(Audio) button •RED(MoSAiC) button: Save the TP information Installation >> Blind Scanning Blind Scanning When you don’t have any transponder information, you can use this function to have all channels from selected satellite. •Satellite: Select the satellite by using the Arrow (◄/►) buttons •Frequency start: Input a Frequency for scanning start with Numeric key •Frequency stop: Input a Frequency for scanning stop with Numeric key •Frequency step: Select the scanning step with the Arrow(◄/►) buttons •Polarity: Select the polarity with the Arrow(◄/►) buttons. •Scan mode: Select the Scan mode(All/Free) by using the Arrow(◄/►) buttons Press OK button to start blind scan If LNB Type is set to Unicable, Blind scan is not spupported. . 'LVWULEXWHG%\:6,QWHUQDWLRQDOaZZZZVLGLJLWDOFRPaVDOHV#ZVLGLJLWDOFRP English 27 Chapter 5 >> Main Menu Installation >> Defaults Setting Defaults Setting You can restore the default settings in case you have encountered some problems after saving changes to channel data and others that may be in error. 1 Select Defaults Setting using the Arrow (▲/▼) buttons on the Installation menu and press the OK button. 2 Select a defaults option (TP Auto roll, Factory Defaults, or STB Reboot) using the Arrow (▲/▼) buttons and press the OK button. •TP Auto roll: Resets back to the additional TP list. •Factory Defaults: Resets back to the factory- default settings. If you press the OK button in this menu, you will see a dialog box asking you to confirm the channel defaults or factory defaults setting. Select Yes or No, and press the OK button. •STB Reboot If you press the OK button in this menu, the Set-top box (STB) reboots. System Setup You can set the system configuration in this menu. Press the Menu ( ) button. Select System Setup using the Arrow (◄/►) buttons on the menu. System Setup >> Language Setting Language Setting You can set languages for OSD, Audio1- 2, and EPG1- 2. 1 Select Language Setting using the Arrow (▲/▼) buttons on the System Setup menu and press the OK button. 2 Select any of OSD, Audio1- 2, and EPG1- 2 Languages using the Arrow (▲/▼) buttons and use the Arrow (◄/►) buttons to select its language. 28 English 'LVWULEXWHG%\:6,QWHUQDWLRQDOaZZZZVLGLJLWDOFRPaVDOHV#ZVLGLJLWDOFRP Chapter 5 >> Main Menu System Setup >> OSD Setting OSD Setting You can adjust OSD Transparency, Window Trans OSD Banner Time, and Screen saver Time. 1 Select OSD Setting using the Arrow (▲/▼) buttons on the System Setup menu and press the OK button. 2 Select any of Transparency, Window Trans, Screen saver Time, VFD Module and Display in Standby Mode, and Screen saver Time using the Arrow (▲/▼) buttons and use the Arrow (◄/►) buttons to make changes. •Transparency: 0 (opaque) to 100% •Window Trans: 0 (opaque) to 100% •Banner Time: 1 to 60 seconds or Always •Screen saver Time: 1 to 60 minutes or None •VFD: On or Off •Display in Standby: On or Off System Setup >> Media Settings Media Setting You can enter the various media settings for TV System, TV Aspect Ratio, Video Aspect Ratio, RGB, Y/Pb/Pr or Composite, RF Channel, Closed caption, Video Freeze. 1 Select Media Setting using the Arrow (▲/▼) buttons on the System Setup menu and press the OK button. 2 Select Media Setting using the Arrow (▲/▼) buttons and press the Arrow (◄/►) buttons to make changes. •TV System : PAL, SECAM, NTSC, and AUTO •TV Aspect Ratio : You can set the aspect ratio of your TV. (4:3 or 16:9) •Video Aspect Ratio : You can select the display format according to TV screen ratio. (Letter Box, Pan & Scan, Mixed, or Full) •Video siganl type : RGB, Y/Pb/Pr or Composite •RF Channel : You can select the external switch for the TV. (CH3 or CH4) •Close caption •Video Freeze : On/Off 'LVWULEXWHG%\:6,QWHUQDWLRQDOaZZZZVLGLJLWDOFRPaVDOHV#ZVLGLJLWDOFRP English 29 Chapter 5 >> Main Menu System Setup >> Time Setting Time Setting You can set the time zone. 1 Select Time Setting using the Arrow (▲/▼) buttons on the System Setup menu and press the OK button. Set Time mode: Selet Auto or Manual mode Press the Arrow (◄/►) buttons to set time mode for Auto or Manual Time Zone Press the Arrow (◄/►) buttons to set the time zone, The local time will be automatically changed by this setting. Set the time by using the Arrow(◄/►) buttons in case of Auto set time mode Input the figures with the numeric keys in case of Manual set time mode Select the summer time function on or off Summer Time Press the Arrow (◄/►) buttons to set the Summer Time option. for on/off. Clock Type Press the Arrow (◄/►) buttons to set the Summer Time option. for 24 Hour or AM/PM System Setup >> Reservation Setting Reservation Setting You can set timer of reservation for TV program such as switch on, off and TV program. Select the Event No. for the reservation. • ON time: Input the Switch-ON time with numeric keys • OFF time: Input the Switch-OFF time with numeric keys • Repetition:Select the Event activation time option(Once, Daily, one day a week) with the Arrow(◄/►) buttons. • Program: Select the channel with Arrow(◄/►) button and press OK to save. System Setup >> System Information System Information You can check system information like Model Name, Hardware version, Loader version, Main Software Version, and Main Software Build Date. 30 English 'LVWULEXWHG%\:6,QWHUQDWLRQDOaZZZZVLGLJLWDOFRPaVDOHV#ZVLGLJLWDOFRP Chapter 5 >> Main Menu Channel Setup You can edit TV and Radio channels and the favorite channel group in this menu. Press the Menu ( ) button. Select Channel Setup using the Arrow (◄/►) buttons on the main menu. Channel Setup >> Delete Channel Delete Channel You can delete TV and Radio channels you want. 1 Select Delete Channel using the Arrow (▲/▼) buttons on the Channel Setup menu and press the OK button. 2 Select the channel you want to delete using the Arrow (▲/▼) buttons and press the OK button. Press the Arrow (◄/►) buttons to switch between TV and Radio List. You can select multiple channels. Bulleted list indicates selected channels. Press the Green(sleep) button for Delete mode by Channel, TP or Satellite. 3 Press the RED(MoSAiC)button to delete selected channels. Channel Setup >> Delete All Channels Delete All Channels You can delete all channels. 1 Select Delete All Channels using the Arrow (▲/▼) buttons on the Channel Setup menu and press the OK button. System message dialog box appears asking you to confirm it. 2 Select Yes using the Arrow (◄/►) buttons and press the OK button to delete all channels. Channel Setup >> Favorite Channels Favorite Channels You can edit favorite channels. There are 9 Favorite channel groups (News, Sports, Movie, Music, Shopping, Kids, Adults, Drama, and Education). 1 Select Favorite Channels using the Arrow (▲/▼) buttons on the Channel Setup menu and press the OK button. 'LVWULEXWHG%\:6,QWHUQDWLRQDOaZZZZVLGLJLWDOFRPaVDOHV#ZVLGLJLWDOFRP English 31 Chapter 5 >> Main Menu 2 Select channels that you want to edit using the Arrow (▲/▼) or Page ( / ) buttons in the TV/Radio List and press the RED(MoSAic) button. Selected channels are listed in the favorite group. ) button switches between TV and Radio List. Pressing the TV/Radio ( 3 Press the FAV (♥) button to select another favorite group. 4 Select channels that you want to edit using the Arrow (▲/▼) buttons in the TV/Radio List and press the RED(MoSAic) button. Repeat steps from 3 to 4. 5 Press the OK button to confirm. Channel Setup >> Edit Channels Edit Channels You can rename the channel list. Select Edit Channels using the Arrow (▲/▼) buttons on the Channel Setup menu and press the OK button. •FAV (♥) button: Shows Favorite channel lists •Arrow (◄/►) buttons: Switches between TV and Radio channel lists To rename the channel list 1 Select the channel you want to rename using the Arrow (▲/▼), PR+/-, or Page ( / ) buttons and press the GREEN(Sleep) button. Font Table will appear. 2 Press the BLUE(INFO) button to delete the selected channel name. 3 Select characters using the Arrow buttons and press the RED(MoSAic) button to enter characters. •YELLOW(Audio) button : Enters space •BLUE(INFO) button : Hits the back space •RED(MoSAic) button : Selects the input 4 Press the OK button to confirm. Channel Setup >> SW Upgrade SW Upgrade You can download the software of your receiver through satellite when the new software is available for your system. During download, don’t turn off your receiver. In case the power is turned off, turned on your receiver again to complete the download. 1 Select Software manager using the Arrow (▲/▼) buttons on the Installation menu and press the OK button. •Program Upload: Copies all the data from Master STB to Slave STB. •Channel Data Upload: Copies only the channel data from Master STB to Slave STB. Connects both Master and Slave STB using RS232C Cable and then press the OK button on the Software Upload menu for the Master STB. 32 English 'LVWULEXWHG%\:6,QWHUQDWLRQDOaZZZZVLGLJLWDOFRPaVDOHV#ZVLGLJLWDOFRP Chapter 5 >> Main Menu Parental Lock You can lock the channels to prohibit unauthorised users from watching specific channels. Press the Menu ( ) button. Select Parental Lock using the Arrow (◄/►) buttons on the main munu Parental Lock >> Channel Lock Channel Lock Whenever you want to see the locked channel you will be prompted to enter the PIN Code in the dialog box. 1 Select Channel Lock using the Arrow (▲/▼) buttons on the Parental Lock menu and press the OK button. 2 Select the channel that you want to lock using the Arrow (▲/▼), PR+/-, Page ( / ), or Numeric (0~9) buttons and press the OK button. Selected channels will be displayed with locking-marked. Press it again to clear. Arrow (◄/►) buttons: Switches between TV and Radio List. 3 Press the RED(MoSAiC) button to confirm. 4 Press the Blue(Info) button to move PIG screen. Parental Lock >> Lock Control Lock Control Whenever you want to use the locked system you will be prompted to enter the PIN Code in the request dialog box. Using Arrow (▲/▼) buttons and press OK button to select a lock status •System Lock: Select Lock or Unlock by using the Arrow(◄/►) button. If Lock is selected, the front key function will be blocked. •Menu Lock: Select Lock or Unlock by using the Arrow( ◄/►) button Submenu Lock control will be available with PIN code •Lock mode: Select Once or Every time mode by using Arrow(◄/►) button •Once: Input the pin code once on the channel change with Parental Lock •Every time: Input the pin code everytime on the channel change with Parental Lock Save the changes with OK button Press the Blue(Info) button to move PIG screen 'LVWULEXWHG%\:6,QWHUQDWLRQDOaZZZZVLGLJLWDOFRPaVDOHV#ZVLGLJLWDOFRP English 33 Chapter 5 >> Main Menu Parental Lock >> Change PIN Code Change PIN Code You can create a new PIN code in this menu. “0000” is the default password. 1 Select Change PIN Code using the Arrow (▲/▼) buttons on the Parental Lock, System Lock, Menu Lock and press the OK button. 2 Enter the old PIN code. 3 Enter the new PIN code. 4 Enter the new PIN code again to confirm. Note • Please keep in mind that the PIN code must be a four-digit number. In case you forgot your PIN code, contact your local dealer. Game This product provides lots of games for your entertaining environment. Select Game using the Arrow (◄/►) buttons on the main menu. 1 Select a game using the Arrow (▲/▼) buttons on the Game menu and press the OK button. 2 According to the instruction displayed on screen, you can enjoy games using the Arrow, Numeric (0~9), and OK buttons. 34 English 'LVWULEXWHG%\:6,QWHUQDWLRQDOaZZZZVLGLJLWDOFRPaVDOHV#ZVLGLJLWDOFRP Troubleshooting Troubleshooting Problem No display LED on the front panel. Solution Plug the power cord correctly. No power supply No Picture Ensure that the STB is switched on. Check the connection status. Check channels and Video output status. Poor picture quality Check the signal level. If this is too low, try adjusting the alignment of your dish. No Sound Check the volume level of the TV and STB. Check the mute status of the TV and STB. Check the connection of audio cable. Remote Control does not operate Point remote control directly towards your receiver. Check and replace batteries. Check if anything blocks the front panel. Service is not running or scrambled. Make sure the smart card is appropriate for the selected service. You have forgotten your PIN code. See chapter 5, “Parental Lock” in this User’s manual. 'LVWULEXWHG%\:6,QWHUQDWLRQDOaZZZZVLGLJLWDOFRPaVDOHV#ZVLGLJLWDOFRP English 35 Specifications Specifications Waveform Demodulation Symbol Rate Code Rate MPEG-2 Video Encoder Data Rate Video Standard Aspect Ratio Processor Processor & Resources LNB Input MPEG-2 MP@ML 15 Mbits/s NTSC 4:3, 16:9 STi 5119AL 16 Mbyte Flash 2 Mbyte EEPROM 64 Kbit Connector IEC 169-24, F Type Input Frequency LNB Voltage S-VHS 950 ~ 2150 MHz 13/18V 22 kHz S-Video OUT Component SPDIF 1/2, 2/3, 3/4, 5/6, 7/8 SDRAM Tone Switch 12V Switch QPSK 2 ~ 45 Msps Y,Pb,Pr OUT S/W controlled 0 or 12V Current 50 mA MAX. Coaxial O Optical O Audio Output Connector Video Output Connector 1 RCA Connector IEC 169-24, F Type RF Modulator Output Channel RS232 Port Power Supply Front Panel Connectors NTSC CH3 or CH4 by Switchable Connector D-SUB Type Speed 115,200 bps Type Input Voltage Buttons SMPS AC100 - 240V~, Max.25W 50/60Hz 7 (UP, DOWN, LEFT, RIGHT, OK, MENU, POWER) Compont O S-Video O RS232C O RCA O 0-12V O SPDIF O RF Modulator Mechanical 2 RCA (L/R) Dimension Weight O 300 X 220 X 63 2 KG 36 English 'LVWULEXWHG%\:6,QWHUQDWLRQDOaZZZZVLGLJLWDOFRPaVDOHV#ZVLGLJLWDOFRP IM22 - 210010 [ENGLISH] Rev.01 memo memo