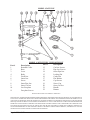
1
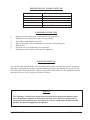
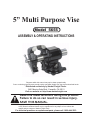
5” Multi Purpose Vise
Model 5655
Assembly & Operating Instructions
Diagrams within this manual may not be drawn proportionally.
Due to continuing improvements, actual product may differ slightly from the product described herein.
Distributed exclusively by Harbor Freight Tools®.
3491 Mission Oaks Blvd., Camarillo, CA 93011
Visit our website at: http://www.harborfreight.com
Read this material before using this product.
Failure to do so can result in serious injury.
Save this manual.
Copyright© 1999 by Harbor Freight Tools®. All rights reserved. No portion of this manual
or any artwork contained herein may be reproduced in any shape or form without the
express written consent of Harbor Freight Tools.
For technical questions or replacement parts, please call 1-800-444-3353.
Specifications Model # 5655 Vise
Jaw Width:
5”
Throat Depth:
3-1/2”
Maximum Jaw Opening:
4”
Base Dimensions:
7-5/16” x 7-5/16”
Base Swivel Capacity:
360o
Jaw Rotation Capacity:
360o
Features of this Vise
1.
2.
3.
4.
5.
6.
7.
Strong cast-iron construction, with hardened and ground jaws.
Rotating Jaws for flat jaw up or pipe jaw up working.
Swivel Base with double lever locks.
Work at any angle, with combination of swivel base and rotating jaws.
Built in anvil.
Enclosed screw for maintenance free operation.
Rotating jaws lock in place when jaws are tightened.
SAVE THIS MANUAL
You will need this manual for the safety warnings and cautions, assembly instructions, operating
procedures, maintenance procedures, trouble shooting, parts list, and diagram. Keep your invoice
with this manual. Write the invoice number on the inside of the front cover. Keep both this manual
and your invoice in a safe, dry place for future reference.
Notice
The Warnings, Cautions, and Instructions discussed in this instruction manual cannot
cover all possible conditions and situations that may occur. It must be understood by
the operator that common sense and caution are factors which cannot be built into this
product, but must be supplied by the operator.
Page 2 SKU # 5655
REV 01c; 08a, 08e
SAFETY WARNING & CAUTIONS
WARNING: When using shop equipment, basic safety precautions should
always be followed to reduce the risk of personal injury and hazards.
READ ALL INSTRUCTIONS BEFORE USING THIS TOOL!
1. KEEP WORK AREA CLEAN. Cluttered areas invite injuries.
2. OBSERVE WORK AREA CONDITIONS. Do not use tools in damp, wet, or poorly lit locations.
Don’t expose to rain. Keep work area well lit. Do not use electrically powered equipment in the
presence of flammable gases or liquids.
3. KEEP CHILDREN AWAY. Children must never be allowed in the work area. Do not let them
handle machines, tools, or equipment.
4. STORE IDLE EQUIPMENT. When not in use, tools must be locked up in a dry location to inhibit
rust. Always lock up tools and keep out of reach of children.
5. DO NOT FORCE THE TOOL. It will do the job better and more safely at the rate for which it was
intended. Do not use inappropriate attachments in an attempt to exceed the tool’s capacities.
6. USE THE RIGHT TOOL FOR THE JOB. Do not use a tool for a purpose for which it was not
intended.
7. Dress Properly Do not wear loose clothing or jewelry, as they can be caught in moving parts.
Non-skid footwear is recommended. Wear restrictive hair covering to contain long hair. Always wear
appropriate work clothing.
8. USE EYE, EAR and breathing PROTECTION. Always wear ANSI approved impact safety
goggles if you are producing metal filings or wood chips. Wear an ANSI approved dust mask or
respirator when working around metal, wood, and chemical dusts and mists. Use ANSI approved ear
protection when working in a loud or noisy environment.
9. DO NOT ABUSE THE POWER CORD. Protect the power cord from damage, either from
impacts, pulling or corrosive materials. Do not yank machine’s cord to disconnect it from the
receptacle.
10. DO NOT OVERREACH. Keep proper footing and balance at all times. Do not reach over or
across running machines.
11. MAINTAIN TOOLS WITH CARE. Keep tools sharp and clean for better and safer performance.
Follow instructions for lubricating and changing accessories. Inspect power cord periodically and,
if damaged, have it repaired by an authorized technician. Inspect all hydraulic seals for leaks prior
to use. Control handle and power switch must be kept clean, dry, and free from oil and grease at all
times.
Page 3 SKU # 5655
12. REMOVE ADJUSTING KEYS AND WRENCHES. Be sure that keys and adjusting wrenches
are removed from the tool or machine work surface before operation.
13. AVOID UNINTENTIONAL STARTING. Be sure that you are prepared to begin work before
turning the start switch on.
14. STAY ALERT. Watch what you are doing. Do not operate this machine when you are tired.
15. Do Not operate this machine while under the influence of alcohol,
drugs, or prescription medicines.
16. CHECK FOR DAMAGED PARTS. Before using any tool, any part that appears damaged should
be carefully checked to determine that it will operate properly and perform its intended function.
Check for alignment and binding of moving parts, any broken parts or mounting fixtures, and any
other condition that may affect proper operation. Any part that is damaged should be properly
repaired or replaced by a qualified technician. Do not use the tool if any switch does not turn on and
off properly.
17. REPLACEMENT PARTS AND ACCESSORIES. When servicing, use only identical
replacement parts. Use of any other parts will void the warranty. Only use parts and accessories
intended for use with this tool, which are available from Harbor Freight Tools.
Special Warnings when using this Vise
Using this Vise may create special hazards.
Take particular care to safeguard yourself and those around you.
Electrical Safety. Never operate any tool if there is an electrical hazard. Never operate an
electrical tool in wet conditions. Never operate a tool with an improper electrical cord or extension
cord. Never operate an electrical tool unless you are plugged into a properly grounded outlet, which
supplies 110-120Volts. We recommend you only use a circuit which is protected by a 30 amp circuit
breaker or other amperage recommended by the manufacturer.
Crushing and Marring. Overtightening or using incorrect or dirty jaws can cause damage to your
workpiece. Before clamping anything in this vise, assure that the jaws are clean. If the workpiece is
softer than steel, use soft jaws or shims of softer material to prevent damage to the workpiece.
Hammering. Use caution when hammering anything in or on this vise. Preferably use the ground
anvil on top of the Vise as a hammering surface. Do not hammer on the outer, movable vise jaw,
as this can damage the screw. Use only light hammers on relatively soft material. For heavier
hammering use an anvil designed for the purpose.
Slipping. Periodically check to be sure the workpiece is tight in the Vise. Twisting, bending,
hammering and sawing on a workpiece can cause it to become loose in the vise, potentially creating
a hazard.
NOTICE: No list of warnings can be all inclusive. The operator must supply
common sense, and operate this tool in a safe manner.
Page 4 SKU # 5655
Assembly and Operation
Your #5655 Vise is delivered completely assembled.
Installation:
1.
Select a sturdy, level work bench to install the Vise. Be sure there is sufficient room around
the vise to hold the various workpieces you will work on, and the various tools you will use.
2.
Place the Vise on the work bench where it will be installed.
3.
Mark through the holes on the left and right sides of the base of the Vise onto the work bench
surface. Remove the Vise.
4.
Drill holes through the bench top in an appropriate size.
5.
Replace the Vise, and insert appropriate size bolts through the Vise base and work bench top.
6.
Install washers and nuts on the bolts underneath the workbench. Tighten securely.
To Swivel Base:
1.
Loosen both Levers (#3) on the base of the Vise by rotating them counterclockwise.
Swivel the Vise to the position desired.
2.
Tighten both levers by rotating them clockwise.
To Open and Close Jaws:
1.
Rotate the Handle (#21) counterclockwise to open the jaws.
2.
Rotate the Handle clockwise to tighten the jaws.
To Rotate the Jaws:
1.
Open the Jaws by rotating the Handle counterclockwise.
2.
Rotate the Jaws in either direction to the desired position.
3.
Insert the workpiece in the jaws, and tighten by rotating the handle clockwise.
4.
Tightening the jaws also tightens the Rotator (#22).
Jaws, Soft Jaws, Pipe Jaws, and Cut Jaws:
1.
Select the standard jaws when clamping flat pieces which will not be damaged by
being clamped.
2.
For flat items which may be marred by the standard jaws, either use soft jaws or use a
shim between the standard jaws and the workpiece.
3.
For round items, such as pipes, rotate the jaws so that the Pipe Jaws are uppermost, holding
the workpiece in them.
4.
For short, round or odd-shaped items, such as a short cylinder rotate the vise so that the Cut
Jaws are up. Insert the cylinder in the cut jaws and tighten the Handle.
Page 5 SKU # 5655
Model # 5655 Vise
Model # 5655 Swivel Vise Parts List
Part #Description
Part #Description
12
Cut Jaw Screws
1
Rotation Collar
13
Pipe Jaw Screws
2
Base
14
Outer Pipe Jaw
3
Lever
15
Locking Pin
4
Body
16
Castle Nut
5
Fixed Jaw
17
Flat Washer
6
Outer Jaw
18
Cap Screws
7
Screw
19
Screw Cap
8
Inner Pipe Jaw
20
Outer Cut Jaw
9
Inner Cut Jaw
21
Handle
10
Jaw Faceplate
22
Rotator
11
Faceplate Screws
PLEASE READ THE FOLLOWING CAREFULLY
THE MANUFACTURER AND/OR DISTRIBUTOR HAS PROVIDED THE PARTS DIAGRAM IN THIS MANUAL AS A REFERENCE
TOOL ONLY: NETHER THE MANUFACTURER NOR DISTRIBUTOR MAKES ANY REPRESENTATION OR WARRANTY OF
ANY KIND TO THE BUYER THAT HE OR SHE IS QUALIFIED TO MAKE ANY REPAIRS TO THE PRODUCT OR THAT HE OR
SHE IS QUALIFIED TO REPLACE ANY PARTS OF THE PRODUCT: IN FACT THE MANUFACTURER A ND/OR DISTRIBUTOR
EXPRESSLY STATES THATALL REPAIRS AND PARTS REPLACEMENTS SHOULD BE UNDERTAKEN BY CERTIFIED AND
LICENSED TECHNICIANS AND NOT BY THE BUYER. THE BUYER ASSUMES ALL RISK AND LIABILITY ARISING OUT
OF HIS OR HER REPAIRS TO THE ORIGINAL PRODUCT OR REPLACEMENT PARTS THERETO, OR ARISING OUT OF HIS
OR HER INSTALLATION OF REPLACEMENT PARTS THERETO.
Page 6 SKU # 5655