1
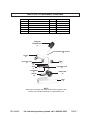
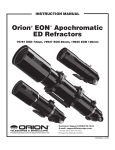
MICROSCOPE
Model 54949
OPERATING INSTRUCTIONS
Due to continuing improvements, actual product may differ slightly from the product described herein.
®
3491 Mission Oaks Blvd., Camarillo, CA 93011
Visit our Web site at: http://www.harborfreight.com
TO PREVENT DAMAGE TO THE PRODUCT,
READ AND UNDERSTAND ALL WARNINGS
AND INSTRUCTIONS BEFORE USE.
Copyright © 2006 by Harbor Freight Tools®. All rights reserved. No portion of this
manual or any artwork contained herein may be reproduced in any shape or form
without the express written consent of Harbor Freight Tools.
For technical questions, please call 1-800-444-3353.
PRODUCT SPECIFICATIONS
Item
Total Magnifications
Objective Magnification
Focusing Adjustment
Light Source
Stages Travel
Stages Adjustment
Eyepiece Diameter
Mirror Diameter
Diaphragm Style
Objectives Movement
Draw Tube Angle
Turret and Table Tilt
Overall Dimensions
Weight
Description
10X ~ 20X
8X or 20X
Eyepiece
Reflective Mirror (External Light Required)
Approximately 7/8”
Double Hand Wheel
1-1/16”
2-1/4”
4 Positions (Adjustable)
Fixed Objectives
45° (Fixed)
0° to 90°
3-5/16” W x 6-1/4” L x 11-1/8” H
2.75 Pounds
SAVE THIS MANUAL
You will need this manual for the safety warnings and precautions, assembly, operating,
inspection, maintenance and cleaning procedures, parts list and assembly diagram.
Keep your invoice with this manual. Write the invoice number on the inside of the front
cover. Keep this manual and invoice in a safe and dry place for future reference.
UNPACKING
When unpacking, check to make sure all the parts shown in the Parts List on page 7
are included. If any parts are missing or broken, please call Harbor Freight Tools at the
number shown on the front cover of this manual as soon as possible.
GENERAL SAFETY RULES
IMPORTANT SAFETY INSTRUCTIONS
CAUTION!
READ AND UNDERSTAND ALL INSTRUCTIONS
Failure to follow all instructions detailed in this manual may
result in damage to the Microscope.
SAVE THESE INSTRUCTIONS
WORK AREA
1.
Keep your work area clean and well lit. Cluttered and dark work areas invite
accidents.
SKU 54949
For technical questions, please call 1-800-444-3353
PAGE 2
2.
Always wear eye protection. Wear ANSI approved safety impact eye
glasses when using this product.
PRODUCT USE AND CARE
1.
Maintain the Microscope with care. Keep this product clean. A properly maintained tool is easier to use. Do not use damaged optical instruments. Tag
damaged instruments “Do not use” until repaired.
2.
Check for misalignment or binding of moving parts, loose or broken parts,
and any other condition that may affect the Microscope’s operation.
If damaged, have the Microscope serviced before using.
3.
Use only accessories that are recommended by the manufacturer for your
model. Accessories that may be suitable for one product may become hazardous when used on another product.
4.
The Microscope is a delicate, precise, optical instrument and should be
handled carefully and kept clean and dry to avoid damage. When not in
use, keep the Microscope covered with a dry, clean cloth. Dust and moisture
can damage the instrument.
5.
Do not touch the optical parts of the Microscope with your fingers. Doing so
may damage the lenses.
6.
If necessary, clean the lenses with a soft, dry brush. Do not clean with
moist cleaning agents.
7.
Because the Microscope is a complex device, any repair and adjustments
should be performed only by a qualified service technician.
SERVICE
1.
When servicing the Microscope, use only identical replacement parts.
Follow instructions in the “Inspection, Maintenance, And Cleaning” section of this
manual. Use of unauthorized parts or failure to follow maintenance instructions
may create a risk of damage to the product.
SPECIFIC SAFETY RULES
1.
Maintain labels and nameplates on the Microscope. These carry important
information. If unreadable or missing, contact Harbor Freight Tools for a replacement.
SKU 54949
For technical questions, please call 1-800-444-3353
PAGE 3
2.
Use the right product for the job. There are certain applications for which this
product was designed. Do not use this product for a purpose for which it was not
intended.
3.
When not in use, store the Microscope in a clean, dry, safe location out of
reach of unauthorized people.
4.
WARNING! The warnings and cautions discussed in this manual cannot
cover all possible conditions and situations that may occur. It must be understood by the operator that common sense and caution are factors which cannot
be built into this product, but must be supplied by the operator.
PRODUCT FEATURES
Parts Of The Microscope:
1.
Objective Lens: The Objective Lens (5) gathers light from the specimen. This
Microscope has interchangeable Objective Lenses. By changing the Objective
Lenses (going from relatively flat, low-magnification to rounder, high-magnification), this Microscope can bring increasingly smaller areas into view.
(See Assy. Diagram.)
2.
Drawtube & Zoom Eyepiece: The Drawtube (1) keeps the Eyepiece (1) at the
proper distance from the Objective Lens (5) and blocks out stray light. The
Zoom Eyepiece transmits and magnifies the image from the Objective Lens to
your eye. The Zoom Eyepiece is also used to make fine adjustments to focus
the image. (See Assy. Diagram.)
3.
Turret: The Turret (4) is the rotating mount that holds the Objective Lenses (5).
(See Assy. Diagram.)
4.
Hand Wheel: The Hand Wheel (11) is used to bring the specimen into the
focal plane of the Objective Lens (5). (See Assy. Diagram.)
5.
Clip: The Clip (6) is used to hold the Slide (7) containing the specimen in position on the Specimen Stage (8). (See Assy. Diagram.)
6.
Drawtube Holder: The Drawtube Holder (2) is the curved portion of the Microscope that holds all of the optical parts at a fixed distance and aligns them.
(See Assy. Diagram.)
7.
Mirror: The Mirror (10) reflects light rays up through the Diaphragm (9) to the
specimen through a hole in the Specimen Stage (8). (See Assy. Diagram.)
SKU 54949
For technical questions, please call 1-800-444-3353
PAGE 4
8.
Diaphragm: The Diaphragm (9) is placed in the light path to alter the amount of
light that reaches the condenser within the Microscope (for enhancing contrast in
the image). (See Assy. Diagram.)
9.
Base: The Base (12) supports the weight of all of the Microscope parts.
(See Assy. Diagram.)
Specimen Preparation:
1.
When observing a specimen by transmitted light, light must pass through the
specimen in order to form an image. The thicker the specimen, the less light
passes through. The less light that passes through, the darker the image.
2.
The specimens must be thin (0.1 to 0.5mm).
3.
Many specimens must be cut into thin sections before observation. Specimens
such as rock or semiconductors are too thick to be sectioned and observed by
transmitted light, so they are observed by the light reflected from their surfaces.
Microscopic Terms:
1.
Depth of Field: The vertical distance, from above to below the focal plane, that
yields an acceptable image.
2.
Field of View: The area of the specimen that can be seen through the Microscope with a given Objective Lens (5).
3.
Focal Length: The distance required for an Objective Lens (5) to bring the light
to a focus (usually measured in microns).
4.
Focal Point/Focus: The point at which the light from an Objective Lens (5)
comes together.
5.
Magnification: The product of the magnifying powers of the Objective Lenses
(5) and Zoom Eyepiece (1). The numbers marked on the Objective Lenses
indicates how many times the specimen on the Slide (7) is being magnified. The
Objective Lenses on this Microscope allow a specimen to be magnified from
eight (8X) to twenty (20X) times its actual size.
SKU 54949
For technical questions, please call 1-800-444-3353
PAGE 5
OPERATING INSTRUCTIONS
Always wear eye protection. Wear ANSI approved safety impact eye
glasses when using this product.
1.
2.
Make sure the location in which you intend to use the Microscope is well lit.
3.
Thoroughly clean and dry the Slide (7). (See Assy. Diagram.)
4.
If necessary, section the specimen from 0.1 to 0.5mm thickness. Then, carefully
position the specimen in the middle of the Slide (7). (See Assy. Diagram.)
5.
Center the Slide (7) on the Specimen Stage (8), and hold the Slide in place using
the Clip (6). (See Assy. Diagram.)
6.
Turn the Turret (4) to align the 8X Objective Lens (5) directly over the specimen
to be observed. For greater magnification of the specimen, align the 20X Objective Lens over the specimen. (See Assy. Diagram.)
7.
While viewing into the Drawtube & Zoom Eyepiece (1), slowly turn the mechanism clockwise or counterclockwise to bring the specimen image into focus.
(See Assy. Diagram.)
8.
When finished viewing the specimen, move the Clip (6) off the Slide (7). Remove the Slide from the Microscope. Properly dispose of or store the specimen.
Then, thoroughly clean and dry the Slide. (See Assy. Diagram.)
9.
Make sure to store the Microscope in a clean, dry, safe location out of reach
of unauthorized people.
INSPECTION, MAINTENANCE, AND CLEANING
1.
Before each use, inspect the general condition of the Microscope. Check for
cracked, worn or damaged parts, and any other condition that may affect the
tool’s safe operation. If a problem occurs, have the problem corrected before
further use.
Do not use damaged equipment.
2.
To clean, use a damp cloth and a mild detergent. Then dry. Do not use solvents as damage to the Microscope will occur. Do not immerse the Microscope in any liquid.
3.
When storing, keep the Microscope in a clean, dry, safe location out of reach of
children.
4.
CAUTION! All maintenance, service, and repairs not discussed in this
manual should only be performed by a qualified service technician.
SKU 54949
For technical questions, please call 1-800-444-3353
PAGE 6
PARTS LIST & ASSEMBLY DIAGRAM
Part #
1
2
3
4
5
6
Description
Drawtube & Zoom Eyepiece
Drawtube Holder
Hinge
Turret
Objective Lens
Clip
Part #
7
8
9
10
11
12
Description
Slide
Specimen Stage
Diaphragm
Mirror
Hand Wheel
Base
DRAWTUBE
&
ZOOM EYEPIECE
(1)
DRAWTUBE HOLDER
(2)
TURRET
(4)
OBJECTIVE LENS
(5)
CLIP
(6)
SLIDE
(7)
DIAPHRAGM
(9)
MIRROR
(10)
HINGE
(3)
SPECIMEN STAGE
(8)
HAND WHEEL
(11)
BASE
(12)
NOTE:
Some parts are listed and shown for illustration purposes only,
and are not available individually as replacement parts.
SKU 54949
For technical questions, please call 1-800-444-3353
PAGE 7
PLEASE READ THE FOLLOWING CAREFULLY
THE MANUFACTURER AND/OR DISTRIBUTOR HAS PROVIDED THE PARTS LIST AND ASSEMBLY
DIAGRAM IN THIS MANUAL AS A REFERENCE TOOL ONLY. NEITHER THE MANUFACTURER OR
DISTRIBUTOR MAKES ANY REPRESENTATION OR WARRANTY OF ANY KIND TO THE BUYER THAT HE
OR SHE IS QUALIFIED TO REPLACE ANY PARTS OF THE PRODUCT. IN FACT, THE MANUFACTURER
AND/OR DISTRIBUTOR EXPRESSLY STATES THAT ALL REPAIRS AND PARTS REPLACEMENTS SHOULD
BE UNDERTAKEN BY CERTIFIED AND LICENSED TECHNICIANS, AND NOT BY THE BUYER. THE BUYER
ASSUMES ALL RISKS AND LIABILITY ARISING OUT OF HIS OR HER REPAIRS TO THE ORIGINAL
PRODUCT OR REPLACEMENT PARTS THERETO, OR ARISING OUT OF HIS OR HER INSTALLATION OF
REPLACEMENT PARTS THERETO.
WARRANTY
LIMITED 1 YEAR
WARRANTY
Harbor Freight Tools Co. makes every effort to assure that its products meet high quality and durability standards,
and warrants to the original purchaser that this product is free from defects in materials and workmanship for
the period of one year from the date of purchase. This warranty does not apply to damage due directly or
indirectly, to misuse, abuse, negligence or accidents, repairs or alterations outside our facilities, or to lack of
maintenance. We shall in no event be liable for death, injuries to persons or property, or for incidental, contingent,
special or consequential damages arising from the use of our product. Some states do not allow the exclusion
or limitation of incidental or consequential damages, so the above limitation of exclusion may not apply to you.
THIS WARRANTY IS EXPRESSLY IN LIEU OF ALL OTHER WARRANTIES, EXPRESS OR IMPLIED,
INCLUDING THE WARRANTIES OF MERCHANTABILITY AND FITNESS.
To take advantage of this warranty, the product or part must be returned to us with transportation charges
prepaid. Proof of purchase date and an explanation of the complaint must accompany the merchandise. If our
inspection verifies the defect, we will either repair or replace the product at our election or we may elect to
refund the purchase price if we cannot readily and quickly provide you with a replacement. We will return
repaired products at our expense, but if we determine there is no defect, or that the defect resulted from
causes not within the scope of our warranty, then you must bear the cost of returning the product.
This warranty gives you specific legal rights and you may also have other rights which vary from state to state.
3491 Mission Oaks Blvd. • PO Box 6009 • Camarillo, CA 93011 • (800) 444-3353
SKU 54949
For technical questions, please call 1-800-444-3353
PAGE 8