1
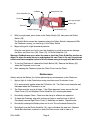
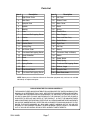
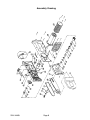
®
18 VOLT CORDLESS
CHAINSAW
44493
ASSEMBLY AND OPERATING INSTRUCTIONS
Distributed Exclusively by Harbor Freight Tools®.
3491 Mission Oaks Blvd., Camarillo, CA 93011
Visit our Web site at http://www.harborfreight.com
Copyright © 2000 by Harbor Freight Tools®. All rights reserved. No portion of
this manual or any artwork contained herein may be reproduced in any shape or
form without the express written consent of Harbor Freight Tools.
For technical questions and replacement parts, please call 1-800-444-3353
Specifications
ITEM
DESCRIPTION
Cutting Length
4-1/2 inches
Chain Speed
520 FPM
Chain Type
25 AP
Chain Pitch
1/4 inch
Weight
5.5 lbs.
Overall Length
18-1/2 inches
Battery
18 VDC
Switches
Safety switch and trigger
Accessories
Battery Charger, 6 foot cord, U.L. Listed
Oil Bottle
Blade Cover
Save This Manual
You will need the manual for the safety warnings and precautions, assembly instructions,
operating and maintenance procedures, parts list and diagram. Keep your invoice with this
manual. Write the invoice number on the inside of the front cover. Keep the manual and
invoice in a safe and dry place for future reference.
Safety Warnings and Precautions
WARNING: When using tool, basic safety precautions should always be followed to
reduce the risk of personal injury and damage to equipment.
Read all instructions before using this tool!
1.
Keep work area clean. Cluttered areas invite injuries.
2.
Observe work area conditions. Do not use machines or power tools in damp or wet
locations. Don’t expose to rain. Keep work area well lighted. Do not use electrically
powered tools in the presence of flammable gases or liquids.
3.
Keep children away. Children must never be allowed in the work area. Do not let
them handle machines, tools, or extension cords.
4.
Store idle equipment. When not in use, tools must be stored in a dry location to
inhibit rust. Always lock up tools and keep out of reach of children.
5.
Do not force tool. It will do the job better and more safely at the rate for which it was
intended. Do not use inappropriate attachments in an attempt to exceed the tool
capacity.
6.
Use the right tool for the job. Do not attempt to force a small tool or attachment to
do the work of a larger industrial tool. There are certain applications for which this tool
was designed. Do not modify this tool and do not use this tool for a purpose for which
it was not intended.
SKU 44493
Page 2
7.
Dress properly. Do not wear loose clothing or jewelry as they can be caught in
moving parts. Protective, electrically non-conductive clothes and non-skid footwear
are recommended when working. Wear restrictive hair covering to contain long hair.
8.
Use eye and ear protection. Always wear ANSI-approved impact safety goggles.
Wear a full face shield if you are producing metal filings or wood chips. Wear an ANSI
approved dust mask or respirator when working around metal, wood, and chemical
dusts and mists.
9.
Do not overreach. Keep proper footing and balance at all times. Do not reach over or
across running machines.
10. Maintenance. For your safety, service and maintenance should be performed
regularly by a qualified technician.
11. Disconnect power. Remove Battery from tool when not in use.
12. Remove adjusting keys and wrenches. Check that keys and adjusting wrenches
are removed from the tool before using.
13. Avoid unintentional starting. Be sure the switch is in the Off position when not in
use. Do not carry any tool with your finger on the trigger.
14. Stay alert. Watch what you are doing, use common sense. Do not operate any tool
when you are tired.
15. Check for damaged parts. Before using any tool, any part that appears damaged
should be carefully checked to determine that it will operate properly and perform its
intended function. Check for alignment and binding of moving parts; any broken parts
or mounting fixtures; and any other condition that may affect proper operation. Any
part that is damaged should be properly repaired or replaced by a qualified
technician. Do not use the tool if any switch does not turn On and Off properly.
16. Do not operate tool if under the influence of alcohol or drugs. Read warning
labels on prescriptions to determine if your judgment or reflexes are impaired while
taking drugs. If there is any doubt, do not operate the tool.
17. People with pacemakers should consult their physician(s) before use.
Electromagnetic fields in close proximity to heart pacemaker could cause pacemaker
interference or pacemaker failure. In addition, people with pacemakers should:
18. Some dust created by power sanding, sawing, grinding, drilling, and other
construction activities, contains chemicals known [to the State of California] to
cause cancer, birth defects or other reproductive harm. Some examples of these
chemicals are: Lead from lead-based paints Crystalline silica from bricks and cement
or other masonry products Arsenic and chromium from chemically treated lumber
Your risk from these exposures varies, depending on how often you do this type of
work. To reduce your exposure to these chemicals: work in a well ventilated area, and
work with approved safety equipment, such as those dust masks that are specially
designed to filter out microscopic particles. (California Health & Safety Code §
25249.5, et seq.)
SKU 44493
Page 3
REV 07j
Unpacking
When unpacking, check to make sure the following parts are included.
Cordless Chainsaw, 18 Volt Battery Pack, Charger, Blade Cover, and Oil Bottle.
If any parts are missing or broken, please call Harbor Freight Tools at the number on the
cover of this manual as soon as possible.
Battery Precautions
1.
Read all instructions and warnings on the battery before charging the battery.
2.
To avoid accidents, charge the supplied battery only. Do not use a different charger
with this battery.
3.
Do not expose the battery (or tool) to rain or wet conditions.
4.
To avoid damage of cable and plug, never pull the cable to disconnect the charger.
5.
Do not use the charger if the cable or plug are damaged.
6.
Repairs should be carried out by qualified technicians only.
7.
Do not touch the battery poles with any conductive source.
8.
Do not store the battery in a box with other metal objects.
9.
Do not throw the battery in a fire.
Operational Warnings
Warning: Improper use of this chainsaw can cause serious injury or death.
1.
Avoid Kickback by not causing the wood to pinch the saw Chain (15).
2.
Do not cut using the upper side of the saw Chain. Do not remove the tip guard located
on the tip of the saw Chain. The Front Hand Guard must be in place at all times.
3.
Firmly grip both handles of the chainsaw while cutting. Never cut with one hand!
4.
Begin cutting only when motor is at full speed.
5.
Do not overreach or cut above chest height.
6.
Cut using the lower side of the saw chain, and always away from your body.
7.
Always stop motor before carrying or setting down the chainsaw.
8.
Keep bystanders away from the work area.
9.
Be prepared for small branches to be caught in the chain path, stopping saw chain
movement. Turn off power switch before clearing caught branches.
10. Have a steady footing before cutting. Never cut from atop a ladder.
Warning: The warnings, cautions, and instructions discussed in this instruction manual
cannot cover all possible conditions and situations that may occur. It must be understood by the operator that common sense and caution are factors which cannot be
built into this product, but must be supplied by the operator.
SKU 44493
Page 4
REV 07j
Charging Battery
The Battery does not come charged from the factory. Charge for 5 to 6 hours before using.
1.
Plug the Charger cord into an electrical outlet.
2.
Insert the battery (32) into the Charger Base. The battery can only insert one way.
Battery (32)
Warning: Never
charge battery more
Charger
than 12 hours
continuously. Chargers should not be left
plugged in, or charging for more than 12
hours.
4.
SET Button
OFF Light
ON Light
Press the Set button to start the charging
The ON indicator light should come on. If it does not come on, check the power
connection or try a different outlet.
5.
Charge the Battery for 5 to 6 hours.
Subsequent full charges should take less time. When battery is completely charged,
the Charger will automatically shut off. The ON Indicator light will turn off, and the OFF
indicator will light.
6.
After charging, unplug the Charger from the wall outlet.
7.
Insert the Battery into the Chainsaw.
Note: the operation time of a new battery will ramp up as it is properly used and recharged.
Inserting Battery into Unit
1.
Insert Battery (32) into the receptacle at the Chainsaw handle bottom. It can only fit in
one way.
2.
Secure the lock-spring clasps to each side of the handle.
Cutting Operation
1.
Stand in front of the wood to be cut with your feet firmly in place.
2.
Grasp the Rubber Cover (22) with your left hand.
SKU 44493
Page 5
Rev 02d
Oil Bottle
Safety Switch (35)
Chain Guide Bar (14)
Tip Guard
Lock-spring Clasps
Battery (32)
Chain (15)
Rubber Cover (22)
3.
Switch Button (29)
With your right hand, press down on the Safety Switch (35), then press the Switch
Button (29).
The Switch Button cannot be squeezed unless the Safety Switch is depressed. With
the Chainsaw running, you can let go of the Safety Switch.
4.
Begin cutting with a light downward pressure.
Allow the saw chain to cut at its own rate. Applying too much pressure can damage
the Motor and Gear Assy (28), Chain (15), or Chain Guide Bar (14).
Warning: Kickback may occur when the nose or tip of the Chain Guide Bar touches an
object, or when the wood closes in and pinches the saw Chain in the cut. Use extreme
caution and have complete control of the Chainsaw using a firm grip with both hands.
5.
To turn the Chainsaw off, release the Switch Button (29). Remove the Battery (32)
when the Chainsaw is not in use.
6.
After cleaning the Chainsaw, place the Chain Cover over the Chain.
Maintenance
Always remove the Battery first, before performing any maintenance on the Chainsaw.
1.
Apply a light oil to the Chain before using, and after every 10 minutes of use.
Oil is automatically applied when the Oil Bottle is full. The Chain must always be well
lubricated when the Chainsaw is in use.
2.
The Chain must be snug at all times. If the Chain becomes loose, remove the Left
Chain Cover (12) and retighten Chain Guide Bar (14) mounting hardware.
3.
Periodically sharpen Chain. Chain must be sharp for efficient saw operation.
4.
To clean the Chainsaw, wipe with a clean rag. Apply a small amount of light oil.
Periodically remove Right Chain Cover (1) and clean out debris. Replace cover.
5.
Periodically recharge the Battery when not in use. This will maintain Battery life.
6.
Periodically turn the Chain Guide Bar (14) over to distribute the wear on it. Replace
Guide Bar when bent, cracked, or when the Chain moves side-to-side on it.
SKU 44493
Page 6
Parts List
Item #
Item #
Description
Description
1
Right Chain Cover
21
Left Case
2
Inner Gear
22
Rubber Cover
3
Epicyclic Gear
23
Motor Cover
4
Spindle
24
Relief
5
Bearing
25
Spring
6
Plate
26
Electric Wire
7
Crosshead Self-tapping Screw
27
Motor Support
8
Washer
28
Motor and Gear Assy
9
Sprocket
29
Switch Button
10
Washer, Bore
30
Right Case
11
Locking Ring
31
Hex Key
12
Left Chain Cover
32
Battery
13
Crosshead Self-tapping Screw
33
Connector, Body to Battery
14
Chain Guide Bar
34
Switch
15
Chain
35
Safety Switch
16
Washer
36
Safety Spring
17
Spring Washer
38
Crosshead Self-tapping Screw
18
Bolt
39
Washer, Large
19
Front Hand Guard
40
Epicyclic Gear
20
Crosshead Self-tapping Screw
41
Gear Plate, Inner
NOTE: Some parts are listed and shown for illustration purposes only and are not available
individually as replacement parts.
PLEASE READ THE FOLLOWING CAREFULLY
THE MANUFACTURER AND/OR DISTRIBUTOR HAS PROVIDED THE PARTS DIAGRAM IN THIS
MANUAL AS A REFERENCE TOOL ONLY. NEITHER THE MANUFACTURER NOR DISTRIBUTOR MAKES ANY REPRESENTATION OR WARRANTY OF ANY KIND TO THE BUYER THAT HE
OR SHE IS QUALIFIED TO MAKE ANY REPAIRS TO THE PRODUCT OR THAT HE OR SHE IS
QUALIFIED TO REPLACE ANY PARTS OF THE PRODUCT. IN FACT, THE MANUFACTURER
AND/OR DISTRIBUTOR EXPRESSLY STATES THAT ALL REPAIRS AND PARTS REPLACEMENTS
SHOULD BE UNDERTAKEN BY CERTIFIED AND LICENSED TECHNICIANS AND NOT BY THE
BUYER. THE BUYER ASSUMES ALL RISK AND LIABILITY ARISING OUT OF HIS OR HER
REPAIRS TO THE ORIGINAL PRODUCT OR REPLACEMENT PARTS THERETO, OR ARISING
OUT OF HIS OR HER INSTALLATION OF REPLACEMENT PARTS THERETO.
SKU 44493
Page 7
Assembly Drawing
SKU 44493
Page 8