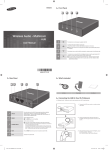
1
4-WHEEL CART
ASSEMBLY INSTRUCTIONS
3491 Mission Oaks Blvd., Camarillo, CA 93011
Visit our Web site at http://www.harborfreight.com
Copyright © 2003 by Harbor Freight Tools®. All rights reserved. No portion of this manual
or any artwork contained herein may be reproduced in any shape or form without the
express written consent of Harbor Freight Tools.
For technical questions please call 1-800-444-3353
02/03
SPECIFICATIONS
ITEM
Open Dimensions
Closed Dimensions
Wire Gauge
Stoage Dimensions
Large (Front) Wheel Diameter
Small (Rear) Wheel Diameter
Handle Length
Net Weight
Finish
DESCRIPTION
38-3/8” Tall X 20-5/8” Deep X 21” Wide
43” Tall X10-1/8” Deep X 21” Wide
8 Gauge Wire
11-1/2” X 15-1/8”W X 18-5/8” Tall
13/16” Wide X 6” Diameter
1-1/16” X 9-7/8” Dia. 5-3/4” Dia. X 7/8” Wide
7/8” Diameter X 12” Wide
14 Lbs.
Red Enamel Coated Alloy Steel
Note: Maximum weight capacity = 75 Lbs.
Do not exceed this maximum capacity.
SAVE THIS MANUAL
You will need the manual for the safety warnings and precautions, assembly
instructions, operating and maintenance procedures, parts list and diagram. Keep
your invoice with this manual. Write the invoice number on the inside of the front
cover. Keep the manual and invoice in a safe and dry place for future reference.
SAFETY WARNINGS AND PRECAUTIONS
1.
KEEP PRODUCT USAGE AREA CLEAN. Cluttered areas invite injuries.
2.
KEEP CHILDREN AWAY FROM PRODUCT USAGE AREA. Allow children
to handle this product only with supervision.
3.
CHECK FOR DAMAGED PARTS. Before using this product, carefully check that it
will operate properly and perform its intended function. Check for damaged parts and
any other conditions that may affect its operation. Replace or repair damaged or worn
parts immediately.
4.
REPLACEMENT PARTS AND ACCESSORIES. Use only identical replacement parts.
5.
WEAR SAFETY GOGGLES (Must comply with ANSI) at all times when assembling.
6.
AVOID SHARP EDGES WHEN ASSEMBLING.
7.
DO NOT ALLOW CHILDREN TO STAND UPON OR CLIMB INTO CART.
SUFFICATION DANGER: Plastic shipping bag could cause suffication if children are
allowed to play with bag.
8.
SHOULD NOT BE USED TO TRANSPORT PEOPLE OR PETS. Use Four Wheel Cart
on flat, level surfaces only.
SKU 40129
PAGE 2
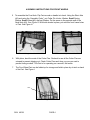
ASSEMBLY INSTRUCTIONS FOR BACK WHEELS
1.
Remove the plastic bag from the Four Wheel Cart. See Figure A. Cut all the tie straps
holding component parts. Open Cart (#1) and organize parts for assembly.
See Figure B & C.
#4
#1
#2
#3
#5
{
Figure A
2.
Figure B
}
#6
Figure C
Turn Cart around and on the handle side, slip the Longer Axle (#2), Figure C,
through the right and left axle-support on lower back frame, matching up the small
holes in the Longer Axle (#2) and axle-support. Place Cotter Pin through holes to
secure the Longer Axle. See Figure D & E.
#4
Hub
#2
Figure D
Figure E
axlesupport
match up small
holes
for Cotter Pins
Figure F
Assembly Order (#6 Hardware Packet)
1.) Cotter Pin
2.) Washer
3.) Spring
4.) Washer
5.) Wheel
6.) Washer
7.) Wheel Hub
3.
With Cotter Pin in place, use “Assembly Order” shown in Figure F, placing Washer on
outer side of axle-support, then Large Spring, Washer, Large Wheel (#4), Washer and
finally Wheel Hub. Tap on Hub to hold Wheel securely in place. With
pliers, bend both ends of the Cotter Pins so it does not slip out of place.
4.
On the opposite side, repeat instructions 3. Next to the axle-support, place Washer to
outside of axle-support, Large Spring, Washer, Large Wheel (#4),
Washer and finally Wheel Hub. Tap to secure.
Bend both ends of Cotter Pins.
Left Side
“Assembly Order”
SKU 40129
PAGE 3
ASSEMBLY INSTRUCTIONS FOR FRONT WHEELS
5.
To assemble the Front Axle: Flip Cart around so handle is in back. Using the Short Axle
(#3) and using the “Assembly Order”, put Cotter Pin in hole, Washer, Small Spring,
Washer, Small Wheel (#5) and last Washer. Do the same on the opposite end of the
Small Axle (#3). See Figure G. With both wheels in place, put axle into front frame holes
of Cart. See Figure H.
#3
#5
Figure G
Figure H
6.
With pliers, bend the ends of the Cotter Pins. Recheck to see all the Cotter Pins are
crimped to prevent slipping out. Check Cotter Pins each time you use your cart to
prevent losing a wheel. This Cart is for operating on a smooth, flat terrain.
7.
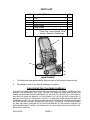
The Four Wheel Cart can be folded-up for storage and held in place by a Latch on back
of the Cart. See Figure I.
Latch
Figure I
SKU 40129
PAGE 4
PARTS LIST
PART #
1
2
3
4
5
6
DESCRIPTION
QTY
Cart
Long Axle
Short Axle
Large Wheel
Small Wheel
Hardware Packet (contents include)
Cotter Pins, Large Springs, Small
Springs, Washers, Wheel Hubs
1
1
1
2
2
1
#1
#2
#4
#3
}
#5
#6
1.
MAINTENANCE
For better and safer performance, keep all parts of this product clean and dry.
2.
Periodically check to see that all hardware is in place.
PLEASE READ THE FOLLOWING CAREFULLY
THE MANUFACTURER AND/OR DISTRIBUTOR HAS PROVIDED THE PARTS DIAGRAM IN THIS
MANUAL AS A REFERENCE TOOL ONLY. NEITHER THE MANUFACTURER NOR DISTRIBUTOR
MAKES ANY REPRESENTATION OR WARRANTY OF ANY KIND TO THE BUYER THAT HE OR SHE IS
QUALIFIED TO MAKE ANY REPAIRS TO THE PRODUCT OR THAT HE OR SHE IS QUALIFIED TO
REPLACE ANY PARTS OF THE PRODUCT. IN FACT, THE MANUFACTURER AND/OR DISTRIBUTOR
EXPRESSLY STATES THAT ALL REPAIRS AND PARTS REPLACEMENTS SHOULD BE UNDERTAKEN
BY CERTIFIED AND LICENSED TECHNICIANS AND NOT BY THE BUYER. THE BUYER ASSUMES
ALL RISK AND LIABILITY ARISING OUT OF HIS OR HER REPAIRS TO THE ORIGINAL PRODUCT OR
REPLACEMENT PARTS THERETO, OR ARISING OUT OF HIS OR HER INSTALLATION OF REPLACEMENT PARTS THERETO.
SKU 40129
PAGE 4