1
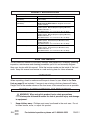
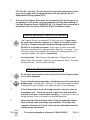
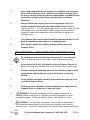
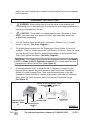
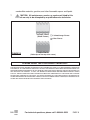
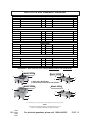
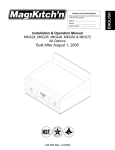
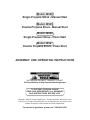
Model 35558
Single Propane Stove - Manual Start
Model 35559
Double Propane Stove - Manual Start
Model 35560
Single Propane Stove - Piezo Start
Model 35561
Double Propane Stove - Piezo Start
ASSEMBLY AND OPERATING INSTRUCTIONS
®
3491 Mission Oaks Blvd., Camarillo, CA 93011
Visit our Web site at: http://www.harborfreight.com
TO PREVENT SERIOUS INJURY,
READ AND UNDERSTAND ALL WARNINGS
AND INSTRUCTIONS BEFORE USE.
Copyright© 2005 by Harbor Freight Tools®. All rights reserved. No portion of this
manual or any artwork contained herein may be reproduced in any shape or form
without the express written consent of Harbor Freight Tools.
For technical questions, please call 1-800-444-3353.
PRODUCT SPECIFICATIONS
Item
Fuel Source
(All Models)
Product Compatibility
(All Models)
Model 35558 Specifications
Model 35559 Specifications
Model 35560 Specifications
Model 35561 Specifications
Description
Standard LP Gas Tank
(not included)
For Use With UL Approved:
Model 91357 or Model 91359 LP Regulator & Hose Kit
(neither included)
Maximum BTU Output: 15,000 each burner
Ignition System: Manual (Requires Lighting w/Matches)
Number of Burners: 1
Overall Dimensions: 5-1/2” H x 10-1/2” W x 13” Deep
Maximum BTU Output: 15,000 each burner
Ignition System: Manual (Requires Lighting w/Matches)
Number of Burners: 2
Overall Dimensions: 5-1/2” H x 23-1/4” W x 13” Deep
Maximum BTU Output: 15,000 each burner
Ignition System: Piezo Electric (For Matchless Start)
Number of Burners: 1
Overall Dimensions: 5-1/2” H x 10-1/2” W x 13” Deep
Maximum BTU Output: 15,000 each burner
Ignition System: Piezo Electric (For Matchless Start)
Number of Burners: 2
Overall Dimensions: 5-1/2” H x 23-1/4” W x 13” Deep
SAVE THIS MANUAL
You will need this manual for the safety warnings and precautions, assembly, operating,
inspection, maintenance and cleaning procedures, parts list and assembly diagram.
Keep your invoice with this manual. Write the invoice number on the inside of the front
cover. Keep this manual and invoice in a safe and dry place for future reference.
UNPACKING
When unpacking, check to make sure all the parts shown for your Model in the Parts
Lists on page 10 are included. If any parts are missing or broken, please call Harbor
Freight Tools at the number shown on the front cover of this manual as soon as possible.
GENERAL SAFETY WARNINGS AND PRECAUTIONS
WARNING! When using this product, basic safety precautions
should always be followed to reduce the risk of personal injury and damage
to equipment.
1.
SKU
Keep children away. Children must never be allowed in the work area. Do not
let them handle, move, or adjust this product.
35558
35559
35560
35561
For technical questions, please call 1-800-444-3353
PAGE 2
2.
Store idle equipment. When not in use, this product must be stored in a dry
location to inhibit rust. Always lock up tools and keep out of reach of children.
3.
Check for damaged parts. Before using any product, any part that appears
damaged should be carefully checked to determine that it will operate properly
and perform its intended function. Check for any broken parts or mounting
fixtures, and any other condition that may affect proper operation. Any part that
is damaged should be properly repaired or replaced by a qualified technician. Do
not use the product if any switch does not turn on and off properly.
4.
Replacement parts and accessories. When servicing, use only identical
replacement parts. Use of any other parts will void the warranty. Only use
accessories intended for use with this product. Approved accessories are
available from Harbor Freight Tools.
5.
Do not operate this product if under the influence of alcohol or drugs. Read
warning labels if taking prescription medicine to determine if your judgement or
reflexes are impaired while taking drugs. If there is any doubt, do not operate
this product.
6.
Maintenance. For your safety, service and maintenance should be performed
regularly by a qualified technician.
SPECIFIC SAFETY WARNINGS AND PRECAUTIONS
1.
Read these instructions carefully before setting up and using the Propane
Stove. Do not allow anyone who has not read the instructions to assemble,
light, or operate the Stove.
2.
Improper assembly, installation, adjustment, alteration, service, use, or
maintenance can cause property damage, PERSONAL INJURY, or DEATH.
3.
Service and repair should be done only by a qualified service technician.
The Propane Stove should be inspected before use and at least annually
by a qualified service technician.
4.
More frequent cleaning may be required as necessary. It is imperative that
the Burner(s), Temperature Control Knob(s), Piezo, and circulating fuel/air
passageways of the Propane Stove should be kept clean.
5.
This Propane Stove must be used only with HD-5 propane gas. The
propane tank should hold no more than 20 pounds of LP gas. Do not use
bulk tanks of larger capacity. Do not use any other fuel. The Stove must
be used only with a vapor withdrawal LP propane tank equipped with a
SKU
35558
35559
35560
35561
For technical questions, please call 1-800-444-3353
PAGE 3
POL (Put On Left) valve. The tank must be constructed and marked in such
a way as to comply with the specifications for LP gas tanks by the U.S.
Department of Transportation (DOT).
6.
The use of the Propane Stove must be in conformity with local codes or, in
the absence of local codes, with the standard for storage and Handling of
Liquified Petroleum Gases, ANSI/NFPA 58. For Canada, the use must be in
accordance with the current CAN/CGA B149.2 installation codes.
CARBON MONOXIDE INHALATION HAZARD
1.
The Propane Stove is an unvented LP Gas-fired stove. It must never
be used inside vehicles, campers, in a house, or any other sealed
structure. Carbon monoxide is produced during operation and is
DEADLY in a closed environment. Early signs of carbon monoxide
poisoning resemble the flu, with headaches, dizziness, or nausea. If you
have these signs, the Propane Stove may not be working properly or is
improperly vented. Get fresh air immediately.
2.
If you smell gas: Shut off gas to the appliance. Extinguish any open
flame. Never light a match. Never turn on an electrical switch. Evacuate
the area at once. Call for professional help.
RISK OF FIRE AND/OR EXPLOSION
1.
Do not store extra propane tanks in the vicinity of the Propane Stove
or any other appliance.
2.
If gas is smelled during operation, immediately close the valve on the
propane tank. Propane gas is odorless. An odor-making agent is added
to propane/LP gas to enable you to smell the gas if it may be leaking.
3.
If the Propane Stove shuts off during operation, close the valve on
the propane tank. Check the amount of gas in the tank and wait 5
minutes for the gas to clear before restarting. If it continues to shut off
during operation, have it serviced by a qualified technician.
4.
Never place the Propane Stove within 15 feet of flammable objects
such as wood, trees, overhangs, and umbrellas. This stove also
requires a clearance of at least 3 feet from non-flammable materials
to allow proper combustion.
35558
SKU 35559
35560
35561
For technical questions, please call 1-800-444-3353
PAGE 4
5.
Keep solid combustibles such as paper or cardboard a safe distance
away from the Propane Stove. Never use the Stove in spaces which
do or may contain volatile or airborne combustibles, or products such
as gasoline, solvents, paint thinner, dust particles or unknown
chemicals.
6.
Always operate the Propane Stove with the propane tank in its
vertical upright position, on a non-combustible surface. While in
operation, do not
tilt or lean the propane tank on its side. Never turn the
tank upside down, not even when it seems empty, as this may cause
clogging of valves and components which could lead to dangerous
flare-ups or fire.
7.
This Propane Stove must be positioned and operated so that it is not
directly exposed to water spray, rain, or dripping water.
8.
Make sure to remove ALL packing materials before using the
Propane Stove.
RISK OF BURNS -- STOVE GETS VERY HOT DURING USE.
1.
Do not attempt to move the Propane Stove while it is in operation.
Turn it off and wait one-half hour until it cools down before moving.
2.
Do not touch the Grill(s) or Burner(s) while the Propane Stove is lit.
Before servicing, wait one-half hour for the Propane Stove to cool down.
3.
Children and adults should be alerted to the hazards of high surface
temperatures and should stay away to avoid burns or clothing
ignition.
4.
Young children should be carefully supervised when they are in the
area of the Propane Stove.
5.
Clothing or other flammable materials should not be hung from the
Propane Stove, or placed on or near the Stove.
6.
WARNING! The brass components of this product contain lead, a
chemical known to the State of California to cause birth defects (or other
reproductive harm). (California Health & Safety Code 25249.5, et seq.)
7.
WARNING! The warnings, precautions, and instructions discussed in
this instruction manual cannot cover all possible conditions and situations
that may occur. It must be understood by the operator that common sense and
35558
SKU 35559
35560
35561
For technical questions, please call 1-800-444-3353
PAGE 5
caution are factors which cannot be built into this product, but must be supplied
by the operator.
ASSEMBLY INSTRUCTIONS
1.
WARNING! Always make sure to close the valve on the propane tank
(not included) prior to assembling the Propane Stove, performing maintenance, or
making any adjustments to the unit.
2.
CAUTION! This product is machine manufactured. Be aware of sharp
edges. Use heavy duty work gloves and ANSI approved safety impact eye
goggles when assembling.
3.
Turn the Propane Stove upside down, and attach a Rubber Foot (7) to each
corner of the unit. (See Assy. Diagram.)
4.
For double-burner models only, the Temperature Control Knobs (4) must be
attached. To do so, loosen the counter-sunk Screw in the Knob. Insert the Knob
onto the Burner Control Shaft by aligning the flat edges of the Knob and Shaft.
Then, firmly tighten the Screw. (See Assy. Diagram.)
WARNING: The Propane Stove requires the attachment and use of the Model
91357 or Model 91359 LP Regulator & Hose Kit (UL® Listed) which are sold
separately by Harbor Freight Tools. (See Figure A.)
5.
To attach the Model 91357 or Model 91359 LP Regulator & Hose Kit to the
Propane Stove, remove the plastic protective cap from the Inlet Connection
Nozzle (5) on the Propane Stove. Next, wrap the male threads of the Inlet
Connection Nozzle with about 4 inches of pipe thread seal tape (not included).
Then, screw the Hose Connector firmly onto the Inlet Connection Nozzle.
(See Figure A.)
MODEL 91357 OR MODEL 91359
LP REGULATOR & HOSE KIT
(NOT INCLUDED)
TEMPERATURE
CONTROL KNOB
(4)
SKU
35558
35559
35560
35561
HOSE
CONNECTOR
INLET
CONNECTION
NOZZLE
(5)
GAS VALVE
PROPANE TANK
(NOT INCLUDED)
For technical questions, please call 1-800-444-3353
FIGURE A
PAGE 6
7.
NOTE: The propane tank used must be constructed and marked in accordance
with the specifications for LP propane cylinders by the U.S. Department of
Transportation. (See Figure A.)
8.
To connect to the propane tank, first make sure the Temperature Control Knob
(4) of the Propane Stove is in its “OFF” position. Wrap the male threads of the
propane tank’s discharge pipe with about 4 inches of pipe thread seal tape.
Then, screw the Gas Valve of the LP Regulator & Hose Kit firmly onto the propane
tank’s discharge pipe (wrench tighten). (See Figure A.)
OPERATING INSTRUCTIONS
1.
CAUTION! Always use clean equipment and utensils. Before using the
Propane Stove, and after using this product, clean all parts in warm, clean water
and anti-bacterial soap. Then, thoroughly dry.
2.
NOTE: Higher altitudes may affect cooking efficiency of the Propane Stove.
3.
Make sure the Propane Stove and propane tank are located on a clean, dry,
level surface capable of supporting the weight of the Stove and propane
tank. Keep the Propane Stove and propane tank away from other flammable
objects.
4.
Check to make sure the Temperature Control Knob (4) on the Propane Stove is
in its “OFF” position. Open the gas valve on the propane tank and check and
smell for gas leaks. Perform a bubble test by applying warm soapy water over
every joint, regulator, fitting, and anywhere else there may be a possible leak.
Observe carefully to see if bubbles expand, indicating a leak. A large leak can
blow the soapy solution away instead of forming bubbles. If leaks are found, do
not use the Propane Stove until the leaks have been stopped. After testing,
make sure to close the gas valve on the propane tank.
5.
For manual ignition models, open the gas valve on the propane tank. Apply a
lighted match to the Burner (2) which is to be lit. Next, push the Temperature
Control Knob (4) and turn it to its “ON” position. Once the Burner is lit, safely
dispose of the match and adjust the Temperature Control Knob to the desired
setting. (See Assy. Diagram.)
6.
For Piezo Electric ignition models, a Burner (2) can be lit by pushing and turning
the Temperature Control Knob (4) to its “ON” position without having to use a
match. Once the Burner is lit, adjust the Temperature Control Knob to the desired
setting. NOTE: If the Burner does not light up, turn the Temperature Control Knob
to its “OFF” position and wait 5 minutes before trying again.
(See Assy. Diagram.)
SKU
35558
35559
35560
35561
For technical questions, please call 1-800-444-3353
PAGE 7
7.
While cooking, avoid spills as this may result in extinguishing the flame and
clogging the Burner holes.
8.
Always turn the Temperature Control Knob (4) to its “OFF” position before
removing a pan from the Burner (2). (See Assy. Diagram.)
9.
When finished using the Propane Stove, turn the Temperature Control Knob (4)
to its “OFF” position. Then, close the gas valve on the propane tank.
(See Assy. Diagram.)
10.
The propane tank must be stored outside. If the Propane Stove is to be stored
inside a building, the propane tank should be turned off, removed from the
Stove, and left outside. Propane tanks must be stored outdoors in a wellventilated area out of reach of children. Disconnected propane tanks must have
threaded valve plugs (not included) tightly installed, and must not be stored in a
building, garage, or any other enclosed area.
11.
WARNING! Do not attempt to move the Propane Stove while it
is on or while it is hot. Do not touch any area of the Burner (2), Grill
(3), or top of the Stove’s Body (1). Serious burns will occur. Turn
the Propane Stove off and wait one-half hour until it cools down
before moving. (See Assy. Diagram.)
INSPECTION, MAINTENANCE, AND CLEANING
1.
Any guard or other protective device removed for servicing the Propane
Stove must be replaced prior to operating the Stove.
2.
Before each use, check all gas fittings for tightness.
3.
Before each use, check for cracks, excessive abrasion or wear, and any other
damage.
4.
Before and after each use: Before using the Propane Stove, and after using
this product, clean all parts in warm, clean water and anti-bacterial soap.
5.
During each use, visually check the burner’s flame. If the flame looks improper,
have the Propane Stove serviced by a qualified technician before use.
(See Figure B, next page.)
6.
Store the Propane Stove in a clean, dry location out of reach of children. If
storing the unit indoors, first shut off and remove the propane tank and leave it
outdoors. Keep the area near the Propane Stove clear and free from
SKU
35558
35559
35560
35561
For technical questions, please call 1-800-444-3353
PAGE 8
combustible materials, gasoline, and other flammable vapors and liquids.
7.
CAUTION: All maintenance, service, or repairs not listed in this
manual are only to be attempted by a qualified service technician.
Improper Flames
(Yellow Flames)
= Yellow/Orange Flames
= Blue Flames
FIGURE B
Proper Flames
(Yellow tips on the top of the cones)
PLEASE READ THE FOLLOWING CAREFULLY
THE MANUFACTURER AND/OR DISTRIBUTOR HAS PROVIDED THE PARTS LIST AND ASSEMBLY DIAGRAM IN
THIS MANUAL AS A REFERENCE TOOL ONLY. NEITHER THE MANUFACTURER OR DISTRIBUTOR MAKES ANY
REPRESENTATION OR WARRANTY OF ANY KIND TO THE BUYER THAT HE OR SHE IS QUALIFIED TO REPLACE
ANY PARTS OF THE PRODUCT. IN FACT, THE MANUFACTURER AND/OR DISTRIBUTOR EXPRESSLY STATES
THAT ALL REPAIRS AND PARTS REPLACEMENTS SHOULD BE UNDERTAKEN BY CERTIFIED AND LICENSED
TECHNICIANS, AND NOT BY THE BUYER. THE BUYER ASSUMES ALL RISKS AND LIABILITY ARISING OUT OF
HIS OR HER REPAIRS TO THE ORIGINAL PRODUCT OR REPLACEMENT PARTS THERETO, OR ARISING OUT OF
HIS OR HER INSTALLATION OF REPLACEMENT PARTS THERETO.
35558
SKU 35559
35560
35561
For technical questions, please call 1-800-444-3353
PAGE 9
PARTS LISTS AND ASSEMBLY DIAGRAMS
Model 35558
Qty. Part #
1
5
1
6
1
7
1
Description
Inlet Connection Nozzle
Pipe Assembly
Rubber Foot
Qty.
1
1
4
Model 35559
Qty. Part #
1
5
2
6
2
7
2
Description
Inlet Connection Nozzle
Pipe Assembly
Rubber Foot
Qty.
1
2
4
Body
Burner
Grill
Temperature Control Knob
Model 35560
Qty. Part #
1
5
1
6
1
7
1
8
Description
Inlet Connection Nozzle
Pipe Assembly
Rubber Foot
Piezo Electric Start Assy.
Qty.
1
1
4
1
Description
Body
Burner
Grill
Temperature Control Knob
Model 35561
Qty. Part #
1
5
2
6
2
7
2
8
Description
Inlet Connection Nozzle
Pipe Assembly
Rubber Foot
Piezo Electric Start Assy.
Qty.
1
2
4
1
Part #
Description
1
2
3
4
Body
Burner
Grill
Temperature Control Knob
Part #
Description
1
2
3
4
Body
Burner
Grill
Temperature Control Knob
Part #
Description
1
2
3
4
Part #
1
2
3
4
IMPORTANT: When ordering parts, specify Model Number and Part Number.
2
Model 35558
3
Model 35559
2
2
3
1
3
1
7
5
4
5
6: Pipe Assy. Not Shown.
4
8: Piezo Electric Start Assy. Not Shown.
7
4
2
Model 35560
Model 35561
2
3
2
1
3
5
4
7
7
5
3
1
4
4
Due to continuing improvements, actual product may differ slightly from the product described herein.
NOTE:
Some parts are listed and shown for illustration purposes only,
and are not available individually as replacement parts.
35558
SKU 35559
35560
35561
For technical questions, please call 1-800-444-3353
PAGE 10