1
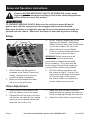
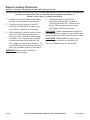
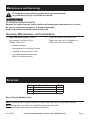
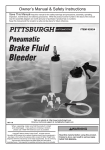
Specifications
Load Capacity
1500 lb.
Ramp Length
69"
Ramp Width
45"
Important Safety Information
1. Before use:
5. Do not use:
a. Read and understand manual.
a. as ladder,
b. Inspect before every use; do not
use if parts loose or damaged.
b. if tailgate on carrying vehicle
is higher than 34”, or
c. Turn vehicle’s ignition OFF
and set parking brake.
c. to load vehicle with wheel
width wider than ramp.
d. Clean dirt, oil and debris off
ramp(s) and allow ramp(s) to dry.
e. Unfold ramp(s) completely.
f. Set up only on solid,
level, dry surface.
g. Turn ramp(s) so flange end faces
downward. Position ramp(s) so
that tongues fully contact tailgate.
h. Properly connect safety chains.
Load vehicle slowly. Do not
ride vehicle down ramp(s).
2. Do not exceed 500 lb. capacity per
separated panel or 1,500 lb. capacity
evenly distributed across joined ramp.
Be aware of dynamic loading! Sudden
load movement may briefly create
excess load causing product failure.
3. Use safety chains as intended only.
4. Use as intended only.
Page 2
6. Ground contact. Use your Ramps
on a solid, level, flat, dry surface.
Make sure the Tongue edge fully
contacts the tailgate of the vehicle.
7. Clean Ramps. Prior to each use,
clean dirt, oil, or any debris off ramps.
8. The Ramps are not designed
to be used separately.
9. Be aware of dynamic loading!
Sudden load movement may
briefly create excess load
causing product failure.
10. This product is not a toy. Do not allow
children to play with or near this item.
11. Maintain product labels and
nameplates. These carry
important safety information.
If unreadable or missing, contact
Harbor Freight Tools for a replacement.
12. Load vehicle slowly. Do not ride a
vehicle up or down the load ramp.
For technical questions, please call 1-800-444-3353.
Item 90018
13. All persons not involved in the
loading process must stand
clear of the loading ramps. Keep
children away. Children must not
be allowed in the work area.
14. Check maximum tailgate weight
capacity. Do not exceed tailgate
capacity if less than 1,000 lb.
15. Avoid working alone. If an accident
happens, an assistant can bring help.
16. Keep work area clean and well lit.
Cluttered and dark areas invite injuries.
17. Store idle equipment. When
not in use, store ramps in a
dry location to inhibit rust.
23. Check for damaged parts. Before
using any ramp, any part that appears
damaged should be carefully checked
to determine that it will perform its
intended function. Check for any
broken parts or mounting fixtures and
any other condition that may affect
proper operation. Any part that is
damaged should be properly repaired
or replaced by a qualified technician.
24. Replacement parts and
accessories. When servicing, use
only identical replacement parts.
Use of any other parts will void the
warranty. Only use accessories
intended for use with this ramp.
25. Do not use ramp if under the
18. Dress properly. Do not wear loose
influence of alcohol or drugs. Read
clothing or jewelry. Protective clothes
warning labels on prescriptions to
and nonskid footwear are recommended
determine if your judgment or reflexes
when working. Wear restrictive hair
are impaired while taking drugs. If there
covering to contain long hair.
is any doubt, do not use the ramp.
19. Wear ANSI-approved impact safety
goggles, a safety helmet, and heavy- 26. The warnings, cautions, and instructions
discussed in this instruction manual
duty work gloves when loading,
cannot cover all possible conditions
unloading or handling ramps.
and situations that may occur. It must
20. Keep proper footing and balance
be understood by the operator that
when loading or unloading.
common sense and caution are factors
which cannot be built into this product,
21. Do not modify this product.
but must be supplied by the operator.
22. Stay alert. Watch what you are
doing, use common sense. Do not
use any ramp when you are tired.
SAVE THESE INSTRUCTIONS.
Item 90018
For technical questions, please call 1-800-444-3353.
Page 3
Setup and Operation Instructions
Read the ENTIRE IMPORTANT SAFETY INFORMATION section at the
beginning of this document including all text under subheadings therein
before set up or use of this product.
TO PREVENT SERIOUS INJURY: Make sure the vehicle is turned off and in
gear or park, with the emergency brake engaged and the wheels blocked.
Make sure the Ramp is completely open and the securing chains and hooks are
secured onto the vehicle. Make sure the Ramp is clean and dry before loading.
Setup
Safety Chain
Tongues
Hinges
Tri-fold
Ramp
Figure A: Components
1. When folded, the Ramp will be
wrapped in the Safety Chains and
Hooks. Release the hooks and
unfold the Ramp completely.
2. Make sure the tailgate the ramp
will sit on is dry and clean.
3. Sit the Tongues (angled lips) of the
Ramp on the tailgate. Stretch the
Safety Chain on each side of the Ramp
up into the inside of the truck bed.
4. Attach the hook on each Safety
Chain to a secure attachment point
on the inside of the truck bed.
WARNING! Safety chains must be
connected to secure attachment
points able to withstand the pulling
force of loading. They must also be
taut enough to prevent the ramp from
coming off the vehicle being loaded.
5. Pull the loading ramp back until
the chains are tight. If most of the
edge or the entire edge of the ramp
is off of the edge of the vehicle
the chains need to be adjusted or
shorter chains must be used.
Chain Adjustment
1. Remove the bolt and washer that
hold the safety chain to the ramp.
2. Reinsert the bolt through a link that
will shorten the chain so the loading
ramp can not be pulled backwards
more than an inch or two.
Page 4
3. Make sure that the bolt is properly
tightened and the washer prevents the
bolt from slipping through the chain link.
4. Adjust the other chain to equal length.
For technical questions, please call 1-800-444-3353.
Item 90018
ATV Loading and Unloading
• Do not use this ramp to load
or unload any vehicle that
weighs more than 1500 lb.
• Do not use this ramp to load
or unload any vehicle that
is wider than the ramp.
• Do not use this ramp to load
or unload any vehicle that is
carrying gear on its racks.
• Do not use this ramp if the
tailgate on the vehicle being
loaded or unloaded is higher than
half the ramp’s length (34").
WARNING: Be aware of dynamic loading!
Sudden load movement may briefly create
excess load causing the Ramp to fail.
WARNING! All persons not involved in
the process must stand clear of the Ramp
and truck. Make sure no pets are nearby.
Loading Using a Winch (not included)
1. The winch and mounting/
connection points must all have
appropriate capacity to pull the
ATV up the ramp safely.
2. ATV Mounted Winch Setup: Unwind
cable from the winch and attach it to a
secure mounting location on the truck,
at the same height as the winch will
be after the ATV has been loaded.
3. Truck Mounted Winch Setup:
Attach the cable to the bottom
front part of the frame.
4. While operating the winch, stand
back and to the side of the
ATV, with the vehicle between
you and the winch cable.
5. Operate the winch to slowly load
the ATV onto the vehicle.
Unloading
WARNING! Riding an ATV while unloading
is dangerous and should not be attempted.
3. While staying off the ATV, start
the engine, disengage the parking
brake, put the transmission into
1. Have an assistant monitor the Ramp
reverse, and make sure the wheels
tongue for slippage on the tailgate.
are in a straight line with the ramp.
2. Setup the ramp on the truck bed
While holding the brake, position
as explained under operation.
yourself in front of the ATV.
Remove all tie down straps and
4. Release the brake and push on the ATV
securing equipment from the ATV.
to get it started down the ramp. Allow
WARNING! Be sure the 4-wheel
the ATV to roll down naturally, do not
ATV is centered on ramp.
attempt to steer it or apply the brakes.
If it stops while on the ramp, gently
give it throttle to back it off the ramp.
Item 90018
For technical questions, please call 1-800-444-3353.
Page 5
Expert Loading Directions
Only for individuals certified by the ASI (ATV Safety Institute)
By using directions in this section, you are agreeing that you are an ASI trained, certified rider
and that you understand that your safety in performing this procedure is
based on your ability to control the vehicle.
1. Have an assistant monitor the Ramp
tongue for slippage on the tailgate.
2. Confirm that the weight of the ATV
and rider combined is still less than
the 1500 lb. capacity of this ramp.
3. While wearing a safety helmet, drive
your ATV onto ramp at less than 1
Mile Per Hour using the lowest gear
possible. Drive up at a slow, steady
speed while leaning forward on the
front pegs to keep proper balance. Try
to avoid bouncing or jerking, because
they will increase stress on the ramp.
4. Once the load is in truck bed,
be sure to set the ATV’s brake &
securely tie down ATV. Remove the
ramp, fold it up and secure it with
the Safety Chains and Hooks.
CAUTION! Contact between the tongue of
the ramp and the tailgate of the vehicle may
result in damage to the vehicle’s body finish.
CAUTION! WHENEVER possible, use
a winch (not included) to load the ATV.
This is the safest way to load an ATV.
WARNING! Be sure the 4-wheeled
ATV is centered on ramp.
Page 6
For technical questions, please call 1-800-444-3353.
Item 90018
Maintenance and Servicing
Procedures not specifically explained in this manual must
be performed only by a qualified technician.
TO PREVENT SERIOUS INJURY:
Remove the ramp from the vehicle before performing any maintenance or service.
Do not use damaged equipment. If Ramp is damaged
have the problem corrected before further use.
Cleaning, Maintenance, and Lubrication
1. BEFORE EACH USE, inspect
the general condition of the
Ramp. Check for:
2. Clean the ramp after each use.
Make sure any dirt, oil, grease, or
debris are not on the Ramp.
• loose hardware,
• misalignment or binding of parts,
• cracked or broken parts, and
• any other condition that may
affect its safe operation.
Parts List
Part
1
2
3
Description
Tri-fold Ramp
Safety Chain and Hook set
Hinge
Qty
1
2
6
Record Serial Number Here:
Note: If product has no serial number, record month and year of purchase instead.
Note: Some parts are listed for illustration purposes only, and
are not available individually as replacement parts.
Item 90018
For technical questions, please call 1-800-444-3353.
Page 7
PLEASE READ THE FOLLOWING CAREFULLY
THE MANUFACTURER AND/OR DISTRIBUTOR HAS PROVIDED THE PARTS LIST IN THIS
DOCUMENT AS A REFERENCE TOOL ONLY. NEITHER THE MANUFACTURER OR DISTRIBUTOR
MAKES ANY REPRESENTATION OR WARRANTY OF ANY KIND TO THE BUYER THAT HE
OR SHE IS QUALIFIED TO MAKE ANY REPAIRS TO THE PRODUCT, OR THAT HE OR SHE IS
QUALIFIED TO REPLACE ANY PARTS OF THE PRODUCT. IN FACT, THE MANUFACTURER AND/
OR DISTRIBUTOR EXPRESSLY STATES THAT ALL REPAIRS AND PARTS REPLACEMENTS
SHOULD BE UNDERTAKEN BY CERTIFIED AND LICENSED TECHNICIANS, AND NOT BY
THE BUYER. THE BUYER ASSUMES ALL RISK AND LIABILITY ARISING OUT OF HIS OR
HER REPAIRS TO THE ORIGINAL PRODUCT OR REPLACEMENT PARTS THERETO, OR
ARISING OUT OF HIS OR HER INSTALLATION OF REPLACEMENT PARTS THERETO.
Limited 90 Day Warranty
Harbor Freight Tools Co. makes every effort to assure that its products meet high quality
and durability standards, and warrants to the original purchaser that this product is free from
defects in materials and workmanship for the period of 90 days from the date of purchase.
This warranty does not apply to damage due directly or indirectly, to misuse, abuse, negligence
or accidents, repairs or alterations outside our facilities, criminal activity, improper installation,
normal wear and tear, or to lack of maintenance. We shall in no event be liable for death,
injuries to persons or property, or for incidental, contingent, special or consequential damages
arising from the use of our product. Some states do not allow the exclusion or limitation of
incidental or consequential damages, so the above limitation of exclusion may not apply to you.
THIS WARRANTY IS EXPRESSLY IN LIEU OF ALL OTHER WARRANTIES, EXPRESS OR
IMPLIED, INCLUDING THE WARRANTIES OF MERCHANTABILITY AND FITNESS.
To take advantage of this warranty, the product or part must be returned to us with transportation
charges prepaid. Proof of purchase date and an explanation of the complaint must accompany
the merchandise. If our inspection verifies the defect, we will either repair or replace
the product at our election or we may elect to refund the purchase price if we cannot readily
and quickly provide you with a replacement. We will return repaired products at our expense,
but if we determine there is no defect, or that the defect resulted from causes not within
the scope of our warranty, then you must bear the cost of returning the product.
This warranty gives you specific legal rights and you may also
have other rights which vary from state to state.
3491 Mission Oaks Blvd. • PO Box 6009 • Camarillo, CA 93011 • (800) 444-3353