1
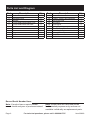
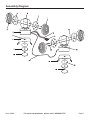
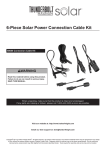
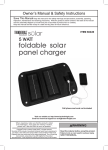
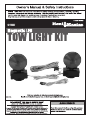
Specifications
Electrical Requirements
Connector
Page 2
12 VDC
4-way Flat
For technical questions, please call 1-888-866-5797.
Item 69869
Important Safety Information
1.
Observe posted speed limits to
prevent lights from blowing off.
2.
Securely attach lights to
vehicle before moving.
Loose lights are a traffic hazard.
3.
Thoroughly test vehicle lights
and tow lights before use.
4.
Mount lights in proper orientation.
Amber lights must face forward and red
lights must face backward. Improper
orientation can confuse or distract
drivers, causing a traffic hazard.
5.
Install on a 12VDC negative ground
circuit only. Installing on different
circuit can result in electric shock,
fire, or property damage.
6.
Turn off vehicle and set the parking
brake before installation or testing.
7.
Do not use on marine trailers
(such as boat trailers). Not waterproof.
8.
Wear ANSI-approved impact safety
goggles and heavy-duty work gloves
during installation and use.
9.
Do not modify the Towing Light Kit and
do not use the Towing Light Kit for a
purpose for which it was not intended.
10. Inspect before use; do not use if parts
are loose or damaged. Inspect wires
and connections for insulation damage
or loose wires and repair before use.
11. People with pacemakers should
consult their physician(s) before use.
Electromagnetic fields in close
proximity to heart pacemaker could
cause pacemaker interference
or pacemaker failure.
12. WARNING: Handling the cord
on this product will expose you
to lead, a chemical known to
the State of California to cause
cancer, and birth defects or other
reproductive harm. Wash hands
after handling. (California Health &
Safety Code § 25249.5, et seq.)
13. This product is not a toy. Keep it
out of reach of children.
14. Check light position and function
regularly when towing, especially
on rough or uneven surfaces, or
in windy conditions. The magnets
may loose their grip on the vehicle
under extreme circumstances.
15. The warnings, precautions, and
instructions discussed in this instruction
manual cannot cover all possible
conditions and situations that may
occur. It must be understood by the
operator that common sense and
caution are factors which cannot
be built into this product, but must
be supplied by the operator.
SAVE THESE INSTRUCTIONS.
Item 69869
For technical questions, please call 1-888-866-5797.
Page 3
Wiring
Note: Some towing vehicles may already have a 4-way Flat Connector, “Trunk”
plug wired in. For those vehicles, skip the following wiring instructions.
If you do not have experience doing this type of automotive electrical wiring
or if the wiring in your vehicle differs from that explained below,
have an automotive service technician connect the wiring.
1.
Identify the towing vehicle’s wires in
the trunk that correspond to the circuits
indicated in Figure A. The white ground
wire from the Pigtail (22) may be
connected to a bolt or appropriate
component on the vehicle to establish
a ground instead of a ground wire.
c. Make sure both wires stay
properly in place while the cover
is closed until it snaps together.
A) Insert Pigtail (22) wire
into ‘dead-end’ channel
C) Close Splice
cover securely
Note: This is the wiring configuration of the
“Trunk” 4-way Flat Connector (23). The towing
vehicle may have a different wiring color code.
WHITE
Ground
“Trunk” 4-way
Flat Connector (23)
BROWN
Running Lights
YELLOW
Left Stop and
Turn Lights
GREEN
Right Stop and
Turn Lights
B) Place splice
around vehicle wire
Wiring
Pigtail (22)
Figure A: Wiring Color Code
2.
Connect the wires from the
Wiring Pigtail (22) to the proper vehicle
circuit wires using Wire Splices (21).
When the supplied splices are used,
generally no wire stripping or cutting
would be required. Follow these
three steps and refer to Figure B:
a. Insert the end of the Pigtail (22) wire
into the ‘dead-end’ channel of the
Splice. Insert the wire all the way to
the end of the channel as shown.
b. Place the Splice around the
correct vehicle circuit wire.
Figure B: Wire Splice (21) Usage
3.
Verify that all wires are held securely.
4.
Plug the “Trunk” Connector (23)
into the “Trailer” Connector (18).
WARNING! If the Wire Splices (21)
are used improperly and damage the
vehicle’s wiring, the vehicles rear lights
may fail, resulting in a traffic hazard.
Have an assistant operate the vehicle’s
lights while you carefully check that
the vehicle lights and the towing lights
all work properly after installation.
If any function of the vehicle or towing lights
does not work, do not drive the vehicle.
Carefully inspect the splice connection
and the circuit that failed and repair
the problem and retest before use.
5.
Page 4
Disconnect the “Trailer” Connector (18)
if the light kit is not going to be used yet.
For technical questions, please call 1-888-866-5797.
Item 69869
Set up
1.
To help avoid scratches, clean the
mounting locations and clean the
protective labels under the lights.
2.
Set the lights on the back of the
vehicle being towed so that the RED
side of each light faces backwards.
Set the light that has a green wire on
the right side and the light that does
not have a green wire on the left side.
3.
4.
5.
Make sure all wires are secured with
enough slack to prevent binding when
turning, but controlled enough to
prevent roadway or moving part contact.
When routing the wires along the
trailer, avoid sharp objects, tight
corners and exposure to the elements.
Keep away from moving parts.
Secure with cable ties where
necessary and use rubber grommets
when passing through cut-outs.
Plug the “Trunk” Connector into
the “Trailer” Connector.
Item 69869
WARNING! Have an assistant
operate the vehicle’s lights while
you carefully check that the
vehicle lights and the towing
lights all work properly.
•
Both tow lights should illuminate
when the towing vehicle’s
running lights are switched on.
•
The tow lights should both light
brightly as you apply the brake.
•
The tow light with a green
wire should blink brightly
with the right turn signal.
•
The tow light without a green
wire should blink brightly
with the left turn signal.
If ANY function of the vehicle
lights or towing lights does not
work, do not drive the towing
vehicle until all lights are repaired
and retested successfully.
6.
The tow light kit is now ready for use.
It will automatically illuminate when
turn and brake pedal or turn signals
in the towing vehicle are used.
7.
WARNING! Check light position
and function regularly when
towing, especially on rough or
uneven surfaces. The magnets
cannot hold the lights to the vehicle
in extreme circumstances.
8.
After towing, disconnect “Trailer”
Connector, remove tow lights from
towed vehicle, clean with a moist
cloth, and store in dry location out
of reach of children. Do not drag
the magnetic bases to disconnect,
as they may scratch the body paint.
Push to tilt then remove.
For technical questions, please call 1-888-866-5797.
Page 5
Parts List and Diagram
Part
1
2
3
4
5
6
7
8
9
10
11
Description
Amber Front Lens
Red Rear Lens
Bracket
Circuit Board with Amber LED
Circuit Board with Red LED
Shell
Screw
Cover
Magnet
Nut
Screw
Qty
2
2
2
2
2
2
2
2
2
2
8
Part
12
13
14
15
16
17
18
19
20
21
22
Description
Power Cord
“Trailer” 4-way Flat Connector
Left-Right Cord
LED Wire
Wire Splice
Wiring Pigtail
“Trunk” 4-way Flat Connector
Protective Label
Screw (M3 x 16)
Nut (M3)
Metal base
Qty
1
1
1
6
4
1
1
2
4
4
2
Record Serial Number Here:
Note: If product has no serial number,
record month and year of purchase instead.
Page 6
Note: Some parts are listed and shown
for illustration purposes only, and are not
available individually as replacement parts.
For technical questions, please call 1-888-866-5797.
Item 69869
Assembly Diagram
Item 69869
For technical questions, please call 1-888-866-5797.
Page 7
PLEASE READ THE FOLLOWING CAREFULLY
THE MANUFACTURER AND/OR DISTRIBUTOR HAS PROVIDED THE PARTS LIST AND ASSEMBLY
DIAGRAM IN THIS DOCUMENT AS A REFERENCE TOOL ONLY. NEITHER THE MANUFACTURER
OR DISTRIBUTOR MAKES ANY REPRESENTATION OR WARRANTY OF ANY KIND TO THE
BUYER THAT HE OR SHE IS QUALIFIED TO MAKE ANY REPAIRS TO THE PRODUCT, OR
THAT HE OR SHE IS QUALIFIED TO REPLACE ANY PARTS OF THE PRODUCT. IN FACT, THE
MANUFACTURER AND/OR DISTRIBUTOR EXPRESSLY STATES THAT ALL REPAIRS AND PARTS
REPLACEMENTS SHOULD BE UNDERTAKEN BY CERTIFIED AND LICENSED TECHNICIANS,
AND NOT BY THE BUYER. THE BUYER ASSUMES ALL RISK AND LIABILITY ARISING OUT OF
HIS OR HER REPAIRS TO THE ORIGINAL PRODUCT OR REPLACEMENT PARTS THERETO,
OR ARISING OUT OF HIS OR HER INSTALLATION OF REPLACEMENT PARTS THERETO.
Limited 90 Day Warranty
Harbor Freight Tools Co. makes every effort to assure that its products meet high quality
and durability standards, and warrants to the original purchaser that this product is free from
defects in materials and workmanship for the period of 90 days from the date of purchase.
This warranty does not apply to damage due directly or indirectly, to misuse, abuse, negligence
or accidents, repairs or alterations outside our facilities, criminal activity, improper installation,
normal wear and tear, or to lack of maintenance. We shall in no event be liable for death,
injuries to persons or property, or for incidental, contingent, special or consequential damages
arising from the use of our product. Some states do not allow the exclusion or limitation of
incidental or consequential damages, so the above limitation of exclusion may not apply to you.
THIS WARRANTY IS EXPRESSLY IN LIEU OF ALL OTHER WARRANTIES, EXPRESS OR
IMPLIED, INCLUDING THE WARRANTIES OF MERCHANTABILITY AND FITNESS.
To take advantage of this warranty, the product or part must be returned to us with transportation
charges prepaid. Proof of purchase date and an explanation of the complaint must accompany
the merchandise. If our inspection verifies the defect, we will either repair or replace
the product at our election or we may elect to refund the purchase price if we cannot readily
and quickly provide you with a replacement. We will return repaired products at our expense,
but if we determine there is no defect, or that the defect resulted from causes not within
the scope of our warranty, then you must bear the cost of returning the product.
This warranty gives you specific legal rights and you may also
have other rights which vary from state to state.
3491 Mission Oaks Blvd. • PO Box 6009 • Camarillo, CA 93011 • (888) 866-5797