1
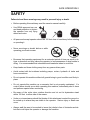
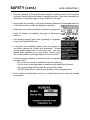
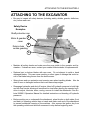
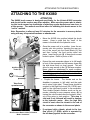
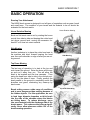
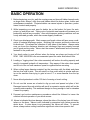
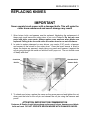
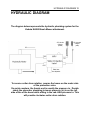
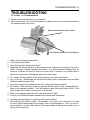
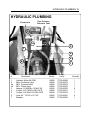
OPERATOR’S MANUAL
BRUSH MOWER
MODEL K4080
PLEASE READ THIS MANUAL CAREFULLY AND KEEP
READY AT ALL TIMES
KUBOTA®
CONTENTS
BEFORE OPERATION ——————————————————————— 1
SAFE OPERATION —-——————————————————————— 2-3
ATTACHING TO THE EXCAVATOR —-———————————————— 4-5
ADJUSTMENT & MAINTENANCE —————————————————— 6
BASIC OPERATIONS —-———————-—————————————— 7-9
MAINTENANCE ——————————————————————————10
REPLACING KNIVES——–————————————————————— 11
HYDRAULIC DIAGRAM ———–—–————–--———————————— 12
ATTACHMENT TRANSPORT -—————————————————–—— 13
TROUBLESHOOTING ———————————–—————————–——14
TROUBLESHOOTING (cont.) —————————-——————-———— 15
SPECIFICATIONS -–————————————–——————————— 16
KNIFE ASSEMBLY —————————————–——————————— 17
DRIVE ASSEMBLY ——————————————–—————————— 18
HYDRAULIC PLUMBING———————————–——————————–-19
BEFORE OPERATION 1
BEFORE OPERATION
1. Keep children out of the operating area under the watchful eye of another responsible adult.
2. Never allow another person in the operator’s station of the excavator while
the machine is in operation.
3. Stop machine operation if a person approaches the mowing area.
4. The operator should walk through the mowing area to identify and locate hazards.
5. Hazards may include large stones, pieces of concrete, glass bottles, discarded wire & cable, discarded automotive parts, fence posts, or exposed
pipes.
6. Inspect the mowing area for utility lines and features such as electrical lines
and enclosures, water and sewer lines, or communications equipment.
7. Read and understand this manual and the excavator manual before operating
the mower.
SAFE OPERATION 2
SAFETY
Failure to heed these warnings may result in personal injury or death.
•
Before operating this machinery read the owner’s manual carefully.
•
Use OSHA approved eye, ear
and head protection to protect
the operator from any flying
debris and noise.
•
All personnel except operator should be 150 feet clear of machinery before starting
or operating it.
•
Never use drugs or alcohol before or while
operating your brush mower.
•
Be aware that operating equipment for an extended period of time can result in fatigue or boredom and may cause the operator to lose awareness of what he/she is
doing. It is recommended that scheduled work breaks be taken to avoid this.
•
Keep hands and loose clothing away from any power-driven parts.
•
Avoid contact with hot surfaces including pumps, motors, hydraulic oil tanks and
hose connections.
•
Do not operate this machine without all guards being in good condition and firmly in
place.
•
Do not operate this machine on a excavator that is not properly maintained. If a
control failure should occur while operating this machine, immediately shut it down
and perform repairs before continuing.
•
Be aware of the cutter drum rotation direction and do not let bystanders stand
within 150 feet to either side of the mower.
•
Under no circumstances should the blades of this attachment contact the ground or
be curled up to where they are visible to the operator. Serious injury or death can
occur.
•
Always walk the area to be worked to insure the jobsite is free of obstacles and debris that could injure the operator or damage the machine.
SAFETY (cont.)
SAFE OPERATION 3
•
Stop the operation of this machine when people or vehicle driver’s vision becomes
obscured, caused by the discharge of materials and dust. Also avoid operating this
attachment in unusually foggy or dusty conditions or at night.
•
Never leave the excavator or the brush shredding attachment unattended while it is
in the lifted position or while the shredder is spinning.
•
Keep away from rotating elements to prevent entanglement.
•
Listen for blades to completely stop prior to dismounting
machine.
•
Use flashing warning lights when operating on highways,
except when prohibited by law.
•
If using the side shredding method, drive at a speed you
can safely operate the vehicle and attachment. Normal
ground speed ranges from 0-5 miles per hour. Use slow
speeds when operating on or near slopes, ditches, dropoffs, or when debris and foreign objects are to be avoided.
•
Use the following guidelines to reduce the risk of equipment
and grass fires:
- Do not smoke or have an open flame near the machinery.
- Do not drive into burning areas or areas that have been freshly burned.
- Do not mow areas that are tinder dry and can burn easily.
- DO NOT allow debris to collect near hydraulic motors and gearboxes.
•
Do not position the attachment or turn it so sharp that the hoses could get pinched
or squeezed.
ATTACHING TO THE EXCAVATOR 4
ATTACHING TO THE EXCAVATOR
•
Be sure to inspect all safety devices (including safety shields, guards, deflectors,
etc.) before each use.
Safety Device
Examples
Shaft protection cap
Motor & gearbox
cover
Debris chain
curtain guarding
1
2
3
•
Maintain all safety decals and make sure they are visible to the operator and bystanders. If decals are worn, contact your nearest Kubota dealer for replacements.
•
Replace bent or broken blades with new ones. Do not attempt to weld or bend
damaged blades. This can cause cracking or other types of damage that could result in the blade being thrown from the brush mower.
•
Wear gloves and eye protection and exercise care when handling blades. Also be
alert to worn or damaged surfaces that could have sharp edges.
•
Disengage hydraulics and shut off engine, bleed off hydraulic pressure to both high
and low flow circuits allowing all movement to stop before leaving the operator’s position to adjust, lubricate, clean, unclog, remove or install the attachment. See Kubota KX080-3 Operators Manual for detailed instructions on bleeding off hydraulic
pressures.
•
Before working on or underneath the attachment, place blocks on both sides (front
and back) of operating vehicle tires or treads and under each end of the attachment
to prevent accidental lowering of the machine. Also remove the ignition key from
the operating vehicle and allow all movement to stop before beginning work.
ATTACHING TO THE EXCAVATOR 5
ATTACHING TO THE KX080
ATTENTION
The K4080 brush mower is designed specifically for the Kubota KX080 excavator
and should not be used on any other machine. Make sure the person who is attaching this brush mower has knowledge of attaching regular buckets and can do so in
a safe manner. The method used most often for attaching this brush mower is the
“curl-in” method.
Note: Remember to allow at least 3-5 minutes for the excavator to warm-up before
using with any oil-operated functions or attachments.
2
1
•
Move the KX080 into position behind the brush
mower. Keep in mind that the “back” of the
mower is the end with the hydraulic motor.
•
Once the power unit is in position, lower the excavator arm into position, inserting the rear portion of the mount into the Quick-Attach (1) first
and then “curling” the front portion down into
place. Insert factory pin (2) to keep brush mower
locked in place. Refer to photo on left.
•
Extend the main excavator dipper to its full length
in front of the excavator and set mower down with
the skid shoes firmly on level ground. This will
allow for easy access to the (3) flat-face couplers.
Never stand on attachment to reach couplers.
Turn off the excavator and bleed down pressure
on both high and low flow hydraulic circuits. See
Kubota KX080 Operators Manual.
LowFlow (SP2)
outside line
HighFlow (SP1)
inside line
3
pressure
return
•
View from
operators seat.
4
•
Zero Pressure Return Valve To Breaker
Mode “clockwise”.
Couple the hoses. The female end on the
shredder is pressure in (left side) and the male
end is return (right side). These hoses should be
coupled to the high-flow circuit (26.4 GPM) operated by the right-hand joystick in the excavator.
Then enable hydraulic breaker mode on the excavator, allowing for zero pressure return, (4) by
turning the valve located near the hydraulic reservoir to the return to tank position. This step is
vital and if not followed will result in damage
to the hydraulic motor. Also, the high flow
circuit is most often the closest to the cab of
the excavator as shown in the second photo.
If equipped with a thumb, plumb to the lowflow circuit (17 GPM), which is operated by
the left-hand joystick on the excavator.
ADJUSTMENT & MAINTENANCE 6
ADJUSTMENT & MAINTENANCE
CLEANING YOUR BRUSH MOWER
To preserve life of paint and decals, wash the brush mower after each use. The
preservation of your brush mower’s decals is essential to safety, so make sure they
are kept in good condition. It is also recommended that some sort of degreasing
solution be used on all bearings.
•
Check for excessive grease in bearing areas. Clean off any excessive amount.
•
Clean clippings from hydraulic hose areas, mounting areas or any areas that may be
susceptible to excessive heat.
•
Clean inside the brush mower with a pressure washer. Make sure the inside of the
mower is kept free from mud and compact grass. Keep in mind that mud built up on
the cutter drum can cause imbalance resulting in vibration.
•
Preserve damaged decals or replace them if they are unreadable. Decal kits can be
obtained from your local Kubota dealer.
•
Inspect blades for small cracks across the hole and insure they are wearing evenly.
•
Inspect attachment hardware such as bolts and roll pins to make sure they are tight.
Kubota strongly recommends
dealers order one starter pack of knives to
be shipped with every K4080 brush mower.
BASIC OPERATION 7
BASIC OPERATION
Running Your Attachment
The K4080 brush mower is designed to cut all types of vegetation such as grass, brush
and small trees. The condition of your terrain and the material to be cut should be
evaluated for the best results.
House Rotation Mowing
House Rotation Mowing
Brush on flat terrain can be cut by rotating the house
control from side-to-side and keeping the cutter head
just above ground level, moving the excavator forward 40” at a time into uncut material.
Side Mowing
Another technique is to place the cutter head next to
the machine and drive forward keeping the head
near the road’s shoulder or edge of what you are cutting around.
Side Mowing
Top Down Mowing
The last way of operation is to start at the top and
work toward the ground. Raise the boom all the way
up and curl it away from you. This will allow the
head to be inverted and trim tree canopies. Then
swing the head from side to side in the vertical position to trim the sides of trees. Finally, position the
head parallel to the ground to completely mulch the
branches and grass, eliminating any clean-up by
hand crews.
Brush cutting covers a wide range of conditions
and is more dangerous than mowing because of
the hidden objects. For this application, be sure
to feed large diameter branches or thick brush
into the side of the shredder where the blades
are hitting down. To reduce discharge, move
into uncut material with the discharge side of the
brush mower. This reduces debris throw significantly. Never allow observers within 150’ of the
brush mowing operation.
Top Down Shredding
BASIC OPERATION 8
BASIC OPERATION
1. Before beginning your job, walk the mowing area and clear all hidden hazards such
as large rocks, stumps, utility lines and hidden debris like broken glass, bottles and
miscellaneous materials. Projected debris can cause injuries to operators, pedestrians, livestock and property.
2. While inspecting your work area for debris, be on the lookout for bees, fire ants,
poison ivy and poison oak. Taking note of potential area hazards will increase your
productivity as well as your safety. Also avoid improper working conditions such as
overly saturated grounds, which can cause slippery conditions.
3. Check your discharge path. Most mowers and brush cutters will have some combination of material discharge system. Mulching flail mowers and brush cutters are
bi-directional. This allows the utilization of both sides of the blades. Always make
sure you know the discharge direction and discharge flaps are properly secured
and in good working order. Never start the mower if attachments are not securely
fastened to the power unit.
4. Your brush cutter is most efficient when the knives are sharp and turning at full
RPM. 1500-1800 RPM is the recommended speed the cutter shaft should turn.
5. Loading or “lugging down” the cutter excessively will reduce its cutting capacity and
result in increased hydraulic oil temperature. Stay aware of the cutter drum speed
and lift out of the cut until maximum speed is regained before resuming.
6. When cutting larger diameter material, lay the tree down with the blade and plane
the tree from side-to-side. This will result in a finer mulch which is quicker and easier on the machine than trying to grind a tree of 3” or more diameter from the top
down.
7. Never allow bystanders to within 150 feet of mowing or brush cutting.
8. Do not use this mower as a bucket to dig up roots and spread out piles of dirt.
Damaged caused by such activities will result in expensive repairs which will not be
covered under warranty. This weldment design is strong enough to last for decades
if cared for properly.
9. Frequent and routine maintenance procedures should be followed to insure the
safe and efficient operation of your brush mower
10. Abuse is indicated by drum damage, where the sides of the knives have left indentations on the drum. Abuse is also indicated by premature knife failure across the
whole drum. If cutter abuse is not prevented, ear failure will follow. To prevent
abuse, always reduce cutting load before significant cutter drum speed is lost.
BASIC OPERATION
9
BASIC OPERATION
Starting Procedure
1. While the excavator’s engine is turned OFF, and all moving parts have completely
stopped, remove outer spindle cover.
2. Check to see that the brush mower is in the down position and blades are not touching the ground. Start the engine and set throttle at idle speed. Important: Do not
start the operating vehicle until the brush mower has been carefully checked
for correct assembly and installation. Be sure that all observers are at least
100 feet clear of the machine.
3. Check pressure settings and make sure that the brush mower circuit is set to 3000
PSI and the thumb circuit is set to 2500 PSI.
4. With low RPM, turn on the auxiliary flow hydraulics. Do not engage auxiliary flow
hydraulics at a high engine speed.
5. Slowly bring up the RPM to maximum flow/efficiency. The brush mower should be
operating at 1500-1800 RPM. The RPM can be checked on the idler end side of
the mower using the shaft center. To do this, you will need a handheld tachometer
as shown in the photo below. Simply insert the end of the tachometer into the hole
in the center shaft. When checking the RPM with this method, it should be around
1700 at full throttle with nothing else running on the power unit. Use extreme caution when checking RPM near rotating parts!
Tachometer Usage
Auxiliary Hydraulics Control
6. Listen and feel for excess vibrations. Should excess vibrations occur, disable auxiliary flow hydraulics and shut the machine down. Determine and correct the problem before continuing work.
7. When work is finished, disable auxiliary flow hydraulics, shut off operating vehicle,
set parking brake and check hydraulic motor and surrounding parts for excess heat
or any leaks. Then replace shaft cover.
MAINTENANCE 10
MAINTENANCE
ATTENTION
Before doing any service work, observe the following safety rules:
1. Remove the ignition key from the operating vehicle and allow all movements to stop
before leaving the operator’s position and starting any maintenance activities.
2. Allow all movements to stop before leaving the operator’s position to lubricate or
clean the machine.
3. Before working on or underneath the brush mower, place blocks on both sides of
the operating vehicle tires or treads and under each end of the brush mower to prevent accidental lowering of the machine.
Lubrication
1. GREASE DAILY: Two cutter drum bearings. The grease fitting for the bearing on
the motor side of the attachment is mounted on the side of the motor housing.
2. Inspect rubber isolation disk. This disk will last over 1000 hours but should be inspected daily and replaced whenever the cutter drum is removed.
3. When greasing, apply 6-8 full pumps every eight hours of operation. Apply 6-8 full
pumps every four hours if running in severe conditions, apply 6-8 full pumps every
three hours in wet, boggy conditions.
CAUTION
Over-greasing seals and bearings can cause damage. If an excessive amount of
grease is visible, too much grease has been applied.
Lubrication Points
REPLACING KNIVES 11
REPLACING KNIVES
IMPORTANT
Never operate brush mower with a damaged knife. This will make the
cutter drum unbalanced and severe damage may result!
1. Worn knives, bolts, and spacers must be replaced. Neglecting the replacement of
these parts could cause the cutting drum to run out of balance. Do not mix new
parts with older, worn parts. Always replace wear washers when blades are
replaced. Failing to do so could cause the cutter drum to run out of balance.
2. In order to replace damaged or worn knives, you need a 3/16” punch, a hammer
and access to the knives on the cutter drum. Once the brush mower is tilted to
where the knives are exposed, simply take your punch and hammer it against the
roll pin going through the castle nut and bolt until it pops out. The nut should come
off easily after that.
Castle Nut
Shredder Knife
Roll Pin
Hammer Knife
3. To attach new knives, replace the same as they were removed and tighten the nut
down past the hole for the roll pin and reinsert the roll pin using the hammer and
punch.
ATTENTION IMPORTANT RECOMMENDATION
Customer & Dealer should always keep replacement knives, hammers and blade
bolts on hand. DO NOT OPERATE BRUSH MOWER WITH DAMAGED KNIVES.
HYDRAULIC DIAGRAM 12
HYDRAULIC DIAGRAM
The diagram below represents the hydraulic plumbing system for the
Kubota K4080 Brush Mower attachment.
SP1 left side
of dipper
(female)
SP1 right side
of dipper
(male)
Relief valve
Non adjustable
To reverse cutter drum rotation, reverse the hoses on the motor side
of the protection valve.
On quick couplers, the female end is usually the pressure in. Double
check the excavator plumbing to insure pressure (in) is on the left
side of the of the boom while sitting in the cab. AKA pressure in. This
will provide clockwise cutter drum rotation.
TRANSPORT 13
TRANSPORT
ATTENTION
Allow all movements to stop before leaving the operator’s position to lubricate or clean
the machine. Before working on or underneath the brush mower, place blocks on both
sides of the operating vehicle tires or treads and under each end of the mower to prevent accidental lowering of the machine. Remove the ignition key from the operating
vehicle and allow all movements to stop before beginning work. To transport, disengage auxiliary hydraulics and lower the machine to a reasonable ride height.
Removal
1. Lower the brush mower all the way onto level ground, extend boom and stick to
reach hoses.
2. Turn off the excavator and cycle all controls to insure all hydraulic pressure is relieved.
3. Unlock the locking devices on the excavator mount, never stand on the attachment.
4. Unlock mounting devices at the excavator and uncouple hydraulic hoses.
5. Re start and lift the excavator boom to remove it from the mower.
6. If transporting excavator and brush mower, leave the shredder mounted and curl
forwards so that the underside is exposed to the operator as shown above.
Storage
1.
2.
3.
4.
5.
Clean the brush mower thoroughly.
Lubricate the mower as recommended.
Check hoses and replace if damaged.
Check for worn parts and replace so you will be ready to operate when necessary.
Store in a clean, dry place.
TROUBLESHOOTING 14
TROUBLESHOOTING
T= Trouble C= Countermeasure
T. Where is the serial number for my machine?
C. The serial number for your brush shredder is stamped next to the mounting bracket on
the opposite side of the motor.
Model & Serial Number Plate Location
Serial Number Stamped On Top Of Mower
T. Where do I find replacement parts?
C. Your local Kubota dealer.
T. How often should I change my knives?
C. Replacing the cutting knives is a performance issue. When the cut begins to be inconsistent or rough, consider replacing the knives. It is recommended to always keep an
extra set of knives on hand so that loss of work time is minimal. Your dealers has a
starter kit of wear parts that shipped with your brush mower.
T. Do I need to fill the hydraulic motor with oil before I use the brush mower?
C. No, you do not. Attachments are tested at the factory prior to shipment and come filled
with high quality hydraulic fluid.
T. How can I prevent my hydraulic hoses from coming off during operation?
C. Be careful! Make sure the hoses are pressed all the way into their corresponding fittings on the operating vehicle. Turn the female coupler collar past bump to lock. Give
them a slight tug to make sure they are on all the way.
T. When I am replacing hydraulic fluid, how much should I add?
C. Consult your KX080 excavator manual for fluid levels and information.
T. Are there any advantages to reversing cutter drum rotation?
C. Obviously the first thing is safety. For example, if you want your cutter drum to rotate
so that it throws debris away from property, then it is advantageous. Also, you can reverse rotation to use the other side of the knives instead of having to buy new ones or
flip the old ones around.
TROUBLESHOOTING cont. 15
TROUBLESHOOTING cont.
T= Trouble C= Countermeasure
T. How do I reverse the cutter drum rotation?
C. Refer to the Adjustments and Maintenance section of this manual for information on
reversing the hydraulic hoses at the motor to reverse the cutter drum direction.
T. How do I replace my knives?
C. Refer to the Adjustments and Maintenance section of this manual for information
regarding the replacement of knives.
T. When connecting my hydraulic hoses, is there a specific way they should be attached or can any hose go to any fitting on the operating vehicle?
C. Make sure the engine is turned off and all the functions have been cycled to insure
all hydraulic back pressure has been relieved. You will notice that one hose has a
female end and the other hose has a male end. The female hose attaches to the
male fitting on the operating vehicle and vice versa. Refer to the Basic Operation
section of this manual for further information regarding plumbing.
T. I keep blowing the seals on my 40EXT and cannot seem to resolve the issue. What
should I do?
C. The main cause of seal ruptures with this machine is a result of high pressure return problems. In order to eliminate these problems, let the operating vehicle warm
up for at least 3-5 minutes before attempting to use any oil-operated functions.
Check to insure return valve is in the HAMMER / BREAKER clockwise position.
NOTE: Consult your KX080 excavator manual to insure lift capacities are not exceeded. K4080 features custom bolt on hitch mounting to match your existing buckets.
Safety begins with a thorough understanding of the equipment. Always make sure you
and your operators read the Operator’s Manual before using the equipment. Pay close
attention to all safety and operating decals and never operate machinery without all
shields, protective devices and structures in place. Design, materials and/or specifications are subject to change without notice and without liability therefore. Specifications
are applicable to units sold in Canada, the United States, its territories and possessions, and may vary outside these areas.
SPECIFICATIONS 16
SPECIFICATIONS
K4080 Brush Mower Specifications
Working Width
Overall Width
Weight
Number of knives
Capacity
Hyd. Flow required
40”
(101.6 cm)
58”
(127 cm)
1,325 lbs.
(600 kg)
24/12 –77 lbs.(35 kg)
6“.
(15.3cm.)
23 gpm /
87 lpm
FEATURES
•
•
•
•
•
•
•
Bolt on excavator bucket style quick attach mount
3/4” & 3/8” high strength AR plate structure
Grade 8 castle nut, roll pin attachment system
Reversible spiral mounted triple hammer knifes
Wire proof hardened cutter shaft protectors
Integrated thumb saddle motor guard
Safety chain debris deflector guards
Includes complementary 3/4” hydraulic hoses, 92” long, with
flat faced hydraulic couplers and factory quick attach mount.
KNIFE ASSEMPLY 17
KNIFE ASSEMBLY
7
5
1
6
3
4
2
#
1
2
3
4
5
6
7
Description
BOLT, KNIFE 1"x4" GR8 -2 1/2" Shoulder
KNIFE, SHREDDER
SPACER, 1" Flat Washer (KNIFE BOLT)
NUT, CASTLE 1" (KNIFE)
PIN, ROLL 3/16"x1 1/2" (KNIFE BOLT)
KNIFE, SHREDDER (CENTER)
WASHER, LOCK 1" (KNIFE BOLT)
Model
Part #
All
All
All
All
All
All
All
77700-00862
77700-00853
77700-00863
77700-00866
77700-00866
77700-00854
77700-00864
Quantity
12
24
24
24
12
12
12
DRIVE ASSEMBLY 18
DRIVE ASSEMBLY
11
10
1
6
4
12
2
5
3
7
6
9
#
1
2
3
4
5
6
7
8
9
10
11
12
Description
GUARD, WIRE - DRIVE SIDE
SEAL, SHAFT 3 1/2"x2 3/4" OD
WASHER, DAMPENER
HOUSING, SPINDLE
BREATHER
BEARING, BALL 50mm ANGULAR CONTACT
NUT, LOCK (DRIVESHAFT)
O RING, SPINDLE HOUSING 5/32"x17"
MOTOR, HYD 26 gpm flow
GUARD, WIRE - IDLER SIDE
BEARING, FLANGE (1 15/16" 4 BOLT)
HOSE, GREASE 1/4"x18"
Model
All
All
All
All
All
All
All
All
All
All
All
All
Part #
77700-00860
77700-00857
77700-00858
77700-00859
77700-00883
77700-00856
77700-00867
77700-00855
77700-00882
77700-00861
77700-00852
77700-00872
Quantity
1
1
1
1
1
2
1
1
1
1
1
1
HYDRAULIC PLUMBING 19
HYDRAULIC PLUMBING
Zero Pressure
Return to Tank
Pressure In
3
2a
2b
2
7
4
5
6
#
1
2
2a
2b
3
4
5
6
7
Description
Hydraulic Motor-24 GPM
Motor Protection Valve
MPV Pressure Relief
MPV Check Valve
Adapter, 12 MORB x 12 MJIC 90
Coupler, 3/4" FEM FLUSH FACE
Coupler, 3/4" MALE FLUSH FACE
Hose, 44 " 12FJIC x 12 FJIC
Breather
1
Model
K4080
K4080
K4080
K4080
K4080
K4080
K4080
K4080
K4080
Part #
77700-00882
77700-00873
77700-00874
77700-00875
77700-00876
77700-00877
77700-00878
77700-00881
77700-00883
Quantity
1
1
1
1
4
1
1
2
1
Notes 20
NOTES
K4080 Complete Parts List
Qty. Per Unit
Description
Part Number
1
24
12
BEARING, FLANGE (1 15/16" 4 BOLT)
KNIFE, SHREDDER
KNIFE, SHREDDER (CENTER)
77700-00852
77700-00853
77700-00854
1
O RING, SPINDLE HOUSING 5/32"x17"
BEARING, BALL 50mm ANGULAR CONTACT
SEAL, SHAFT 3 1/2"x2 3/4" OD
WASHER, DAMPENER
HOUSING, SPINDLE
GUARD, WIRE - DRIVE SIDE
GUARD, WIRE - IDLER SIDE
77700-00855
2
1
1
1
1
1
12
77700-00856
77700-00857
77700-00858
77700-00859
77700-00860
77700-00861
BOLT, KNIFE 1"x4" GR8 -2 1/2" Shoulder
SPACER, 1" GR8 Flat Washer (KNIFE
BOLT)
77700-00862
77700-00864
77700-00865
12
1
1
1
1
WASHER, LOCK 1" (KNIFE BOLT)
NUT, CASTLE 1" (KNIFE)
PIN, ROLL 3/16"x1 1/2"w/hole (KNIFE
BOLT)
NUT, LOCK (DRIVESHAFT)
SET DECAL
FITTING, GREASE 1/4" NPT
BARB, HOSE 1/4"MNPTx1/4" 90°
1
1
1
1
1
BARB, HOSE 1/4"MNPTx1/4" Straight
HOSE, GREASE 1/4"x18"
MPV - Aluminum Body
MPV - Cartridge, Pressure Relief
MPV - Cartridge, Check Valve
77700-00871
77700-00872
77700-00873
77700-00874
77700-00875
4
ADAPTER, 12 MORB x 12 MJIC 90
77700-00876
1
COUPLER, 3/4" FEM FLUSH FACE
77700-00877
1
COUPLER, 3/4" MALE FLUSH FACE
77700-00878
2
ADAPTER, 16 MORB x 12 MJIC 90
77700-00879
2
2
1
1
1
1
1
1
1
HOSE, 90" 12 MORB x 12 FJIC Shielded
HOSE, 44 " 12FJIC x 12 FJIC
MOTOR, HYD 26 gpm flow
BREATHER
COMP DRUM (CUTTER ASSY)
COMP MOUNT, BOLTED QA
CAP, END - BEARING GUARD
COVER, MOTOR UPPER
COVER, MOTOR LOWER
77700-00880
77700-00881
77700-00882
77700-00883
77700-00884
77700-00885
77700-00886
77700-00887
77700-00888
24
12
12
77700-00863
77700-00866
77700-00867
77700-00868
77700-00869
77700-00870
KUBOTA TRACTOR CORPORATION
3401 Del Amo Blvd., Torrance, CA 90503, U.S.A.
Telephone: (310) 370-3370
Western Division: 1175 S. Guild Ave., Lodi, CA 95240
Telephone: (209) 334-9910
Central Division: 14855 FAA Blvd., Forth Worth, TX 76155
Telephone: (817) 571-0900
Northern Division: 6300 at One Kubota Way, Groveport, OH 43125
Telephone: (614) 835-1100
Southeast Division: 1025 Northbrook Parkway, Suwanee, GA 30024
Telephone: (770) 995-8855
PRINTED IN USA