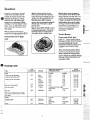
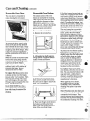
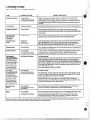
1
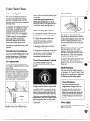
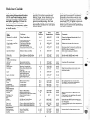
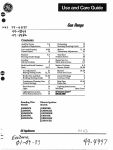
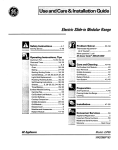
C
b
Aluminum Foil
Appliance Registration
12
2
Baking, Baking Guide
Broiling, Broiling Guide
7,8
10
Care and Cleaning
Clock/Timer
Continuous Cleaning Care
Door Removal
Features
Light; Bulb Replacement
Model and Serial Numbers
~Problem Solver
11-14
5
n
Repair Service
Roasting, Roasting Guide
Safety Instructions
Shelves
t
15
9
2,3
6
13
Thermostat Adjustment
Warranty
Back Cover
11
12
6,1:
2
15
GEAIISLWYC&m@
8W*$%MW
+?“2
2-(5?9
q9.q773
.
.
.?@
%=:.x
=li>.~fk
~,..=.
Wdi Gwdtmj’e
-%$%.
:>=-&=~ <>z$~
~qgfi.
isim.mkd [t?help }’mqw.itc
iiild illiii ~iliiil }’i?U~
~CW’
L)\’Cll
prqk?rh’m
ii
Kwp ii hmd~- h- Lins\Yt.2k-s10 J“ouiLp!estkm.
&wI’tunderstand something
]f .~.WU
or”needmorehelp,Writd(inciudc
yourphonenumber):
C~msumerAfftiirs
GE Appkmccs
AppliancePark
Louisville,KY40225
TheCaliforniaSk&5
Drinking
~fvater
N’ldToxicEnforcement
Act-requirestheGovernorof
Californiatopublisha listof
substancesknown03thestate
focauseCwlcerandrequires
businessestowarncustomers
ofpotentialexposuretosuch
subWulces.
VVrite dolvlli the model
and serial numbers.
You*11
findthemon a labellocated
insidetheovenon the leftside.
Sccpage4.
Thesenumbersare also on the
ConsumerProductOwnership
RegistrationCardthatcamewith
youroven.Beforesendingin this
card, pieasewritethesenumbers
here:
T.
~-.
Gasappliancescancause
.minorexposuretothreeofthese
;L
substances,namelybenzene,
formaldehyde
andsoot,caused ___;-primarilybytheincomplete
‘ ‘-~combustionofnaturalgasor IX ‘---—:
--fuek. Properlyadjustedovens,
indicatedbya blq$h ratherthan
a yeilolv-flme,Willminimize
~ihcmnpkticombustion.Exposure ‘-:
tothesesubstancescanbe ~
;
minimizedfurtherbyventing
..
withanopenwindowor using
>-a ventilationfanor hod.
Model Number
Serial Number
tJse these numbersin any
correspondenceor servicecalls
concerningyouroven.
when You&t YiR.lw
oven
@Havetheimhilerallow
you
thelocation
d them%m gas cut-
HJW. UWeived
a &mWed 0%’Wi’le
00
Immediatelycontactthe dealer(or
builder)that soldyouthe oven.
offVakwi!
andhowtoshutitoff
,-”
if nwessarye
@~f$veyour Qweninstilled
.—
—
fullproperly
grwdnded
bya
qualified
inshlier,inaccordance
withtheInshllationInstructions.
Amyadjustmentandserviceshould.
beperformedonlybyqualified
gasrangeinstakrs or service
technicians.
save time and !HBOEFMYJL
lR$kWE’you Ireqwst
Wix-wice
*..
Checkthe ProblemSolveron
page 15.It Iistscausesof minor
operatingproblemsthat youcan
correctyourself.
2
.
:“
;
~.:
:-”
;-::-
~~
ftw
@J\T~y@g’
~~$j&
yf-)~~
appl;gr$g$~
flr’13&siing
Warming
tile 2X!$QEH
I?mkmgi’xi
USC d theown without
xkquate ve~=tilaticm
can be
h,azardc)us.
@Ix] TMM
use Waisr on gr&3sa
fires. Flame in!Q%%?n
can be
snlothered by completely
&Mlg door and turning
OVEN TEhlP to OFF*
QDo not WWeflammable
materials in an oven.
@Do not M Cooting grW3M?
or ‘otherflammable materials
accumulate in or near the Well.
* Do not use oven for a storage
area.
@Stand away from the oven
when opening oven door. The
hot air or steam which escapes
can ca!useburns to hmMk5face
aMM9reye%
a Keep Wen free frwmgrease’
buildup.
e Place oven shelvesin desired
position Wh&?oven is $00].
@Pulling out shelf to the $k?lf
stop is a Conveniencein lifting
heavyRMdS.It isalso8 pmution
against burns from touching
hot surfaces of the’door on’oven
~~~~~=
e
e Dolft WN?
aluminum foil
anywhere in the oven except as
described in this book. Misuse
could result in a fire hazard or
damageto the range.
@DQn9theat unopened food
Conbiners in the oven. Imwsslw
could build
could bwst
up ad. the Conbiner
Causing am injury.
a use dy
glass mdm’are
is Feconlmemded
for use
ovens.
e~y~~nusing
that
in gas
Coo!fing OF
ImMing bags in. owm9 follow
the rnarmfactunx’sdirections.
3
—-.
.
@AhwysMmove
broilerpm
fum broilercol~partmentas
MH.m$3syoufinishbroiling.
Chase
left
in the pan can catch
fire if ovenis used without
removingthe grease from the
broikx pan.
}y~enbroiling?if meat
istoo
‘=$
totheflme9 the fatmay
ignite.Trimexcessfattoprevent
excessiveflare-ups.
@Make sure broiler pm ish.
placecorrectlyto reducethe
possibilityofgreasefires.
@If you should km! a gww
fire in the broiler pan9turnoff
oven,andkeepdrawerclosedto
containfireuntilit burnsout.
e clean only!pWs listedinthis
use andcareBook.
a KeepO’vel’n
dean$Imd
freeof
accumulations d greaseOF
spilloven
Wtich mayignite.
dme
~ Read66’H’M!
Problemsdwr’
onpageE d thisbook
e Don9tattempt
toi-wpahG4r
repkx! my partd yew’ ‘4Yw!n
Udessit isspecifically
recommended
in.‘thisbwlk.AH
otherservicings!mkl bereferred
to a qualifiedtechnician.
Featllres
ofYour
oven
——
-(0
—
ModelKUK$15GEH
(StandardOven)
ModelJGKC16GEH
(Continuous-Cleaning
Oven)
FeatureIndex
1 MinuteTimer
2 AutomaticOvenTimer
3 DigitalElectricClock
4 RadialElectricClock
5 OvenLightSwitch
6 OvenSetKnob
7 OvenTempKnob
8 OvenInteriorLight
9 OvenShelves
10 OvenShelfSupports
11 RemovableOvenBottom
12 RemovableOvenDoor
13 RemovableBroilerCompartmentDoor
14 Broikx Panand Rack
15 ‘Model and SerialNumbers
16 Continuous-CleaningOvenInterior
17 BroilerCompartment
Seepage
5
5
5
5
6
5
5,6
6
6
6
12
12
12
10, 13, 14
2
11
10, 13
4
JGKS15GEH
e
0
JGKC16GEH
e
e
e
e
e
e
e
e
e
@
e
e
0
@
e
@
e
e
e
@
@
e
@
e
e
e
e
*
— .—
—
Automatic
oven
her ad clock
Theclock
.ModelJGK$15GEEI
TheMinuteTimerhasbeen
combinedwiththeovenclock.Use
it to timeall yourprecisecooking
operations.You’llrecognizeit as
thepointerwhichis differentin
colorthanthe clockhands.
Minutesare markedup to 60 on the
centerringof theclock.
.
ModelJGKS15GEH
Toset the (Hock,pushtheknobin
and turn the clockhandsto the
rightto the correcttime.Then let
the knoboutandcontinueturning
to OFF.
3. Setthe SIXIPcontrol.Pushin
and turn the STOPknobto thetime
youwantthe ovento turn itselfoff.
Note:Theremustbeat leasta half
hourdifferencebetweentheSTART
and SKIP dialsfortheautomatic
controlto work.
‘I’oset the MinuteTimer,turn the
knobto the left, withoutpushingin,
untilthepointerreachesthenumber
ofminutesyouwantto time.
ModelJGKC16GEH $
TheMinuteTimeris the largedial
to thelefiof the digitalclock.Use
it to timeall yourprecisecooking
operations.This dialalso changes
thedigitalclock.
TOset the MinuteThner,turn
thecenterknobclockwise,without
pushingin, untilthepointerreaches
thenumberof minutesyouwantto
time(upto 60).
At the end of the timeset on
eitherMinuteTimer9a buzzer
soundsto MByoutimeis up. Turn
fheknob,withoutpushingin, until
thepointerreachesOFF and the
buzzerstops.
2. Setthe STARTcontrol.Push in
and turnthe STARTknobto the
timeyouwanttheovento turn itself
on. (Ifyouwantit to startcooking
immediately,do notset the Start
time.)
ModelJGKC16GEH
Toset the Clock,pushin thecenter
knobofthe MinuteTimerand turn
the knobin eitherdirectionto set
the digitalclocknumeralsto the
correcttime. (Aftersettingthe
clock, let the knobout andturn the
MinuteTimerpointerto OFF.)
AutimaticOvenTimer
This Timerwillautomaticallystart
and stopyourovenfor you.Here’s
whatyoudo:
L Makesurebothyourovenclock
andtheSTARTdialshowthecorrect
timeof day.Whenthe STARTknob
ispushedinandturned,itwill“pop”
intoplacewhenthe time shownon
the ovenclockis reached.
5
4. Set theOVENSETknobto
AUTOOVEN.
5. Setthe OVENTEMPknobto
the desiredcookingtemperature.
Nowtheovenwillturn itselfon
immediatelyor at a later Starttime
thatyouset, cookatthe temperature
youselectedand turn itselfoffat
the Stoptimeyouselected.
After takingfoodoutof the oven,
be sureto turn theOVENTEMP
controlto off and theOVENSET
knobto the MAN. OVENsetting
whereit shouldbe keptfor normal
ovenuse.
using
Your
oven
Antoknatic
Ignition
Theovenandbroilerburnerscm
yourovertare lightedhy electric
ignitioneliminatingthe needfor
standingpilotlightswithconstantly
burningflame.
CAUTION:DO NOTMAKEANY
ATTEMPTTOOPERATETHE
ELECTRICIGNITIONOVEN
DURINGAN ELECTRICAL
POWERFAILURE.Resumption
of electricalpowerwhenOVEN
TEMPcontrolis in anyposition
otherthan OFF willresultin
automaticignitionof the oven
burnerandcouldcausesevere
burnsif, at the time,youwere
attemptingto lightthe burnerwith
a match.
TO~@
~~~Ove~
Burner
llmn the OVENTEMP knobto the
desiredtemperature.The burner
shouldignitewithin60 seconds.
AirAdjustment
Anair adjustmentshutterfor the
ovenburnerregulatesthe flowofair
tothe flame.
Removethe broilerpan and rack,
pullthe broilercompartmentdrawer
outto the “stop”positionor remove
thebroilercornp&tmentshelfand
you’llfindthe shutteragainstthe
backwallof thecompartment.
kd
3\
w~”e<.
/k
Loosen
Air
I adjustment shutter
screwand rotatetheshutterto ailow
moreor lessair intotheburnertube
as needed.
When the rightamountof air
flow%
intothe lmrner,the flame
shouldbe steady,withapproximate]
y
l-inchblueconesandshouldnot
extendoutoverthebaffleedges.
BeforeUsingYourOven
1. Lookat thecontrol.Besureyou
understandhowto set itproperly.
2. Checkthe insideof the oven.
Lookat the shelves.Practice
removingand replacingthem
whilethe ovenis cool.
3. Readthe informationandtips
on the followingpages.
4. Keepthisbookhandywhereyou
can referto it—especiallyduring
the first fewweeksof getting
acquaintedwithyouroven.
(hen Temperature
Control
The OVENTEMPcontrolis
locatedon the upperovencontrol
panel.
The shelvesare designedwith
stop-locksso whenplacedcorrectly
on the shelfsupports,theywillstop
beforecomingcompletelyout of
the ovenand willnot tilt whenyou
are removingfoodor placingfood
on them.
Whenplacingcookwareon a shelf,
pullthe shelfout to the “stop”
position.Placethe cookwareon
the shelf, then slidethe shelfback
intothe oven.This willeliminate
reachingintothe hotoven.
Toremovethe shelvesfromtheoven
for cleaning,pulloutto stop
position,lift upon frontand pull
&emout.
-
—
–~
ShelfPositions
The ovenhas fourshelfsumortsA (bottom),B, C and D (t&). Shelf
positionsfor cookingare suggested
on Bakingand Roastingpages.
OvenMoisture
Simplyturn the knobto the desired
cookingtemperatures,whichare
markedin 25”F.incrementson the
dial. It willnormallytake30 to 60
secondsbeforethe flamecomeson.
Afterthe ovenreachesthe selected
temperature,theovenburnercycles
off completely,thenon witha full
flameto keepthe oventemperature
controlled.
3-’()
adjust the fhvvof air to the
burner,loosenthePhillipshead
As yourovenheatsup, the
temperaturechangeof the air
in the ovenmaycausewater
dropletsto formon the door
glass. Topreventthis, open the
ovendoor for the first minute
of ovenheat-upto let the moist
air out.
oven Light
Use switchon controlpanelto turn
lighton and off.
6
—
—
“ HQBY
msetYourRalge
BAing
– for
1. Posi\kmthe shelfor shelvesin
theoven.
2. C1oseovendoor.TurnOVEN
TIWWknobto desiredtempmawre.
Preheatovenforat least 10minutes
if preheatingis necessary.
3. Placefoodin ovenon center
of shelf. Allowat leastan inch
betweenedgeof bakewareandoven
wallor adjacentcookware.
If cookingcmIwoshelvesat the
sametime, piaceshelvesabout4
inchesapart andstaggerfoodon
them.
4. Checkfoodfordonenessat
minimumtimeon recipe.Cook
longerif necessary.Switchoff
heatand removefood.
—
Preheating
Preheatingis veryimportantwhen
usingtemperaturesbelow225”F.
andwhenbakingfoodssuchas
biscuits,cookie~,cakesandother
pastries.
Preheatingis notnecessarywhen
roastingor forlong-timecookingof
wholemeals.
shelfPositiom
Mostbakingis doneon the second
shelfposition(B)fromthe bottom. ,
V/henbakingthreeor four items,
usetwoshelvespositionedon the
secondand fourthsetsof supports
(B& D) from bottomof oven.
Bakeangelfoodcakeson firstshelf
position(A) frombottomof oven.
Baking mps
@Followa testedrecipeand
meawretheingredientscarefully.
[fyouareusinga packagemix,
followlabeldirections.
s Ifmoistureisnoticeableontile
frontoftheovenorontheoven
windowwhenfirstturningonthe
oven,leavetheovendoorajarfora
fewminutesor untiltheoveniswmno
@Donotopentheovendoorduring
a bakingoperation-heatwillbelost
andthebakingtimemightneedto
beextended.Thiscouldcausepoor
bakingresults.Ifyoumustopenthe
door,openitpartially-only 3 or4
inches—andcloseitasquicklyas
possible.
*Donotdisturbtie heatcirculation
intheovenwiththeuseofaluminum
foil.If foilis used,placea small
sheetof it, about10by 12inchesat
themost,on a lowershelfseveral
inchesbelowthefood.Donotplace
foilontheovenbottom.
Comon BakingProblems
andPossibleSolutions
PIES
Burningaroundedges
~Oventoofill; avoidovercrowding.
*Edgesofcrusttoothin.
@Incorrectbakingtemperature.
Bottomcrustsoggyandunbaked
~MOWcrustand/orfillingtoCOO1
sufficientlybeforefi~lingpieshell.
~Fillingmaybe toothinorjuicy.
~Fillingallowedto standinpieshell
beforebaking.(Fillpie shellsand
bakeimmediately.)
@Ingredients
andpropermeasuring
affectthequalityofthecrust.Usea
testedrecipeandgoodtechnique.
Makesurethereareno tinyholesor
tearsin a bottomcrust. “Patching”
a piecrustcouldcausesoaking.
CAKES
Cakeriseshigherm me side
~Batterspreadunevcrdyinpan.
@oven shelvesnotlevel,
@Usingwarpedpans.
*Incorrectpansize+
Cakescrackingontop
oOventemperaturetoohigh.
~Battertoothick,followrecipe
or exactpackagedirections.
* Checkforpropershelfposition.
@Chwkpansizecakd forinrecipe.
~Impropermixingofcake.
Cakefalls
~Toomuchshortening,sugaror
liquid.
a Checkleaveningagent,baking
powderor bakingsodatoassure
freshness.Makea habitto note
expirationdatesofpackaged
ingredients.
~Cakenotbakedlongenoughor
at incorrecttemperature.
*If addingoiltoa cakemix,make
certaintheoilisthetypeand
amountspecified.
Crustis hard
@Checktemperature.
@Checkshelfposition.
Cakehassoggylayerorstreaks
at bottom
e Underminingingredients.
e Shorteningtoosoftforproper
creaming.
e TOOmuchliquid.
Pie f“diingrunsover
~Topandbottomcrustnotwell
sealedtogether.
@Edgesofpiecrustnotbuiltup
highenough.
oTOO
much~l~ling.
~Checksizeofpieplate.
ICOOIKllZS& BISCUI’IS
Doughycenter;heavycruston
surface
e Checktemperature.
e Checkshelfposition.
e FO11OW
bakinginstructions
carefullyasgiveninreliablerecipe
or onconveniencefoodpackage.
e Flatcookiesheetswillgivemore
evenbakingresults.Don’tovercrowd
foodsona bakingsheet.
~Conveniencefoodsusedbeyond
theirexpirationdate,
Pastryis tough;crustnotflaky
@Toomuchhandling.
~Fattoosofior cutintoofine.
Rolldoughlightlyandhandleas
littleaspossible.
Browningmorenoticeableon
oneside
~Ovendoornotclosedproperly,
checkgasketseal.
@Checkshelfposition.
7
.
m–
--
Bting Guide
.
L Preheating isvery important
wiwnusingtemperaturesbelow
225”F.and when bakingfoods
suchas biscuits,cookies,cakes
andotherpastries.Preheatthe
ovenfor at least 15minutes.
Preheatingis notnecessarywhen
roastingor for long-timecooking
of wholemeals.
3. Darkor non-shinyfinishes,also
glassand Pyrocemrn”cookware,
generallyabsorbheatwhichmay
resultin dry,crispcrusts.Reduce
ovenheat25”F.if lightercrustsare
desired.Rapidbrowningof some
foodscanbe achievedbypreheating
castironcookware.
2. Aluminumpansconductheat
quickly.For mostconventional
baking,light,shinyfinishesgive
bestresultsbecausetheyhelp
preventoverbrowning.For best
browningresults,we recommend
dullbottomsurfacesfor cakepans
andpieplates.
Shelf
Positions
Oven
‘lkmperatures
Time,
Minutes
ShinyCookieSheet
B,C
400°-4750
15-20
B,A
350°-4000
20-30
B
400°-4500
20-40
B
350°
45-55
Muffins
Popovers
ShinyMetalPanwith
satin-finishbottom
Cast Iron or GlassPan
ShinyMetalPanwith
satin-finishbottom
ShinyMetalMuffinPans
DeepGlassor CastIronCups
A, B
B
400°-4250
375°
20-30
45-60
Quickloafbread
Ymstbread(2loaves)
Metalor GlassLoafPans
Metalor GlassLoafPans
B
A, B
350°-3750
375°-4250
45-60
45-60
Decreaseabout5 minutesformuffinmix.
Or bakeat450”F.for25minutes,thenat
350”F.for 10to 15minutes.
Darkmetalor glassgivesdeepest
browning.
Plainrolls
Sweetrolls
Cakes
(withoutshortening)
Angelfood
Jellyroll
Sponge
Cakes
Bundtcakes
Cupcakes
Fruitcakes
ShinyO~longor MuffinPans
ShinyOblongor MuffinPans
A, B
B,A
375°-4250
350°-3750
10-25
20-30
Forthinrolls,ShelfB maybeused.
Forthinrolls,ShelfB maybeused.
A
B
A
325°-3750
375°-4000
325°-3500
30-55
1o-15
45-60
Twopiecepanisconvenient.
Linepanwithwaxedpaper.
Metalor CeramicPan
ShinyMetalMuffinPans
Metalor GlassLoafor
TubePan
ShinyMetalPanwith
satin-finishbottom
ShinyMetalPanwith
satin-finishbottom
Metalor GlassLoafPans
A, B
B
A, B
325°-3500
350°-375”
275°-3000
45-65
20-25
2-4hrs.
B
350°-3750
20-35
B
350°-3750
25.30
B
350°
40-60
Metalor GlassPans
CookieSheet
B,C
B,C
325°-3500
350”-400°
25-35
10-20
CookieSheet
CookieSheet
B,C
B,C
400°-4250
375°-4000
6-12
7-12
A, B,C
B
350°-4000
300°-3500
30-60
30-60
B
325°
50-90
FoilPanonCookieSheet
Spreadtocrustedges
A
B,A
400°-4250
325°-3500
45-70
;5-25
Glassor Satin-finishMetalI%
Glassor Satin-finishMetalPan
Glassor Satin-finishMetalPan
A, B
B
B
400°-4250
400°-4250
450°
45-60
40-60
12-15
A, B, C
A, B,C
325°-4000
325°-3750
300°-3500
60-90
30-60
30-75
Food
Bread
Cookware
Biscuits(%-in.thick)
Coffeecake
Cornbreador muffins
Gingerbread
Layer
Layer,chocolate
Loaf
Cookies
Brownies
Drop
Refrigerator
Rol!edor sliced
Fruits,
otherDesserts
Bakedapples
~ustard
%ddings,rice
mdcustard
.,—
?ies
%ozen
vferingue
he crust
rwocrust
%try shell
tiiscei!aneous
lakedpotatoes
icallopeddishes
kwffles
AluminumTubePan
MetalJellyRollPan
Metalor CeramicPan
Glassor MetalPans
GlassCustardCupsor
Casserole(setinpanofhotwater)
GlassCustardCupsor
Casserole
SetonQvenShelf
G]assor Me@lpan
GlassPan
B
8
Comments
Canned,refrigeratedbiscuitstake2 to4
minuteslesstime.
Preheatcast ironpanforcrispcrust.
Paperlinersproducemoremoistcrusts.
Use300”F.andShelfB forsmailor
individualcakes.
Barcookiesfrommixusesametime.
UseShelfC andincreasetemperature
25to 50”F.formorebrowning.
Reducetemperatureto 300”F.forlarge
custard.
Cookbreador ricepuddingwithcustard
base80to90 minutes.
Largepiesuse400”F.andincreasetime.
Toquicklybrownmeringueuse400°F.for
8 to 10minutes.
Custardfillingsrequirelowertemperature,
longertime.
Increasetimeforlargeamountor size,
Roasting
—
Roastingis cookingby dry heat.
Tendermeator poultrycan be
roasteduncoveredin youroven.
Roastingtemperatures,which
shouldbe lowand steady,keep
spatteringto a minimum.When
roasting,it is notnecessaryto sear,
baste,cover,or add waterto your
meat. Roastingis easy,just follow
thesesteps:
Step L Positionovenshelfat
secondfrombottomposition(B)for
smallsizeroast (3 to 5 lbs.) andat
bottomposition(A) for larger
roasts.
Step2: Checkweightof roas~.
Placemeatfat-side-upor poultry
breast-side-upon roastingrack in a
shallowpan. Themeltingfatwill
bastethe meat. Selecta panas
closeto the sizeof meatas possible.
(Broilerpan withrack is a good
pan for this.)
Step3: lbrn OVENTEMPcontrol
to desiredtemperature.Checkthe
RoastingGuidefor temperatures
andapproximatecookingtimes.
Step4: Mostmeatscontinueto
cookslightlywhilestandingafter
beingremovedfromthe oven.For
rare or mediuminternaldoneness,
if meatis to stand 10to 20 minutes
whilemakinggravyor foreasier
carving,youmaywishto remove
meatfromovenjust beforeit is
done.If no standingis planned,
cookmeatto suggested
temperature
Rozen Roask
Frozenroastsof beef,pork,
lamb,etc., can be startedwithout
thawing,butallow10to 25 minutes
per poundadditionaltime (10
minutesper poundfor roastsunder
5 pounds,moretimefor larger
roasts).
Thawmostfrozenpoultrybefore
roastingto ensureevendoneness.
Somecommercialfrozenpoultry
canbe cookedsuccessfullywithout
thawing.Followdirectionsgiven
on packer’slabel.
RoastingGuide
‘0P
Meat
Tendercuts; rib, highquality
sirlointip, rumpor topround*
Oven
Temperature
Lamblegor bone-inshoulder*
325°
Vealshoulder,legor loin*
Porkloin, rib or shoulder*
Ham,pre-cooked
325°
325°
325°
Rare:
Medium:
WellDone:
Rare:
Medium:
WellDone:
WellDone:
WellDone:
ToWarm:
Ham,raw
*Forbonelessrolledroastsover6-inches
thick,add5 to 10mirmtesper lb. to times
givenabove.
325°
WellDone:
325°
375°
WellDone:
WellDone:
325°
WellDone:
Poultry
Chickenor Duck
Chickenpieces
Turkey
-.
325°
Doneness
9
Approximate
RoastingTime
in MinutesperPound
3 to5-lbs.
6 to8-lbs.
24-30
18-22
30-35
22-25
35-45
28-33
21-25
20-23
25-30
24-28
30-35
28-33
35-45
30-40
35-45
30-40
10minutesper lb. (anyweight)
Under10Ibs.
10to 15-lbs.
20-30
17-20
3 to5-lbs.
35-40
35-40
10to Wills.
20-25
Over5 Ibs.
30-35
OverK lbs.
15-20
Internal
lkmperature“F
130°-140”
150°-160°
170°-185°
130°-140°
150°-1600
170”-185°
170°-180°
1700-180°
125°-130°
170°
185°-190°
185°-1900
In thigh:
185°-1900
Broiling
Broilingis cookingfoodbydirect
BroilingTips
heatfromabovethe food.Your
e ~teak id chops SllOUl~ kl~ i3t
@the tongs to turn meatover—
rangehasa convenientcompartment
piercedm~atlosesjuices.
least1
inchthickforbest broiling
belowthe ovenfor broiling.It also
results.Panbroilthinnerones.
hasa speciallydesignedbroilerpan
andrack thatallowdrippingfatto
drainawayfromthe foodsandbe
BroilingGhJkk
keptawayfromthehighheatof
tie gasfl~.eo
Quantity
1st
Side 2ndSide
Distancefromtheheat sourcemay
andlor
Shelf ‘13me, Time,
Food
Thickness
Position Minutes Minutes Comments
bechangedbypositioningthebroiler
31/j
31/j
panand rack on oneof threeshelf
Bacon
%-lb.(about8
Arrangeinsinglelayer.
c
thinslices)
positionsin thebroilercompartment—
A (bottomof broilercompartment),
l-lb.(4patties)
Spaceevenly.Upto 8 patties
GroundBeef
WellDone
7-8
takeaboutsametime.
9-1o
c
%to %-in.thick
B (middle)andC (top).
BeefSteaks
Both the ovenand broiler
A
7
Rare
1-in.thick
9
Steakslessthan l-in. cook
compartmentdoorsshouldbe
Medium
(1-l filbs.)
12
throughbeforebrowning.
A
5-6
ciosedduringbroiling.
A
8-9
WellDone
13
Panfryingis recommended.
Howt-oBroil
L If meathas fator gristlenearthe
edge,cut verticalslashesthroughit
about2 inchesapart, but don’tcut
intomeat. Werecommendthatyou
trimfatto preventexcessive
smoking,leavinga layerabout
l/8-inchthick.
2. Removebroilerpan and rack
frombroilercompartmentand
placefoodon rack.
3. Pullout broilerdraweror broiler
shelfand positionbroilerpan in
compartment.Placingfoodcloserto
flameincreasesexteriorbrowning
of food,but also increases
spatteringand thepossibilityof fats
andmeatjuices igniting.
4. Closebroilerdoorand, for most
foods,turn OVENTEMP knobto
BROIL.Exceptionsare chicken
andhamwhichare broiledat a
lowersettingin order to cookfood
throughbeforeoverbrowningit.
5. Tbrnmost foodsonce during
cooking;(theexceptionis thinffllets
offish;oil one side,placethat side
downonbroilerrackandcookwithout
turninguntildone).Timefoodsfor
aboutone-halfthetotalcooking
time,turn food, thencontinueto
cookto preferreddoneness.
6. TurnOVENTEMP knobto
OFF.Removebroilerpan from
compartmentand servefood
immediately.Leavepan outside
compartmentto cool.
Rare
Medium
WellDone
lth-in.thick
(2-2%Ibs.)
A
A
A
10
15
25
6-7
12-14
16-18
Slashfat.
Chicken(450°)
1whole
(2 to 2Vi-lbs.),
splitlengthwise
A
30-35
25-30
Reducetimesabout5-10rein,
per sideforcut-upchicken.
Brusheachsidewithmelted
butter.Broilwithskinsidedown
firstandbroilwithdoorclosed.
c
2-3
%-1
c
3-4
Spaceevenly.PlaceEnglish
muffinscut-side-upandbrush
withbutterif desired.
BakeryProducts
Bread(Toast)or
2-4slices
ToasterPastries
1pkg.(2)
EnglishMuffins 2-split
%
Lobstertails
(6 to 8-oz.each)
24
B
13-16
Donot
turn
over.
Cutthroughbackofshell,spread
open.Brushwithmeltedbutter
beforeandafterhalftime.
Fish
l-lb.fillets %to
%-in.thick
c
5
5
Handleandturnverycarefully.
Brushwithlemonbutterbefore
andduringcookingif desired.
Preheatbroilerto increase
browning.
Hamslices(4507 l-in. thick
Precooked
B
8
8
Increasetimes5-10min.perside
for 1%-in.thickor homecured,
I%rkchops
WellDone
2(% inch)
2 (%-in.thick),
about1lb.
A
A
10
4-5
10-12
Slashfat.
13
2(1 inch)
about10-12oz.
2 (1%inch),
about1lb.
B
B
B
B
8
10
10
17
4-7
10
4-6
12-14
Slashfat.
Wieners,
l-lb. pkg.(10)
similarprecooked
sausages,
bratwurst
c
6
1-2
Lambchops
Medium
WellDone
Medium
WellDone
—–
——
—
If desired,splitsausagesinhalf
lengthwise;cut into5 to 6-in.
—
—
10
care
andcleating
—
—
Propercare andcleaningare
importantso yourovenwillgive
youefficientandsatisfactory
service.Followthesedirections
carefullyin caringfor it to help
assuresafeandpropermaintenance.
BE SURE ELECTRICPOWER
1SOFFBEFORECLEANING
ANYPART’
OF YOUROVEN.
special care of
Continuom-Cleani~
(hen Interior
N’iodelJGKC16GEH
—
Yourovenhasa ContinuousCleaninginteriorthatcleansitself
whilecooking.Theinsideof the
oven—top,sides,andback—is
finishedwitha specialcoating
whichcannotbe cleanedin the
usualmannerwithsoap,detergents,
commercialovencleaners,coarse
abrasivepadsor coarsebrushes.
Useof suchcleanersand/orthe use
ofovensprayswillcausepermanent
damage.
The specialcoatingis a porous
ceramicmaterialwhichis dark in
colorand feelsslightlyroughto the
touch.If magnified,the surface
wouldappearas peaks,valleys,and
sub-surface“tunnels?This rough
finishtendsto preventgrease
spattersfromforminglittlebeads
or dropletswhichrun downthe
sidewallsof a hard-surfaceoven
linerleavingunsightlystreaksthat
requirehandcleaning.Instead,
~~henspatterhitstheporousfinish
it isdispersedandis partially
absorbed.This spreadingaction
increasesthe exposureof oven
soilto heatedair, andmakesit
somewhatlessnoticeable.
Soilmaynotdisappearcompk%ely
andat sometime afterextended
usage,stainsmayappearwhich
carmotbe removed.
The special!coatingworksbest On
smallmmmts
of spatter.It does
notworkwellwithlargerspills,
~aa ~~peci~lly sugars,eggor dairy
~<~~”mixtures.
Thespecialcoatingis notused
on ovenshelves.Shelvesshouldbe
cleanedoutsidetheoven,to avoid
damageto the specialcoating.
TOCleanthe
ContinuowAkming Oven:
1. Let ovenpartscoolbefore
handling.It is recommendedthat
rubberglovesbe wornwhen
cleaningovenpartsmanually.
2. Removeshelvesandcookware.
3. Soilvisibilitymaybe reducedby
operatingthe ovenat 450”F.Close
the doorandturn OVENTEMP
knobto 450°F.Timeforat least4
hours.Repeatedcyclesmaybe
necessarybeforeimprovementin
appearanceis apparent.
REMEMBER:DuruNG THE
OPERATION
OFTHEOVEN,
THE
DOOR,WINDOW
AND~HER
SURFACES
WILLGETHOTENOUGH
lXXJCH.
TOCAUSE
BURNS.
~0 NCYI’
LETTHEOVEN
COOLBEFORE
REPLACING
SHELVES.
4. If a spilloveror heavysoiling
occurson the poroussurface,as
soonas practicalaftertheovenhas
cooled,removeas muchof the soil
as possibleusinga smallamountof
waterand a stiffbristlenylon
brush. Whenusingwater,use it
sparinglyand changeit frequently,
keepingit as cleanas possible,and
be sureto blotit up withpaper
towels,cloths,or sponges.Do not
rubor scrubwithpapertowels,
clothsor sponges,sincetheywill
leaveunsightlylinton theoven
finish.If waterleavesa whitering
on the finishas it dries, applywater
againandblot itwitha cleansponge,
startingat the edgeof the ring and
workingtowardthe center.
Do not use soap, detergent,
commercialovencleaner,silicone
ovensprays,coarsesteelpadsor
coarsebrusheson the porous
surface.Theseproductswill spot,
clog,andmar the poroussurface
and reduceits abilityto work.
Donotscrapethe poroussurface
witha knifeorspatula—-they
could
permanentlydamagethe finish.
Porcelain(hen hterior
Withpropercare,theporcelain
enamelwallswillretaintheirgood-looking
finishformanyyears.
Soapandwaterwillnormally
dothejob.Heavyspatteringor
spilloversmayrequirecleaning
witha mildabrasivecleanser.Soapy,
wetpadsmayalsobeused.Donot
allowfd spillswitha highsugaror
acidcontent(suchasmilk,tomatoes,
sauerkraut,fruitjuicesor piefilling)
toremainonthesurfhce.Theymay
causea dullspotevenaftercleaning.
Householdammoniamaymakethe
cleaningjob easier.P!ace1/2cupina
shallowglassor potterycontainerin
a coldovenovernight.Theammonia
fumeswillhelploosentheburned-on
greaseandfood.
If necessary,youmayusea caustic
cleaner.Followthepackage
directions.
Cautionsaboutusing
spray-onovencleaners:
Becarefulwheretheovencleaner
is sprayed.
6Donotsprayontheelectrical
controlsandswitches(onmodelsso
equipped)becauseitcouldcausea
shortcircuitandresultin sparking
or fire.
e DO not allow a film fromthe
cleanertobuilduponthetempemture
sensingbulb—itcouldcausethe
oventoheatimproperly.(Thebulb
is locatedatthetopoftheoven.)
——
Carefullywipethebulbcleanafter
mmF—.
eachovencleaning,beingcareful
nottomovethebulbas a changein
&itspositioncouldaffecthowthe
ovenbakes.
~Donotsprayanyovencleaner
ontheovendoor,handlesor any
exteriorsurfaceoftheoven,wood
or paintedsurfaces.Thecleanercan
damagethesesurfaces.
(contitlued mst pqe)
H
~
——
Relllovabieoven
Dwr
RemovableOvenBottom
Tkwovendoor is removableto
makecleaningtheoveneasier.
The raisedsectionof theoven
bottomis removableforcleaning.
Takeit outof theovenandyoucan
applyeffectivecleanersto clean
up excessivespilloversor remove
baked-onsoil–cleanersthatshould
neverbe usednearthespecial
porousceramicoveninterior.
Toremovethe ovenbottom:
L Removetheovenshelves.
Toremovethedoor,open it a few
inchesto the specialstop position
thatwillholdthedooropen. Grasp
firmlyon eachsideand lift thedoor
straightup and offthe hinges.(IMe
to thelargeamountof insulation
andtheconstructionof the door,it
is heavy.)
Note: Be carefulnotto placehands
betweenthe springhingeandthe
ovendoor frame.The hingecould
snapbackand pinchfingers.
Washwithhot, soapywater.For
stubbornspots,usea solutionof
ammoniaand water.Do not
immersethe doorin water.
TOreplace the door, positionslots
in bottomof dooroverthe hinges
thatare in the “out”position.Then
lowerthe door slowlyand evenly
overbothhingesat the sametime.
If hingessnapbackagainsttheoven
frame,pullthemback?ut.
\
2. Liftupwhrdon shelfsupports.
Swingbottomof supportstoward
centerof ovenand remove.
3. Removethetwoknurledholddownscrewsat eachfrontcorner.
If screwsare tootightto removeby
hand, use a screwdriver.
ModelJGKC16GEHalso hasa
removablebroilercompartment
doorwhichmaybe removedfor
cleaning.
4. Placeyourfingersin the slotsin
the bottomand lift up the front
edgeof the ovenbottomuntilit is
clear of the ovenfrontframe.
5. Pullthe bottomforwardandout
of theoven.keepingthe rearof the
ovenbottomglidingon thebottom
of thelowestshelfglide.Thiskeeps
itfromcatchingontheburnerigniter
shield.Toreplacethe bottom,just
reversethisprocedure,makkigsure
thetwotabson therear of theoven
bottomgo intotheslotsat the rear.
Theovenbottomhas a porcelain
enamelfinish.Tomakecleaning
easier,protecttheovenbottom
fromexcessivespillovers.This is
particularlyimportantwhenbaking
a fruitpieor otherfoodswithhigh
acidcontent.Hotfruit fillingsor
foodsthatare acidin contentsuch
as milk,tomatoor sauerkraut,and
sauceswith vinegaror lemon
juice,maycausepittinganddamage
to theporcelainenamelsurface.
Toprotectthe ovenbottomsurface,
placea pieceofaluminumfoil
slightlylargerthanthe bakingdish
or smallcookiesheeton a lower
rackor underthebakingdishto
catchanyboilovers.It shouldnot
completelycoverthe rack as this
wouldcauseunevenheat in the
oven.Aluminumfoilshouldnot
be placedon theovenbottom.
If a spilloverdoesoccuron the
ovenbottom,allowthe ovento cool
first. Youcan cleanthe bottomwith
soapandwater,a mildabrasive
cleanser,soap-filledabrasivepads,
or causticovencleanerfollowing
manufacturer’sdirections.
Whenapplyingovencleaner,
be carefulnotto getit on the
countertop,floor,continuouscleaningovenpartsor anyother
surface.
Note:Porcelainovendoor linerand
ovenbottommaybe cleanedwith a
commercialovencleaner.They
mustbe removedandcleanedaway
fromthe oventopreventdamageto
the continuous-cleaning
ovenliner.
.
.- ovenSheh”es
‘“
OVenshelvesmaybe cleanedwith
a mildabrasivecleanserfollowing
manufacturer’sdirections.After
cleaning,rinsetheshelveswithclean
water and dry witha dry cloth.TO
rernovc heavy,burned-onsoil,soapy
metalpads maybe used following
manufkcturer>s
directions.After
scrubbing,washwithsoapywater,
rinse and dry.
Broiler
Rn
& Wck
After broiling, remove the broiler
raclc and carefully pour off the
grease. Wash and rinse the pan
and rack in hot, soapy water.
If food has burned on, sprinkle
the broiler rack while hot with
detergent and cover with wet paper
towelsor a dish cloth.That way,
burned-onfoodswillsoak loose
whilethe meal is beingserved.
Donotstorea soiledbroilerpan
andrackin theovenor broiler
compartment.
LightBulb
Replacement
SOven
Beforereplacing any light bulb,
disconnect electric power to the
range at the main fuse or circuit
breakerpanel. Letthe bulbcool
completelybeforeremovingit. Do
nottoucha hotbulbwith a damp
cioth—thebulbwillbreak.
Thelightbulb in yourovenis
locatedin the upperright corner.
Reachin and unscrewit aller taking
precautionsmentionedabove.
Replaceit with a high-temperature
appliancebulb of the same wattage.
Adjustingh?
OvenThermosbt
Thetemperaturecontrolin your
newovenhasbeencarefullyadjusted
to provideaccuratetemperatures.
However,if thisovenhas replaced
oneyouhaveusedforseveralyears,
youmaynoticea differencein the
degreeof browningor the length
oftimerequiredwhenusingyour
favoriterecipes.Oventemperature
controlshavea tendencyto “drift”
overa periodof yearsandsince
thisdrift is verygradual,it is not
readilynoticed.Therefore,you
mayhavebecomeaccustomedto
yourpreviousovenwhichmay
haveprovideda higheror lower
temperaturethanyouselected.
Beforeattemptingto havethe
temperatureof yournewoven
changed,be sureyouhavefollowed
the bakingtimeandtemperatureof
the recipecarefhlly.Then, after
youhaveusedtheovena fewtimes
andyoufeelthe ovenis toohot
or toocool, thereis a simple
adjustmentyoucanmakeyourself
on the OVENTEMPknob.
Pullthe knoboff thecontrolshaft
andlookat the backside.There is
a discin the centerof theknobskirt
witha seriesof notcheson theimer
edgenextto the knobshafl.Oneof
thesenotchesis positionedovera
pointeron thesideoftheknobshaft.
Note position of
pointer to notches
before adjustment
~
.+fl’;l
/
$!h
(!&f#*
‘\\ +&. h &
%? W
\\...
@
,‘/
Loosen only the
locking screws
Notewhichnotchthepointeris
locatedin. Tbmakean adjustment,
carefullyloosen(approximately
oneturn), butdo notcompletely
removethe twoscrewsthatholdthe
skirtto the knob.Holdthe knobin
one handand withtheotherhand
carefullytiltthe skirtuntilthenotch
in thediscclearsthepointeron the
knobshaft.
Tomisethe oventemperature,turn
the dial in thedirectionofthe
arrowfor “Raise~’Tolowerthe
temperature,turn the dial in the
directionof arrowfor “Lower~’
Eachnotchwillchangetheoven
temperatureapproximately25°E
Wesuggestthatyoumakethe
adjustmentonenotchfromthe
originalsettingandcheckoven
performancebeforemakingany
additionaladjustments.
Afterthe adjustmentis made,make
surethepointeron theknobshaft
is alignedwiththenotchin thedisc.
Press skirtandknobtogetherand
retightenscrewssotheyare snug,
butbe carefulnotto overtighten.
Re-installknobon rangeand
checkperformance.Note:After
an adjustmenthasbeenmadethe
“Off” and “Broil”positionswill
not lineup withtheindicatormark
on the controlpanelas they
previouslydid. Thiscondition
is normalandwill notcreate
a problem.
e
Clemiw Guide
NW: Let rangeptiriscoolbeforeckxming.
—–
BNrr
MATHUALSTo
USE
GENERALDIRECTIONS
I&oilerPanandRack
? SoapandWater
@Soap-FilledScouringPad
e Commereia]oven Cleaner
Drainfat,coolpanandracksligh[ly.(Do notletsoiledpanandrackstandinbroiler
compartmenttocool.) Sprinkleonde(crgcnt.Fillthepanwithwarmwaterandspread
clothor papertowelovertherack. Letpanandrackstxndfors fewminutes.Wash;scour
if neeessary.Rinseanddry.OPTION:Thebroilerpanandrackmayalsobecleanedina
dishwasher.
ControlKnobs
e MildSoapandWater
Pulloffknobs.Washgentlybutdonotsoak,Dryandreturncontrolsto rangemakingsure
tomatchflatareaon theknobandshaft.
OutsideGhwsFinish
~ SoapandWater
Cleanoutsideofcooledblackglassdoorwitha glassclemw thatdoesnot contain
ammonia.Washotherglasswithclothdampenedin soapywater.Rinseandpolishwitha
drycloth.If knobsa~ removed,donotallowwaterto rundowninsidethesurfaceofglass
whilecleaning.
Metal,inciuding
SideTrimsand
‘11-im
Strips
~SoapandWater
Wash,rinse,andthenpolishwitha drycloth.DONCYI’
USEsteelwool,abrasives,
ammonia,acids,or commercialovencleanemwhichmaydamagethefinish.
F+xeelainEnamel
Finish
o PaperTbwel
e DryCloth
e SoapandWater
Avoidcleaningpowdersor harshabrasiveswhichmayscratchtheenamel.If acidsshould
spillontherangewhileit ishot,useadrypapertowelor clothto wipeuprightaway.
Whenthesurfiicehascooled,washandrinse, I% otherspills,suchasfatsmatterings,
etc.,
washwithsoapandwaterwhencooledandthenrinse.IWishwithdrycloth.
%intedSurfaces
o SoapandWater
Usea mildsolutionofsoapandwater.Donotuseanyharshabrasivesor cleaningpowders
whichmayscratchor marsurface.
*SoapandWater
Soap-FilledScouringPad
● Commercial
OvenCleaner
Tocleanovendoor;removebyopeninga fewinchesandgraspingdoorat sides.Liftdoor
upandawayfromhinges.Cleanwithanyandall mentionedmaterials.Replaceby
graspingdoorat sidesandliningupdoorwithhinges.Pushdoorfirmlyintoplace.
OvenInteriofi–
Top,SidesandBack
(ModelJGKC16GEH)
(CAUTION:Whenin
use,lightbulbscan
becomewarmenoughto
breakif touchedwith
moistclothor towel.
Whencleaning,avoid
touchingwarmlamps
withcleaningcloths.)
o StiffBristleNylonBrush
Coolbeforecleaning.
If heavysoilinghasoccurredon theporousw-jace, removeas muchofthesoilas possible
usinga smallamountof wateranda stiff bristlenylonbrush.Usewatersparinglyand
changeit frequently,keepingit as cleanas possible,andbe sureto blotit upwithpaper
towels,cloths,or sponges.Do not rub or scrub withpapertowels,clothsor sponges,since
theywillleaveunsightlylintontheovenfinish.If waterleavesa whiteringonthe finishas
it dries,applywateragainandblotit witha cleansponge,startingattheedgeof thering
andworkingtowardthecenter.
Forspeeialcleaninginstructions,see page11.
OvenLine@
(lModelJGKSISGEH)
(CAUTION:Whenin
use,lightbulbscan
becomewarmenoughto
breakif touchedwith
moistclothor towel.
Whencleaning,avoid
:ouchingwarmlamps
withcleaningclothsif
lampcoveris removed.
e SoapandWater
e Soap-FilledScouringPad
o CommercialOvenCleaner
Coolbeforecleaning.
FORLIGHTSOIL:Frequentwipingwithmildsoapandwater(especiallyaftercooking
meat)willproiongthetimebetweenmajorcleaning.Rinsethoroughly.NOTE:Soapleft
onlinercausesadditionalstainswhenovenis reheated.
FORHEAVYSOIL:Choosea nonabrasivecleanerandfollowlabelinstructions,using
thinlayerofcleaner.Useof rubberglovesis recommended.W@eor rublightlyon
stubbornspots.Rinsewell.Wipeoffanyovencleanerthatgetsonthermostatbulb.When
rinsingovenaflercleaningalsowipethermostatbulb.
Removable
OverI
Bottom
aSoapandWater
e Soap-FilledScouringPad
(Non-metallic)
Theovenbottompanelcanbe removedforeasycleaning(seepage12).Usethe same
directionsforcleaningas explainedaboveforPorcelainEnamelFinish.
Melves
e SoapandWater
g Soap-FilledScouringPad
e CommercialOvenCleaner
Removeshelvesandcleanthemoutsideof theovento avoiddamagingthe speciallycoated
oventop,sidesandback. Useanyandall mentionedmaterials.Rinsethoroughlyto
removeall materialsaftercleaning.N~E: Somecommercialovencleanerscause
darkeninganddiscoloration.Whenusingfor firsttime,testcleaneronsmallpartof
shelfandcheckfordiscolorationbeforecompletelycleaning.
InsideOvenDo@’
●
—
—
*Spillageof marinades,fruitjuices, andbastingmaterialscontainingacidsmaycausediscoloration.Spilloversshouldbeblottedupimmediately,withcare
beingtakennottotouchanyhotportionoftheoven.Whenthesurfaceiscool, cleanandrinse.
--—
— —.—
14
.—
-–=F--e—.
--
——-——-—
--—.— -.
. .. . . .
.
POSSIBLE CMLJSE
AND REk3EDY
Cwm-?WILL N(YI’ WORK
* Hug cm rangeis not mnpkkly . insertedintothe outletreceptacle.
@(3rcuit breakerin househas beentripped,or fusehasbeenblown.
=(hm controlsare riotproperlyset.
~ Lightbulbis Io(x.
~ Mb is defective.lleplace.
@Switchwhichoperatesovenlightis bro’ken.~all for service.
FOOD DOES NOT
BROIL
~OVEFJT~Mp knobnot set at 131U31L.
13roilerwillnotoperateif OVEN
TEMP knobis turnedpastBROIL.
* Foodis beingcookedon hotpan.
@Utensilsare notsuitedfor broiling.
FOODDOESNOT’ROAST
OR BAKEPROPERLY
@OVENSET knobnotset on AUTO.OVENwhenusingAutomaticOven
Timer.
~ OVENTEMP knobnotset correctly.
@Shelfpositionis incorrect.CheckRoastingandBakingpages.
* Ovenshelfis notlevel.
* Wrongcookwareis beingused.Whenroasting,pan is toosmail.
* Foiltentnotusedwhenneededto SIOW
downbrowningduringroasting.
MOISTUREINSIDEAND
OUTSIDEOVEN
~Be sureovenventductis notblockedor covered.
PROPERLY
If YouNeedservice
-.
YOURGENERALELEHRIC RANGE
WARRANTY
Save proof of original purchase date such as your sales slip or cancelled check to establish warranty period.
WHAT
E COVERED FULL ONE=WEAFiWARRANTY
For one year from date of original
purchase, we will provide, free of
charge, parts and service labor
in your home to repair or replace
anypartof the range that fails
because of a manufacturing defect.
e Service trips to your home to
WHATIS No-r COVERED
teach you how to use the product.
Read your Use and Care material.
If you then have any questions
about operating the product,
please contact your dealer or our
Consumer Affairs office at the
address below, or call, toll free:
GE Answer Center”
800.626.2000
consumer information service
This warranty
is extended
tO
the original purchaser and any succeeding owner for products
purchased for ordinary home use
in the 48 mainland states, Hawaii
and Washington, D.C.In Alaska the
warranty is the same except that it is
LIMITED because you must pay to
ship the product to the service shop
or for the service technician’s travel
costs to your home.
All warranty service will be provided
by our Factory Service Centers or
by our authorized Customer Care@
servicers during normal working
hours.
Look in the White or Yellow Pages
of your telephone directory fa;
GENERAL ELECTRIC COfvlPANYj
GENERAL ELECTRIC FACTORY
SERVICE, GENERAL ELECTRICHOTPOINT FACTORYSERVICE or
GENERAL ELECTRIC CUSTOMER
CARE@SERVICE.
e Replacement of house fuses or
resetting of circuit breakers.
@Failure of the product if it is used
for other than its intended purpose
or used commercially.
e Damage to product caused
by accident, fire, floods or acts
of God.
WARRANK)R IS IVOTRESPONSIBLE
FOR CONSEQUENTIAL DAMAGES.
@improper installation.
If you have an installation problem,
contact your dealer or installer.
You are responsible for providing
adequate electrical, gas, exhausting
and other connecting facilities.
Some states do not allow the exclusion or limitation of incidental or consequential damages, so the above limitation or exclusion
may not apply to you. This warranty gives you specific legal rights, and you may also have other rights which vary from state to state,
To know what your legal rights are in your state, consult your local or state consumer affairs office or your state’s Attorney General.
.
Warrantor: General Electric Company
H further help is needed concerning this warrahty, write:
Manager—-ConsumerAffairs, GE Appliances, Louisville, KY 40225
.
——–
Part NO.164D1352P225
Pub.
No. 49-4993
i
PIN 56(3S118P12
I
3-89