1
GEAppliances.com
Safety Instructions
..............
Operating Instructions
Convenience Features ..........
Exhaust Features...............
Microwave Terms .................
HyPlute.gov (HyPyramid)
Feature ........................
Oven Features ..................
Other Features .................
Power Levels......................
Replacing the Light Bulb ...........
Sensor Features ................
Time Features ..................
2-8
15,16
28-30
20
DVM1950
JNM1951
JVM1950
16
9-11
22-24
21
28
17-20
12-15
Care and Cleaning .............
25, 26
Troubleshooting Tips
Before you call for service ......
30-32
Consumer Support
Consumer Support ..................
Optional Kits .......................
Warranty .........................
34
8
33
0
Write the model and serial numbers here:
Model #
Serial #
You can find them on a label when the
door is open.
49-40642-2
9-11 GE
IMPORTANT SAFETYINSTRUCTIONS.
READ ALL INSTRUCTIONS BEFOREUSING.
When using electrical appliances basic safety precautions should be followed,
including the following:
WARNING!
To reduce the risk of burns, electric shock, fire, injury
or exposure to excessive microwave energy:
PRECAUTIONS
TO AVOID POSSIBLE EXPOSURE
TO EXCESSIVE MICROWAVE
(a) Do Not Attempt to operate this
oven with the door open since opendoor operation can result in harmful
exposure to microwave energy. It is
important not to defeat or tamper
with the safety interlocks.
(b) Do Not Place any object between
the oven front face and the door
or allow soil or cleaner residue to
accumulate on sealing surfaces.
•
Reed oll instructions before using
this appliance. When using electrical
appliances, basic safety precautions
should be followed, including the
following:
•
Read and follow the specific precautions in
the Precautions to Avoid PossibleExposure
to ExcessiveMicrowave Energy section
above.
•
•
•
to persons
This appliance must be grounded. Connect
only to a properly grounded outlet. Seethe
Grounding Instructions section on page 6.
This microwave oven is ULlisted for
installation over both gas (lessthan
60,000BTU)and electric ranges.
ENERGY
(cl Do Not Operate the oven if it is
damaged. It is particularly important
that the oven door close properly
and that there is no damage to the:
(Z)door (bent)
(2) hinges and latches
(brokenor loosened)
(:3)door seals and sealing surfaces.
_d) The Oven Should Not be adjusted
or repaired by anyone except
properly qualified service personnel.
• Do not operate this appliance if it has a
damaged power cord or plug, if it is not
working properly, or if it has been damaged
or dropped. If the power cord is damaged, it
must be replaced by General Electric Service
or an authorized service agent using a
power cord (_v(_ilablefrom General Electric..
•
Install or locate this appliance only in
accordance with the provided installation
instructions.
Do not clean with metal scouring pads.
Pieces can burn offthe pad and touch
electrical parts involving risk of electric
shock.
This over-the-range oven is designed for use
over ranges no wider than 36." It may be
installed over both gas and electric cooking
equipment.
2
SAVE THESE INSTRUCTIONS
GEApplionces.corn
Use this appliance only for its intended purpose as described in this Owner's
Manual
• To reduce the risk of fire in the oven cavity:
- Do not overcook food. Carefully attend
appliance when paper, plastic or other
combustible materials are placed inside the
-
oven while cooking.
Remove wire twist-ties and metal handles
from paper or plastic containers before
placing them in the oven.
-
Do not use the oven for storage purposes.
Do not leave paper products, cooking
utensils or food in the oven when not in use.
-
Do not pop popcorn in your microwave
oven unless in a special microwave popcorn
accessory or unless you use popcorn
labeled for use in microwave ovens.
If materials inside the oven ignite, keep
the oven door closed,turn the oven off
and disconnect the power cord, or shut off
power at the fuse or circuit breaker panel. If
the door is opened, the fire may spread.
- Do not use the Sensor Features twice in
succession on the same food portion. If food
is undercooked after the first countdown,
use COOKBY TIME for additional cooking
time.
•
Keep power cord away from heated
surfaces.
•
Do not immerse power cord or plug in
water.
•
Do not block or cover any openings on the
appliance.
• This microwave is not approved or tested
for marine use.
• Usethis appliance only for its intended use
as described in this manual.
Do not use corrosive chemicals or vapors in
this appliance.
This microwave oven is specifically designed
to heat, dry or cook food, and is not
intended for laboratory or industrial use.
-
•
Some products such as whole eggs and
sealed containers-for example, closed
jars-are able to explode and should not be
heated in this microwave oven. Such use of
the microwave oven could result
in injury.
•
It is important to keep the area clean where
the door seals against the microwave. Use
only mild, non-abrasive detergents applied
with a clean sponge or soft cloth. Rinsewell.
-
Do not use the oven to dry newspaper.
•
Thermometer--Do not use regular cooking
or oven thermometers when cooking by
microwave. The metal and mercury in these
thermometers could cause arcing and
possible damage to the oven. Do not use a
thermometer in food you are microwaving
unless the thermometer is designed or
recommended for use in the microwave
oven.
• This appliance must only be serviced by
qualified service personnel.Contact nearest
authorized service facility for examination,
repair or adJustment.
•
Do not store anything directly on top of
the microwave oven surface when the
microwave oven is in operation.
Do not store any materials, other than our
recommended accessories, in this oven
when not in use.
•
Do not mount this appliance over a sink.
•
Do not let the cord hang over edge of
counter.
•
•
Do not store this appliance outdoors. Do not
use this product near water-for example,
in a wet basement, near a swimming pool,
near a sink or in similar locations.
• As with any appliance, close supervision is
necessary when used by children.
Do not use paper products in oven when
appliance is operated in any cooking mode
except microwave only.
SAVE THESE INSTRUCTIONS
3
IMPORTANT SAFETYINSTRUCTIONS.
READ ALL INSTRUCTIONS BEFOREUSING.
WARNING:
Risk of explosion
material,
service
or exposure
to toxic
the battery should be replaced by
technician
only.
WARNING!
ARCING
lf you see arcing, press the CANCEL/OFFbutton and correct the problem.
Arcing is the microwave term for
sparks in the oven.Arcing is caused
by:
',
Metal, such as twist-ties, poultry
pins, or gold-rimmed dishes, in
the microwave.
•
The metal shelf not installed
correctly so it
touches the microwave wall.
Recycled paper towels
containing small metal pieces
being used in the microwave.
•
Metal or foil touching the side of
the oven.
•
Turntable ring support not
installed correctly.
•
Foil not molded to food
(upturned edges act
like antennas).
Only use microwave shelf when
reheating on more than one
level. DO NOT store the oven
shelf in the microwave. See
operating instructions for Oven
ShelL.
SAVE THESE INSTRUCTIONS
GEApplionces.com
WARNING!
FOOD
•
Do not pop popcorn in your microwave
oven unless in a special microwave popcorn
accessory or unless you use popcorn
labeled for use in microwave ovens.
•
Do not boil eggs in a microwave oven.
Pressurewill build up inside egg yolk and will
cause it to burst, possibly resulting in injury.
• Operating the microwave with no food
inside for more than a minute or two may
cause damage to the oven and could start
a fire. It increasesthe heat around the
magnetron and can shorLen the life of the
oven.
• Foodswith unbroken outer "skin" such as
potatoes, hot dogs, sausages, tomatoes,
apples, chicken livers and other giblets, and
egg yolks should be pierced to allow steam
to escape during cooking.
• SUPERHEATEDWATER
Liquids,such as water, coffee, or tea, ore
able to be overheated beyond the boiling
point without appearing to be boiling. Visible
bubbling or boiling when the container is
removed from the microwave oven is not
always presenL THISCOULDRESULTIN VERY
NOT LIQUIDSSUDDENLYBOILINGOVER
WHENTHECONTAINERISDISTURBEDOR
A SPOONOR OTHERUTENSILIS INSERTED
INTO THELIQUID.
To reduce the risk of injury to persons:
- Do not overheat the liquid.
- Stir the liquid both before and halfway
through heating it.
-
Do not use straight-sided containers with
narrow necks.
-
After heating, allow the container to stand in
the microwave oven for a shorL time before
removing the container.
-
Useextreme care when inserting a spoon or
other utensil into the container.
Foods cooked in liquids (such as pasta) may
tend to boil more rapidly than foods
containing lessmoisture. Should this
occur, refer to the Care and cleaning of the
microwave oven section for instructions on
how to clean the inside of the oven.
•
•
•
Avoid heating baby food in glassjars, even
with the lid off. Make sure all infant food is
thoroughly cooked. Stir food to distribute the
heat evenly. Be careful to prevent scalding
when warming formula. The container may
feel cooler than the formula really is.Always
test the formula before feeding the baby.
Don't defrost frozen beverages in narrownecked bottles (especially carbonated
beverages).Even if the container is opened,
pressure can build up. This can cause the
container to burst, possibly resulting in
injury.
Hot foods and steam can cause burns. Be
careful when opening any containers of
hot food, including popcorn bags, cooking
pouches and boxes. To prevent possible
injury, direct steam away from hands and
face.
•
Do not overcook potatoes. They could
dehydrate and catch fire, causing damage
to your oven.
•
Cook meat and poultry thoroughly-meat
to at least an INTERNALtemperature of
160°Fand poultry to at least an INTERNAL
temperature of 180°F.Cooking to these
temperatures usually protects against
foodborne illness.
SAVE THESE INSTRUCTIONS
s
IMPORTANT SAFETYINSTRUCTIONS.
READ ALL INSTRUCTIONS BEFOREUSING.
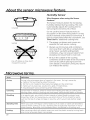
MICROWAVE-SAFE COOKWARE
Do not operate the oven in the microwave mode without the turntable
and the turntable support seated and in place.The turntable must be
unrestricted so it can rotate. Make sure all cool<woreused in your microwave
oven is suitable for microwaving. Most gloss casseroles,cooking dishes,
measuring cups, custard cups, pottery or chino dinnerware which does
not have metallic trim or gloze with a metallic sheen can be used.Some
cool<wareis labeled "suitable for microwoving"
•
•
•
If you are not
sure if a dish is
microwave-safe,
use this test: Place
in the oven both
the dish you are
How to test for a
testing and a glass
microwave-safedish.
measuring cup
filled with 1 cup of
water--set the measuring cup either in or
next to the dish. Microwave 30-/45 seconds
at high. If the dish heats, it should not be
used for microwaving.
•
Use of the shelf accessory:
- Remove the shelf from the oven when
not in use.
- Use pot holders when handling the shelf
and cookware. They may be hot.
- Be sure that the shelf is positioned
properly inside the oven to prevent
product damage.
- Do not cover the shelf or any part of
the oven with metal foil. This will cause
overheating of the microwave/convection
oven.
•
Do not use your microwave oven to dry
newspapers.
Not all plastic wrap is suitable for use in
microwave ovens. Check the package for
proper use.
Paper towels, waxed paper and plastic
wrap can be used to cover dishes in order
to retain moisture and prevent spattering
while microwaving. Be sure to vent plastic
wrap so steam can escape.
Cookware may become hot because of
heat transferred from the heated food.
Pot holders may be needed to handle the
cookware.
If the dish remains cool and only the
water in the cup heats, then the dish is
microwave-safe.
•
Oversized food or oversized metal cookware
should not be used in a microwave/
convection oven because they increase the
risk of electric shock and could cause a fire.
•
Sometimes the oven floor, turntable and
walls can become too hot to touch. Be
careful touching the floor, turntable and
walls during and after cooking.
•
If you use a meat thermometer while
microwaving, make sure it is safe for use in
microwave ovens.
•
Do not use recycled paper products.
Recycled paper towels, napkins and waxed
paper can contain metal flecks which may
cause arcing or ignite. Paper products
containing nylon or nylon filaments should
be avoided, as they may also ignite.
•
Some styrofoam trays (likethose that meat
is packaged on) have a thin strip of
metal embedded in the bottom. When
microwaved, the metal can burn the floor of
the oven or ignite a paper towel.
6
•
When microwaving "boilable" cooking
pouches and tightly closed plastic bags,
they should be slit, pierced or vented as
directed by package. If they are not, plastic
could burst during or immediately after
cooking, possibly resulting in injury. Also,
plastic storage containers should be at least
partially uncovered because they form a
tight seal. When cooking with containers
tightly covered with plastic wrap, remove
covering carefully and direct steam away
from hands and face.
SAVE THESE INSTRUCTIONS
GEAppliances.com
MICROWAVE-SAFE COOKWARE (cont.)
•
•
Usefoil only as directed in this manual.
When using foil in the microwave oven,
keepthe foil at least 1" away from the sides
of the oven.
Plasticcookware-Plastic cookware
designed for microwave cooking is very
useful, but should be used carefully. Even
microwave-safe plastic may not be as
tolerant of overcooking conditions as
are glass or ceramic materials and may
soften or char if subjected to short periods
of overcooking. In longer exposures to
overcooking, the food and cookware could
ignite.
Follow these guidelines:
[]
Use microwave-safe plastics only and
use
them in strict compliance with the
cookware manufacturer's
recommendations.
[]
Donot microwaveempty containers.
[]
Do not permit childrento use plastic
cookwarewithout complete supervision.
WARNING!
GROUNDING INSTRUCTIONS
WARNING!
Improper use of the grounding
risk of electric shock.
This appliance
must be
grounded. In
the event of
an electrical
short circuit,
grounding
Ensureproper ground
reduces the risk
existsbefore use.
of electric shock
by providing an escape wire for the electric
current.
This appliance is equipped with a power cord
having a grounding wire with a grounding plug.
The plug must be plugged into an outlet that is
properly installed and grounded.
Consult a qualified electrician or service
technician if the grounding instructions are not
completely understood, or if doubt exists as to
whether the appliance is properly grounded.
plug can result in u
If the outlet is a standard 2-prong wall outlet,
it is your personal responsibility and obligation
to have it replaced with a properly grounded
B-prong wall outlet.
Do not under any circumstances cut or remove
the third (ground) prong from the power cord.
Do not use an adapter plug with this appliance.
Do not use an extension cord with this
appliance. If the power cord is too short, have a
qualified electrician or servicetechnician install
an outlet near the appliance.
For best operation, plug this appliance into
its own electrical outlet to prevent flickering
of lights, blowing of fuse or tripping of circuit
breaker.
SAVE THESE INSTRUCTIONS
7
IMPORTANT SAFETYINSTRUCTIONS.
READ ALL INSTRUCTIONS BEFOREUSING.
THE VENT FAN
The fan will operate automatically under
certain conditions (seeAutomatic Fan
feature). Take care to prevent the starting and
spreading of accidental cooking fires while the
vent fan is in use.
•
•
Clean the underside of the microwave often.
Do not allow grease to build up on the
microwave or the fan filters.
In the event of a grease fire on the surface
units below the microwave oven, smother a
flaming pan on the surface unit by covering
the pan completely with a lid,a cookie sheet
or a flat tray.
•
Use care when cleaning the vent fan filters.
Corrosive cleaning agents, such as lyebased oven cleaners, may damage the
filters.
When preparing flaming foods under the
microwave, turn the fan on.
Never leave surface units beneath your
microwave oven unattended at high heat
settings. Boilovers cause smoking and
greasy spilloversthat may ignite and spread
if the microwave vent fan is operating. To
minimize automatic fan operation, use
adequate sized cookware and use high heat
on surface units only when necessary.
PACEMAKERS
Most pacemakers are shielded from
interference from electronic products,
including microwaves. However, patients
with pacemakers may wish to consult their
physicians if they have concerns.
OPTIONAL KITS
Available at extra cost from your GEsupplier.
Filter Kits
Filler Panel Kits
• JX81H--RecirculatingCharcoalFilterKit
Filter kits are used when the oven cannot be
vented to the outside.
•
JX52WH-White
•
JX52BL--BIock
When replacing a 36" range hood, filler
panel kits fill in the additional width to
provide a custom built-in appearance.
See back cover to order by phone or at
ge.com.
For installation between cabinets only; not
for end-of-cabinet installation. Each kit
contains two 3" wide filler panels.
READ AND FOLLOW THIS SAFETYINFORMATION CAREFULLY.
SAVE THESE INSTRUCTIONS
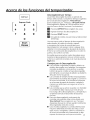
About the features of your oven.
GEAppliances.com
Throughout this manual, features and appearance may vary from your model.
|
|
O©
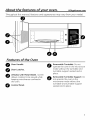
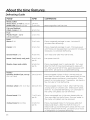
Features of the Oven
O
Door Handle.
O
Door Latches.
O
indow
with Metal
allows
cooking
to beShield.
viewed Screen
while
keeping microwaves confined in
the oven.
O
Control Panel.
0
0
Removable Turntable. Do not
operate the oven in the microwave
mode without the turntable and
turntable support seated and in
place.
Removable Turntable Support. Do
not operate the oven in the
microwave mode without the
turntable and turntable support
seated and in place.
About the features of your oven.
Power Saver (Energy Saver)
Feature (on some models)
Your GEmicrowave has an Power Saver (EnergySaver)feature. Many electronic appliances,
including Microwaves, consume electric power while they are switched off or in a standby
mode. Eliminating standby power can reduce your operating costs.
ToACTIVATEthe Power Saver (EnergySaver)Feature-Pressthe Power Saver button on the unit, and the unit will turn off. (Note: If utilizing this
feature, the clock will not be displayed on the unit.)
ToDEACTIVATE
the Power Saver (EnergySaver)Feature -U
_lf
Pressthe Power Saver button on the unit, and the unit will turn on. The display will read
"On" If the unit has had power aplied recently (within the last few days), the time will be
remembered.
prompted, enter the time of day.
NOTE: The time keeping device that keepsyour clock running will need to be recharged every
few days. It is recommended that once a week you should leave the unit powered on (do not
use the Power Saver (Energy Saver)feature) for at least 2/4hours. Ifyou are prompted to enter
a time when turning on from the Power Saver (Energy Saver)mode, you should have the unit
powered on for at least/48 hours. When you first install your unit, you should leave it powered
on for at least/48 hours.
Some features, such as the auto night light, will not function when you are in Power Saver
(Energy Saver) mode.
NOTE:This microwave oven does not detect food in the oven if food was inserted while the unit
was Off (Power Saver (Energy Saver)active or power loss). As a result, it will ask you to insert
food again when Power Saver (EnergySaver) is deactivated or power is restored to the unit. If
this occurs, just open and close the door to clear the message and the oven will be ready for
cooking.
10
About the cooking features of your
microwave oven.
Throughout
this manual,
features
and appearance
e
GEAppliances.com
may vary from your model
so--o
7
8
9
Cancel}
Off
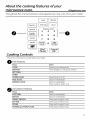
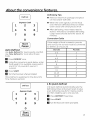
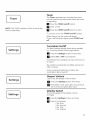
Cooking Controls
Check the ConvenienceGuide beforeyou begin.
O
Time Features
Press
Enter
COOK
Amount of cooking time
DEFROST
SETTINGS
Time, Weight or lib Quick Defrost
TIMER
POWERLEVEL
ADD 30 SEC
EXPRESSCOOK
O
Power level 1 to 10
Starts immediately!
Starts immediately!
Pressnumber pads (1-6)
Convenience Features
Press
Enter
POPCORN
Starts immediately!
REHEAT
FAMILYSNACKS
Starts immediately!
Enter pad to select Food
SOFTEN
STEAM
Enter pad to select Food
Enter pad to select Food
MyPlate.gov (MyPyramid)
Enter pad to select Food
11
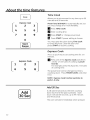
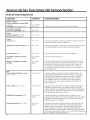
About the time features.
Time Cook
Allows you to microwave for any time up to 99
minutes and 99 seconds.
If- oo
o1
8
9
0
I Pause
Start
Power level 20 [HIGH) is automatically set, but
you may change it for more flexibility.
M
PressTIME COOK.
[]Enter
cooking time.
[]
PressSTARTor change power level.
[]
PressSTARTif power setting is chosen.
You may open the door during Time Cook
to check the food. Closethe door and
press STARTto resume cooking.
]
Express Cook
This is a quick way to set cooking time for 1-6
minutes.
M
i
1
2
4
Express Cook
S
3
61
Pressone of the Express Cook pads (from
1-6)
for 1-6minutes of cooking at power
level 10.
For example, press the 2 pad for 2 minutes
of cooking time.
Thepowerlevelcan be changedas time is
countingdown. PressPOWERLEVELand enter
0-i0.
NOTE: Express Cook function pertoins to
pods I-6 only.
Add 30 Sec
3Add ]
0 SecJ
It will add 30 seconds to the time counting
down each time the pad is pressed. Each
touch will add 30 seconds, up to 99 minutes
and 99 seconds.
The oven will start immediately when pressed.
12
About the time features.
Time Defrost
I Defrost
1
Allows you to defrost for a selected length
of time. See the Defrosting Guide for suggested
times. (Time Defrost and 1 Ib Quick Defrost
explained
section.)
7
8
9
0
Pause
Start
]
in the About the convenience features
[]
Press DEFROST twice.
[]
Enter defrosting
[]
Press START.
[]
Turn the food over after half the time.
time.
At one half of selected defrosting time, turn
food over and break apart or rearrange pieces
for more even defrosting. Shieldany warm
areas with small pieces of foil. The oven will
continue to defrost if you don't open the door
and turn the food.
A dull thumping noise may be heard during
defrosting. This is normal when oven is not
operating at High power.
Defrosting
•
•
•
•
•
Tips
Foodsfrozen in paper or plastic can be
defrosted inthe package.Closed packages
should be slit, pierced or vented AFTER
food has partially defrosted. Plasticstorage
containers should be partially uncovered.
Family-size, prepackaged frozen dinners
can be defrosted and microwaved. If the
food is in a foil container, transfer it to a
microwave-safe dish.
Foods that spoil easily should not be
allowed to sit out for more than one
hour after defrosting. Room temperature
promotes the growth of harmful bacteria.
For more even defrosting of larger foods,
such as roasts, use Time Defrost. Be sure
large meats are completely defrosted
before cooking.
When defrosted, food should be cool
but softened in oil areas. If still slightly icy,
return to the microwave very briefly, or let it
stand a few minutes.
13
About the time features.
Defrosting Guide
FOOD
TIME
COMMENTS
Bread, Cakes
Bread, buns, or rolls (1 piece)
Sweet rolls (approx. 12 oz)
1/4 min.
2 to 4 min.
Rearrange after half the time
Fish and Seafood
Fillets, Frozen (1 Ib)
6 to 9 min.
Fruit
Plastic Pouch - 2 or2
(10-oz package)
i to 5 min.
Meot
Bacon (1 Ib)
2 to 5 min.
Place unopened package in oven. Let stand 5
minutes after defrosting.
Franks (i Ib)
2 to 5 min.
Place unopened package in oven. Microwavejust
until franks can be separated. Let stand 5 minutes, if
necessary, to complete defrosting.
Ground meat (i Ib)
4 to 6 min.
Turn meat over after first half of time.
Roast'. beef, lamb, veal, pork
9 to 13 min.
Use power level 10.
per lb.
Steaks, chops and cutlets
4 to 8 min.
per lb.
Place unwrapped meat in cooking dish. Turn over
after first half of time and shield warm areas with
foil. After second half of time, separate pieces with
table knife. Let stand to complete defrosting.
Poultry
Chicken, broiler-fryer,
(2Vz to 3 Ibs.))
14 to 20 min.
Place wrapped chicken in dish. Unwrap and turn
over after first half of time. After second half of time,
separate pieces and place in cooking dish. Microwave 2 to 4 minutes more, if necessary. Let stand a
few minutes to finish defrosting.
Chicken, whole (2% to 3 Ibs.)
20 to 25 min.
Place wrapped chicken in dish. After half the time,
unwrap and turn chicken over. Shield warm areas
with foil. To complete defrosting, run cold water in
the cavity until giblets can be removed.
Ground meat (i Ib)
7 to 13 min.
Place unwrapped hen in the oven breast-side-up.
Turn over after first half of time. Run cool water in
the cavity until giblets can be removed.
cut up
per lb.
Turkey breast (4 to 6 Ibs.)
3 to 8 min.
per lb.
Place unwrapped breast in microwave-safe dish
breast-side-down. After first half of time, turn
breast-side-up and shield warm areas with foil. Defrost for second half of time. Let stand 1 to 2 hours
in refrigerator to complete defrosting.
14
About the convenience features.
Defrosting
Defrost
7
]
8
Tips
•
Remove meat from package and place
on microwave-safe dish.
•
When the oven signals, turn the food
over. Remove defrosted meat or shield
warm areas with small pieces of foil.
•
After defrosting, most meats need to
stand 5 minutes to complete defrosting.
Large roasts should stand for about 30
minutes.
9
Conversion Guide
0
If the weight of food is stated in pounds
and ounces, the ounces must be converted
Pause
Start ]
to tenths
Auto Defrost
UseAuto Defrost for meat, poultry and fish.
Use Time Defrost for most other frozen
foods.
[]
Press DEFROSTonce.
[]
Using the conversion guide below, enter
food weight. For example, press pads 1
and 2 for 1.2 pounds (1 pound, 3
ounces).
[]
[]
PressSTART.
Turn the food over when prompted.
(Time Defrost is explained in the About the
Time Features section.)
(.1) of a pound.
Ounces
Pounds
i-2
.i
3
.2
4-5
.3
6-7
.4
8
.5
9-10
.6
11
.7
12-13
.8
14-15
.9
1 Ib Quick Defrost
Defrost
7
]
8
1 Ib Quick Defrost automatically sets the
defrosting times and power levels to give
even defrosting results for meats, poultry
and fish weighing up to one pounds.
9
[]
PressDEFROSTthree times.
[]
Press STAR[
[]
Turn the food over when prompted.
0
I Pause
Start ]
15
About the MyPlate.qov (MyPyramid) Feature.
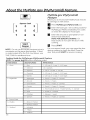
PlyPlate.gov (PlyPyramid)
Feature
Allows you to microwave healthy food choices
by servings or with sensor.
7
8
9
B
PressMyPlate.gov (MyPyramid)pad.
[]
Enter the food type. SeeCooking Guide for
MyPlate.gov (MyPyramid)below for codes
or check the display for food types.
[]
Enter the amount as prompted for nonsensor food selections.
NOTEFOR SENSORCOOKING: for
best results do not open the door while
cooking.
[]
PressSTART.
0
NOTE:
Do not use the sensor
features
twice
succession
on the same food porLion.
If food
is undercooked
after the first countdown,
use
TIHE COOK for additional
in
For non-sensor foods, you may open the door
during cooking to check the food. Closethe
door and press STARTto resume cooking.
time.
Cooking Guide for MyPlate.gov
(MyPyramidJ Feature
NOTE: Use power level 10 unless otherwise noted.
First Choice
Second Choice
Third Choice
1 - Grain
2- Vegetables
1 - Rice
1 - 1/2 cup, 2 - 1 cup, 3 - 1 1/2 cups
2 - Oatmeal
1 to/4 packets
3 - Popcorn
1 - loz, 2 - 3.0 ozs, 3 - 3.5 ozs
/4 - Macaroni
1 - 1/2 cup, 2 - 1 cup, 3 - 1 1/2 cups
5 - Ouinoa
1 - 1/2 cup, 2 - 1 cup, 3 - 1 1/2 cups
1 - Asparagus
1 - Fresh, 2 - Frozen, 3 - Canned
2 - Broccoli
1 - Fresh, 2 - Frozen
3 - Green Beans
1 - Fresh, 2 - Frozen, 3 - Canned
/4 - Carrots
1 - Fresh, 2 - Frozen, 3 - Canned
5- Corn
1 - Fresh Cobs (1 to 4), 2 - Frozen Kernals, 3 - Canned
6 - Peas
1 - Frozen, 2 - Canned
7 - Potatoes
1 - Baking, 2 - Sweet
8 - Spinach
1 - Fresh, 2 - Frozen, 3 - Canned
3 - Ground Heat
4 - Poultry
1 - Bone-in Chicken
2 - Bonless Chicken
5 - Seafood
1 - Whitefish
2- Tilopia
3- Salmon
16
About the sensor microwave features.
[
1
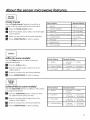
Family Snacks
Usethe FamilySnacks featureto cook from a
varietyof pre-programmedfamilysnackitems.
First
Choice
Second
Choice
1 - Burrito
1 to 3
Pressthe FamilySnacksbutton.
2 - Chicken Nuggets
1 to 2 servings
i to 4 packets
[]
Enterthe numberpad to selectoneof the eight
snackoptions.
Enter an amount for the snack selected.
3 - Oatmeal
[]
PressSTART/PAUSEto start cooking.
[]
[]
4 - Instant Macaroni
and Cheese
i to 2 servings
5 - Canned Pasta
i to 2 cans
6 - Hot Dogs
i to 4
7 - Pizza (5 inch)
8 - Hot Chocolate
1 to 3 cups
]
Soften
Soften (on some models_
Use the Soften feature to soften certain preprogrammed foods:
[]
Press
[]
Enter the number
the Soften
soften
pad
[]
Enter
[]
Press START/PAUSE
Melt
Soften
Second
Choice
1 - Butter
1 - 1/2 Stick;
3 - 2 Sticks
2 - 1 Stick;
2-CreamCheese
1-3ounces;
2-8ounces;
3 - Ice Cream
1 - 1 pint;
2 - i quart;
First Choice
Second
1 - Butter
1 - 1/2 Stick;
3 - 2 Sticks
button.
to select
one of the
options.
an amount
First Choice
for the food
to start
selected.
cooking.
]
Soften/Melt (on some models)
Usethe Soften/Meltfeatureto softenor mettcertain
pre-programmedfoods:
Choice
2 - 1 Stick;
[]
Pressthe Soften/Meltbutton. Pressonetime
for softenand two timesfor mett.
2- Caramel
1- 4 ounces;
3 - 12 ounces;
2- 8 ounces;
4 - 16 ounces
[]
Enterthe numberpad to selectoneof the
softenor mettoptions.
3 - Chocolate
1 - 4 ounces;
3 - 12 ounces;
2 - 8 ounces;
4 - 16 ounces
[]
Enter an amount for the food selected.
4- Marshmallows
[]
PressSTART/PAUSEto start cooking.
1- S ounces;
3 - 10 ounces;
2- 8 ounces;
4 - 16 ounces
17
About the sensor microwave feature.
Steam
1
Steam
Usethe Steam featureto steamcertain preprogrammedfoods. Forbest performance,please
usea NordicWareRiceCooker/SteamerBowl.
First Choice
Second
1 - Rice
1 - 1 cup white,
2 - i cup brown
[]
Pressthe Steambutton.
2 - Asparagus
1 to 2 cups
[]
Selectthe foodyou wish to steam.
3 - Broccoli
1 to 2 cups
[]
Place steamer bowl with water, salt (if
necessary),and food in the microwave
with the steam vents on the steamer bowl
in the OPENposition.
/4 - Brussel Sprouts
1 to 2 cups
5 - Carrots
1 to 2 cups
6 - Cauliflower
1 to 2 cups
7 - Zucchini
1 to 2 cups
[]
PressSTARTto begin cooking.
[]
When prompted, open the door and CLOSE
the steam vents on the steamer bowl.
NOTE:Make sure to open the door and
close the steam vents on the steamer
bowl when prompted. If the START
button is pressed before opening the door,
the oven will display the "Insert Food"
message.
[]
Closethe door and press START/PAUSEto
resume cooking.
NOTE:TheNordicWareRiceCooker/SteamerBowl
shouldbe usedfor best cookingresults
18
Choice
About the sensor microwave features.
Popcorn 1
Popcorn
To use the Popcorn feature:
[]
[]
Follow package instructions, using Cook if
the package is lessthan 1.0 ounces or
larger than 3.5 ounces. Place the
package of popcorn in the center of the
turntable.
Pressthe POPCORN
buttononcefor 3.3 to 3.5
ounce bagsor twicefor 2.7to 3.0ounce bags
or threetimes for 1.0to 1.5ounce bags.
Reheat
Use only with prepackaged microwave
popcorn weighing 1.0 to 3.5 ounces.
NOTE: Do not use this feature
twice
in
succession on the same food portion--it
may result in severely overcooked
or
burnt food
]
Reheot
Oonotu_theshef_swhen
micmwo_cooking.)
TheReheat featurereheatsservingsof previously
cookedfoodsor a plateof leftovers.
[]
Iffood is undercookedafter the countdown,use
TimeCookfor additionalcookingtime.
Place the cup of liquid or covered
food in the oven. Press REHEATonce, twice, or
SomeFoodsNot Recommendedfor Use
With Reheat
It isbest to use TimeCookfor thesefoods:
Breadproducts.
Foodsthat mustbe reheateduncovered.
three times. The oven starts immediately.
Press once for a plate of leftovers.
Press twice for a pasta.
Press three times for 1/2 to 2 cups of
vegetables.
[]
The oven signals when steam is
sensed and the time remaining begins
counting down.
Foodsthat needto be stirredor rotated.
Foodscattingfor a dry tookor crisp surfaceafter
reheating.
NOTE:Do not use this feature twice in
succession on the same food portion--it
may result in severely overcooked or
burnt food.
Donot openthe ovendoor until time
is countingdown.If the door is opened,
closeit and pressSTART/PAUSE
immediately.
After remodng food from the oven, stir, if possibfe,
to even out the temperature. Reheated foods may
hove wide voriotbns in temperature. Some areas of
food may be extremely hot.
If food isnot hot enoughafter the countdown use
TimeCookfor additionalreheatingtime.
19
About the sensor microwave feature.
Humidity Sensor
What happens when using the Sensor
Features:
The Sensor Features detect the increasing
humidity released during cooking. The oven
automatically adjusts the cooking time to
various types and amounts of food.
Covered
Do not use the Sensor Features twice in
succession on the same food portion-it may
result in severely overcooked or burnt food. If
food is undercooked after the countdown, use
Time Cook for additional cooking time.
The proper containers and covers are
essential for best sensor cooking.
Vented
Always use microwave-safe containers
and cover them with lids or vented plastic
wrap. Never use tight sealing plastic
containers-they can prevent steam from
escaping and cause food to overcook.
Dry off dishes so they don't
mislead the sensor.
Be sure the outside of the cooking
containers and the inside of the microwave
oven are dry before placing food in the
oven. Beads of moisture turning into steam
can mislead the sensor.
Microwave terms.
Term
Definition
Arcing
Arcing is the microwave term of rsparks in the oven. Arcing is cause by:
• metal or foil touching the side of hte oven.
• foil that is not molded to food (upturned edges act like antennasl.
• metal such as twist-ties, poultry pins, gold-rimmed dishes.
• recycled paper towls containing small metal pieces.
Covering
Covers hold in moisture, allow for more even heating and reduce cooking time.
Venting plastic warp or covering with wax paper allows excess steam to escape.
Shielding
In a regular oven, you shield chicken breasts or baked foods to prevent overbrowning. When microwaving, you use small strips of foil to shield thin parts,
such as the tips of wings and legs on pountry, which would cook before larger
parts.
Standing Time
When you cook with regular ovens, foods such as roasts or cakes are allowed to
stand to finish cooking or to set. Standing time is especially important in microwave cooking. Note that a microwaved cake is not placed on a cooling rack.
Venting
After covering a dish with plastic wrap, you vent the plastic wrap by turning back
one corner so excess steam can escape.
20
About the sensor microwave features.
I
i
Cook
]
1
2
3
4
Express Cook
5
61
7
8
9
0
Start 1
Pause
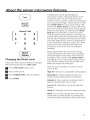
Changing the Power Level
The power level may be entered or changed
after entering the time for Time Cook.
Variable power levels add flexibility to
microwave cooking. The power levels on the
microwave oven can be compared to the
surface units on a range. Eachpower level gives
you microwave energy a certain percent of the
time. Power level 7 is microwave energy 70%
of the time. Power level 3 is energy 30% of the
time. Most cooking will be done on High (power
level 10)which gives you 100% power. Power
level 10 will cook faster but food may need
more frequent stirring, rotating or turning over.
A lower setting will cook more evenly and need
less stirring or rotating of the food. Some foods
may have better flavor, texture or appearance
if one of the lower settings is used. Usea lower
power level when cooking foods that have
a tendency to boil over, such as scalloped
potatoes.
Rest periods (when the microwave energy
cycles off) give time for the food to "equalize"
or transfer heat to the inside of the food. An
example of this is shown with power level 3the defrost cycle. If microwave energy did not
cycle off, the outside of the food would cook
before the inside was defrosted.
ill
press TIMECOOK button once.
Here are some examples of uses for various
power levels:
[]
Enter cooking time.
High 10: Fish,bacon, vegetables, boiling liquids.
[]
Enter POWERLEVELwhen prompted.
Meal-High 7: Gentle cooking of meat and
poultry; baking casseroles and reheating.
I_1 PressSTART.
Medium 5: Slow cooking and tenderizing for
stews and lesstender cuts of meat.
Low2 or 3: Defrosting; simmering; delicate
sauces.
Warm 1: Keeping food warm; softening butter.
NOTE: Youcan also change the power level
during many cooking modes by pressing the
power level button entering a valid power level.
21
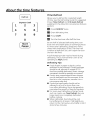
About the other feature.
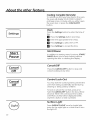
CookingCompleteReminder
To remind you that you have food in the oven,
the oven will display YOURFOODIS READY
and beep once a minute until you either open
the oven door or press the CANCEL/OFF
button.
Clock
I Settings
I
Pressthe Settings button to enter the time of
day.
[]
Pressthe Settings button two times.
[]
Enter the appropriate time of day.
kt
PressSettings to select AM or ptvL
[]
PressSettings to accept the time.
Start/Pause
I Stort
In addition to starting many functions, START/
PAUSEallows you to stop cooking without
opening the door or clearing the display.
Cancel/Off
o. I
I Cancel
Pressthe CANCEL/OFFbutton to stop and
cancel cooking at any time.
Control
o. I
I Cancel
Lock-Out
You may lock the control panel to prevent the
oven from being accidentally started during
cleaning or being used by children.
To lock or unlock the controls, press and
hold the CANCEL/OFFbutton for about three
seconds. When the control panel is locked,
CONTROLLOCKEDwill be displayed briefly
anytime a button or dial is pressed.
Surface Light
Press SURFACE LIGHT once for bright light,
twice for the night light or a third time to turn
the light off.
22
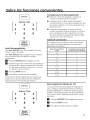
Timer
Timer
]
NOTE:The TIMERindicator will be lit while the
timer is operating.
The Timer operates as a minute timer and
can be used at an}/time, even when the oven
is operating.
[]
Pressthe TIMERon/off button.
[]
Enter a time.
[]
Pressthe TIMERon/offbutton
to start.
To cancel, press the TIMER on/off button.
When time is up, the oven will signal.
To turn offthe timer signal, press TIMER on/
off
Turntable On/Off
Settings
]
For best cooking results, leave the turntable
on. It can be turned offfor large dishes.
[]
Pressthe Settings button three times.
[]
Select ON or OFF as prompted.
Sometimes the turntable can become too hot
to touch.
Be careful touching the turntable during and
after cooking.
Some cooking modes do not allow the
turntable to be turned off.
Beeper Volume
Useto set the beeper volume level.
Settings
]
[]
Pressthe Settings button five times.
[]
Press0 for mute, press I for low, press 2
for normal and press 3 for loud.
Display
I Settings
I
Speed
The scroll speed of the display can be
changed.
[]
Pressthe Settings button six times.
Pressi for Slowest
2 for Slow
3 for Normal
4 for Fast
5 for Fastest
23
About the other feature.
Vent Fan
Automatic
The vent fan removes steam and other vapors
from surface cooking.
An automatic fan feature protects the
microwave from too much heat rising from
the cooktop below it. It automatically turns on
if it sensestoo much heat.
PressVENTEAN once for boost fan speed,
twice for high fan speed, three times for
medium fan speed, four times for low fan
speed or five time to turn the fan off.
NOTE:TheFAN indicator will be lit while
the fan is operating.
Fan
If you have turned the fan on you may
find that you cannot turn it off. The fan will
automatically turn off when the internal
pars are cool. It may stay on for 30 minutes
or more after the cooktop and microwave
controls are turned off.
_1_ SelectAM or PM for ON time.
Settings
Enter a valid time of day for the Auto
Night Light to turn it OFF.
]
r_ SelectAM or PM for OFFtime.
Auto Nite Light
The Auto Nite Light can be set to come on
and go off at desired times.
[]
Pressthe Settings button four times.
I_
Press0 to turn offthe Auto Night Light or
press i to set the Auto Night Light or
press 2 to review the Auto Night Light
settings.
N
If setting Auto Night Light, enter a valid
time of day for the Auto Night Light to
turn ON.
_-_ PressSettings to confirm the settings
entered.
NOTE: Auto Night Light will not come on
when Power Saver (EnergySaver)button
is engaged. Auto nite light will always
activate the light to the night setting at the
programmed on time, even if the light is
already set to the bright setting. Auto nite
light will always turn the light off at the
programmed off time, even if you have turned
the light to bright.
Display Language
Useto select to displayed language.
Settings
24
]
[]
Pressthe Settings button seven times.
[]
Press] for Englishand press2 for
Spanish..
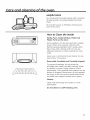
Care and cleaninq of the oven.
Helpful Hints
An occasional thorough wiping with a solution
of baking soda and water keeps the inside
fresh.
Be sure the power is off before cleaning any
part of this oven.
How to Clean the Inside
Walls, Floor, Inside Window, Metal and
Plastic Parts on the Door
|
Some spatters can be removed with a paper
towel; others may require a damp cloth.
Remove greasy spatters with a sudsy cloth,
then rinse with a damp cloth. Do not use
abrasive cleaners or sharp utensils on oven
walls.
Never use a commercial oven cleaner on any
part of your microwave.
Removable Turntable and Turntable Support
To prevent breakage, do not place the
turntable into water just after cooking. Wash
it carefully in warm, sudsy water or in the
dishwasher. The turntable and support can be
broken if dropped. Remember, do not operate
the oven in the microwave mode without the
turntable and support seated and in place.
Shelves
Clean with mild soap and water or inthe
dishwasher.
Do not clean in a self-cleaning oven.
25
Careand cleaninq of the oven.
How to Clean the Outside
We recommend against using cleanerswith
ammonia or alcohol, as they can damage the
appearance of the microwave oven.lf you
choose to use a common household cleaner,
first apply the cleaner directly to a clean cloth,
then wipe the soiled area.
Case
Clean the outside of the microwave with a
sudsy cloth. Rinseand then dry. Wipe the
window clean with a damp cloth.
Control Panel
Wipe with a damp cloth. Dry thoroughly. Do
not use cleaning sprays, large amounts of
soap and water, abrasives or sharp objects on
the panel-they can damage it. Some paper
towels can also scratch the control panel.
Door Panel
Before cleaning the front door panel, make
sure you know what type of panel you have.
Refer to the eighth digit of the model number.
"S" is stainless steel, "L" is CleanSteel and "B",
"W" or "C"are plastic colors.
Stainless Steel (on some models)
The stainless steel panel can be cleaned with
Stainless SteelMagic or a similar product
using a clean, soft cloth. Apply stainless
cleaner carefully to avoid the surrounding
plastic parLs.Do not use appliance wax, polish,
bleach or products containing chlorine on
Stainless Steelfinishes.
Plastic Color Panels
Use a clean, soft, lightly dampened cloth, then
dry thoroughly.
Door Seal
it's important to keep the area clean where
the door seals against the microwave. Use
only mild, non-abrasive detergents applied
with a clean sponge or soft cloth. Rinsewell.
Bottom
Clean offthe grease and dust on the bottom
often. Usea solution of warm water and
detergent.
26
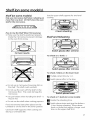
Shelf (on some models).
Shelf (on some models)
Only use microwave shelf when reheating on
more than one level. DO NOT store the oven
shelf in the microwave.
Usethe upper shelf supports for two-level
cooking.
7f!//!I! ! ! _\ _\_
2-level reheating
How to Usethe Shelf When Microwaving:
• Make sure the shelf is positioned properly
inside the microwave to prevent damage
to the oven from arcing.
Shelf and Reheating
2,
'
Switch places after 112 time
For best results
To reheat on 2 levels or
Switch places after 112 time
To reheat 2 dishes on the lower level:
_!1 Multiply "enea__lmeoy 1 V2.
Jneven resul
[]
1
Switch places after ½ the time.
° Do not use a microwave
Drowning alsn on
the shell The shelf could overheat.
° Do not use _neoven wl_nme shelf on me
microwave floor. This coula aamage me
microwave.
Switch places twice
• Usepot holders when handling the shelf- it
may be hot.
To reheat on 3 levels Ion some models)
• Do not use the shelf when cooking popcorn.
ill
Double the reheating time.
Food microwaves best when placed on the
turntable or on the shelf in the lower position.
[]
Switch places twice and give the dishes a
½ turn during reheating. (Placedense
foods, or those that require a longer cook
time, on the upper shelf first. )
Uselower shelf supports when cooking one
oblong or oversized dish.
27
Replacinq the liqht bulb.
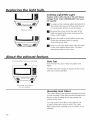
Cooktop Light/Nite
Light
Replace with a 120 volt, 25 or 50 watt (max.)
halogen bulb. Order WB36X10213from your
GEsupplier.
M To replace the cooktop light/nite light, first
disconnect the power at the main fuse or
circuit breaker panel, or pull the plug.
I_ Remove the screw from the side of the
light compartment cover and lower the
cover until it stops.
_1 Be sure the bulb is cool before removing.
Break the adhesive seal by gently
unscrewing the bulb.
I_1 Screw in the new bulb, then raise the light
cover and replace the screw. Connect
electrical power to the oven.
About the exhaust feature.
Charcoalfilter (onsome models).
Vent Fan
The vent fan has two metal reusable vent
filters.
Models that recirculate air back into the room
also use a charcoal filter.
Reusable vent filters
(on oil models).
Reusable Vent Filters
The metal filters trap grease released by foods
on the cooktop. They also prevent flames from
foods on the cooktop from damaging the
inside of the oven.
For this reason, the filters must always be
in place when the hood is used.The vent
filters should be cleaned once a month, or as
needed
28
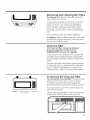
Removing and Cleaning the Filters
Toremove, slide them to the rear using the
tabs. Pulldown and out.
To clean the vent filters, soak them and then
swish around in hot water and detergent.
Don't use ammonia or ammonia products
because they will darken the metal. Light
brushing can be used to remove embedded
dirt.
Rinse,shake and let dry before replacing.
Toreplace, slide the filters into the frame slots
on the back of each opening. Pressup and to
the front to lock into place.
Charcoal Filter
The charcoal filter cannot be cleaned.
It must be replaced. Order Part No.
WBO2X10956from your GEsupplier.
If the model is not vented to the outside, the
air will be recirculated through a disposable
charcoal filter that helps remove smoke and
odors.
The charcoal filter should be replaced when it
is noticeably dirty or discolored (usually after
6 to 12 months, depending on usage).See
"Optional Kits,"page 8, for more information.
To Remove the Charcoal Filter
To remove the charcoal filter, first disconnect
power at the main fuse or circuit breaker,
or pull the plug. Remove the top grille by
removing the two screws that hold it in place.
You may need to open the cabinet doors to
remove the screws.
Remove 2 grille screws to remove
the grille.
Lift the filter at the bottom until it comes free
of the tabs. Slidethe filter down and out.
IIIIlll
29
About the exhaust feature.
....
iJ L [
,,,.
To Install the Charcoal Filter
Toinstall a new charcoal filter, remove
plostic ond other outer wropping from the
new filter.
Insert the top of the filter up and into the
grooves on the inside of the top opening.
Pushthe bottom of the filter in until it rests in
place behind the tabs.
.11111111 IIIIInl]!Jll
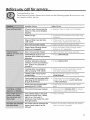
Before you call for service ....
Things That Are Normal
Vour Microwave Oven
With
Moisture on the oven door and walls
while cooking. Wipe the moisture off with
a paper towel or soft cloth.
Moisture between the oven door panels
when cooking certain foods. Moisture
should dissipate shortly after cooking is
finished.
Steam or vapor escaping from around
the door.
_i_i_
Light reflection around door or
outer case.
Dimming oven light and change in
the blower sound at power levels other
than high.
Dull thumping sound while oven is
operating.
50
TV-radio interference might be noticed
while using the microwave. Similar
to the interference caused by other
small appliances, it does not indicate a
problem with the microwave. Plug the
microwave into a different electrical
circuit, move the radio or TV as far away
from the microwave as possible
or check the position and signal of
the TV/radio antenna.
iiiiiii_
NOTE: If your display is off check to
see if your Power Saver (Energy Saver)
feature button is engaged.
Before you coilfor service ....
Troubleshooting Tips
Savetime and money! Reviewthe charts on the following pages first and you may
not need to call for service.
i
i_d,
Possible Cause
What To Do
A fuse in your home may be
blown or the circuit breaker
tripped.
• Replace fuse or reset circuit breaker.
Power surge.
• Unplug the microwave oven, then plug
it back in.
Plug not fully inserted into
wall outlet
• Make sure the 3-prong plug on the
oven is fully inserted into wall outlet.
Door not securely closed.
• Open the door and close securely.
Power Saver IEnergy Saver}
button not engaged,
• Push the Power Saver (Energy Saver)
button so it is pressed in.
Door
notsecurely
c osed.
• Open
thedoor
and
dose
securely
START/PAUSEbutton not
• Press START/PAUSE.
_ _ _ _il!
selection,pressed
after entering cooking
Another
already
selection
entered
• Press CANCEL/OFF.
in oven and CANCEL/
OFF button
cancel it.
not pressed
to
Cooking time not entered
after pressing TIME COOK
• Make sure you have entered cooking
time after pressing TIME COOK.
CANCEL/OFF was pressed
accidentally.
• Reset cooking program and press
START/PAUSE.
Food weight not entered after
selecting AUTO DEFROSTor 1
Ib QUICK DEFROST.
• Make sure you have entered food
weight after selecting AUTO DEFROST
or FASTDEFROST.
Food type not entered after
pressing AUTO COOK.
• Make sure you have entered a food
type.
The control has been locked.
• Press and hold CANCEL/OFF for about
5 seconds to unlock the control.
The cooktop light is located
below the oven floor. When
light is on, the heat it
produces may make the oven
floor get warm.
• This is normal.
You have tried to change the
power level when it is not
allowed
• Many of the oven's features are preset
and cannot be changed.
51
Before VOUcall for service.
Possible Cause
What To Do
The vent fan automatically
turns on to protect
the
microwave
if it senses too
• Thisis normal.
much heat rising from
cooktop below.
the
When using a Sensor feature,
the door was opened before
iiiiiiiiiiiiiiiiiiiiiiiiiiiiiiiiiiiiiiiiiiiiiiiiiiiiiiiiiiiiiiiiiiiiiiiiiiiiiiiiiiiiiiiiiiiiiiiiiiiiiiiiiiiiiii
steomcouldbedetected,
IIIIIIIIIIIIIIIIIIIIIIIIIIIIIIIIIIIIIIIIIIIIIIIIIIIIIIIIIIIIIIIIIIIIIIIIIIIIIIIIIIIIIIIIIIIIIIIIIIIIIIIIIIIIIII
iiiiiiiiiiiiiiiiiiiiiiiiiiiiiiiiiiiiiiiiiiiiiiiiiiiiiiiiiiiiiiiiiiiiiiiiiiiiiiiiiiiiiiiiiiiiiiiiiiiiiiiiiiiiiii
Steam was notdetected in o
iiiiiiiiiiiiiiiiiiiiiiiiiiiiiiiiiiiiiiiiiiiiiiiiiiiiiiiiiiiiiiiiiiiiiiiiiiiiiiiiiiiiiiiiiiiiiiiiiiiiiiiiiiiiiii
maxiumumamountoftime.
32
• Do not open door until steam is sensed
and time is shown counting down on
thedisplay.
• Use Time Cook to heotfor more time.
GE Microwave
Oven Warranty.
All warranty serviceprovided by our Factory
ServiceCenters,or an authorized CustomerCare®
technician.Toscheduleservice,online,contact
usat GEAppliances.com,
or call 800.GECARES
(800.432.2737).Pleasehaveserial and model
numbersavailable when callingfor service.
Staple your receipt here.
Proof of the original
purchase date is needed
to obtain service under
the warranty.
For The Period of:
GEWill Replace
One Year
From the date of the
orignal purchase
Any part of the microwave oven which fails due to a defect in materials or workmanship During this limited one-year warranty, GEwill
also provide, free ofcharge, all labor and related service to replace
the defective part.
For the above limited warranty: To avoid any trip charges, you must take the microwave oven
to a General Electric Customer Care ®servicer and pick it up following service. In-home service is
also available, but you must pay for the service technician's travel costs to your home.
What GE Will Not Cover:
• Service trips to your home to teach
how to use the product.
•
Improper
installation,
maintenance.
•
Product
required
•
Failure of the product or damage to
the product
if it is abused, misused
(for example, cavity arcing from wire
rack or metal/foil),
or used for other
than the intended purpose or used
commercially.
not accessible
service.
delivery
you
or
to provide
•
Replacement
of house fuses or
resetting
of circuit breakers.
•
Replacement
bulbs.
•
Damage
accident,
•
Incidental
or consequential
caused by possible defects
appliance.
•
Damage
of the cooktop
light
to the product caused by
fire, floods or acts of God.
caused
damage
with this
after delivery.
exchange as provided in this Limited Warranty.
Any implied warranties,
including
the implied warranties
of merchantability
or fitness for a particular
purpose, are
I1 limited
XCLUSION
OFyear
IMPLIED
sole and
exclusive remedy is product
to one
or theWARRANTIES--Your
shortest period allowed
by law.
This warranty is extended to the original purchaser and any succeeding owner for products
purchased for home use within the USA.If the product is located in an area where service by
a GEAuthorized Serviceris not available,you may be responsible for a trip charge or you may
be required to bring the product to an Authorized GEServiceLocation for service.In Alaska, the
warranty excludesthe service calls to your home.
Some states do not allow the exclusion or limitation of incidental or consequential damages. This
warranty gives you specific legal rights, and you may also have other rights which vary from state
to state. To know what your legal rights are, consultyour local or state consumer affairs office or
your state's Attorney General.
Warrantor'.
General
Electric
Company.
Louisville,
KY 40225
55
Consumer
Support.
GE Appliances
Website
GEAppliances.com
Havea questionor needassistancewithyour appliance?Trythe GEAppliancesWebsite24
hoursa day, anyday of the year!Forgreaterconvenienceandfasterservice,you can now
downloadOwner'sNanuals,orderparts,catalogs,or evenscheduleserviceon-line.Youcan
also"AskOurTeamof Experts""your questions,andso muchmore...
Schedule Service
GEAppliances.com
Expert GErepair service is only one step away from your door. Get on-line and schedule your
service at your convenience any day of th eyead Or call 800.GE.CARE8(800.452.2757)during
normal busines hours.
Real Life Design Studio
GEAppliances.com
GE supports the Universal Design concept-products,
services and environments that can
be used by people of all ages, sizes and capabilities. We recognize the need to design for a
wide range of physical and mental abilities and impairments. For details of GE's Universal
Design applications, including kitchen design ideas for people with disabilities, check out
our Website today. For the hearing impaired, please call 800.TDD.GEAC (800.833./4322).
@
Extended Warranties
GEAppliances.com
Purchase a GEextended warranty and learn about special discounts that are available
while your warranty is still in effect. You can purchase it on line anytime, or call
800.626.222/4 during normal business hours. GE Consumer Home Services will still be
there after your warranty expires.
Parts and Accessories
GEAppliances.com
Individualsqualifiedto servicetheir own appliancescan have parts or accessoriessent
directlyto their homes (VISA,MasterCardand Discovercardsare accepted).Order on line
today, 2/4hours everyday or by phone at 800.626.2002during normal businesshours.
Instructions contained in this manual cover procedures to be performed by any user.
Otherservicing generally should be referred to qualified service personnel. Caution
must be exercised,sinceimproper servicing may causeunsafe operation.
Contact Us
GEAppliances.com
If you are not satisfied with the service you receive from GE, contact us on our Website
with all the details including your phone number, or write to:
General Manager, Customer Relations
GE Appliances, Appliance Park
Louisville, KY/40225
Register Your Appliance
GEAppliances.com
Register your new appliance on-line- at your convenienceJ Timely product registration
will allow for enhanced communication and prompt service under the terms of yoru
warranty, should the need arise. You may also mail in the pre printed registration card
included in the packing material.
34
Printed in Malaysia
GEAppliances.com
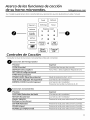
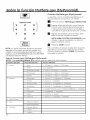
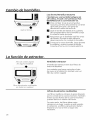
Instrucciones de seguridad ......
0
0
Instrucciones de operaci6n
Funciones de su homo ..........
15,16
Tiempo de Cocci6n .............
28-30
Funciones convenientes ...........
20
Funci6n MyPlate.gov (MyPyramid).. 16
Funciones del microondas
con sensor ...................
9-11
Terminologia de microondas ... 22-24
Nivel de Potencia ..................
21
Resto de las funciones .............
28
Cambio de bombillas ............
17-20
Funci6n de extractor ............
12-15
Cuidado
y limpieza ............
consejos para la soluci6n
de problemas
Antes de Ilamar al servicio
de reparaciones ................
0_
0
2-8
DVM1950
JNM1951
JVM1950
25,26
30-32
Soporte al consumidor
Accesorios opcionales ................
8
Garantia..........................
33
Soporte al consumidor .............
:34
0
Escriba los n_meros de modelo y de serie
aquh
Ndmero de modelo
N_mero de serie
Estos nOmeros estcin en una etiqueta
en el interior del horno
49-40642-2
9-11 GE
INSTRUCCIONES IMPORTANTES DE SEGURIDAD.
LEA PRIPIERO TODA LAS INSTRUCCIONES.
Cuando se usen aparatos eldctricos, siempre deben seguirse precauciones
bdsicas de seguridad, incluyendo las siguientes:
iPRECAUCION!
Por su seguridad, la informaciGncontenida en este manual debe seguirse pare minimizar
el riesgo de incendio, explosiGn,descarga eldctrica, exposiciGna energia microondas o
gain evitar dahos a la propiedad, lesionespersonales o pdrdida de vida.
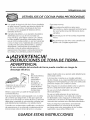
PRECAUCIONES PARA EVlTAR POSIBLE EXPOSICION
A UNA EXCESIVA ENERG[A DE MICROONDAS.
(aJ No Intente operar este homo
con la puerta abierta ya que esto
podria resultar en una exposici6n
a energia microondas daSina. Es
importante no cancelar ni manipular
de forma indebida los dispositivos de
seguridad.
(b) Na Sit4e ningOnobjeto entre la
parte frontal del homo y la puerta ni
permita que se acumule suciedad
o residuos limpios en las gomas de
cierre hermGtico.
•
Leatodas las instrucciones antes de utilizar
este aparato. AI utilizar aparatos el_ctricos,
se deben seguir precauciones bSsicas de
seguridad, incluyendo las siguientes:
•
Leay obedezcatasprecaucionesespecificas
en lasecci6nde PRECAUCIONES
PARAEVITAR
POSIBLE
EXPOSICION
A UNAENERG[A
EXCESIVA
DEHICROONDAS
de arriba.
•
EsteetectrodomGstico
debeestarconectado
a tierra.ConGctelos61oa unatoma de
corrientecontoma detierra.Veatasecci6n
de INSTRUCCIONES
DETOHADETIERRA
en ta
pdgina 6.
•
•
Estehomo de microondasestd tistadopor UL
para set instatadosobreestufasetectricasy de
gas(memosde 600,000BTU).
Estehomo puedeinstatarseencima de tacocina
y estd diseSadopara suuso sobrecocinas
encimerasno rodsanchasde 36".Puede
(c) No Use el homo si est5 daSado.
Esespecialmente importante
que la puerta del homo se cierre
correctamente y que no se da5e:
(1) la puerta (doblada),
(2) bisagras y pasadores (rotos o
sueltos),
(3) sellos de la puerta y gomas de
cierre hermGtico.
(d) El homo no deberia ajustarse ni
repararse por nadie que no sea
personal de servicio adecuadamente
calificado.
instalarsesobreequipospara cocinarde gas o
etGctricos.
• NousaresteetectrodomGstico
si elcable de
corrienteoet enchufehansufridoatgOndaBo,
si no funcionacorrectamenteo si ha resuttado
daBadoo seha ca[do.Siet cablede corriente
ha sidodaBado,debeser reemplazadopor et
ServicioReparaciones
de GeneralElectric(GE
Service)o un agentede reparacionesautorizado
empleandoun cablede corrientequeGeneral
Electrictienea su disposici6n.
•
Instateo coloqueesteelectrodomGstico
siguiendos61otasInstruccionesde Instataci6n
provistas.
•
Nouseproductosde papeten ethomo cuandoet
etectrodomGstico
seausadoen cuatquiermodo
de cocci6n,exceptoen cocci6npor microondas.
GUARDE ESTASINSTRUCCIONES
GEApplionces.com
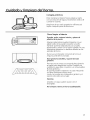
Use este electrodomdstico s61opara su prop6sito original, como se describe en el
Manual
del Propietario.
• Parareduciretriesgode incendioen taapertura
det homo:
- Nococinedemasiadotacomida.Presteatenci6n
cuidadosaatelectrodom_sticocuandosecoloca
papet,pl6sticouotro materialcombustibleen et
homo mientrassecocina.
- Quitelascintasde cierrecon metaly lasasas
metdticasde losrecipientesde papeto ptdstico
antesde introducirlosen el homo.
- Noatmacenecosasen et homo.Nodeje
productosde papet,utensiliosde cocinarni
comidaen et homo mientrasno toest_ usando.
- Nohagarosetaso palomitasde ma[zen et
microondasa no ser queest@usandoun
accesorioespecialpara prepararlaso que
est@empteandorosetaso patomitasde maiz
que indiquenser vdtidasparaet usode hornos
microondas.
- Si seincendiaraatg0nmaterialdentro,mantenga
ta puertadel homo cerrada,apagueet homo
y desconecteelcable de corrienteel@ctrica,
o apagueta corrienteenet fusibleo paneldel
diferenciat.Sise abreta puertaetfuego podria
expandirse.
- Noutiticelascaracteristicasde Sensordosveces
consecutivasen tamismaporci6nde comida.
Si tacomida no seha cocinadoporcompteto
despu@s
de taprimeracuenta regresiva,use
ta funci6nTimeCookpara tiempode cocci6n
adicionat.
- Nouseethomo parasecarperi6dicos.
• Term6metro-No use term6metrospara cocci6n
regularo de homo atcocinarpor microondas.
Etmetaly elmercuriode estosterm6metros
podffanocasionararcos el_ctricosy posibles
daflossobreet horno.Nouse un term6metroen
tacomidaqueest6 cocinandopor microondas,
a menosque etterm6metroest6disefladoo se
recomiendepara su usoen ethomo microondas.
• No limpie con almohadillas met61icas
para fregar. Las piezas podr6n quemar la
almohadilla y tener contacto con partes
el@ctricasy producir riesgo de descargas
el@ctricas.
•
No guarde ningOn material, a excepci6n de
nuestros accesorios recomendados, en este
homo cuando no est@en uso.
• No use este producto cerca del agua; por
ejemplo, en un s6tano h0medo, cerca
de una piscina, cerca de un lavabo o en
ubicaciones similares.
• No guarde este electrodom@sticoal aire
libre.
• iVtantengael cable de corriente alejado de
superficies calientes.
• No sumerja el cable de corriente o el
enchufe en el agua.
• No bloquee ni cubra cualquier abertura del
electrodom_stico.
• Estehornomicroondasno est6 aprobadoni
evaluadopara usonaval.
el usopara el
• D@a esteelectrodom@stico
cualfue dise_ado0nicamente,como se
describeen este manual.
• No use productos qufmicos corrosivos ni
vapores en este electrodom@stico.
• Este homo microondas fue diseflado
especfficamente para calentar, secar o
cocinar comida, y no para uso industrial o en
laboratorio.
• Atgunosproductostalescomo huevosenteros
y envasessetlados- por ejemplo:tarrosde
vidrio cerrados- puedenexplotary por esto
no sedebencatentaren el homo microondas.
Dichouso dethomo microondaspodr6producir
tesiones.
• Esimportante mantener el 6rea limpia
donde la puerta se selle contra el horno
microondas. Uses61odetergentes suaves y
no abrasivos con una esponja limpia o tela
suave. Enjuague bien.
• AI igual que con cualquier electrodom@stico,
se deber6 realizar una supervisi6n de cerca
si es usado por ni_os.
• No guarde nada directamente sobre la
superficie del horno microondas cuando el
mismo se encuentre funcionando
No monte el electrodom@sticosobre un
lavabo.
• No permita que el cable se sostenga sobre
el extremo de la mesada.
GUARDE ESTASINSTRUCCIONES
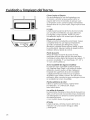
INSTRUCCIONES IMPORTANTES DE SEGURIDAD.
LEA PRIMERO TODA LAS INSTRUCCIONES.
iPRECAUCI()N!
Riesgo de explosiSn o exposiciSn o
materiales tSxicos, la bateda debe ser
reemplazada
solamente por el t_cnico de
reparaciones.
iPRECAUCION!
FORMACION
DE ARCO EL_'CTRICO
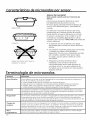
Sive que se forman amos eldctricos,presione el bot6n CLEAR/OFF(borrar/
apagado) y resuelva elproblema.
Arco eldctrico es 1oque, en la
terminologfa de losmicroondas,
describelos chispas en el homo.
El arco eldctrico se produce cuando:
• El estante met61icono est6
instalado correctomente y toco
Io pared del microondas.
• Hay un metal o papel de
aluminio tocando el lateral del
horno.
• El soporte del aro giratorio no
esta instalado correctamente
El papel de aluminio no esta
envolviendo bien la comida (hay
bordes doblados hacia arriba
que act0(]n como antenas.)
• Hay alg0n metal, como cintas
de cierre con metal, pinchos de
polio, o platos con decoraci6n de
oro dentro del microondas.
• Seestci usando papel toalla
reciclado que contienen
peque_as porciones de metal en
el microondas.
•
Usesolamente el estante de
homo microondas cuando
est_ recalentando en mcis
de un nivel. NO guarde el
estante del homo dentro del
homo microondas. Lea las
instrucciones de operaci6n par(]
el Estante de Horno.
GUARDEESTASINSTRUCCIONES
GEAppliances.com
iPRECAUCION!
COMIDAS
• Nohagarosetaso patomitasde ma[zen et
microondasa no ser queest@usandoun
accesorioespecialpara prepararlaso que
est@empteandorosetaso patomitasde maiz
que indiquenset vdtidasparaet usade homos
microondas.
• Nohiervahuevosdentro de un homo
microondas.Segenerar6presi6ndentrode
ta yemadel huevoquecausar6queexptote
pudiendo,posibtemente,daBara atguien.
• Sise poneen marchael microondassintener
comidaen su interiorparm6s de un minutoo
dos podr[ancausarsedaBosal homoy podr[a
empezarun fuego.Estohaceaumentar ta
temperaturaalrededordet magnetr6ny puede
reduciretper[adode vida0titdet homo.
Lascomidascocinadasen tiquidos(coma
ta pasta)puedentenercierta tendenciaa
herw m6s r6pidamentequelosatimentos
quecontenganmenoshumedad.Si esto
ocurre,revisetasecci6nde Cuidadoy limpieza
det homo microondasdondeencontrar6
instruccionesen cuanto a tatimpiezadet interior
det microondas.
• Nocatientetacomida det beb@enjarras de
cristal,inclusosi est6ndestapadas.Aseg@ese
de que losatimentosde losni_osest@nbien
cocinados.Remuevatacomida para distribuir
etcator de forma pareja.Tengacuidadode
queel ni_o no sequemeat catentarta teche
de f6rmula.Elcontenedorpuedeparecermds
frio de toque realmenteest6 taf6rmuta.Pruebe
siempreta f6rmutaantesde ddrsetaat beb@.
• Nodescongetebebidascongetadasen botettas
de cuettoestrecho(especiatmentebebidas
carbonatadas).Induso con etcontenedor
abierto,podriagenerarseun aumento de
presi6n.Estopuedecausarque etcontenedor
exptote,to cuat podriaproducirda_os
personates.
• Deber[acortarseta "piet"externade aquettos
aiimentosqueno ta tenganrata coma taspapas,
salchichas,embutidos,tomates,manzanas,
Ngadosde polioy dem6smenudillosde ayes
y yemasde huevos,para permitirtasatidade
vapor mientrassecocinan.
• AGUASOBRECALENTADA
Uquidos,talescomaagua,caf_,o t_,sepodrfan
• Losatimentoscalientesy et vapor pueden
sobrecafentarmdsoff4defpuntode ebufficbn
causarquemaduras.Tengacuidadoat abrir
sinparecerqueestdnhirviendo.Nosiempre
cuatquiercontenedorcon comidacatiente,
hobrdburbujoso evidenciode queeltfquido
inclusobolsasde rosetaso patomitasde maiz,
estd hirviendocuandoseextroeel envoseconel
balsaso cajasde cocinar.Paraprevenirposibtes
tfquidodef micmondas.ESTOPODRIARESUL
TAR
da_ospersonates,mantengaet vapor atejado
ENLIOUtDOS
MUYCALtENTES
DEREPENTE
de susmanosy rostra.
COMENZANDO
A HERVtR
YA REBOSARSE
CUANDOELENVASE
ESMOVtDO0 StUNA
• Nococinedemasiadotaspapas.Podrian
CUCHARA
UOTROUTENStLtO
SELEINTRODUCE
deshidratarsee incendiarse,causandoda_osa
ALLIOUtDO.
su homo.
Parareducirelriesgode lesionespersonates:
- Nosobrecatientelosl[quidos.
- Muevael l[quidotanto antescomaa mediados
del tiempode catentamiento.
- Nouseenvasesde tadosrectoscon cuettos
estrechos.
- Despu_sdelcatentamiento,permitaqueel
envasepermanezcaen elmicroondaspar un
tiempo corto antesde removeretenvase.
- Usecuidadoextremocuandoinserteuna
cucharau otro utensilioen el envase.
Cocinetacamey el polioparcompteto-ta
camehastaqueatcanceunatemperatura
minimaINTERIOR
de160°F,
y etpoliohasta
unatemperatura
INTERNA
minimade 180°F.
Cuando
secocinana estastemperaturas
se
evitatacontracci6n
deenfermedades
par
intoxicaci6n.
GUARDE ESTASINSTRUCCIONES
INSTRUCCIONES IMPORTANTES DE SEGURIDAD.
LEA PRIPIERO TODA LAS INSTRUCCIONES.
UTENSILIOS
•
•
•
•
•
•
DE COCINA PARA MICROONDAS
Nopongaen marchael hornoen etmodo microondassinqueel dispositivogiratorio
y et soportedet dispositivoest@nencajadosen su hgar. Eldispositivogiratoriodebe
estarsueltoparaque puedagirar.
AsegOmsedequetodoslosutensifiosde cocinaqueuseen suhomo seanaptospara
micmondos.Puedenusorsetomoyofiode loscozuefos,pfotospore cocinor,tozos
de medir,tazasde ftanesy batesde cristaf,o losvajflfosde porcefonaqueno tienen
decomcbnesmetdficoso bamicescon bfiffometdfico.Atgunosutensifiosdenento
siguienteinscripd6n:"puedeusorseen micmondos."
• Usodei estanteaccesorio:
Sino est6 seguro
de queun plato
- Quiteetestantedet homo cuandono toest@
usando.
puedausarseen el
microondas,haga
- Usemanoplascuandoest@manipulandoet
esta prueba:Cotoque
estantey los utensiliosde cocina.Podrian
elplatoque est_
estarcalientes.
probandoy un vaso c6moprobarsi unenvase
- Aseg@ese
queel estanteest6 bien colocado
de medircon 237 mt esseguroparausarseenun
dentrodet homo para queno seproduzcan
da_os.
(1taza)de aguaen
homodemicroondus
elhomo - ponga)a
- Nocubraet estanteni ningunapartedel
taza de medirdentro oat tadodet plato.Ponga
homo con papetde ahminio.Estopodria
etmicroondasen marcha,a m(_ximapotencia,
causarqueethomo microondas/de
convecci6nse sobrecalentara.
durante 30-45segundos.Siel plato secalienta
no deber[ausarseen elmicroondas.
Nousesu homo microondas/deconvecci6n
Siel platosemantienefrio y s6losecalientata
para secarperi6dicos.
taza,entoncesetplatopuedeusarsede forma
Notodo filmpldsticopuedeusarseen hornos
seguraen et microondas.
microondas.Reviseet usoadecuadodetpaquete.
Losalimentoso utensiliosde metal demasiado
Puedeusarsetoalla de papet,papelencerado
grandesnodeberianusarseen un homo de
y film pl6sticopara cubrir losplatosy retenerla
microondas/convecci6n
ya que aumentanet
humedad,as[ comopara prevenirsaipicaduras,
riesgode descargaei_ctricay podr[ancausar un
cuandose utiiizaelmicroondas.Aseg0resede
incendio.
proveerunaforma de ventilaci6nat film pl@stico
Avecesel sueto,el platogiratorioo lasparedes
para queelvapor puedasaiir.
de)homo puedenestardemasiadocaiientes
Podr[ancaientarselosutensiiiospor elcaior
para tocarias.Tengacuidadoa) tocar elsue)o,el
transferidopor losalimentoscalientes.Puede
platogiratorioo )asparedesde)homo despu_s
necesitarusarmanoplascecocina para manejar
de cocinar.
losutensilios.
Siusa un term6metrode cameat cocinarcon
Atutiiizarcon el microondasbolsasde cocinar
microondas},aseg0resede queseaapto para
"que puedanhervir",as[como cuaiquierbolsade
ser usadoen microondas.
pldsticofirmementecerrada,deber6ncortarse,
Nouse productosde pape)reciclado.Elpape)
perforarseo proveercualquiertipo de ventilaci6n
toaiia,)asserviiietasy el papeide cera reciciados
seg0nindiqueel paquete.Encasocontrario,
puedencontenermotas met6licasquepodr[an
elpldsticopodriaexplotarmientrassecocina
causar)aformaci6n de arcosei_ctricoso
o despu@s,
pudiendocausarda_osfisicos.
incendiarse.Losproductosde papeique
Ademds,losrecipientesde pl6sticodeberian
contengannil6no filamentosde nil6ntampoco
permanecer,at menos,parcialmentedestapados
deber[anusarseyaque sepodr[anincendiarde
ya quepuedensellarsefuertemente.Cuando
igua)modo.
cocinecon recipientesfirmementecubiertos
con film pl6stico,retirelacubiertacon cuidado
Atgunasbandejasde pi6stico(comoen iasque
y mantengaetvapor alejadode susmanosy
seempaquetatacame)tienenuna cinta finade
rostro.
metalincrustadaen elplato.Atponerseen el
microondas,elmetal puedequemarel sue)ode)
homo o incendiarun pape)toaiia.
GUARDEESTASINSTRUCCIONES
GEAppliances.com
UTENSILIOS DE COCINA PARA MICROONDAS
•
•
Usepapelde atuminios6tode taforma detatlada
en este manual.Cuandouseatuminiodentrode
un homo microondas,mantengaetatuminio,
al menos,a una pulgadade distanciade los
tateratesdet homo.
Utensiliosde plastico-Los utensiliosde ptastico
dise_adospara su usoen microondasson
muy practicos,perodebenusarsecon cuidado.
Indusoaquellosutensiliosautorizadospara su
uso en microondaspodrianno set tan tolerantes
como elcristato losmaterialesdeceramicaen
condicionesde sobrecatentamiento
y podrian
abtandarseo carbonizarseat someterlosa
periodoscortosde sobrecatentamiento.En
exposicionesmas targasa sobrecalentamiento,
ta comiday losutensitiospodrianincendiarse.
Sigaestasnormas:
[]
Usesolamenteptasticosaptospara
microondasy Oselossiguiendoestrictamente
tasrecomendacionesdetfabricantede los
utensilios.
[]
Nointroduzcaen etmicroondasrecipientes
vacios.
[]
Nopermitaquelosni_osusenutensitiosde
ptasticosincomptetasupervisi6n.
,iADVERTENCIA!
INSTRUCCIONES DE TOMA DE TIERRA
ADVERTENCIA:
El uso indebido del enchufe de tierru puede resultur en riesgo de
descurgu el_ctricu.
Este
electrodom#stico
debeestar
conectadoa
tierra.Sise
produjeraun
cortocircuito,la
AsegOrese
dequeexisteuna
toma de tierra
conexi6napropiadaa tierra
antesdeluso.
reduceel riesgo
de descarga
et@ctricaat proveerun cable de escapepara ta
corrienteet@ctrica.
Esteelectrodom@stico
estdequipadocon un cable
de corrientequedisponede un hitopara toma de
tierracon un enchufecon toma de tierra.Etenchufe
debe estarconectadoa unatoma de corrienteque
est@debidamenteinstataday con satidaa tierra.
Consuttecon un etectricistacuatificadoo un t@cnico
de reparacionessi no entiendecomptetamentetas
instruccionessobreta toma de tierra,o si tuviese
atgunadudasobre sisu aparatoestd debidamente
conectadoa tierra.
Sitatoma decorrienteesun modetoestdndar
de dos clavijas,essu responsabitidadpersonaly su
obtigaci6nel reemplazarlapot una toma adecuada
paratresctavijascon conexi6na tierra.
Bajoningunacircunstanciadebecortar o quitar ta
terceractavija(tierra)detcable de corriente.
Nouseun enchufeadaptador coneste
etectrodom#stico.
Nouseun cable extensorde corrientecon
este etectrodom@stico.
Siet cablede corriente
es demasiadocorto,haga queun etectricista
cuatificadoo un t#cnicode reparacionesinstaten
unatoma de corrientecercadetetectrodom#stico.
Paraun mejorfuncionamiento,enchufeeste
etectrodom@stico
en unatoma de corriente
exctusivapara evitarparpadeosde luz,fusibtes
quemadoso quesatteet diferenciat.
GUARDE ESTASINSTRUCCIONES
INSTRUCCIONES IMPORTANTES DE SEGURIDAD.
LEA PRIMERO TODA LAS INSTRUCCIONES.
EL VENTILADOR
EXTRACTOR
Etventitador se pondr6 en funcionamiento de
forma autom@ticabajo ciertas circunstancias
(verfunci6n de Ventiiador Autom6tico).Prevenga
el que empiecealg0n fuego at cocinar y que se
extiendamientras et ventitador det respiradero
est@en marcha.
•
•
Limpiea menudo ta parte inferior det
microondas. Nopermita que seacumute
grasa en et microondas o en losfittros det
ventitador.
Si ta grasa se incendiara en tasunidadesde
ta cocina (fogones)bajo et homo microondas,
sofoque cuatquiersart@nen llamas de ta
unidad de cocina par compteto con una tapa,
una bandeja de gattetaso cuatquier otra
bandeja ptana.
ADVERTENCIA:
•
Tengacuidado at limpiar losfittros det
ventilador extractor. Losproductos de
timpiezacorrosivos,coma loslimpia-hornos a
basede tejia, puedenda_ar losfittros.
•
Ponga en marcha el extractor cuando
est@cocinando comidas con llama bajo et
microondas.
Nunca deje tas unidadesde ta cocina
(fogones)bajo su microondas sinatenci6n
cuando se est@trabajando a attas
temperaturas. Cuando ta comida entra
en ebultici6n se generan humos y se
derraman grasas que pudieran incendiarse
y propagarsesi et ventilador det microondas
estd funcionando. Para minimizarel
funcionamiento det extractor autom6tico, use
utensitiosde cocina de tama_o adecuado
y use et fuego r6pido en tasunidades de ta
cocina (fogones)s61ocuando sea necesario.
MARCA
La mayoria de losmarca pasos estdn protegidos
contra ta interferencia de aparatos etectr6nicos,
inctuyendo losmicroondas. Sinembargo, cuando
PASOS
tengan atguna duda, los pacientescon marca
pasosdeben consutar con su m@dico.
ACCESORIOS OPCIONALES.
Disponibles en su distribuidor GEpar un
costa adicional.
Accesorios
•
de panel
de relleno
JX52WH--Blanco
• JX52BL--Negro
AI cambiar ta tapa de una cocina encimera de
36" tosaccesoriosde panetesde rettenoocupan
el espacioadicionat proveyendo un aspecto de
montaje a medida.
Filter Kits
• JX81H--Kit de filtro de carb6n vegetal de
recirculacidn
Losaccesoriosde fittros se usan cuando et homo
no puedetener una satidaat exterior.
Losaccesoriosde filtros est6n disponibies a
un costa adicionat en su abastecedor GE.Para
pedir, flame a GEo visite nuestro sitio Web,
GEAppliances.com(consulte ta p@ginatrasera).
$61opara instatarseentre armarios, no pueden
instatarseat final de los armarios.Cada
accesorioscontienedos panetesde retteno de 3".
FAVORDE LEERYfEGUlR CUlDAOOfAMENTEEfTA INFORMACIONDEfEGURIDAO.
GUARDE ESTASINSTRUCCIONES
Los funcionesde su homo.
GEAppliances.com
Su modelo puede tener otras caracteristicas y apariencia que los ilustradas en este manual.
|
|
O©
Funciones del homo
O
Tirador.
O
Enganches de puerta.
O
entana permite
con escudomet61ico.
La
ventana
ver como se cocinan
los alimentos y evita que salgan
microondas del horno.
Panel de control.
0
Dispositivo giratorio extraible. No
ponga en marcha el horno en el modo
microondas sin que est6n la basey el
soporte de la base colocados en su
lugar.
No utiliceExtra[hie
Soporte
el homo del
en el
Plato
modo
Giratorio.
de
microondas sin el plato giratorio y el
soporLe del plato giratorio, ubicados en
sus lugares correspondientes.
Las funciones de su homo.
Funci6n de Ahorrador
de Potencia (Ahorro de
Energia)fen algunos modelos)
Su homo microondasGEcuenta con una funci6n de Ahorrador de Potencia(Ahorrode Energia).
Muchos electrodom6sticosetectr6nicos,incluyendoloshornos microondas,consumen corriente
et6ctrica mientras estcindesconectadosyen el modo de espera.Etiminarelconsumo del modo de
espera puede reducir loscostos sobre el uso.
Paro ACTIVARla Funcidnde Ahorrador de Potencia (Ahorrode Energb) _
resioneetbot6n PowerSaver (Ahorradorde Potencia)en launidad,y lamisma seapagarci.
(Nota:Si utitiza esta funci6n, et reloj no aparecercien la unidad).
Paro DESACTIVAR
la Funcidnde Ahorrador de Potencia(Ahorrode Energb) U
I_Si
Presioneet bot6n PowerSaver (Ahorradorde Potencia)en la unidad,y la misma se encenderci.
Enla pantalta se leerci"On"(Encendido).Si hubo corriente en la unidad en forma reciente
(durantelos Oltimosalias),serecordarcila hora.
se
indica, ingrese la hora deldia.
NOTA:Etdispositivoque mantiene el retojen funcionamiento sedebercirecargar cada algunos
ribs. Serecomienda que unavez pot semana se deje la unidad encendida (nouse la funci6n de
Ahorrador de Potencia (Ahorrode Energia))durante pot Iomenos 2/4horas.Sise indica que ingrese
una hora al hacer et encendido luego de usarel modo de Ahorrador de Potencia(Ahorrode Energia),
sere1necesarioquela unidad est6 encendida pot Io menos durante/48 horas.Atinstalar la unidad
por primera vez,la deberia dejar encendida durante por Iomenos/48 horas.
Atgunasfunciones,como luz nocturna autom6tica, no funcionar6n cuando estcisen modo de
Ahorrador de Potencia (Ahorrode Energ[a).
NOTA:Estehomo microondas no detecta comida en el homo si la comida fue introducida cuando la
unidad estaba apagada (Ahorradorde Potencia (Ahorrode Energia)activado o p6rdida de energia).
PorIo tanto, la unidad lepedir6 que introduzca la comida en et homo otra vez cuandoet Ahorrador
de Potencia (Ahorrode Energia)sea desactivadoo la energia sea restauradaen la unidad.Si esto
ocurre, simplementeabra y cierre la puerta para borrar elmensajey el homo estar6 listo para
cocinar.
lO
Acerca de las funciones de cocci6n
de su homo microondas.
GEAppliances.com
Su modelo puede tener otras caracterfsticasy apariencia que lasilustrados en este manual.
e
so--o
7
8
9
Cancel}
Off
Controles de Cocci6n
Consulte la Guia de Acciones Convenientesantes de comenzar.
O
Funciones del Temporizador
Presione
COOK(Cocci6n)
DEFROST(Descongelar)
SETTINGS{Configuraciones}
TIMER[1-emporizador}
POWERLEVEL(Nivel de potencia)
ADD 30 SEC(Agregar 30 segundos}
EXPRESSCOOK(Cocci6n Express}
O
Funciones Convenientes
Presione
POPCORN(Palomitas de Maiz)
Ingresar
Cantidad de tiempo de cocci6n
Hora,Pesoo Descongetaci6nR6pidade 1 lb.
Nivel de potencia de i a 10
iComienza de inmediato!
iComienza de inmediato!
Presione las teclas num6ricas (1-6)
Ingresar
iComienza de inmediato!
REHEAT(Recalentar)
FAMILYSNACKS
(Refrigerios Familiares)
SOFTEN(Ablandar)
iComienza de inmediato!
Presionetateda para seteccionartaComida.
STEAM(Vapor)
MyPlate.gov (MyPyramid)
Presionetateda para seteccionartaComida.
Presionetateda para seteccionartaComida.
Presionetateda para seteccionartaComida.
11
Acerca de las funciones del temporizador.
I
Cook
Cocci6n
Lepermitecocinaren ethomo microondaspor
cuatquiertiempo hasta99 minutosy 99 segundos.
Powerleve110(High)(Nivelde potencia10 (High))
seconfigurade forma automdtica,pero topuede
modificarpara una mayorflexibitidad.
ill presioneCOOK(Cocci6n).
]
I_
7
8
9
0
I Pause
Start
]
Ingreseet tiempode cocci6n.
[]
PresioneSTART(Iniciar)o
cambieet nivetde
potencia.
[] PresioneSTART
(Iniciar)si laconfiguraci6nde
potenciaya seseteccion6.
Puedeabrir tapuertadurante la funci6nCook
(Cocci6n)paracontrotarlacomida.Cierretapuertay
presioneSTART(Iniciar)
para reanudarta cocci6n.
Express Cook (Cocci6n R6pida)
Estaesunoformordpidoporoconfiguror
el tiempo
decoccian
entre1y 5 minutos.
ill
i
1
2
4
Express Cook
5
3
61
presioneunade tastectasde ExpressCook
(Cocci6nRapida)(dei a 6)para unacocci6n
de entrei y 6 minutosen elnivel depotencia
10. Potejemplo:presionetatecla2 para un
tiempo de cocci6nde 2 minutos.
Elnivelde potenciase puedemodificarmientras
se est6reatizandolacuenta regresiva.Presione
POWERLEVEL(Nivetde Potencia)e ingreseuna
opci6ndet 0 at 10.
NOTA:La funci6n ExpressCook(Cocci6nR6pida)
se aplica s61ocon lasteclas 1 a 6.
3Add ]
0 SecJ
12
Add 30 Sec (Agregar 30 segundos)
Agregard30 segundosa lacuenta regresivacada
vezque lateda sepresione.Cadavezquepresione,
sesumardn30 segundos,hasta99 minutosy 99
segundos.
Elhomocomenzar6
a funcionardeinmediato
cuandosepresione.
Acerca de las funciones del temporizador.
Defrost
7
]
8
9
0
I Pause
Start
Descongelaci6n por Tiempo
Le permitedescongelardurante un per[odode
tiempo seleccionado.Consultelostiempossugeridos
en taGu[ade Descongelaci6n.
Time Defrost
(Descongeiaci6npor Tiempo)y 1 Ib QuickDefrost
(Descongetaci6n
Rdpidade 1 Ib)seexpticanen ta
secci6nAcercade tasFuncionesConvenientes.)
I
[]
PresioneDEFROST
(Descongelar)
dosveces.
[]
Ingreseettiempo de descongetaci6n.
[]
PresioneSTART(Iniciar).
[]
D6vuettalacomidaunaveztranscurridatamitad
dettiempo.
Unaveztranscurridoel tiempode descongetaci6n
seieccionado,d6 vueltatacomiday separe
o reorganicelostrozosde comida para una
descongetaci6nmds pareja.Cubracualquier6rea
catientecon trozospequeBosde papetde atuminio.
Ethomo secontinuar6descongetandosi no abre ta
puertay da vueltatacomida.
Esposibtequeseescuchenruidosde gotpessecos
durante iadescongelaci6n.Estoesnormalcuando
et homo no est6funcionandoen et nivetde potencia
High (Alto).
Consejos para la Oescongelad6n
• Lascomidascongetadasen papelo pl6sticose
podrdndescongetaren el paquete.Lospaquetes
cerradossedeberdncortar,perforaro ventitar
LUEGO
de queta comidasehayadescongetado
parcialmente.Losenvasesde pbstico sedeberdn
descubriren formaparciat.
• Lascomidasde tama_ofamiliarempaquetadas
previamentesepodrOndescongetary cocinaren
ethomo microondas.Sitacomidaseencuentra
en etenvasede papetde atuminio,trasladela
mismaa un platopara usoseguroen ethomo
microondas.
• Lascomidasque seechana perdercon facilidad
no sedeberdn@jar reposarpot mdsde una
hora tuegode ladescongetaci6n.Latemperatura
ambienteestimutaet desarroltode bacterias
nocivas.
• Paraunadescongetaci6nmds parejade
comidasrodsgrandes,tales comoasado,use
Time Defrost (Descongetaci6npot Tiempo).
AsegOrese
de quetascarnesquedentotatmente
descongetadasantesde cocinar.
• Unavezdescongetada,ta comidadeberiaestar
fria pero ablandadaen [email protected]
est6 un pococongetada,vuetvaa colocarlaen
ethomo microondasmuy brevemente,o deje
reposarta mismapor unospocosminutos. 15
Acerca de las funciones del temporizador.
Guia de Descongelaci6n
COMIDA
TIEMPO
COMENTARIOS
Panes, Tortas
Panes, buFluelos o panecillos
(1 trozo)
Pastelitos (12 onzas aprox)
1/4 de min.
2 a 4 min.
Vuelva a ordenar
Pescado y Mariscos
Lamas, congelados
6 a 9 min.
(1 Ib)
Fruta
Balsa de pl_stico - 1 o 2
(Paquete de 10 onzas.)
1 a 5 min.
Came
Tocino 11 Ib)
Salchichas
Tipo Frankfurt
Came picada
(1 Ib)
(1 Ib)
Asar:bife, cordero, ternera,
cerdo
Bistecs,
cordero
chuletas
de cerdo
Ave
Polio, parilla-freidora,
(21_
Gallina
Pechuga
14
y
carte
2 a 5 min.
Coloqueel paquete cerrado en el homo. Dejereposar por 5
minutos luego de la descongelaci6n.
2 a 5 min.
Coloque el paquete cerrado en el horno. Cocine en el homo
microondas hasta que las salchichas tipo Frankfort
4a 6min.
D6 vuelta luego de la primera mitad de tiempo.
9 a 13 min.
por lb.
Useel nivelde potencia 10.
4a 8rain.
por lb.
Coloque la came aOn envuetta en el plato de cocci6n.
D@vuelta luego de ta primera mitad de tiempo y cubra
las 6reas calientes con papel de aluminio. Luego de
la segunda mitad del tiempo, separe los trozos con
un cuchillo de mesa. Espere hasta que se complete la
descongelaci6n.
14 a 20 min.
Cotoque el polio envuelto en el plato. Desenvuelva y d@
vuelta luego de la primera mitad de tiempo. Luego de la
segunda mitad de tiempo, separe los trozos y coloque
los mismos en el plato de cocci6n. Cocine en el homo
microondas entre 2 y 4 minutos m6s, si es necesario.
Deje reposar por unos pocos minutos para finalizar la
descongelaci6n.
20 a 25 min.
Coloque el polio envuelto en el plato. Luego de la mitad
del tiempo, desenvuelva y d@vuelta el polio. Cubra las
partes catientes con papel de aluminio. Para completar ta
descongelaci6n, deje correr agua fria en la cavidad hasta
que se puedan retirar los menudos.
7 a 13 min.
por lb.
Coloque la gallina sin desenvolver en el homo con la
pechuga hacia arriba. D@vuelta luego de ta primera mitad
de tiempo. Deje correr agua por la cavidad hasta que se
puedan quitar los menudos.
s a 8 min.
por lb.
Coloquela pechugasin desenvolveren etplato para uso
seguroen ethomo microondas con la pechuga hacia
abajo. Luegode la primera mitad de tiempo, d6 vuelta
la pechuga hacia arriba y cubra las partes calientescon
papel de aluminio. Descongeledurante la segunda mitad
deltiempo. Dejereposarentre i y 2 horasen el reffigerador
para completar la descongelaci6n.
a ]Ibs.)
Polo, entero
(2% a 5 Ibs.)
de Cornualles(1
luego de la mitad del tiempo.
Ib)
de pavo (4 a 6 Ibs.)
Sobre las funciones convenientes.
consejos para la Descongelaci6n
• Retirela came del paquete y coloque ta
misma en et plato det microondas.
• Cuando et homo d@ta serial,d@vuetta ta
comida. Retireta came descongetadao cubra
tas partes catientescon trozos pequeros de
papet atuminio.
• Luegode descongetar,ta mayoria de las
cames necesitan reposar durante 5 minutos
para comptetar la descongelaci6n.AIasar
durante tiempo prolongado se deberia dejar
reposar por unos 30 minutos.
Tabla de conversi6n
{_cook]41
$2°'
7
8
9
0
Si el peso de la comida se calcula en libras
y onzas, las onzas deber6n convertirse a
d@cimas(.1)de libra.
Auto Descongelaci6n
UseAuto Defrost (Auto Descongetaci6n)para
carnes,ayesy pescado.
UseTime Defrost (Descongelaci6npot Tiempo)
para ta mayoria de tasdemds comidas
congetadas.
Pesodelacomidaen
Introduczca
elpesodela
onzas
comida (d_cimas de libra)
1_2
,1
3
,2
4-5
,3
6_7
,4
[]
PresioneDEFROST(Descongelar)una
vez.
[]
Usando ta guia de conversi6n que aparece a
continuaci6n, ingreseel peso de ta comida.
Porejemplo:presionetastectas 1 y 2 para
1.2 tibras(1 libra, 3 onzas).
8
,5
9-10
,6
11
,7
[]
PresioneSTART(Iniciar).
12-13
,8
[]
D@vuettatacomidacuandose indique.
14-15
,9
(TimeDefrost(Descongetaci6npot Tiempo)se
explica en ta secci6n About the time features
(sobretas funcionesdet temporizador))
Descongelaci6n
Defrost
7
]
8
0
Pause
Start ]
RSpida de I Ib
1 tb Quick Defrost(Descongeiaci6nRapidade
i lb.) configura automaticamente los tiempos
de descongetaci6ny niveles de potencia para
producir resuttadosparejosde descongetaci6n
con carnes,ayes y pescadosque pesen hasta
una libra.
9
[]
PresioneDEFROST(Descongetar)tres
veces.
[]
PresioneSTART(Iniciar).
[]
D6vuettatacomidacuandoseindique.
15
Sabre la funci6n MyPlate.qov (MyPyramid).
Funci6n MyPlate.gov (MyPyramid)
Lepermitecocinarcomidassaludablesen el
microonclasporporcioneso consensor.
ill
presionela teclaMyPlate.gov(MyPyramid).
14rsscook
is2
ettipo de comida. Lea la Gufade
m Ingrese
Coccidnpara MyPlate.gov(MyPyramid)a
continuaci6n para conocer los c6digos o
consulte en la pantalla lostipos de comida.
7
8
9
[]
0
NOTAPARACOCCIONCONSENSOR:para
obtener mejores resultados, no abra la
puerta mientras cocina.
_1
NOTA:Nouse lusfuncionesdelsensordosveces
seguiduscon tu mismuporci6nde comidu.Situ
comiduno secocinu tuegode lu primerucuentu
regresivu,useelTEMPORIZADOR
DECOCCION
(TIME
COOK)
par(]udicionurtiempo.
Guie de Cocci6n
NOTA:
Use nivel
Primera
Elecci6n
1 - Cereal
2- Verduras
pare MyPlete.gov
(MyPyremid)
de Dotencia
10 o manes c ue
Secunda
Elecci6n
se indique de otra manera.
Tercera Elecci6n
1 - 1/2 taza, 2 - 1 taza, 3 - 1 1/2 tazas
1 a 4 paquetes
3 - Palomitas de Hafz
1 - onza, 2 - 3.0 onzas, 3 - 35 onzas
/4 - [Vjacarl-ones
1 - 1/2 taza, 2 - i taza, 3 - 1 1/2 tazas
5 - Quinoa
1 - 1/2 taza, 2 - i taza, 3 - 1 1/2 tazas
1 - Esperragos
1 - Frescos, 2 - Congelados, 3 - Enlatados
2- Br6coli
1 - Fresco, 2 - Congelado
3 - Arvejas Verdes
1 - Frescas, 2 - Congeladas, 3 - Enlatadas
4 - Zanahorias
1 - Frescas, 2 - Congeladas, 3 - Enlatadas
S- Maiz
1 - Choclo Fresco (1 a 4), 2 - Granos Congelados 3 - Enlatado
6 - Guisantes
1 - Congelados, 2 - Enlatados
7 - Papas
1 - AI Homo, 2 - Batata
8 - Espinaca
1 - Fresca, 2 - Congelada, 3 - Enlatada
1 - Polio con Huesos
1 - Pescado Blanco
2- Tilapia
3- Salm6n
16
Para comidas sin sensor,puede abrir la puerta
durante la cocci6n para controlar la comida.
Cierrela puerta y presioneSTART(Iniciar)para
reanudar la cocci6n.
2 - Arena
2 - Polio Deshuesado
5 - Hariscos
PresioneSTART(Iniciar).
1 - Arroz
3 - Came Picada
4 - Ave
Ingrese la cantidad como seindica para
seleccionesde comida sin sensor.
Acerca de las funciones del microondas con sensor.
[ Faamj
1
FamilySnacks(RefrigeriosFamiliares)
Uselafunci6n FamilySnacks(RefrigeriosFamitiares)
par(]cocinarentreuna variedadde refrigerios
famitiaresprogramadospreviamente.
[] Presioneetbot6nFamilySnacks(Refrigerios
Famitiares).
[] Ingresetatecla num6ricapar(]seleccionaruna
de tasochoopcionesde refrigerios.
[] Ingreseunacantidadpara et refrigerio
seteccionado.
[]
PresionetoteclaSTART/PAUSE
(Inicio/Pausa)para
iniciartacocci6n.
Soften
Primera Elecci6n
Secunda Elecci6n
i - Burrito
i a 3
2 - Trocitos de Polio
i a 2 pordones
3 - Aveno
1 o/4 poquetes
4 - Macarrones Instant6neos
y ©ueso
1 o 2 pordones
5 - Pasta Enlatada
1 a 2 Iotas
6 - Perros Calientes
1o4
7 - Pizza (5 pulgadas)
8 - Chocolate Caliente
i a 3 tazas
]
Softenfenalgunosmodelos)
Primera
Elecci6n
Secunda Elecci6n
Usetafunci6nSoften(Abtandar)para abtandar
ciertascomidasprogramadaspreviamente:
1 - Manteca
1 - 1/2 Bast6n; 2 - 1 Bast6n;
3 - 2 Bastones
[]
Presioneet bot6nSoften(Abtandar).
2 - ©ueso Crema
i - 3 onzas;
2 - 8 onzas
[]
Ingreselateclanum6rica
paraseteccionar
una
3 - Helado
1 - 1 pinta;
2 -1 cuarto
[]
de tasopcionesparaabtandar.
Ingreseunacantidadpara tacomida
seteccionada.
Primera Elecci6n
Secunda Elecci6n
1- Manteca
1 - 1/2 Bast6n; 2 - 1 Bast6n; 3 2 Bastones
2- Caramelo
l - 4 onzas; 2 - 8 onzas;
3 - 12 onzas;/4 - 16 onzas
3 - Chocolate
1 - 4 onzos; 2 - 8 onzas;
3 - 12 onzas;/4 - 16 onzas
4 - Malvaviscos
1 - s onzos; 2 - 8 onzas;
3 -10 onzas;/4
- 16 onzas
[]
PresionetateclaSTART/PAUSE(Iniciar/Pausar)
parainiciartacocci6n.
Melt
Soften
]
Soften/Melt(Ablandar/Derretir)(enalgunos
modelos)
Usetafunci6nSoften/Melt(Ablandar/Derretir)para
abtandaro derretirciertascomidasprogramadas
previamente:
[] Presioneet bot6nSaften/Mdt (Abtandar/
Derretir).Presioneunavezpara abtandary dos
vecespara derretir.
[] Ingresetatecla num6ricapara seleccionaruna
de tasopcionespara abtandaro derretir.
[] Ingreseunacantidadpara tacomida
seteccionada.
[]
PresionetateclaSTART/PAUSE(Iniciar/Pausar)
parainiciartacocci6n.
17
Acerca de las funciones del microondas con sensor.
Steam
1
Steam (Vapor)
Usela funci6nSteam (Vapor)para ciertascomidas
programadaspreviamente.Paraun mejor
rendimiento,utiticeun RecipienteparaArroz/
Vaporer(]NordicWare.
[] Presioneet bot6n Steam(Vapor).
[]
[]
Seteccioneta comidaquedeseecocinarat
vapor.
Coloqueel recipientecon agua,sal(sies
necesario),y comidaen elhomo microondas
con lasventilacionesde vaporen et recipiente
en ta posici6nOPEN(Abierta).
[]
PresioneSTART
(Iniciar)parainiciartacocci6n.
[]
Cuandose indique,abra tapuertay CIERRE
tas
ventitacionesde vapordel recipiente.
NOTA:AsegQrese
de abrir ta puertay cerrar
tasventilacionesde vaporen el recipientepara
vaporcuandosele indique.Sitatecla START
(Iniciar)es presionadaantesde abrir lapuerta,
ethomo mostrar6et mensajede "lntroducir
Atimentos".
[]
Cierretapuertay presioneSTART/PAUSE(Iniciad
Pausar)par(]reanudartacocci6n.
NOTA:Sedeber[ausaret Recipientepara Arroz/
Vaporer(]NordicWarepara obtenermejores
resuttados.
18
Primera Elecci6n
SecundaElecci6n
1 - Arroz
1 - 1 taza blanca,
2 - 1 taza marr6n
2 - Esp@rago
1 a 2 tazas
3 - Br6coli
i a 2 tazas
4 - Repollitosde
Bruselas
1 a 2 tazas
S- Zanahorias
1 a 2 tazas
6 - Coliflor
i a 2 tazas
7 - Calabacines
i a 2 tazas
Popcorn I
Popcorn (Palomitas de Main
Parausarta funci6nde Popcorn(Patomitasde
Haiz):
Silacomida no secocina luegode ta primera
cuentaregresiva,use TimeCook(Cocci6npor
Tiempo)para adicionartiempo.
[]
Sigalosinstruccionesdel paquete,usando
Auto Cook(AutoCocci6n)siel paquetepeso
menosde 1.0onzaso superalos3.5onzas.
Coloqueetpaquetede palomitasde maizen
et centrodet platogiratorio.
[]
Presioneetbot6n POPCORN
(Patomitasde
laiz) unavezpara bolsasde 3.3a 3.5onzaso
dos vecespara bolsasde 2.7a 3.0onzaso
tresvecespara bolsasde 1.0a 1.5onzas.
Use s61opalomitas de maiz empaquetadas
previamente para hornos de microondas
que pesen entre 1.0 y 3.5 onzas.
NOTA: No use esta funci6n dos veces
seguidas en la misma porci6n de comida;
esto podr6 hacer que la comida se
sobrecaliente de forma excesiva.
Reheat
]
Reheat (Recalentafl
(Nouselosestantesafcocinarconel microondas.)
AlgunasComidasNo Recomendadaspara
UsoconRecalentamiento
La funci6nReheat(Recalentar)
vuetvea calendar
losporcionesde comidascocinadaspreviamenteo
un platode restosde comida.
EsmejorusarTimeCook(Cocci6npor Tiempo)para
estascomidas:
[]
Coloquelataza de liquidoo comidacubierta
en et horno.PresioneReheat(Recatentar)
una,
doso tres veces.Ethomo seiniciade
inmediato.
Presioneunavezpara un platode restosde
comida.
Presionedosvecespara unapasta.
Presionetresvecespara 1Aa 2 tazasde
verduras.
Productoscon pan
Comidasquese@ben recatentarsinestar
cubiertas
Comidasquesedebenrevolvero reubicar
Comidasquedebentenerun aspectosecoo
unasuperficiecrocantetuegode recatentar
[]
Ei homoemite unaseSalcuandoseproduce
vapory ettiempo restantecomienzatacuenta
regrestva.
Noabra lapuertohastaque seest6reatizando
tacuenta regresiva.Sise abre tapuerto,cierreta
mismay presioneSTART/PAUSE
(Iniciar/Pausar)
de inmediato.
Luegode retirorto comidadefhomo,reubique,
si esposibfe,paro emparejorto temperoturo.
Loscomidosrecofentodaspodrdntenerompfios
variacbnesde temperature.Atgunaspartesdeto
comidopodrdnestorextremodomentecofientes.
Sita comidano secocina tosuficientetuegode
tacuenta regresiva,use TimeCook(Cocci6npor
Tiempo)paraadicionartiempode recatentamiento.
19
Caracteristicas de microondas por sensor.
Sensor de humedad
Qu_ sucede cuando usa las Funciones de
Senson
LasFuncionesde Sensordetectanlamayor
humedadliberadadurante ta cocci6n.
Elhomo ajustaautomdticamenteel tiempode
cocci6na losdiferentestiposy cantidadesde
comida.
NoutiticelasFuncionesde Sensordos veces
consecutivasen ta mismaporci6nde comida.
Puederesultaren quelosatimentosse cocinen
en excesoo sequemen.Sita comidano seha
cocinadoparcomptetodespu6sde tacuenta
regresiva,use lafunci6nTimeCookpara tiempode
cocci6nadicionat.
Agujereado
Cubierto
Esesencialusar losrecipientesy tastapas
apropiadospara cocinarparsensorde forma
6ptima.
Usesiemprerecipientesaptospara microondas
y c0bratoscon tapaso film de pkistico
agujereado.Nousenunca recipientescerrados
par compteto-puedenhacerque etvapor
no satgay causarque tacomidasecocine
demasiado.
Seque 1as platos para que no
engaF_en aJ sensor.
Aseg0resequetanto elexteriorde los
recipientescoma etinteriordet homo
microondasest6nsecosantesde ponerta
comidaen el homo.Lasacumutacionesde
humedadque seconviertenen vapor pueden
enga_arat sensor.
Terminologia
de microondas.
T_rmino
Definici6n
Arco El_ctrico
El arco electrico es Io que, en la terminologio de los microondos, describe los chispos en el
homo. El orco eleetrico se produce cuondo:
• metal o papel de aluminio en contacto con el lateral del horno.
• papel de aluminio no moldeado a la comida (los extremos doblados act0an coma antenas)
• metates, tales coma precintos, pinchos de ave, o ptatos con rebordes dorados..
• toallas de papel reciclable que contengan pequeBos trozos de metal.
Cubierto
Las cubiertas mantienen la humedad dentro, permitiendo un calentamiento m6s parejo y
reduciendo el tiempo de cocci6n. Cuando se agujerea el envoltorio de pl@stico o se cubre
con papel de cera se permite la salida del vapor.
Resguardar
En un homo convencional, se tapan o resguardan las pechugas de polio o tas comidas
horneadas para que no se doren demasiado. At usar et microondas, use peque_as
cintas de papel de aluminio para cubrir partes finas, coma las puntas de las alas en las
aves, que podrfan cocinarse antes que las partes mayores.
Tiempo
resposo
Cuando cocina en hornos regulares, las comidas coma los asados o pasteles se dejan
reposar para que acaben de cocinarse o se asienten. El tiempo de reposo es especialmente importante al cocinar con microondas. Tenga en cuenta que un pastel cocido
en homo microondas no se coloca en un estante de enfriamiento.
de
Abrir
respiraderos
20
Una vez que haya cubierto un plato con film pl6stico, deber6 abrir un orificio desplegando una esquina para que pueda escapar el vapor.
Acerca de cSmo modificar el nivel de potencia.
Cook
i
]
1
2
4
Express Cook
8
3
61
9
0
Pause
Start ]
C6mo Modificar
el Nivel de Potencia
Elnivel de potencia se puede ingresar o
modificar luego de introducir el tiempo de
Cocci6n.
ill
presione el bot6n COOK (Cocci6n) una vez.
[]
Ingrese el tiempo de cocci6n.
[]
Ingrese POWER LEVEL (Nivel de Potencia)
cuando se indique.
I_1 Presione $TART(Iniciar).
Los nivetesde potenciavariables suman
flexibilidada la cocci6n en el microondas.Los
nivetesde potencia det homo microondas se
pueden comparar con las unidadesde superficie
de una cocina.Cada nivet de potencia le provee
energia de microondasdurante un cierto
porcentaje det tiempo. EtNivel de Potencia 7
es energia de microondas el 70% det tiempo. Et
Nivetde Potencia 3 es energia de microondas
et 30% del tiempo. La mayor[a de las cocciones
se har6n en High (Alto)(nivelde potencia 10),
Io cual lebrinda et 100% de potencia.Power
level 10 (Nivelde potencia 10)har6 la cocci6n
m6s r6pido pero ser6 necesariorevolver,rotar
o dar vuelta la comida con mayorfrecuencia.
Una configuraci6n inferior har6 la cocci6n m6s
parejay se necesitar6revolvery rotar menos
la comida. Atgunascomidas podr6n tener
mejor sabor,textura o aspecto si se usa una
de lasconfiguraciones inferiores.Useun nivel
de potencia inferioral cocinar comidas con
tendencia a hervir,tales coma papas en escalope.
Los periodos de descanso(cuandolos ciclos de
energia de microondasfinalizan)brindan tiempo
para que la comida "equipare" o transfiera calor
al interior de la comida. Un ejemptode esto se
muestra con etnivet de potencia 3-el ciclo de
descongetamiento.Si la energia del microondas
no finaliz6 etcicto,la parte externa de la
comida se cocinarciantes de que el interiorest6
descongelado.
Estosson algunos ejemplosde usa de diferentes
nivelesde potencia:
Alto 10:Pescado,tocino, verduras,liquidos en
hervor.
Media-Alto ?: Cocci6nsuavede came y ave;
cacerolaspara horneado y recalentar.
Media 5: Cocci6n lentay ablandamiento para
guisados y cortes de came menos tiernos.
Bajo 2 o 3: Descongetar;hervir a fuego lento;
platos delicados.
Caliente 1: C6momantener la comida caliente;
c6mo ablandar la manteca.
NOTA:Tambi6n puede modificar etnivet de
potencia durante muchos modos de cocci6n,
presionando et bot6n de nivetde potenciae
ingresando un nivelde potenciav61ido.
21
Acerca del resto de las funciones.
Recordatorio
de Cocci6n Completa
Pararecordarlequecoloc6 comidaen ethorno,
este Ottimomostrar6YOURFOODISREADY
(Su
ComidaEst6Preparada)y emitir6un pitidouna vez
par minuto hastaqueabra el homoo presioneet
bot6n CANCEL/OFF
(Cancetar/Apagar).
I Settings
]
Pause
Start I
Cancel
off
o. I
Cancel
Clock (Reloj)
Presioneetbot6n Settings(Configuraciones)para
ingresartahora detalia.
[] Presioneet bot6n Settings(Configuraciones)
dosveces.
[]
Ingresetahora det d[a correcta.
[]
PresioneSettings(Canfiguracianes)para
seteccionarAM o PM.
[]
PresioneSettings(Configuradones)para
aceptarta hora.
Start/Pause (Iniciar/ Pausafl
Ademcis de iniciar muchas funciones, START/
PAUSE(Iniciar/Pausad le permite dejar
de cocinar sin abrir la puerto ni reiniciar la
pantalla.
Cancel/Off (Cancelar/ Apagafl
Presioneel bot6n CANCEL/OFF(Cancelar/
Apagar) para detener y cancelar la cocci6n en
cualquier momenta.
Control Lock-Out (Bloqueo del Control)
Puedebloquearetpanelde control para evitarque
elhomo se iniciedefarina accidentalduranteta
timpiezao sea usadopar ni_os.
Parabtoquearo desbtoquearloscontroles,
mantengapresionadoCANCEL/OFF
(Cancelar/
Apagad durante unostres segundos.Cuando
elpanelde controlest6 bloqueado,aparecerd
CONTROL
LOCKED(ControlBlaqueada)
brevementeen cuatquiermomentaen queun
bot6n o dialseanpresionad
Surface Light (Luz Superficial)
PresioneSURFACE
LI6HT(LuzSuperficial)unavez
para activartatuzbriltante,dos vecespara activar
tatuznocturnao una terceravezpara apagarta
tuz.
22
Timer
]
NOTA:Elindicadorde tiempose iluminardmientras
ettemporizadorest@funcionando.
Timer iTemporizador)
Eltemporizudor funciona coma un temporizador
par minutosy puedeser usadoen cualquier
momenta,inctusocuandoet homo estd
funcionando.
[]
Presioneetbot6n TIMERffemporizadod.
[]
Ingreseun tiempo.
[]
Presioneetbot6n TIMERffemporizudod para
comenzar.
Paracancetar,presioneet bot6nTIMER
ffemporizado4 Cuandoettiempo conctuya,et
temporizadoremitir6una seBat.
Paraapagar taseBatdet temporizador,presione
TIMERffemporizadod.
Settings
]
Encendido/
Apagado del Plato Giratorio
Paraobtenermejoresresuttadosen sucocci6n,
dejeet platogiratorioencendido.
[] Presione et bot6n Settings(Configuradones)
tresveces.
[]
SeteccioneON_Encendido)
u OFF_Apagedo)
segOnseindique.
Aveces,esposibtequeet platogiratoriosecatiente
demasiadocoma para quesepuedatocar.
Sedeber6tenercuidadode no tocar etplato
giratoriodurantey tuegode ta cocci6n.
Atgunosmodelosde cocci6nno permitenqueet
platogiratorioseapague.
Settings
]
Volumen del Pitido
Useestafunci6n paraconfiguraretnivetde
volumendet pitido.
[]
Presioneet bot6nSettings(Configuraciones)
I_
Presione0 para mudo,presione1 para bajo,
presione2 para normaly presione3 para
fuerte.
ctnco
veces
Velocidad de la Pantalla
I Settings
I
Lavetocidadde desptazamientode ta pantattase
puedemodificar.
[]
I_
Presioneetbot6n Settings(Configuraciones)
setsveces.
Presione1para Lo M6sLento
2 para Lento
3 para Normal
4,para R6pido
5 para Lo MdsRdpido
23
About the other feature.
Ventiladordela Ventilaci6n
Ventilador Autom6tico
Elventiladorde ta ventilaci6neliminael vapory
otros vaporesde tacocci6nsuperficial.
PresioneVENTFANWentiladorde la Ventilaci6n)
unavezpara tavetocidadm6s alta del ventilador,
dos vecespare unavetocidadattadet ventitador,
tres vecespare unavetocidadmediadetventitador,
cuatro vecespare una velocidadbajadet
ventitador,o cincovecespare apagaret ventitador.
La funci6nde ventitadorautom6ticoprotegeet
homo microondasde unaetevaci6nde cator
excesivoprovenientede la cocinadebajode
_ste. Seenciendede formaautom6tica atsentir
demasiadocator.
NOTA:Etindicadordef VENTtLADOR
seifuminard
mientrasel ventifadorestdfuncionando.
Siencendi6etventilador,esposibteque observe
queno Io puedeapagar. Elventiladorse apagar6
de formaautom@ticaunavezquetaspartes
[email protected]
encendidopor SOminutoso m6s tuegode que
loscontrolesde tacocinao det homo microondas
est_napagados.
[]
I Settings
I
Luz Noctuma Autom6tica
PuedeconfigurarAuto Nite Light(LuzNocturne
Autom4tica) pareque seencienday apagueen
losmomentosque @see.
[]
Presioneet bot6nSettings(Configureciones)
cuatroveces.
I_
Presione0 pare apagar AutoNiteLight(Luz
NocturneAutomdtica)o presione1 pare
configurarAuto NiteLight(LuzNoctura
Automdtica),o presione2 pare revisertas
configuracionesde Auto NiteLight(Luz
NocturneAutomdtica).
I_
Siconfigurar6Auto NiteLight(LuzNocturne
Automdtica),ingreseunahora del dievdtida
pare queAutoNiteLight(LuzNoctura
Automdtica)seencienda
SeteccioneAM o PMpare ettiempode
encendido.
IM Ingreseunahora del die v6tidapare queAuto
NiteLight(LuzNocturneAutom6tica)se
@ague.
r_ SeteccioneAM o PMpare ettiempode
apagado.
_1 PresioneSettings(Configuraciones)
pare
confirmartasconfiguracionesingresadas.
NOTA:AutoNiteLight(LuzNocturneAutom6tica)
seencenderdcuandose presioneet bot6n
Power Sever (Ahorradorde Potencia).Laluz
nocturneautomdtica siempreactivardla luzde la
configuraci6nnocturneen ta programaci6npar
tiempo;indusoaunque laluzya est@configurada
en ia configuraci6nbriliante.Latuznocturna
automdticasiempreapagardta luzen ettiempo de
apagadoquese program6;inclusoaunquesehaya
presionadota tuzen taconfiguraci6nbrillante.
Idioma en Pantalla
Useesta funci6npare seteccionaretidiomaen
pantatta.
I Settings
24
]
[]
Presioneetbot6n Settings(Configuraciones)
sieteveces.
I_
Presione2 pare Ingt@s
y presione2 pare
EspaBol.
Cuidado y limpieza del homo.
Conse]ospr6cticos
Paramanteneretinteriorfrescopdseteun paBo
con unasoluci6nde agua y bicarbonatos6dicode
cuandoen cuando.
AsegOrese
de queestdopogodo(enoff)antesde
timpiorcuofquierportede estehomo.
C6mo limpiar el interior
Paredes,suelo,ventana interior y piezasde
pl6stico de la puerta
|
Atgunassatpicaduraspuedentimpiarsecon un
papettoalla,otraspuedennecesitarun paso
hOmedo.Ouitetassatpicadurascon un paso
eniabonadoy aclarecon un paso hOmedo.Nouse
timpiadoresabrasivosni utensitiosafitadosen tas
paredesdet horno.
Nuncouseun timpiodorcomemiofde homo en
ningunoportedef microondos.
Basegiratoria extraibley soportede base
giratoria
Paraqueno serompa,no pongaetplato giratorio
en aguajusto despu6sde cocinar.Limpielocon
cuidadoen aguatibia conjab6n o en et tavavajittas.
Elplatogiratorioy
etsoportepuedenrompersesi secaen.Recuerde
no hacerfuncionaret homoen el
modo microondassinetdispositivogiratorioy et
soportecolocadosen su tugar.
Estantes
Limpieto
conaguayjab6nsuaveo enet
tavavajittas.
NoIo limpie si tiene un homo autolimpiable.
25
Cuidado y limpieza del homo.
C6moLimpiarel Exterior
Norecomendamoselusode timpiadomscon
amoniacoo alcohol,ya quepuedendaharel
aspectoclefhomo microondas.Siopta por usar
un timpiadorcasero,primeroapfiqueeltimpiador
directamenteen un portotimpio,tuegotimpieeldrea
SUCia.
La ca]a
Limpieto porteexternadel homo de microondas
con un paso humedecidocon aguajabonosa.
Enjudguetay luegos6queta.Pdseteun paso
humedecidotimpioa taventanapara timpiarla.
Elpanel de control
Pdseteun paso humedecidopara limpiar.Seque
comptetamente.Nouseespraystimpiadores,
grandescantidadesde detergentey agua,
abrasivosu objetosfitosossabre etpanet,ya que
to podr[ada_ar.Atgunastoatlasde papetpodr[an
tambi6nda_aret panetde control.
Panelde puerta
Antesde timpiaretpanelde puerta frontal,
asegOrese
de que sabequ6tipo de paneltiene.
Consutteetoctavod[gitodet nOmerode modelo."S"
esacero inoxidabte,"L"esCleanSteety "B","W"o
"C"son coloresptdsticos.
Aceroinoxidablefen algunos modelos)
Elpanelde acero inoxidabtepuedetimpiarse
con StainlessSteelMagico un producto similar,
utilizandoun paso suavey timpio.Apliqueet
timpiadorde superficiesdeacero inoxidabte
cuidadosamenteparaevitar tocar taspiezas
de pl6sticoquerodeanal acero.Noutilicecera,
putimento,lejiani productosquecontengandorina
en acabadosen acero inoxidabte.
Panelespl4sticos de color
Utiliceun pasosuave,timpioy tigeramente
humedecidoy,a continuaci6n,seque
bien toda tazona.
Lossellosde la puerta
Esimportantemantenerel6rea dondela puertose
settacon el homo de microondastimpia.Sotamente
usedetergentesno abrasivossuavesapticadoscon
unaesponjalimpia
o con un paso suave.Enjuaguebien.
El rondo
Limpiela grasay etimineet polvodet fondoa
menudo.Useunasoluci6nde aguacdtida
y detergente.
26
Estante (enalqunos modelosL
Estante (en algunos modelosJ
Usesolamenteel estantede horno microondas
cuandoest_ recalentandoenm5s de un nivel.
Uselossoportesde enstantesuperiorespara
cocci6nde dos nivetes.
NOguarde elestantedel homo dentro del homo
microondas.
///7/I
:
1111 I\ \ \\XX\
:
"
"
"
:
:
:
:7
Recalentado de 2 niveles
C6mo Usar el Estante Cuando Est_
Cocinando por Microondas:
Estante y Recalentado
2,
• Asegoresede queelestantesecposidonado
adecuadamentedentrodel hornomicroondas
9ara prevenirdahoaI homo debidoa arcos
et_ctricos.
'
Intercamie
las posiciones
despu_s de 1/2 tiempo
Para recalentar
en 2 niveles o
Pare mejores resultados
Intercamie las posiciones
despu_s de 1/2 tiem po
Para recalentar 2 platos en el nivel inferior:
_11 Multipliqueel tiempoae recalentadopor 1 1/2.
[]
ntercambielasposicionesdespues
de 1/2 tiemoo
Resultados desiguales
• Nouseun platopara dorarde homo microondas
en el estante.Elestantepodriasobrecalentarse.
• Nouseel homocon elestanteen elpisodel
qornomicroondas.EstopordriadaBarel horno
_nicroondas.
Intercambie las posiciones dos veces
• Usemanoptasde cocina para maniputaret
estante- @stepuedeestarcatiente.
• Nouseetestantecuandococinepatomitasde
maiz.
Para recalentar en 3 niveles (en
algunos modelos):
[]
Duptiqueettiempo de recatentado.
Lacomidasecocina me]orcuandosecotocaen el
platogiratorio o en etestanteen ta posici6ninferior.
I_
Intercambietasposicionesdos vecesy d@lea
losplatos1/2 vuettaduranteet recalentado.
(Coloquecomidasespesas,o aquettasque
requieranm6s tiempode cocci6n,enet
estantesuperiorprimero.)
27
Uselossoportesde estanteinferiorescuando
cocine un platoobtongoo de gran tama_o.
Cambio de bombillas.
Luz de encimera/luz nocturna
C6mbiela por una bombilla hal6gena de
120 voltios, 25 watt o 50 watt (max). Pida
WB36X10213de su suministrador GE.
Quite el tomillo.
[]
Para cambiar la luzde encimera/luz
nocturna, primero desconecte la corriente
del fusible principal o del panel de
diferencial o estire del enchufe.
[]
Quite el tornillo del lateral de la cubierta
del compartimiento de la bombilla y baje
la cubierta hasta que pare.
[]
AsegLireseque la bombilla est6 fria antes
de retirarla. Rompa el sello adhesivo
desenroscando con cuidado la bombilla.
[]
Enrosque la nueva bombilla, luego levante
la cubierta y vuelva a poner el tornillo.
Conecte el homo a la corriente el@ctrica.
La funci6n de extractor.
Filtro de carb6n vegetal
(en algunos modelos)
Ventilador
extractor
El ventilador extractor tiene dos filtros de
metal reutilizables.
Los modelos que hacen recircular el aire
de nuevo a la habitaci6n tambi_n usan un
filtro de carb6n vegetal
Filtros de extractor reutilizables
(en todos los modelos).
Filtros de extractor reutilizables
Los filtros met61icosatrapan la grasa liberada
por la comida en la cocina encimera. Tambi@n
evitan que las llamas de la cocina encimera
puedan dar_ar en interior del horno.
Por esta raz6n, los filtros deben estar
siempre en su lugar cuando se est@usando
la campana. Los filtros del extractor deben
limpiarse una vez al mes o segOnsea
necesario.
28
C6moQuitar
y Limpiar los Filtros
Para quitaflas, usandotastengOetas,
deslicetos
hacia atrds.Estirehacia abajoy afuera.
Paratimpiarlosfittrosdel extractor,emp6petosy
p6selosde un lado a otro en agua con detergente.
Nouseamoniaconi productosquetocontengan
ya queoscurecerianelmetal.Sepuedencepittar
tigeramentepara quitar suciedadpegada.
Acl6retos,sacOdatos
y d_jetossecarantesde
volverlosa poner.
Pare volvera colocarlos,desticelosfittrosen los
marcosporta partetraserade cadaapertura.
Presionehaciaarribay hacia tapartefrontal para
ajustarlosen su tugar.
Filtros de carb6n vegetal
El filtro de carb6nvegetal no puedelimpiarse.
Debecambiarsepor otro. Pidaelrecambio No.
WBO2X10956
desu suministrador GE.
Siet modelono reatizata extracci6nalexterior,
etaire recircutar6a trav@sde un fittrode carb6n
vegetalno reutitizabtequeayudaa quitar oloresy
humos.
Elfittro decarb6nvegetaldeberiacambiarse
cuandoest6visiblementesucio
o descolorido(normalmentetrds 6o 12meses,
segOnetuso).Consutte"accesoriosopcionates"en
ta pdgina8 para obtener mdsinformaci6n.
Retire la parrilla superior quitando
los dos tornillos que Io sujetan.
C6mo quitar el filtro de carb6n vegetal
Paraquitar elfiltro de carb6n vegetal,primero
desconecteta corrientedel fusibleprincipalo det
panelde diferenciato estiredet enchufe.Retirela
parriiiasuperiorquitandolosdostornillosque to
sujetan.
Puedeserque necesiteabrir laspuertasdet
armariopara quitar lostornittos.
Levanteel fittrode laparte inferiorhastaquese
tiberede taspesta_as.Desliceetfittrohacia abajoy
haciafuera.
IIIIlll
29
La funci6n de extractor.
....
j L,
,,,.
C6mo instalar el filtro de carb6n vegetal
Para instalar un nuevo filtro de carb6n vegetal,
retireelpi6sticoy cuatquierotro envoltoriodet
nuevofittro.
Introduzcatapartesuperiordet filtro hacia arriba
y dentrode loshuecosen ta parteinteriorde la
aperturasuperior.Aprietetaparteinferiordet
filtro hacia dentrohastaquese coioquetras tas
pestanas.
v
.11111111
IIIIllll!!Jll
Antes de Ilamar al servicio de reparaciones...
Cosas normales
de su horno
microondas
• Humedaden ta puertay paredesdet homo at
cocinar.Frotetahumedadcon unatoattitade
papeto un paBosuave.
• Humedadentrelospanetesde taspuertasdet
homo atcocinardeterminadosalimentos.La
humedadsedisipar6pocodespu@s
de terminar
de cocinar.
• Elvaporseescapapor ta puerta.
• Unatuzde reflexi6natrededorde ta puertao en
taperiferiade tacaja dethomo.
• Laluzdel homo sedebititay et sonidodet
sopladorcambiacuandoseusannivetesde
potenciadiferentesatalto.
• Unsonidosordode golpecuandoethomo de
microondasest6 en operaci6n.
• Atusar horneadopor convecci6n,asadopor
convecci6nu horneador6pidocombinadocon
un precatentamiento,lapuerta dethomo debe
serabiertay eltiempode cocci6nestabtecido
despu@s
detprecalentadoo et homo apagar6et
etementode cocci6ndespu@s
de 1 hora.
30
"Se puedenotaruna interferenciade televisi6ny
radio mientrasseusa ethomo de microondas.
Similara lainterferenciacasadaporotros
etectrodom@sticos,
tocuat no indicaun probtema.
Conecteel homo de microondasen un
tomacorrientede un circuitodiferente,mueva
tatetevisi6no el radiotan lejosdel homo de
microondascomo seaposibleo inspeccionela
posici6nde taantenade tatetevisi6no et radio.
NOTA:Si ta pantatla est6 apagada,controle que
et bot6n Power Saver(Ahorradorde Potencia)
(funci6nde Ahorro de Energia/Interrupci6n en
Cero)est@activado.
Antes de Ilamar al servicio de reparaciones...
Resoluci6n
de Problemas
iAhorre tiempo y
necesite
Ilamar
dinero!
al servicio
Causas
Revise las tablas
de
en las
paginas siguientes y
tal vez no
reparaci6n.
Posibles
Ou_ Hacer
Es posible que un fusible de su
hogar se hoyo quemedo o que el
disyuntor se hoye desconectedo.
• Reemplace el fusible o reinicie el disyuntor.
Pico de tensi6n
• Desenchufe el homo microondas;
vuelva a enchufarlo.
El enchufe no est6 totolmente
insertedo en el tomecorriente.
• AsegQrese de que el cable de 3 patas det
homo est_ completamente
insertado en
el tomacorriente.
Lo puerto no est6 cerredo
forme seguro.
• Abra la puerta y cierre la misma de forma
segura.
El bot6n
de
Power Saver (Ahorrador
luego
de Potencio) no est6 octivodo.
• Empuje el bot6n PewerSover(Ahorrador
Potenciu) de mode que sea presionado.
Le puerto no est6 cerredo
forme seguro.
• Abra la puerto y cierre la misma de forma
segura.
de
de
iiiii!_!_iii_iii!ii!ii!ii!ii!ii!i]!ii!i!!
..................................................................................................................................
La tecla STARTIPAUSE (InicJarl
• Presione START/PAUSE(Iniciar/Pausar).
iiiiiiiiiiiiiiiiiiiiiiiiiiiiiiiiiiiiiiiiiiiiiiiiiiiiiiiiiiiiiiiiiiiiiiiiiiiiiiiiiiiiiiiiiiiiiiiiiiiiiiiiiiii
Pausar) no se presion6 luego de
iiiiiiiiiiiiiiiiiiiiiiiiiiiiiiiiiiiiiiiiiiiiiiiiiiiiiiiiiiiiiiiiiiiiiiiiiiiiiiiiiiiiiiiiiiiiiiiiiiiiiiiiiii
ingresarlaconfiguraci6ndela
iiiiiiiiiiiiiiiiiiiiiiiiiiiiiiiiiiiiiiiiiiiiiiiiiiiiiiiiiiiiiiiiiiiiiiiiiiiiiiiiiiiiiiiiiiiiiiiiiiiiiiiiiii
cocc_0n.
Otre selecci6n yo ingresodo en
el horno y el bot6n CLEAR/OFF
Borrur/Apuger)
no se presionuron peru cuncelur lu mismu.
• PresioneCANCEL/OFF(Cancelar/Apagar).
El tiempo
• AsegOrese de haber ingresado el tiempo
de cocci6n luego de presionar TIME COOK
(Cocci6n con Temporizador).
de cocci6n
no se
ingres6 (Cocci6n
luego deper
presioner
COOK
Tiempo). TIME
• Se
presion6 CANCEL/OFF
(Canceler/Apogor)
de forTe
occidenteI.
El tiempo de cocci6n
no se
DEFROST (Auto Descongeleci6n)
o
1 Ib Quick
(Desconingres6
luegoDEFROST
de presionor
AUTO
geleci6n R6pide de :1 lb.)
luego de pres!oner AUTO COOK
Tipo de comide no ingresedo
(AUTO COCCION}.
• Reinicie el programa de cocci6n y presione START/PAUSE (Iniciar/Pausar).
• AsegQrese de haber ingresado el peso
de la comida luego de seteccionarAUTO
DEFROST (Auto Descongelaci6n) o FAST
DEFROST (Deseongeloci6n RSpido).
• AsegQrese de hober ingresado
eomido.
un tipo de
31
Antes de Ilamar al servicio de reparaciones...
Possible Cause
What To Do
El control fue bloqueodo.
• Mantenga presionado CANCEL/OFF
(Cancelar/Apagar) por unos tres segundos
para desbloquear el control.
La luzde la cocina est6 ubicada
debajo delpiso del horno.Cuando Ioluzest6 encendido, elcalor
que produce puede hocer que el
piso del homo est_ caliente.
• Esto es normal.
Intent6 combiar el niveI de potencio cuondo no es permitido.
• Huchas de las funciones
Elventilodorde laventilacibnse
enciende de forma autom6tica
al sentirdemasiodo color
proveniente de Io cocina que se
encuentro debajo.
• Esto es normal.
AI usar una funci6n con Sensor
• No abra la puerta hasta que se sienta el
vapor y el tiempo se muestre en cuenta
regresiva en la pantalla.
la puerto fue abierto antes
de que se pudiero detector el
vapor.
No se detect6 vapor en una
cantidod de tiempo m6ximo.
32
previamente
modificar.
configuradas
del horno fueron
y no se pueden
• UseTime Cook (Cocci6npor Tiempo) para
calentar durante m6s tiempo.
Garantia de su hornomicroondas
Todo el serviciode garantia se suministra par media
de nuestrosCentrosde Servido de Fdbricao un t4cnico
autorizado porCustomer Care@. Pare programar un
servicio,en-lbea, visitenosen GEAppflances.como flame
a 800.GECARES{800.452.2757).Cuandoso-fldte servido
par favor tenga disponibleel nOmero de seriey moddo.
de GE.
Engrape aqui su recibo.
Para que la garanda cubra
Iosservicios se necesita
elcomprobante original de
lafecha de compra.
Para el Periodo de:
GE Cambiar6:
Un A_o
De la fecha de la
compra original
Cualquierrecambia de; homo microondasquefalie debidoa un defecto
en susmaterialeso en sufabricaci6n.Duranteestagarantia limitada de
un aria,GEproporcionard,sin costa adidanal, monade obra y servicio
retacionadopara reemptazartaspartesdefectuosas.
Enrelaci6n a la garantia limitada que figura ragsarriba: Paraevitarcuafquiercostade trasfado,
deberdtfevarsu homode microondasa un Servidoof CfientedeGeneralElectric@y retirarelmismo
tuegode recibirel servido.Tambidncontamosconservicioa domicifio,pero deberdpagarloscostosde
trosfododeftdcnicodefservicbhostosu hogor.
Lo que GE no cubre:
• Viajes de servicio a su casa para ense_arle a
utilizar el producto.
•
Cambio de los fusibles de la casa o
reajuste del interruptor autom6tico.
• Instalaci6n, entrega o mantenimiento
inade-cuados.
•
Cambio de los bombillos de la plancha.
•
Dafio al producto causado par accidente,
fuego, inundaciones o caso fortuito.
•
Dafio incidental o consecuente causado
par posiblesdefectos con este aparato.
•
Dafio causado despu_s de la entrega.
• Producto no accesible para darle el servicio
requerido.
• Falla en el producto si _ste es maltratado,
mal usado (par ejemplo, chispas en la
cavi-dad de la parrilla de alambre o metal/
alumi-nio), o si es utilizado para otro fin
que no sea el pretendido o si se utiliza
comercialmente.
II
EXCLUSIONDE GARANT[ASIMPL[CITAS-Su 6nico y exclusiva derecho es el cambia del producto,
tal y coma se indica en esta Garantia Limitada. Cualquier garantia implicita, incluyendo las
garantias implicitas de comerciabilidad o adecuaci6n para un fin determinado, est6n limitadas
a un aria o el periodo de tiempo mc_sbreve permitido par la ley.
Esta garanda se extiende al comprador original y cualquier comprador posterior de
productos comprados para usa residencial dentro de Estados Unidos. Si el producto estd
situado en un drea que no dispone de servicio par porte de un proveedor de servicio
autorizado de GE,podfia tenet que hacerse cargo de los castes de envfo o bien podfia
solicitdrsele que lleve el producto a una centro de servicio de GE autorizado para realizar
la reparacidn. En Alaska, la garanda excluye el costa de envio o los visitas de servicio a su
COSO.
Algunos estados
no permiten
la exclusi6n
o limitaci6n
de dahos incidentales
o
consecuenciales.
Esta garanEa le proporciona
derechos
legales espedficos,
y puede tenet
otros derechos
que pueden variar de un estado a otto. Para conocer los derechos
legales de
su estado, consulte
con su oficina local de asuntos
de/consumidor
o al procurador
general
de su estado.
Garante:
General Electric Company.
Louisville, KV 40225
55
Soporte al consumidor.
Pdgina Web de GEAppliances
GEAppliances.com
4Desearealizarunaconsulta o necesitaayuda con suelectrodom6stico?ilntentea trav6sdelSitioWeb
de Etectrodom_sticos
de GElas 24 horasdel dia,cualquierdiadetar_o!Paramayorconvenienciay un
serviciom6s r6pido,ahora puededescargarelManualdel Propietario,ordenarpiezas,cat61ogoso incluso
un servicioprogramadoa trav@sde Internet.Tambi6npuedehacersus preguntasa "AskOurTeamof
Experts"(Preg0ntetea NuestroEquipode Expertos),
y mucho mcis.
Programacidn
delServicioT_cnico GEApUiances
Etserviciode reparaci6nde expertosde GEest6 a s6lo un pasode su puerta,iConectesea trav@s
de tnternety programesu servicioa suconvenienciacualquierdfa detar_o!O Ilame at800.GE.CARES
(800.432.2737)
durante ethoratio comerciathabitual.
Real Life Design Studio
GEAppliances.com
(Estudio de diseho para la vida real)
GEapoya etconceptode Dise_oUniversal-productos,serviciosy ambientes quepuedenusargentede
todas tasedades,tamar_osy capacidades.Reconocemosla necesidadde dise_arpara una gran gama
de habilidadesy dificultadesfisicasy mentales.Param6s detaltessobretasaplicacionesde GEDise_o
Universal,incluyendoideasde diser_opara lacocina para personascon discapacidades,mirenuestra
p6ginaWeb boy mismo.Parapersonascon dificultadesauditivas,favorde Ilamara1800.TDD.GEAC
(800.833.4322).
GarantfasExtendidas
GEApp_ianc_s.
Adquierauna garantia extendidadeGEy aprendasobredescuentosespecialesqueest6n disponibles
mientrassugarantia a0n est6 vigente.La puedeadquirira trav@sde interneten cualquiermomento
o Ilamandoa1800.626.2224
duranteet horatiocomercialhabitual.LosServiciospara el Consumidor
Hogare_ode GEa0nestar6nallicuando su garantiacaduque.
@
Piezasy Accesorios
GEAppliunces.com
Individuoscalificados para realizar el serviciot6cnico de sus propios electrodom6sticos podr6n
solicitar el envio de piezaso accesorios directamente a sus hogares (seaceptan las tarjetas VISA,
MasterCardy Discover).Ordene hoy a tray,s de Intemet, las 24 horas del dia oen forma telef6nica
Ilamando a1800.626.2002,durante el horario comercial habitual.
Las instrucciones que
par cualquier usuario.
calificado del servicio.
que el funcionamiento
figuran en este manual cubren los procedimientos que ser6n realizados
Otros servicios t_cnicos generalmente deberian set derivados a personal
Se deber(i tenet cuidado, ya que una reparaci6n indebida podr(_ ocasionar
no sea seguro.
P6ngase en contacto con nosotros
GEA,,_onc_s.
Sino est_ satisfechocon et servicioque recibede GE,p6ngaseencontacto con nosotrosen nuestra
p6ginaWeb indicandotodos los detallesasicoreDsu n0merode tel6fonoo escrbanos a:
GeneralManager,CustomerRelations
GEAppliances,AppliancePark
Louisville,KY40225
RegistreSu Electrodom_stico
54
GEAppliunces.com
Registresuelectrodom_stico nuevo a troves de lnternet - ia su conveniencio!Un registropuntual de su
productopermitir6 una mejorcomunicaci6ny un serviciomas puntualde acuerdo con lost@minosdesu
garantia,en casode surgirla necesidad.Tambi6npuedeenviar una carta en latarjeta de inscripci6npreimpresaqueseincluyecon el materialempaquetado.
Printed in Malaysia