1
Use & Care Guide
Manual
de Uso y Cuidado
English / Espaiol
Models/Modelos:
721. 7920 _
Kenmore Elite°
P/No.: MFL63264901
Sears Brands Management
Hoffman
Estatesr IL 60179
www°kenmore°com
www.sears.com
Corporation
U.S.A.
SAFETY
............................................................
Precautions To Avoid
To Excessive
Grounding
Microwave
Safety
MICROWAVE
........................................................................
13
Reheat
Table
............................................................
13
..........................................................
13
Timed
Cooking
3
Soften/Melt
4
Melt
Table
Soften
........................................
...............................................................
14
.................................................................
14
.............................................................
14
Table
Custom Cook
.............................................................
15
...........................................................
5
Custom Cook
Table
15
................................................................
5
Add
Kit ..................................................................
5
Control
Setup
6
Control
Setup Function
6
Custom Defrost
7
Weight
8
Custom Defrost
8
1 LB Defrost
9
Two-Stage
Cooking
10
Microwave
Power
Parts And Accessories
Control
Panel
Cookware
............................................
...........................................................
Guide
Tips For Microwave
....................................................
Cooking
................................
....................................................................
UNDERSTANDING
TrueCookPlus
USING TrueCookPlus
USING YOUR
Kitchen
Reheat
5-8
Installation
Clock
3
YOUR
OVEN
Specifications
Cleaning
Energy ...........................
Instructions ................................
UNDERSTANDING
Built-In
Possible Exposure
Instructions ............................................
Important
3-4
® ......................
® ............................................
MICROWAVE
OVEN
..................
..........................................................................
11-21
1 Minute
............................................................
15
............................................................
16
Child
Lock .................................................................
11
Before
Calling
Smart
Touch Sensor Operation
Master
Protection
Smart
Instruction ......... 1 2
Touch Sensor Table
.....................................
12
WARRANTY
12
Service
2
17
.......................................
17
18
18
.................................................
19
Levels ........................................
19
........................................
For Service
......................................
Agreements
...............................
......................................................
............................................
20-21
22-24
And Answers ............................................
Numbers
16
..............................................
Tips ..............................................................
TROUBLESHOOTING
Questions
...........................................................
.................................
..............................................................
11
Potato
table
Table
Timer ............................................................
Baked
Table
.........................................................
Conversion
Cooking
11
.................................................
22-23
24
48
49
Back cover
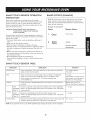
PRECAUTIONSTO AVOID POSSIBLEEXPOSURE
TO EXCESSIVEMICROWAVE ENERGY...
• Do not attempt
to operate
harmful exposure
interlock.
• Do not operate
this oven with the door open, since open-door
to microwave
energy.
It is important
the oven if it is damaged.
and that there is no damage
not to defeat
It is particularly
operation
or tamper
important
can result in
with the safety
that the oven door close properly
to the:
- door (bent)
- hinges and latches (broken or loosened)
- door seals and sealing surfaces.
• Do not place any object between the oven front face and the door, or allow soil or cleaner
to accumulate on sealing surfaces.
• The oven should not be adjusted
or repaired
by anyone except
properly
qualified
residue
service personnel.
GROUNDING INSTRUCTIONS
This appliance
by providing
must be grounded!
an escape
wire with a grounding
If an electrical
wire for the electric
short circuit
current.
occurs, grounding
This appliance
is equipped
reduces
the risk of electric
with a cord
having
shock
a grounding
plug.
Put the plug into an outlet that is properly
installed
and grounded.
4k WARNING 4k
If you use the grounding
Ask a qualified
if you wonder
This appliance
in the cord.
plug improperly,
electrician
whether
or the Sears Service
the appliance
has a short power
• The extension
cord,
equal
rating
instructions
or
the risk of anyone's
tripping
over or becoming
entangled
be sure that:
cord has the same electrical
to or greater
the grounding
if you are careful.
rating
as the appliance.
• The marked
if you do not understand
grounded.
cord to reduce
cord
shock.
Department
is properly
supply
You may use an extension
If you use an extension
you risk electric
of the extension
than the electrical
cord
shall be
rating
of
the appliance.
• The extension
cord
is a grounding-type
• The extension
cord
does not drape
over a countertop
where
it can be pulled
on by children
or tabletop,
tripped
cord.
or
over accidentally.
• The electrical
in any way.
NOTE: This oven draws 14 amperes at 120 Volts, 60 Hz.
3-wire
cord
is dry and not pinched
or crushed
iMPORTANT SAFETY iNSTRUCTiONS
The safety instructions below wilt tell you how to use your microwave
WARNING
-
energy:
1. Read all the instructions before using your microwave
2. Do not allow children to use this oven without close
oven.
e) This appliance
should
service personnel.
supervision!
3. Read and follow the specific PRECAUTIONS
TO AVOID
POSSIBLE EXPOSURE TO EXCESSIVE MICROWAVE
The oven has several
safety
built-in
switches
safety
switches
use only
6. if your
mild,
or soft
nonabrasive
to make
result
the
or detergents
service
have
technician
and
paper
using
a fire.
items
combustible
it
twist-ties
oven.
arcing
or may
cookies,
etc.) in
strikes the power
lines, it
in the oven.
the item
f) Do not use the cavity
Be sure to remove
purposes.
utensils, or food
Do not leave
provided
11. To avoid
is made
cord
or shut off
the power
cooking
package
at the
panel.
- Keep
purposes.
for household
this appliance
Connect
it only
use only.
b) Do not operate
or plug,
damaged
the
this appliance
d) Keep
outlet.
on page
3.)
cord
from
cord
heated
or plug
rest in the
the oven
basement,
in the oven.
oven empty.
over the edge
of a table
or
excessively.
directly
on the glass turntable.
film on special
dish at least
break
the glass
not to chip
Some
produce
microwave
3/16 inch above
in this manual.
the
dish incorrectly,
the edges
may cause
eggs
of the
the turntable
in water.
designed
surfaces.
to heat,
for industrial
cook,
SAVE THESE iNSTRUCTiONS!
4
use.
food.
to
use as described
chemicals
or vapors
of oven is specifically
or dry
or laboratory
to
and sealed
only for its intended
Do not use corrosive
This type
the
turntable.
or scratch
such as whole
in this appliance.
the electrical
away
the
water.
If you use the browning
21. Use this appliance
or if it has been
or dropped.
the cord
necks.
containers
- for example,
closed glass jars are able
explode
and should not be heated
in this oven.
if it has a damaged
properly,
roller
near
any openings
the grey
a browning
19. Be careful
20.
grounded
with narrow
Do not store
turntable.
Chips or scratches
break during use.
instructions
if it is not working
c) Do not immerse
through
packages
to touch the glass turntable.Put
on a microwave-safe
dish.
you could
with
must be grounded!
(See the Grounding
bacon
glass turntable.
in accordance
to a properly
containers
glass turntable
- Do not allow
installation
instructions.
electric
shock:
a) This appliance
is
to
counter.
in the cavity
closed.
breaker
or locate
and halfway
and the turntable
or block
- Do not cook
the power
This microwave
before
16. Do not run the microwave
17. Do not let the cord hang
18. Do not heat
9. Do not use this oven for commercial
10. Install
the
utensil
the risk of injury
Do not use this product
15. Do not cover
b) Turn the oven off.
fuse or circuit
To reduce
over When
or other
- for example,
near a kitchen sink, in a wet
near a swimming
pool, or similar location.
start:
the oven door
c) Disconnect
boiling
a spoon
from
This could
the liquid.
both
the glass tray
outdoors.
in the oven.
for storage
paper products,
cooking
when not in use.
a) Keep
into the liquid.
is removed
present.
suddenly
or when
oven when you are cooking.
14. Do not use the oven outdoors.
(bread,
if lightning
placing
8. if a fire should
to be
5) After heating,
allow the container
to stand in the
microwave
oven for a short time before
removing
container.
the oven to turn ON.
before
hot liquids
2) Stir the liquid
heating
it.
13. Keep
d) Do not store
them
in your
that can cause
c) Do not overtook
potatoes.
Overcooking
could cause
e) Do not use wire
the container
4) Do not use straight-sided
products
particles
because
are able
3) Use extreme
care when inserting
a spoon or other
utensil into the container
once heating
has begun.
b) Do not use recycled
may cause
or tea
by qualified
persons;
a) Do not severely
overtook
foods.
It can cause a fire in the oven.
the oven,
when
is disturbed
inserted
it thoroughly
before
coffee,
only
oven is not always
in very
container
a fire hazard:
contain
or boiling
1 ) Do not overheat
or damaged,
by a qualified
They can
ignite.
such as water,
the microwave
cloth.
oven is dropped
checked
again.
7. To avoid
soaps
be serviced
overheated
beyond
the boiling
point without appearing
to be boiling
due to surface tension of the liquid. Visible
on the oven
sure the power is off when the door is open.
5. When cleaning the door and the surfaces
that touch
a sponge
12. Liquids
bubbling
ENERGY found on page 3.
4. Do not tamper
with the built-in
door,
to your oven.
To reduce the risk of burns, electric shock, fire, injury to persons, or exposure to excessive
microwave
door!
oven to avoid harm to yourself or damage
It is not intended
SPECIFICATIONS
Power Supply
Rated
Microwave
Rated
Output
1,650
W
_1,200
W
Current
Overall
Oven
120 V AC, 60 Hz
Power Consumption
14.0 A
Dimensions
Cavity
Capacity
(WxHxD)
Dimensions
of Oven
IEC 60705
x 139,66
x 1913,66
1611,66
x 111/4
x 181/16
Cavity
RATING
Specifications
(WxHxD)
237/8
2.0 Cu. Ft.
STANDARD
subject
to change
without
prior
notice.
INSTALLATION
1. Remove your Kenmore
packing
materials
Elite microwave
from
the shipping
2. Place the oven on a level surface
4 inches of space
for proper
oven and all
4. Place the turntable
carton.
that provides
at least
at the left, right, top, and rear
roller rest in the circle
floor and then place the glass turntable
the turntable
roller rest.
sides
NOTE:
ventilation.
Never
place
the glass turntable
down. Blocking the inlet and/or
can damage
the oven.
3. Only install your microwave
oven over the Kenmore
Elite Electric ovens listed in the "Built-In Kit" section.
on the oven
on the top of
in the oven upside
outlet
openings
Built-In
Countertop
BUILT-IN KIT
You can build
in your microwave
This kit is available
SIZE
30"
27"
through
COLOR
oven by using one of the following
1-800-4-MY-HOME
KIT MODEL
WHITE
STAINLESS
63002
64003
BISQUE
63004
BLACK
63009
WHITE
63012
STAINLESS
63013
BISQUE
63014
BLACK
63019
trim kits.
®.
NO.
FOR INSTALLATION OVER KENMORE OVEN MODEL
41085,
41086,
41089,
47485,
5
41785,
41789,
49004,
49009
47486,
47189,
49002,
47489
49003,
PARTS AND ACCESSORIES
See-Through
Door
Easy-Clean
Oven
Your oven comes
Cavity
with
the following
1
1
Use and Care Guide
Glass Turntable
1
Turntable
Roller
Rest
Glass
Safety
Interiock
System
Oven
Control
CONTROL
accessories:
Turntable
Turntable
Panel
Roller
Rest
PANEL
1. DISPLAY. The display
you time
selected.
of day,
2. SMART
TOUCH.
favorite
foods
power
includes
cooking
This pad
without
a clock
time
allows
having
and
settings,
indicators
that tell
and cooking
you to cook
to select
functions
most of your
cooking
times and
levels.
3. 1 LB DEFROST.
defrosting
This pad
method
4. CUSTOM
provides
you with
for 1.0 pound
COOK.
frozen
the quick
foods.
Touch this pad to select
programming
food
items.
5. NUMBER
power
®
PADS. Touch
Number
level, quantities,
6. COOl<
TIME. Touch this pad to set a cooking
7. COOl<
POWER.
Touch this pad
8. START. Touch this pad to start
Touch
start
Sensor,
11b Defrost
DEFROST.
method
4.0
cooking
time,
time.
to set a cooking
all
entries
and Add
power.
(except
I Minute
the Smart
function
which
automatically).
9. CUSTOM
for frozen
This pad
meat,
is an accurate
poultry
and
defrosting
fish up to 6.0
Ibs or
kgs.
10. SOFTEN/MELT.
cheese,
butter,
11. ADD
Touch this pad to soften
butter, or frozen
juice
and
ice cream,
melt chocolate,
Touch this pad to cook
for 1 minute
up to 99 minutes
at 100%
to use your
13. CLOCK.
the time
Touch this pad
14. CONTROL
15. HOLD
control
16. CLEAR.
17. STOR
Touch
to enter
microwave
for sound,
3 SEC. Touch
clock,
and hold
scroll
the oven's
speed
this pad
oven
of day.
SETUR Touch this pad to change
settings
cook
59 seconds.
12. KITCHEN TIMER. Touch this pad
as a kitchen timer.
default
cream
cheese,
or marshmallows.
I MINUTE.
power
and Lbs/kg.
3 seconds
to lock
the
panel.
Touch this pad to clear
the oven entries.
Touch this pad
to stop the running
this pad twice
to clear
18. TrueCookPlus
cooking.
the oven entries.
®. Touch this pad to cook
TrueCookPlus®code.
6
Pads to enter
or weights.
food
according
to a
COOKWARE
GUIDE
Most heat-resistant,
these
non-metallic
cookware
is safe
for use in your
microwave
oven.
However,
to test cookware
before
using,
follow
steps:
1. Place the empty
2. Measure
cookware
in the microwave
1 cup of water
3. Microwave
on 100%
oven.
in a glass measuring
power
for
1 minute.
cup and
place
If the dish is warm,
it in the oven beside
it should
the cookware.
not be used for microwave
USE
Ovenproof
DO NOT USE
Metal
Glass
• Glass treated
dishes, bread
measuring
for use in high-intensity
heat
dishes,
plates,
pie plates,
cups, casseroles,
cake
and
bowls
includes
utility
liquid
without
Utensil
• Metal
shields
uneven
metallic
trim.
Metal
can
utensils
electric
plates,
be used in your
and
platters
without
metallic
food
cooking.
from
microwave
Avoid
metal
can cause
current.
Arcing
arcing,
can
Metal
oven.
Plastic
using
plastic
enough
As the food
heats,
wrap
touches
Place
plastic
secure
Vent
wrap
it may
plastic
sure that
wrap
over
the wrap
back
steam
only
may
of
microwave
oven.
or metal-banded
dinnerware,
wherever
Centura
the
TM
Tableware
• The Coming
Company
tableware
for microwave
recommends
and some
that
Coretle
TM
you do not use
closed-handle
cups
cooking.
to the sides of the dish.
of the plastic
Aluminum
wrap.
to escape.
for short time
the plastic
is a discharge
your
the dish
the food.
the top of the dish and
one corner
excess
which
damage
dishes, etc.
Centura
dishes, cups, semi-rigid
bags
because
make
does not touch
melt the plastic
loosely
it by pressing
by turning
Use plastic
wrap
the food.
wrap
This wilt allow
as a cover,
so the plastic
or foil
Decoration
casserole
is deep
and produces
thermometers,
trim
• Do not use metal-trimmed
When
energy
skewers,
trays.
China
• Bowls, cups, serving
cooking.
• Avoid
freezer
cooking.
soften
containers,
Use these
from
the heat
waxed
paper,
and
with
Foil
large
cooking
care
sheets
of aluminum
and may
• Use small
pieces
cause
of foil
of the food.
• Keep all aluminum
door of the oven.
paper
Wood
foil
foil
because
they hinder
arcing.
to shield
at least
poultry
legs and
1 inch from
wings.
the walls
and
Paper
• Microwave-safe
and paper
used in your
Refer
product
paper
plates
with
towels,
no metallic
trim
or design
napkins,
can be
• Wooden
oven.
to the manufacturer's
in the microwave
bowls,
split or crack
label
for use of any
boards,
when
and
baskets
you use them
will dry out and
in the microwave
may
oven.
paper
oven.
Tightly
Closed
• Tightly
Containers
closed
opening
cookware
for steam
can explode.
to escape
from
Be sure to leave
covered
an
cookware.
Brown Paper
• Avoid
burn.
Metal
using
brown
bags.
They absorb
heat
and could
Twist Ties
• Always remove
cause a fire.
7
paper
metal
twist
ties as they can
become
hot and
TiPS FOR MICROWAVE
COOKING
BROWNING
Meat
ARRANGEMENT
and
poultry
with
1 0 or 1 5 minutes
shorter
time
can
Worcestershire
high fat
or longer
wilt
be brushed
sauce,
content
that are
brown
lightly.
with
a browning
soy sauce,
or barbecue
cooked
Foods
for
Do not stack food.
cooked
agent,
a
more
such as
place
sauce.
A cover
more
heat
quickly.
one corner
and steam
can
back
become
paper
will
retain
waxed
napkins,
paper,
wrap
to vent the excess
hot during
prevent
oven and help
moisture,
the food
Use a lid or microwave-safe
folded
casseroles
and causes
cooking.
the food
heat.
When
towels.
and fatty
wrap
steam.
Lids on glass
bread
in the
items,
To absorb
foods
with
carefully.
splattering
warming
or paper
sandwiches
from
use
towels.
individual
foods,
and hors d'oeuvres
wilt help
such as baked
in a circle
the food
cook
more
and
potatoes,
at least
cook
TiME
1 5 minutes
either
power
cover
food
foods
when
Always
Food
stir from
and
redistributes
the outside
at the outside
This
toward
the heat
the center
of the dish heats
such as roasts
so that the top and
pieces
and
and
bottom
food
often
in or outside
shuts off.
during
oven,
you
need
needs
of oven,
time
slightly
standing
to stand
from
2 to
of oven to finish cooking
Outside
standing
they are
during
to
to retain
heat.
undercooked
standing
after
you usually
need
Remove
and they
time. The internal
1 0°F during
in foods.
of the dish.
to
most
wilt finish
temperature
of food
time.
cook
poultry,
evenly.
should
portions
of rectangular
you may
strips
of aluminum
cover
poultry
foil
need
to block
legs and
wing
or square
to shield
the microwaves.
tips with foil
dishes
them with
small
You can
to keep
them
also
from
overcooking.
first.
whole
some
overcooking,
Always
keep
foil
arcing,
which
is a discharge
damage
foods,
in a microwave
SHiELDiNG
TURNING
Large
slowly,
evenly.
STiRRiNG
flavors
more
fish, and vegetables
cupcakes,
1 inch apart.
from
blends
quickly
on density,
To prevent
Stirring
poultry,
in the dish for
cook
for doneness.
wilt rise about
Arrange
layer
foods
of the dish.
Depending
cooking
SPACING
of meat,
STANDING
cooking
extra
in paper
foods
test frequently
plastic
Handle
portions
dense
FOR DONENESS
Because
to cook
in a single
Because
the outside
TESTING
traps
Waxed
thicker
toward
COVERING
Arrange
even cooking.
at least
1 inch from
oven walls
of electric
current
to prevent
that can
the oven.
be turned
Also turn over
PiERCiNG
chicken
chops.
Pierce
the shell, skin, or membrane
prevent
yolks
them
from
and whites
vegetables,
bursting.
of eggs,
of foods
Foods
that
hot dogs,
such as potatoes
before
require
clams,
cooking
piercing
oysters,
to
include
and whole
and squash.
CLEANING
Wipe
the oven inside
detergent
done
weekly
powders
will
with
solution.
or more
or rough
be dimcult
and outside
often,
pads.
towel,
if needed.
Excessive
to remove
a wet paper
with
Then rinse and wipe
a soft cloth
Never
after
a mild
GLASS
be
• The glass turntable
on the inside
days.
cooking
Wipe
turntable
top
may
to break
• The turntable
splatters
chicken
TURNTABLE
not to chip or scratch
use cleaning
oil splatters
if left for many
especially
and
dry. This should
during
roller
SPECIAL
The turntable
and turntable
should
be hand-washed
detergent
dry
with
or rough
and a soft cloth.
a soft cloth.
roller
Never
Once
rest are
removable.
(not hot) water
they are
use cleaning
clean,
powders,
They
with a mild
rinse well
steel
be cleaned
regularly.
CARE
the oven front
in warm
the
use.
rest should
For best performance
PARTS
at the sink. Be careful
as this may cause
or
bacon.
REMOVABLE
be cleaned
the edges
and
Wipe
often
Never
use cleaning
After
wool,
pads.
cleaning
8
with
cleaning
any entries
and
frame
should
a mild
the control
the panel.
have
the inner door
be free
detergent;
powders
that might
safety,
of food
then
or rough
panel,
been
touch
panel
or grease
rinse and
and
buildup.
wipe
dry.
pads.
STOP/CLEAR
entered
accidentally
to clear
while
HOW
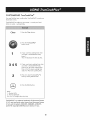
TO USE TrueCookPlus ®
frueCookP/us
is a registered
trademark
JV LLC. USA and world wide.
of Microwave
Science
CleQr
1. Press the Clear button.
WHAT IS TrueCookPlus ® ?
TrueCookPtus
cook
® is the first way
using a code
found
ever
developed
on packaged
to microwave
food.
Find the simple
code
TrueCookPlus ® SETUP
package
After
http://www.
you unpack
few moments
and plug
in your
to tell TrueCookPlus
TrueCookPlus
® your zip
® oven,
take
a
®
food
or at
TrueCookPlu;.corn
On your food
code.
TrueCookPlus
on your favorite
TrueCookPlus
package,
® code
your
wilt appear
on the TCP logo.
Press the TrueCookPlus ® button
Clear
on your microwave oven keypad.
1. Press the Clear button.
4.
a tone,
then enter
the TrueCookPtus®code
You will hear
on your
microwave
2. Press the TrueCookPlus
three
oven keypad.
® button
1
times.
5. For example,
The display
enter
1 2 3 4.
shows:
L- ,' 2 J '7' _'_'"- '
3. Enter your
five digit
Post Offlce
U.S.
6. Press the Start
button.
zip code.
7. TrueCookPlus
° now manages
your
microwave
cooking
automatically.
When TrueCookPlus ® is done, you
will hear a tone to indicate
the
cooking
©
4. Press the Start
button.
as it appears
or at
htt.p:JJwww.
adjust
for your
elevation
above
time
you
If you
of a power
failure,
be reset. Your zip code
your
is saved
zip code
does
in the microwave
enter
TrueCookPlus
sea level.
will display
NOTE:
In case
on you to enter
the TrueCookPlus®code
Once TrueCookPtus ® knows your zip code, every
enter a TrueCookPlus ® code, TrueCookPlus ® wilt
automatically
is done.
8. Your oven relies
not need
exactly
on the food
package
TrueCookPlu;.corn
an invalid
®code,
CODE
your oven
ERROR.
If you make an error while entering the numeric code or fail
to press the TrueCookPlus ® button before entering the code,
your food may undercook, overcook or even burn.
to
oven's
memory.
If the microwave
oven is moved into a new zip
code, the oven must be set up for the new zip code.
9
CUSTOMIZING
TrueCookPlus ®
You may find that you would
food more or less.
TrueCookPlus®can
hotter
or cooler
adjust
prefer
to your
TrueCookPtus
tastes
- to cook
® to cook
your
your
food
- automatically.
Clear
1. Press the Clear button.
2. Press the TrueCookPlus
button
1
twice
3. If you want
you enter
press
less cooking
time
when
a TrueCookPlusecode,
1.
This wilt decrease
34 5
®
.
4. If you want
you enter
the time
more
cooking
by 6%.
time
when
a TrueCookPlusetode,
press 3 for 3% more cooking
Press 4 for 6% more cooking
and 5 for 9%
2
more
cooking
time.
time
time.
5. Press 2 to reset TrueCookPtus®to
factory
setting
default
6. Press the Start
button.
time.
Note:
1 : Shorter
(6°/o)
2 : Normal
(Default)
3 or 4 or 5 : Longer
(3°/0, 6%,
TrueCookPlus ® is a registered
9%)
of Microwave
Science
JV LLC; and used herein under license from Microwave
trademark
Science
JV LLC unde US patents 5,812,393,
6,249,710.
Copyright
5,883,801,
2008 Microwave
6,198,975,
Science JV LLC.
10
CLOCK
CHILD LOCK
Example: To set the clock for 10:30(AM).
Touch:
Display
You can use this safety
feature
so that
use the oven when
them
Shows:
children
to and when
To set CHILD
Clear
cannot
to lock
you are cleaning
panel
you do not want
the oven.
LOCK:
Touch:
2.
the control
1.
Clear
2.
HOLD 3 SEC
Display
Shows:
Time of day.
' L-h;';-&_
'"Tim-'_-";_"_7-_'
/'7- n U
3.
1 0 3 0
il
Touch
and hold
until LOCKED
appears
in the
display
(approximately
3 seconds).
_L?-"2_"_
To cancel CHILD LOCK:
.- _77-_
Touch:
Display
Touch
and hold
until LOCKED
.
IU
HOLD 3 SEC
" _-IU
disappears
the display
NOTE:
This is a 1 2 hour clock.
and PM by touching
KITCHEN
between
can set timer
1 or 2 as shown in step 5.
oven can
be used as a kitchen
up to 99 minutes,
timer.
You
99 seconds.
To set 3 minutes.
Touch:
1.
Kitchen
2.
300
Timer
Display
• u,/u,
Shows:
/,,Z- 11,1111,I-?,,,L,5L--L-
n/?
3.
AM
TIMER
Your microwave
Example:
You can switch
@
"
/_,_,_;
L, 5_qRT
T/'II
J'
II-
I
ITim
II I_1\
-?
"-0_,_,'_'_
Time counting
down.
(approximately
3 seconds).
from
Shows:
Time of day.
SMART TOUCH
iNSTRUCTiON
Sensor touch
cooking
microwavJng
choices
Sensor
type
is an exciting
easier.
to help
The Sensor
you heat
automatically
and amount
Categories:
the next
enters
Baked
Frozen
Vegetable)
Touch
the vapor
Potato,
because
cooking
Rice,
Veggie
and
you to cook
to select
levels. This oven automatically
times for each food item.
the
time
allows
having
most of your
cooking
times
determines
and
required
favorite
power
cooking
for the
Popcorn,
To cook
potato
Touch:
Display
1.
Time
Shows:
(Fresh Vegetable,
programs,
cooking
works
a table
instructions
with
is provided
Clear
of day.
in
by detecting
a build-up
of
Baked
Potato
2.
remains
closed.
is detected,
the door
the vapor
food
COOl<
without
pages.
vapor.
* Make sure the door
* Opening
perfectly,
Sensor Cooking
examples
* The Sensor Touch system
* Once
popular
foods
Example:
Entrees,
few
SENSOR
that makes
menu contains
the correct
BAKED POTATO (EXAMPLE)
of food.
Frozen
food
feature
or reheat
Reheat,
For most Smart
specific
SENSOR OPERATION
two
or touching
is detected
beeps
wilt
sound.
The oven will
the STOP or CLEAR pad
wilt abort
o_
I UH_JU
the process.
before
start
automatically.
The oven wilt
stop.
* Before
using Smart
Touch Sensor,
make
the heating
container
and the interior
assure the best results.
* Room temperature
* Oven
should
should
be plugged
sure the exterior
of the oven are
not exceed
of
dry, to
95°F.
in at least
5 minutes
before
sensor
cooking.
SMART TOUCH
SENSOR TABLE
CATEGORY
Baked
DiRECTiON
Potato
Rice
Pierce
each
edge,
at least one inch apart.
potato
Place
rice and twice
stock)
in a 2-quart
When
cooking
Place only
a fork
as much
and place
on the oven tray
around
the
liquid
(water
or chicken
dish. Cover
allow
1 0 minutes
with
or vegetable
plastic
standing
1-2
wrap.
time.
rice.
bag
medium
of prepackaged
cups
or long grain
Cook instant
rice
microwave
popcorn
on the center
of
Regular
Prepare
Vegetable
Place in an appropriately-sized
as desired,
wash,
(Touch
wrap
and
leave
residual
microwave
water
container,
on the vegetables.
cover
size 3.0-3.5
1 - 4 cups
with
plastic
with
plastic
and vent.
Veggie
Frozen
Frozen
Remove
Vegetable
(Touch 2)
Place in an appropriately-sized
wrap and vent.
Entrees
Remove
container,
NOTE:
If you open
the door
from
from
package,
outer
place
rinse off
display
on plate,
or press STOP/CLEAR
frost
under
microwave
package.
cover
during
with
running
container,
Slit cover.
plastic
sensing,
wrap
1 - 4 cups
cover
If not in microwave
and vent.
the process
12
water.
wilt
be canceled.
safe
according
rice.
to
on the package.
Use one fresh
Fresh
approx.
Use medium
directions
turntable.
1)
1-4
9 oz. each
microwavable
is complete,
Stir for fiuftfier
Popcorn
with
AMOUNT
1 0 - 21 oz.
bag
oz.
of popcorn.
REHEAT
TIMED COOKING
This feature
allows
you to reheat
precooked
room-temper-
This feature
lets you program
a specific
ature or refrigerated
foods without selecting
cooking
times
and power levels. This feature
has 4 categories
: dinner
power. For best results, there are
addition
to HiGH power (100%).
plate, soup/sauce,
casserole,
for more information.
Power Level Table"
pizza.
See following
table
NOTE:
Example
: To reheat
casserole.
If you
do not select
matically
Touch:
Display
Example:
Shows:
on page
To cook
cook
cook
19 for more
a power
at HIGH
and
information.
power.
30 seconds
at 80°/0
power.
1.
Time of day.
Clear
Touch:
Cook
Time
2.
Reheat
-1....
CFT"
I'......
I_I Iu
5k:
/
J7"n
u
3
The oven
wilt reheat
. O,IT"CO
J-ran
Shows:
LL/L7_//I/L7
/AI,-
,_T//_-/I
i_
ZT/
2.530
3.
Display
• L/HL/\
5 ."
:Z"
_
,.,.,.)$ 5,;9_, .^ , .,.,.^ ..,...
.... , : o,, o
:_qs
......
1-
food
-O,-t/
automatically
C
by sensor
3.
system.
Cook
Power
//7/7_AITC
, :-7/-://c-c?
.................
/___n/
leo LL
/o/_.-/
_/':
i_iLl_
VLL
/"rn/[_7
U
REH EAT TAB LE
4.
Code
1
Direction
Category
Dinner
Place
plate
on dinner
foods
dish. Cover
Amount
to be heated
plate
or similar
with
plastic
Approx.
10.3-15.5
5.
OZ.
wrap.
Soup/
Place
Sauce
in an appropriately
sized
microwave
container.
foods
Cover with
3
Casserole
to be heated
plastic
with
cups
1-4
cups
1-3
slices
wrap.
Cover dish containing
the casserole
1-4
plastic
wrap.
4
Pizza
Place
foods
to be heated
on a dish.
13
in
level, the oven wilt auto-
(100%)
for 5 minutes,
time
10 power level settings
Refer to the "Microwave
POWER
80 will appear
Time
in
display.
counting
down and
ME LT TAB LE
SOFTEN/MELT
The oven uses tow power
marshmallows
to melt
and cheese)
foods
(butter,
and soften
cream, cream cheese, and frozen
See the following
table.
chocolate,
foods
(butter,
Code
Amount
Direction
Category
ice
juice).
1
Butter/
Margarine
Unwrap
and place in
microwava
ble container.
No need
Example: To Melt 8 oz. Chocolate.
to cover
1,2or
3 sticks
butter.
Stir at the end of cooking
Touch:
1.
Display Shows:
Clear
to complete
Chocolate
Time of day.
I'_-T-AI
TRill-
I
/
,"7bL
f __'7,',',',','_'
2
t
melting.
Choose
the 4 or 8 oz.
(actual
weight)
to melt
baking
squares of
chocolate.
Unwrap
4 or 8 oz.
selection
squares
and
place them in a
microwavable
container.
5L--LL--L-F I_6"/LI
Stir at the end of cycle
t
I
/ u
L-_LqL-,_'7,',LIg_5
_5'JL-H
t
/
/
if using
chocolate
morsels
always
Stir
at the end of the cycle
complete
melting.
Add
as necessary
time
to
if
more than 4 oz. dry
measure is being melted.
t
Cheese
t
melting,
use the 4 oz. setting.
Tn
/u
to
complete
@
Time counting
down
CHOCOLATE
wilt
Use processed
food
and
8 or 16 oz.
cheese
only. Cut into cubes.
Place in a single layer in
microwavabte
container
appear
in display.
Stir at the end of cooking
to complete
SOFTEN TABLE
Code
Large
Category
microwavable
1
Butter
1,2or
3 sticks
Unwrap
and place in
microwavable
container.
No need
Butter
to cover
wilt
complete
butter.
and
ready
for
in oven.
Ice
use in recipe.
ice Cream
Place container
cream
wilt
to make
be soft
enough
scooping
easier.
Pint,
Quart,
Half
gallon
Cream
Cheese
Unwrap
and place in
microwava
ble container.
Cream
cheese
room
temperature
ready
4
for
Frozen
Remove
Juice
Frozen
enough
water.
3 or 8 oz.
will be at
and
use in recipe.
top.
juice
Place
in oven.
wilt be soft
to easily
be
container.
Stir at the end of cycle
be at room
temperature
5 or 10 oz.
or miniature
marshmallows
may
used. Place in
Amount
Direction
melting.
6, 1 2 or
16oz.
mix with
14
melting.
to
CUSTOM
COOK
Use this function
or power. Refer
information.
Example:
to cook
ADD I MINUTE
food
without
to the "Custom
entering
Cook Table"
a cook
below
time
A time-saving
for more
To cook 4 Slices of bacon.
Touch:
pad,
this simplified
set and start microwave
cooking
the need to touch START.
Furthermore,
by using the add
Soften/Melt,
Timed
can
Display Shows:
be adjusted
Cooking
to cook
control
lets you quickly
at 1 00%
1 minute
key, all
and Custom
food
power
without
of the
Cook programs
for a longer
period
of time.
Example: To cook for 2 minutes.
1.
Custom
Cook
2.
5t_,
," /u_'_L_7l--I I_-FT ,b,,u
m-ldll
8,9,,!
u,,
"_
1
......
Till
II--
I
i-i'11_1
//
Touch:
Display
Shows:
1.
Clear
Time of day.
2.
Add 1
Minute
5
JTRu
Twice
Time counting
down and
POWER
100 wilt appear
in display.
i IFC
t
CUSTOM
CODE
Ii-
I
BACON will appear
Time counting
down
display.
COOK
NOTE: If you touch ADD 1 MINUTE, it wilt add I minute up
to 99 min 59 seconds.
in
and
TABLE
CATEGORY
Bacon
Frozen
Roll/Muffin
DiRECTiON
Fresh Roll/Muffin
2 to 6 slices
Remove
package
(If
muffins from
are display
over 3 oz.
each,
quantity.)
1 to 6oz.pieces
(2-3
each)
quantity.)
(2-3
(If muffins
Remove
Beverage
Chicken
Pieces
from
display
are over
from
package
and
3 oz. each,
display
and place
plate. entering
count
as twoon when
package
count
and
place
on plate.
as two when
place
1 to 6 pieces
entering
oz. each)
on plate.
(Be careful!
After heating,
the beverage
will be very hot! Sometimes
liquids
heated
in cylindrical
containers
will splash out when the cup is moved.)
1 to 2 cups
Place the chicken
cover with plastic
0.5 to 2 Ibs.
Prepare
Hot Cereal
AMOUNT
Place dinner
bacon plate
strips lined
on microwave
for is
best
(Use
with paper bacon
towels rack
if rack
not results.
available).
Remove
_
Tn!
as directed
pieces in an appropriately
wrap, and vent.
on package
Stir and allow standing
time
Use only instant hot cereal.
sized
microwaveabte
container,
and cool<.
before
15
eating.
1 to 6 servings
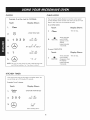
CONTROL
CONTROL
You can
SETUP
SETUP provides
select
Example:
four
SOUND
ON/OFF,
To turn off
Sound
modes
which
CLOCK
make
using
ON/OFF,
your
microwave
SCROLL SPEED and
of beeper.
oven quite
handy.
LBS/KG.
Example:
To select
Kg unit.
Touch:
Display Shows:
Touch:
Display
1.
Clear
Time
1.
Time
Control
Four modes
2.
Setup
of day.
show in the
Contro_
display
5[/I-II
ILl
i'_1 lain
,
i'_ -c
Clear
2.
i"IAI ¢
ul
i gul_-/7
Tf_/n- Tf_lI II7
I
Setup
of day.
Four modes
show in the
display
,uuJ7,
,_L;
.....
-'2
3.
//
Shows:
i'_111dD I'_l--C
4.
2
_ ........
Time
NOTE:
To turn beep sound
touch number 1.
CONTROL
back
on, repeat
SETUP FUNCTION
NUMBER
4.
of day.
Time
steps
SOUND
2
CLOCK
ON
ON
TABLE
RESULT
NUMBER
1
Sound
On
2
Sound
Off
1
Clock
On
2
Clock
Off
/ OFF
/ OFF
SCROLL SPEED
1
Stow
2
Normal
3
4
NOTE:
When
of day.
NOTE: To change to LBS, repeat steps 1-3 then touch
number 1.
1-3 then
OPTION
1
2
speed
speed
Fast speed
1
Lbs.
2
Kg.
LBS / KG
the power
cord
is first
plugged
in, the default
settings
16
are Sound
On, Clock
On, Normal
Speed
and LBS.
CUSTOM
Three
defrost
defrost
sequences
feature
for frozen
OPERATING
DEFROST
are
provides
foods.
preset
you with
The cooking
• For best results,
in the oven. The custom
the best defrosting
guide
its original
method
will show you which
mechanism
or rearrange
Three
that
to get
different
reminds
you to check,
best defrost
defrosting
levels
turn over,
• For best results,
separate,
a doughnut
results.
thawed
are provided.
1 MEAT
2 POULTRY
weight
Example:
is 0.1 _6.0
To defrost
Touch:
1.
meat
4.
ground
When
when the beep
rack
to catch
drippings.
shows you food
I/_1--0
ICI I IT
nn/.
I1-1
IT/"71
UU/-f'7
rn
/ II..ll_.ll_.f'7
rn/.-//
I
f
_.
IYL--P,;
L-7;'_.S_
IZIL
"cII_/-I
.... J
2
and
;
£2
Tnll,-
Lbs
I
T
FOOD
of cycle
selections
For best results,
Touch
At this time,
food.
OVER will appear
Remove
any
Return frozen
the defrost
defrosting.
when
and
loosen
roasting
removed
the weights
you
or remove
Weights
you can set
(tenths of a pound)
.1 to 6.0 (45g
to 2722g)
POULTRY
2
.1 to 6.0 (45g
to 2722g)
FISH
3
.1 to 6.0 (45g
to 2722g)
CONVERSION
probably
TABLE
used to food
ounces
that
are fractions
equals
1/4
pound).
Custom
Defrost,
weights
of a pound
However,
on the food
package
table
in display
in middle
the START pad,
the display
the door
portions
portions
during
changes
that have
cycle.
or rearrange
the
thawed.
to the oven and touch
weight
and tenths
is in fractions
and
4 ounces
to enter food
pounds
to convert
in pounds
example,
in
of a pound.
of apound,
the weight
you
to decimals.
Weight
DECIMAL WEIGHT
1.6
.10
3.2
.20
4.0
.25
4.8
.30
6.4
.40
8.0
.50
9.6
.60
11.2
.70
12.0
.75
12.8
.80
1 4.4
.90
1 6.0
1.00
One-Quarter
Pound
to defrost
the DEFROST
and turn, separate,
as being
(for
in order
you must specify
OUNCES
and beep.
The oven wilt beep
open
off
1
can use the following
NOTE:
time countdown.
and continue
icy in the center
type
of
scrape
or on a microwave
Custom defrost
If the weight
OT
DEFROST wilt appear
on
Time counting
down and
display.
you touch
from
into the form
defrosting,
sounds
Equivalent
When
poultry
(wrapper).
MEAT
You are
the weight
5.
TURN
and
on food.
Food
,-1-1/ rnl ,,-1/
to enter
NOTE:
meat
container
be somewhat
set for each type.
WEIGHT
1
your
in a shallow
covering
beef.
I=/._l/_.lLIf_..._
Defrost
|
meat,
package
Time of day.
Custom
3.
or plastic
freezing.
foods
can
Display Shows:
CJear
2.
shape
before
• Place
This table
Ibs.
1.2 Ibs of ground
fish, shellfish,
paper
• Food should still
from the oven.
3 FISH
Available
remove
closed
Otherwise,
the wrap wilt hold steam and juice close to the
foods, which can cause the outer surface of the foods to cook.
defrost
sequence
is recommended
for the food you are defrosting.
For added
convenience,
the custom defrost
includes a built-in
beep
TIPS
START to resume
One-Half
Pound
Three-Quarters
Pound
cycle.
One
Pound
NOTE:
If between
two decimal
the best defrosting
17
weights,
results.
choose
the lower
weight
for
CUSTOM
DEFROST TABLE
Category
Food
I LB DEFROST
to be Defrosted
This feature
Beef
Ground
beef,
Tenderloin
roast, Chuck
1
Round
steak,
steak,
Pot roast,
roast,
Cubes
for stew,
Rib roast,
Hamburger
should be used only
of frozen
ground
Example:
To defrost
when
you defrost
1 pound
beef.
1 Jb Ground
beef.
Rump
Touch:
patty.
Display
Shows:
Lamb
Chops
(1 inch thick),
Rolled
1.
roast
Clear
Time
of day.
Pork
MEAT
Chops
(_/2 inch thick),
Country-style
ribs.
Hot dogs,
Rolled
roast,
Spareribs,
2,
Sausage.
1 Ib
Defrost
Veal
Cutlets
POULTRY
3
FiSH
down and
appear
on
display.
(_/2 inch thick)
Ground beef 1 Lbs/0.5
2
Time counting
DEFROST wilt
Poultry
Whole (under 4 Ibs), Cut-up,
Breasts (boneless)
Kg only.
Note: TURN FOOD OVER will appear
of cycle.
Cornish Hens
Whole
Turkey
Breast
Fish
Fillets, Whole Steaks
Shellfish
Crab meat, Lobster tails, Shrimp, Scallops.
18
on display
in middle
TWO-STAGE
COOKING
MICROWAVE
Your microwave
For best
power
results, some
in a second
You can
program
another
while
Exampie:
recipes
stage
call
for a different
of a cooking
continues
To set o 2-stoge
or heat
cycle.
this oven to switch
cooking
cooking
from
a wide
POWER
variety
of foods.
one power
Microwave
Power
Level
LLiLZ_lllL_
Use
10
7.
3 0 0
,7,7
" Making
candy.
" Cooking
poultry
" Cooking
tender
, Whole
pieces,
fish, & vegetables.
cuts of meat.
poultry.
Tn!
I1- I
1_0
,uuJ7
5_9R2 u^
to set a 3 minute
cook
J l-,_,l-^ l-l-vl-l-
9
* Reheating
rice, pasta,
& vegetables.
8
• Reheating
• Reheating
prepared
foods
sandwiches.
for first stage.
7.
Cook
Power
/7/7
_..'-lnJ
__-uu
I_"
I&-O
IL_ll-I_
I1712
I
l-l-
L-I
I&-I
Ill-&
-ALTO"
/-_
Z./
7"1-1 //?
J U /&/
7
• Cooking
egg,
• Cooking
cakes,
• Melting
to set an 80%
cook power for
4.
the first
_7_.. ,7,_
,°n'lC°u_,l,\ 3_5" ,'rn'-uul&/&z)£1 __9R7
stage.
Cook
Time
dishes.
breads.
chocolate.
veal.
• Cooking
whole
• Cooking
puddings
5
• Cooking
• Cooking
ham, whole poultry,
rib roast, sirloin tip.
4
• Thawing
meat,
3
• Cooking
• Cooking
less tender cuts of meat.
pork chops, roast.
2
• Taking chill out of fruit.
• Softening
butter.
1
* Keeping
casseroles
& main dishes
• Softening
butter & cream cheese.
0
* Standing
fish.
& custard.
poultry,
& lamb.
& seafood.
7 ./7,7
7 0 0
'"
7"t'?l
#- / _q]/TRfu,,"°
,
uu__
01_!
for second
milk, & cheese
• Cooking
6
-L-7ffsS?
l-uJK,,,,o'........ - ,,, J_--
to set a 7 minute
quickly.
, u_,_ ,u_, L-,,, l-_
'_l-nl
time
water.
ITJlI'_-II
I_
(High)
6t
for
Power Level Table
* Boiling
• LlllLl\
5,
below
to
to completion.
Time
3.
levels to let you cook
Refer to the table
suggestions:
Display Shows:
It
time
power
cook cycJe.
Touch:
t
LEVELS
oven has 10 cook
cook
ICO
! C! IC!
_ u_,l-_\ l-l-_/l-l-
stage.
7 ./7,7
7.
Cook
I "&/&/
zc
/,7,7
-Afrc
,ot'?l
u_,_
,u_,
E,,,l-_
Power
/'_l-rll
8,
to
an 50%for
cookset power
the second
/CO
IL_ll-I\
J L-I
l-l-
IL-I
Ill-l-
I-_
C/
7"1"1 /,7
JU
/C/
.n,_
/_ -uu
OI'_I /L-O
-,7 Tr?J /,- I
7" 07"
/ uu,l-/\ _L, Juul-)_ _JJ_ J
stage.
9t
10.
POWER 80 wilt appear
Time counting
down and
display.
When the first stage is over, you will hear two short
tones as the oven begins the second cook stage.
19
time.
warm.
WARNING:Do
COOKING
not use aluminum foil during cooking cycle.
TiPS
Poultry
Meat
1. No special
prepared
techniques
Always
thoroughly
2. Place the meat
defrost
plate
according
4. Turn the meat
5. Let stand
6. Make
cuts of meats
once
through
time
minutes
is very
rack
Table
For thicker
halfway
prepared
in oven after
important
before
especially
pork,
Because
cooking.
is thoroughly
of its shape,
6. Let stand
cooked
for 5-10
7. Make
Meat Cooking Table
sure poultry
Whole poultry
from the inside
Cooking Time
Per Pound
Poultry
BEEF
8
8
9_/2 to I 1 _/2 minutes
HIGH (100%)
6_/2 to 9_/2 minutes
and placed
giblets
and
oil unless the
roasting
rack
on the turntable.
has a tendency
to cook
pieces
time
in oven after
is very
is thoroughly
cooking
important,
cooked
during
before
as it completes
before
eating.
is completely
cooked when the juices
thigh when it is pierced
with a sharp
should
the thickest part
flesh is firm.
Standing/Rolled Rib
- Medium
- Well-done
Ground Beef
with vegetable
poultry
minutes
carving. The standing
the cooking
process.
Microwave
Power
Remove
on a microwave
plate
be
if desired.
unevenly, especially
in very bony parts. Turning
roasting
helps to cook these areas evenly.
the
eating.
Meat
defrosted.
should
Season
5. Cook according
to the instructions
in the Poultry Cooking
Table below. Turn over halfway
through the cooking
time.
time.
process.
sure meat,
Poultry
cooking.
brush lightly
or a microwave-proof
use the longer
as it completes
required.
poultry is self-basting.
4. All poultry should be placed
and the shorter
the cooking
are
conventional
3. Prick the skin and
(below).
chops,
techniques
as with
2. Poultry should be thoroughly
any metal clamps.
or
on the turntable.
Cooking
large
1. No special
be
if desired.
cooking.
roasting
cuts of meats.
for 5-10
The standing
cooking
time for
should
Season
before
place
to the Meat
Use the longer
time for small
time.
meat
and
Meat
cooking.
on a microwave
microwave-proof
3. Cook
are required.
as with conventional
be pierced
to ensure
with a sharp
that the juices
run clear
knife.
knife
are clear
through
and the
Poultry Cooking Table
11 _/2 to 14 minutes
(to brown for casserole)
Hamburgers, Freshor
defrosted (4 oz. each)
Microwave
Power
Poultry
Cooking Time
Per Pound
CHICKEN
- 2 patties
HiGH (100%)
2_/2 to 4_/2 minutes
Whole
8
] ] to ] 5 minutes
- 4 patties
HiGH (100%)
3_/2 to 5_/2 minutes
Breast (boned)
Portions
8
8
] 0 to ] 4 minutes
] ] to ] 7 minutes
8
] ] to ] 5 minutes
PORK
TURKEY
8
12_/2 to 16_/2 minutes
Loin, Leg
Bacon
- 4 slices
HIGH (100%)
2_/2 to 3_/2 minutes
- 6 slices
HIGH (100%)
3_/2 to 4_/2 minutes
Whole
NOTES:
• The times listed above are only a guide.
individual
NOTE: The times listed above are only a guide. Allow for difference in
individual tastes and preferences. The times may also vary due
to the shape, cut, and composition
tastes and preferences.
shape, cut, and composition
if whole poultry
of the food.
is stuffed,
used when calculating
2O
Allow for difference
in
The times may also vary due to the
of the food.
the weight of the stuffed
the cooking
time.
bird should be
COOKING
TIPS (continued)
Fish
1. Arrange
fish in a large
shallow
2. Cover with pierced
microwave
3. Place the dish on the turntable.
4. Cook according
Flakes of butter
5. Let stand
6. After
dish or casserole.
plastic
or casserole
wrap
lid.
to the instructions
in the Fresh Fish Cooking
can be added
to the fish if desired.
as directed
standing
non-metallic
time,
in the Cooking
check
Table
before
Table
below.
serving.
to see that the fish is thoroughly
cooked.
The fish should
be opaque
and flake
easily.
Fresh Fish Cooking Table
Fish
Fish Fillets
Whole
Cleaned
Whole
and
Mackerel,
and
Trout,
Microwave
Power
Cooking Time Per
Pound
Butter
Add
l 5 to 30 ml (l
to 2 tbsp
Standing Time
HIGH
4_/2 to 8 minutes
lemon
juice)
2 to 3 minutes
HIGH
4_/2 to 8 minutes
3 to 4 minutes
HIGH
5_/2 to 9 minutes
3 to 4 minutes
HIGH
5_/2 to 8 minutes
Prepared
Cleaned
Prepared
Salmon
Steaks
Add
21
15 to 30 ml (1 to 2 tbsp
lemon
juice)
3 to 4 minutes
QUESTIONS
AND ANSWERS
Operation
Question
Why
is the oven
Answer
light not on during
cooking?
There
may
be several
Have you:
* Set a cooking
* Touched
Why
Will
does
steam
come
the microwave
out of the air exhaust
oven be damaged
vent?
if it operates
reasons
why the oven light is not on.
time?
START?
Steam is normally
produced
during cooking.
The microwave
oven has been designed
to vent this steam.
Yes. Never
operate
the oven empty
or without
the glass turntable.
e m pt y?
Does microwave
screen
energy
pass through
the viewing
in the door?
No. The metal
screen
The holes (or ports)
bounces
allow
They do not let microwave
Why does a tone
_anet is touched?
sound
Can my microwave
oven
cooked
for too
when
a pad
on the control
be damaged
if food
is
long?
tells you that the setting
Like any
other
point
the oven is plugged
the first time,
What
and it does
into
the wall
not work
outlet
for
properly.
is wrong?
cooking
that the food
of the oven.
has been
entered.
it is possible
smoke
It is always
best to be near
controlling
your
scrambled
to function
as programmed
first
time
or when
oven from
power
the 120
resumes
volt household
to overcook
and even possibly
The microcomputer
and fail
to the oven cavity.
through.
pass through.
appliance,
creates
back
to pass
energy
The tone
the inside
cooking.
When
the energy
only light
when
a power
outlet
plug
to
you are
become
you plug
interruption.
and then
to the
the oven while
oven may temporarily
after
food
fire, and damage
in for the
Unplug
it back
the
in to reset
the microcomputer.
Why
do I see light
reflection
around
the outer
case?
This light is from the oven light which
and the outer wall of the oven.
What are the various sounds I hear when the
The clicking
microwave
microwave
oven is operating?
The heavy
draws
blower
being
sound
oven's
is caused
magnetron
hum and clunk
as it is turned
speed
turned
22
is from
ON
ON
between
by a mechanical
ON
is from
and OFF
the change
and OFF.
is located
switch
the oven cavity
turning
the
and OFF.
the change
in power
by a mechanical
in line voltage
the magnetron
switch.The
caused
change
in
by the magnetron
QUESTIONS
AND ANSWERS
(continued)
Food
Question
What
is wrong
brown
Why
when
baked
Answer
foods
have
a hard,
dry,
spot?
do eggs
sometimes
pop?
A hard,
dry,
Shorten
the cooking
When
brown
baking,
Why
after
are scrambled
cooking?
eggs
sometimes
a little
dry
time.
or poaching
the yolk
toothpick
Never
overcooking.
or reheating
frying,
build-up
inside
with a wooden
CAUTION:
spot indicates
eggs,
the yolk
membrane.
To prevent
before cooking.
microwave
eggs
may
pop due to steam
this, simply
pierce
the yolk
in the shell.
Eggs will dry out when they are overcooked, even if the same recipe is
used each time. The cooking time may need to be varied for one of these
reasons:
Eggs vary in size.
Eggs are at room temperature
another time.
one time and at refrigerator
temperature
Eggs continue cooking during standing time.
Is it possible
to pop popcorn
in a microwave
oven?
Yes, if using one of the two methods described below:
(1) Microwave-popping
devices designed specifically for microwave
cooking.
(2) Prepackaged commercial microwave popcorn that is made for specific
times and power output needed.
Follow exact directions given by each manufacturer for its popcorn
popping product and do not leave the oven unattended while the corn is
being popped. If corn fails to pop after the suggested time, discontinue
cooking. Overcooking could result in an oven fire.
CAUTION:
o Never use a brown paper
leftover kernels.
Why
do baked
apples
sometimes
burst during
The peel has not been
cooking?
for expansion
Why
do baked
potatoes
sometimes
burn during
cooking?
after
Standing
after
time
stored
time
is additional
time
in the refrigerator?
required
for cooking
food
time
depends
allows
As in conventional
cooking
than
time.
for food
23
foods
microwave
upon
the top
methods,
corn or attempt to pop
half
during
the interior
of each
apple
to allow
cooking.
of the apple
expands
process.
is too long,
the actual
from
of the apple
food
recommended
cooking
time,
CAUTION:
Do not overcook.
Why is a standing time recommended
microwave cooking time is over?
Why
cooking
the cooking
If cooking
removed
of the interior
As in conventional
during
bag for popping
cooking,
at room
burn in the oven.
should
to continue
cycle.
evenly
firm.
for a few
The amount
minutes
of standing
of the foods.
the initial
more
At the end of the
be slightly
cooking
oven cooking
the density
You need
can
potatoes
time
temperature.
temperature
to cook
food
of food
taken
affects
total
out of a refrigerator
BEFORE CALLING
FOR SERVICE
You can often
correct
the list below
and try the solutions
If the microwave
Sears
operating
problems
oven still does
Parts & Repair
Service
listed
yourself.
problem.
properly,
contact
not work
Centers
If your
for each
are fully
equipped
microwave
oven fails
the nearest
to handle
Sears
your
* Is the power cord plugged
• Is the door closed?
• Is the cooking
or Sparking
* Are
time
locate
Service
the operating
problem
in
Center.
requirements.
Possible
does not start
Arcing
properly,
Parts & Repair
service
Problem
Oven
to work
Causes
in?
set?
you using approved
cookware?
• Is the oven empty?
Incorrect
time of day
* Have
Unevenly
Cooked
* Are
Foods
you tried
to reset the time
you using approved
* Is the glass turntable
cookware?
in the oven?
* Did you turn or stir the food
* Were
Overcooked
Foods
Undercooked
Foods
the foods
of day?
completely
as directed
while
* Was
the time/cooking
power
level correct?
* Was
the time/cooking
power
level correct?
* Are
you using approved
it was cooking?
defrosted?
cookware?
• Were the foods completely
defrosted?
• Was the time/cooking
power level correct?
• Are the ventilation
Improper
Defrosting
* Are
ports
you using approved
• Was
the time/cooking
clear?
cookware?
power
• Did you turn or stir the food
FEDERAL COMMUNiCATiONS
COMMiSSiON
level correct?
as directed
during
the defrosting
cycle?
RADIO FREQUENCY iNTERFERENCE STATEMENT
(U.S.A. ONLY)
WARNING:
This equipment
generates
if not installed
and
with the manufacturer's
to radio
found
reception.
with limits
1 8 of FCC Rules, which
against
that
instructions,
and television
to comply
protection
uses ISM frequency
and used properly,
are
may
cause
It has been
designed
* Reorient
and
* Relocate
accordance
* Move
interference
type
for ISM Equipment
such interference
energy
is in strict
tested
pursuant
to provide
the microwave
there
in a particular
is no guarantee
installation.
interference
to radio
determined
by turning
that
If this equipment
or television
off
interference
microwave
will not occur
does cause
reception,
the equipment
encouraged
to try to correct
of the following:
interference
which
and
the interference
Oven
of the radio
or television.
with
to the receiver.
oven away
respect
from
the receiver.
installation.
The manufacturer
However,
antenna
the Microwave
* Plug the microwave
oven into a different
outlet so that the
microwave
oven and the receiver
are on different
branch
circuits.
and
to part
reasonable
in a residential
the receiving
can
caused
oven.
It is the responsibility
be
on, the user is
by one or more
24
is not responsible
by unauthorized
for any
radio
modification
of the user to correct
or TV
to this
such interference.
SEGURiDAD
...................................................................
Precauciones
a excesiva
para evitar
energia
de microondas
Instrucciones
para
Instrucciones
importantes
COMO
ENTENDER
MiCROONDAS
conexi6n
Tabla
de recalentamiento
26
Cocci6n
......................
26
Ablandar/Fundir
a tierra
................ 27
DE
..........................................................
....................................................................
Kit de embutido
.....................................................................
........................
de seguridad
SU HORNO
Recalentar
exposici6n
..............................................................
Especificaciones
Instalaci6n
la posible
26-27
..........................................................
a tiempo
Tabla
de indicaciones
para
ablandar
28-31
Cocina
28
Tabla
de cocina
28
A_adir
I minuto
28
Configuraci6n
personalizada
29
29
de control
.........................................................
30
Descongelaci6n
para cocci6n
Limpieza
ENTENDER
................. 31
38
38
..........................................
39
de configuraci6n
....................................................................
personalizada
de conversi6n
39
................................
40
de pesos .................................
40
32
Descongelaci6n
1 LB .................................................
41
DE TrueCookPlus ® .................................
33
Cocina
de dos fases ...................................................
42
Niveles
de intensidad
USAR SU HORNO
DE MiCROONDAS
...........................................................
34
niSos ......................................................
34
para
Instrucciones
asada
TabJa de descongelaci6n
....... 34-44
Reloj de cocina
Patata
38
..............................
DE TrueCookPlus ® ....................................
34
Tabla
37
31
Reloj ..............................................................................
Seguro
Tabla
37
......................................................................
UTIUZACi6N
COMO
con microondas
...................
..........................................................
de funciones
36
37
.........................
...............................................
personalizada
de control
....................................................
Consejos
........................................................
fundir
......................................................
36
...............................
para
Panel de controles
de cocci6n
programado
de indicaciones
Partes y accesorios
Guia
.........................................
Tabla
Tabla
36
Consejos
DIAGN6STICO
Preguntas
de uso del sensor smart touch .......... 35
..............................................................
de sensor smart touch
....................................
para
35
Contratos
35
GARANT{A
El servicio
25
de las microondas
.............. 41
............... 42
cocci6n ................................................
Y SOLUCi6N
y respuestas
Antes de Ilamar
personalizada
para
de protecci6n
DE PROBLEMAS
43-44
.... 45-47
..............................................
servicio
45-46
.................................
maestra
47
...........................
.....................................................................
numera ..........................................
tapa
48
50
posterior
PRECAUCiONES
PARA EViTAR LA POSiBLE
EXPOSICION A EXCESIVA ENERGfA DE
MICROONDAS...
• No intente operar
a la energia
este horno con la puerta
de microondas.
abierta_
Es importante
• No use el horno si est6 da_ado.
ya que esto puede
no forzar
Es parficularmente
la traba
resultar
en exposici6n
nociva
del horno cierre
bien y
de seguridad.
importante
que la puerta
que no haya daSos en:
- ia puerta
(torcida)
- bisagras
- sellado
y seguros (rotos o fiojos)
de la puerta
• No ponga
y superficies
ning6n objeto
poivo o residuos de limpiadores
• El horno no debe
de seilado.
entre la cara frontal del horno y la puerta
ser ajustado
sobre ias superficies
o reparado
INSTRUCCIONES
Este aparato
electrodom6sfico
fierra
el riesgo
reduce
debe
por nadie,
en un tomacorriente
con conexi6n
Consuite con un eiectricista
personal
con un cable
de escape
calificado
en forma
indebida,
o con ei Departamento
ias instrucciones para hacer ia conexi6n
correctamente
conectado
a fierra.
A TIERRA
circuito,
instalado
de extensi6n
que figura en el cable
debe ser iguai o mayor
electrodom6sfico.
• el cable
de extensi6n
corre el riesgo de electrocutarse.
de Servicios
de Sears si Ud. no enfiende
tres ciavijas
de extensi6n
para conexi6n
tener enchufe
se tropiece
est6
o enrede
• el cable debe estar seco y no estar peilizcado
o aplastado en ningOn lugar.
de
a fierra.
NOTA: Este homo usa 14 amperios
electrodom6sfico
• ei cable de extensi6n no debe coigar de una
mesa o de ia cubierta de un gabinete donde un
niSo pueda firar dei mismo o se pueda tropezar
con 6i.
que
que el dei
debe
a fierra.
de Io siguiente:
• ia extensi6n debe ser para ei mismo voitaje
el electrodom6sfico.
• el voltaic
a
4k
a fierra o si quiere saber si ei aparato
aseg6rese
a
ei6ctrica.
para conexi6n
y conectado
Este electrodom6sfico
fiene un cable corto para reducir ei riesgo de que aiguien
con ei cable. Sea cuidadoso si usa un cable de extensi6n.
Si Ud. usa un cable
ia conexi6n
para la corriente
que fiene un aiambre
PRECAUCION
a tierra
que se acumule
de servicio calificado.
Si hay un corto
un cable
que est6 correctamente
4k
Si Ud. usa el enchufe
a fierra.
proveyendo
Este aparato electrodom6sfico
est6 equipado
fierra con un enchufe de conexi6n a fierra.
Ponga ei enchufe
excepto
PARA CONEXION
ser conectado
de electrocuci6n
y no permita
de sellado.
a 120 Voltios, 60Hz.
26
INSTRUCCIONES
Las siguientes
instrucciones
PRECAUCI6N
IMPORTANTES DE SEGURIDAD
de seguridad
le indicar6n
c6mo
- Para
reducir
e,riesgo
de
quemaduras,
exposici6n
a energfa
de microondas
1. Lea todas Jas instrucciones antes de usar su homo.
y sJga
EXCESiVA
Jas
especfficas
que
se detaJJan
en
Ja p6gina
etectrocuci6n,
evitar
da_os
a Ud. y a su horno.
incendio,
heridas
a personas
debe
ser revisado
riesgo de lesiones personates:
1 ) No sobre caliente
et Ifquido.
2) Mezcle el Ifquido antes y a la mitad
catentamiento.
5. Cuando limpia Ja puerta y las superficies que tocan Ja
puerta, use s6io jabones o detergentes suaves, no
abrasivos y una espon]a o paso suave.
3) No use contenedores
angostos.
6. Si su homo se cae o daSa, h6galo revisar por un t6cnico
catificado antes de votverlo a usar.
con
lados
a) No recocine los alimentos en exceso. Se puede iniciar
fuego en el homo.
5) Tenga
u otto
b) No use productos de papeU reciclado en el homo.
Estos pueden contener partfculas que se incendian.
rectos
y cuellos
mucho cuidado
cuando
introduzca
utensitio en et contenedor.
d) No guarde artlculos combustibles (pan, galletas, etc.)
en el homo, porque si cae un rayo en las Ifneas
et6ctricas, puede hacer que et homo se prenda.
14. No use et homo al aire libre. No guarde
intemperie.
No use este producto
cerca
15. No cubra
o btoquee
e) No use ataduras de alambre en el homo. Aseg_rese
de quitarlas antes de poner el artfculo en et homo.
16. No haga
funcionar
ninguna
et horno
abertura
cuando
17. No de]e que el cable cuelgue
de la cubierta
det gabinete.
en
18. No caliente
la bande]a
giratoria
- No cocine tocino directamente
giratoria
de vidrio.
8. Si se prende fuego:
Ja puerta
de
una cuchara
13. Mantenga
ta bandeja
de vidrio y et descanso
del roditto
de la bandeja
giratoria
en et homo cuando
est6
cocinando.
c) No recocine las papas. Esto puede causarfuego.
b) Apague
del proceso
4) Despu6s de calentar,
deje que et contenedor
repose
en el microondas
por un momento
antes de sacarlo.
7. Para evitar peligro de incendio:
a) Mantenga
s6to por un
hay un burbujeo
o hervor cuando
se saca et contenedor
det horno de microondas.
Esto puede
provocar
que los
Ifquidos muy calientes
hiervan de repente
si se introduce
una cuchara
u otro utensilio en et Ifquido.
Para reducir et
26.
4. iNo toque los interruptores de seguridad embutidos en
Ja puerta deJ homo! Et horno tiene varios
interruptores de seguridad para asegurar que 6ste se
apague cuando se abre la puerta.
f) No use la cavidad para guardar cosas. No de]e
productos de papet, utensitios de cocina o comida
la cavidad cuando no est6 en uso.
o
excesiva:
12. Los lfquidos como agua, cat6 y t6 pueden calentarse
m6s all6 det punto de ebuttici6n
sin parecer
que hierven
debido
a la tensi6n superficial
del Ifquido. No siempre
PRECAUCIONES PARA EViTAR LA
POSIBLE EXPOSICION A ENERGJA DE MiCROONDAS
Lea
para
e) Este electrodom6stico
t6cnico calificado.
2. iNo permita que JosniSos usen este homo sin
supervisi6n!
3.
usar su horno
del horno cerrada.
el homo a la
del agua.
det horno.
est6 vacfo.
del borde
de la mesa
o
excesivamente.
sobre
la bandeja
- No permita
que la pelfcula
gris especial
de las botsas
para cocinar
toquen la bande]a
giratoria.
Ponga et
paquete
sobre un plato para microondas.
el homo.
c) Desconecte el enchufe, corte la corriente en el
tablero ei_ctrico de fusibles o disyuntores.
- Si usa un plato para dorar alimentos
mant6ngato
3/16
pulgadas
sobre la bande]a.
Si se usa incorrectamente
la bandeja
se puede romper.
9. No use este homo para fines comerciates. Este homo de
microondas es s61o para uso familiar.
19. Tenga cuidado
de no rasgu_ar
o astitlar
los bordes de la
bandeia
giratoria.
Rasgu_os o astitlas pueden hacer que
la bande]a
se rompa durante et uso.
10. instale o ubique el electrodom_stico de acuerdo con
Jas instrucciones para instalaci6n provistas.
11. Para evitar electrocuci6n:
20. Algunos
setlados
pueden
horno.
a) Este electrodom6stico debe conectarse a tierra.
Con6cteto s6to a un tomacorriente debidamente
debidamente conectado a tierra (Vea las instrucciones
para conexi6n a tierra en la p6gina 26).
b) No use el electrodom_stico si el cable o el enchufe est6n
da_ados, si no funciona bien o si est6 da_ado o se ha
cafdo.
productos
tales como huevos enteros y envases
como por ejempto
jarras cerradas
de vidrio,
explotar
y no deben ser calentados
en este
21. Use este electrodom6stico
s61o para el prop6sito
que
se describe
en este manual. No use qufmicos corrosivos
ni vapores
en este electrodom6stico.
Este tipo de homo
est6 diseBado
especfficamente
para catentar,
cocinar,
secar los alimentos.
No se ha disefiado
para uso
industrial
o de laboratorio.
c) No sumer]a el cable o el enchufe en agua.
d) Mantenga el cable aiejado de superficies caiientes.
GUARDE ESTAS INSTRUCCIONES
27
o
ESPECIFICACIONES
Suministro
Consumo
de electricidad
1 20 V AC, 60 Hz
de etectricidad
Producci6n
Corriente
estimada
1,650
de microondas
_1,200
estimada
1 4.0
Dimensiones
totates
Dimensiones
de
Capacidad
Norma
(Ancho
la cavidad
x Profundidad)
det horno
de la cavidad
est6ndar
x Alto
(Ax
237/8
A x P)
1611/16
det horno
W
W
A
x 1 39/16
x 1 913/16
x 111/4
x 181/16
2.0
pie c0bico
IEC 60705
Las especificaciones
est6n
sujetas a cambios
sin previo
aviso.
INSTALACI()N
1. Saque
su homo
material
2. Ponga
el homo
homo
de microondas
de empaque
sobre
4 pulgadas
I<enmore
de la caja
sobre
una superficie
una superficie
de espacio
Elite y todo
et
4. Ponga
de embalaje.
nivetada
a la izquier
nivelada
que Ponga
que deje
por
da,
et
a la derecha,
Elite
listado
en la secci6n
sobre
giratoria
Io menos
del roditto
de la bandeja
el piso del horno
de vidrio
encima
y luego
del descanso
giratoria
cotoque
en el
la bandeja
del rodilto
de la
bandeja.
por
encima y por atr6s para una ventitaci6n
apropiada.
3. Instale el homo microondas
sobre los hornos Et6ctrico
Kenmore
el descanso
cfrculo
NOTA:
del "Kit de Embutido".
Nunca
dentro
ponga
la bandeja
giratoria
de vidrio invertida
et horno. Si se btoquean
los orificios de entrada
o satida
se puede
daBar
el horno.
Embutido
Contratope
KIT DE EMBUTIDO
Usted
puede
Este kit esta
TAMAI_IO
30
27
_
_
embutir
su homo
disponibte
a trav6s
microondas
de
utitizando
1-800-4-MY-HOME
COLOR
NO. MODELO
BLANCO
63002
ACERO
64003
AVELLANA
63004
NEGRO
63009
BLANCO
63012
ACERO
63013
AVELLANA
63014
NEGRO
63019
uno de
los siguientes
juegos
de adorno.
®.
DE KIT
MODELO
41 085,
41 086,
DE HORNO
41 089,
PAPA SER INSTALADO
41785,
49004,
47485,47486,47189,47489
28
41789,
49009
49002,
49003,
PARTES Y ACCESORIOS
Puerta
con visor
Cavidad
f6cil
del homo
de
Su horno
I Manual
limpieza
vJene con los sJguientes
accesorJos:
de uso y cuidado
1 Bandeja
giratoria
de vidrio
1 Descanso det rodilto de la bandeja
Bandeja
Sistema de cerrojo de seguridad
de vidrio
giratoria
giratoria
Descanso del
rodil[o
de [a
Panel de controles
del homo
bandeja
PANEL DE CONTROLES
1. PANTALLA.
muestran
funciones
La pantalla
giratoria
induye
un relo] e indicadores
la hora, los par6metros
de tiempo
de cocci6n seleccionadas.
2. SMART TOUCH.
de sus alimentos
y las
Este tedado le permite cocinar la mayor parte
favoritos
sin tener que seleccionar
los tiempos
preparaci6n
y los niveles de potencia.
3. DESCONGELACK_N
1 LB. Este pulsador
m6todo de descongelaci6n
de medio kilo,
4. COCINA
que
de cocci6n
PERSONAUZADA.
r_pida
le proporciona
para alimentos
Toque este pulsador
un
congelados
para
seleccionar
los elementos de programaci6n
de alimentos.
5. PULSADORES NUMI_RICOS. Toque los pulsadores num6ricos
para introducir
el tiempo de preparaci6n,
el nivel de potencia,
las cantidades
o los pesos.
6. TIEMPO DE PREPARACI6N. Toque este pulsador para
seleccionar
un tiempo
de cocci6n.
7. POTENCIA. Toque este pulsador para seleccionar
la potencia.
8. INICJO. Toque este pulsador para iniciar todas las opciones
(excepto el Sensor Smart Touch, Descongelaci6n
11b y la funci6n
A_adir 1 minuto, que se inician autom6ticamente).
9. DESCONGELACI6N
PERSONALJZADA. Este pulsador es un
m6todo
de descongelaci6n
y pescado congelados
10. ABLANDAR/FUNDJR.
preciso
para came
de hasta 4.0 kg.
Toque este pulsador
congelada,
ayes
para ablandar
helado, crema de queso, mantequilla
o zumo congelado
y
fundir chocolate,
queso, mantequilla
o malvaviscos.
11. ANADJR 1 MJNUTO. Toque este pulsador para cocinar al 100%
de potencia
desde
1 minuto hasta
99 minutos
12. RELOJ DE COCJNA. Toque este pulsador
microondas
como reloj de cocina.
13. RELOJ. Toque este pulsando para
14. CONFIGURACI6N
DE CONTROL.
59 segundos.
para utilizar
introducir
la hora.
Toque este pulsador
cambiar
los ajustes predefinidos
del homo, es decir,
reloj, velocidad
de desplazamiento
y libras/kg.
15. PULSAR 3 SEGUNDOS.
Mant6ngalo
3 segundos para bloquear el panel
pulsado durante
de control.
16. BORRAR. Toque este pulsador
introducida
en el horno.
borrar
para
el homo
para
el sonido,
la informaci6n
17. PARAR. Toque este pulsador para detener el funcionamiento
del homo. Toque este pulsador dos veces para borrar la
informaci6n
introducida
en el horno.
18. Funci6n TrueCookPlus ®, Toque este pulsador para cocinar
alimentos
de acuerdo con el c6digo TrueCookPlus ®.
29
GUiA
DE COCCION
La mayorfa
de los recipientes
de cocJna no met6licos
resJstentes al calor se pueden
para probar
los recipientes
antes de usarlos, siga las siguientes instrucciones:
I. Coloque
el recipiente
vacfo
en el homo
2. Mida
I taza de agua usando
3. Prenda et homo de microondas
cocinar
a microondas.
usar en su horno
a prueba
* El vidrio
platos
para
ser usado
de uso general,
tortas, tazas para medir
motduras
de metal.
en cator
ptatos
Ifquidos,
del recipiente.
est6 tibio no debe
usarse
para
NO USAR
de homo
tratado
incluye
Sin embargo,
de microondas.
una taza de vidrio para medir
y p6ngala
en el homo al lado
al 1 00% de su intensidad
durante
1 minuto. Si el recipiente
USAR
Vidrio
de microondas.
de gran intensidad
para
pan,
cacerolas
pasteles
Utensilios
de
° El metal
no permite
y produce
met61icas,
o
y recipientes
metal
sin
que las microondas
una cocci6n
term6metros
° Los utensitios
despareja.
o bande]as
met6ticos
pueden
descarga
de corriente
de microondas.
lleguen
causar
el6ctrica.
al atimento
Evite el uso de brochetas
de aluminio.
chispas
Esto puede
por la
dafiar
et horno
PorceJana
* Tazones,
tazas,
pueden
ptatos
ser usados
y fuentes
en el horno
sin motduras
DecoracJones
met61icas
Pi6stico
Vajilla
* Cuando
se usa pelfcula
de que el plato
de pl6stico
como
sea 1o suficientemente
tapa,
aseg6rese
profundo
pt6stico
no toque la comida.
Cuando la comida
puede derrefir
et pt6stico
donde Io toca.
° Cotoque
la petfcula
aseggrela
° Ventite
dobtando
Esto permitir6
° Use ptatos
semi-rfgidos
cocci6n
puede
de pt6stico
apretando
una esquina
que el exceso
pl6sticos,
tazas,
y botsas
breves.
ablandar
flo]a
el pt6stico
de vapor
recipientes
Use con cuidado
el calor
para
de
se calienta,
el plato
los lados
Papel
y
del plato.
para
paras
tiempos
ya que el pl6stico
afectar
et papet
de las paredes
a prueba
de papel
met6ticos
pueden
° Refi6rase
producto
usarse
a la etiqueta
de papel
de papet
en el homo
para
cocinar
a
de papet
y causar
de papet
de atuminio
ya que
chispas.
de aluminio
para
proteger
las
de atuminio
por
Io menos
det homo
a 1 pulgada
de microondas.
Madera
papet
encerado,
sin bordes
o disefios
en su horno.
det fabricante
de Coretle
se
Ja comida.
de microondas,
y platos
grandes
y la puerta
de madera,
partirse
o quebrarse
mJcroondas.
de papel
que no se use vajilla
cerradas
la cocci6n
pequeBos
° Los tazones
serviltetas
o con bandas
y alas de ayes.
° Mantenga
de
met61icos
de aluminio
• Use trozos
congetador
s61o para
recomienda
tazas
° Evite el uso de ho]as
pueden
escape.
con bordes
Coming
Centura y algunas
microondas.
Papel
• Toallas
metal
Centura
° La compaBfa
que el
det pt6stico.
de pt6sticos
por
sobre
contra
de
* No use vajitla o ptatos
met61icas, etc.
de microondas.
para
Recipientes
cerrados
° La va]itla
herm6tica
usar cuatquier
abertura
para
tablas
cuando
y canastos
se secan
y pueden
Ud. los usa en el homo
de
herm_ticamente
puede
que el vapor
exptotar.
salga
Aseggrese
de la vajitla
de dejar
tapada.
de microondas.
Papel de estraza
° Evite el uso de bolsas de papet de estraza. Este absorbe
cator y puede arder.
Ataduras de metal
° Siempre saque las ataduras de metal ya que pueden
catentarse y causar incendio.
3O
una
CONSEJOS
PARA COCCION
CON
MICROONDAS
DISTRi BUCION
DORADO
La came y las ayes con mucha grasa que se cocinan
por
1 5 minutos o m6s se dorar6n
ligeramente.
Los alimentos
cocinados
por menos
sustancia
para
de soya
o salsa
tiempo
se pueden
que se doren,
para
como
pintar
No apite
10 a
para
densos
con una
salsa Worcestershire,
cocinan
atrapan
et calor
m6s r6pido.
microondas
con una esquina
ceso de vapor.
calentar
Las tapas
durante
evita
mantener
et calor.
absorber
Cuando
con toallas
dejar
satpique
de
o toaltas
PROBAR
Como
los atimentos
TIEMPO
a
panaderfa
veces
use
de papet.
individuales
formado
1 putgada
cocine
en forma
y comidas
tales
un cfrculo
entre
como
y por
papas,
tortitas
ellos. Esto ayudar6
a que la comida
potto
En general
de reposo
Para
prevenJr
cuadrados
los sabores
Siempre
revuelva
de afuera
y redistribuye
desde
el borde
se catienta
et calor
los atimentos
es necesario
para
de
si ya est6n
necesitan
despu6s
tapar
conservar
se etevar6
hacia
el centro
de papet
muchas
de sacarlos
la comida
et calor.
durante
Quite
unos 10°F
del
Mantenga
primero.
voluminosos_
como
asados
que la partes
en forma
pareja.
o aves
de arriba
Tambi6n
dar
enteras
vuetta
se
las piezas
de
un arco
el6ctrica
deben
y de abajo
puede
el papel
1.0 pulgada
porciones
usted
de aluminio
tambi6n
forme
para
que algunas
se recocinen,
el
la mayorfa
durante
btoquear
de aluminio
de aluminio
el6ctrico,
protegerlos
las paras
las paredes
que puede
en platos
debe
para
cubrir
de las alas con papel
recocinen.
en los
ROTACION
cocinen
en un horno
con frecuencia
et perfodo
PROTECCION
se
m6s pareja.
mezcla
vueJta
r6pido
controtar
por unos 2 a 1 5 minutos
de la comida
Usted
La parte
darse
del
y
Io menos a una distan-
tiras
Los alJmentos
en et borde
de las comidas
cuando
est6n casi cocinadas
y 6stas se
terminar6n
de cocinar
durante
et reposo. La temperatura
AGITACION
plato.
m6s
m6s
de reposo.
cia de
alimentos.
y verduras
se cocinan
de la densidad,
reposar
perfodo
de papel.
los alimentos
La agitaci6n
las porciones
DE REPOSO
interna
hors d'oeuvres
en el plato
los atimentos
LA COCCION
es necesario
det horno.
Para
ESPACIAMiENTO
Ponga
Como
ponga
aves, pescado
C6MO
Dependiendo
y ayuda
los emparedados
en una sota capa
pareja.
el ex-
se pueden
Et papel
el horno
artfculos
de papel
envuelva
salir
Distribuya
en forma
m6s lentamente,
de came,
microondas,
cocidos.
para
de vidrio
con cuidado.
caliente
se
pt6stica
para
0setas
serviltetas
m6s humedad
grasosas
dobtada
que el alimento
encerado,
y los alimentos
o pelfcula
de las cacerotas
la cocci6n.
encerado
papel
y et vapor
Use una tapa
se cocinan
gruesas
plato.
salsa
barbacoa.
TAPAS
Las tapas
los alimentos.
que se cocine
es decir,
daBar
o
peque_as
las ayes y las puntas
evitar
que se
a una distan¢ia
del horno
con
las microondas.
de
para
rectanguJares
para
minima
evitar
una descarga
de
que se
de corriente
el horno.
PERFORACI6N
de
Perfore
y las chutetas.
la c6scara,
de cocinarlos
requieren
para
piel o membrana
evitar
perforaci6n
alme]as,
ostras
de los atimentos
que estatlen.
son: yemas
y verduras
y ctaras
enteras
antes
Los alimentos
como
que
de huevo,
papas
salchichas,
y catabacitas.
LIMPIEZA
Limpie
et horno
detergente
por
ditufdo.
una vez por
use potvos
y por fuera
enjuague
o esponjas
excesivas
con una toatla
de cocinar
polio
por
BANDEJA
suave y
Esto debe
si es necesario.
hacerse
en el techo
muchos
de papel
dfas.
interior
Limpie
mojada,
giratoria
son desmontabtes.
(no catiente)
Nunca
son
giratoria
El descanso
limpiarse
las
se puede
tavar
en el fregadero.
del roditto
con
de la bande]a
giratoria
debe
regularidad.
especialmente
CUIDADO
o tocino.
ESPECIAL
Para me]or funcionamiento
y seguridad,
et panel interno de
la puerta y et marco frontal
del horno deben
estar libres de
y el descanso
Estos deben
y detergente
use potvos
GIRATORIA
Tenga cuidado
de no astitlar o rasguBar
los bordes ya que
esto puede hacer que la bande]a
se rompa durante
et uso.
PARTES DESMONTABLES
La bandeja
DE VIDRIO
La bande]a
Nunca
6speras.
de aceite
si se dejan
con un paso
y seque.
o m6s a menudo
limpiadores
de quitar
satpicaduras
despu6s
Luego
semana
Las satpicaduras
diffcites
dentro
ditufdo
limpiadores,
del roditto
lavarse
usando
con agua
un paso
lana de acero
acumulaci6n
de la bandeja
a mano
detergente
tibia
de alimentos
dilufdo;
limpiadores
suave.
Despu6s
o esponjas
o espon]as
de limpiar
"STOP/CLEAR"
6speras.
se pudo
panel.
31
haber
o grasa.
luego
para
hecho
en]uague
Limpie
a menudo
y seque.
Nunca
con
use polvos
6speras.
el panel
borrar
de controles,
cuatquier
accidentalmente
toque
entrada
durante
et bot6n
de datos
que
la limpieza
del
UTILIZACI6N
TrueCookP/us
Microwave
de TrueCookPlus ®
® ES UNA
Science
MARCA
COMERCIAL
REGISTRADA
JV LLC. en EE.UU. y en todo
DE
el mundo.
CleQr
1. Presione
el bot6n
Clear.
_Qu6 es TrueCookPlus ® ?
TrueCookPlus
® es la primera
microondas
utitizando
de los alimentos.
forma
un c6digo
de cocinar
con
que encontrar6
en et envase
Localice
el c6digo
en su paquete
CONFIGURACION
Tras desembalar
y enchufar
unos minutos para informar
c6digo
o en la p6gina
de TrueCookPlus ®
http:JJwww,
En su paquete
su homo TrueCookPtus ®, t6mese
a la funci6n TrueCookPlus ® de su
c6digo
sobre
postal.
3.
Clear
1. Presione
et bot6n
2. Presione tres veces et bot6n
TrueCookPtus ®
3. Introduzca
el c6digo
cinco cifras
en EE.UU.
4. Presione
postal
de su Oficina
et bot6n
5.
@ aparecer6
TCP.
Presione
el bot6n
el panel
de su horno
TrueCookPlus
un sonido
pulsadores
microondas.
1
Web
TrueCookPtus
continuaci6n,
TrueCookPlus
y, a
introduzca
® mediante
num6ricos
et c6digo
los
de su
g / 2 J '7' _'_'"-'
@
de
6. Presione
et bot6n
7. La funci6n
postal
Start.
Start.
TrueCookPlus
controtar6
en su microondas.
la funci6n TrueCookPtus
acabe,
escuchar6
un tono
cuando
la cocci6n
haya
8. Su homo
necesita
o en la p6gina
un c6digo
con su c6digo
postal,
cada vez que introduzca
un c6digo
TrueCookPtus ®, et sistema se ajustar6
autom6ticamente
® no v6tido,
a la altura
ubicado.
"CODE
et nivel
det mar
en la que se encuentra
If usted
de corte
el c6digo
postal.
homo microondas.
En caso
un error
mientras
et6ctrico,
Este c6digo
de haber
uno nuevo,
el horno
modificado
deber6
no es necesario
se guarda
et c6digo
conflgurarse
restabtecer
en la memoria
postal
undercook,
del
e introducido
segOn dicho
c6digo.
32
para
quemarlo
de
Web
su homo
et mensaje
ERROR"
que puede
c6digo
num6rico
o el fall para presionar
TrueCookPtus ® antes de entrar en el c6di
NOTA:
En caso
hace
® exacto
TrueCook P/us.corn
TrueCookPlus
mostrarfa
finatizado.
en et paquete
Si introdujese
® est6 configurado
®
de aviso
que introduzca
TrueCookPlus
ht?_://www.
sobre
la
cocci6n
Cuando
comida
TrueCookPlus
®
autom6ticamente
que aparece
et sistema
® en
microondas.
Por ejempto, introduzca 12 3 4.
La pantalla mostrar6:
el c6digo
Una vez que
®
favorita
TrueCookPlus.corm
de comida,
et
el Iogotipo
4. Escuchar6
Clear.
TrueCookPlus
de comida
o aOn para
(c6digo
err6neo)
incorporar
et
el bot6n de
go, su atimento
quemar.
PERSONALIZACK_N
de TrueCookPlus ®
En ocasiones,
podrfa preferir
que la funci6n
cocinase
m6s o menos su comida.
Et sistema
TrueCookPtus
catentando
o enfriando
® puede
adaptarse
1. Presione
®
a sus gustos,
m6s sus atimentos,
Clear
TrueCookPtus
el bot6n
autom6ticamente.
Clear.
2. Presione dos veces el bot6n
TrueCookPlus ®
1
3.
Si desea menos cocci6nt al
introducir et c6digo TrueCookPlus ®,
presione 1.
Esto reducir6 et tiempo en un 6%.
4.
Si desea
m6s cocci6n,
et c6digo
3
para obtener
de cocci6n.
Presione
al introducir
TrueCookPlus
un 3%
4 para
de fiempo
9% m6s.
®, presione
3
m6s de tiempo
obtener
de cocci6n
un 6%
y 5 para
m6s
un
Presione 2 para restabtecer la
5. funci6n TrueCookPtus ® a la
configuraci6n
del tiempo de cocci6n
predeterminada
6. Presione
et bot6n
de f6brica.
Start.
Nora:
1 : menos
2 : normal
tiempo
(6%)
(predeterminado)
3, 4 6 5: m6s tiempo
(3%,
6%,
9%).
TrueCookPlus ® es una marca comercial
Microwave
registrada
de
Science JV LLC; y se usa en este documento
licencia de Microwave
ba]o
Science JV LLC ba]o patentes
5,812,393,5,833,801,6,198,975,6,249,710.
Copyright
2008 Microwave
Science JV LLC.
33
SEGURO
RELOJ
Ejemplo: Para poner el reloj a las 10:30.
Puede
panel
Toque:
La pantalla
muestra:
usar esta funci6n
de control
autorizaci6n
Para
1.
PARA NINOS
para
y cuando
programar
de seguridad
que
btoquear
et
los ni_os no usen et horno
para
sin
est6 limpiando
el seguro
para
et horno.
ni_os:
Clear
Toque:
2.
g
."Z-7;;'L_,_
,,,,'t
J/,_<_,
TlmI"7- n U
3.
1 0 3 0
1.
Clear
2.
HOLD 3 SEC
La pantalla
Hora
Toque
, uT
r L_L-H 5 DgR7
y sostenga
5.
1
II-
_L?9
..2_?9
I
/
I
I !
,sLILIL
;_
del dfa.
hasta
que aparezca
LOCKED
(BLOQUEO)
en la pantatla
(Aproximadamente
i1"_ TRJ
muestra:
3 segundos).
/._
Paracancelar:
Toque:
.....,3;7
.._ z;9
La pantalla
muestra:
,.,u_.;_5DfRT
Hora
del dfa.
FZ'x
t
LST_RT
/u
_,7 #-7
)
" _-_u
-_F?
HOLD 3 SEC
V
NOTA:
Este es un reloj
AM
de
Y PM tocando
1 2 horas.
Puede
I 6 2 despues
cambiar
det
entre
paso 4.
RELOJ DE COCINA
Su homo
de microondas
temporizador.
Puede
puede
prefijar
ser usado
hasta
como
99 minutos,
un
99
segundos.
EjempIo:
Para fijarlo
en 3 minutos.
Toque:
La pantalla muestra:
1.
Kitchen
Timer
:L--,';;_,S_
D_'TL--,h'I_,_'}'I-?/}2
5L--L-
2.
30
3.
0
;9;9
T/'_! #- I
,_,_,_;_5_qRT
JTim - _'_"
,,/ER/9/9
TIMER y tiempo en
cuenta regresiva
34
Toque y sostenga hasta
que desaparezca LOCKED
(BLOQUEO) de la pantalla
(Aproximadamente
3 segundos).
INSTRUCCIONES
DE USO DEL SENSOR SMART TOUCH
Sensor Touch es una funci6n muy interesante
f6cit la cocina con microondas.
Et men6
Sensor contiene
calentar
o recatentar
autom6ticamente
dad de alimentos.
Cafegor[as
recetas
populares
perfectamente,
et fiempo
que hace
m6s
6. La temperatura
det ambiente
no debe exceder
de 95°F.
7. El homo se debe enchufar
at menos 5 minutos antes de usar
que te ayudar6n
porque
a
la cocci6n
de preparaci6n
para
fipo
y canti-
PATATA ASADA
:
COCCION
Recalentar, Papas, Arroz,
Palomitas, Vegetales frescos,
Vegetales congelados,
En las pr6ximas
de alimentos
mayorfa
p6ginas
se provee
especificados
de Cocci6n
detecci6n
de cocci6n
e enstrucciones
de Cocci6n
de Toque
de la acumulaci6n
2. Cerci6rese
con e]emptos
de cocci6n
de Toque
se mantenga
le permite
sin tener
o los niveles
para
la
cocinar
la mayorfa
que seleccionar
de energia.
Este homo
de cocci6n
de
los tiempos
determina
requeridos
para
E]emplo: Para cocinar entradas congeladas.
por Sensor.
por Sensor traba]a
por
sonar6n
La pantalla
Toque:
la
cerrada.
ha sido detectado,
favoritos
autom6ticamente
los tiempos
cada ctase de alimentos.
de vapor.
de que la puerta
3. Una vez que el vapor
una tabla
(EJEMPLO)
POR SENSOR
sus alimentos
Entradas congeladas.
de los programas
1. El sistema
por sensor.
Sensor introduce
muestra:
1. Clear
Hora del dfa.
2.
I UH_JU
dos
pitidos.
4. Si se abre
la puerta
(PARAR/BORRAR),
o se toca
antes
proceso
se cancelar6.
Et horno
parar6
5. Antes
de usar
de STOP/CLEAR
el vapor,
el
Baked
o_:_
Potato
de funcionar.
la Cocci6n
de que el exterior
y el interior
resuttado.
et bot6n
de que se detecte
de Toque
del recipiente
del horno
est6n
por Sensor,
que
se use para
secos, para
El homo recalentar6
cerci6rese
asegurar
autom6ticamente
el alimento a trav6s
det sistema por sensor.
cocinar
un me]or
TABLA DE SENSOR SMART TOUCH
CATEGORiA
iNSTRUCCiON
CANTiDAD
Papas
Pique cada papa con un tenedor y coJ6quelas en la charola
alrededor
dei borde, separadas al menos 3 cenfimetros.
] - 4 medJanas aprox.
250 gramos cada una
Arroz
Coloque el arroz y el doble de liquido (agua o caldo de polio o vegetales)
en un pJat6n para microondas Cubra con envoJtura pJ6stJca.
1 - 2 tazas.
Use arroz de grano medio
Cuando est6 cocinado_ de]e reposar ] 0 mJnutos antes de sacar.
Remueva un poco para espon]ar eJ arroz,
CocJne arroz instant6neo de acuerdo
con Jas instrucciones deJ paquete.
CoJoque una boJsa de paJomitas
la charoJa giratoria.
Tama_o regular 3.0 - 3.5 oz.
Use una boJsa de paJomJtas de maiz
fresca.
PaJomitas de maiz
de maiz para mJcroondas
en el centro de
VegetaJes
frescos
(Toque I )
Prepare como Jo desee, lave y deje la humedad natural de los vegetaJes.
CoJoque en un recipiente para microondas deJ tama_o adecuado, tape con
una envoltura pl6stica con ventJlaci6n.
1 - 4 tazas
VegetaJes
congeJados
(Toque 2)
Saque deJ paquete, enjuague ba)o el agua corriente.
CoJoque en un recipiente para microondas deJ tama_o
una envoltura pl6stica con ventJlaci6n.
I - 4 tazas
VegetaJes
Entremeses
congeJados
NOTA:
Si abre
adecuado,
tape con
Saque deJ empaque exterior. DesJice Ja cubierta. Si el contenedor no es
para microondas_ coJoque en un pJat6n_ cubra con una envoJtura pJ6stica
con ventiJaci6n.
la puerta
u oprime
STOP/CLEAR
(PARAR/BORRAR)
durante
35
la detecci6n,
] 0 - 2 ] oz.
se cancelarc_
el proceso.
o largo.
COCCKDN
RECALENTAR
Esta funci6n
le permite
recatentar
temperatura
ambiente
o refrigerados
atimentos
precocidos
sin seteccionar
a
Este elemento
tiempo
intensidad
de cocci6n y nivetes de potencia.
Esta funci6n tiene 4 categorfas:
Platillo para la Cena,
Soup/Sauce,
Vea
Caserola,
la siguiente
tabta
Ejemplo: Para recalentar
m6s informaci6n.
1.
p6gina
un guisado.
Toque:
NOTA:
La pantalla
Clear
Hora
le permite
de cocci6n.
programar
Para
Reheat
un tiempo
resultados
y una
6ptimos
hay
10
muestra:
42.
Si Ud. no setecciona
el nivet de intensidad,
et horno
cocinar6
autom6ticamente
a 100% de intensidad
(HIGH).
EjempIo: Pora cocinar por 5 minutos, 30 segundos a 80°/0
de intensidad.
det dfa.
La pantalla
Toque:
2.
PROGRAMADO
niveles de intensidad
adem6s
de intensidad
atta (HIGH)
que es el 100%.
Para m6s informaci6n
referirse
a ta
"Tabla de nivetes de intensidad
de microondas"
en la
Pizza.
para
A TIEMPO
-1....
l_-FT" //_-/fu
7"n
5_:
"_-" / ,u
muestra:
LZ/
Cook
•. L/HL/\
O,IT"CO
LL/L7_//I/L?
:ram
//,#-
,_7"//1-/-/I
i1_
Time
3.
3
:ss ......
,
/-
COl-t/
El homo recatentar6
autom6ticamente
trav6s det sistema del sensor.
2. 5 3 0
C
et alimento
Cook
Power
TABLA DE RECALENTAMIENTO
1
Cafegoda
Platillo paro
io Cena
#-
I
Confidod
los alimentos
7"
_
T
I"_C_
L,"_RI
I_,,-_
i UL£1LI_
-': ":/-?_
, _,_,_,,,uu _,,,_
/...71"_11_.--/"7
I_ILI\
instrucciones
Coloque
TRI
a
t
C6digo
:_,z;,
,_,_,_)__q,_ql, u,,
4.
8
I1717
L,-I_/
LLVLL
T_"
JU
J:":]'_
Aprox.
] 0.3- ] 5.5 oz.
que desee recalentar
en un plato de servicio
de mesa o en otto plato
similar. Cgbralo con
papel
Soup/Sauce
de pl6stico.
Coloque
un recipiente
apropiado,
en
de tamaSo
aprobado
para uso en el
icroondas. Cgbralo
Caserola
1-4 tazas
los alimentos
que desee recalentar
papel
5.
con
de pl6stico.
Cubra con papel de
pl6stico el recipente que
contenga
la cacerola
1-4 tazas
de
carnes y verduras.
Pizza
Ponga la pizza en el
papel
1-3 piezas
no-reciclado
directamente
giratorio.
al palto
36
POTENCIA
80.
Cuenta regresiva
y
I
_11L,-I
LL VLL
TABLA DE INDICACIONES
ABLANDAR/FUNDIR
El homo
usa baja
o margarina,
can queso)
sas crema
energfa
chocolate,
y ablandar
y jugos
para fundir
matvaviscos
atimentos
hetadas).
Ejemp[o: Para derretir
alimentas
(mantequitta
o alimentos
procesados
(mantequitta,
Vea la tabta
hetados,
que-
a cantinuaci6n:
C6digo
Categoria
1
Mantequilla
o margarina
8 oz. de chocolate.
Toque:
La pantalla
1.
Hora
Clear
Chocolate
2.
I
Elija la selecci6n de 4 o 8
5&'____
i "_-....
1/
I-
4.
JTn
u
T_"
Tn
Ju
8o
16oz.
los
y p6ngalos
en
un envase para uso de
microonda. AI fin del ciclo
TI'II
ll-
revuelva
I
_;5_/,_
uJ-7........ ;5
//
oz.
para hornear.
cuadrados
ILl
l?/
I1"11-1"11
4o8
onzas (del peso real) para
derretir cuadrados de
Desempaquete
I I_1
para
la fusi6n.
chocolate
3.
porciones
//
, ,_,_,_52
/,_-Z......
-'
Melt
1,2o3
y col6quela
ai concluir
completar
I"?-T-AI
_[//-,
L-,, ,TRilluu_._
Soften
Desenvu61vala
en un envase apto para
microondas.
No es necesafio cubrir la
Ja cocci6n revuelva
det dfa.
Cantidad
Instrucciones
mantequilla,
muestra:
PARA FUNDIR
para terminar
derretir.
de
Si usa pedacitos
de
L-7
chocolate
ufilice
siempre la
configuraci6n
de las 4
onzas. AI fin del ciclo
Tf?lllI 5, T7-7_,
OT
,_,_,_5
revuelva
para terminar
de
derretir. Agregue el tiempo
necesario si se esta
6.
! oZo__
Tiempo en cuenta
regresiva
y CHOCOLATE.
Quesos
derritiendo
m6s de 4 onzas
en medida
seca.
Use soJamente
procesados
TABLA DE INDICACIONES
PARA
ABLANDAR
C6rteJo
en cubos.
en una
soJa capa
envase
apto
microondas,
C6digo
1
Categoria
Manteq
uilla
instrucciones
Cantidad
Ca mantequilla
estar6 a
1,2 o 3
la temperatura
ambiente
porciones
cocci6n
Malvaviscos
2
Helados
Io suficientemente
para ser aprovechados
f6cilmente.
Qgesos
Desenvueiva
crema
en un envase
microondas,
estar6
Jugos
helados
para
El queso
crema
a temperatura
ambiente
seg0n
apto
y Jisto para
usar
Ja receta,
Quite la tapa.
Col6quelo
en
el horno. El jugo helado ser6
Io suficientemente blando
para mezclarse
Ja fusi6n,
o peque_os.
en un envase
para completar
gal6n
3o8oz.
y coJoque
Ja
para
apto para microondas. AI
final del ciclo revu61valos
Cuarto,
Medio
m6s
en un
AI concJuir
Col6quelos
Pinta,
blandos
CoJ6queJo
Pueden usarse maJvaviscos
grandes
Coloque el envase en el
horno. Los helados ser6n
queso,
para
revueJva
compJetar
y lista para usar segOn la
receta,
aJJmentos
con
6,12016
OZ.
f6cilmente
con agua.
37
la fusi6n.
5o lOoz.
COCINA
ANADIR
PERSONALIZADA
Use esta funci6n
para
cocinar
alimentos
sin necesidad
fl]ar el tiempo
de cocci6n
o la intensidad.
Para m6s informaci6n
lea la "Tabta de cocina
que se muestra
de
Tecla
Toque:
de ahorro
le permite
personalizada"
ajustar
de tocineta.
La pantalla
fijar
de tiempo.
e iniciar
Este control
r6pidamente
simptificado
la cocci6n
a
una potencia
de 1 00% sin necesidad
de tocar INICIO.
Adem6s,
utitizando
la tecta A_adir
1 minuto, se pueden
a continuaci6n.
Ejemplo : Para cocinar 4 tajadas
I MINUTO
todos
los programas
Ablandar/Fundir,
Programada
y Cocina Personatizada
alimentos
durante m6s tiempo.
muestra:
Cocina
para
cocinar
los
Ejemplo : Para cocinar por 2 minutos.
].
Custom
5E_J/_2/,u
-i I_-FT m-A,1/
Cook
/
rn
Ju
_/7-
Toque:
2.
8__'....
";
I
i-f'll_l
/
Tfl_
,_,_,_;_,
II-
Tf_1
111-L-
1.
Clear
2.
Add I
Minute
II-
Hora det dfa.
Dos
veces
Si toque
AI_IADIR
] minuto
contra-retoj
Cuenta regresiva
potencia
1 00.
y
I
NOTA:
t
muestra:
"-7
Ju
Tf'll
La pantalla
despu6s
hasta
1 MINUTO,
se agrega
desde
99 min 59 segundos.
de
Et tiempo
que
TOCINO
correr6
aparezca
al
en la pantatla.
C6digo
PERSONALIZADA
CategoHa
DIRECTION
Para obtener
1"
Tocino
para
tocino
de servicio
r_v
un mejor
de mesa,
Panecitlos
S6quelos
Congelados/
Mottetes
de 3 oz cada
cantidad).
Panecitlos
S6quelos
Frescos/Mottetes
de 3 oz cada
cantidad).
Bebidas
Tras catentarta,
que se calientan
S6quelos
resultado,
det microondas.
del envase
revestido
cada
cada
de tocino
en la parritla
no est6 disponible,
use un plato
2-6
rebanadas
de papet).
(Si los motletes
dos cuando
en un plato.
uno como
y cot6quetos
las tiras
en un plato.
uno como
y cot6quetos
uno, cuente
del envase
de toaltas
y cot6quetos
uno, cuente
del envase
cotoque
(Si la parrilta
Cantidad
pesan
(Tenga
m6s
a registrar
(Si los motletes
dos cuando
en un plato.
vaya
pesan
vaya
a registrar
mucho
cuidado!
la
1-6
(2-3
m6s
la
la bebida
estar6 muy catiente.
Algunas
veces, los Ifquidos
en recipients
citfndricos,
salpicar6n
cuando
se mueva la
pedazos
onzas cada
1-6
(2-3
1
2 tazas
taza).
Pedazos
v
de
Potto Hot Cereal
Cotoque
Prep6relo
v
Cereal
Catiente
los pedazos
de
potlo
en un recipiente
aprobado
para uso en el microondas,
deje un respiradero.
seg6n
d6jeto reposar
instant6neo.
las instrucciones
antes
de comerlo.
de tama_o
cgbrato
con papet
det paquete
y cocineto.
Use sotamente
38
cereal
apropiado,
de pt6stico
y
Revu61valo
y
caliente
0.5
uno)
pedazos
onzas cada
J
TABLA DE COCINA
- 2.0
Ibs.
1-6 porciones
uno)
CONFIGURACION
OPC]ON
Puede
proporcJona
seleccionar
EjempJo:
DE CONTROL
cuafro
modos
que facJJJtarc_n
APAGAR/ENCENDER
Para apagar
el Sonido
SONIDO,
del alertador
Toque:
La pantalla
1,
Hora det d_a.
Clear
Control
2,
Los cuatro
Setup
muestran
i"1111_1#
5_lL# I"__t-C
3t
("beeper")
TnJ
#-
I
"_
i"tl_l
Tn!/I-
I
DE PANTALLA
Para seleccionar
Ja unidad
de Kg.
La pantalla
1.
Hora del d_a.
Clear
Corltrol
2.
Los cuatro
Setup
muestran
modos
muestra:
se
en pantatla.
/
3.
4.
Hora det dfa
! ._
TI.lJ #/-__,;
J.....
ULIL -,
_
i//
C
2
Hora
NOTA: Para votver a encender el sonido det alertador,
repita los pasos det 1 al 3, entonces toque et
nOmero 1.
TABLA DE FUNCIONES
NOTA:
OPCiON
1
ENCENDIDO/APAGADO
Para
seteccionar
entonces
DE CONFIGURACION
NUME RO
NUMERO
SONIDO
RELOJ
2
y LBS/KG.
Toque:
se
en pantalla.
U! /
RELOJ, VELOCIDAD
EjempIo:
muestra:
modos
de mJcroondas.
_,uJ ,,_,J/-,
2
4.
el uso de su homo
APAGAR/ENCENDER
toque
del d_a
LBS., repita
et nOmero
los pasos
det 1 at 3,
1.
DE CONTROL
RESULTADO
1
Sonido
Encendido
2
Sonido
Apagado
1
Reloj Encendido
2
Reloj Apagado
ENCENDIDO/APAGADO
VELOCIDAD
DESPLAZA-MIENTO
INFORMACION
DEL
1
Lenta
2
Normal
3
R6pida
1
Lbs.
2
Kg.
DE
EN LA
VENTANILLA
4
NOTA: Cuando se conecta
Normal y Libras.
LBS / KG
por primera vez las configuraciones
por omisi6n son Sonido Encendido, Retoj Encendido, Vetocidad
39
DESCONGELACION
PERSONALiZADA
Se presentan
3 secuencias de DESCONGELACKDN
en e[ homo.
La ¢aracterfstica
descongelaci6n
le mostrar6
le provee
de alimentos
que secuencia
rn6todo
La gufa
es recomendada
• Para 6ptimos
PERSONAUZADE
e[ rnejor
congelados.
LAS PUNTAS OPERADORAS
et alimento
que est6 descongelando.
Para
agregar
conveniencias,
un mecanismo
girar,
de pitidos
separar
Se provee
el Auto
Descongetaci6n
incorporados
incluye
que le recuerda
niveles
et pescado,
o paquete
mariscos,
came
de pl6stico.
De Io
raspe la came derretida
cuando
suene et pitido y continOe
descongetando.
• Ponga los alimentos
en recipientes
que no son profundos
o en
revisar,
o reajustar.
tres diferentes
Saque
original
contrario,
la envottura mantendr6
el vapor y los jugos cerca
det alirnento
cual puede causar que la superficie
se cocine.
• Para los mejores resultados,
acomode
su came entera dentro
de ta forma de un buBueto antes de congetar.
AI descongelar,
de la cocina
para
resultados:
y aves de su envottura
de
de descongetaci6n.
una bandeja
para asar a microondas
para que junte Io que
gotea.
• Los aNmentos
deben estar todavfa
frfos en el centro cuando
los saca det homo.
1. CARNE
2. AVES
3. PESCADO
Peso disponibte
Ejemplo
es de 0,1 _ 6,0
: Para descongelar
Esta tabla muestra
fipos de atimentos.
libras.
o retire
1.2 Ibs. de came
las tapas
las selecdones
Para obtener
de los atimentos.
molida.
Toque
Toque:
La pantalla
1.
Clear
2.
Custom
muestra:
Alimento
Hora del d_a.
I /"_1--0
ICI
I IT
nnl,
Defrost
T/"71
I1--1 I
I/--ILl/--/-J
rnu
rn_ ,-
y pesos para los diferentes
los mejores resultados,
afloje
_
Pesosque se pueden aju#ar
Descongelaci6n
Personalizada
(d6cimas de libra)
CARNE
1
.1 to 6.0 (45g
to 2722g)
AVES
2
.1 to 6.0 (45g
to 2722g)
PESCADO
3
.1 to 6.0 (45g
to 2722g)
,-,g _ rn,,-, _
TABLA DE CONVERSI6N DE PESOS
3,
1
4.
1
para
Probablemente,
IYE,<TT
L-7;"]5_
'1c1'-,_
!
2
escribir
usted
est6 acostumbrado
en libras y onzas, es decir, fracciones
onzas son 1/_ de libra). Sin embargo,
en Descongetaci6n
d6cimas
de libra.
i.
2
TnlOI
T OT
,uu&S
5,;9_
,
personalizada,
Si et peso del
debe
paquete
indica
en fracciones
de libra, puede
_ara converfir
et peso a decimates.
el peso
a medir
los atimentos
de libra (por
para introducir
ejemplo,
4
el peso
especificar
libras
de los atimentos
ufiNzar
la tabta
y
se
siguiente
Peso equivalente
5.
(
I_ "_
Cuenta
regresiva
ONZAS
PESO DECIMAL
y DESCONGELAR.
NOTA: "Dar la vuetlda" aparecer6
en el medio de cic.
en la xxibicion
digital
NOTA:
AI tocar et bot6n de INICIO, la pantalla
carnbia
al fiempo de
descongetaci6n
en cuenta regresiva.
Et homo pitar6 dos veces
durante
el cicto
la puerta
Saque
y gire,
todas
de DESCONGELACK)N.
separe,
tas porciones
o reajuste
EN cada
pitido,
abra
1.6
.10
3.2
.20
4.0
.25
4.8
.30
6.4
.40
8.0
.50
9.6
.60
11.2
.70
12.0
.75
I 2.8
.80
14.4
.90
1 6.0
1.00
Un cuarto
Media
de
libra
libra
et aNrnento.
que se hayan
descongetado.
Vuetva a poner las porciones congeladas
en et homo
"lNICIO"
para continuar
et cicto de descongelaci6n.
y toque
Tras
Una
cuartos
de
libra
libra
NOTA:
Si et valor se encuentra
m6s bajo para obtener
4O
entre dos pesos decimates,
etija et peso
mejores resultados
de descongelaci6n.
TABLADE DESCONGELACI(DN PERSONALIZADA
Categor_a
Aiimento
DESCONGELACION
I LB
Esta funci6n debe ser usado
de came de vaca.
a descongelar
solo cuando
descongela
1 libra
Res
Came
motida,
asado
(distintos
filetes,
cubos
cortes),
para
asado
EjempJo
estofado,
de costitta,
Cordero
Chuletas
(1 putgada
de espesor),
desoongeJar
Toque:
hamburguesa.
1¸
: Para
1.
Clear
Chutetas(1/2
costittar,
putgada
2.
1 Ib
Defrost
asado,
de came
moJida.
La pantalla muestra:
Hora del dfa.
asado
Cerdo
CARNE
1 Jibra
de espesor),
hotdog,
chorizos
Tiempo en cuenta regresiva
y DESCONGELAR
.
Ternera
Came
Chutetas
(1/2
pulgada
NOTA:
Ayes
Enteras (menos de 4 Ibs.), cortes, pechugas
(sin hueso)
Gallinita
de Cornualles
Entera
AVES
Pavo
Pechuga
Pesoado
3
Filetes,
rebanadas
Mariscos
Came
PESCADO
de cangrejo,
camarones,
catlo
motida
1 Ibs/0.5
kg sot6.
de espesor)
colas
de hacha
de
langosta,
(vieiras).
41
"Dar la vuettda"
aparecera
en et medio de cic.
en la xxibicion
digital
COCINA
DE DOS FASES
Para resultados
intensidades
ciclo
6ptimos,
de cocci6n.
cambie
algunas
de cocci6n
de una intensidad
programar
etapas
su homo
para
Su homo
det
que
en 2 etapas.
La pantalla
Cook
permifirle
En et siguiente
tabta
tiene
7.
Nivel
2
1717
" &/&/
se muestran
primera
minutos.
etapa
la
'_lrll
I_..--0
i1!ii
/\
I
ii
(Alto)
&.--I l&.--I
J/LL
en 3
7.
Cook
Power
I_..-0
9
1717
...........
/_'_lrll
b';;;£R
1 &.-I IL--I 17
aZlLI_
LL
IILL
C/
Tl_
/17
/ u IC/
8
.
para
programar al
la intensidad
80% en la
-? " uc,'7"7
,
7
,..,_,2_b_.
57,,..,,_,,_;£
5,',gRT
Oill
_ -
II-
Tnl
I
etapa.
Cook
Time
-,/y;S ° '-ilil ""- ,,2
L UL7_ll
tO
Tim
6
-
5
6. 7 0 0
para programar
segunda
etapa
minutos.
Till
#-
* Hervir
* Hacer
agua.
carameIo.
* Cocinar
* Cocinar
trozos
trozos
* Cocinar
ayes
de ayes, pescado
fiernos de carne.
y verduras.
enteras.
* Recalentar
arroz,
pastas
• Recatentar
comidas
y verduras.
preparadas
r6pidamente.
emparedados.
• Cocinar
ptatos
queso.
• Cocinar
• Derretir
a base
de huevos,
pasteles,
chocolate.
• Cocinar
ternera.
* Cocinar
un pescado
• Cocinar
budines
• Cocinar
]am6n,
aves
• Cocinar
asado
de costitla,
leche
y
pan.
entero.
y natittas.
enteras,
cordero.
puntas
de filete.
I
4
oilHco LLVLL
Jclio
I LII!ILI\
3
Cook
.1717
* Descongelar
came,
• Cocinar
cortes
• Cocinar
chuletas
• Quitarle
el fifo
aves
de came
y mariscos.
menos
de cerdo,
fiema.
asado.
/ "c/c/
Power
.... 2_..... b,';;;£R
Onl
_)_ill
[
I_0
aZlLl\
--
//7/'7
I
LL
para
programar al
la intensidad
primera
L--I IL--I
IILL
17
C/
Til
2
lit
/ u IC/
l_'O
-IT
Till
II-
I
T
0
Cuenta regresiva
POTENCIA
80.
At final
del perfodo
sonidos
cortos
mantequilta.
1
* Mantener
• Ablandar
guisados
manteca
0
* Tiempo
T
etapa.
9. (oZo.]
alas
• Ablandar
/7"uu'n'7
Oil!
10.
de microondas
,_,_,_ 5TRRT _,^ii°
la
en 7
?
8.
sugerencias:
Uso
• Recalentar
7.
algunas
de
__uu
11717
_,."_nl ICO
primera
de
una variedad
de
I0
Til! #- I
,_,_,_b5LgRT
u^"_°
programar
de intensidad
o caJentar
intensidad
2.300
5.
1 0 niveies
cocinar
Tabla de nivel de intensidad
muestra:
.o,,,co
,-ilil
.,,,_,,,_-u,,u,
_uO_,,o
,,,,2
Time
3.
de microondas
cocci6n
para
atimentos.
un ciclo de cocci6n de 2 etapas.
Toque:
para
DE LAS
necesitan
en las distintas
a otra hasta
EjempIo: Para programar
I.
recetas
diferentes
Ud. puede
NIVELES DE INTENSIDAD
MICROONDAS
de cocci6n
se escuchar6n
y
dos
y uno largo.
42
de
reposo.
frutas.
y ptatos
y queso
principates
crema.
tibios.
PRECAUCI6N:
No usepapel de aluminioduranteel ciclo de cocci6n.
CONSEJOS
PARA COCCI6N
Ca rne
Aves
1. No se requieren
preparase
t6cnicas
en la forma
especiates.
La came
convencionat
para
la came
un plato
en una bandeja
especial
para
5. Deje
m6s cortos
gruesas
4. D6 vuelta
cocci6n.
a la "Tabla
Use el tiempo
y los tiempos
chuletas
reposar
importante
6. AsegOrese
para
para
6ste sobre
cocinar
carnes
de cocinar.
la piet y pase
4. Todas
(a
carnes
m6s peque_as.
en papet
de reposo
et proceso
especiatmente
antes
asar
Para
aceite
y luego
de acuerdo
cuando
est6
de
tienden
a cocinarse
es muy
partes
de
vegetal
partes
de cocci6n.
de cerdo,
6. Deje
est6
de comerla.
comertas.
Intensidad
Corte
de
microondas
Tiempo
cuando
de
los jugos
jugos
son claros
vuetta
saten
y la came
la "Tabta
para
D6 vuelta
a su forma,
las aves
especialmente
durante
envuelta
la cocci6n
las
estas
en papel
El tiempo
de
de reposo
es
la cocci6n.
est6n
est6n
claros
en la parte
para
giratoria.
m6s pareja.
comptetar
con un cuchitlo.
de
Debiclo
la carne.
de que las ayes
con un cuchillo
RES
para
la bandeja
despareja,
5-1 0 minutos
Las aves enteras
pincharlo
cocci6n pot libra
cocinar.
de sacar
a menos
en una bandeja
especial
a continuaci6n.
en forma
por
antes
7. Aseggrese
carnes
sobre
instrucciones
At darlas
muy importante
Tabla para cocinar
cocinarse
en forma
se cocinan
reposar
aluminio
puesto
a medio
de metal.
con un pincet
marinada.
que se muestra
huesudas.
descongetadas.
o en un plato
alas
ayes"
deben
cocinar.
y las abrazaderas
de ave deben
cocinar
para
comptetamente
a microondas
microondas
5. Cocine
del tiempo
envuelta
Et tiempo
las carnes
para
grandes
Las ayes
si Io desea.
estar
las menudencias
3. Pique
la
especiates.
convencionat
condimentos
Saque
o
m6s largo.
que se complete
cocinada
carnes"
para
una vez en la mitad
de que la came,
comptetamente
a microondas
y ponga
para
por 5-1 0 minutos
despu6s
Agregue
la
2. Las ayes deben
asar
m6s largo
use el tiempo
la came
aluminio
microondas
descongele
t6cnicas
en la forma
que et ave est6 previamente
bandeja
giratoria.
3. Cocine de acuerdo
confinuaci6n).
para
preparase
cocinar.
Agregue
condimentos
si Io desea. Siempre
came totalmente
antes de cocinar.
2. Ponga
1. No se requieren
debe
bien
cocidas
antes
completamente
desde
adentro
Los trozos
de ave
m6s gruesa
de
cocidas
det musto at
deben
para
picarse
asegurar
que los
es firme.
Costillas
8
8
9_/2 to ] ] _/2 minutos
- Bien cocida
Came molida
"ALTO" (] oo%)
6 _/2 to 9 _/2 minutos
- Medio
cocida
Tabla para cocinar
aves
] 1 _/2 to 14 minutos
(para guisados),
Intensidad de
microondas
Ave
hamburguesas,
Tiempo de
cocci6n por
libra
frescas o descongeladas
POLLO
(4 ozc/u)
- 2 hamburguesa
"ALTO"
(] 00%)
2_/2 to 4_/2 minutos
Entero
- 4 hamburguesas
"ALTO"
(] 00%)
3_/2 to 5_/2 minutos
Pechuga
Porciones
(con hueso)
8
8
] ] to ] 5 minutos
8
] ] to ] 7 minutos
8
] ] to ] 5 minutos
] 0 to ] 4 minutos
CERDO
8
Lomo, pata,
tocino
]2_/2 to ]6_/2 minutos
- 4 Ionjas
"ALTO"
(] 00%)
2_/2 to 3_/2 minutos
- 6 Ionjas
"ALTO"
(] 00%)
3_/2 to 4_/2 minutos
PAVO
Entero
NOTAS:
NOTA:
Los tiempos
Considere
preferencias
variar
tos.
listados
atgunas
en la tabla
diferencias
individuates.
con la forma,
corte
Los tiempos
son s6to una gufa.
de acuerdo
Los tiempos
y composici6n
at gusto
tambi6n
listados
en la tabta
son s6to una gufa.
Considere
algunas
diferencias
de acuerdo
al gusto y
preferencias
individuales.
Los tiempos tambi6n
pueden
y
pueden
con la forma, corte y composici6n
de los alimentos.
Si se reltena un ave entera, et peso det ave reltena
de los atimen-
considerar
43
para
catcular
et tiempo
de cocci6n.
variar
se debe
CONSEJOS
PAPA COCCION
(confinuaci6n)
Pescado
1. Ponga
el pescado
2. Cubra
con
3. Ponga
4. Cocine
el plato sobre la bandeja
giratoria.
de acuerdo
alas instrucciones
de la "Tabta
pelfcula
Se pueden
5. Deje
reposar
agregar
como
en un plato
de pt6stico
trocitos
Tabla para cocinar
grande
perforada
en la "Tabta
que no sea de metal
o con
de mantequilta
se indica
6. Antes det tiempo de reposo,
escamas f6citmente.
o fuente
para
cocinar
pescado
fresco"
que se muestra
para
cocci6n"
antes
de servir.
est6 comptetamente
cocido.
El pescado
debe
estar
opaco
y separarse
en
fresco
Pescado
Intensidad
Tiempo de
cocci6n por libra
de pescado
"ALTO"
4_/2 to 8 minutos
Tiempo de
reposo
Mantequilla
Agregar
Fitetes
a continuaci6n.
si se desea.
revise si et pescado
pescado
ni muy profunda.
una tapa.
15 a 30
ml
2 a 3 minutos
(1 a 2 cucharadas
soperas)
Macarela
entera,
limpia y preparada
"ALTO"
4_/2 to 8 minutos
3 a 4 minutos
Trucha entera,
y preparada
"ALTO"
5_/2 to 9 minutos
3 a 4 minutos
"ALTO"
5_/2 to 8 minutos
Fitetes
limpia
de satm6n
Agregar
15 a 30
(1 a 2 cucharadas
44
ml
soperas)
3 a 4 minutos
PREGUNTAS
Y RESPUESTAS
FuncionamJento
Pregunta
_Por qu6
rnientras
la luz del homo
Respuesta
no se prende
Puede
est6 cocinando?
_Por qu6
sale vapor
haber
por la ventilaci6n?
Es normal
El homo
_Se da_a
et homo
_La energ_a
visor
si se usa vacfo?
a rnicroondas
de vidrio
de
rnuchas
pasa
que se produzca
de microondas
Sf. Nunca
a trav6s
det
la puerta?
No. La rnalta
homo.
_Por qu6 hay un sonido cuando
bot6n en el panel de controles?
cocina
da_ar
et horno
se toca
si la comida
El sonido
se
Como
mejor
puede
et horno
se enchufa
ser que no funcione
por primera
correctamente.
_Por qu6?
vez
riente
dora.
de luz en la
_Cu61es son los diferentes
sonidos
escuchan
mientras et horno esta
que se
funcionando?
at punto
es quedarse
como
a veces
manchas
_Por qu6
los atimentos
los huevos
explotan
horneados
secas
y duras?
a veces?
a la cavidad
det
datos.
que controta
cocinar,
es posibte
fuego
mientras
est6 cocinando.
su homo
puede
cuando
Ud. Io enchufa
de corriente.
para
votver
ubicada
det horno.
Lo
temporariamente
por
Desenchufe
a enchufar
que est6
fallar
que la comida
dentro
vez o cuando
el horno
det tomacor-
a programar
entre
para
primera
la cavidad
la computa-
y la pared
El chasquido
es causado
por un interruptor
mec6nico
que enciende
y apaga
magnetr6n
del horno de microondas.
Et zumbido
y et sonido met6tico
vienen
cambio
marrones,
det horno
y vu6tvalo
rebote
pasen.
humo y hasta
de un corte
giratoria.
que la energ_a
para
se program6
se libere.
la luz.
de que se forme
Esta tuz viene de la luz det horno
externa
det horno.
cambio
tienen
que et vapor
o sin la bandeja
Ud. est6 entrando
cerca
la luz luego
la cocci6n.
para
etectrodom6stico
de 1 20 voltios
de intensidad
interruptor
_Por qu6
cuando
hace
pasar
que las rnicroondas
con cualquier
funcionar
durante
en la puerta
La microcomputadora
vuelve
_Por qu6 se ve un reflejo
cubierta
externa?
que la luz no se encienda
est6 vacfo
s6to de]an
le avisa
se recocine
vapor
cuando
de metal
Los orificios
un
demasiado?
Cuando
para
ha sido disefiado
use et homo
Estos no dejan
_Se puede
razones
* _Prograrn6
et tiernpo de cocci6n?
_Toc6 et bot6n "START"?
en et vottaje
Las manchas
Acorte
Cuando
det magnetr6n
mec6nico.
causado
marrones,
el tiempo
hornea,
acumutaci6n
simplemente
PRECAUCI6N:
Et cambio
secas
de cocci6n
frfe
o hierve
cuando
en la velocidad
por et encendido
y duras
indican
se prende
o se apaga
det ventitador
y apagado
con et
se produce
por
det magnetr6n.
que se recocin6.
o calentamiento.
huevos,
la yema
puede
reventar
debido
a la
de vapor dentro de ta membrana
de la yema. Para evitar esto,
perfore
la yema con un palitlo
de madera
antes de cocinar.
Nunca cocine huevos con c6scara
en et horno de
microondas.
45
el
del
el
PREGUNTAS
Y RESPUESTAS (confinuaci6n)
Alimentos
Respuesta
Pregunta
_Por qu6 los huevos revuettos a veces est6n
un poco secos despu6s de cocinar?
Los huevos
se secan
si est6n
tiempo de cocci6n
• Los huevos varfan
Los huevos
recocidos
puede
variar
de tamaBo.
est6n
aunque
use siempre
por las siguientes
a temperatura
ambiente
la misma
receta.
Et
razones:
algunas
veces
y otras
veces
est6n
refrigerados.
Los huevos
_Se pueden hacer patomitas
et horno de microondas?
de mafz
en
se siguen
cocinando
durante
el tiempo
de reposo.
Sf, si se usa uno de los siguientes m6todos:
(1) Dispositivos para hacer palomitas especfficos para microondas.
(2) Bolsas de mafz para palomitas especiates para microondas que est6n
preparadas para tiempos de cocci6n e intensidad especfficos.
Siga las instrucciones exactas dadas pot cada fabricante para su producto y
no deje el homo descuidado mientras el mafz se est6 cocinando. Si el mafz no
explota despu6s del tiempo indicado, deje de cocinar. Si se recocina se puede
prender fuego.
PRECAUCION:
• Nunca use bolsas de papel de estraza para hacer palomitas de ma_z o intente
hacer saltar los granos de mafz que han quedado sin reventar.
_Por qu6
revientan
a veces
durante
las manzanas
la cocci6n?
asadas
La c6scara
permitir
Como
queman
_Por qu6
a veces
durante
las papas
se recomienda
Si el tiempo
un tiempo
tiempo
guardados
convencionales
et proceso
de cocci6n
de reposo
Et tiempo
de reposo
unos minutos
adicional
en el
para
El tiempo
de reposo
En cocina
convencionat,
total
de cocci6n.
refrigerador
de cocci6n,
depende
manzana
para
se cocina.
et interior
los alimentos
recomendado,
de cocci6n
de
la manzana
se
atimentos
que est6n
se cocinen
de
inicial
m6s tiempo
pueden
las papas
quemarse
deberfan
en forma
pareja
en
estar
por
con microondas.
de la densidad
la temperatura
Ud. necesita
46
largo,
que los alimentos
det cicto
que para
de cada
mientras
de cocci6n.
es demasiado
permite
despu6s
superior
de la fruta
et horno. At final det tiempo
de cocci6n
retativamente
firmes.
PRECAUCI6N:
no cocinar
en exceso.
con
se requiere
cocinar
atimentos
refrigerador?
se
la cocci6n?
despu6s
de cocinar
microondas?
_Por qu6
asadas
durante
de la parte
det interior
en los m6todos
expande
_Por qu6
no se ha quitado
la expansi6n
para
los atimentos.
de los atimentos
cocinar
a temperatura
afecta
atimentos
ambiente.
el tiempo
sacados
det
ANTES DE LLAMAR
Hay
muchos
Iocalice
probtemas
el probtema
PARA SERVICIO
de funcionamiento
en la siguiente
Si el horno
de microondas
Los centros
de servicio
que Ud. puede
lista y pruebe
a6n no funciona
Sears
est6n
corregir
las sotuciones
correctamente,
totalmente
solo.
contacte
equipados
para
Si su homo
de microondas
para
probtema.
sugeridas
et centro
darle
de servicio
et servicio
m6s cercano.
• _Est6 enchufado?
• _La puerta
est6 cerrada?
• _Program6
et tiempo
de cocci6n?
Hay chispas
• _Est6 usando vajitla aprobada?
• _Et homo est6 vacfo?
Hora incorrecta
• _Ha tratado
cocidas
correctamente,
Causas posibles
no arranca
Comidas
Sears
no funciona
requerido.
Problema
El homo
cada
en forma
despareja
Ud. de votver
• _Est6 usando
vajitta
a poner
el retoj
aprobada?
• _Est6 la bandeja
giratoria
en et homo?
• _Ha girado
o agitado
los atimentos
durante
• _Estaban
Alimentos
recocidos
Alimentos
no suficientemente
cocidos
a la hora?
los atimentos
comptetamente
la cocci6n,
• _Et tiempo
y la intensidad
de cocci6n
eran correctos?
• _Et tiempo
y la intensidad
de cocci6n
eran correctos?
• _Est6 usando
• _Estaban
vajitta
seg6n
las instrucciones?
descongetados?
aprobada?
los atimentos
comptetamente
descongelados?
• _Et tiempo y la intensidad
de cocci6n eran correctos?
• _Los orificios
de la ventilaci6n
est6n destapados?
Descongelaci6n
incorrecta
DECLARACION
• _Est6 usando
vajitta
aprobada?
• _Et tiempo
y la intensidad
• _Ha girado
o agitado
de cocci6n
los atimentos
DE INTERFERENCIA DE RADIOFRECUENCIA
COMUNICACIONES
eran correctos?
durante
la descongetaci6n,
seg6n las instrucciones?
DE LA COMISION
FEDERAL DE
($61o para Estados Unidos)
AVISO:
Este aparato
se instala
con
genera
las instrucciones
interferencia
el tipo
los If mites de aparatos
la parte
] 8 de
de frecuencia
es decir
del fabricante,
a la recepci6n
Se ha analizado
seg6n
y usa energ_a
o usa debidamente,
puede
de radio
industriates,
y si no
acuerdo
cientfficos
la orientaci6n
• Cambie
la posici6n
• Mueva
que cumpte
el homo
que el homo
et6ctricos.
con
y m6dicos
de la Comisi6n,
• Cambie
(ISM)
• Enchufe
las cuales
El fabricante
no se garantiza
que no habr6
una instalaci6n
especfflca.
Si este aparato
a la recepci6n
de la radio
o televisi6n,
determinar
recomienda
mediante
prendiendo
y apagando
que et usuario
trate
o televisi6n
este horno
en
interferencia
et aparato,
et homo
se
la interferencia
pasos:
47
a otro
est6n
de microondas
y et receptor
o televisi6n.
con
respecto
en otro
est6n
no es responsabte
det usuario.
tomacorriente
en distintos
por
para
circuitos
tomacorriente
en distintos
para
circuitos.
la interferencia
causada
por la modificaci6n
de microondas.
La correcci6n
es responsabitidad
Io cual se puede
de corregir
uno o m6s de los siguientes
interferencia
causa
de radio
de microondas
de microondas
y et receptor
que et homo
est6n disefiadas
para proveer
una protecci6n
razonabte
contra dicha interferencia
en la instataci6n
residenciat.
Sin embargo,
de la antena
det horno
at receptor.
causar
y tetevisi6n.
y se ha encontrado
las reglas
ISM
en estricto
de radio
sin autorizaci6n
de
de la interferencia
Master
Protection Agreement
Congratulations
on mak,;ng
Your new Kenmore
a smart
Elite ® product
Contratos
purchase.
is designed
and manufactured
Su nuevo
para
pot
The Master
o reparaci6n
your
new product.
Here's
[_ Parts and labor
properly
what
needed
under
beyond
functional
failure
extend
the Agreement*
to help
normal
goes well
also helps
keep
the product
products
warranty.
from
of
includes:
use, not just defects.
excluded
the life
operating
Our coverage
No deductibles,
coverage
service
Sears
by a force
service
trust will
technicians,
be working
r_ Unlimited
service
you want
10,000
le puede
El Contrato
de protecci6n
maestra
tambi6n
nationwide
service,
if your
r_ Power
failures
as
covered
Maintenance
within
product
Check
by phone
- we call
it Rapid
protection
against
Food
twelve
can't
at your
that is the result of mechanical
refrigerator
or freezer.
request
- no
r_zJRental
reimbursement
longer
than
damage
10% discount
off
and
you purchase
that it takes
or night,
de reparaci6n
significa
que alguien
related
covered
price
of any
installed
parts.
the Agreement,
for you to schedule
or schedule
a simple
service.
a service
anual
Ayuda
spoilage
can-cet
will
Protection
for any
provide
the product
Protection
Agreement
reason
a full
during
refund.
warranty
period
Agreement
today!
phone
todos
F_ Protecci6n
call
call
purchase.
warranty
refund
Purchase
limitations
For prices and
1-800-827-6655.
If you
period,
anytime
your
reposici6n
de su
det
cubierto
no puede
home
a su solicitud:
de
resotuci6n
parte
Piense
de un t6cnico
en nosotros
para
Sears
como
un
daffos
debido
de
alimentos
de
$250
a perder
refrigeradores
anuatmente
por un mat
o freezers
cubiertos
por la
alquiler
sila
reparaci6n
det precio
no cubierta
det producto
del prometido.
com6n
y piezas
de cualquier
instatadas
relacionadas.
et contrato,
para
s6to necesita
programar
reatizar
et servicio.
hora det dfa o de la noche,
una
Puede
o programar
Itamar
la cita
det
por Internet.
call
appliances,
major
cuantas
o m6s fallas
-to ltamamos
m6s tiempo
tetef6nica
riesgo.
de protecci6n
Sila
canceta
de garantfa
maestro
garage
Existen
maci6n
items, in the
del producto,
del producto,
hoy
es una compra
raz6n
le reintegraremos
prorrateado
iAdquiera
de
el perfodo
et dinero
en su
despu6s
de que expire
et Contrato
de protecci6n
Para precios
e infor-
en Canad6
es diferente
en algunos items.
Ilame a Sears Canad6
a[ 1-800-361-6665.
de instalaci6n
Para la instalaci6n
etectrodom6sficos,
catentadores
libre
durante
ciertas
limitaciones
y exclusiones.
adicional,
Ilame al 1-800-827-6655.
Servicio
48
maestro
cualquier
mismo!
* La cobertura
m6s detaJles
hogar,
por
O un reintegro
la garantfa
of home
de
Una vez que adquiera
Master
Service
and other
Ja naci6n,
con su
after
servicio
in the U.S.A.
p_rdida
por
reparaci6n
totalidad.
door openers, water heaters,
U.S.A. or Canade call
1-800-4-MY-HOME
® .
trabajar6
preventivo
que se han echado
toma
El Contrato
For Sears profess,;ona/installation
cuatro
tetef6nica
10% de descuento
we
* Coverage
in Canada
varies on some items.
For full details call Sears Canada
at 1-800-361-6665.
Sears Installation
en toda
10.000
Io que
et6ctricas.
pot
F_ Reembolso
apply.
information
conffa
m6s
ni falla
garantfa.
Ilamada
and exclusions
additional
r6pida
los productos.
alimentos
cuatquier
Some
de Sears,
usted
de mantenimiento
funcionamiento
is all
anytime
online.
is a risk free
expires.
un uso
va mucho
Sin franquicia,
"manual
de usuario que habta".
FTJ Protecci6n
contra descargas
el6ctricas
product
por
appointment
Or, a prorated
a mantener
bajo
adicional.
asistencia
sobre
non-covered
You can
the product
en quien
si ocurren
telef6nica
r6pida-
cubierto
The Master
ayudar
cobertura
autorizados
a domicilio
cubierto
a fluctuaciones
the regular
Nuestra
del producto.
t6cnicos
r_ Revisi6n
due to
of any covered
of your
a amptiar
repararse.
promised.
repair
service
if repair
para
adecuado
producto
dentro de doce meses.
[_ Reposici6n
del producto
si et producto
on all products.
for any food
failure
le ayuda
y
es Io que se incluye
veces quiera, cuando
Io necesite.
F_ Garantia
contra productos
defectuosos:
Resolution
electrical
annually
dinero
excluidos de la cobertura:
protecci6n
real.
experto
otorgado
por un grupo de m6s de
producto.
Servicio
ilimitado
be fixed.
necesaria
en funcionamiento
de la garantia
sin cargo
Loss Protection
Es ahf cuando
ahorrar
Lo siguiente
no s6to defectos.
funcional
r_ Servicio
fluctuations.
FZj $250
day
normal,
covered
occur
y mano de obra
producto
surge
power
Once
as often
of your
- phone support from a Sears representative
Think of us as a "talking
owner's manual."
r_
you can
us.
product
producto.
al ig-
de mantenimiento
de vez en cuando.
maestro
all6
want
requerir
de protecci6n
los productos
charge.
F_ Fast help
takes
authorized
product.
you
puede
y fabricado
Sin embargo,
- real protection.
means someone
and
or more
Preventive
than
- replacement
replacement
FFj Annual
extra
calls
guarantee
if four
r_zJProduct
which
on your
us, whenever
F_ "No-lemon"
product
months.
of more
confiable.
et contrato
molestias.
Piezas
FZJ Expert
los productos,
la vida de su nuevo
en et contrato*:
no
Elite ® est5 diseSado
de operaci6n
preventivas
maestro
inte/,;gente.
Kenmore
afios
uat que todos
Agreement
su compra
producto
muchos
for years of dependable
operation.
But like all products,
it may
require
preventive
maintenance
or repair from time to time.
Protection
de protecci6n
Fe/ic/taciones
profesional
dispositivos
de agua
y otros
en los EE.UU. o Canad6
Para
de Sears
garantizada
para abrir
aparatos
Ilame
de Sears de
puertas de garaje,
importantes
al
para
1-800-4-MY-HOME
et
®
a
One Year Limited
Warranty
When
and maintained
installed,
operated
due to a defect
arrange
in material
for free
Five-year
After
within
to all instructions
one year from
supplied
the date
with the product,
of purchase,
call]
if this appliance
-800-4-MY-HOME
fails
® to
repair.
Limited
For five years from
workmanship,
according
or workmanship
Warranty
the date
Sears will replace
covers
if the magnetron
the magnetron.
the first year, the customer
This warranty
on the Macjnetron
of purchase,
Safety
assumes any labor
only defects
in this microwave
regulations
require
costs associated
in material
oven fails due to a defect
the magnetron
with magnetron
in material
to be installed
or
by Sears.
replacement.
and workmanship.
Sears will NOT pay for:
]. Expendable
2. A service
items that can wear out from
technician
to instruct
3. A service
technician
to clean
4. Damage
to or failure
supplied
normal
the user in correct
or maintain
of this product
use, including
product
but not limited
installation,
operation
to filters,
belts, light
bulbs, and bags.
or maintenance.
this product.
if it is not installed,
operated
or maintained
according
to all instructions
with the product.
5. Damage
to or failure
of this product
resulting
to or failure
of this product
caused
from
accident,
abuse, misuse or use for other
than its intended
purpose.
6. Damage
recommended
7. Damage
in all instructions
to or failure
of parts
supplied
or systems resulting
Disclaimer of implied warranties;
Customer's
sole and
warranties,
including
shortest
period
exclusive
warranties
allowed
by the use of detergents,
remedy
from
of merchantability
the exclusion
of implied
warranties
of merchantability
This warranty
applies
This warranty
gives you specific
or limitation
warranty
rights, and
modifications
shall be product
for incidental
of incidental
made
is used in the United
repair
purpose,
or utensils
other than those
to this product.
States
you may also have other
damages.
damages,
or limitations
as provided
are limited
or consequential
or consequential
or fitness, so these exclusions
only while this appliance
legal
unauthorized
or fitness for a particular
by law. Sears shall not be liable
do not allow
chemicals
limitation of remedies
under this limited
provinces
cleaners,
with the product.
vary from
Sears Brands Manacjement
Corporation,
Hoffman Estates, IL 60179
Sears Canada Inc., Toronto, Ontario, Canada M5B 2B8
49
on the duration
to you.
and Canada.
rights which
Implied
Some states and
or limitations
may not apply
herein.
to one year or the
state to state.
Garant[a
limitada
Si, tras ser instaJado,
electrodom_stico
desde
Dentro
averfas
sufriera
Ja fecha
Garant[a
y mantenido
averfas
de compra,
debidas
de cinco
de material
de seguridad
requieren
coste
a defectos
resultante
Ja fecha
Jimitativa,
2. Un t_cnico
de servicio
para
de obra,
que el magnetr6n
de Jas tareas
que pueden
los fiJtros, correas,
induidas
con el producto,
o mano de obra,
® para su reparaci6n
de compra,
o mano
Esta cjarantia cubre gnicamente
Sears NO cubrir6:
1. EJementos consumibles
Jas instrucciones
de material
dentro
este
del perfodo
de un a_o
gratuita.
aSos en eJ macjnetr6n
de cinco a_os desde
a defectos
cuaJquier
seggn todas
debidas
Jlame aJ 1-800-4-MY-HOME
limitada
deJ perfodo
Las normativas
asumir6
de un a_o
operado
mostrar
sea instalado
de sustituci6n
de este horno
microondas
sufriera
de su sustituci6n.
por Sears. Tras el primer
a_o de uso, el diente
del magnetr6n.
los defectos de material y mano de obra.
gastarse
bombiJlas
si el magnetr6n
Sears se responsabiJizar6
debido
aJ uso normal,
incJuyendo
de forma
enunciativa
pero no
y boJsas de Ja unidad.
al usuario
Ja instalaci6n,
funcionamiento
o mantenimiento
correctos
del
producto.
3. Un t@cnico de servicio para reaiizar
Jabores de Jimpieza o mantenimiento
del producto.
4. DaBos o averfas en caso de no acatar Jas instrucciones
de instaiaci6n,
funcionamiento
o mantenimiento
incJuidas
con
el producto.
5. DaBos o averfas
fue diseBado.
6. DaBos o averfas
recomendados
de accidente,
en caso
de utilizar
en las instrucciones
7. DaBos o averfas
CI6usula
en caso
en las piezas
de exenci6n
abuso,
detergentes,
incJuidas
o sistemas
uso inadecuado
Jimpiadores,
o uso con prop6sitos
sustancias
qufmicas
distintos
a Jos fines para los que
o utensiJios distintos
a Jos
con el producto.
provocadas
por modificaciones
de responsabilidad
del producto
o cjarantias
no autorizadas.
implicitas;
limitaci6n
de
recursos
EJ Onico y exclusive
mencionado.
est6s limitadas
de los da_os
incidentales
idoneidad,
recurso
del cJiente bajo
Las garantias
esta garant[a
implicitas,
incluyendo
a un a_o o el periodo
de tiempo
incidentales
o derivados,
de tal forma
o derivados.
Ciertos
garantias
limitada
m6s reducido
estados
ser6 Ja reparaci6n
de comerciabilidad
permitido
y provincias
del producto
o idoneidad
como
se ha
para un fin concreto,
por Ja Jey. Sears no ser6 responsable
no permiten
exclusiones
o limitaciones
de da_os
o Jimitaciones en relaci6n a Ja duraci6n de Jas garantias
impJicitas de comerciabiJidad
que estas Jimitaciones o excepciones
pueden no ser pertinentes
para usted.
Esta garantia
Canad6.
ser6 apiicable
Esta garantia
le otorga
dependiendo
del estado
6nicamente
unos derechos
mientras
este electrodom_stico
Jegales especificos,
e incluso
puede
sea utilizado
conferirle
dentro
de los Estados Unidos
otros derechos,
en que se encuentre.
Sears, Brands Management
Corporation,
Hoffman
Estates, IL 60179
Sears Canad6 Inc., Toronto, Ontario, Canad6 M5B 2B8
5O
o
distintos
y
Your Home
For troubleshooting,
product
manuals
and home
solutions
advice:
managemylife
www.managemylife.com
For repair
lawn
- in your home
and garden
no matter
- of all major
equipment,
or heat
who made
it, no matter
For the replacement
owner's
manuals
For Sears
parts,
and items like garage
Call
anytime, day or night
www.sears.com
who sold it!
of home
door openers
®
systems,
and
to do-it-yourself.
installation
1-800-4-MY-HOME
appliances,
ing and cooling
accessories
that you need
professional
brand
appliances
and water
heaters.
(1-800-469-4663)
(U.S.A. and Canada)
www.sears.ca
Our Home
For repair
of carry-in
and electronics,
items like vacuums,
call anytime
lawn
for the location
equipment,
of your nearest
Sears Parts & Repair Service Center
1-800-488-1222
(U.S.A.)
www.sears.com
To purchase
a protection
Para pedir
a domicilio,
(U.S.A.)
servicio
y para
de reparaci6n
ordenar
piezas:
1 -888-SU-HOGAR
®
(1-888-784-6427)
www.sears.com
® Registered
Trademark
/TM
Trademark
(Canada)
www.sears.ca
agreement
1-800-827-6655
1-800-469-4663
on a product
serviced
by Sears:
1-800-361-6665
Au Canada
pour service
1 -800-LE-FOYER
(Canada)
en fran_:ais:
Mc
(1-800-533-6937)
www.sears.ca
of KCD IP, LLC in the United States, or Sears Brands, LLC in other countries
® Marca Registrada /TM Marca de F_brica de KCD IP, LLC en Estados Unidos, o Sears Brands, LLC in otros paises
MC Marqye de cinnerce / MD Marque d6pos6e de Sear Brands, LLC.