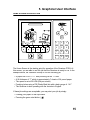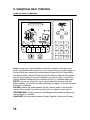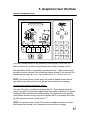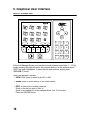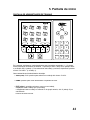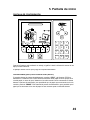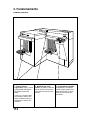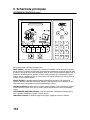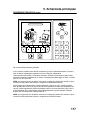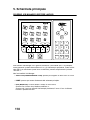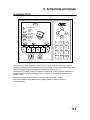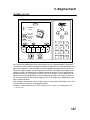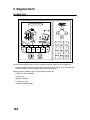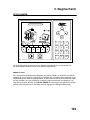
1
Quantum™ P70iX
Operator Manual
Manual de uso
Bedienhandbuch
Manuel d’utilisation Manuale operatore
Bedienhandbuch
Handleiding
US/Canada – 230V 50/60 Hz
Assembly Number 7707010
USA/Kanada – 230V 50/60 Hz
Baugruppennr. 7707010
EE.UU./Canadá – 230 V 50/60 Hz
Número de Ensamblaje 7707010
US/Canada – 230V 50/60 Hz
Gruppo numero 7707010
Canada/É.-U. – 230V 50/60 Hz
Numéro d’assemblage 7707010
VS/Canada – 230V 50/60 Hz
Assemblagenummer 7707010
2 to 26
28 to 51
53 to 76
78 to 101
103 to 126
128 to 151
Table of Contents
Section
Page
Safety Information
Safety Messages
Important Safeguards
Service
Cleaning
Main Cordset Selection
FCC Rules, Electrical Interference
Service and Equipment Maintenance Agreement
3
4
5
5
6
7
7
1. Introduction
Introduction
Unpacking and Setup
8
8
2. Getting to Know your Quantum P70iX
Paper Static
Limitations
Plastic Cover Stock
9
10
11
3. Operation
Operating Controls
12
4. Options and Accessories
Die Set
Die Set Storage
13
14
5. Graphical User Interface
Home Screen Introduction
Home Screen Commands
Speed Command
Select Saved Job
Create a New Job, Punch Edge
Create a New Job, Side Edge
Create a New Job, Punch Die
Create a New Job, Change Die
Screen Information, Job Running
Screen Information, Stop Command
15
16
17
18
19
20
21
22
23
24
6. Maintenance
Slug Bin (Chad Container)
Punch Pins
Service
Troubleshooting
25
25
25
25
7. Specifications
Specifications Quantum P70iX
26
2
Safety Information
SAFETY MESSAGES
The safety of you and others is very important to GBC. Important safety messages and information are contained within this manual as well as on the
machine itself. Please be certain to carefully read and understand all of these
before operating the machine.
!
The safety alert symbol precedes each safety message in this Operating
Instruction Manual. This symbol indicates a potential personal safety
hazard that could hurt you or others, as well as cause product or property
damage.
The following pictorial is found on the Quantum P70iX:
!
CAUTION: This means you could fall and be injured if you try to stand or
sit on the conveyor belts.
!
WARNING: This means you can be seriously injured by crushing and
cutting, moving parts. Do not operate without guards in place. Do not
attempt to defeat any of the safety interlock switches.
!
WARNING: This means you can be seriously injured by the covers falling
on you. Keep your hands and other body parts away to avoid getting them
crushed or cut.
3
Safety Information
SAFETY MESSAGES continued
!
WARNING: This means you can be seriously injured by crushing
and cutting, moving parts. Do not operate without guards in place.
Do not attempt to defeat any of the safety interlock switches.
The following symbols appear on this product, and their meaning is as follows:
I Means the electrical power is “ON”.
O Means the electrical power is “OFF”.
IMPORTANT SAFEGUARDS
• Use the Quantum P70iX only for its intended purpose of punching paper and
covers according to the indicated specifications.
• Retain this Operating Instructions manual for later use.
!
4
CAUTION: IN CASE OF EMERGENCY, USE THE POWER CORD AS A
MAIN DISCONNECT.
Safety Information
IMPORTANT SAFEGUARDS continued
• The Quantum P70iX must be connected to a supply voltage corresponding
to the electrical rating of the machine operating instructions (also listed on
the serial number label).
• The socket-outlet shall be located near the equipment and shall be easily
accessible.
• The grounding plug is a safety feature and will only fit into the proper grounding-type power outlet. If you are unable to insert the plug into an outlet, contact a qualified electrician to have a suitable outlet installed. Do not alter the
plug on the end of the cordset (if provided) of the Quantum P70iX. It was
provided for your safety.
• Unplug the Quantum P70iX before moving the machine or whenever the
machine is not in use for an extended period of time.
• Do not operate the Quantum P70iX if the machine has a damaged power
supply cord or plug. Do not operate the machine after any malfunction, if liquid has been spilled into the machine, or it the machine has been damaged
in any way.
• Do not overload electrical outlets beyond their capacity. To do so can result in
fire or electrical shock.
• Do not attempt to bypass the safety interlocks, if you do so you may be
injured
SERVICE
Do not attempt to service your Quantum P70iX yourself. Contact an authorized
GBC service representative for any required repairs or major maintenance for
your Quantum P70iX.
There are NO user-serviceable parts inside the machine. To avoid potential personal injury and/or property or machine damage.
!
DO NOT REMOVE THE MACHINE’S SIDE COVERS AND TOP
COVERS.
CLEANING
You may clean the exterior of the Quantum P70iX using a soft, damp cloth. Do
not use detergent or solvents as damage to the machine may occur.
5
Safety Information
MAIN CORDSET SELECTION
(THE FOLLOWING NOTE APPLIES ONLY TO EUROPEAN UNITS)
!
CAUTION: WHEN CHOOSING A DETACHABLE LINE CORD FOR USE
WITH YOUR Quantum P70iX, ALWAYS OBSERVE THE FOLLOWING
PRECAUTIONS
The cordset consist of three parts; the attachment plug, cordage and appliance
inlet. Each of these components must have European regulatory approvals for
safety.
The following minimum electrical ratings for the specific cordset are published
for safety purposes. DO NOT USE CORDSETS THAT DO NOT MEET THE
FOLLOWING MINIMUM ELECTRICAL REQUIREMENTS.
PLUG: 3 amperes, 250 volts, 50/60 Hz, Class 1, 3 conductor, European safety
approved.
CORDAGE: Type H05VV-F3G0.75, Harmonized ( < HAR> ). The “< >” symbols indicate cordage approved to appropriate European standard (NOTE:
“HAR” may be substituted for approval mark of European safety agency, which
approved the cordage. An example would be “ < VDE > “).
APPLIANCE CONNECTOR: 3 ampere, 250 volts, 50/60 Hz, European safety
approved, Type IEC 320. The cordset shall not exceed 3 meters in length. A
cordset with component electrical ratings greater than the minimum specified
electrical ratings may be substituted.
6
Safety Information
FCC RULES, ELECTRICAL INTERFERENCE
(THE FOLLOWING NOTE APPLIES ONLY TO THE U.S. UNITS.)
FCC NOTE
This equipment has been tested and found to comply with the limits for a Class
A digital device, pursuant to Part 15 of the FCC Rules. These limits are
designed to provide reasonable protection against harmful interference when the
equipment is operated in a commercial environment.
This equipment generates, uses, and can radiate radio frequency energy and, if
not installed and used in accordance with the Operator Manual, may cause
harmful interference to radio communications. Operation of this equipment in a
residential area is likely to cause harmful interference in which case the user will
be required to correct the interference at his/her own expense.
CAUTION: CHANGES OR MODIFICATIONS NOT EXPRESSLY
APPROVED BY GENERAL BINDING CORPORATION COULD VOID
YOUR AUTHORITY TO OPERATE THE EQUIPMENT.
This Class A digital apparatus complies with Canadian ICES-003.
!
Cet appareil numerique dela classe A est conforme a la norme NMB-003 du
Canada.
SERVICE AND EQUIPMENT MAINTENANCE AGREEMENT
By purchasing the P70iX you have invested in a highly capable punching
machine that will give you years of reliable service. To help protect this investment be certain to take advantage of the GBC Equipment Maintenance
Agreement (EMA). The EMA provides your P70iX with proper ongoing maintenance and care, helping to ensure the years of quality performance and long life
built into the machine. Without an EMA, a charge for parts and labor would
result from every normal maintenance or repair service call. An EMA for your
P70iX eliminates this possibility by providing you with a low, fixed annual cost for
protecting your valuable machine investment. For full details about purchasing
an EMA, consult with your GBC Sales Representative or contact:
General Binding Corporation
500 Bond Street
Lincolnshire, IL 60069
Or Call: 1-800-790-7787
A GBC Authorized Technician must perform all service and maintenance unless it
is operator maintenance in accordance with the P70iX Automatic Punch User
Guide. Use of the P70iX Automatic Punch in any manner not in accordance with
the GBC P70iX User Guide is not recommended and may void your warranty or
maintenance contract
Trained operators and regular operator maintenance of the P70iX A can optimize performance and minimize service calls.
7
1. Introduction
INTRODUCTION
The Quantum P70iX is designed to meet the unique requirements of the digital
print marketplace. It is designed to support all commonly required punching patterns, including three-hole, comb, VeloBind, Twin-Loop wire, and Color Coil.
Custom die patterns are also available. This new system is designed to deliver
the quick changeover requirements of the short-run digital printer.
Virtually all set-ups are quickly and easily accomplished from the digital print
display panel, overcoming a major time-consuming aspect of traditional production punches. Die changes can be accomplished in a short time without tools.
The system is pre-programmed with all common paper sizes, and can store 20
custom jobs.
The P70iX is designed to handle a wide range of media. It can handle sheet
sizes from 5 1/2” x 5 1/2” to 9” x 12”, including mixed paper-weights and cover
stocks. Another key feature is the system’s ability to process intermixed index
tabs without any special adjustments.
The P70iX incorporates GBC’s new “stack processing” technology, which is
designed to reduce operator labor cost. This new architecture allows the system
to process a 14” stack (3,500 sheets 20# bond) without operator attendance.
The P70iX offers a maximum throughput speed of 60,000 sheets per hour.
The Quantum P70iX is GBC’s revolutionary new, near-line, high-speed Digital
Production Punch. It sets up in minutes and keeps up, side-by-side, with banks
of today’s fastest digital print engines.
These instructions have been prepared to acquaint you with the Quantum P70iX
punch and it’s operation. Please read them carefully. Keep these operating
instructions for future reference.
UNPACKING AND SETUP
The Quantum P70iX punch must be installed by a qualified GBC Technician.
Your Technician will ensure that the system is properly leveled and ready to run.
8
2. Getting to Know your Quantum P70iX
PAPER STATIC
External factors can affect performance of your P70iX. These factors include
customer requirements for hole quality, throughput materials (paper/transparencies/covers), toner coverage on the printed page, and environmental factors.
Static in the paper can result in poor performance. If your P70iX runs a fresh
ream of clean white paper but has trouble with your printed job, it may be due to
static. The following tips might help you to correct this problem.
Suggestions for static: If you’re P70iX Automatic Punch is having trouble
running certain jobs, it may be due to excessive static build-up in the
paper. Here are some suggestions that may help to minimize the static
effect.
1. Fan the paper before loading it into the P70iX. Do not jog the paper; this
will only cause more static build-up.
2. Slow the speed down on the P70iX. This will give the paper more time to
settle down into the die.
3. Consider the purchase of a room humidifier to add moisture into the air.
Dry air helps to produce more static.
4. Move your punching operation to an environmentally controlled room.
5. Pay close attention to seasonal conditions. Procedures you follow in the
hot humid days may need to be modified during dry winter months when
static is most common.
6. Consider storing your unwrapped paper jobs in very large Tupperware
type containers to retain the moisture. Using these containers along with
humidor type products can actually reintroduce moisture into the paper
that was lost during the fusing process.
7. Contact your copier/printer service department and enquire as to the
possibility of lowering your fuser temperature.
9
2. Getting to Know your Quantum P70iX
LIMITATIONS
To ensure your satisfaction, please take a moment to understand the following
application limitations.
• Tabs must have a 1/4” shoulder. Without this shoulder, the paper lift cannot
be properly tapped into the punch die, resulting in poor hole registration.
• When running mixed stocks, you must ensure the dimensions are consistent.
One stock smaller than the other will prevent proper hole registration.
• Very slippery paper or cover stocks may not run in the P70iX. Test small stacks
at slower speeds and/or smaller lift sizes before committing to a large job.
• Cover stocks mixed with paper usually run best at slower speeds.
• If a very straight output stack is important for a particular job, select speed
one or two for improved stack quality.
• When running cover stock alone, performance is best at slower speeds.
• Improper loading of stack will result in feeding problems. Take care to justify
the stack against the input door and the right stacking registration bracket.
• Some specialty papers (NCR paper for example) will show handling marks.
• The punched edge of a stack will be taller than when it went in. With some
papers, paper sizes and die set combinations; you may want to reduce the
input stack to prevent slumping, instability or excessive height.
• Excessive paper curl can result in poor feeding or jams. You can identify
excessive paper curl when you see more than 1/4" of curl 2" from the paper
edge. If curl is not excessive, you will have best results with the curl down.
For our purposes, curl down is defined as the outside front edges are down
and the middle is up.
10
2. Getting to Know your Quantum P70iX
PLASTIC COVER STOCK
The Quantum P70iX is capable of handling and punching some types of clear
cover stock materials. In fact, every Quantum P70iX is tested with clear covers
before it leaves the factory. The following guidelines will help you to understand
the capabilities of the Quantum P70iX system. In cases where your particular
clear cover stock is not suitable to run through the Quantum P70iX, you may
want to try separating the clear covers from the book contents and punching the
clear covers using a GBC Magnapunch heavy duty table top punch.
• For clear cover stocks to work in the GBC Quantum P70iX, they require the
body found in GBC Premium covers, which are 10-mil and 14-mil thickness.
• Clear covers must be run intermixed. The photo sensors used on the
Quantum cannot detect clear covers.
• When running mixed stocks, you must ensure the dimensions are consistent.
One stock smaller than the other will prevent proper hole-registration.
• With a smaller lift size the punch is more likely to pick a single clear cover.
Lift size settings 5-7 work best.
• It is best to run a job containing clear cover stocks at a slower speed. GBC
recommends 75 LPM for most jobs.
• Clear covers produce more static sticking than other stock, ambient conditions will affect performance.
• If a clear cover is picked alone, the punch may shut down with a false jam.
This is due to the inability of the optical sensors to see some clear cover
stocks. In this event, the stock will not be damaged. Simply press the green
button to continue.
11
3. Operation
OPERATION CONTROLS
2
3
1
1
1. Ergonomic
Workflow:
load, unload and program from the same
side without any wasted
steps.
Loading and unloading
stack can be safely
accomplished while the
machine is punching.
12
2. Die Set Changes:
are completed without
tools and only take seconds to perform.
3. Fully Digital:
push button set-up and
operation. With simple
steps to recall up to 24
custom jobs.
4. Options and Accessories
DIE SETS
The GBC Quantum P70iX Automatic Punch is capable of punching a variety of hole
patterns commonly used in binding today, by simply changing the Die Set. Die sets
can be changed in seconds without tools.
A significant feature of the Quantum P70iX is that it uses GBC Magnapunch Die Sets.
If you include a Magnapunch in your paper punch work station, you will enjoy the
flexability and versility of diesets that can be used in either punch platform. Some jobs
or parts of jobs may be better suited for the table top paper punch.
Please note: The PB Plastic Bind with multiple adjust depth of punch Magnapunch Die
Set is not suitable for use in the automatic paper handling system utilized by the
Quantum.
The Die Sets currently available are listed below. Your GBC Sales Representative can
provide you with price and availability, or contact the GBC Call Center at 1-800-7234000. For more information, visit GBC’s website at www.gbcconnect.com.
Each punching style listed below requires a separate die set for the Quantum P70iX.
Quantum P70iX Automatic Punch - Die Sets
PB Plastic Bind – Deepest Fixed Back Gauge, .187”
PB Plastic Bind – Middle Fixed Back Gauge, .141”
PB Plastic Bind – Shallow Fixed Back Gauge, .094”
W3 Twin Loop Wire - 3:1 Round
W3 Twin Loop Wire - 3:1 Square
W2 Twin Loop Wire - 2:1 Rectangular
W2 Twin Loop Wire - 2:1 Round
C4 Color Coil – 4:1 Oval .2475
C4 Color Coil – 4:1 Round .2475 Pitch
C4 Color Coil - 4:1 Round .250 Pitch
Color Coil Heavy Duty C4 Oval Quantum Dieset
VB VeloBind 11 inch
Ring Binder 2-4 Standard 5/16” Diameter Hole (Europe)
Ring Binder 3-5-7 5/16” Diameter Hole (U.S.)
Product Code
7707230
7707220
7707210
7708350
7708360
7708330
7708320
7707290
7708300
7708310
7707300
7708340
7708390
7708380
GBC offers a full suite of binding equipment and supplies to meet your binding needs.
In addition Custom Die Sets are available for the Quantum P70iX. For additional
information, consult with your GBC Sales Representative.
IMPORTANT: A decal on the handle of each interchangeable die set indicates the
punching pattern.
13
4. Options and Accessories
DIE SET STORAGE
GBC Die Set Storage Cabinet #7703207 is an excellent way to store all of your
interchangeable die sets for the Quantum P70iX (see figure 3). This special
product securely holds three die sets, protecting them from dirt, dust, and accidental damage. Contact your sales representative for information on obtaining a
Die Set Storage Cabinet.
Figure 3
!
14
CAUTION: POSSIBLE PINCH POINT HAZARD. WHEN INSTALLING
DIE SETS INTO YOUR Quantum P70iX, ALWAYS KEEP FINGERS AND
BODY PARTS OUT OF THE MACHINE’S DIE SET SLOT AND AWAY
FROM ALL AREAS OF THE DIE SET EXCEPT FOR THE FINGER
GROOVE IN THE DIE SET’S HANDLE. FAILURE TO OBSERVE THESE
PRECAUTIONS MAY RESULT IN INJURY.
5. Graphical User Interface
HOME SCREEN INTRODUCTION
GBC QUANTUM PUNCH
90 LPM
7
MODE
UNLOAD
PROOF
JOB MANAGER
LANGUAGE
1
2
3
4
5
6
7
8
9
0
OK
The Home Screen is the starting point for operation of the Quantum P70iX. At
this screen, you are able to see the job that the Quantum is ready to run. In the
example above, the Quantum is setup to run the following job:
•
•
•
•
•
A paper size of 8.5” x 11” with punching on the 11” side.
A lift thickness of “7” which is approximately 7 sheets of 24 pound paper.
The speed is set at 90 LPM (lifts per minute).
Punching holes using a PB (Plastic Bind) die with a back gauge of .141”.
The Quantum is also operating with the controls in English.
If these job settings are acceptable, you may start your job by simply:
• Loading your paper on the input belts.
• Pressing the green start button ( ).
15
5. Graphical User Interface
HOME SCREEN COMMANDS
GBC QUANTUM PUNCH
90 LPM
7
MODE
UNLOAD
PROOF
JOB MANAGER
LANGUAGE
1
2
3
4
5
6
7
8
9
0
OK
MODE: allows you to select between Automatic or Manual. Automatic Mode
means the Quantum will continue to run non-stop as long as you place paper on
the Input Belts and remove the punched stack of paper from the Output Belts.
The Manual Mode means the Quantum will stop before it takes the next paper
stack in for processing. This mode is helpful if you want to start a new job that
requires different settings such as a different Die Set, or a different paper size.
PROOF: you can run a few lifts of your job and have the Quantum stop. This
feature enables you to check the hole positioning and pattern to ensure the setup
is the job you intended.
UNLOAD: means that when pressed, the job currently inside of the Quantum
will exit. This is helpful if you need to start a job over again for some reason.
JOB MANAGER: will take you to the Job Manager screen where a different job
can be selected or created.
LANGUAGE: you may select between English, Spanish, French and German.
16
5. Graphical User Interface
SPEED COMMAND (LPM)
GBC QUANTUM PUNCH
90 LPM
7
MODE
UNLOAD
PROOF
JOB MANAGER
LANGUAGE
1
2
3
4
5
6
7
8
9
0
OK
You have constant control of the Speed by controlling the LPM or Lifts Per
Minute and the size of each Lift by adjusting the number of sheets per Lift.
Lifts Per Minute (LPM) is controlled by pressing the Left – Right arrow buttons
above the numeric key pad. You will see the number change in the window. The
example above reads “90 LPM”. The choices are 60, 75, 90 and 105 LPM.
NOTE: You would choose a lower speed for harder to handle media such as
jobs with heavier than normal curl or heavier than normal toner coverage.
Lift command (sheets punched per stroke).
The size of the lift is controlled by pressing the Up – Down arrows above the
numeric key pad. The numbers roughly equal the number of sheets of 24 pound
bond paper that would be picked at this setting. This feature does not actually
count sheets however and you should not expect the lift to be exactly this quantity. The example shown is of a lift size of “7”
NOTE: You would choose a lower lift for harder to handle media such as jobs
with heavier than normal curl or heavier than normal toner coverage.
17
5. Graphical User Interface
SELECT A SAVED JOB
JOB MANAGER — USE ARROWS
GO JOB 1
VIEW 13-24
EDITOR
HOME
1
2
3
4
5
6
7
8
9
0
OK
At the Job Manager Screen you are able to scroll between saved jobs (1 – 12) by
simply pressing the right-left and/or the up/down buttons. In the example above,
JOB 1 has been highlighted. To select this job and continue, simply press
“GO JOB 1” button.
Other Job Manager Features:
• VIEW 13-24: press to select a job #13 to #24.
• HOME: press to return directly to the Home screen.
• EDIT: a current job or create a new job,
Scroll to the job you wish to Edit, or,
Scroll to an unused job. In the example above, Job 12 is unused.
Press the EDITOR button.
18
5. Graphical User Interface
CREATE A NEW JOB: Select a punch edge
EDITOR
USE ARROWS TO
CHANGE
OTHER
0..9
SIZES
GO TO NEXT
SETTING
ESCAPE NO CHANGE
GO BACK
DATA OK
SAVE
STORE
ACCEPT
ESCAPE
SAVE
1
ACCEPT
1
2
3
4
5
6
7
8
9
0
OK
To Edit an exiting job or create a new job, press the up – down arrows to select
the desired setting. In the example above, the Punch Edge paper dimension has
been selected and currently reads 11”.
Alternatively, the dimension can be entered directly using the numeric keypad.
The machine will automatically toggle between inches and millimeters depending on the size of the number entered.
The min-max range for the punch edge is 5.50” to 12.00” (139.7 mm to 304.8
mm). If at this time you entered 140 and 305, the system would automatically
recognize the dimensions as 140 millimeters (mm).
Once the desired punch edge dimension appears on the display, press the
“ACCEPT” button.
19
5. Graphical User Interface
CREATE A NEW JOB: Select a side edge
EDITOR
USE ARROWS TO
CHANGE
OTHER
0..9
SIZES
GO TO NEXT
SETTING
ESCAPE NO CHANGE
GO BACK
DATA OK
SAVE
STORE
ACCEPT
ESCAPE
SAVE
1
ACCEPT
1
2
3
4
5
6
7
8
9
0
OK
Once you have accepted the Punch Edge, the cursor will move to the Side Edge
dimension.
In the example above, the Side Edge paper dimension has been selected and
currently reads 8.5”.
The min-max range for the Side Edge sample shown above, is 5.50” to 9.00”
(139.7 mm to 228.6 mm).
Once the desired Side Edge dimension appears on the display, press the
“Accept” button.
20
5. Graphical User Interface
CREATE A NEW JOB: Select a punch die
EDITOR
USE ARROWS TO
CHANGE
GO TO NEXT
SETTING
ESCAPE NO CHANGE
GO BACK
DATA OK
SAVE
STORE
ACCEPT
ESCAPE
SAVE
1
ACCEPT
1
2
3
4
5
6
7
8
9
0
OK
Once you have accepted the Side Edge, the cursor will move to the Punch Die
type.
In the example above, the Punch Die type has been selected and currently
reads PB .141. See Page 13, Diesets for the Die Sets available for the
Quantum.
Once all three settings are correct, press the “SAVE” button to save the job and
return to the Job Manager Screen.
21
5. Graphical User Interface
CREATE A NEW JOB: Change die set
CHANGE DIESET OR ADJUST PINS
PRESS KEY W HEN READY
1
0
23
PB .141
-
5
23
P B . 14 1
20 HOLES
SHIFT
20 HOLE S
-
19 HOLES
19 HOLE S
ESCAPE
1
2
3
4
5
6
7
8
9
0
OK
Selection of a new Die Set will prompt the Die Set screen to come up. This
screen will prompt you to remove the proper Punch Pin numbers for the paper
size you are running. In the example shown, there are two possible pin configurations with this Die Set and Paper combination. The Die Set itself features a
handy reference label to identify the Pin numbers. The Quantum will automatically center the Die Set to the paper size selected if you press buttons 2 or 4. By
pressing buttons 1 or 2, the Quantum will perform all required adjustments (bind
edge, side edge & center the die). You can manually fine-tune the hole centering
by pressing the right-left arrows at this screen.
Note that the pins indicated on the display are the pins that should remain in the
Die Set, i.e. pull the pins to the left and right of the range indicated.
22
5. Graphical User Interface
SCREEN INFORMATION: Job running
GBC QUANTUM PUNCH
90 LPM
7
MODE
UNLOAD
PROOF
JOB MANAGER
LANGUAGE
1
2
3
4
5
6
7
8
9
0
OK
When the Quantum is running a job, the Graphics will provide you with information about the job that is running.
• The example above is telling you that there is paper on the Input Belts.
Other graphics would indicate:
• Elevator Positions
• Doors Open
• Die Set is clamped
• Error locations
• Adjusting sheet sizes
23
5. Graphical User Interface
SCREEN INFORMATION: Stop Command
GBC QUANTUM PUNCH
90 LPM
7
MODE
UNLOAD
PROOF
STOP (
JOB MANAGER
LANGUAGE
1
2
3
4
5
6
7
8
9
0
OK
)
If you need to stop the system immediately, press “STOP” and the Quantum
P70iX will stop in mid-cycle.
START (
)
To resume running your job, ensure all doors and lids are closed, then press
“START”. In most cases, a normally interrupted job will clear itself and start up
again . If not, you may need to clear paper from various points in the paper
path.
24
6. Maintenance
SLUG BIN: (Paper Chip Container/Paper Chad Container)
The SLUG BIN for your Quantum P70iX is located behind the left hand access
door near the bottom of the machine. The container will need to be periodically
pulled out and emptied. This will avoid jamming and damage to the machine. The
Quantum P70iX incorporates optical sensor technology to inform the opera- tor
when the container needs to be emptied.
GBC recommends emptying the SLUG BIN whenever the EMPTY SLUG BIN
appears. This indication will appear when the height of the slug pile reaches the
Optical Sensor, it does not necessarly mean the container is full.
PUNCH PINS
You may need to remove some of the Punch Pins for proper punching of some
combinations of paper sizes and punching patterns.
SERVICE
Should your Quantum P70iX require service contact your local authorized GBC
service representative.
There are NO user-serviceable parts inside the machine. To avoid potential personal injury and/or property damage, DO NOT REMOVE THE MACHINE’S
COVER.
TROUBLESHOOTING Quantum P70iX
Problem
No power, won’t punch
Probable Cause
Power cord not attached to back of machine or not
properly plugged into the wall
Die Set is not fully inserted
Door or Lid is not closed
Punches too many holes
Operator familiar with paper sizes
referenced on the Xerox DocuTech
as mm
Selectable pins have not been pulled
When manually loading the first
stack of paper onto the Feed Belts,
the bottom sheets of paper catch
The surface of the belts are designed to grab the
paper. You will find that it is not possible to set the
paper stack on the belts and slide it into the alignment corner. Instead, push the stack gently against
the door first, then against the sheet metal right
guide and then set the stack down onto the belt.
Also loading a smaller stack first followed by a couple of larger stacks is best
After heavy use, the machine begins
to read jam, when there is no jam
A blast of air across the lens of each of the three
optical sensors periodically will prevent paper dust
build up from interfering with their performance.
Go to “SETUP” and change the dimensions to “mm”
from inches
25
7. Specifications
SPECIFICATIONS: Quantum P70iX
Speed:
Up to 105 cycles / minute, 60,000 sheets per hour
Sheet size:
5 1/2" to 12", side edge 5 1/2"” to 9"”
Paper Stock:
61 gsm (16#) bond to 300 gsm (140#)
Intermixed weights, flush-cut covers, and standard index tabs
Lift Height:
Variable, 5 to 12 sheets of 20# bond (75 gsm)
Stack Height:
Up to 14” (approximately 3,500 sheets of 20# bond (75 gsm)
Dimensions:
60”W x 55”L x 52”H (152cm x 140cm x 132cm)
(An authorized technician can separate the Quantum to fit through a
32” doorway.)
Weight:
850 lbs. (386kg)
Power Supply:
USA/Canada: 220VAC, 50/60Hz, Single Phase, 2.7 Amps, 0.32 KW, 1,092 BTU/hr
International: 220VAC, 50/60Hz, Single Phase, 2.7 Amps, 0.32 KW, 1,092 BTU/hr
Receptacle Type 6-20R 20A, 250V
Approvals:
CSA certified to CAN/CSA-C22.2 No. 60950-00, UL Std No. 60950-00, 3rd Ed.
TUV certified to EN 60950:2000
Compliance:
Carries CE mark to show compliance with European Union requirement
Die Sets:
Interchangeable die sets can be switched in seconds without tools
Noise Level:
GBC recommends ear protection for operators of the Quantum P70iX.
Our sound test levels are as follows:
Worst Case Operation (speed 4, C4 Die Set, 20# bond,
lift #9 – 12 sheets):
Sound Pressure Level = LpA = 83.0 dbA
Sound Pressure Impulse = LpAI = 85.2 dbA
Typical Use Operation (speed 2, PB Die Set, 20#
bond, lift #9 – 12 sheets):
Sound Pressure Level = LpA = 78.5 dbA
Sound Pressure Impulse = LpAI = 83.5 dbA
Dimensions in meters
30°
0.25
(9.85”)
ISO 7779 Test method and microphone placement:
1.5M (59.1”) from Feeder,
1.5M (59.1”) high,
0.25M (9.85”) from vertical lead edge of Quantum at control panel.
Standing operator
Specifications are subject to change without notice
26
Índice
Sección
Página
Información de seguridad
29
1. Introducción
Introducción
34
2. Conozca su Quantum P70iX
Controles de funcionamiento
Cubiertas plásticas
3. Funcionamiento
Controles de funcionamiento
35
36
37
4. Opciones y accesorios
Juego de troqueles
Almacenamiento del juego de troqueles
38
39
5. Pantalla de inicio
Funcionamiento
Servicio
40
40
6. Mantenimiento
Resolución de problemas
Atasco de papel
50
50
7. Especificaciones
Especificaciones Quantum P70iX
51
28
Información de seguridad
MENSAJES DE SEGURIDAD
Su seguridad y la de los demás son muy importantes para GBC. Este manual contiene mensajes importantes e información de seguridad, que también figuran en la propia máquina.
Asegúrese de leer con atención y comprender todos estos mensajes antes de poner la máquina
en funcionamiento.
El símbolo de alerta de seguridad precede a cada mensaje de seguridad que se incluye
en este manual de instrucciones de funcionamiento. Este símbolo indica un peligro
potencial a la seguridad personal que podría lesionarlo a usted o a otros, además de
provocar daños al producto o a la propiedad.
!
El siguiente pictograma se encuentra en la Quantum P70iX:
!
PRECAUCIÓN: Esto significa que puede caer y lesionarse si intenta pararse o sentarse
en las cintas transportadoras.
!
ADVERTENCIA: Esto significa que las partes móviles de aplastamiento y corte pueden
lesionarlo gravemente. No haga funcionar la máquina si las protecciones no están en su
lugar. No intente anular ninguno de los interruptores cortacorriente de seguridad.
!
ADVERTENCIA: Esto significa que las cubiertas pueden caer sobre usted y lesionarlo
gravemente. Mantenga las manos y demás partes del cuerpo fuera de la máquina para
evitar aplastarse o cortarse.
29
Información de seguridad
MENSAJES DE SEGURIDAD continuación
!
ADVERTENCIA: Esto significa que las partes móviles de aplastamiento y corte
pueden lesionarlo gravemente. No haga funcionar la máquina sin las protecciones en su lugar. No intente anular ninguno de los interruptores cortacorriente
de seguridad.
Los siguientes símbolos aparecen en este producto y significan lo siguiente:
I Significa que la corriente eléctrica está conectada “ON”.
O Significa que la corriente eléctrica está desconectada “OFF”.
PRECAUCIONES IMPORTANTES
• Utilice la Quantum P70iX únicamente para el uso para el cual fue diseñada, es decir para
perforar papel y tapas de acuerdo con las especificaciones que se indican.
• Guarde este manual de instrucciones de funcionamiento para usarlo en el futuro.
!
30
PRECAUCIÓN: EN CASO DE EMERGENCIA, DESCONECTE EL CABLE DE CORRIENTE.
Información de seguridad
PRECAUCIONES IMPORTANTES continuación
• La Quantum P70iX debe estar conectada a una fuente de voltaje que corresponda con la
clasificación eléctrica de las instrucciones de funcionamiento de la máquina (también detalladas en la etiqueta del número de serie).
• El tomacorriente debe encontrarse cerca del equipo y debe ser de fácil acceso.
• El enchufe con descarga a tierra es una característica de seguridad y sólo funcionará en un
tomacorriente adecuado con descarga a tierra. Si no puede introducir el enchufe en el
tomacorriente, póngase en contacto con un electricista calificado para que le instale un
tomacorriente adecuado. No altere el enchufe del extremo del cable de corriente (si se proporciona) de la Quantum P70iX. Éste se proporciona para su seguridad.
• Desenchufe la Quantum P70iX antes de mover la máquina o cuando la misma no se utilice
durante un período de tiempo prolongado.
• No haga funcionar la Quantum P70iX si la máquina tiene el cable de corriente o el enchufe
dañados. No haga funcionar la máquina después de un desperfecto, si se ha derramado
líquido dentro de la misma o si ha sido dañada de alguna forma.
• No sobrecargue los tomacorrientes eléctricos por encima de su capacidad. Si lo hace puede
provocar un incendio o un choque eléctrico.
• No intente derivar los interruptores cortacorriente de seguridad, si lo hace podrá lesionarse.
SERVICIO
No intente realizar un servicio a la Quantum P70iX usted mismo. Póngase en contacto con un
representante de servicio autorizado de GBC si necesita cualquier reparación o mantenimiento
importante de su Quantum P70iX.
Dentro de la máquina NO hay piezas que admitan servicio por parte del usuario, para evitar
posibles lesiones personales y/o daños a la propiedad o a la máquina.
!
NO RETIRE LAS CUBIERTAS LATERALES NI SUPERIORES DE LA MÁQUINA.
LIMPIEZA
Puede limpiar el exterior de la Quantum P70iX utilizando un paño suave y húmedo. No use
detergentes ni solventes ya que éstos pueden dañar la máquina.
31
Información de seguridad
ELECCIÓN DEL CABLE DE CORRIENTE PRINCIPAL
(LA NOTA SIGUIENTE SÓLO SE APLICA PARA LAS UNIDADES EUROPEAS)
!
PRECAUCIÓN: AL ELEGIR UN CABLE DESCONECTABLE PARA USARLO CON SU
Quantum P70iX, SIEMPRE CUMPLA CON LAS SIGUIENTES PRECAUCIONES
El cable consiste en tres partes, el enchufe de conexión, el cable y la entrada del artefacto.
Cada uno de estos componentes debe tener las aprobaciones normativas de seguridad europeas.
Las siguientes clasificaciones eléctricas mínimas para el cable específico se publican con fines
de seguridad. NO UTILICE CABLES QUE NO CUMPLAN CON LOS SIGUIENTES REQUISITOS ELÉCTRICOS MÍNIMOS.
ENCHUFE: 3 amperios, 250 voltios, 50/60 Hz, Clase 1, de 3 conductores, aprobado según las
normas de seguridad europea.
CABLE: Tipo H05VV-F 3G 0,75, armonizado (< HAR>). El símbolo “< >” indica que el cable
está aprobado por las normas europeas apropiadas (NOTA: “HAR” se podrá sustituir por la
marca de aprobación de la agencia de seguridad europea que aprobó el cable. Un ejemplo
sería “< VDE >”).
CONECTOR DEL ARTEFACTO: 3 amperios, 250 voltios, 50/60 Hz, aprobado según las normas
de seguridad europeas, tipo IEC 320. El cable no excederá los 3 metros de largo. Se podrán
sustituir los cables que tengan componentes con una clasificación eléctrica superior a las clasificaciones eléctricas mínimas especificadas.
32
Información de seguridad
ELECCIÓN DEL CABLE DE CORRIENTE PRINCIPAL continuación
(LA NOTA SIGUIENTE SÓLO SE APLICA PARA LAS UNIDADES DE EE.UU.)
NOTA DE FCC (Comisión Federal de Comunicaciones)
Se probó el equipo y se encontró que cumple con los límites para los dispositivos digitales
Clase A, de acuerdo con la Parte 15 de las Normas de FCC. Estos límites están diseñados para
proporcionar una protección razonable contra la interferencia perjudicial cuando se hace funcionar el equipo en un ambiente comercial.
El equipo genera, usa y puede irradiar energía de frecuencias de radio y, si no se instala y usa
según el Manual del Operador, puede causar interferencia perjudicial para las comunicaciones de
radio. El hacer funcionar este equipo en un área residencial puede causar interferencia perjudicial, en cuyo caso el usuario deberá corregir la interferencia corriendo con los gastos.
!
PRECAUCIÓN: LOS CAMBIOS O MODIFICACIONES QUE NO ESTÉN APROBADOS
EXPRESAMENTE POR GENERAL BINDING CORPORATION PODRÁN ANULAR SU
AUTORIDAD PARA MANEJAR EL EQUIPO.
Este equipo digital Clase A cumple con ICES-003 de Canadá.
Cet appareil numerique dela classe A est conforme a la norme NMB-003 du Canada.
ACUERDO DE SERVICIO Y MANTENIMIENTO DEL EQUIPO
Al adquirir P70iX usted invierte en una máquina perforadora altamente capaz que le dará años
de años de servicio confiable. Para ayudar a proteger esta inversión, asegúrese aprovechar el
Acuerdo de mantenimiento del equipo (EMA) de GBC. El EMA le da a su P70iX mantenimiento
y cuidado continuos adecuados, ayudándolo a asegurar los años de rendimiento de calidad y
una mayor duración de la máquina. Sin el EMA, todo mantenimiento o servicio de reparación
normales tendrán un cargo por las partes y la mano de obra. El EMA para su P70iX elimina esta
posibilidad al proporcionarle un costo anual, bajo y fijo para proteger su valiosa inversión en la
máquina. Para los detalles completos sobre la adquisición de un EMA, consulte a su
Representante de ventas de GBC o póngase en contacto con:
General Binding Corporation
500 Bond Street
Lincolnshire, IL 60069
O llame al: 1-800-790-7787
Un Técnico autorizado de GBC debe realizar todos los servicios y mantenimientos, a menos que
el Manual del Usuario de la Perforadora Automática P70iX exprese que sea mantenimiento de
operador. No se recomienda el uso de la Perforadora Automática P70iX de cualquier modo que
no sea de acuerdo con el Manual del Usuario de P70iX de GBC, ya que esto podría anular su
garantía o contrato de mantenimiento.
El mantenimiento regular de P70iX A por parte de operadores entrenados puede optimizar el
rendimiento y minimizar las llamadas de servicio.
33
1. Introducción
INTRODUCCIÓN
Quantum P70iX está diseñada para cumplir con los requisitos únicos del mercado de impresión
digital. Está diseñada para realizar todos los modelos de perforación requeridos comúnmente,
incluyendo los tres orificios, VeloBind, anillo metálico doble, y espiral de color. También se
encuentran disponibles modelos de troqueles por encargo. Este nuevo sistema está diseñado
para cumplir con las necesidades cambiantes de la impresora digital a corto plazo. Prácticamente
todas las configuraciones se logran rápida y fácilmente desde el panel de la pan- talla de
impresiones digitales, dejando atrás el gran consumo de tiempo de la perforación tradi- cional.
Los cambios en el troquel se pueden lograr en poco tiempo y sin herramientas. El sis- tema está
preprogramado con todos los tamaños comunes de papel, y puede almacenar 20 tra- bajos por
encargo.
P70iX está diseñada para manejar una gran variedad de medios. Puede manejar hojas desde
127 x 127 mm (5 x 5 pulgadas) hasta 229 x 305 mm (9 x 12 pulgadas), incluyendo pisapapeles
y tapas (cover stocks) mezclados. Otra característica clave es la capacidad del sistema para
procesar pestañas de índice entremezcladas sin ningún ajuste especial.
P70iX incorpora la nueva tecnología de GBC “procesamiento de apilados”, que está diseñada
para reducir el costo de mano de obra del operador. Esta nueva arquitectura permite al sistema
procesar una pila de 356 mm (14 pulgadas) (3.500 hojas de 20# bond) sin la asistencia del
operador. P70iX ofrece una velocidad máxima de rendimiento total de 60.000 hojas por hora.
Quantum P70iX es la nueva y revolucionaria Perforadora de producción digital Near-line de alta
velocidad de GBC. Se configura en minutos y se mantiene, de igual a igual, con los motores de
las impresoras digitales más rápidas de hoy.
Estas instrucciones se hicieron para que conozca la perforadora Quantum P70iX y su funcionamiento. Por favor léalas cuidadosamente. Guarde estas instrucciones de funcionamiento
para referencia futura.
DESEMPAQUETADO Y CONFIGURACIÓN
Un Técnico calificado de GBC debe instalar la perforadora Quantum P70iX. Su Técnico se asegurará de que el sistema esté correctamente nivelado y listo para funcionar.
34
2. Conozca su Quantum P70iX
CONOZCA SU QUANTUM P70iX
Factores externos pueden afectar el rendimiento de su P70iX. Estos factores incluyen los requisitos del cliente para la calidad del orificio, materiales de producción
(papel/transparencias/tapas), cobertura del tóner en la página impresa, y factores ambientales.
La ESTÁTICA en el papel puede causar un rendimiento insuficiente. Si su P70iX acepta una
resma nueva de papel blanco sin usar, pero tiene problemas con su trabajo impreso, puede
deberse a la estática. Los siguientes consejos lo pueden ayudar a corregir este problema.
Sugerencias para la estática: Si su Perforadora Automática tiene problemas para realizar
ciertos trabajos, puede deberse al aumento excesivo de la estática en el papel. Aquí hay
algunas sugerencias que pueden ayudarlo a minimizar los efectos de la estática.
1.Airee el papel antes de colocarlo en la P70iX. No empareje el papel, esto sólo causará que
aumente la estática.
2.Baje la velocidad de la P70iX. Esto permitirá que el papel tenga más tiempo para acomodarse en el troquel.
3.Considere adquirir un humidificador de ambiente para aumentar la humedad del aire. El aire
seco ayuda a que se genere más estática.
4.Mueva la perforadora a otra sala donde las condiciones ambientales estén controladas.
5.Preste atención a las condiciones de las estaciones. Los procedimientos que realice los días
calurosos y húmedos deberán ser modificados los meses secos de invierno cuando la
estática es más común.
6. Considere almacenar los trabajos en papel que no estén envueltos, en un gran recipiente
tipo Tupperware para mantener la humedad. Al utilizar los recipientes junto con productos
de tipo humectante se puede devolver la humedad del papel que se perdió durante el proceso de fusión.
7.Póngase en contacto con el departamento de servicio de copiadoras/impresoras y averigüe
acerca de la posibilidad de bajar la temperatura del fusor.
Áreas generales a vigilar para lograr máxima satisfacción.
Las pestañas deben tener un hombro 1/4".
• Cuando hace correr tapas mezcladas, asegúrese de que las dimensiones son compatibles.
Una tapa más pequeña que la otra impedirá el correcto registro del orificio.
• Los papeles o tapas (cover stock) muy resbaladizos pueden no correr en la P70iX. Pruebe
con pequeñas pilas en las velocidades más bajas y/o con tamaños de cargas más
pequeños antes de comenzar un trabajo grande.
• Las tapas (cover stock) mezcladas con papel a menudo corren mejor a velocidades bajas.
• Si es importante obtener una pila de salida muy recta para un trabajo en particular, verá
que la mejor calidad de la pila se obtiene cuando se opera a velocidad baja.
• Cuando corre una tapa sóla (cover stock), el rendimiento es mejor a velocidades bajas.
• Cargar una pila de modo indebido causará problemas de alimentación.
• Algunos papeles especiales (como el papel NCR por ejemplo) mostrarán marcas de haber
sido manipulados.
• El borde perforado de una pila será más alto que cuando entró. Con algunos papeles,
tamaños de papel y combinaciones de juegos de troqueles, puede querer reducir la pila de
entrada para evitar que se caigan, la inestabilidad o la altura excesiva.
• La cpmbatura excesiva del papel puede causar una alimentación insuficiente o atascos.
Usted puede identificar la combatura excesiva cuando ve más de 7 mm de combatura a 5
cm del borde. Si la combatura no es excesiva, usted tendrá los mejores resultados con la
combatura hacia abajo. Para nuestros propósitos, la combatura hacia abajo se define como
teniendo los bordes exteriores del frente hacia abajo y el medio hacia arriba.
35
2. Conozca su Quantum P70iX
CONOZCA SU QUANTUM P70iX continuación
Sugerencias para tapas plásticas transparentes:
La Quantum P70iX es capaz de manejar y perforar algunos tipos de materiales de tapas transparentes. De hecho, cada Quantum P70iX se prueba con tapas transparentes antes de abandonar la fábrica. Las siguientes pautas lo ayudarán a entender las capacidades del sistema
Quantum P70iX. En los casos en los que su tapa transparente no sea apropiada para pasar por
la Quantum P70iX, intente separar las tapas transparentes del contenido del libro y perforar la
tapa transparente utilizando una perforadora de mesa para trabajo pesado Magnapunch de GBC.
• Para que las tapas transparentes funcionen en la Quantum P70iX de GBC, necesitan el
armazón que se encuentra en las tapas Premium de GBC, que tienen un espesor de 0,2
mm (0,01 pulgada) y 0,3 mm (0,014 pulgadas).
• Cuando hace pasar tapas mezcladas, asegúrese de que las dimensiones sean compatibles.
Una tapa más pequeña que la otra impedirá la correcta ubicación del orificio.
• Con los tamaños de carga más pequeños, es más probable que la perforación agarre una
sola tapa transparente. Los tamaños de carga ente 5 y 7 funcionan mejor.
• Es mejor introducir un trabajo que contenga tapas transparentes a velocidades bajas. GBC
recomienda 75 LPM (cargas por minuto) para la mayoría de los trabajos.
• Es mejor introducir un trabajo que contenga tapas transparentes a velocidades bajas. GBC
recomienda 75 LPM (cargas por minuto) para la mayoría de los trabajos.
• Las tapas transparentes producen más adherencias por estática que otras tapas, las condiciones ambientales afectarán el rendimiento.
• Si la máquina toma una sola tapa transparente, la perforación se podrá apagar con un falso
atasco, sin embargo, no se dañará la tapa.
36
3. Funcionamiento
CONTROLES DE FUNCIONAMIENTO
2
3
1
1
1. Volumen de trabajo
ergonómico: carga, descarga y programación desde el
mismo lado sin perder
ningún paso.
Se puede cargar y descargar una pila con seguridad
mientras la máquina está
perforando.
2. Cambios en el juego de
troqueles: se pueden
realizar sin herramientas y
sólo toma unos segundos.
3. Totalmente digital: presione el botón “Set-up and
operation” (configuración y
funcionamiento). Con pasos
simples para recordar hasta
24 trabajos personalizados.
37
4. Opciones y accesorios
OPCIONES Y ACCESORIOS:
Juegos de troqueles:
La perforadora automática Quantum P70iX de GBC es capaz de realizar una variedad de modelos de perforación comúnmente usados en encuadernaciones actuales, simplemente cambiando
el juego de troqueles. Los juegos de troqueles se pueden cambiar en segundos y sin herramientas.
Una característica importante de la Quantun P70iX es que usa juegos de troqueles Magnapunch
de GBC. En combinación con una Magnapunch, es capaz de cambiar el juego de troqueles a la
plataforma de perforación más adecuada para el trabajo, en sólo cuestión de minutos.
Observe: La encuadernación plástica PB con juego de troqueles Magnapunch de múltiple ajuste
de profundidad de perforación no es adecuada para usarse con el sistema automático de manejo
de papel utilizado por la Quantum.
Más abajo se enumeran los juegos de troqueles disponibles actualmente. Su representante de
ventas de GBC puede brindarle información sobre precios y disponibilidad, o póngase en contacto con el centro de atención de GBC al 1-800-723-4000. Para más información, visite el sitio Web
de GBC en www.gbcconnect.com.
Observe que cada estilo de perforación mencionado más arriba requiere un juego de troqueles
distinto para la Quantum P70iX.
Perforadora automática Quantum P70iX – juegos de troqueles
Encuad. plás. PB – Calib. trasero prof., 22,1 mm (0,87 pulg.)
Encuad. plás. PB – Calib. trasero med., 3,6 mm (0,141 pulg.)
Encuad. plás. PB – Calib. trasero sup., 2,4 mm (0,094 pulg.)
Rulo metálico doble W3 – 3:1 redondo
Rulo metálico doble W3 – 3:1 cuadrado
Rulo metálico doble W2 – 2:1 rectangular
Rulo metálico doble W2 – 2:1 redondo
Espiral de color C4 – 4:1 redondo 0,2475 puntos
Espirales de colores C4 – 4:1 oval 0,2475
Espiral de color C4 – 4:1 redondo 0,250 puntos
VB VeloBind 11 pulgadas
Anillo de encuad. 2/4 están. c/orif. de 5/16” (8 mm) de diám.
Anillo de encuad. con orificios de 3-5-7 5/16 de diámetro
Código del producto
7707230
7707220
7707210
7708350
7708360
7708330
7708320
7708300
7707290
7708310
7708340
7708390
7708380
GBC ofrece una serie completa de equipos de encuadernación y suministros para cumplir con
sus necesidades de encuadernación. Para más información vea el Catálogo de soluciones de
encuadernación y el Catálogo de suministros que se adjuntan.
Hay juegos de troqueles personalizados disponibles para la Quantum P70iX. Para información
adicional, consulte a su representante de ventas de GBC.
IMPORTANTE: Una calcomanía ubicada en el mango de cada juego de troqueles intercambiables le indica el diseño de perforación. Al leer las Instrucciones de funcionamiento, observe las
instrucciones especiales para el juego de troqueles del diseño de perforación correcto que instaló
en su Quantum P70iX.
38
4. Opciones y accesorios
OPCIONES Y ACCESORIOS continuación
Almacenamiento del juego de troqueles:
Consejo útil: La caja de almacenamiento para juegos de troqueles de GBC #7703207 es un
excelente modo de almacenar todos sus juegos de troqueles intercambiables para la Quantum
P70iX (ver figura 3). Este producto especial mantiene seguros tres juegos de troqueles, protegiéndolos de la suciedad, del polvo y de los daños accidentales. Póngase en contacto con su
representante de ventas para obtener información acerca de cómo conseguir una caja de almacenamiento para juegos de troqueles.
Figura 3
!
PRECAUCIÓN: RIESGO POSIBLE DE LESIÓN. AL INSTALAR JUEGOS DE TROQUELES EN SU Quantum P70iX, SIEMPRE MANTENGA LOS DEDOS Y DEMÁS
PARTES DEL CUERPO FUERA DE LA RANURA PARA LOS JUEGOS DE TROQUELES DE LA MÁQUINA Y ALEJADOS DE TODAS LAS ÁREAS DEL JUEGO DE TROQUELES, CON EXCEPCIÓN DE LA HENDIDURA PARA LOS DEDOS EN EL MANGO
DEL JUEGO DE TROQUELES. SI NO CUMPLE CON ESTAS PRECAUCIONES PUEDE
LESIONARSE.
39
5. Pantalla de inicio
PANTALLA DE INICIO
GBC QUANTUM PUNCH
90 LPM
7
MODE
UNLOAD
JOB MANAGER
PROOF
LANGUAGE
1
2
3
4
5
6
7
8
9
0
OK
La pantalla de inicio es el punto de partida para manejar la Quantum P70iX. En esta pantalla,
puede ver el trabajo que la Quantum está lista para realizar. En el ejemplo anterior, Quantum
está configurada para realizar:
• Un tamaño de papel de 216 x 279 mm (8,5 x 11 pulgadas) con perforaciones en el lado de
279 mm (11 pulgadas).
• Un espesor de carga de “7” que es aproximadamente 7 hojas de papel de 24 libras.
• A una velocidad de 90 cargas por minuto.
• Orificios de perforación usando un troquel PB (encuadernación plástica) con un calibrador
trasero de 3,6 mm (0,141 pulgadas).
• La Quantum también funciona con las lecturas de los controles en idioma inglés.
Si estas configuraciones son aceptables, puede comenzar su trabajo de la siguiente manera:
• Cargando el papel en la cintas de entrada.
• Presionando el botón verde de inicio.
40
5. Pantalla de inicio
PANTALLA DE INICIO continuación
GBC QUANTUM PUNCH
90 LPM
7
MODE
UNLOAD
PROOF
JOB MANAGER
LANGUAGE
1
2
3
4
5
6
7
8
9
0
OK
Otros comandos de la PANTALLA DE INICIO son:
MODE (modo): le permite elegir Automatic (automático) o Manual. El modo automático significa
que Quantum continuará funcionando sin parar siempre que coloque papel en las cintas de
entrada y retire la pila de papel perforado de la cinta de salida. El modo manual significa que la
Quantum se detendrá antes de tomar la siguiente pila de papel para procesarla. Este modo es útil
si quiere comenzar un nuevo trabajo que requiere distintas configuraciones, como por ejem- plo
distintos juegos de troqueles.
PROOF (prueba): puede procesar algunas cargas de su trabajo y hacer que la Quantum se
detenga. Esta característica le permite verificar el posicionamiento del orificio y el diseño para
asegurarse que configuró el trabajo como realmente deseaba.
UNLOAD (descargar): significa que cuando lo presiona, saldrá del trabajo que se esté realizando actualmente en la Quantum. Esto es útil si debe comenzar un trabajo nuevamente por algu- na
razón.
JOB MANAGER (administrador de trabajo): lo llevará a la pantalla Job Manager donde puede
seleccionar o crear un trabajo distinto.
LANGUAGE (idioma): puede elegir entre inglés, español, francés y alemán.
41
5. Pantalla de inicio
PANTALLA DE INICIO continuación
GBC QUANTUM PUNCH
90 LPM
7
MODE
UNLOAD
JOB MANAGER
PROOF
LANGUAGE
1
2
3
4
5
6
7
8
9
0
OK
Otros comandos de la PANTALLA DE INICIO:
Tiene control constante de la velocidad al controlar las LPM o cargas por minuto y el tamaño de
cada carga al ajustar el número de hojas por carga.
Las cargas por minuto (LPM) se controlan presionando los botones de las flechas de derecha –
izquierda. Verá que el número cambia en la pantalla. El ejemplo de arriba dice “90 LPM”. Las
opciones son 60, 75, 90 y 105 LPM.
NOTA: Elija una velocidad más baja para medios más difíciles de manejar, como trabajos con
rollos más pesados que lo normal o cobertura de tóner más pesada que lo normal.
El tamaño de la carga se controla presionando las flechas de arriba—abajo. Los números se
aproximan al número de hojas de papel de 24 libras bond que se tomarán en esta configuración. Sin embargo, esta característica no cuenta realmente las hojas, y usted no debe esperar
que la carga sea exactamente de esa cantidad. El ejemplo que se muestra tiene un tamaño de
carga de “7”.
NOTA: Elija una carga más baja para medios más difíciles de manejar, como trabajos con rollos
más pesados que lo normal o cobertura de tóner más pesada que lo normal.
42
5. Pantalla de inicio
PANTALLA DE ADMINISTRADOR DE TRABAJO
JOB MANAGER — USE ARROWS
GO JOB 1
VIEW 13-24
EDITOR
HOME
1
2
3
4
5
6
7
8
9
0
OK
En la pantalla Job Manager, puede desplazarse entre los trabajos guardados (1 – 12) simplemente presionando los botones de derecha – izquierda y/o arriba – abajo. En el ejemplo anterior se resaltó JOB 1 (trabajo 1). Para seleccionar este trabajo y continuar, simplemente presione
el botón “GO JOB 1” (ir a trabajo 1).
Otras características del administrador de trabajo:
• VIEW (vista) 13-24: presione para seleccionar un trabajo del número 13 al 24.
• HOME: presione para volver directamente a la pantalla de Inicio.
• EDIT (editar): un trabajo corriente o crear un nuevo trabajo,
desplácese hasta el trabajo que quiere editar,
o desplácese hasta un trabajo no utilizado. En el ejemplo anterior, Job 12 (trabajo 12) no
está utilizado.
Presione el botón EDITOR.
43
5. Pantalla de inicio
PANTALLA DE EDITOR
EDITOR
USE ARROWS TO
CHANGE
OTHER
0..9
SIZES
GO TO NEXT
SETTING
ESCAPE NO CHANGE
GO BACK
DATA OK
SAVE
STORE
ACCEPT
ESCAPE
SAVE
1
ACCEPT
1
2
3
4
5
6
7
8
9
0
OK
Para editar un trabajo existente o crear un nuevo trabajo, presione las flechas de arriba – abajo
para seleccionar la configuración deseada. En el ejemplo anterior, se seleccionó la dimensión de
Borde de perforación del papel y actualmente es 28 cm (11 pulgadas).
De otro modo, la dimensión se puede ingresar directamente usando el teclado numérico. La
máquina alternará automáticamente entre pulgadas y milímetros según el tamaño del número
ingresado.
Observe que el rango para este valor es de 139,7 a 304,8 mm (5,50 a 12,00 pulgadas).
Una vez que aparece el valor deseado en la pantalla, presione el botón “ACCEPT” (aceptar).
44
5. Pantalla de inicio
PANTALLA DE EDITOR continuación
EDITOR
USE ARROWS TO
CHANGE
OTHER
0..9
SIZES
GO TO NEXT
SETTING
ESCAPE NO CHANGE
GO BACK
DATA OK
SAVE
STORE
ACCEPT
ESCAPE
SAVE
1
ACCEPT
1
2
3
4
5
6
7
8
9
0
OK
PANTALLA DE EDITOR
En el ejemplo anterior, se seleccionó la dimensión de Borde de lado del papel y actualmente es
215,9 mm (8,5 pulgadas).
Observe que el rango para este valor es de 139,7 a 228,6 mm (5,5 a 9 pulgadas).
45
5. Pantalla de inicio
PANTALLA DE EDITOR continuación
EDITOR
USE ARROWS TO
CHANGE
ACCEPT
GO TO NEXT
SETTING
1
ESCAPE NO CHANGE
SAVE
GO BACK
DATA OK
STORE
ESCAPE
SAVE
ACCEPT
1
2
3
4
5
6
7
8
9
0
OK
PANTALLA DE EDITOR
En el ejemplo anterior, se seleccionó el tipo de troquel de perforación y actualmente se lee
PB .141. Ver la Tabla 1 para los juegos de troqueles disponibles para la Quantum.
Una vez que las tres configuraciones son correctas, presione el botón “SAVE” (guardar), lo que
lo hará volver a la pantalla Job Manager.
46
5. Pantalla de inicio
PANTALLA “IR A TRABAJO”
EDITOR
USE ARROWS TO
CHANGE
GO TO NEXT
SETTING
ESCAPE NO CHANGE
GO BACK
DATA OK
SAVE
STORE
ACCEPT
ESCAPE
SAVE
1
ACCEPT
1
2
3
4
5
6
7
8
9
0
OK
Al seleccionar un nuevo juego de troqueles aparecerá la pantalla Die Set (juego de troqueles).
Esta pantalla le indicará que retire los números correspondientes de Punch Pin (vástago de perforación) para el tamaño de papel con el que esté trabajando. En el ejemplo que se muestra,
hay dos posibles configuraciones de vástago con este juego de troqueles y combinación de
papel. El juego de troqueles presenta una referencia útil para identificar los números de vásta- go.
La Quantum centrará automáticamente el juego de troqueles al tamaño de papel selecciona- do si
presiona los botones 2 o 4. Si presiona los botones 1 o 2, la Quantum realizará los ajustes
necesarios (borde de encuadernado, borde de lado y centrado del troquel). Puede poner a
punto el centrado de orificios manualmente, presionando las flechas de derecha – izquierda en
esta pantalla.
Observe que los vástagos indicados en la pantalla son los vástagos que deben permanecer en el
juego de troqueles, es decir, corra los vástagos a la derecha y a la izquierda del rango indica- do.
Nota: en la pantalla anterior, el gráfico debe mostrar los vástagos “4 – 23 y 5 – 23”, no “1 – 23 y
5 – 23”.
47
5. Pantalla de inicio
PANTALLA DE EJECUCIÓN
GBC QUANTUM PUNCH
90 LPM
7
MODE
UNLOAD
PROOF
JOB MANAGER
LANGUAGE
1
2
3
4
5
6
7
8
9
0
OK
Cuando la Quantum esté realizando un trabajo, el gráfico le dará la información acerca del trabajo que está realizando.
• El ejemplo anterior le dice que hay papel en las cintas de entrada y en las cintas de salida,
al igual que dentro del área de procesamiento de la Quantum.
Otros gráficos indican:
• Posiciones de elevador
• Puertas abiertas
• El juego de troqueles está trabado
• Ubicaciones de errores
• Ajuste de tamaños de hoja
48
5. Pantalla de inicio
PANTALLA DE CONFIGURACIÓN
GBC QUANTUM PUNCH
90 LPM
7
MODE
UNLOAD
PROOF
JOB MANAGER
LANGUAGE
1
2
3
4
5
6
7
8
9
0
OK
Cuando la Quantum esté realizando un trabajo, el gráfico le dará la información acerca del trabajo que está realizando.
El ejemplo anterior le dice que el juego de troqueles está trabado.
Comando PAUSE (pausa) contra comando STOP (detener):
Si necesita detener el sistema inmediatamente, presione “STOP” y la Quantum P70iX se
detendrá en el medio del ciclo. Puede entonces necesitar retirar papel de varios puntos de la
ruta del papel, en caso de que el sistema no los retire cuando la inicie nuevamente. Si desea
detener el proceso de perforación, pero permitiendo que el papel que se encuentra en la ruta
continúe, presione “PAUSE”. Esto detendrá el proceso de alimentación, pero permitirá que el
papel que se encuentre en la ruta del papel en ese momento pase a través del sistema.
49
6. Mantenimiento
INFORMACIÓN ADICIONAL
RECIPIENTE DE DEPÓSITO DE PAPEL (RESTOS o RECORTES DE PAPEL)
El recipiente de depósito de papel de su Quantum P70iX se encuentra detrás de la puerta de
acceso a mano izquierda, cerca de la parte inferior de la máquina. El recipiente se deberá retirar y vaciar periódicamente. Esto evitará que la máquina se atasque y se dañe. La Quantum
P70iX incorpora tecnología de microprocesadores para informarle al operador cuándo se debe
vaciar el recipiente.
NOTA: Asegúrese de que cuando retire el recipiente, se vacíe correctamente. Para reestablecer
completamente el sistema del recipiente, se deberá retirar completamente el recipiente durante
al menos 5 segundos.
VÁSTAGOS DE PERFORACIÓN
Es posible que necesite retirar algunos de los vástagos de perforación para la correcta perforación de algunas combinaciones de tamaños de papel y diseños de perforación.
SERVICIO
Si su Quantum P70iX necesita servicio, póngase en contacto con el representante de servicio
local de GBC autorizado.
Dentro de la máquina NO hay piezas que admitan servicio por parte del usuario. Para evitar
posibles lesiones personales y/o daños a la propiedad, NO RETIRE LA CUBIERTA DE LA
MÁQUINAN.
Problema
Causa posible
No hay corriente, no perfora
El cable de corriente no está conectado a la parte
trasera de la máquina o no está enchufado correctamente a la pared.
El juego de troqueles no se ha colocado correctamente
La puerta de la tapa no está cerrada
Hace demasiados orificios
No se han retirado los vástagos seleccionables
El operador conoce los tamaños de papel mencionados en la Xerox Docu Tech en mm
Vaya a “CONFIGURACIÓN” y cambie las dimensiones de pulg. a “mm”
Cuando está cargando la primera pila de papel en
las cintas de entrada, las hojas que están más
abajo se traban
La superficie de las cintas está diseñada para
agarrar el papel. Se dará cuenta de que no es
posible colocar la pila de papel en las cintas y
deslizarla dentro de la esquina de alineación. En
lugar de hacer eso, presione suavemente la pila
contra la puerta primero, luego contra la guía
derecha de metal de la hoja y luego apoye la pila
en la cinta. También le resultará mejor cargar una
pila más pequeña primero, y luego un par de pilas
más grandes.
Luego de un uso prolongado, la máquina comienza
a indicar que hay un atasco cuando realmente no
lo hay.
Una ráfaga de aire a través de las lentes de cada
uno de los tres sensores ópticos de manera periódica evitará que la acumulación del polvo del
papel interfiera con el rendimiento.
50
7. Especificaciones
ESPECIFICACIONES Quantum P70iX
Velocidad:
Tamaño de la hoja
Hasta 105 ciclos por minuto, 60.000 hojas por hora.
Borde de perforación 139,7 a 304,8 mm (5,5 a 12 pulgadas), borde de lado
139,7 a 228,6 mm (5,5 a 9 pulgadas)
Papel:
61 gramos por centímetro cuadrado (#16) bond a 300 gramos por centímetro
cuadrado (140#)
Pesos entremezclados, tapas de corte al ras, y pestañas de índice estándar.
Altura de la carga:
Variable, 5 a 12 hojas de 20# bond (75 gramos por centímetro cuadrado)
Altura de la pila:
hasta 355,6 mm (14 pulgadas) (aproximadamente 3.500 hojas de 20# bond
(75 gramos por centímetro cuadrado))
Dimensiones:
152 cm largo x 140 cm ancho x 132 cm alto(60 x 55 x 52 pulgadas)
(Se desarma fácilmente para que pase por una puerta de 81 cm (32 pulgadas)) ver página 8
Peso:
386 kg (850 lbs)
Sumin. de corriente: EE.UU/Canadá: 220 V CA, 50/60 Hz, monofásico, 2,7 Amp, 0, 32 KW, 1.092
BTU/hr
Internacional: 220 V CA, 50/60 Hz, monofásico, 2,7 Amp, 0, 32 KW, 1.092
BTU/hr
Tipo de tomacorriente 6-20R 20A, 250 V
Aprobación:
Certificado por CSA según CAN/CSA-C22 Nº 60950-00, Norma UL Nº 6095000, 3ª ed.
Certificado por TUV según EN 60950:2000
Cumplimiento:
Lleva marca de CE para indicar cumplimiento con los requisitos de la Unión
Europea.
Juegos de troqueles: Los juegos de troqueles intercambiables se pueden cambiar en segundos y
sin herramientas.
Las especificaciones están sujetas a cambio sin previo aviso
GBC recomienda a los operadores de la Quantum P7OiX usar protección auditiva. Nuestros
niveles de prueba de sonido son los siguientes:
Dimensiones en metros
Funcionamiento en las peores condiciones (velocidad 4, juego de troqueles C4, 20# bond, carga de 9 a
12 hojas):
Nivel de presión acústica = LpA = 83,0 dbA
Impulso de presión acústica = LpA = 85,2 dbA
30°
0.25
(9.85")
Funcionamiento en condiciones normales (velocidad
2, juego de troqueles PB, 20# bond, carga de 9 a 12
hojas):bond, lift #9 – 12 sheets):
Nivel de presión acústica = LpA = 78,5 dbA
Impulso de presión acústica = LpA = 83,5 dbA
ISO 7779 Método de prueba y colocación de micrófono:
1,5 mts. (59,1 pulgadas) desde la fuente,
1,5 mts. (59,1 pulgadas) de altura,
0,25 mts (9,85 pulgadas) desde el borde vertical de
plomo de la Quantum en el panel de control.
Operador parado
51
Table des matières
Section
Page
Information sur la sécurité
54
1. Introduction
Introduction
59
2. Apprendre à connaître votre Quantum P70iX
Commandes de fonctionnement
Couvercles de plastique
60
61
3. Fonctionnement
Commandes de fonctionnement
62
4. Options et Accessoires
Jeu de matrices
Rangement des jeux de matrices
63
64
5. Écran d’accueil
Fonctionnement
Service
65
65
6. Entretien
Solution de problèmes
Blocage de papier
75
75
7. Spécifications
Spécifications du Quantum P70iX
76
53
Information sur la sécurité
MESSAGES de SÉCURITÉ
Votre sécurité et celles des autres est très importante pour GBC. Ce manuel contient des messages et de l’information de sécurité importants que l’on retrouve aussi sur l’appareil lui-même.
Veuillez vous assurer de les lire attentivement et de les comprendre tous avant d’utiliser l’appareil
Le symbole de sécurité précède chaque message de sécurité dans ce manuel d’instructions de fonctionnement. Ce symbole indique un danger possible pour la sécurité personnelle qui pourrait mener à des blessures pour vous ou pour d’autres en plus de
provoquer des dommages au produit ou à la propriété.
L’illustration suivante se trouve sur le Quantum P70iX:
!
!
MISE EN GARDE : Ceci signifie que vous pourriez tomber et être blessé si vous
essayez de vous lever ou de vous asseoir sur les courroies transporteuses.
AVERTISSEMENT : Ceci signifie que vous pourriez être blessé gravement par des
pièces mobiles qui écrasent et coupent. Ne faites pas fonctionner sans que les dispositifs de protection soient en place. N’essayez pas de contourner les interrupteurs de verrouillage de sécurité
!
!
54
AVERTISSEMENT : Ceci signifie que vous pourriez être blessé gravement par les couvercles tombant sur vous. Gardez les mains et autres parties du corps loin pour éviter de
les faire écraser ou couper
Information sur la sécurité
MESSAGES de SÉCURITÉ suite
!
AVERTISSEMENT : Ceci signifie que vous pourriez être blessé gravement par des
pièces mobiles qui écrasent et coupent. Ne faites pas fonctionner sans que les
dispositifs de protection soient en place. N’essayez pas de contourner les interrupteurs de verrouillage de sécurité.
Les symboles suivants apparaissent sur ce produit et voici ce qu’ils signifient :
I Signifie que le courant électrique est en « MARCHE » (sous tension).
O Signifie que le courant électrique est « ARRÊTÉ » (hors tension).
MESURES DE PROTECTION IMPORTANTES
• Utilisez le Quantum P70iX seulement à ses fins prévues soit pour perforer le papier et les
couvertures conformément aux spécifications indiquées.
• Conservez ce manuel d’instructions à titre de référence future
!
MISE EN GARDE : EN CAS D’URGENCE, UTILISEZ LE CORDON POUR COUPER
LE COURANT.
55
Information sur la sécurité
MESURES DE PROTECTION IMPORTANTES suite
• Le Quantum P70iX doit être branché à une source de tension correspondant à la capacité
nominale électrique des instructions d’utilisation de l’appareil (cette tension est aussi
indiquée sur l’étiquette du numéro de série).
• Assurez-vous que la prise se trouve et soit installée près de l’équipement et facile d’accès.
• La fiche de mise à la terre est une fonction de sécurité et ne s’adaptera que dans une prise
de courant mise à la terre appropriée. Si vous êtes incapable d’insérer la fiche dans une
prise, contactez un électricien qualifié pour faire installer une prise convenable. Ne modifiez
pas la fiche à l’extrémité du cordon (s’il est fourni) du Quantum P70iX. Elle a été fournie
pour votre sécurité.
• Débranchez le Quantum P70iX avant de déplacer l’appareil ou lorsque ce dernier n’est pas
utilisé pendant de longues périodes.
• Ne faites pas fonctionner le Quantum P70iX si l’appareil a un cordon d’alimentation ou une
fiche endommagé(e). Ne faites pas fonctionner l’appareil après tout mauvais fonctionnement, si un liquide a été déversé dans l’appareil ou si l’appareil a été endommagé de
quelque façon que ce soit.
• Ne surchargez pas les prises électriques en dépassant leur capacité. Ceci pourrait mener à
des chocs électriques ou à un incendie.
• N’essayez pas de contourner les verrouillages de sécurité car vous pourriez vous blesser.
ENTRETIEN ET RÉPARATION
N’essayez pas de faire l’entretien ou de réparer le Quantum P70iX vous-même. Contactez un
représentant du service GBC autorisé pour toute réparation ou entretien important requis pour
votre Quantum P70iX Il N’y a AUCUNE pièce réparable par l’utilisateur dans cet appareil. Pour
éviter toute blessure et/ou dommages à la propriété ou à l’appareil.
!
NE RETIREZ PAS LES COUVERCLES LATÉRAUX ET LES COUVERCLES
SUPÉRIEURS DE L’APPAREIL
NETTOYAGE
Vous pouvez nettoyer l’extérieur du Quantum P70iX en utilisant un chiffon doux et humide.
N’utilisez pas de détergent ou de solvants car cela pourrait endommager l’appareil.
56
Information sur la sécurité
CHOIX DU CORDON AMOVIBLE PRINCIPAL
(LA NOTE SUIVANTE S’APPLIQUE SEULEMENT AUX APPAREILS EUROPÉENS)
!
MISE EN GARDE : EN CHOISISSANT UN CORDON AMOVIBLE À UTILISER AVEC
VOTRE Quantum P70iX, RESPECTEZ TOUJOURS LES PRÉCAUTIONS SUIVANTE
Le cordon amovible comprend trois parties : la fiche, le cordon lui-même et la fiche d’entrée
dans l’appareil. Chacun de ces composants doivent avoir des approbations réglementaires
européennes en termes de sécurité.
Les capacités nominales électriques minimales pour le cordon amovible spécifique sont publiées à
des fins de sécurité. N’UTILISEZ PAS DE CORDON AMOVIBLE QUI NE RÉPOND PAS AUX
EXIGENCES ÉLECTRIQUES MINIMALES SUIVANTES :
FICHE: 3 ampères, 250 volts, 50/60 Hz, classe 1, 3 conducteurs, approbation de sécurité
européenne.
CORDON MÊME : Type H05VV-F3G0.75, harmonisé (< HAR>). Les symboles «< > » indiquent
que le cordon est approuvé selon la norme européenne appropriée (REMARQUE : « HAR »
peut être substitué pour la marque d’approbation de l’agence de sécurité européenne qui a
approuvé le cordon. Un exemple serait « <VDE> »).
CONNECTEUR D’APPAREIL : 3 ampères, 250 volts, 50/60 Hz, approbation de sécurité
européenne, type CEI 320. Le cordon amovible ne doit pas dépasser 3 mètres de longueur. Un
cordon amovible aux valeurs nominales électriques de composants dépassant les valeurs nominales électriques minimales spécifiées peut être substitué.
57
Information sur la sécurité
CHOIX DU CORDON AMOVIBLE PRINCIPAL suite
(LA NOTE SUIVANTE S’APPLIQUE SEULEMENT AUX APPAREILS DES É.-U.)
NOTE DE LA FCC
Cet équipement a été testé et se conforme aux limites d’un appareil numérique de classe A,
conformément à la partie 15 des règles de la FCC. Ces limites sont conçues pour offrir une protection raisonnable contre l’interférence dangereuse lorsque l’équipement fonctionne dans un
environnement commercial.
Cet équipement produit, utilise et peut émettre une énergie de fréquence radio et, si l’appareil
n’est pas installé et utilisé conformément au manuel de l’opérateur, il pourrait causer de l’interférence dangereuse pour les radiocommunications. Le fonctionnement de cet équipement dans
un site résidentiel pourrait causer une interférence dangereuse et l’utilisateur devra corriger l’interférence à ses frais.
!
MISE EN GARDE : LES CHANGEMENTS OU LES MODIFICATIONS QUI NE SONT
PAS APPROUVÉS EXPRESSÉMENT PAR GENERAL BINDING CORPORATION
POURRAIENT ANNULER VOTRE AUTORITÉ DE FAIRE FONCTIONNER
L’ÉQUIPEMENT.
This Class A digital apparatus complies with Canadian ICES-003.
Cet appareil numerique dela classe A est conforme a la norme NMB-003 du Canada.
ENTENTE DE SERVICE ET D’ENTRETIEN DE L’ÉQUIPEMENT
En achetant le P70iX, vous avez investi dans un perforateur très performant qui vous offrira des
années de service fiable. Pour aider à protéger cet investissement, assurez-vous de tirer profit de
l’entente d’entretien d’équipement (EMA) de GBC. L’EMA fournit l’entretien continu appro- priée
de votre P70iX vous aidant ainsi à assurer des années de performance de qualité pour l’appareil.
Sans EMA, tout appel d’entretien normal ou de réparation mènerait à des frais de pièces et de
main d’ uvre. Une EMA pour votre P70iX élimine cette possibilité en vous four- nissant de
faibles frais annuels fixes pour protéger votre investissement de valeur. Consultez votre
représentant de ventes GBC pour tous les détails d’achat d’un EMA ou contactez : General
Binding Corporation
500 Bond Street
Lincolnshire, IL 60069
Ou appelez le : 1-800-790-7787
Un technicien autorisé GBC doit effectuer tout l’entretien et le service à moins que ce ne soit un
entretien de l’opérateur conformément au guide d’utilisateur du perforateur automatique P70iX.
Utiliser le perforateur automatique P70iX d’une manière non conforme au guide d’utilisateur P70iX
de GBC n’est pas recommandé et pourrait annuler votre garantie ou votre contrat d’entre- tien.
Les opérateurs formés et l’entretien d’opérateur régulier de P70iX peuvent optimiser le rendement et réduire les appels de service.
58
1. Introduction
INTRODUCTION
Le Quantum P70iX est conçu pour répondre aux exigences uniques du marché impression
numérique. Il est conçu pour supporter tous les modèles de perforation requis couramment y
compris trois trous, peigne, VeloBind, fil à double boucle et serpentin de couleur. Des modèles
de matrices personnalisées sont aussi disponibles. Ce nouveau système est conçu pour répondre aux exigences de changement rapide de l’imprimante numérique en cours tirages.
Presque toutes les configurations s’accomplissent rapidement et facilement à partir du panneau
d’affichage d’impression numérique, évitant ainsi un aspect chronophage des perforateurs traditionnels. Les changements de matrices s’accomplissent rapidement sans outils. Le système est
pré-programmé pour toutes les tailles courantes de papier et peut mettre en mémoire 20 travaux
personnalisés.
Le P70iX est conçu pour traiter une variété de médias. Il peut traiter des tailles de feuilles de 5,5
po x 5,5 po à 9 po x 12 po (127 x 127 mm à 229 x 305 mm), y compris des papiers couvertures
et des poids de papiers différents. Une autre fonction clé est la capacité du système de traiter des
pattes mélangées sans ajustements spéciaux.
Le P70iX incorpore la nouvelle technologie GBC de « traitement de piles » conçue pour réduire
les frais de main d’ uvre de l’opérateur. Cette nouvelle architecture permet au système de traiter
une pile de 14 po (35,56 cm) (3 500 feuilles de papier bond 20) sans que l’opérateur ne soit
présent. Le P70iX offre une vitesse maximum de passage de 60 000 feuilles par heure.
Le Quantum P70iX est le nouveau perforateur de production numérique haute vitesse, près de
la ligne révolutionnaire de GBC. Il s’installe en quelques minutes et suit au même rythme les
banques de moteurs d’impression numérique les plus rapides d’aujourd’hui.
Ces instructions ont été préparées pour vous familiariser avec le perforateur Quantum P70iX et
son fonctionnement. Veuillez les lire attentivement. Conservez ces instructions à portée de la
main à titre de référence.
DÉBALLAGE ET CONFIGURATION
Le perforateur Quantum P70iX doit être installé par un technicien qualifié GBC. Votre technicien
fera en sorte que le système soit à niveau et prêt à fonctionner.
59
2. Apprendre à connaître votre Quantum P70iX
APPRENDRE À CONNAÎTRE VOTRE QUANTUM P70iX
Des facteurs externes peuvent affecter le rendement de votre P70iX. Ces facteurs incluent les exigences des clients pour la qualité de trous, les matériaux de passage (papier/acétates/couvertures), la
couverture de toner de la page imprimée et les facteurs environnementaux.
De l’électricité STATIQUE du papier peut mener à une mauvaise performance. Si votre P70iX exécute
une nouvelle rame de papiers blancs, mais a de la difficulté avec votre travail imprimé, la cause pourrait être l’électricité statique. Les conseils suivants pourraient peut-être vous aider à corriger ce problème.
Suggestions pour l’électricité statique : si votre perforateur automatique P70ix a des problèmes pour certains travaux, la cause pourrait être une accumulation excessive d’électricité
statique sur le papier. Voici certaines suggestions qui peuvent aider à réduire l’effet statique.
1. Ventilez le papier avant de le charger sur le P70iX. Ne taquer pas le papier car cela pourrait tout
simplement ajouter de l’électricité statique.
2. Réduisez la vitesse du P70iX. Ceci donnera plus de temps au papier pour se tasser sur la
matrice.
3. Considérez l’achat d’un humidificateur pour ajouter de l’humidité dans l’air. L’air sec favorise la production de plus d’électricité statique.
4. Déplacez l’appareil à une pièce à l’environnement contrôlé.
5.Attention aux conditions saisonnières. Les procédures à suivre par temps chauds et humides
devront peut-être être modifiées pendant les mois secs d’hivers lorsque l’électricité statique est
plus courante.
6. Considérez ranger votre papier qui n’et pas encore déballé dans de très gros contenants de type
Tupperware pour conserver l’humidité. Si vous utilisez ces contenants en plus de produits de type
humidificateur peut, en fait, redonner de l’humidité au papier qui en a perdu durant la procédure de
fusion.
7. Contactez votre service d’impression/copie et demandez s’il est possible de réduire la température
de votre dispositif de fusion.
Sections générales à surveiller pour une satisfaction maximum.
Les languettes doivent avoir une épaule 1/4".
• Pour les stocks de papier mixtes, vous devez vous assurer que les dimensions soient constantes.
Un stock plus petit que les autres empêchera l’enregistrement du trou approprié.
• Les stocks de couvertures ou le papier très glissant pourrait ne pas fonctionner dans le P70iX.
Testez de petites piles à des vitesses plus lentes et/ou des tailles de manutentions plus petites
avant de s’engager dans un travail de taille.
• Les stocks de couverture mélangés avec le papier fonctionnent normalement mieux à des
vitesses plus lentes.
• S’il est important d’avoir une pile droite pour un travail particulier, vous pourriez obtenir la meilleure
qualité de pile à une vitesse plus lente
• Lorsque vous traitez seulement du stock de couverture, le meilleur rendement et à des vitesses
plus lentes
• Un mauvais chargement de papier donnera des problèmes d’alimentation.
• Certains papiers spéciaux (papier NCR par exemple) présenteront des marques de manipulation.
• Le bord perforé d’une pile sera plus élevé qu’à l’entrée. Avec certains papier, combinaisons de
tailles de papier et jeu de matrices, vous devriez probablement réduire la pile d’entrée pour éviter
l’affaissement, l’instabilité et la hauteur excessive.
• Le roulement de papier excessif peut mener à des blocages ou à une mauvaise alimentation.
Vous pouvez identifier le roulement excessif quand vous voyez plus de 7 mm de roulement à 5 cm
du bord. Si le roulement n’est pas excessif, vous aurez de meilleurs résultats en roulant vers le bas.
Pour nous, le roulement vers le bas se définit comme les bords avant vers l’extérieur et le milieu
vers le haut
60
2. Apprendre à connaître votre Quantum P70iX
APPRENDRE À CONNAÎTRE VOTRE QUANTUM P70iX suite
Suggestions pour des couvertures de plastique transparentes :
Le Quantum P70iX peut traiter et perforer certains types de matériaux de couvertures transparentes. En fait, chaque Quantum P70iX est testé avec des couvertures transparentes avant de
quitter l’usine. Les directives suivantes vous aideront à comprendre les capacités du système
Quantum P70iX. Dans les cas où votre stock particulier de couverture transparente ne convient
pas pour le Quantum P70iX, vous pourriez essayer de déparer les couvertures transparentes du
contenu du livre et perforer les couvertures transparentes à l’aide d’un perforateur de table solide
Magnapunch de GBC.
• Pour que les stocks de couvertures transparentes fonctionnent dans le Quantum P70iX
GBC, il faut le corps qui se trouve dans les couvertures Premium de GBC de 0,2 mm
(0,01 po) et 0,3 mm (0,014 po) d’épaisseur.
• Les couvertures transparentes doivent être incorporées. Les capteurs optiques utilisés pour
le Quantum ne peuvent pas détecter les couvertures transparentes.
• En utilisant des stocks mixtes, vous devez vous assurer que les dimensions soient constantes. Un stock plus petit que l’autre prévient l’enregistrement de trous approprié.
• Avec une taille de manutention plus petite, le perforateur a plus de chance de traverse une
seule épaisseur de couverture transparente. Les tailles de manutention de 5 à 7 sont les
meilleures.
• Il est préférable d’effectuer un travail contenant des stocks de couvertures transparentes à
une vitesse plus lente. GBC recommande 75 LPM pour la plupart des travaux.
• Les couvertures transparentes produisent plus d’adhésion statique que d’autres stocks,
donc les conditions ambiantes affectent sa performance.
• Si on utilise une couverture transparente seule, le perforateur peut s’arrêter avec un faux
blocage, sans que le stock soit endommagé.
61
3. Fonctionnement
COMMANDES DE FONCTIONNEMENT
2
3
1
1
1. Déroulement de travail
ergonomique : charge,
décharge et programme du
même côté sans étapes perdues.
On peut charger et décharger les piles sans danger tandis que la machine perfore.
62
2. Changements de jeu de
matrices : s’effectuent sans
outils et en quelques secondes.
3. Entièrement numérique :
configuration et fonctionnement à bouton poussoir.
Avec des étapes simples de
rappel jusqu’à 24 travaux
personnalisés.
4. Options et accessoires
OPTIONS ET ACCESSOIRES :
Jeux de matrices :
Le perforateur automatique Quantum P70iX de GBC peut perforer une variété de motifs de trous
utilisés couramment dans la reliure d’aujourd’hui en changeant tout simplement le jeu de matrices. Les jeux de matrices se changent en quelques secondes sans outils.
Une fonction importante de Quantum P70iX est le fait qu’il utilise des jeux de matrices
Magnapunch de GBC. Si vous utilisez avec un Magnapunch, vous pouvez transformer le jeu de
matrices en une plateforme de perforation convenant le mieux pour le travail en quelques minutes.
Veuillez noter : La reliure de plastique PB ajustera différentes profondeurs de perforation du jeu
de matrices Magnapunch (ne convient pas pour le système de manipulation de papier automatique utilisé par le Quantum.
Les jeux de matrices disponibles actuellement sont indiqués plus bas. Votre représentant des
ventes GBC peut vous fournir le prix et la disponibilité ou vous pouvez contacter le centre d’appel GBC au 1 800 723-4000. Pour plus d’information, visitez le site Web de GBC à www.gbcconnect.com.
Veuillez noter que chaque style de perforation indiqué précédemment exige un jeu de matrices
distinct pour le Quantum P70iX.
Perf. automatique Quantum P70iX - Jeux de matrices
Reliure de plastique PB – arrière fixe le plus profond, calibre 0,187 po
Reliure de plastique PB – arrière fixe moyen, calibre 0,141 po
Reliure de plastique PB – arrière fixe peu profond, calibre 0,094 po
Fil à boucle double W3 - 3:1 Rond
Fil à boucle double W3 - 3:1 Carré
Fil à boucle double W2 - 2:1 Rectangulaire
Fil à boucle double W2 - 2:1 Rond
Serpentin de couleur C4 – 4:1 Ovale .2475
Serpentin de couleur C4 – 4:1 Rond .2475 Inclinaison
Serpentin de couleur C4 – 4:1 Rond .250 Inclinaison
VB VeloBind 11 pouces
Reliure à anneaux 2/4 Standard 5/16 po Diamètre du trou
Code de produit
7707230
7707220
7707210
7708350
7708360
7708330
7708320
7707290
7708300
7708310
7708340
7708390
GBC offre une suite complète d’équipement et de fournitures de reliure pour répondre aux
besoins de reliure. Veuillez consulter le catalogue de solutions de reliure et le catalogue de
fournitures pour plus d’information.
Des jeux de matrices personnalisés sont disponibles pour le Quantum P70iX. Pour plus d’information, consultez votre représentant des ventes GBC.
IMPORTANT : Un décalque sur la poignée de chaque jeu de matrices interchangeable indique
le motif de perforation. En lisant les instructions de fonctionnement, veuillez noter les instructions spéciales pour le jeu de matrices du bon motif de perforation que vous avez installez sur
votre Quantum P70iX.
63
4. Options et accessoires
OPTIONS ET ACCESSOIRES suite
Rangement des jeux de matrices :
Conseil utile: L’armoire de rangement du jeu de matrices GBC 7703207 est un excellent moyen
de ranger tous vos jeux de matrices interchangeables pour le Quantum P70iX (voir la figure 3).
Ce produit spécial retient les trois jeux de matrices en place, les protégeant de la poussière, de la
saleté et des dommages accidentels. Contactez votre représentant des ventes pour de l’information pour obtenir une armoire de rangement des jeux de matrices.
Figure 3
!
64
MISE EN GARDE : DANGER POSSIBLE DE PINCEMENT. EN INSTALLANT LES
JEUX DE MATRICES DANS VOTRE Quantum P70iX, GARDEZ TOUJOURS LES
DOIGTS ET LES PARTIES DU CORPS LOIN DE LA FENTE DES JEUX DE MATRICES DE L’APPAREIL ET LOIN DE TOUS LES ENDROITS DU JEU DE MATRICES
SAUF LA RAINURE DES DOIGTS DANS LA POIGNÉE DU JEUX DE MATRICES. NE
PAS RESPECTER CES PRÉCAUTIONS PEUT MENER À DES BLESSURES.
5. Écran d’accueil
ÉCRAN D’ACCUEIL
GBC QUANTUM PUNCH
90 LPM
7
MODE
UNLOAD
JOB MANAGER
PROOF
LANGUAGE
1
2
3
4
5
6
7
8
9
0
OK
L’écran d’accueil est le point de départ du fonctionnement du Quantum P70iX. À cet écran, vous
pouvez voir le travail qu’entreprendra le Quantum. Dans l’exemple précédent, le Quantum est
configuré pour exécuter:
• Une taille de papier de 8,5 x 11 po (216 x 279 mm) avec perforation du côté de 11 po
(279 mm).
• Une épaisseur de manutention de « 7 » ce qui est environ 7 feuilles de papier de 24 livres
(10,8 kg).
• À une vitesse de 90 élévations à la minute.
• Perforer des trous à l’aide d’une matrice PB (reliure de plastique) avec une équerre de massicot de 0,141 po (3,6 mm).
• Le Quantum fonctionne aussi avec les lectures de commandes en anglais.
Si ces réglages de travail sont acceptables, vous pouvez commencer en :
• Chargeant votre papier sur les courroies d’entrée.
• Appuyant sur le bouton de démarrage vert.
65
5. Écran d’accueil
ÉCRAN D’ACCUEIL sui
GBC QUANTUM PUNCH
90 LPM
7
MODE
UNLOAD
PROOF
JOB MANAGER
LANGUAGE
1
2
3
4
5
6
7
8
9
0
OK
Voici d’autres commandes pour l’ÉCRAN D’ACCUEIL :
MODE : vous permet de choisir automatique ou manuel. Le mode automatique signifie que le
Quantum continuera à fonctionner sans arrêt en autant que vous placez le papier sur les courroies d’entrée et retirez la pile de papier perforée des courroies de sortie. Le mode manuel signifie que le Quantum s’arrêtera avant de prendre la pile de papier suivante pour le traitement. Ce
mode et utile si vous désirez commencer un nouveau travail exigeant différents réglages tels
qu’un jeu de matrices différent par exemple.
PROOF (ESSAI) : vous pouvez essayer quelques manutentions pour ensuite arrêter le
Quantum. Cette fonction vous permet de vérifier le positionnement des trous et du motif pour
faire en sorte que la configuration soit celle voulue..
UNLOAD (DÉCHARGER) : signifie qu’en enfonçant, le travail déjà à l’intérieur du Quantum sortira. Ceci est utile si vous avez besoin de reprendre un travail pour quelque raison que ce soit.
JOB MANAGER (GESTIONNAIRE DE TRAVAIL) : vous mènera à l’écran de Gestionnaire de
travail où vous pouvez choisir ou créer un travail différent.
LANGUAGE (LANGUE) : vous pouvez choisir français, anglais, espagnol et allemand.
.
66
5. Écran d’accueil
CRAN D’ACCUEIL suite
GBC QUANTUM PUNCH
90 LPM
7
MODE
UNLOAD
JOB MANAGER
PROOF
LANGUAGE
1
2
3
4
5
6
7
8
9
0
OK
D’autres commandes de l’ÉCRAN D’ACCUEIL :
Vous avez un contrôle constant de la vitesse en contrôlant le LPM (lifts per minute) ou les
Manutentions par minute et la taille de chaque manutention en ajustant le nombre de feuilles par
manutention.
Les manutentions à la minute (LPM) se contrôle en pressant les boutons fléchés gauche –
droite. Vous verrez le changement de nombre dans la fenêtre. L’exemple précédent indique
« 90 LPM ». Les choix sont 60, 75, 90 et 105 LPM
REMARQUE : Vous devriez choisir une vitesse plus basse pour les médias plus difficiles à
manipuler tels que les travaux qui tournent plus que normalement ou pour une couverture de
toner plus lourde que normalement.
La taille de manutention se contrôle en appuyant sur les flèches vers le haut – bas. Les chiffres
sont environ égaux au nombre de feuilles de papier bond de 24 livres (10,8 kg) choisis à ce
réglage. Cette fonction ne compte pas vraiment les feuilles et vous ne devez pas vous attendre à
ce que la manutention ait exactement cette quantité. L’exemple illustré est d’une taille de
manutention de « 7 »
REMARQUE : Vous devriez choisir une manutention plus basse pour manipuler les médias tels
que les travaux qui roulent plus que normalement ou plus que la couverture de toner normal.
67
5. Écran d’accueil
ÉCRAN DE GESTIONNAIRE DE TRAVAIL
JOB MANAGER — USE ARROWS
GO JOB 1
VIEW 13-24
EDITOR
HOME
1
2
3
4
5
6
7
8
9
0
OK
À l’écran du gestionnaire de travail vous pouvez faire défiler entre les travaux sauvegardés
(1 – 12) en appuyant tout simplement sur les boutons de droite à gauche et/ou vers le haut/vers
le bas. Dans l’exemple précédent, le TRAVAIL 1 a été mis en évidence. Pour choisir ce travail et
continuer, appuyez simplement sur le bouton “GO JOB 1” (ALLER AU TRAVAIL 1).
Autres fonctions du gestionnaire de travail :
• VIEW (VUE) 13-24 : appuyez pour choisir un travail N° 13 à N° 24.
• HOME : (ACCUEIL) : appuyez pour revenir directement à l’écran d’accueil
• EDIT : (MODIFIER) : un travail actuel ou créer un nouveau travail,
Faites défiler au travail que vous désirez modifier, ou ,
Faites défiler vers un travail inutilisé : Dans l’exemple précédent, le Travail 12 est inutilisé.
Appuyez sur le bouton EDITOR (MODIFIER).
68
5. Écran d’accueil
ÉCRAN EDITOR (ÉDITEUR)
EDITOR
USE ARROWS TO
CHANGE
OTHER
0..9
SIZES
GO TO NEXT
SETTING
ESCAPE NO CHANGE
GO BACK
DATA OK
SAVE
STORE
ACCEPT
ESCAPE
SAVE
1
ACCEPT
1
2
3
4
5
6
7
8
9
0
OK
Pour modifier un travail actuel ou créer un nouveau travail, appuyez sur les flèches vers le haut
– bas pour choisir le réglage voulu. Dans l’exemple précédent, la dimension du papier Bord de
perforation a été choisie et indique actuellement 11 po (28 cm) .
Alternativement, la dimension peut être inscrite directement à l’aide du clavier numérique.
L’appareil basculera automatiquement entre pouces et millimètres selon la taille du chiffre inscrit.
Notez que la plage de cette valeur est de 5,5 po à 12 po (139,7 mm à 304,8 mm).
Après que la valeur choisie et affichée, appuyez sur le bouton « ACCEPT ».
69
5. Écran d’accueil
ÉCRAN EDITOR (ÉDITEUR) suite
EDITOR
USE ARROWS TO
CHANGE
OTHER
0..9
SIZES
GO TO NEXT
SETTING
ESCAPE NO CHANGE
GO BACK
DATA OK
SAVE
STORE
ACCEPT
ESCAPE
SAVE
1
ACCEPT
1
2
3
4
5
6
7
8
9
0
OK
ÉCRAN EDITOR (ÉDITEUR)
Dans l’exemple précédent, la dimension du papier Bord latéral a été choisie et indique actuellement 8,5 po (21,6 cm).
Notez que la plage de cette valeur est de 5,5 po à 9 po (139,7 mm à 228,6 mm).
.
70
5. Écran d’accueil
ÉCRAN EDITOR (ÉDITEUR) suite
EDITOR
USE ARROWS TO
CHANGE
ACCEPT
GO TO NEXT
SETTING
1
ESCAPE NO CHANGE
SAVE
GO BACK
DATA OK
STORE
ESCAPE
SAVE
ACCEPT
1
2
3
4
5
6
7
8
9
0
OK
ÉCRAN EDITOR (ÉDITEUR)
Dans l’exemple précédent, le type de Matrice de perforation a été choisi et indique actuellement
PB .141. Voir le tableau 1 pour les jeux de matrices disponibles pour le Quantum.
Lorsque les trois réglages sont exacts, appuyez sur le bouton « SAVE » (SAUVEGARDER) qui
ramènera à l’écran Gestionnaire de travail.
71
5. Écran d’accueil
ÉCRAN « GO JOB » (ALLER AU TRAVAIL)
EDITOR
USE ARROWS TO
CHANGE
GO TO NEXT
SETTING
ESCAPE NO CHANGE
GO BACK
DATA OK
SAVE
STORE
ACCEPT
ESCAPE
SAVE
1
ACCEPT
1
2
3
4
5
6
7
8
9
0
OK
Choisir un nouvel ensemble de matrices affichera l’écran de jeux de matrices. Cet écran vous
demandera de retirer les bons chiffres de tiges de perforation pour la taille de papier que vous
utilisez. Dans l’exemple illustré, il y a deux configurations possibles de tiges avec cette combinaison de papier et de jeux de matrices. Le jeu de matrices même présente une pratique étiquette de référence pour identifier les chiffres de tiges. Le Quantum centrera automatiquement
le jeu de matrices à la taille de papier choisie si vous appuyez sur les boutons 2 ou 4. En
appuyant sur les boutons 1 ou 2, le Quantum effectuera tous les ajustements requis (bord de
reliure, bord latéral et centrer la matrice). Vous pouvez peaufiner manuellement le centrage de
trous en appuyant sur les flèches droite- gauche à cet écran.
Notez que les tiges indiquées à l’affichage sont des tiges qui doivent rester dans le jeu de matrices, c’est-à-dire tirez sur les tiges à gauche et à droite de la plage indiquée.
Remarque : à l’écran précédent, le graphique devrait indiquer les tiges « 4 - 23 et 5 – 23 » non
pas « 1 – 23 et 5 – 23 ».
72
5. Écran d’accueil
ÉCRAN RUN (EXÉCUTER)
GBC QUANTUM PUNCH
90 LPM
7
MODE
UNLOAD
PROOF
JOB MANAGER
LANGUAGE
1
2
3
4
5
6
7
8
9
0
OK
Lorsque le Quantum exécute un travail, les Graphiques vous fourniront l’information au sujet du
travail en cours.
• L’exemple précédent vous indique qu’il y a du papier sur les courroies d’entrée et sur les
courroies de sortie en plus d’à l’intérieur de l’aire de traitement Quantum.
D’autres graphiques indiqueraient :
• Positions de manutention
• Portes s’ouvrent
• Jeu de matrices est pincé
• Emplacements des erreurs
• Ajuster les tailles de feuilles
73
5. Écran d’accueil
ÉCRAN SETUP (CONFIGURATION)
GBC QUANTUM PUNCH
90 LPM
7
MODE
UNLOAD
PROOF
JOB MANAGER
LANGUAGE
1
2
3
4
5
6
7
8
9
0
OK
Lorsque le Quantum effectue un travail, les graphiques vous fournissent l’information au sujet du
travail en cours.
L’exemple précédent vous indique que le jeu de matrices est verrouillé.
Commandes PAUSE par rapport à STOP (ARRÊT) :
ISi vous devez arrêter le système immédiatement, appuyez sur « STOP » (ARRÊT) et le
Quantum P70iX s’arrêtera en mi-cycle. Vous devrez peut-être libérer le papier de divers points
dans la voie du papier si le système ne se débloque pas seul en le redémarrant. Si vous désirez
arrêter la perforation, mais si vous pouvez laisser le papier continuer, appuyez sur « PAUSE ».
Ceci arrêtera l’alimentation, mais laissera tout papier dans l’appareil continuer dans le système.
74
6. Entretien
INFORMATION SUPPLÉMENTAIRE
CONTENANT DU PLATEAU À REBUTS (CONFETTIS DE PAPIER ou COPEAUX DE PAPIER)
Le contenant de rebuts de votre Quantum P70iX se trouve derrière la porte d’accès gauche près
du bas de l’appareil. Le contenant doit être retiré régulièrement et vidé. Ceci évite les blocages et
les dommages à l’appareil. Le Quantum P70iX incorpore la technologie du micro- processeur
pour informer l’opérateur du moment où le contenant doit être vidé.
REMARQUE : Lorsque le contenant de rebuts est sorti, assurez-vous de le vider. Pour réinitialiser le système de compteur de rebuts, il faut retirer entièrement le contenant de rebuts du
Quantum pendant au moins 5 secondes
TIGES DU PERFORATEUR
Vous devrez peut-être retirer certaines tiges du perforateur pour perforer correctement certaines
combinaisons de tailles de papier et de motifs de perforation
ENTRETIEN ET RÉPARATION
Si votre Quantum P70iX doit être réparé, contactez votre représentant de service autorisé GBC.
TIl N’y a AUCUNE pièce réparable par l’utilisateur dans cet appareil. Pour éviter toute blessure
et/ou dommages à la propriété, NE RETIREZ PAS LE COUVERCLE DE LA MACHINE.
DÉPANNAGE Quantum P70iX
Problème
Cause du problème
Aucun courant, ne perfore pas
Cordon d’alimentation n’est pas branché à l’arrière
de l’appareil ou n’est pas branché correctement
dans le mur.
Le jeu de matrices n’est pas inséré complètement.
La porte ou le couvercle n’est pas fermé(e)
Perfore trop de trous
Les tiges optionnelles n’ont pas été tirées
L’opérateur est familier avec les tailles de papier
citées en référence sur le DocuTech Xerox en mm
Allez à « SETUP » et changez les dimensions de
pouces à ‘mm’
En chargeant manuellement la première pile de
papier dans les courroies d’alimentation, les
feuilles du bas s’agrippent
La surface des courroies est conçue pour saisir le
papier. Vous verrez qu’il n’est pas possible de placer la pile de papier sur les courroies et de la glisser
dans le coin d’alignement. Poussez plutôt la pile
avec soin contre la porte d’abord, puis contre le
guide droit de métal des feuilles, puis réglez la pile
vers le bas sur la courroie. Il est aussi préférable
de charger une pile plus petite pour commencer et
de faire suivre par des piles plus volumineuses
Après une utilisation chargée, l’appareil commence
à lire des blocages quand il n’y en a pas
Un jet d’air périodique sur les lentilles des trois
capteurs optiques empêchera l’accumulation de
poussière du papier ce qui entrave leur rendement
75
7. Spécifications
SPÉCIFICATIONS du Quantum P70iX
Vitesse :
Taille de feuille :
Jusqu’à 105 cycles / minute, 60 000 feuilles par heure
Bord de perforation 5 1/2 po à 12 po, (139,7 a 304,8 mm) bord latéral
5,5 po à 9 po (139,7 a 228,6 mm)
Stock de papier :
61 gsm (N° 16) bond à 300 gsm (N° 140)
Poids mélangés, couvertures à coupe à ras et à repères d’indexage
standard
Hauteur de manutention : Variable, 5 à 12 feuilles de bond N° 20 (75 gsm)
Hauteur de pile :
Jusqu’à 14 po (environ 3 500 feuilles de bond N° 20 (75 gsm)
Dimensions :
60 po larg. x 55 po long. x 52 po haut. (152 cm x 140 cm x 132 cm)
(Se divise facilement pour s’adapter à une entrée de 32 po) voir page
8
Poids :
850 lb (386 kg)
Alimentation de courant : É.-U./Canada : 220 V c.a., 50/60 Hz, monophase, 2,7 A, 0,32 KW,
1 092 BTU/h
International : 220 V c.a., 50/60 Hz, monophase, 2,7 A, 0,32 KW,
1 092 BTU/h
Prise de courant de type 6-20R 20A, 250V
Approbations :
Homologation CSA à CAN/CSA-C22.2 N° 60950-00, UL
Std N° 60950-00, 3e Éd.
Homologation TUV à EN 60950:2000
Conformité :
Porte la marque CE pour montrer sa conformité aux exigences de l’union européenne
Jeux de matrices :
Jeux de matrices interchangeables pouvant être changés en quelques
secondes sans outils
Les caractéristiques techniques sont susceptibles de modifications sans préavis.
GBC recommande une protection auditive pour les opérateurs du Quantum P70iX. Voici nos
niveaux d’essais sonores :
Fonctionnement dans le cas le plus défavorable
(vitesse 4, jeu de matrices C4, bond N° 20, manutention N° 9 – 12 feuilles):
Niveau de pression acoustique = LpA = 83,0 dbA
Impulsion de pression acoustique = LpAI = 85,2 dbA
Dimensions métriques
30°
0.25
(9.85")
Fonctionnement d'utilisation typique (vitesse 2, jeu
de matrices PB, bond N° 20, manutention N° 9 – 12
feuilles):
Niveau de pression acoustique = LpA = 78,5 dbA
Impulsion de pression acoustique = LpAI = 83,5 dbA
Méthode de test et placement du microphone ISO 7779 :
1,5 M (59,1 po) d'alimentation,
1,5 M (59,1 po) de hauteur,
0,25 M (9,85 po) du bord d'entrée vertical de Quantum au
panneau de commande.
Opérateur debout
76
Inhaltsverzeichnis
Abschnitt
Seite
Sicherheitsinformationen
79
1. Einleitung
Einleitung
84
2. Lernen Sie Ihre Quantum P70iX kennen
Bedienelemente
Plastikumschläge
85
86
3. Bedienung
Bedienelemente
87
4. Optionen und Zubehör
Matrize
Aufbewahrung der Matrizen
88
89
5. Ausgangsbildschirm
Bedienung
Service
90
90
6. Wartung
Problemlösung
Papierstau
7. Technische Daten
Technische Daten der Quantum P70iX
78
100
100
101
Sicherheitsinformationen
SICHERHEITSMITTEILUNGEN
Ihre und anderer Sicherheit ist GBC sehr wichtig. In diesem Handbuch sowie an der Maschine
selbst befinden sich wichtige Sicherheitsmitteilungen und –informationen. Bevor Sie mit der
Maschine arbeiten, lesen Sie diese bitte sorgfältig durch und begreifen Sie sie.
Vor jeder Sicherheitsmitteilung steht in diesem Bedienhandbuch das
Sicherheitswarnsymbol. Dieses Symbol deutet auf eine mögliche Gefahr für die
Sicherheit von Personen hin, der Sie oder andere ausgesetzt werden könnten, oder die
einen Produkt- oder Funktionsschaden verursachen könnte.
Folgendes Bild ist an der Quantum P70iX angebracht:
!
!
VORSICHT: Das bedeutet, Sie könnten fallen und sich verletzen, wenn Sie versuchen,
sich auf die Förderbänder zu stellen oder zu setzen.
!
WARNUNG: Das bedeutet, Sie können von beweglichen Teilen, die quetschen und
schneiden, ernsthaft verletzt werden. Lassen die Maschine nicht ohne angebrachte
Schutzvorrichtungen laufen. Versuchen Sie nicht, irgendwelche
Sicherheitsverriegelungsschalter unwirksam zu machen.
!
WARNUNG: Das bedeutet, Sie können durch herabfallende Abdeckungen ernsthaft verletzt werden. Halten Sie Ihre Hände und andere Körperteile fern, damit sie nicht zerquetscht oder geschnitten werden.
79
Sicherheitsinformationen
SICHERHEITSMITTEILUNGEN (Fortsetzung)
!
WARNUNG: Das bedeutet, Sie können von beweglichen Teilen, die quetschen und
schneiden, ernsthaft verletzt werden. Lassen die Maschine nicht ohne angebrachte Schutzvorrichtungen laufen. Versuchen Sie nicht, irgendwelche
Sicherheitsverriegelungsschalter unwirksam zu machen.
Die folgenden Symbole sind auf diesem Produkt angebracht, und sie haben folgende
Bedeutung:
I
heißt, der Strom ist eingeschaltet.
O heißt, der Strom ist ausgeschaltet.
WICHTIGE SCHUTZVORRICHTUNGEN
• Verwenden Sie die Quantum P70iX nur für den vorgesehenen Zweck des Papier- und
Umschlagstanzens gemäß den angegebenen technischen Daten.
• Bewahren Sie dieses Bedienhandbuch für später auf.
!
80
VORSICHT: BENUTZEN SIE DAS NETZKABEL IM NOTFALL ALS HAUPTTRENNSCHALTER.
Sicherheitsinformationen
WICHTIGE SCHUTZVORRICHTUNGEN (Fortsetzung)
• Die Quantum P70iX muss an eine Netzspannung angeschlossen werden, die der elektrischen Nennleistung in der Bedienanleitung der Maschine entspricht (auch auf dem
Seriennummernschild angegeben).
• Die Steckdose soll sich in der Nähe der Maschine befinden und leicht zugänglich sein.
• Der Schutzkontaktstecker dient der Sicherheit und passt nur in eine geeignete
Schutzkontaktsteckdose. Wenn sich der Stecker in keine Steckdose stecken lässt, bitten Sie
einen qualifizierten Elektriker, eine geeignete Steckdose zu installieren. Verändern Sie den
Stecker am Ende des Leitungssatzes (wenn vorhanden) der Quantum P70iX nicht. Er soll
Ihrer Sicherheit dienen.
• Ziehen Sie den Stecker der Quantum P70iX ab, bevor Sie sie umsetzen oder wenn Sie sie
für eine längere Zeit nicht benutzen.
• Nehmen Sie die Quantum P70iX nicht in Betrieb, wenn ihr Netzkabel oder Netzstecker
beschädigt ist. Nehmen Sie die Maschine nach einer Störung nicht in Betrieb, wenn
Flüssigkeit in die Maschine gelangt ist oder die Maschine in irgendeiner Weise beschädigt
wurde.
• Belasten Sie die Steckdosen nicht über ihre Kapazität hinaus. Wenn Sie das machen, kann
es zu Brand oder elektrischem Schlag kommen.
• Versuchen Sie nicht, die Sicherheitsverriegelungen zu überbrücken. Wenn Sie das machen,
können Sie verletzt werden.
SERVICE
Versuchen Sie nicht, Ihre Quantum P70iX selbst zu warten. Lassen Sie alle erforderlichen
Reparaturen oder hauptsächlichen Wartungsarbeiten an Ihrer Quantum P70iX von einem
berechtigten Servicevertreter von GBC durchführen.
In der Maschine befinden sich KEINE Teile, die vom Benutzer zu warten sind. Zur Vermeidung
möglicher Personenverletzungen und/oder der Funktionstüchtigkeit oder eines
Maschinenschadens:
!
ENTFERNEN SIE DIE SEITLICHEN UND OBEREN ABDECKUNGEN DER MASCHINE NICHT.
REINIGUNG
Sie können das Äußere der Quantum P70iX mit einem weichen, feuchten Lappen reinigen.
Verwenden Sie kein Waschpulver oder Lösungsmittel, da die Maschine dadurch beschädigt werden kann.
81
Sicherheitsinformationen
AUSWAHL DES HAUPTLEITUNGSSATZES
(DIE FOLGENDE ANMERKUNG GILT NUR FÜR EUROPÄISCHE GERÄTE)
!
VORSICHT: WENN SIE EIN ABZIEHBARES NETZKABEL FÜR IHRE Quantum P70iX
AUSWÄHLEN, BEACHTEN SIE IMMER DIE FOLGENDEN VORSICHTSMASSNAHMEN:
Der Leitungssatz besteht aus drei Teilen; dem Anschlussstecker, dem Kabel und dem
Gerätestecker. Jedes dieser Teile muss den gesetzlichen Bestimmungen für Sicherheit in
Europa entsprechen.
Es werden die folgenden minimalen elektrischen Nennwerte für den speziellen Leitungssatz für
Sicherheitszwecke veröffentlicht: VERWENDEN SIE KEINE LEITUNGSSÄTZE, DIE DIE FOLGENDEN MINIMALEN ELEKTRISCHEN ANFORDERUNGEN NICHT ERFÜLLEN.
STECKER: 3 A, 250 V, 50/60 Hz, Leiterklasse 1, 3, in Europa genehmigte Sicherheit. KABEL:
Typ H05VV-F3G0.75, harmonisiert (< HAR>). Die “< >”-Symbole bedeuten, dass das Kabel
nach dem entsprechenden Europäischen Standard genehmigt wurde (ANMERKUNG:
“HAR” kann durch das Genehmigungszeichen der Europäischen Sicherheitsbehörde, die das
Kabel genehmigt hat, ersetzt werden, z. B. “<VDE>”).
GERÄTESTECKVERBINDER: 3 A, 250 V, 50/60 Hz, in Europa genehmigte Sicherheit, Typ IEC
320. Der Leitungssatz darf nicht länger als 3 m sein. Es kann auch ein Leitungssatz verwendet
werden, dessen einzelne Teile elektrische Nennwerte haben, die größer als die angegebenen
minimalen elektrischen Nennwerte sind.
82
Sicherheitsinformationen
AUSWAHL DES HAUPTLEITUNGSSATZES (Fortsetzung)
(DIE FOLGENDE ANMERKUNG GILT NUR FÜR USA-GERÄTE.)
FCC-ANMERKUNG
Dieses Gerät ist geprüft worden und liegt in den Grenzen für digitale Geräte der Klasse A
gemäß Punkt 15 der FCC-Bestimmungen. Diese Grenzen dienen dazu, einen vernünftigen
Schutz vor gefährlichen Störungen zu schaffen, wenn das Gerät gewerblich betrieben wird.
Dieses Gerät erzeugt, benutzt und strahlt hochfrequente Energie aus und kann den
Nachrichtenverkehr empfindlich stören, wenn es nicht gemäß Bedienanweisung installiert und
benutzt wird. Beim Betrieb dieses Geräts in einem Wohnbereich werden wahrscheinlich
gefährliche Störungen erzeugt, die der Anwender auf seine eigenen Kosten beseitigen muss.
!
VORSICHT: ÄNDERUNGEN ODER ABWANDLUNGEN, DIE NICHT AUSDRÜCKLICH
VON DER GENERAL BINDING CORPORATION GENEHMIGT WURDEN, KÖNNTEN
IHRE BERECHTIGUNG ZUM BETRIEB DER ANLAGE UNGÜLTIG MACHEN.
Dieses digitale Gerät der Klasse A entspricht der kanadischen ICES-003
Cet appareil numerique dela classe A est conforme a la norme NMB-003 du Canada.
SERVICE- UND ANLAGENWARTUNGSVERTRAG
Durch den Kauf der P70iX haben Sie in eine sehr leistungsfähige Stanzmaschine investiert, die
jahrelang zuverlässig arbeiten wird. Damit diese Investition geschützt werden kann, können Sie
sich auf den Nutzen des Anlagenwartungsvertrags (EMA) von GBC verlassen. Der EMA verschafft Ihrer P70iX die richtige fortlaufende Wartung und Pflege und gewährleistet damit, dass die
Maschine jahrelang Qualitätsleistung bringt und ein langes Leben hat, was ihr eigen ist. Ohne
EMA würden bei jeder normalen Wartungs- oder Reparaturdienstanforderung Kosten für Teile und
Arbeit entstehen. Mit einem EMA für Ihre P70iX ist das nicht möglich, da er Ihnen niedrige
jährliche, feste Kosten bietet, um die Investition in Ihre wertvolle Maschine zu schützen.
Vollständige Einzelheiten zum Erwerb eines EMA erhalten Sie bei Ihrem Verkaufsvertreter von
GBC oder bei:
General Binding Corporation
500 Bond Street
Lincolnshire, IL 60069
Oder rufen Sie an: 1-800-790-7787
Alle Wartungsarbeiten sind von einem von GBC berechtigten Techniker auszuführen, sofern es
sich nicht um eine Bedienerwartung gemäß Bedienhandbuch für die automatische Stanzmaschine
P70iX handelt. Es ist nicht zu empfehlen, die automatische Stanzmaschine P70iX nicht
entsprechend dem Bedienhandbuch zu verwenden. Dadurch kann die Garantie oder der
Wartungsvertrag ungültig werden.
Durch geübte Bediener und regelmäßige Bedienerwartung der P70iX können die Leistung optimiert und die Serviceanforderungen minimiert werden.
83
1. Einleitung
EINLEITUNG
Die Quantum P70iX erfüllt einzigartige Anforderungen auf dem Markt des Digitaldrucks. Sie
unterstützt alle üblichen geforderten Stanzmuster einschließlich Dreiloch, Kamm, VeloBind,
Doppelschleifendraht und Farbspirale. Es gibt auch Kundenschnittmuster. Dieses neue System
lässt sich für kleine Auflagen schnell umstellen.
Es werden praktisch alle Einstellungen schnell und leicht von der Anzeigetafel des Digitaldruckers
aus vorgenommen, wodurch ein wesentlicher Aspekt der Zeitverschwendung bei herkömmlichen
Produktionsstanzmaschinen beseitigt wird. Schnittänderungen können in kurzer Zeit ohne
Werkzeuge vorgenommen werden. Das System ist mit allen üblichen Papiergrößen
vorprogrammiert und kann bis zu 20 Kundenaufträge speichern.
Die P70iX kann mit vielen Medien umgehen. Sie kann mit Blattgrößen von 13,6 x 13,6 cm
(5 1/2" x 5 1/2") bis 22,2 x 29,6 cm (9" x 12") einschließlich gemischter Papiergewichte und
Umschlagstoffe umgehen. Ein weiteres Schlüsselmerkmal ist die Fähigkeit des Systems, vermischte Indexetiketten ohne spezielle Einstellungen zu verarbeiten.
In die P70iX ist die neue “Stapelverarbeitungstechnik” von GBC eingebaut, mit der die
Arbeitskosten des Bedieners verringert werden sollen. Mit dieser neuen Bauweise kann das
System einen Stapel von 34,6 cm (14") (3.500 Blatt Feinpostpapier 20#) ohne Beteiligung des
Bedieners verarbeiten. Die P70iX hat eine maximale Durchsatzgeschwindigkeit von 60.000 Blatt
pro Stunde.
Die Quantum P70iX ist die revolutionäre neue, Near-Line-, HochgeschwindigkeitsDigitalproduktionsstanzmaschine von GBC. Sie ist in Minuten eingerichtet und behauptet sich
neben anderen der gegenwärtig schnellsten Digitaldruckmaschinen.
Diese Anweisungen wurden erarbeitet, um Sie mit der Stanzmaschine Quantum P70iX und ihrer
Bedienung vertraut zu machen. Lesen Sie sie bitte sorgfältig durch. Bewahren Sie diese
Bedienanweisungen auf, damit Sie sie auch künftig haben.
AUSPACKEN UND EINRICHTEN
Die Stanzmaschine Quantum P70iX muss von einem qualifizierten GBC-Techniker installiert
werden. Ihr Techniker hat dafür zu sorgen, dass das System richtig nivelliert und betriebsbereit ist.
84
2. Lernen Sie Ihre Quantum P70iX kennen
LERNEN SIE IHRE QUANTUM P70iX KENNEN
Äußere Faktoren können die Leistung Ihrer P70iX beeinflussen. Diese Faktoren bestehen aus
Kundenforderungen an die Lochqualität, Durchsatzmaterialien (Papier/Diapositive/Umschläge),
Tonermenge auf der gedruckten Seite und Umgebungsfaktoren.
STATIK im Papier kann zu schlechter Qualität führen. Wenn Ihre P70iX mit einem neuen
Ries reinem weißen Papier arbeitet, aber Probleme mit Ihrem gedruckten Auftrag
bekommt, kann das auf die Statik zurückzuführen sein. Die folgenden Hinweise könnten
helfen, dieses Problem zu beseitigen.
Vorschläge für die Statik: Wenn Ihre automatische Stanzmaschine P70iX bei der Abarbeitung
bestimmter Aufträge Schwierigkeiten hat, kann das daran liegen, dass sich im Papier zu viel
Statik aufgebaut hat. Hier sind einige Vorschläge, wie der Statikeffekt verringert werden kann.
1.Fächeln Sie das Papier, bevor Sie es in die P70iX legen. Stoßen Sie das Papier nicht;
dadurch wird nur noch mehr Statik erzeugt.
2.Verringern Sie die Geschwindigkeit der P70iX. Dadurch bekommt das Papier mehr Zeit, in
die Matrize herunter zu gelangen.
3.Erwägen Sie den Kauf eines Raumbefeuchters, um die Luftfeuchtigkeit zu erhöhen.
Trockene Luft erzeugt mehr Statik.
4.Verlegen Sie das Stanzen in einen klimageregelten Raum.
5.Achten Sie gut auf saisonbedingte Zustände. Verfahren, die Sie an heißen feuchten Tagen
befolgen, müssen in den trockenen Wintermonaten, wenn die Statik am üblichsten ist, vielleicht verändert werden.
6.Erwägen Sie, Ihre Aufträge mit ausgepacktem Papier in sehr großen Tupperware-artigen
Behältern aufzubewahren, um die Feuchtigkeit zu erhalten. Wenn Sie diese Behälter zusammen mit Luftbefeuchtern benutzen, kann das Papier tatsächlich wieder Feuchtigkeit
aufnehmen, die beim Verschmelzen verloren ging.
7.Wenden Sie sich an Ihre Kopierer-/Drucker-Serviceabteilung und erkundigen Sie sich, wie
die Verschmelzertemperatur verringert werden kann.
Zu beachtende Allgemeinheiten, damit Sie höchst zufrieden sind.
Die Etiketten müssen eine Schulter von _” haben.
• Wenn Sie mit gemischten Stoffen arbeiten, müssen Sie dafür sorgen, dass die
Abmessungen gleichbleibend sind. Wenn ein Stoff kleiner ist als der andere, kann das Loch
nicht richtig festgestellt werden.
• Sehr glatte Papier- oder Umschlagstoffe können im P70iX nicht verarbeitet werden. Prüfen
Sie kleine Stapel bei niedrigeren Geschwindigkeiten und/oder geringeren Hebegrößen,
bevor Sie einen großen Auftrag ausführen.
• Umschlagstoffe, die mit Papier gemischt sind, laufen bei niedrigeren Geschwindigkeiten
gewöhnlich am besten.
• Wenn für einen bestimmten Auftrag ein sehr gerader Ausgangsstapel wichtig ist, wird die
beste Stapelqualität bei niedrigeren Geschwindigkeiten erreicht.
• Wenn nur Umschlagstapel verarbeitet werden, wird die beste Leistung bei niedrigen
Geschwindigkeiten erreicht.
• Schlechtes Laden des Stapels hat Zuführprobleme zur Folge.
• Einige Spezialpapiere (z. B. NCR-Papier) haben Handhabungsmarkierungen.
• Die gestanzte Kante eines Stapels wird länger als wenn sie hineinging. Bei einigen
Kombinationen von Papierarten, Papiergrößen und Schneidwerkzeugen kann es sein, dass
Sie den Eingangsstapel verkleinern möchten, um ein Zusammensacken, Instabilität oder zu
große Höhe zu vermeiden.
• Zu starkes Kräuseln des Papiers kann zu schlechter Zuführung oder Stau führen. Mit übermäßigem Kräuseln haben Sie es dann zu tun, wenn Sie mehr als 6mm (1/4") Kräuselung
mit einem Abstand von 5 cm (2") vom Papierrand sehen. Wenn das Kräuseln nicht übermäßig ist, dann kommen Sie am besten, wenn die Kräuselung unten ist. Für
unsere Zwecke ist das so definiert, dass die äußeren Vorderkanten unten sind und
die Mitte oben ist.
85
2. Lernen Sie Ihre Quantum P70iX kennen
LERNEN SIE IHRE QUANTUM P70iX KENNEN (Fortsetzung)
Vorschläge für Klarsichtplastikumschläge:
Die Quantum P70iX kann einige Arten von Materialien für Klarsichtumschläge bearbeiten und
stanzen. Tatsächlich wird jede Quantum P70iX mit Klarsichtumschlägen getestet, bevor sie das
Werk verlässt. Die folgenden Richtlinien helfen Ihnen, die Fähigkeiten der Quantum P70iX zu
verstehen. In Fällen, wo das Material für Ihre speziellen Klarsichtumschläge für die Bearbeitung
durch die Quantum P70iX nicht geeignet ist, können Sie versuchen, die Klarsichtumschläge vom
Buchinhalt zu trennen und die Klarsichtumschläge mit einer Magnapunch-HochleistungsTischstanze von GBC zu stanzen.
• Wenn Materialien für Klarsichtumschläge in der Quantum P70iX verarbeitet werden sollen,
muss die Substanz in den Premiumumschlägen von GBC zwischen 10 mm und 14 mm dick
sein.
• Klarsichtumschläge müssen vermischt bearbeitet werden. Die am Quantum benutzten
Fotosensoren können keine Klarsichtumschläge feststellen.
• Wenn gemischte Materialien verarbeitet werden, müssen Sie für gleichbleibende
Abmessungen sorgen. Wenn ein Material kleiner als das andere ist, werden die Löcher nicht
richtig erkannt.
• Bei einer kleineren Hebegröße ist die Sicherheit größer, dass die Stanzmaschine einen
einzelnen Klarsichtumschlag aufnimmt. Hebegrößen von 5-7 sind am besten.
• Am besten ist es, einen Auftrag mit Materialien für Klarsichtumschläge bei einer niedrigeren
Geschwindigkeit abzuarbeiten. GBC empfiehlt für die meisten Aufträge 75 Hebungen pro
Minute.
• Klarsichtumschläge erzeugen mehr statisches Kleben als anderes Material. Die
Umgebungsbedingungen können die Leistung beeinflussen.
• Wenn ein Klarsichtumschlag allein aufgenommen wird, kann die Stanzmaschine bei einem
Stau aufhören zu arbeiten, es wird aber kein Material beschädigt.
86
3. Bedienung
BEDIENEINRICHTUNGEN
2
3
1
1
1. Ergonomischer
Arbeitsfluss:
Laden, Entladen und
Programmieren von derselben Seite aus ohne überflüssige Schritte.
2. Wechsel der Matrizen:
wird ohne Werkzeuge
gemacht und dauert nur
Sekunden.
3. Vollständig digital:
Druckknopfeinstellung und
–bedienung. Mit einfachen
Schritten können bis zu 24
Kundenaufträge abgerufen
werden.
Der Stapel kann sicher
geladen und entladen werden, während die Maschine
stanzt.
87
4. Optionen und Zubehör
OPTIONEN UND ZUBEHÖR:
Matrizen:
Die automatische Stanzmaschine Quantum P70iX von GBC kann einfach durch Wechseln der
Matrizen eine Vielzahl von Lochmustern stanzen, die gegenwärtig beim Binden benutzt werden.
Matrizen können in Sekunden ohne Werkzeuge gewechselt werden.
Ein wesentliches Merkmal der Quantum P70iX ist, dass sie Magnapunch-Matrizen von GBC
benutzt. In Verbindung mit einer Magnapunch haben Sie die Möglichkeit, die Matrize an der
Stanzplattform anzubringen, die am besten geeignet ist, den Auftrag innerhalb von Minuten zu
erledigen.
Beachten Sie bitte: Die PB Plastic Bind mit der Magnapunch-Matrize mit mehreren verstellbaren
Stanztiefen ist nicht für die Anwendung in dem automatischen Papierbehandlungssystem
geeignet, das von der Quantum benutzt wird.
Die gegenwärtig vorhandenen Matrizen sind unten aufgeführt. Ihr GBC-Verkaufsvertreter kann
Ihnen Preise und Verfügbarkeit beschaffen. Oder rufen Sie GBC unter 1-800-723-4000 an. Mehr
Informationen erhalten Sie auf der Webseite von GBC bei www.gbcconnect.com.
Beachten Sie bitte, dass jeder der unten aufgeführten Stanzstile für die Quantum P70iX eine
gesonderte Matrize erfordert.
Automatische Stanzmaschine Quantum P70iX - Matrizen
PB Plastic Bind – Tiefster fester Rückanschlag, 4,6 mm (.187")
PB Plastic Bind – Mittlerer fester Rückanschlag, 3,5 mm (.141")
PB Plastic Bind – Flacher fester Rückanschlag, 2,2 mm (.094")
W3 Twin Loop Wire – 3:1 Rund
W3 Twin Loop Wire – 3:1 Quadratisch
W2 Twin Loop Wire – 2:1 Rechteckig
W2 Twin Loop Wire – 2:1 Rund
C4 Color Coil – 4:1 Oval 0,629 cm
C4 Color Coil – 4:1 Rund 0,629 cm Neigung
C4 Color Coil – 4:1 Rund 0,635 cm Neigung
VB VeloBind 28 cm
Ringbinder 2/4 Standardloch von 7,4 mm (5/16") Durchmesser
Ringbinder 3-5-7 Loch von 7,4 mm (5/16") Durchmesser
Produktkode
7707230
7707220
7707210
7708350
7708360
7708330
7708320
7707290
7708300
7708310
7708340
7708390
7708380
GBC bietet eine vollständige Garnitur von Bindegeräten an und liefert entsprechend Ihren
Bindeanforderungen. Sehen Sie bitte den beigefügten Katalog mit Bindelösungen und den
Lieferkatalog, in denen Sie mehr Informationen finden.
Für die Quantum P70iX gibt es Kundenmatrizen. Weitere Informationen erhalten Sie von Ihrem
GBC-Verkaufsvertreter.
WICHTIG: Ein Abziehbild am Griff jeder austauschbaren Matrize zeigt das Stanzmuster. Beim
Lesen der Bedienanleitung beachten Sie bitte die speziellen Anweisungen für die Matrize mit
dem richtigen Stanzmuster, die Sie in Ihrer Quantum P70iX installiert haben.
88
4. Optionen und Zubehör
OPTIONEN UND ZUBEHÖR (Fortsetzung)
Aufbewahrung der Matrizen:
Hilfreicher Hinweis: Der Matrizenaufbewahrungsschrank #7703207 von GBC bietet eine hervorragende Möglichkeit zur Aufbewahrung all Ihrer austauschbaren Matrizen für die Quantum
P70iX (siehe Abb. 3). Dieses spezielle Produkt nimmt drei Matrizen sicher auf und schützt sie
vor Schmutz, Staub und zufälliger Beschädigung. Informationen zum Erhalt eines
Matrizenaufbewahrungsschranks erhalten Sie von Ihrem Verkaufsvertreter.
Abb. 3
VORSICHT: MÖGLICHE KLEMMGEFAHR. BEI DER INSTALLATION DER MATRIZEN
IN IHRER QUANTUM P70iX LASSEN SIE IMMER DIE FINGER UND KÖRPERTEILE
AUS DEM MATRIZENSCHLITZ DER MASCHINE UND VON ALLEN FLÄCHEN DER
MATRIZE, MIT AUSNAHME DER FINGERRILLEN AM GRIFF DER MATRIZE. WENN SIE DAS
NICHT MACHEN, KÖNNEN SIE SICH VERLETZEN.
!
89
5. Ausgangsbildschirm
AUSGANGSBILDSCHIRM
GBC QUANTUM PUNCH
90 LPM
7
MODE
UNLOAD
PROOF
JOB MANAGER
LANGUAGE
1
2
3
4
5
6
7
8
9
0
OK
Der Ausgangsbildschirm ist der Ausgangspunkt für die Bedienung der Quantum P70iX. Auf
diesem Bildschirm können Sie den Auftrag sehen, den die Quantum ausführen kann. Im Beispiel
oben ist die Quantum so eingestellt, dass sie arbeiten kann mit:
• Einer Papiergröße von 21 x 27 cm (8.5" x 11") mit Stanzen auf der 27 cm (11")-Seite.
• Einer Hebedicke von 7, was etwa 7 Blätter Papier von 24 Pfund entspricht.
• Einer Geschwindigkeit von 90 Hebungen pro Minute.
• Stanzlöchern unter Verwendung einer PlasticBind-Matrize mit einem Rückanschlag von
3,5 mm (.141").
• Die Quantum arbeitet auch mit englischen Steuerungsanzeigen.
Wenn diese Einstellungen für den Auftrag akzeptabel sind, können Sie den Auftrag beginnen,
indem Sie:
• Ihr Papier auf die Eingangsbänder laden.
• Den grünen Startknopf drücken.
90
5. Ausgangsbildschirm
AUSGANGSBILDSCHIRM (Fortsetzung)
GBC QUANTUM PUNCH
90 LPM
7
MODE
UNLOAD
PROOF
JOB MANAGER
LANGUAGE
1
2
3
4
5
6
7
8
9
0
OK
Weitere Befehle aus dem AUSGANGSBILDSCHIRM sind:
MODE: erlaubt Ihnen, zwischen automatisch und manuell auszuwählen. Automatischer Betrieb
bedeutet, dass die Quantum ununterbrochen weiterläuft, solange Sie Papier auf die
Eingangsbänder legen und den gestanzten Papierstapel von den Ausgangsbändern wegnehmen. Der manuelle Betrieb bedeutet, dass die Quantum anhält, bevor sie den nächsten
Papierstapel zur Bearbeitung aufnimmt. Diese Betriebsart ist hilfreich, wenn Sie einen neuen
Auftrag beginnen möchten, der andere Einstellungen erfordert, wie z. B. eine andere Matrize.
PROOF: Sie können ein paar Hebungen Ihres Auftrags ausführen und die Quantum dann anhalten lassen. Mit dieser Funktion können Sie die Lochposition und das Lochmuster prüfen, damit Sie
die richtigen Einstellungen für Ihren Auftrag haben.
UNLOAD: bedeutet, dass der Auftrag, der sich gerade in der Quantum befindet, beim Drücken
ausgegeben wird. Das ist hilfreich, wenn Sie den Auftrag aus irgendeinem Grund noch einmal
beginnen müssen.
JOB MANAGER: bringt Sie auf den Job-Manager-Bildschirm, wo ein neuer Auftrag ausgewählt
oder erzeugt werden kann.
LANGUAGE: Sie können zwischen Englisch, Spanisch, Französisch und Deutsch auswählen.
91
5. Ausgangsbildschirm
AUSGANGSBILDSCHIRM (Fortsetzung)
GBC QUANTUM PUNCH
90 LPM
7
MODE
UNLOAD
PROOF
JOB MANAGER
LANGUAGE
1
2
3
4
5
6
7
8
9
0
OK
Weitere Befehle aus dem AUSGANGSBILDSCHIRM sind:
Sie können ständig die Geschwindigkeit und Größe jeder Hebung regeln, indem Sie die
Hebungen pro Minute regeln bzw. die Anzahl der Blätter pro Hebung einstellen.
Die Hebungen pro Minute werden durch Drücken der Links-Rechts-Pfeiltasten gesteuert. Sie
werden sehen, wie sich die Zahl im Fenster verändert. Im Beispiel oben wird 90 LPM (90
Hebungen pro Minute) angezeigt. Es gibt 60, 75, 90 und 105 Hebungen pro Minute.
ANMERKUNG: Für schwerer zu behandelnde Medien, wie z. B. Aufträge stärkerer als normaler
Kräuselung oder stärkerer als normaler Tonermenge, sollten Sie eine geringere Geschwindigkeit
wählen.
Die Größe der Hebungen wird durch Drücken der Aufwärts-Abwärts-Pfeiltasten geregelt. Die
Zahlen entsprechen etwa der Anzahl der Blätter Feinpostpapier von 24 Pfund, die bei dieser
Einstellung aufgenommen werden würden. Damit werden jedoch nicht wirklich die Blätter gezählt,
und Sie sollten nicht erwarten, dass genau diese Menge angehoben wird. Im gezeigten Beispiel
ist die Größe der Hebung 7.
ANMERKUNG: Für schwerer zu behandelnde Medien, wie z. B. Aufträge stärkerer als normaler
Kräuselung oder stärkerer als normaler Tonermenge, sollten Sie eine geringere Hebung wählen.
92
5. Ausgangsbildschirm
JOB-MANAGER-BILDSCHIRM
JOB MANAGER — USE ARROWS
GO JOB 1
VIEW 13-24
EDITOR
HOME
1
2
3
4
5
6
7
8
9
0
OK
Auf dem Job-Manager-Bildschirm können Sie durch einfaches Drücken der Links-Rechts
und/oder Aufwärts-Abwärts-Tasten zwischen gespeicherten Aufträgen (1-12) auswählen. Im
Beispiel oben ist JOB 1 markiert. Um diesen Auftrag auszuwählen und weiterzumachen, drücken Sie einfach den Knopf GO JOB 1.
Weitere Funktionen des Job Managers:
• VIEW 13-24: drücken, um einen Auftrag zwischen 13 und 24 auszuwählen.
• HOME: drücken, um direkt zum Ausgangsbildschirm zurückzukehren.
• EDIT: ein aktueller Auftrag oder einen neuen Auftrag erzeugen.
Blättern Sie zu dem Auftrag, den Sie bearbeiten möchten.
Oder blättern Sie zu einem nicht benutzten Auftrag. Im Beispiel oben wird JOB 12 nicht
benutzt.
Drücken Sie den Knopf EDITOR.
93
5. Ausgangsbildschirm
EDITOR-BILDSCHIRM
EDITOR
USE ARROWS TO
CHANGE
OTHER
0..9
SIZES
GO TO NEXT
SETTING
ESCAPE NO CHANGE
GO BACK
DATA OK
SAVE
STORE
ACCEPT
ESCAPE
SAVE
1
ACCEPT
1
2
3
4
5
6
7
8
9
0
OK
Um einen vorhandenen Auftrag zu bearbeiten oder einen neuen Auftrag zu erzeugen, wählen
Sie die gewünschte Einstellung durch Drücken der Aufwärts-Abwärts-Pfeile aus. Im obigen
Beispiel ist die Stanzkantenpapiergröße ausgewählt worden und sie beträgt im Moment
27 cm (11").
Die Größe kann auch direkt über die numerische Tastatur eingegeben werden. Die Maschine
wird automatisch zwischen Zoll und Millimeter umschalten, je nach dem welche Größe die
eingegebene Zahl hat.
Man beachte, dass der Bereich für diesen Wert zwischen 140 und 304,8 mm (5.50" x 12.00").
liegt.
Wenn der gewünschte Wert auf der Anzeige erscheint, drücken Sie den Knopf ACCEPT.
94
5. Ausgangsbildschirm
EDITOR-BILDSCHIRM (Fortsetzung)
EDITOR
USE ARROWS TO
CHANGE
OTHER
0..9
SIZES
GO TO NEXT
SETTING
ESCAPE NO CHANGE
GO BACK
DATA OK
SAVE
STORE
ACCEPT
ESCAPE
SAVE
1
ACCEPT
1
2
3
4
5
6
7
8
9
0
OK
EDITOR-BILDSCHIRM
Im obigen Beispiel ist die Seitenkantenpapiergröße ausgewählt worden und sie beträgt im
Moment 21,6 cm (8.5").
Man beachte, dass der Bereich für diesen Wert zwischen 140 und 228,6 mm (5.50" x 9.00").
liegt.
95
5. Ausgangsbildschirm
EDITOR-BILDSCHIRM (Fortsetzung)
EDITOR
USE ARROWS TO
CHANGE
ACCEPT
GO TO NEXT
SETTING
1
ESCAPE NO CHANGE
SAVE
GO BACK
DATA OK
STORE
ESCAPE
SAVE
ACCEPT
1
2
3
4
5
6
7
8
9
0
OK
EDITOR-BILDSCHIRM
Im obigen Beispiel ist der Matrizentyp ausgewählt worden und er ist im Moment PB .141. Siehe
Tabelle 1 bezüglich der Matrizen, die es für die Quantum gibt.
Wenn alle drei Einstellungen richtig sind, drücken Sie den Knopf SAVE, wodurch Sie zurück
zum Job-Manager-Bildschirm gelangen.
96
5. Ausgangsbildschirm
GO-JOB-BILDSCHIRM
EDITOR
USE ARROWS TO
CHANGE
GO TO NEXT
SETTING
ESCAPE NO CHANGE
GO BACK
DATA OK
SAVE
STORE
ACCEPT
ESCAPE
SAVE
1
ACCEPT
1
2
3
4
5
6
7
8
9
0
OK
Die Auswahl einer neuen Matrize öffnet den Matrizen-Bildschirm. Auf diesem Bildschirm werden
Sie aufgefordert, die richtigen Stanzstiftnummern für die Papiergröße, mit der Sie arbeiten wollen,
einzugeben. In dem gezeigten Beispiel gibt es zwei mögliche Stiftkonfigurationen für diese
Kombination aus Matrize und Papier. Die Matrize selbst stellt ein praktisches Bezugsschild dar,
mit dem die Stiftnummern identifiziert werden können. Die Quantum wird die Matrize automatisch
auf die von Ihnen gewählte Papiergröße zentrieren, wenn Sie die Knöpfe 2 oder 4 drücken. Durch
Drücken der Knöpfe 1 oder 2 wird die Quantum alle erforderlichen Einstellungen
(Binderand, Seitenrand und Matrize zentrieren) vornehmen. Durch Drücken der Rechts-LinksPfeiltasten auf diesem Bildschirm können Sie die Lochzentrierung manuell fein abstimmen.
Beachten Sie, dass die Stifte auf der Anzeige die Stifte sind, die in der Matrize bleiben sollten,
d. h. ziehen Sie die Stifte auf die linke und rechte Seite des angezeigten Bereichs.
Anmerkung: im obigen Bildschirm sollte die Grafik die Stifte 4-23 und 5-23, aber nicht 1-23 und 5-23 zeigen.
97
5. Ausgangsbildschirm
RUN-BILDSCHIRM
GBC QUANTUM PUNCH
90 LPM
7
MODE
UNLOAD
PROOF
JOB MANAGER
LANGUAGE
1
2
3
4
5
6
7
8
9
0
OK
Wenn die Quantum einen Auftrag abarbeitet, liefert Ihnen die Grafik Informationen über den
laufenden Auftrag.
• Das obige Beispiel sagt Ihnen, dass sich auf den Eingangs- und Ausgangsbändern sowie im
Inneren des Verarbeitungsbereiches der Quantum Papier befindet.
Andere Grafiken bedeuten:
• Positionen der Hebeeinrichtung
• Türen offen
• Matrize klemmt
• Fehlerorte
• Einstellung der Blattgrößen
98
5. Ausgangsbildschirm
SETUP-BILDSCHIRM
GBC QUANTUM PUNCH
90 LPM
7
MODE
UNLOAD
PROOF
JOB MANAGER
LANGUAGE
1
2
3
4
5
6
7
8
9
0
OK
Wenn die Quantum einen Auftrag abarbeitet, liefert Ihnen die Grafik Informationen über den
laufenden Auftrag.
Das obige Beispiel sagt Ihnen, dass die Matrize blockiert ist.
Unterschied zwischen den Befehle PAUSE und STOP:
Wenn Sie das System sofort anhalten müssen, drücken Sie STOP und die Quantum P70iX hält in
der Mitte eines Zyklus an. Sie können dann Papier an den verschiedenen Stellen auf dem
Papierweg entfernen, wenn das System das beim Neustart nicht selbst tut. Wenn Sie den
Stanzvorgang anhalten möchten, aber das Papier auf seinem Weg weiterlaufen kann, drücken Sie
PAUSE. Dadurch wird der Zuführvorgang beendet, aber alles Papier, das sich augenblicklich auf
dem Papierweg befindet, kann durch das System laufen.
99
6. Wartung
ZUSÄTZLICHE INFORMATIONEN
BEHÄLTER FÜR PAPIERSCHNIPSEL UND STANZABFÄLLE
Dieser Behälter Ihrer Quantum P70iX befindet sich hinter der linken Zugangstür in der Nähe des
Maschinenbodens. Der Behälter sollte regelmäßig herausgezogen und geleert werden. Dadurch
wird ein Stau und eine Beschädigung der Maschine verhindert. Im Quantum P70iX ist
Mikroprozessortechnik eingebaut, die den Bediener informiert, wenn der Behälter geleert wer- den
muss.
ANMERKUNG: Wenn der Behälter herausgezogen wird, muss er entleert werden. Damit das
Zählersystem vollständig zurückgesetzt wird, muss der Behälter mindestens 5 Sekunden lang
vollständig aus der Quantum herausgezogen worden sein.
STANZSTIFTE
Es kann erforderlich sein, dass Sie einige der Stanzstifte entfernen müssen, damit einige
Kombinationen aus Papiergrößen und Stanzmustern richtig gestanzt werden.
SERVICE
Wenn Ihr Quantum P70iX gewartet werden muss, nehmen Sie Kontakt mit Ihrem örtlichen
berechtigten GBC-Kundendienstvertreter auf.
In der Maschine befinden sich KEINE Teile, die vom Anwender zu warten sind. Damit keine
Personen verletzt werden können und/oder die Funktionstüchtigkeit vermindert wird, ENTFERNEN SIE NICHT DIE MASCHINENVERKLEIDUNGEN.
FEHLERSUCHE an der Quantum P70iX
Problem
Kein Strom, es wird nicht gestanzt
Wahrscheinliche Ursache
Netzkabel nicht an der Rückseite der Maschine
angeschlossen oder nicht richtig in die Dose
gesteckt.
Matrize ist nicht vollständig eingesetzt.
Tür oder Deckel nicht richtig geschlossen.
Stanzt zu viele Löcher
Die ausgewählten Stifte sind nicht herausgezogen
Der für die Papiergrößen Verantwortliche hat die
Xerox-Dokumentation in mm verstanden
Gehen Sie zu SETUP und ändern Sie die
Abmessungen von Zoll in mm.
Wenn der erste Papierstapel manuell auf die
Zuführbänder geladen wird, werden die unteren
Papierblätter festgehalten
Die Oberfläche der Bänder sollen das Papier
ergreifen. Sie stellen fest, dass es nicht möglich ist,
den Papierstapel auf die Bänder zu setzen und ihn
in die Ausrichtungsecke zu schieben. Stattdessen
drücken Sie den Stapel zunächst leicht gegen die
Tür, dann gegen rechte Führung aus Blech, und
dann stellen Sie den Stapel unten auf das Band.
Auch das Laden zunächst eines kleineren Stapels
gefolgt von ein paar größeren Stapeln ist am besten.
Nach schwerer Belastung zeigt die Maschine Stau
an, obwohl kein Stau ist
Ein regelmäßiger Luftstoß über die Linsen eines
jeden der drei optischen Fühler verhindert, dass sich
Papierstaub aufbaut und ihre Funktion beeinträchtigt.
100
7. Technische Daten
TECHNISCHE DATEN der Quantum P70iX
Geschwindigkeit:
Bis zu 105 Zyklen/Minute, 60.000 Blatt pro Stunde
Blattgröße:
Stanzkante 14 bis 30,5 cm (5 1/2" x 12"), Seitenkante 14 bis 22,2 cm
(5 1/2" x 9")
Papierstoff:
61 g/m2 (16#) Feinpostpapier bis 300 g/m2 (140#)
Vermischte Gewichte, bündig geschnittene Umschläge und
Standardindexetiketten
Hebhöhe:
Variabel, 5 bis 12 Blatt Feinpostpapier 20# (75 g/m2)
Stapelhöhe:
bis zu 35,5 cm (14") (etwa 3.500 Blatt Feinpostpapier 20# (75 g/m2))
Abmessungen:
152 cm x 140 cm x 132 cm (60" B x 55" L x 52" H)
(Lässt sich leicht zusammenschlagen, damit es durch einen Eingang
von 80 cm passt) siehe Seite 8
Gewicht:
386 kg
Stromversorgung:
USA/Kanada: 220 V WS, 50/60 Hz, einphasig, 2,7 A, 0.32 kW, 1.092 BTU/h
International: 220 V WS, 50/60 Hz, einphasig, 2,7 A, 0.32 kW, 1.092 BTU/h
Steckdose vom Typ 6-20R 20 A, 250 V
Genehmigungen:
von CSA zertifiziert nach CAN/CSA-C22.2 Nr. 60950-00, UL StandardNr. 60950-00, 3. Ausgabe
von TÜV zertifiziert nach EN 60950:2000
Konformität:
Trägt das CE-Zeichen, wodurch die Konformität mit den Forderungen
der Europäischen Union gezeigt wird
Matrizen:
Austauschbare Matrizen, die in Sekunden ohne Werkzeuge gewechselt
werden können.
Die technischen Daten können ohne Ankündigung geändert werden.
GBC empfiehlt den Bedienern der Quantum P70iX Ohrenschutz. Wir haben folgende
Schalltestpegel ermittelt:
Abmessungen in m
Betrieb im schlechtesten Fall (Geschwindigkeit 4,
Matrize C4, Feinpostpapier 20#, Heben von 9-12
Blatt):
Schalldruckpegel = LpA = 83,0 dbA
Schalldruckimpuls = LpAI = 85,2 dbA
30¡
0.25
(9.85 )
Betrieb bei typischer Anwendung
(Geschwindigkeit 2, Matrize PB Feinpostpapier 20#,
Heben von 9-12 Blatt):
Schalldruckpegel = LpA = 78.5 dbA
Schalldruckimpuls = LpAI = 83.5 dbA
Testmethode und Mikrofonanbringung nach ISO 7779:
1,5 m (59.1") vom Einzug,
1,5 m (59.1") hoch,
0,25 m (9.85") von der vertikalen Vorderkante der
Quantum am Bedienpult.
Stehender
Bediener
101
Indice
Sezione
Pagina
Informazioni sulla sicurezza
104
1. Introduzione
Introduzione
109
2. Fare conoscenza con la Quantum P70iX
Comandi operativi
Coperture in plastica
110
111
3. Funzionamento
Comandi operativi
112
4. Opzioni ed accessori
Set di matrici
Memorizzazione set di matrici
113
114
5. Schermata principale
Funzionamento
Assistenza
115
115
6. Manutenzione
Risoluzione dei problemi
Inceppamento carta
125
125
7. Specifiche
Specifiche Quantum P70iX
126
103
Informazioni sulla sicurezza
MESSAGGI SULLA SICUREZZA
La propria sicurezza e quella di altre persone è molto importante per GBC. Il presente manuale
contiene importanti messaggi ed informazioni sulla sicurezza, così come sulla macchina stessa.
Accertarsi di leggerli attentamente e di comprenderli tutti prima di mettere in funzione la macchina.
!
Il simbolo di avviso di sicurezza precede ciascun messaggio sulla sicurezza di questo
Manuale di istruzioni di funzionamento. Questo simbolo segnala un potenziale pericolo
per le persone che potrebbe provocare ferite all’utente o agli astanti, così come danneggiare il prodotto o la proprietà.
La seguente illustrazione si trova sulla Quantum P70iX:
!
!
!
104
ATTENZIONE: significa che si potrebbe cadere e restare feriti se si tenta di stare in
piedi o seduti sui nastri trasportatori.
AVVISO: significa si potrebbero subire gravi infortuni ad opera delle parti che comprimono e tagliano, i cinematismi. Non mettere in funzione la macchina senza le protezioni
montate. Non tentare di bypassare nessuno degli interruttori di interbloccaggio di
sicurezza.
AVVISO: significa che si potrebbero subire gravi infortuni ad opera delle coperture che
possono cadere addosso alle persone. Tenere le mani ed altre parti del corpo lontani,
onde evitare che restino schiacciati o subiscano tagli.
Informazioni sulla sicurezza
SMESSAGGI SULLA SICUREZZA segue
!
AVVISO: significa che si potrebbero subire gravi infortuni ad opera delle parti che
comprimono e tagliano, i cinematismi. Non mettere in funzione la macchina senza
le protezioni montate. Non tentare di bypassare nessuno degli interruttori di
interbloccaggio di sicurezza.
I seguenti simboli compaiono su questo prodotto ed il loro significato è il seguente:
I Significa che l’alimentazione elettrica è inserita (ON).
O Significa che l’alimentazione elettrica è disinserita (OFF).
MISURE DI SICUREZZA IMPORTANTI
• Usare la Quantum P70iX esclusivamente per il suo scopo previsto di perforare carta e copertine secondo le specifiche indicate.
• Conservare il presente manuale di istruzioni di funzionamento per l’utilizzo futuro.
!
ATTENZIONE: IN CASO DI EMERGENZA, USARE IL CAVO DI ALIMENTAZIONE
COME SCOLLEGAMENTO DALLA LINEA PRINCIPALE.
105
Informazioni sulla sicurezza
MISURE DI SICUREZZA IMPORTANTI segue
• La Quantum P70iX deve essere collegata ad una tensione di alimentazione corrispondente
alla potenza nominale elettrica delle istruzioni di funzionamento della macchina (elencata
anche sull’etichetta del numero di serie).
• La presa dovrà essere collocata vicino all’apparecchiatura e dovrà essere facilmente accessibile.
• La spina di messa a terra è una funzionalità di sicurezza e dovrà essere inserita esclusivamente nella corretta presa di alimentazione di tipo per messa a terra. Nel caso in cui non si
fosse in grado di inserire la spina in una presa, contattare un elettricista qualificato per far
installare una presa idonea. Non modificare la spina all’estremità del cordone (se fornita)
della Quantum P70iX. È stata fornita a scopo di sicurezza.
• Scollegare il Quantum P70iX prima di spostare la macchina o ogniqualvolta quest’ultima
non debba essere utilizzata per un lungo periodo di tempo.
• Non mettere in funzione la Quantum P70iX se la macchina ha un cavo o una spina danneggiati. Non mettere in funzione la macchina dopo un qualsiasi funzionamento anomalo,
se è stato versato del liquido nell’unità o se quest’ultima ha subito un qualsiasi danno.
• Non sovraccaricare le prese elettriche oltre la loro portata, onde evitare di provocare incendi o
scosse elettriche.
• Non tentare di bypassare gli interbloccaggi di sicurezza onde evitare di provocare infortuni.
ASSISTENZA
Non tentare di realizzare da soli interventi di manutenzione sulla Quantum P70iX. Per qualsiasi
riparazione necessaria o intervento di manutenzione importante per la Quantum P70iX, contattare un rappresentante dell’assistenza GBC autorizzato.
All’interno della macchina NON vi sono parti che l’utente possa riparare da solo. Onde evitare
potenziali infortuni e/o danni alla proprietà o alla macchina:
!
NON TOGLIERE LE COPERTURE LATERALI E SUPERIORI DELLA MACCHINA.
PULIZIA
È possibile pulire la parte esterna della Quantum P70iX usando un panno soffice ed umido.
Non usare detergenti o solventi che potrebbero danneggiare la macchina.
106
Informazioni sulla sicurezza
SCELTA DEL CORDONE PRINCIPALE
(LA SEGUENTE NOTA VALE SOLO PER LE UNITÀ EUROPEE)
!
ATTENZIONE: QUANDO SI SCEGLIE UN CORDONE RIMOVIBILE DA USARE CON
LA Quantum P70iX, RISPETTARE SEMPRE LE SEGUENTI PRECAUZIONI
Il cordone è composto da tre parti; la spina di attacco, il cavo e la spina dell’apparecchio. Ciascuno di questi componenti deve avere le approvazioni normative per la sicurezza
europee.
Le seguenti potenze nominali elettriche minime per il cordone di alimentazione specifico sono
pubblicate a scopo di sicurezza. NON USARE CORDONI CHE NON RISPETTANO I SEGUENTI REQUISITI ELETTRICI MINIMI.
SPINA: 3 ampere, 250 volt, 50/60 Hz, Classe 1, a 3 conduttori, approvato per la sicurezza in
Europa.
CORDONE: Tipo H05VV-F3G0.75, Armonizzato ( < HAR> ). Il simbolo “< >” segnala il cordone
approvato secondo lo standard europeo appropriato (NOTA: “HAR” potrebbe essere sostituito
dal marchio di approvazione dell’agenzia sulla sicurezza europea che ha approvato il cordone.
Un esempio potrebbe essere “< VDE >”).
CONNETTORE DELL’APPARECCHIO: 3 ampere, 250 volt, 50/60 Hz, approvato per la sicurezza in Europa, Tipo IEC 320. il cordone non dovrà superare i 3 metri di lunghezza.
Un cordone con potenze elettriche nominali del componente superiori alle potenze elettriche
nominali minime potrebbe essere sostituito.
107
Informazioni sulla sicurezza
SCELTA DEL CORDONE PRINCIPALE segue
(LA SEGUENTE NOTA VALE SOLO PER LE UNITÀ STATUNITENSI)
NOTA FCC
Questa apparecchiatura è stata collaudata e trovata conforme ai limiti stabiliti per un dispositivo
digitale di Classe A, secondo la Parte 15 delle Norme FCC. Tali limiti sono stati stabiliti per fornire
una protezione ragionevole contro le interferenze dannose quando l’apparecchiatura viene
messa in funzione in un ambiente commerciale.
Questa apparecchiatura genera, usa e può irradiare energia di radiofrequenza e, se non installata ed usata secondo quanto prescritto dal Manuale operatore, potrebbe provocare interferenze
dannose alle comunicazioni radio. Il funzionamento di questa apparecchiatura in una zona residenziale può provocare interferenze dannose, nel qual caso l’utente dovrà eliminare l’interferenza a sue spese.
!
ATTENZIONE: LE MODIFICHE O LE ALTERAZIONI NON ESPRESSAMENTE
APPROVATI DA GENERAL BINDING CORPORATION POTREBBERO RENDERE
NULLA L’AUTORITÀ DELL’UTENTE A METTERE IN FUNZIONE L’APPARECCHIATURA.
Questo apparato digitale di Classe A rispetta la norma ICES-003 canadese.
Cet appareil numerique de la classe A est conforme a la norme NMB-003 du Canada.
ACCORDO DI MANUTENZIONE ED ASSISTENZA DELL’APPARECCHIATURA Acquistando
la P70iX, si è realizzato un investimento in una macchina perforatrice ad alta capacità che
offrirà anni di servizio affidabile. Per aiutare a proteggere questo investimento, accertarsi dei
vantaggi offerti dall’Accordo di manutenzione dell’apparecchiatura (Equipment Maintenance
Agreement - EMA) di GBC. L’EMA fornisce al P70iX la corretta manutenzione e cura continue,
aiutando a garantire anni di prestazioni di qualità ed una lunga vita utile della macchina.
Senza un EMA, ad ogni chiamata di assistenza per la normale manutenzione o la
riparazione conseguirà un addebito per le parti e la manodopera. Un EMA per la propria P70iX
elimina questa possibilità fornendo un costo fisso annuale basso per proteggere l’investimento
nella preziosa macchina. Per i dettagli completi sull’acquisto di un EMA, consultare il proprio
rappresentante delle vendite GBC o contattare:
General Binding Corporation
500 Bond Street
Lincolnshire, IL 60069
O chiamare il numero: 1-800-790-7787
Tutti gli interventi di assistenza e manutenzione devono essere eseguiti da un tecnico autorizzato GBC, a meno che la manutenzione sia da realizzare ad opera dell’operatore secondo la Guida
utente della perforatrice automatica P70iX. Non si consiglia di usare la perforatrice auto- matica
P70iX in qualsiasi altro modo diverso da quanto prescritto nella Guida utente della P70iX GBC, in
quanto ciò potrebbe rendere nulla la garanzia o il contratto di manutenzione.
Operatori addestrati ed una regolare manutenzione della P70iX A ad opera dell’operatore possono ottimizzare le prestazioni e ridurre al minimo le chiamate di assistenza.
108
1. Introduzione
INTRODUZIONE
La Quantum P70iX è stata progettata per soddisfare i requisiti esclusivi del mercato della stampa digitale. È stata progettata per supportare tutti i modelli di perforazione comunemente richiesti, incluso a tre fori, a pettine, VeloBind, filo ad occhiello doppio e bobina colorata. Sono anche
disponibili modelli di matrici personalizzati. Questo nuovo sistema è stato progettato per offrire i
requisiti di passaggio rapido della stampante digitale di piccole serie.
Potenzialmente tutte le configurazioni si realizzano rapidamente e facilmente dal pannello di
visualizzazione di stampa digitale, superando un importante aspetto che richiede tempo delle
perforatrici di produzione tradizionale. I cambi di matrice possono essere realizzati in breve tempo
senza attrezzi. Il sistema è preprogrammato con tutte le dimensioni di carta comuni e può
memorizzare 20 lavori personalizzati.
La P70iX è stata progettata per gestire un’ampia gamma di supporti. Può gestire dimensioni di
fogli da 13,6 x 13,6 cm (5 1/2" x 5 1/2") a 22,2 x 29,6 cm (9" x 12"), incluso pesi di carta mista e
stock di copertine. Un’altra funzionalità chiave è la capacità del sistema di elaborare divisori orizzontali mescolati senza alcuna regolazione particolare.
La P70iX incorpora la nuova tecnologia di “elaborazione della pila” di GBC, che è stata progettata per ridurre il costo della manodopera dell’operatore. Questa nuova architettura consente al
sistema di elaborare una pila da 34,6 cm (14") (3.500 fogli di carta di buona qualità n. 20) senza
la sorveglianza dell’operatore. La P70iX offre una velocità del materiale in lavorazione massima di
60.000 fogli/ora.
La Quantum P70iX è la rivoluzionaria nuova perforatrice di produzione digitale ad alta velocità,
nearline di GBC. Si configura nel giro di pochi minuti e sta al passo, fianco a fianco, con la gran
quantità di macchinari di stampa digitale più veloci di oggi.
Queste istruzioni sono state preparate per far familiarizzare l’utente con la perforatrice Quantum
P70iX ed il suo funzionamento. Leggerle attentamente e conservarle come riferimento futuro.
DISIMBALLAGGIO E CONFIGURAZIONE
La perforatrice Quantum P70iX deve essere installata da un tecnico GBC qualificato. Il proprio
tecnico garantirà che il sistema sia correttamente livellato e pronto ad essere messo in funzione.
109
2. Fare conoscenza con la Quantum P70iX
FARE CONOSCENZA CON LA QUANTUM P70iX
Le prestazioni della P70iX possono essere influenzate da fattori esterni, fra i quali sono inclusi i
requisiti del cliente per la qualità del foro, i materiali di lavorazione (carta/diapositive/copertine), la
copertura del toner sulla pagina stampata ed i fattori ambientali.
CARICHE ELETTROSTATICHE nella carta possono avere come conseguenza prestazioni
scarse. Se la P70iX elabora una risma nuova di carta bianca ma ha dei problemi con il lavoro di
stampa, la cosa potrebbe essere dovuta alle cariche elettrostatiche. I seguenti suggerimenti
potrebbero essere di aiuto nella risoluzione di questo problema.
Suggerimento per le cariche elettrostatiche: se la perforatrice automatica P70iX ha dei
problemi nell’elaborare determinati lavori, ciò potrebbe essere dovuto all’eccessivo accumulo di cariche elettrostatiche nella carta. Ecco alcuni consigli che potrebbero essere di
aiuto per ridurre al minimo l’effetto di tali cariche.
1.‘Smazzare’ la carta prima di caricarla nella P70iX. Non scuotere la carta, poichè ciò
provocherà soltanto ulteriore accumulo di cariche elettrostatiche.
2.Diminuire la velocità della P70iX. Ciò darà alla carta più tempo per sistemarsi nella matrice.
3.Prendere in considerazione l’acquisto di un umidificatore ambientale per aggiungere umidità
all’aria. L’aria secca aiuta a produrre più cariche elettrostatiche.
4.Spostare l’operazione di perforazione in una stanza controllata dal punto di vista ambientale.
5.Prestare molta attenzione alle condizioni stagionali. Le procedure seguite nei giorni caldoumidi potrebbero dover essere modificate durante i mesi invernali quando le cariche elettrostatiche sono più comuni.
6.Prendere in considerazione la possibilità di conservare i lavori su carta scartati in contenitori
molto grandi tipo Tupperware per trattenere l’umidità. L’uso di tali contenitori insieme con
prodotti tipo umidificatore può davvero riportare l’umidità nella carta persa durante il processo di fusione.
7.Contattare il dipartimento di assistenza copiatrice/stampante e chiedere informazioni su
come abbassare la temperatura del fusore.
Zone generali da osservare per la massima soddisfazione.
I divisori devono avere un bordo di 0,6 cm (1/4").
• Quando si lavorano stock misti, occorre assicurarsi che le dimensioni siano adeguate. Uno
stock più piccolo dell’altro impedirà la corretta registrazione del foro.
• Carta o stock di copertine molto scivolosi potrebbero non essere lavorati nella P70iX. Prima
di impegnarsi in un lavoro di grandi dimensioni, provare piccole pile a velocità inferiori e/o
dimensioni di sollevamento più piccole.
• Di solito, gli stock di copertine misti a carta vengono lavorati meglio a velocità inferiori
• Se per un lavoro particolare è importante una pila di prodotto molto diritta, si potrebbe scoprire che la qualità della pila è migliore se la si lavora ad una velocità inferiore.
• Quando si lavorano stock di sole copertine, le prestazioni sono migliori alle velocità inferiori.
• Un caricamento non corretto della pila avrà come conseguenza dei problemi di alimentazione.
• Alcune carte speciali (ad esempio, carta NCR) mostreranno dei contrassegni di maneggio.
• Il margine perforato di una pila sarà più alto di quanto non fosse all’inserimento. Con alcune
carte, combinazioni di dimensioni della carta e set di matrici; si potrebbe voler ridurre la pila
di entrata per evitare cadute, instabilità o altezza eccessiva.
• Una piega eccessiva della carta può avere come conseguenza una alimentazione scadente o
inceppamenti. Si può definire eccessiva la piega della carta quando è più di 6 mm (1/4") a
una distanza di 5 cm (2") dal margine. Se la piega non è eccessiva, si otterranno i risultati
migliori con la piega verso il basso. Ai nostri fini, la piega verso il basso viene definita come i
margini anteriori esterni rivolti verso il basso e quello al centro verso l’alto.
110
2. Fare conoscenza con la Quantum P70iX
FARE CONOSCENZA CON LA QUANTUM P70iX segue
Suggerimenti per copertine in plastica trasparente:
La Quantum P70iX è in grado di gestire e perforare alcuni tipi di materiali di copertine trasparenti. In effetti, ogni Quantum P70iX viene collaudata con copertine trasparenti prima di lasciare la
fabbrica. Le seguenti linee guida aiuteranno a comprendere le capacità del sistema Quantum
P70iX. Nei casi in cui lo stock di copertine trasparenti particolare non è adatto ad essere lavora- to
con la Quantum P70iX, si potrebbe voler separare le copertine trasparenti dai contenuti del libro e
perforare le copertine trasparenti usando una perforatrice da tavolo per servizio pesante GBC
Magnapunch.
• Perchè gli stock di copertine trasparenti siano lavorati nella GBC Quantum P70iX, devono
avere il corpo che si trova nelle copertine GBC Premium, che hanno uno spessore di 10
mill. e 14 mill.
• Le copertine trasparenti devono essere lavorate mescolate. I sensori fotoelettrici usati sulla
Quantum non riescono a rilevare le copertine trasparenti.
• Quando si lavorano stock misti, occorre assicurarsi che le dimensioni siano adeguate.
Uno stock più piccolo dell’altro impedirà la corretta registrazione del foro.
• Con una dimensione di sollevamento inferiore, è molto più probabile che il punzone prelevi
un’unica copertina trasparente. La dimensione di sollevamento da 5 a 7 funziona meglio.
• È meglio elaborare un lavoro contenente stock di copertine trasparenti ad una velocità inferiore. GBC consiglia 75 sollevamenti/minuto per la maggior parte dei lavori.
• Le copertine trasparenti producono più appiccicamento da cariche elettrostatiche di altri
stock, le condizioni ambientali influiranno sulle prestazioni.
• Se una copertina trasparente viene prelevata da sola, il punzone potrebbe interrompersi con
un falso inceppamento, comunque lo stock non subirebbe danni.
111
3. Funzionamento
COMANDI OPERATIVI
2
3
1
1
1. Flusso di lavoro
ergonomico: carico, scarico
e programma dallo stesso
lato senza alcuna fase
inutile.
Il carico e lo scarico della
pila possono essere facilmente realizzati mentre la
macchina è in fase di perforazione..
112
2. Modifiche del set di
matrici: si portano a termine
senza attrezzi ed occorrono
solo pochi secondi per realizzarle..
3. Completamente digitale:
configurazione e funzionamento tramite pulsanti. Con
delle semplici fasi si richiamano fino a 24 lavori personalizzati.
4. Opzioni ed accessori
OPZIONI ED ACCESSORI:
Set di matrici:
La perforatrice automatica GBC Quantum P70iX è in grado di perforare una varietà di modelli di
foro comunemente usati oggigiorno nella rilegatura, semplicemente cambiando il set di matrici.
I set di matrici possono essere cambiati in pochi secondi senza attrezzi.
Una funzionalità significativa della Quantum P70iX è che usa i set di matrici GBC Magnapunch.
In combinazione con un Magnapunch, si ha la possibilità di commutare il set di matrici nella
piattaforma di perforazione più adatta a gestire il lavoro nel giro di pochi minuti.
Nota: la rilegatura in plastica PB con profondità di perforazione a regolazione multipla del set di
matrici Magnapunch non è adatta ad essere usata nel sistema di gestione della carta automatico utilizzato dalla Quantum.
I set di matrici attualmente disponibili sono elencati di seguito. Il proprio rappresentante delle
vendite GBC può fornire il prezzo e la disponibilità, o contattare il call center GBC al numero
1-800-723-4000. Per ulteriori informazioni, visitare il sito web di GBC all’indirizzo www.gbcconnect.com.
Notare che ogni stile di perforazione elencato sopra richiede un set di metrici a parte per la
Quantum P70iX.
Perforatrice automatica Quantum P70iX – Set di matrici
Rilegatura in plastica PB – Spessore post. fisso più prof.;
4,6 mm (.187")
Rilegatura in plastica PB – Spessore post. fisso medio;
3,5 mm (.141")
Rilegatura in plastica PB – Spessore post. fisso poco prof.;
2,2 mm (.094")
Filo ad occhiello doppio W3 - 3:1 rotondo
Filo ad occhiello doppio W3 - 3:1 quadrato
Filo ad occhiello doppio W2 - 2:1 rettangolare
Filo ad occhiello doppio W2 - 2:1 rotondo
Bobina colorata C4 – 4:1 ovale 0,2475
Bobina colorata C4 – 4:1 rotonda; passo 0,2475
Bobina colorata C4 - 4:1 rotonda; passo 0,250
VB VeloBind 11 poll
Rilegatore ad anelli 2/4 Standard; Diametro foro 7,4 mm (5/16")
Rilegatore ad anelli 3-5-7; Diametro foro 7,4 mm (5/16")
Codice prodotto
7707230
7707220
7707210
7708350
7708360
7708330
7708320
7707290
7708300
7708310
7708340
7708390
7708380
GBC offre una suite completa di apparecchiature e forniture per rilegatura allo scopo di soddisfare le necessità di rilegatura di qualsiasi utente. Per ulteriori informazioni, consultare il Catalogo
delle soluzioni di rilegatura ed il Catalogo delle forniture allegati.
Per la Quantum P70iX, sono disponibili i set di matrici personalizzati. Per informazioni aggiuntive, consultare il proprio rappresentante delle vendite GBC.
IMPORTANTE: una decalcomania posta sulla maniglia di ogni matrice intercambiabile indica il
modello di perforazione. Quando si leggono le Istruzioni di funzionamento, notare le istruzioni
speciali per il set di matrici del modello di perforazione corretto installato sulla propria Quantum
P70iX.
113
4. Opzioni ed accessori
OPZIONI ED ACCESSORI segue
Conservazione del set di matrici:
Suggerimento utile: l’armadio di conservazione del set di matrici GBC n. 7703207 rappresenta
un modo eccellente per conservare tutti i propri set di matrici intercambiabili per la
Quantum P70iX (vedere figura 3). Questo prodotto speciale conserva in sicurezza tre set di
matrici, proteggendoli dallo sporco, dalla polvere e da danni involontari. Per avere informazioni
su come ottenere l’armadio di conservazione del set di matrici, contattare il proprio rappresentante delle vendite.
Figura 3
ATTENZIONE: POSSIBILE PERICOLO DI PUNTI DI PIZZICAMENTO. QUANDO SI
INSTALLANO I SET DI MATRICI NELLA Quantum P70iX, TENERE SEMPRE LE DITA
E LE PARTI DEL CORPO FUORI DALLA SCANALATURA DEL SET DI MATRICI DELLA MACCHINA E LONTANO DA TUTTE LE ZONE DEL SET DI MATRICI TRANNE
CHE L’INCAVO DELLE DITA NELLA MANIGLIA DEL SET DI MATRICI. LA MANCATA
OSSERVANZA DI QUESTE PRECAUZIONI POTREBBE PROVOCARE INFORTUNI.
!
114
5. Schermata principale
SCHERMATA PRINCIPALE
GBC QUANTUM PUNCH
90 LPM
7
MODE
UNLOAD
JOB MANAGER
PROOF
LANGUAGE
1
2
3
4
5
6
7
8
9
0
OK
La schermata principale è il punto di partenza per mettere in funzione la Quantum P70iX.
In questo schermata, è possibile vedere il lavoro che la Quantum è pronta ad elaborare.
Nell’esempio precedente, la Quantum è configurata a partire:
• Una dimensione carta di 21 x 27 cm (8.5" x 11") con perforazione sul lato da 27 cm(11").
• Uno spessore di sollevamento di “7” che equivale circa a 7 fogli di carta da 24 libbre.
• Ad una velocità di 90 sollevamenti/minuto.
• Fori di perforazione che usano una matrice PB (rilegatura in plastica) con uno spessore posteriore di 3,5 mm (.141").
• La Quantum funziona anche con i comandi che leggono in lingua inglese.
Se queste impostazioni del lavoro sono accettabili, è possibile avviare il lavoro nel seguente
modo:
• caricare la carta sui nastri di entrata.
• premere il pulsante di avvio color verde.
115
5. Schermata principale
SCHERMATA PRINCIPALE segue
GBC QUANTUM PUNCH
90 LPM
7
MODE
UNLOAD
JOB MANAGER
PROOF
LANGUAGE
1
2
3
4
5
6
7
8
9
0
OK
Altri comandi della schermata principale sono:
MODE (MODO): consente di scegliere tra Automatico o Manuale. Il modo Automatico significa
che la Quantum continuerà a funzionare senza interruzioni fintantochè si collochi carta nei nastri
di entrata e si tolga la pila di carta perforata dai nastri di uscita. Il modo Manuale significa che la
Quantum si arresterà prima di prendere la pila di carta successiva per l’elaborazione. Questo
modo è utile se si desidera avviare un nuovo lavoro che richiede impostazioni diverse come ad
esempio un set di matrici diverso.
PROOF (BOZZA): è possibile operare qualche sollevamento del lavoro e far arrestare la
Quantum. Questa funzionalità consente di verificare i posizionamento ed il modelli dei fori per
assicurarsi che la configurazione sia quella desiderata per il lavoro.
UNLOAD (SCARICO): significa che se si preme questo pulsante, il lavoro attualmente all’interno della Quantum uscirà. Ciò è utile se occorre avviare nuovamente un lavoro per qualsiasi
motivo.
JOB MANAGER (GESTORE LAVORO): porta alla schermata Job Manager (Gestore lavoro)
dove è possibile selezionare o creare un lavoro diverso.
LANGUAGE (LINGUA): è possibile scegliere tra inglese, spagnolo, francese e tedesco.
116
5. Schermata principale
SCHERMATA PRINCIPALE segue
GBC QUANTUM PUNCH
90 LPM
7
MODE
UNLOAD
JOB MANAGER
PROOF
LANGUAGE
1
2
3
4
5
6
7
8
9
0
OK
Altri comandi della schermata principale:
Si ha il controllo costante della velocità controllando gli LPM o sollevamenti/minuto e le dimensioni di ciascun sollevamento regolando il numero di fogli per sollevamento.
I sollevamenti/minuto (LPM) si controllano premendo i pulsanti freccia sinistro e destro. Nella
finestrella comparirà il cambiamento di numero. L’esempio precedente legge “90 LPM”. Le scelte
sono 60, 75, 90 e 105 LPM.
NOTA: per supporti più duri da gestire, come lavori con piega più pesante del normale o copertura del toner più pesante del normale, si sceglierà un sollevamento inferiore.
La dimensione del sollevamento si controlla premendo le frecce su e giù. I numeri corrispondono grossomodo al numero di fogli di carta di buona qualità da 24 libbre che sarebbero prelevati con questa impostazione. Questa funzionalità, tuttavia, non conta realmente i fogli e non ci
si deve aspettare che il sollevamento corrisponda esattamente a questa quantità. L’esempio
illustrato è di una dimensione di sollevamento di “7”
NOTA: per supporti più duri da gestire, come lavori con piega più pesante del normale o copertura del toner più pesante del normale, si sceglierà una velocità più bassa.
117
5. Schermata principale
SCHERMO JOB MANAGER (GESTORE LAVORO)
JOB MANAGER — USE ARROWS
GO JOB 1
VIEW 13-24
EDITOR
HOME
1
2
3
4
5
6
7
8
9
0
OK
Sullo schermo Job Manager si è in grado di scorrere tra i lavori salvati (da 1 a 12) semplicemente premendo i pulsanti destro-sinistro e/o su - giù. Nell’esempio precedente, è stato evidenziato JOB 1. per selezionare questo lavoro e continuare, premere semplicemente il pulsante
“GO JOB 1”.
Altre funzionalità di Job Manager:
• VIEW 13-24 (VISUALIZZAZIONE 13-24): premere per scegliere un lavoro dal n.13 al n.24.
• HOME: premere per tornare direttamente alla schermata principale.
• EDIT (MODIFICA): un lavoro attuale o creare un nuovo lavoro,
Scorrere fino al lavoro che si desidera modificare, o,
Scorrere tutti i lavori non utilizzati. Nell’esempio precedente, il lavoro 12 non è utilizzato.
Premere il pulsante EDITOR.
118
5. Schermata principale
SCHERMATA EDITOR
EDITOR
USE ARROWS TO
CHANGE
OTHER
0..9
SIZES
GO TO NEXT
SETTING
ESCAPE NO CHANGE
GO BACK
DATA OK
SAVE
STORE
ACCEPT
ESCAPE
SAVE
1
ACCEPT
1
2
3
4
5
6
7
8
9
0
OK
Per modificare un lavoro esistente o creare un nuovo lavoro, premere le frecce su – giù per
scegliere l’impostazione desiderata. Nell’esempio precedente, è stata scelta la dimensione della
carta Punch Edge (margine perforazione)ed attualmente legge 27 cm (11").
In alternativa, è possibile inserire la dimensione direttamente usando il tastierino numerico. La
macchina alternerà automaticamente tra pollici e millimetri a seconda della dimensione del
numero inserita.
Notare che il range per questo valore va da 140 a 304,8 mm (5.50" x 12.00").
Una volta comparso il valore desiderato sul display, premere il pulsante “ACCEPT”
(ACCETTAZIONE).
119
5. Schermata principale
SCHERMATA EDITOR segue
EDITOR
USE ARROWS TO
CHANGE
OTHER
0..9
SIZES
GO TO NEXT
SETTING
ESCAPE NO CHANGE
GO BACK
DATA OK
SAVE
STORE
ACCEPT
ESCAPE
SAVE
1
ACCEPT
1
2
3
4
5
6
7
8
9
0
OK
SCHERMATA EDITOR
Nell’esempio precedente, è stata scelta la dimensione della carta Side edge (margine laterale)
ed attualmente legge 21,6 cm 21,6 cm (8.5").
Notare che il range per questo valore va da 140 a 228,6 mm (5.50" x 9.00").
120
5. Schermata principale
SCHERMATA EDITOR segue
EDITOR
USE ARROWS TO
CHANGE
ACCEPT
GO TO NEXT
SETTING
1
ESCAPE NO CHANGE
SAVE
GO BACK
DATA OK
STORE
ESCAPE
SAVE
ACCEPT
1
2
3
4
5
6
7
8
9
0
OK
SCHERMATA EDITOR
Nell’esempio precedente, è stato selezionato il tipo Punch Die (matrice perforazione) ed attualmente legge PB 0,141. consultare la Tabella 1 per i set di matrici disponibili per la Quantum. Una
volta che tutte e tre le impostazioni siano corrette, premere il pulsante “SAVE” (SALVA) che
riporterà alla schermata Job Manager.
121
5. Schermata principale
SCHERMATA “GO JOB”
EDITOR
USE ARROWS TO
CHANGE
GO TO NEXT
SETTING
ESCAPE NO CHANGE
GO BACK
DATA OK
SAVE
STORE
ACCEPT
ESCAPE
SAVE
1
ACCEPT
1
2
3
4
5
6
7
8
9
0
OK
La scelta di un nuovo set di matrici richiamerà la schermata a comparsa Die Set (Set di matrici).
Questa schermata inviterà a togliere i numeri di perni di perforazione corretti per la dimensione
della carta in lavorazione. Nell’esempio illustrato, esistono due configurazioni di perni possibili con
questa combinazione di set di matrici e di carta. Il set di matrici stesso presenta una pratica
etichetta di riferimento per identificare i numeri dei perni. La Quantum centrerà automaticamente il
set di matrici sulla dimensione della carta scelta se si premono i pulsanti 2 o 4. premendo i
pulsanti 1 o 2, la Quantum realizzerà tutte le regolazioni necessarie (margine di rilegatura, margine laterale e centratura della matrice). È possibile eseguire manualmente la regolazione fine del
centraggio del foro premendo le frecce destra – sinistra su questa schermata.
Notare che i perni indicati sul display sono quelli che devono restare nel set di matrici, cioè tirare i
perni a sinistra ed a destra del range indicato.
Nota: nella schermata precedente, il grafico dovrebbe mostrare i perni “4 - 23 e 5 – 23” non “1 – 23 e 5 – 23”.
122
5. Schermata principale
SCHERMATA RUN
GBC QUANTUM PUNCH
90 LPM
7
MODE
UNLOAD
PROOF
JOB MANAGER
LANGUAGE
1
2
3
4
5
6
7
8
9
0
OK
Quando la Quantum sta elaborando un lavoro, la grafica fornirà le informazioni sul lavoro in
elaborazione.
• L’esempio precedente dice che vi è carta sui nastri di entrata e sui nastri di uscita così come
all’interno dell’area di elaborazione della Quantum.
Altra grafica indica:
• posizioni dell’elevatore
• porte aperte
• set di matrici fissato
• ubicazioni errori
• regolazione delle dimensioni foglio
123
5. Schermata principale
SCHERMATA SETUP (CONFIGURAZIONE)
GBC QUANTUM PUNCH
90 LPM
7
MODE
UNLOAD
PROOF
JOB MANAGER
LANGUAGE
1
2
3
4
5
6
7
8
9
0
OK
Quando la Quantum elabora un lavoro, la grafica fornirà le informazioni sul lavoro in elaborazione.
L’esempio precedente informa che il set di matrici è bloccato.
Comandi PAUSE (PAUSA) o STOP (ARRESTO):
Se occorre arrestare il sistema immediatamente, premere “STOP” e la Quantum P70iX si
arresterà a metà ciclo. A quel punto, potrebbe essere necessario togliere la carta dai vari punti
del percorso carta se il sistema non lo fa da solo al riavvio successivo. Se si desidera arrestare il
processo di perforazione, ma è possibile consentire alla carta nel percorso di continuare, premere “PAUSE”. Ciò arresterà il processo di alimentazione, ma consentirà alla carta eventualmente presente nel percorso di passare attraverso il sistema.
124
6. Manutenzione
INFORMAZIONI AGGIUNTIVE
CONTENITORE SFRIDI CARTA (STRISCE O CORIANDOLI DI CARTA)
Il contenitore sfridi carta per la Quantum P70iX si trova dietro la porta di accesso sinistra vicino
alla parte inferiore della macchina. Il contenitore deve essere periodicamente estratto e svuotato. Tale operazione eviterà inceppamenti e danni alla macchina. La Quantum P70iX dispone di
tecnologia di microprocessore per informare l’operatore quando occorra svuotare il contenitore.
NOTA: quando si estrae il contenitore sfridi, assicurarsi che venga svuotato. Per azzerare totalmente il sistema contatore del contenitore sfridi, occorre che quest’ultimo resti completamente
fuori dalla Quantum per un minimo di 5 secondi.
PERNI DI PERFORAZIONE
Potrebbe essere necessario dover togliere alcuni dei perni di perforazione per la corretta perforazione di alcune combinazioni di dimensioni carta e modelli di perforazione.
ASSISTENZA
Nel caso in cui la Quantum P70iX dovesse necessitare di interventi di assistenza, contattare il
rappresentante dell’assistenza GBC autorizzato locale.
All’interno della macchina NON vi sono parti che possano essere riparate dall’utente. Onde
evitare potenziali infortuni e/o danni alla proprietà, NON TOGLIERE LA COPERTURA DELLA
MACCHINA.
RICERCA GUASTI della Quantum P70iX
Problema
Causa probabile
Assenza di alimentazione, mancata perforazione
Cavo di alimentazione non collegato al retro della
macchina o non correttamente inserito nella presa
a muro
Set di matrici non completamente inserito
Porta o coperchio non chiusi
Perforazione di troppi fori
Perni a scelta non tirati
Operatore con dimestichezza con le dimensioni
carta di cui allo Xerox DocuTech come mm
Andare a “SETUP”(CONFIGURAZIONE) e modificare le dimensioni da pollici a “mm”
Quando si carica manualmente la prima pila di
La superficie dei nastri è stata progettata per affercarta sui nastri di alimentazione, i fogli di carta nella rare la carta. Si scoprirà che non è possibile
parte inferiore restano impigliati
impostare la pila di carta sui nastri e farla scivolare
nell’angolo di allineamento. Al contrario, spingere
delicatamente la pila prima contro la porta, poi contro la guida fogli destra in metallo e poi impostare la
pila sul nastro. Sarebbe anche meglio caricare prima
una piccola pila seguita da un paio di pile più grandi.
Dopo un uso pesante, la macchina inizia a rilevare
inceppamenti, sebbene non ve ne siano
Un soffio d’aria sulla lente di ciascuno dei tre sensori ottici periodicamente eviterà che la polvere
della carta si accumuli ed interferisca con le loro
prestazioni.
125
7. Specifiche
SPECIFICHE Quantum P70iX
Velocità:
Dimensioni foglio:
Stock carta:
Altezza sollevamento:
Altezza pila:
Dimensioni:
Peso:
Alimentazione:
Approvazioni:
Conformità:
Set di matrici:
fino a 105 cicli / minuto, 60.000 fogli/ora
margine perforazione da 14 a 30,5 cm (5 1/2" x 12"), margine laterale
da 14 a 22,2 cm (5 1/2" x 9")
da 61 gsm (n. 16) di carta di buona qualità a 300 gsm (n. 140)
Pesi mescolati, copertine tagliate a filo, e divisori orizzontali standard
Variabile, da 5 a 12 fogli di carta di buona qualità n. 20 (75 gsm)
fino a 35,5 cm (14") (circa 3.500 fogli di carta di buona qualità n. 20
(75 gsm)
152cm x 140cm x 132cm (Largh. 60" x Lung. 55" x Alt. 52")
(Si smonta facilmente per passare attraverso un vano porta di 81.2 cm
(32")) vedere pag. 8
850 libbre (386kg)
USA/Canada: 220VAC, 50/60Hz, Monofase, 2,7 Amp, 0,32 KW, 1.092
BTU/ora
Internazionale: 220VAC, 50/60Hz, Monofase, 2,7 Amp, 0,32 KW, 1.092
BTU/ora
Tipo innesto femmina 6-20R 20A, 250V
certificato CSA per CAN/CSA-C22.2 N. 60950-00, UL Std N. 6095000, 3° Ed.
Certificato TUV per EN 60950:2000
Porta il marchio CE per dimostrare la conformità con i requisiti
dell’Unione europea
Il set di matrici intercambiabili può essere cambiato in pochi secondi
senza attrezzi
Specifiche passibili di modifiche senza preavviso
GBC consiglia di usare protezioni auricolari per gli operatori della Quantum P70iX. I nostri test
dei livelli acustici sono i seguenti:
Funzionamento nel peggiore dei casi (velocità 4, set
di matrici C4, carta di buona qualità n. 20, sollevamento n. 9 – 12 fogli):
Livello pressione acustica = LpA = 83,0 dbA
Impulso pressione acustica = LpAI = 85,2 dbA
Dimensioni espresse in
metri
30°
0.25
Funzionamento dell’uso tipico (velocità2, set di matrici PB, carta di buona qualità n. 20, sollevamento n. 9
– 12 fogli):
Livello pressione acustica = LpA = 78,5 dbA
Impulso pressione acustica = LpAI = 83,5 dbA
(9.85”)
Metodo di prova ISO 7779 e collocazione del microfono:
1,5M (59.1") dall’alimentatore,
1,5M (59.1") altezza,
0,25M (9.85") dal margine superiore verticale del quadro
comandi Quantum.
Operatore in
piedi
126
Inhoudsopgave
Sectie
Pagina
Veiligheidsinformatie
129
1. Inleiding
Inleiding
134
2. Kennismaken met uw Quantum P70iX
Controlepaneel
Plastic Covers
135
136
3. Bediening
Operating Controls
137
4. Opties en accessoires
Matrijzen
Matrijzen bewaren
138
139
5. Beginscherm
Bediening
Service
140
140
6. Onderhoud
Probleemoplossing
Papierblokkering
150
150
7. Specificaties
Specificaties Quantum P70iX
151
128
Veiligheidsinformatie
VEILIGHEIDSMELDINGEN
De veiligheid van u en anderen is heel belangrijk voor GBC. In deze handleiding vindt u de
belangrijke veiligheidsmeldingen en -informatie, net zoals op de machine zelf. Zorg ervoor dat u
al deze waarschuwingen zorgvuldig hebt gelezen en begrepen voor u de machine bedient.
!
Voor elke veiligheidswaarschuwing in deze bedieningshandleiding staat het veiligheidssymbool. Dit symbool wijst op een potentieel persoonlijk veiligheidsrisico dat
vewondingen kan veroorzaken bij u of anderen of producten of bezittingen kan
beschadigen.
Op de Quantum P70iX vindt u het volgende pictogram:
!
!
OPGEPAST: Dit betekent dat u kan vallen en zich kan verwonderen als u probeert op
de transportbanden te staan of te zitten.
WAARSCHUWING: Dit betekent dat u zich ernstig kan verwonderen door plettende en
snijdende, bewegende onderdelen. Niet bedienen zonder dat de
beveiligingsvoorzieningen correct worden gebruikt. Probeer niet om de beveiligende vergrendelingsschakelingen te verschalken.
.
!
WAARSCHUWING: Dit betekent dat u zich ernstig kan verwonden als de afsluitkleppen
op u vallen. Hou uw handen en andere lichaamsdelen weg zodat ze niet geplet raken of
zodat u zich niet snijdt.
129
Veiligheidsinformatie
VEILIGHEIDSMELDINGEN vervolg
!
WAARSCHUWING: Dit betekent dat u zich ernstig kan verwonderen door plettende en
snijdende, bewegende onderdelen. Niet bedienen zonder dat de beveiligingsvoorzieningen correct worden gebruikt. Probeer niet om de beveiligende vergrendelingsschakelingen te verschalken.
De volgende symbolen komen voor op dit product en dit is hun betekenis:
I
Betekent dat de stroom “AAN” staat.
O Betekent dat de stroom “UIT” staat.
BELANGRIJKE VOORZORGSMAATREGELEN
• Gebruik de Quantum P70iX enkel voor het doel waarvoor hij gemaakt is: het perforeren van
papier en covers volgens de aangegeven specificaties.
• Bewaar deze bedieningshandleiding voor later gebruik.
!
OPGEPAST: VOORZICHTIG: GEBRUIK IN GEVAL VAN NOOD DE STROOMKABEL
OM DE MACHINE HELEMAAL ZEKER UIT TE ZETTEN.
130
Veiligheidsinformatie
BELANGRIJKE VOORZORGSMAATREGELEN vervolg
• De Quantum P70iX moet aangesloten zijn op een stroomnet met een voltage dat
overeenkomt met de elektrische vermeldingen in de bedieningsinstructies (ook vermeld op
het label met het serienummer).
• Het stopcontact moet zich dicht bij het toestel bevinden en moet makkelijk toegankelijk zijn.
• De aardingsstekker is er voor uw veiligheid en zal enkel passen in het juiste stopcontact met
aarding. Als u de stekker niet in een stopcontact krijgt, neem dan contact op met een gekwalificeerd elektricien om het juiste stopcontact te laten installeren. Wijzig de stekker op het
einde van de kabels (indien meegeleverd) van de Quantum P70iX nooit. Deze werd
meegeleverd met het oog op uw veiligheid.
• Koppel de Quantum P70iX los vóór u de machine verplaatst of het telkens als de machine
gedurende lange tijd niet wordt gebruikt.
• Bedien de Quantum P70iX in geen geval als de stroomkabel of de stekker van de machine
beschadigd is. Bedien de machine niet na een defect, als er een vloeistof op de machine
werd gemorst of als de machine op welke manier dan ook werd beschadigd.
• Belast de stopcontacten niet meer dan de capaciteit waarvoor ze bedoeld zijn. Doet u dat
toch, dan kan dat brand of een elektrische schok veroorzaken.
• Tracht niet om de veiligheidsschakelingen te verschalken. Als u dat toch doet, kan u gewond
raken.
ONDERHOUD
Probeer niet om uw Quantum P70iX zelf te onderhouden. Neem contact op met een erkende
GBC-onderhoudsfirma voor alle nodige herstellingen of grote onderhoudsbeurten voor uw
Quantum P70iX. De machine bevat GEEN onderdelen die de gebruiker kan onderhouden. Deze
maatregelen zijn bedoeld om mogelijke persoonlijke verwondingen en/of schade aan eigendommen of de machine te voorkomen.
!
DE ZIJ- OF OF BOVENPANELEN VAN DE MACHINE NOOIT VERWIJDEREN.
SCHOONMAKEN
U kan de buitenzijde van de Quantum P70iX schoonmaken met behulp van een zachte,
vochtige doek. Gebruik geen afwasmiddel of solventen, want die kunnen de machine beschadigen.
131
Veiligheidsinformatie
KEUZE VAN DE STROOMKABELS
(DEZE OPMERKING IS ENKEL BESTEMD VOOR EUROPESE EENHEDEN)
!
OPGEPAST: ALS U EEN LOSSE KABEL KIEST VOOR UW Quantum P70iX,
RESPECTEER DAN ALTIJD DE VOLGENDE VOORZORGSMAATREGELEN
De kabel bestaat uit drie delen: de stekker, de kabel en de aansluitstekker op de machine. Elk
van deze componenten moet de nodige Europese veiligheidslabels dragen.
De volgende minimale elektrische vereisten voor de specifieke stroomkabel worden gepubliceerd om veiligheidsredenen. GEBRUIK GEEN KABELS DIE NIET VOLDOEN AAN DE VOLGENDE MINIMALE ELEKTRISCHE VEREISTEN.
STEKKER: 3 ampère, 250 volt, 50/60 Hz, geleider (klasse 1, 3), Europees veiligheidslabel.
KABEL: Type H05VV-F3G0.75, Geharmoniseerd ( < HAR> ). De symbolen “< >” geven aan dat
de kabel goedgekeurd is volgens de Europese normen (OPMERKING: “HAR” kan worden vervangen door een keurmerk van een Europees veiligheidsagentschap dat de kabel heeft gekeurd.
Een voorbeeld kan zijn “ < VDE > ”).
MACHINE-AANSLUITING: 3 ampère, 250 volt, 50/60 Hz, Europees veiligheidslabel, Type IEC
320. De kabel mag niet meer dan 3 meter lang zijn. Een kabel met onderdelen waarvan de elektrische kenmerken zwaarder zijn dan de aangegeven minimale elektrische vereisten mag eveneens worden gebruikt.
132
Veiligheidsinformatie
KEUZE VAN DE STROOMKABELS vervolg
(DE VOLGENDE OPMERKING GELDT ENKEL VOOR TOESTELLEN IN DE VS.)
NOOT VAN DE FCC
Dit toestel werd getest en voldoet aan de beperkingen voor een digitaal toestel van klasse A,
conform lid 15 van het FCC-reglement. Deze beperkingen worden opgelegd met het oog op een
redelijke bescherming tegen schadelijke interferentie als het toestel wordt bediend in een commerciële omgeving.
Dit toestel genereert, gebruikt en kan radiofrequentie-energie uitstralen en als het niet wordt
geïnstalleerd en gebruikt zoals voorgeschreven in de bedieningshandleiding kan het op die
manier radiocommunicatie verstoren. De kans bestaat dat de bediening van dit toestel in een
residentiële omgeving schadelijke interferentie veroorzaakt. In dat geval zal de gebruiker de
interferentie op eigen kosten dienen te corrigeren.
!
OPGEPAST: VERANDERINGEN OF AANPASSINGEN DIE NIET UITDRUKKELIJK
WERDEN TOEGELATEN DOOR GENERAL BINDING CORPORATION KUNNEN UW
MACHTIGING OM HET TOESTEL TE BEDIENEN, DOEN VERVALLEN.
Dit digitale toestel van Klasse A voldoet aan de Canadese ICES-003.
Cet appareil numerique de la classe A est conforme à la norme NMB-003 du Canada.
OVEREENKOMST INZAKE SERVICE EN ONDERHOUD VAN HET TOESTEL
Met de aankoop van deze P70iX hebt u geïnvesteerd in een heel krachtige ponsmachine
waarmee u kan rekenen op jarenlang betrouwbaar gebruik. Om deze investering te helpen
beschermen, raden we u aan gebruik te maken van de GBC-onderhoudsovereenkomst voor
apparatuur (OOA). De OOA verschaft uw P70iX gepast permanent onderhoud en nazicht, waardoor u verzekerd wordt van jarenlange kwalitatieve prestaties en de lange levensduur waar de
machine voor gemaakt is. Zonder OOA zouden voor elk normaal onderhoud of elke instelling
kosten worden aangerekend voor onderdelen en de werkuren. Een OOA voor uw P70iX lost dat
op middels een lage, vaste jaarlijkse kostprijs voor de bescherming van uw waardevolle investering in deze machine. Voor meer informatie over een OOA kan u contact opnemen met uw GBCvertegenwoordiger of met:
General Binding Corporation
500 Bond Street
Lincolnshire, IL 60069
Of bel naar: 1-800-790-7787
Alle service en onderhoud moeten worden uitgevoerd door een technicus die is erkend door GBC,
tenzij het gaat om bedieningsonderhoud in overeenstemming met de gebruikershandleid- ing van
de automatische ponsmachine P70iX. Gebruik van de automatische ponsmachine P70iX op een
manier die niet overeenstemt met de GBC P70iX-gebruikershandleiding wordt niet aangeraden en
kan uw garantie of onderhoudscontract doen vervallen.
Ervaren bedienaars en regelmatig bedieningsonderhoud van de P70iX kunnen de prestaties
optimaliseren en het aantal keren dat een interventie nodig is, reduceren.
133
1. Inleiding
INLEIDING
De Quantum P70iX is ontworpen om te voldoen aan de unieke vereisten van de markt van het
digitale drukwerk. Hij is ontworpen voor alle nodige ponspatronen, inclusief drie gaten, kam,
VeloBind, dubbele lussen en gekleurde band. Er zijn ook op maat gemaakte patronen verkrijgbaar. Dit nieuwe systeem werd ontworpen met het oog op de snelle leveringsvereisten van digitaal drukwerk in kleine oplagen.
Zowat alle instellingen zijn snel en makkelijk te realiseren van op het digitale display, waarmee
heel wat tijdrovende aspecten van traditionele ponsmachines worden vermeden. Die veranderingen kunnen heel snel en zonder materiaal worden aangebracht. Het systeem is voorgeprogrammeerd met alle conventionele papierformaten en kan 20 eigen instellingen bewaren.
De P70iX is ontworpen om een ruim gamma van dragers aan te kunnen. Hij kan overweg met
papierformaten van 13,6 x 13,6 cm (5 1/2" x 5 1/2") tot 22,2 x 29,6 cm (9" x 12"), inclusief
gemengde papiergrammages en covers. Een ander belangrijk kenmerk is het feit dat het systeem in staat is om gemengde indexlabels te verwerken zonder specifieke aanpassingen.
De P70iX omvat de nieuwe "stapeltechnologie" van GBC, die is ontworpen om de arbeidskosten
voor de bediening terug te dringen. Door deze nieuwe architectuur kan het systeem stapels verwerken van 34,6 cm (14") (3500 vel van 75 g/m_) zonder dat er een bedienaar nodig is.
De P70iX biedt een maximale doorvoersnelheid van 60.000 vel per uur.
De Quantum P70iX is de revolutionaire, nieuwe, uiterst snelle digitale productieponsmachine die
bijna op de rand kan ponsen. De machine instellen duurt maar enkele minuten en kan het
tempo aan van de snelste digitale printers van het moment.
Deze instructies zijn opgesteld om u vertrouwd te maken met de Quantum P70iX-ponsmachine
en de bediening ervan. Gelieve ze zorgvuldig te lezen. Bewaar deze bedieningshandleiding voor
de toekomst.
UITPAKKEN EN INSTALLATIE
De Quantum P70iX-ponsmachine moet worden geïnstalleerd door een gekwalificeerd GBCtechnicus. Uw technicus zal ervoor zorgen dat het systeem correct waterpas wordt geplaatst en
klaar is voor gebruik.
134
2. Kennismaken met uw Quantum P70iX
KENNISMAKEN MET UW QUANTUM P70IX
Externe factoren kunnen een invloed hebben op de prestaties van uw P70iX. Deze factoren zijn
vereisten van de klant voor de kwaliteit van de gaten, het doorgevoerde materiaal (papier/projectieplaten/covers), tonerdekking op het bedrukte vel en omgevingsfactoren.
Statische elektriciteit in het papier kan voor een slechte prestatie zorgen. Als uw P70iX geen
problemen heeft met een verse riem onbedrukt papier, maar wel moeite heeft met bedrukte
vellen, kan statische elektriciteit de oorzaak zijn. De volgende tips kunnen helpen om dat probleem op te lossen.
Suggesties tegen statische elektriciteit: als uw automatische P70iX-ponsmachine moeite
heeft om bepaalde jobs uit te voeren, kan dat te wijten zijn aan overmatige statische elektriciteit in het papier. Hier zijn enkele suggesties om het statische effect te helpen
beperken.
1.Waaier het papier uit vóór u het in de P70iX plaatst. Schud het papier niet; dat zal enkel
voor nog meer statische elektriciteit zorgen.
2.Verlaag de snelheid op de P70iX. Zo krijgt het papier meer tijd om in de matrijs te vallen.
3.Overweeg de aankoop van een luchtbevochtiger. Droge lucht stimuleert de productie van
statische elektriciteit.
4.Verplaatst uw ponsmachine naar een geklimatiseerde kamer.
5.Hou steeds goed rekening met de seizoensomstandigheden. De procedures die gevolgd
worden tijdens heel warme, vochtige dagen moeten misschien worden aangepast tijdens
droge wintermaanden, als er meer statische elektriciteit is.
6. Overweeg om uw nog verpakte papier te bewaren in hele grote Tupperware-achtige bakken
om de vochtigheidsgraad te behouden. Door deze laadkisten te gebruiken in combinatie met
luchtbevochtigende producten kan het vocht dat tijdens het fusieproces werd verloren, weer
worden opgenomen.
7.Neem contact op met uw kopieer-/printeronderhoudafdeling en vraag naar de mogelijkheid
om uw smelttemperatuur te verlagen.
Algemene aandachtspunten voor optimale tevredenheid.
Tabs moet een boord hebben van 0,6 cm.
• Als u met gemengde stapels werkt, moet u ervoor zorgen dat de afmetingen consistent zijn.
Als één stapel kleiner is dan de andere, kan dat ertoe leiden dat de gaten niet goed geregistreerd worden.
• Heel glad papier of coverstapels zullen misschien niet kunnen worden gebruikt in de P70iX.
Test kleine stapels tegen lagere snelheden en/of kleinere opvoerhoogte voor u aan een grote
opdracht begint.
• Coverstapels gemengd met papier lopen gewoonlijk het best bij lagere snelheden.
• Als een heel rechte uitvoerstapel belangrijk is voor een bepaalde job, zal u zien dat de
stapelkwaliteit het beste is als u de machine op een lagere snelheid laat lopen.
• Als u enkel covers laat lopen, zijn de prestaties het best bij lagere snelheid.
• Als de stapel niet correct is geladen, kan dat doorvoerproblemen veroorzaken.
• Bepaald speciaal papier (NCR-papier bijvoorbeeld) zal na verwerking afdrukken vertonen.
• De geponste rand van een stapel zal groter zijn dan bij de invoer. Bij bepaalde papieren,
papierformaten en matrijscombinaties is het misschien beter de invoerstapel wat kleiner te
maken om te voorkomen dat hij omvalt of instabiel of te hoog is.
• Als het papier te veel krult, kan dat doorvoerproblemen of blokkeringen veroorzaken.
Overmatig krullen betekent dat u meer dan 6 mm (1/4") krullig op 5 cm (2")van de rand ziet.
Als het krullen niet excessief is, zal u de beste resultaten hebben met de krulling naar beneden. In dit document bedoelen we met naar beneden krullen dat de voorste buitenranden
naar beneden krullen en het midden omhoog staat.
135
2. Kennismaken met uw Quantum P70iX
KENNISMAKEN MET UW QUANTUM P70iX vervolg
Suggesties voor doorzichtige plastic covers:
De Quantum P70iX kan bepaalde types doorzichtige covers verwerken en ponsen. Concreet
wordt elke Quantum P70iX getest met doorzichtige covers vóór hij de fabriek verlaat. De volgende richtlijnen zullen u helpen om de mogelijkheden van het Quantum P70iX-systeem te
begrijpen. In gevallen waar uw specifieke stapel doorzichtige covers niet geschikt is om te worden gebruikt met de Quantum P70iX, kan u proberen om de doorzichtige covers te scheiden
van het boek en ze te ponsen met een zware GBC Magnapunch-tafelponsmachine.
• Om de GBC Quantum P70iX te kunnen gebruiken met stapels doorzichtige covers, moeten
ze van een dichtheid zijn die overeenstemt met die van de GBC Premium-covers, die 10 en
14 millimeter dik zijn.
• Doorzichtige covers moeten vermengd doorlopen. De lichtsensoren op de Quantum kunnen
geen heldere covers detecteren.
• Als u met gemengde stapels werkt, moet ervoor zorgen dat de afmetingen consistent zijn.
Als één stapel kleiner is dan de andere, kan dat ertoe leiden dat de gaten niet goed geregistreerd worden.
• Met een kleinere tilhoogte is de kans groter dat de ponsmachine één enkele doorzichtige
cover opneemt. Tilhoogten 5-7 werkten het best.
• De beste oplossing is om een job met doorzichtige covers op een lagere snelheid te laten
lopen. GBC adviseert voor de meeste jobs een snelheid van 75 LPM.
• Doorzichtige covers produceren meer statische elektriciteit dan andere stapels, de omgevingsfactoren zullen de prestaties beïnvloeden.
• Als een doorzichtige cover alleen wordt opgepikt, kan de ponsmachine stilvallen met een
valse blokkeringsmelding. De stapel zal echter niet beschadigd zijn.
136
3. Bediening
CONTROLEPANEEL
2
3
1
1
1. Ergonomisch werkproces: laden, leegmaken en
programmeren aan dezelfde
zijde zonder een stap te veel
te zetten.
Stapels laden en wegnemen
kan veilig gebeuren terwijl
de machine loopt.
2. De matrijzen veranderen: gebeurt zonder
gereedschap en duurt
slechts enkele seconden.
3. Volledig digitaal:
instellen en bedienen met
een druk op de knop. Met
eenvoudige stappen om tot
24 zelf geprogrammeerde
jobs op te roepen.
137
4. Opties en accessoires
OPTIES EN ACCESSOIRES:
Matrijzen:
De GBC Quantum P70iX Automatic Punch kan een waaier aan vaak gebruikte gatenpatronen
ponsen door gewoon de matrijzen te veranderen. Matrijzen veranderen kan zonder gereedschap
en duurt slechts enkele seconden.
Een significant kenmerk van de Quantum P70iX is dat hij gebruik maakt van GBC Magnapunchmatrijzen. In combinatie met een Magnapunch krijgt u de mogelijkheid om de matrijzen in een
oogwenk te installeren op de ponsmachine die het best geschikt is voor de job in kwestie.
Merk op: De Magnapunch-matrijzen voor de PB Plastic Bind met meervoudig verstelbare ponsdiepte zijn niet geschikt voor gebruik in het automatische papierverwerkingssysteem dat de
Quantum gebruikt.
De momenteel beschikbare matrijzen vindt u hierna. Uw GBC-vertegenwoordiger kan u meer
inlichtingen geven over de prijs en de beschikbaarheid, of u kan contact opnemen met het GBC
Call Center, op het nummer 1-800-723-4000. Voor meer informatie kan u terecht op de website
van GBC: www.gbcconnect.com.
Merk op dat voor alle bovenstaande ponsstijlen voor de Quantum P70iX een aparte matrijzenset
nodig is.
Quantum P70iX Automatic Punch - Matrijzensets:
PB Plastic Bind – Diepste vaste rugdikte, 4,6 mm (.187")
PB Plastic Bind – Middelste vaste rugdikte, 3,5 mm (.141")
PB Plastic Bind – Ondiepe vaste rugdikte, 2,2 mm (.094")
W3 Dubbele draad - 3:1 Rond
W3 Dubbele draad - 3:1 Vierkant
W2 Dubbele draad - 2:1 Rechthoekig
W2 Dubbele draad - 2:1 Rond
C4 Gekleurde band – 4:1 Ovaal 0,2475
C4 Gekleurde band – 4:1 Rond 0,2475 Hoogte
C4 Gekleurde band - 4:1 Rond 0,250 Hoogte
VB VeloBind 11 inch
Ringmap 2/4 Standaarddiameter 7,4 mm (5/16")
Ringmap 3-5-7 Diameter 7,4 mm (5/16")
Productcode
7707230
7707220
7707210
7708350
7708360
7708330
7708320
7707290
7708300
7708310
7708340
7708390
7708380
GBC biedt een volledig gamma inbindtoestellen en -materiaal voor al uw inbindhoeften. Meer
informatie vindt u in de bijgevoegde catalogi met inbindoplossingen en benodigdheden.
De Quantum P70iX kan worden gebruikt met op maat gemaakte matrijzen. Meer informatie kan
u krijgen bij uw GBC-vertegenwoordiger.
BELANGRIJK: Een plakplaatje op de handgreep van elke verwisselbare matrijzen set geeft het
ponspatroon aan. Als u de bedieningsinstructies leest, let dan op de bijzondere instructies voor
de matrijs met het correcte ponspatroon die u hebt geïnstalleerd op uw Quantum P70iX.
138
4. Opties en accessoires
OPTIES EN ACCESSOIRES vervolg
Bewaring van de matrijzensets:
Nuttige tip: De GBC-matrijzenkast #7703207 is een uitstekende manier om al uw verwisselbare
matrijzensets voor de Quantum P70iX te bewaren (zie figuur 3). In dit speciale product bewaart
u op een veilige manier drie sets en beschermt u ze tegen stof, vuil en ongewilde beschadiging.
Neem contact op met uw vertegenwoordiger voor informatie over hoe u een matrijzenkast kan
bekomen.
Figuur 3
!
OPGEPAST: GEVAAR VOOR SCHERPE PUNTEN. ALS U DE MATRIJZENSETS IN
UW Quantum P70iX INSTALLEERT, HOU UW VINGERS EN ANDERE LICHAAMSDELEN DAN STEEDS UIT DE GLEUF VOOR DE MATRIJS EN UIT DE BUURT VAN DE
MATRIJS, MET UITZONDERING VAN DE VINGERGROEF IN DE HANDGREEP VAN
DE MATRIJZENSET. DEZE VOORZORGSMAATREGELEN NIET NALEVEN, KAN TOT
VERWONDINGEN LEIDEN.
139
5. Beginscherm
BEGINSCHERM
GBC QUANTUM PUNCH
90 LPM
7
MODE
UNLOAD
PROOF
JOB MANAGER
LANGUAGE
1
2
3
4
5
6
7
8
9
0
OK
Het Beginscherm is het beginpunt voor de bediening van de Quantum P70iX. Op dit scherm ziet
u de job die klaarstaat om door de Quantum te worden uitgevoerd. In het bovenstaande voorbeeld is de Quantum ingesteld voor:
• Een papierformaat van 21 x 27 cm (8.5" x 11") met perforatie aan de 27 cm (11")-zijde.
• Een tildikte van “7”, wat overeenkomt met ongeveer 7 vellen papier van 90 g/m_.
• Tegen een snelheid van 90 tilbeurten per minuut.
• Perforatie met een PB-matrijs (Plastic Bind) met een rugdikte van 3,5 mm (.141").
• De bediening van de Quantum is in het Engels.
Als deze jobinstellingen goed zijn, kan u de opdracht starten door:
• Het papier op de invoerband te plaatsen.
• Op de groene startknop te drukken.
140
5. Beginscherm
BEGINSCHERM vervolg
GBC QUANTUM PUNCH
90 LPM
7
MODE
UNLOAD
PROOF
JOB MANAGER
LANGUAGE
1
2
3
4
5
6
7
8
9
0
OK
Andere opdrachten vanuit het BEGINSCHERM zijn:
MODE (MODUS): hiermee kan u kiezen tussen Automatic (Automatisch) of Manual (Manueel).
De automatische modus betekent dat de Quantum ononderbroken zal blijven lopen zolang u
papier op de invoerbanden plaatst en de geperforeerde stapels papier van de uitvoerbanden
neemt. De manuele modus betekent dat de Quantum zal stoppen voor hij de volgende papierstapel gaat verwerken. Deze modus is nuttig als u een opdracht wil starten waarvoor verschillende instellingen nodig zijn, zoals bijvoorbeeld een andere matrijs.
PROOF (TEST): u kan enkele exemplaren laten lopen en de Quantum dan laten stoppen. Deze
optie geeft u de mogelijkheid om de plaatsing en het patroon van de gaten te controleren om na
te gaan of de instellingen juist zijn.
UNLOAD (UITLADEN): betekent dat de lopende job die momenteel in de Quantum zit, als u op
deze knop drukt, zal worden uitgeworpen. Dat is nuttig als u een job om een bepaalde reden
opnieuw moet beginnen.
JOB MANAGER (OPDRACHTBEHEERDER): brengt u naar het scherm Job Manager
(Opdrachtbeheer), waar u een andere job kan selecteren of aanmaken.
LANGUAGE (TAAL): u kan kiezen tussen Engels, Spaans, Frans en Duits.
141
5. Beginscherm
BEGINSCHERM vervolg
GBC QUANTUM PUNCH
90 LPM
7
MODE
UNLOAD
JOB MANAGER
PROOF
LANGUAGE
1
2
3
4
5
6
7
8
9
0
OK
Andere opdrachten in het BEGINSCHERM:
U hebt op elk moment de controle over de snelheid door de LPM (Lifts Per Minute of tilbeurten
per minuut) en de omvang van elke tilbeurt door het aantal vellen per tilbeurt (Sheets per lift)
aan te passen.
De Lifts Per Minute (LPM) kan u aanpassen door middel van de pijltjestoetsen (links en rechts).
U zal het nummer op het scherm zien veranderen. Het bovenstaande voorbeeld is “90 LPM”.
U kan kiezen tussen 60, 75, 90 en 105 LPM.
OPMERKING: Kies een lagere snelheid voor moeilijker te verwerken dragers zoals papier dat
makkelijker krult dan normaal of een zwaardere tonerdekking heeft.
Het formaat van het tillen wordt gecontroleerd via de pijltjestoetsen naar boven en beneden.
De getallen zijn ongeveer gelijk aan het aantal vellen van 90 g/m_ dat bij deze instelling zou
worden opgenomen. Deze optie gaat het aantal vellen echter niet echt tellen en u mag niet
verwachten dat dit de exacte hoeveelheid is die zal worden opgetild. In het voorbeeld ziet u een
tilhoogte van “7”.
OPMERKING: Kies een lagere tilhoogte voor moeilijker te verwerken dragers zoals papier dat
makkelijker krult dan normaal of een zwaardere tonerdekking heeft.
142
5. Beginscherm
SCHERM JOB MANAGER (OPDRACHTBEHEERDER)
JOB MANAGER — USE ARROWS
GO JOB 1
VIEW 13-24
EDITOR
HOME
1
2
3
4
5
6
7
8
9
0
OK
In het scherm Job Manager (Opdrachtbeheerder) kan u scrollen tussen opgeslagen jobs
(1 – 12) door gewoon op de pijltjes naar links of rechts en/of naar boven of beneden te drukken.
In het bovenstaande voorbeeld staat JOB 1 geselecteerd. Om deze job te selecteren en voort te
gaan, drukt u gewoon op de knop “GO JOB 1”.
Andere eigenschappen van de Job Manager:
• VIEW 13-24 (13-24 TONEN): druk om een job #13 tot #24 te selecteren.
• HOME (BEGIN): druk om rechtstreeks terug te keren naar het beginscherm.
• EDIT (BEWERKEN): een huidige job of creëer een nieuwe job,
Scroll naar de job die u wil bewerken of,
Scroll naar een ongebruikte job. In het bovenstaande voorbeeld is Job 12 ongebruikt.
Druk op de knop EDITOR (BEWERKEN).
143
5. Beginscherm
EDITOR-SCHERM
EDITOR
USE ARROWS TO
CHANGE
OTHER
0..9
SIZES
GO TO NEXT
SETTING
ESCAPE NO CHANGE
GO BACK
DATA OK
SAVE
STORE
ACCEPT
ESCAPE
SAVE
1
ACCEPT
1
2
3
4
5
6
7
8
9
0
OK
Om een bestaande job te bewerken of een nieuwe job te creëren, drukt u op de pijltjes naar
boven of beneden om de gewenste instelling te kiezen. In het bovenstaande voorbeeld werden
het papierformaat en de ponsrand gekozen, in dit geval 27 cm (11").
Alternatief kan het formaat rechtstreeks worden ingevoerd via het numerieke toetsenbord. De
machine zal automatisch overschakelen tussen inch en mm, afhankelijk van de grootte van het
ingevoerde getal.
Merk op dat de marge voor deze waarde 140 mm tot 304,8 mm (5.50" tot 12.00") is.
Zodra de gewenste waarde op het scherm verschijnt, drukt u op de knop “ACCEPT” (AANVAARDEN).
144
5. Beginscherm
EDITOR-SCHERM vervolg
EDITOR
USE ARROWS TO
CHANGE
OTHER
0..9
SIZES
GO TO NEXT
SETTING
ESCAPE NO CHANGE
GO BACK
DATA OK
SAVE
STORE
ACCEPT
ESCAPE
SAVE
1
ACCEPT
1
2
3
4
5
6
7
8
9
0
OK
EDITOR-SCHERM
In het bovenstaande voorbeeld werden het papierformaat en de zijrand gekozen, in dit geval
21,6 cm (8.5").
Merk op dat de marge voor deze waarde 140 mm tot 228,6 mm (5.50" tot 9.00") is.
145
5. Beginscherm
EDITOR-SCHERM vervolg
EDITOR
USE ARROWS TO
CHANGE
ACCEPT
GO TO NEXT
SETTING
1
ESCAPE NO CHANGE
SAVE
ESCAPE
GO BACK
DATA OK
STORE
SAVE
ACCEPT
1
2
3
4
5
6
7
8
9
0
OK
EDITOR-SCHERM
In het bovenstaande voorbeeld werd het matrijstype geselecteerd en zien we de vermelding
PB 141. Zie tabel 1 voor de beschikbare matrijzensets voor de Quantum.
Zodra de drie instellingen correct zijn, drukt u op de knop “SAVE” (BEWAREN). U keert automatisch terug naar het scherm Job Manager.
146
5. Beginscherm
SCHERM “GO JOB”
EDITOR
USE ARROWS TO
CHANGE
GO TO NEXT
SETTING
ESCAPE NO CHANGE
GO BACK
DATA OK
SAVE
STORE
ACCEPT
ESCAPE
SAVE
1
ACCEPT
1
2
3
4
5
6
7
8
9
0
OK
Als u een nieuwe matrijzensets kiest, zal het scherm “Die Set” (matrijzenscherm) verschijnen.
In dat scherm zouden worden gevraagd om de juiste ponspincijfers voor het papierformaat dat u
gebruikt te verwijderen. In het voorbeeld zijn er twee mogelijke pinconfiguraties voor deze combinatie van matrijs en papier. Op de matrijzensets zelf vindt u een handig referentielabel om de
pincijfers te vinden. De Quantum zal de matrijs automatisch centreren voor het geselecteerde
papierformaat als u op de knoppen 2 of 4 drukt. Door op de knoppen 1 of 2 te drukken, zal de
Quantum alle nodige aanpassingen uitvoeren (bindmarge, zijmarge en de matrijs centreren). U
kan de centrering van de gaten manueel bijstellen door in dit scherm op de pijltjestoetsen naar
links of rechts te drukken.
Merk op dat de pinnen op het scherm de pinnen zijn die in de matrijs moeten blijven, d.w.z. trek
de pinnen links en rechts van het aangegeven gebied.
Opmerking: in het bovenstaande scherm boven moeten pinnen “4 - 23 & 5 – 23” worden getoond, niet
“1 – 23 & 5 – 23”.
147
5. Beginscherm
SCHERM "RUN"
GBC QUANTUM PUNCH
90 LPM
7
MODE
UNLOAD
PROOF
JOB MANAGER
LANGUAGE
1
2
3
4
5
6
7
8
9
0
OK
Als de Quantum bezig is aan een job zal u grafisch informatie krijgen over de lopende job.
• Het bovenstaande voorbeeld vertelt u dat er zich papier op de invoer- en de uitvoerbanden
bevindt, evenals in het verwerkingsgebied binnenin de Quantum.
Andere grafische meldingen geven de volgende elementen aan:
• Posities van het tilonderdeel
• Deuren open
• Matrijs zit geklemd
• Locaties van fouten
• Aanpassen papierformaten
148
5. Beginscherm
SETUP-SCHERM
GBC QUANTUM PUNCH
90 LPM
7
MODE
UNLOAD
PROOF
JOB MANAGER
LANGUAGE
1
2
3
4
5
6
7
8
9
0
OK
Als de Quantum bezig is aan een job zal u grafisch informatie krijgen over de lopende job.
Het bovenstaande voorbeeld leert u dat de matrijs vergrendeld is.
PAUSE en STOP:
Als u het systeem onmiddellijk moet stilleggen, druk dan op “STOP” en de Quantum P70iX zal
middenin zijn cyclus stoppen. In dat geval is het mogelijk dat u het papier moet verwijderen uit de
verschillende punten waar het papier passeert, als het systeem bij het opnieuw starten het papier
niet zelf verwijdert. Als u het ponsproces wil stoppen, maar het papier dat al onderweg is, nog
mag worden verwerkt, druk dan op “PAUSE” (PAUZE). Er zal dan geen vers papier meer worden
geladen, maar het papier dat al vertrokken was, zal nog door het volledige systeem lopen.
149
6. Onderhoud
BIJKOMENDE INFORMATIE
AFVALBAK (PAPIERSNIPPERS OF PONSAFVAL)
De afvalbak voor uw Quantum P70iX bevindt zich achter de linkerdeur onderaan de machine.
De afvalbak moet geregeld worden verwijderd en leeggemaakt. Dat voorkomt blokkeringen en
schade aan de machine. De Quantum P70iX bevat een microprocessor die de operator ervan op
de hoogte brengt als de afvalbak moet worden leeggemaakt.
OPMERKING: Als u de afvalbak wegneemt, zorg er dan voor dat hij wordt leeggemaakt. Om de
teller van de afvalbak weer op nul te zetten, moeten de afvalbak gedurende minstens vijf seconden volledig uit de Quantum worden verwijderd.
PONSPINNEN
Het is mogelijk dat u enkele ponspinnen moet verwijderen om bepaalde combinaties van papierformaat en ponspatroon goed te kunnen ponsen.
ONDERHOUD
Als uw Quantum P70iX onderhoud nodig heeft, neem dan contact op met uw erkende lokale
GBC-onderhoudsvertegenwoordiger.
De machine bevat GEEN onderdelen die de gebruiker kan onderhouden. Om verwondingen
en/of schade te vermijden, mag u NOOIT DE DEKSELS VAN DE MACHINE VERWIJDEREN.
PROBLEEMOPLOSSING Quantum P70iX
Probleem
Vermoedelijk veroorzaakt
Geen stroom, ponst niet
Stroomkabel niet aangesloten aan de achterzijde
van de machine of niet goed aangesloten op het
stopcontact
Matrijs is niet volledig ingebracht
Deur of deksel is niet goed gesloten
Ponst te veel gaten
De selecteerbare pinnen zijn niet uitgetrokken.
Operator vertrouwd met papierformaten op Xerox
DocuTech in mm
Ga naar “SETUP” en verander de afmetingen van
inch naar “mm”
Als u de eerste lading papier manueel laadt op de
Het oppervlak van de banden is ontworpen om het
invoerbanden, komen de onderste vellen vast te zit- papier vast te nemen. U zal merken dat het niet
ten
mogelijk is om de stapel papier op de band te
plaatsen en hem dan op de juiste plaats te schuiven. Duw de stapel in plaats daarvan eerst zachtjes
tegen de deur, daarna tegen de rechter metalen
aanwijzing en plaats de stapel vervolgens op de
band. Het is ook beter om eerst een kleinere stapel
te laden, gevolgd door enkele grotere stapels.
Na intens gebruik begint de machine blokkeringen
aan te geven als er geen zijn
150
Door nu en dan met lucht over de lens van de drie
optische sensoren te blazen, vermijdt u dat er zich
papierstof verzamelt, dat de werking van de
machine kan verstoren.
7. Specificaties
SPECIFICATIES Quantum P70iX
Snelheid:
Papierformaat:
Papierstapel:
Tilhoogte:
Stapelhoogte:
Afmetingen :
Gewicht:
Stroomtoevoer:
Keurmerken:
Conformiteit:
Matrijzensets:
tot 105 cycli / minuut, 60.000 vel per uur
Ponsrand 14 cm tot 30,5 cm (5 1/2" x 12"), zijrand 14 cm tot 22,2 cm
(5 1/2" x 9")
61 g/m_ (16#) tot 300 g/m_ (140#)
Gemengde gewichten, gelijkgesneden covers en standaardindextabs
variabel, 5 tot 12 vel van 75 g/m_ (20#)
tot 35,5 cm (14") (ongeveer 3.500 vel van 20# (75 g/m_)
152 cm x 140 cm x 132 cm (60" B x 55" L x 52" H) (Makkelijk te
demonteren om door een deurgat van 81 cm te kunnen ) zie pagina 8
850 pond (386 kg)
VSA/Canada 220 V wisselstroom, 50/60 Hz, eenfasestroom,
2,7 ampère, 0,32 KW, 1.092 BTU/h
Internationaal: 220 V wisselstroom, 50/60 Hz, eenfasestroom,
2,7 ampère, 0,32 KW, 1.092 BTU/h
Contactdoos type 6-20R 20 A, 250 V
CSA-keurmerk voor CAN/CSA-C22.2 nr. 60950-00, UL
Std Nr. 60950-00, 3rd Ed.
TUV-certificatie tot EN 60950:2000
Draagt het CE-label om aan te geven dat het voldoet aan de vereisten
van de Europese Unie
Verwisselbare matrijzensets kunnen in enkele seconden tijd zonder
gereedschap worden verwisseld
De specificaties kunnen worden gewijzigd zonder kennisgeving
GBC adviseert oorbescherming voor operatoren van de Quantum P70iX. Onze tests van de
geluidsniveaus zijn als volgt:
Afmetingen in meter
Bediening in de slechtste omstandigheden (snelheid
4, C4-matrijs, 75 g/m_, tilhoogte #9 – 12 vel):
Geluidsdrukniveau = LpA = 83,0 dbA
Geluidsdruk impuls = LpAI = 85,2 dbA
Bediening bij typisch gebruik (snelheid 2, PB-matrijs,
75 g/m_, tilhoogte #9 – 12 vel):
Geluidsdrukniveau = LpA = 78,5 dbA
Geluidsdruk impuls = LpAI = 83,5 dbA
30°
0.25
(9.85”)
ISO 7779-testmethode en microfoonplaatsing:
1,5 m (59.1") van Toevoer,
1,5 m (59.1") hoog,
0,25 m (9.85") van verticale rand van Quantum tot controlepaneel.
Staande bediening
151
®
General Binding Corporation
One GBC Plaza
Northbrook, IL 60062-4195
847/272-3700
http://www.GBC.com
For information on GBC supplies or finishers call 1-800-723-4000
Printed in the U.S.A. Rev. D, March 11, 2004 / GBC Part # 7707286
Para más información sobre los productos GBC, llame al 1-800-723-4000
Impreso en EE.UU. Rev. D, March 11, 2004 / GBC Parte # 7707286
Pour de plus amples informations sur les produits GBC, appelez le 1-800-723-4000
Imprimé aux Etats-Unis. Rév. D, March 11, 2004 / GBC Partie # 7707286
Gedruckt in den USA Ausgabe A1 / GBC Teil-Nr. 7707286
Ausgabedatum 15. Oktober 2003
Stampato negli Stati Uniti Rev. A1 / GBC Numero parte 7707286
Data di emissione 15 Ottobre 2003
Revisione C-1
Gedrukt in de VSA Rev. A1 / GBC Part # 7707286
Handleiding # 7707286
Datum van publicatie: 15 oktober 2003
Herziening C-1