1
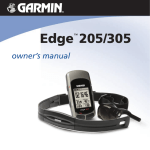
Owner’s Manual
Edge 205/305
™
GPS-enabled computer for cyclists
© Copyright 2005–2006 Garmin Ltd. or its subsidiaries.
Garmin International, Inc.
1200 East 151st Street
Olathe, Kansas 66062, U.S.A.
Tel. 913/397.8200 or
800/800.1020
Fax 913/397.8282
Garmin (Europe) Ltd.
Unit 5, The Quadrangle
Abbey Park Industrial Estate
Romsey, SO51 9DL, U.K.
Tel. 44/0870.8501241
Fax 44/0870.8501251
Garmin Corporation
No. 68, Jangshu 2nd Road
Shijr, Taipei County, Taiwan
Tel. 886/2.2642.9199
Fax 886/2.2642.9099
All rights reserved. Except as expressly provided herein, no part of this manual may be reproduced,
copied, transmitted, disseminated, downloaded or stored in any storage medium, for any purpose
without the express prior written consent of Garmin. Garmin hereby grants permission to download a
single copy of this manual onto a hard drive or other electronic storage medium to be viewed and to
print one copy of this manual or of any revision hereto, provided that such electronic or printed copy
of this manual must contain the complete text of this copyright notice and provided further that any
unauthorized commercial distribution of this manual or any revision hereto is strictly prohibited.
Information in this document is subject to change without notice. Garmin reserves the right to change
or improve its products and to make changes in the content without obligation to notify any person
or organization of such changes or improvements. Visit the Garmin Web site (www.garmin.com) for
current updates and supplemental information concerning the use and operation of this and other
Garmin products.
Garmin®, Auto Lap®, and Auto Pause® are registered trademarks and Edge™, GSC10™, Virtual
Partner™, and Garmin Training Center™ are trademarks of Garmin Ltd. or its subsidiaries and may not
be used without the express permission of Garmin.
May 2006
Part Number 190-00580-00 Rev. D
Printed in Taiwan
INTRODUCTION
TABLE OF
Introduction......................... 5
About This Manual .............5
Getting Started.................... 6
Charge the Battery .............6
Position the Edge .............10
Configure the Edge ..........12
Acquire Satellite
Signals..........................13
Position the Heart Rate
Monitor .........................14
Position the GSC10
Sensor ..........................16
Set Your User Profile ........19
Set Your Bike Profile ........20
Change the Backlight and
Contrast Settings ........21
Training.............................. 22
Auto Pause® .....................22
Auto Lap® .........................22
Alerts .................................24
Edge™ 205/305 Owner’s Manual
CONTENTS
Using Time and Distance
Alerts .......................... 24
Using Speed Alerts .......... 25
Using Heart Rate Alerts ... 26
Using Cadence Alerts ...... 27
Virtual Partner™ ................28
Workouts: Quick, Interval,
and Advanced .............29
Using Workouts ............... 30
Quick Workouts ............... 30
Interval Workouts ............. 32
Advanced Workouts ......... 33
Courses .............................39
Creating Courses ............. 39
Using a Course ................ 40
History ............................... 43
Viewing History ................ 43
Deleting History ............... 46
Navigation ......................... 47
Navigating with the Map ..47
3
INTRODUCTION
Marking and Finding
Locations .....................48
Navigating with Routes....50
Viewing GPS
Information...................52
Customizing ...................... 54
Setting Up Custom Data
Fields ............................54
Changing System
Settings ........................56
Updating User Profile.......59
Changing Bike Profile ......59
Setting Zones....................60
Speed Zones ................... 60
Heart Rate Zones ........... 61
Data Recording .................62
Appendix ........................... 64
Edge Data Fields ..............64
Edge Accessories.............70
Viewing Heart Rate Data ..71
Training with Heart Rate
Zones ............................71
4
Sensor Pairing ..................74
Training with Cadence ....76
Barometric Altimeter ........76
Tire Size and
Circumference .............77
Garmin Training Center ...79
Caring for the Edge ..........80
Specifications ..................81
Product Registration ........84
Contact Garmin................ 84
Warning .............................85
Caution ..............................86
Limited Warranty ..............87
FCC Compliance...............88
Software License
Agreement....................90
CE Compliance .................90
Index .................................. 91
Edge™ 205/305 Owner’s Manual
INTRODUCTION
INTRODUCTION
Thank you for choosing the
Garmin® Edge™! Track your
cycling activities using this
advanced GPS-enabled
computer.
About This Manual
To get the most out of your Edge,
review this manual and the Edge
Quick Reference Guide.
Getting Started–charge your
Edge, position and use the heart
rate monitor and GSC10 speed
and cadence sensor, and set up
the Edge for your first ride.
Training–customize alerts and
create workouts and courses on
your Edge.
Edge™ 205/305 Owner’s Manual
History–view and manage your
Edge history data.
Navigation–learn about the
navigating features of your Edge,
including how to save and find
locations, create routes, and view
the satellite page.
Customizing–configure your
Edge settings to fit your training
needs.
Appendix–review specifications,
cleaning instructions, information
about Garmin Training Center™,
and optional accessories. Be sure
to read the safety information in
this section to learn how to use
your Edge safely and responsibly.
Index–contains a comprehensive
index by subject.
5
GETTING STARTED
GETTING STARTED
Follow the instructions in this
section to set up and begin using
your Edge.
Charge the Battery
The Edge is powered by a built-in
lithium-ion battery that you can
recharge with the A/C charger
included in the product box. You
can also charge the Edge with
the USB cable and your personal
computer. Charge the Edge for
at least three hours before you
begin using it.
6
WARNING: Be sure the mini-USB
port, weather cap, and surrounding
area are thoroughly dry before
charging or connecting to a personal
computer to prevent corrosion.
To charge the Edge:
1. Turn the Edge over and pull
back the weather cap from
the mini-USB port on the back
of the unit.
mini-USB port under
weather cap
Edge™ 205/305 Owner’s Manual
GETTING STARTED
2. Locate the A/C charger
included in the product box.
Plug the mini-USB end of the
charger into the
mini-USB port on the Edge.
Then plug the A/C charger
into a standard wall outlet.
NOTE: The unit will not charge
outside the temperature range of
0°C–50°C (32°F–122°F).
3. Plug the A/C charger into a
standard wall outlet. When the
battery is completely charged,
it can run for approximately
12 hours before recharging.
Edge™ 205/305 Owner’s Manual
7
GETTING STARTED
Buttons
1
6
3
8
power
• Press and hold to turn
unit on/off.
• Press to turn backlight
on/off.
2
mode
• Press to switch modes.
• Press to return to the
previous page.
• Press and hold to
switch bike profiles.
3
reset/lap
• Press and hold to reset
the timer.
• Press to create a new
lap.
4
start/stop
Press to start/stop the
timer.
5
����
2
1
� ��
�
���������
4
Edge™ 205/305 Owner’s Manual
GETTING STARTED
5
6
up/down
• Press to highlight
options.
• Press to scroll through
menus and data fields.
• Press to adjust contrast
when on the Satellite
page.
enter
Press to select options
and to acknowledge
messages.
NOTE: Press mode and reset/lap
simultaneously to reset the unit.
Icons
Battery icon shows the
current battery charge
level.
Satellite icon changes
from blank to 3D when
receiving satellite
signals.
USB connection icon
appears when you
connect the Edge to
your computer using
the USB cable.
Timer icon appears
when timer starts.
Heart Rate icon is
constant (no flashing X)
when receiving data.
Cadence icon is
constant (no flashing X)
when receiving data.
Edge™ 205/305 Owner’s Manual
9
GETTING STARTED
Position the Edge
For best results, position the
Edge with the face oriented
toward the sky. This position
allows the GPS antenna to
acquire satellite information
quickly.
You can install the bike mount
to the stem or handlebars. The
stem installation (shown here)
provides a more sturdy location.
The optional wedge should be
used under the mount for a better
viewing angle.
To install the Edge on your
bike stem:
1. Place the wedge on the bike
stem, and then place the bike
mount on the wedge. Make
sure the release lever is on
the left.
10
release
lever
wedge
(optional)
bike mount
For horizontal bars: Separate
and remove the top part of the
mount, turn it 90 degrees, and
replace. Continue with step 2.
For bars with a diameter less
than 1 in (25.4 mm): Place the
additional rubber pad under
the bike mount to increase the
diameter of the bar. The rubber
pad also keeps the mount from
slipping. Continue with step 2.
Edge™ 205/305 Owner’s Manual
GETTING STARTED
2. Attach the bike mount
securely using two cable ties.
Make sure the cable ties are
threaded through both parts
of the bike mount.
3. Align the Edge with the bike
mount so that the unit is
vertical.
4. Slide the unit left until it snaps
into place.
Top view of Edge being mounted
on a horizontal bar.
��
�
�
To release the unit:
Press down on the release lever,
and slide the unit to the right.
release lever
cable ties
Edge™ 205/305 Owner’s Manual
11
GETTING STARTED
Configure the Edge
When you first turn on your Edge, the following setup screens appear.
Follow the on-screen instructions:
1
3
2
4
5
Screens 4 and
5 apply to Edge
305 only.
12
Edge™ 205/305 Owner’s Manual
GETTING STARTED
Acquire Satellite
Signals
Before you begin using the Edge,
you must acquire GPS satellite
signals. It may take 30–60
seconds to acquire signals.
To acquire satellite signals:
Go outdoors to an open area.
Then press and hold the Power
button to turn on the Edge.
On the Satellite page, the
available satellites are flashing
while the Edge searches for
satellite signals. Acquired
satellites and each corresponding
bar below change to solid. The
GPS accuracy appears at the top
of the page.
Edge™ 205/305 Owner’s Manual
Wait while the Edge searches
for satellites. For best reception,
make sure the Edge is facing up.
Stand still in an open area, and
do not begin moving until the
Satellite page disappears. After
the Satellite page disappears,
you can begin your ride.
NOTE: To turn off GPS receiver and
use the Edge indoors, see page 56.
13
GETTING STARTED
Position the Heart
Rate Monitor
information on customizing the
data fields on your Edge.
NOTE: The heart rate monitor is an
accessory for the Edge 305 only.
Wear the heart rate (HR) monitor
directly on your skin, just below
the breastplate. It should be snug
enough to stay in place during
your workout. To view heart rate
information on your Edge during
a workout, you must add it to the
data fields on one of the data
pages. See page 54 for more
To use the heart rate monitor:
1. Push one tab on the elastic
strap through the slot in the
heart rate monitor.
2. Wet both sensors on the back
of the heart rate monitor to
create a strong connection
between your pulse and the
transmitter.
sensors
14
Edge™ 205/305 Owner’s Manual
GETTING STARTED
3. Place the heart rate monitor
directly on your skin, just
below the breastplate. Wrap
the strap around your chest
and attach the strap to the
other side of the heart rate
monitor.
NOTE: If you have trouble with
erratic heart rate readings, position
the transmitter on your back instead
of your chest, or try applying
electrode gel.
4. Tighten or loosen the strap as
necessary so that it fits snugly
against your body.
5. Turn on the Edge.
Edge™ 205/305 Owner’s Manual
6. Bring it within range (3
meters) of the heart rate
monitor. The heart rate
monitor automatically
transmits your heart rate
to the Edge, and the heart
rate icon
changes from
flashing to constant.
TIP: Be sure to move away from
other heart rate monitors while the
Edge is trying to “pair” with your heart
rate monitor and begin receiving
heart rate data. Once the Edge pairs
with your heart rate monitor, you can
go near other heart rate monitors. For
more information on pairing, training,
and troubleshooting, see pages
71-75.
15
GETTING STARTED
Position the GSC10
Sensor
NOTE: The GSC10 is an accessory
for the Edge 305 only.
To install the GSC10:
1. Place the GSC10 on the
rear chain stay (on the side
opposite of the drive train).
Loosely attach the GSC10
using two cable ties.
The Edge 305 CAD includes a
wireless speed and cadence
sensor. Both magnets must be
aligned with their respective
indication lines for the Edge
1 GSC10 on rear chain stay
to receive data.
reset button
cable ties
indication
line
16
Edge™ 205/305 Owner’s Manual
GETTING STARTED
2. Attach the pedal magnet
to the crank arm using the
adhesive mount and a cable
tie. Make sure the pedal
magnet is within 5 mm of the
GSC10 and the indication line
on the pedal magnet lines up
with the indication line on the
GSC10.
3. Attach the spoke magnet by
unscrewing the magnet from
the plastic piece. Then place
the spoke in the groove of
the plastic piece and tighten
slightly. The magnet can face
away from GSC10 if there is
not enough room between
sensor arm and spoke. Make
sure the magnet is aligned
with the sensor arm indication
line.
Edge™ 205/305 Owner’s Manual
2 Pedal magnet on crank arm
cable tie
indication
line
4. Unscrew and move the
sensor arm to within 5 mm of
the spoke magnet. You can
also tilt the GSC10 closer to
either magnet for improved
alignment.
17
GETTING STARTED
5. Press the Reset button on the
GSC10. The LED light turns
red, then green. Pedal to test
the sensor alignment. The
red LED blinks each time the
crank arm passes the sensor,
and the green LED blinks
each time the wheel magnet
passes the sensor arm.
NOTE: The LED blinks for the first
60 passes after a reset. Press
Reset again if you require additional
passes.
6. When everything is aligned
and working correctly, tighten
the cable ties, sensor arm,
and spoke magnet.
3 Spoke magnet on wheel
spoke
magnet
pedal
magnet
18
sensor arm
indication
line
Edge™ 205/305 Owner’s Manual
GETTING STARTED
Set Your User Profile
The Edge uses information
that you enter about yourself to
calculate calorie consumption.
Set your user profile before you
begin using the Edge to ensure
it is recording accurate workout
data.
To set your user profile:
1. Press mode to access the
Main Menu.
2. Select Settings > User
Profile.
3. Enter your Gender, Birth
Date, and Weight.
Select the
arrows to
move left or
right within a
field.
If you are setting your user profile
for the first time (Edge 305 with
heart rate monitor), a Max HR
message appears. Select Yes to
adjust your maximum heart rate
calculation based on your user
profile.
TIP: When finished selecting options
or entering values on your Edge,
press the mode button to exit the
field or page.
Edge™ 205/305 Owner’s Manual
19
GETTING STARTED
Set Your Bike Profile
You can set up to three profiles.
To set your bike profile:
1. Press mode to access the
Main Menu.
2. Select Settings > Bike
Profile.
5. If you have an Edge 305
with the GSC10 speed and
cadence sensor on your bike,
select the Sensor Mounted
check box.
6. In the Wheel Size field, select
Auto to have the GSC10
automatically detect your tire
size using GPS data or select
Custom to enter your tire
size. For a table of tire sizes
and circumferences, see
pages 77–78.
3. Select the bike profile you
wish to use.
4. Enter the Bike Weight.
20
Edge™ 205/305 Owner’s Manual
GETTING STARTED
Change the Backlight
and Contrast Settings
To change the Edge display:
1. Press mode to access the
Main Menu.
2. Select Settings > System >
Display.
3. Select the amount of time
the backlight stays on. Use a
short backlight timeout setting
to conserve battery power.
4. Select the amount of screen
contrast.
Edge™ 205/305 Owner’s Manual
NOTE: You can also adjust the
screen contrast on the Satellite page
using the
arrows.
21
TRAINING
TRAINING
The Edge offers several training
features and optional settings.
Use your Edge to set goals
and alerts, train with a Virtual
Partner™, program workouts, and
plan courses based on existing
rides.
Auto Pause®
You can set the Edge to pause
the timer automatically during
your ride when you stop moving
or your speed drops below a
custom value. This setting is
helpful if your course includes
stop lights or other places where
you need to slow down or stop.
When you turn on Auto Pause,
the Edge stores any paused time
as Rest Time and any paused
22
distance as Rest Distance. To
add these data fields to a custom
page, see page 54.
NOTE: Rest time and distance for
Auto Pause are not stored in history.
Auto Lap®
You can use Auto Lap to
automatically mark the lap at a
specific position or after you have
traveled a specific distance. This
setting is helpful for comparing
your performance over different
parts of a ride (each 5K or a
major hill, for example).
To set Auto Pause/Lap:
1. Press mode to access the
Main Menu.
2 Select Training > Auto
Pause/Lap.
Edge™ 205/305 Owner’s Manual
TRAINING
3. In the Auto Timer Pause
field, select When Stopped
or Custom Speed to enter a
value.
4. In the Auto Lap Trigger field,
select By Distance to enter
a value or By Position to
choose an option:
• Lap Press only–triggers
the lap counter each time
you press the lap button
and every time you pass
that location again.
Edge™ 205/305 Owner’s Manual
• Start And Lap–triggers
the lap counter at the GPS
location where you press
the start button and at any
locations during the ride
where you press the lap
button.
• Mark And Lap–triggers the
lap counter at a specific
GPS location marked
before the ride and at any
locations during the ride
where you press the lap
button.
23
TRAINING
Alerts
Use Edge alerts to train toward
certain time, distance, speed,
heart rate, and cadence goals.
Using Time and Distance
Alerts
Time and distance alerts are
useful for long workouts when
you want to train for a certain
amount of time or distance. When
you reach your goal, the Edge
beeps and displays a message.
3. In the Time Alert field, select
Once or Repeat.
4. Enter a time in the Alert At
field.
To set a time or distance alert:
1. Press mode to access the
Main Menu.
2. Select Training > Alerts >
Time/Dist Alert.
24
Edge™ 205/305 Owner’s Manual
TRAINING
5. In the Distance Alert field,
select Once or Repeat.
6. Enter a distance in the Alert
At field.
Using Speed Alerts
Speed alerts notify you if you
exceed or drop below a custom
speed setting during your ride.
The speed alert takes advantage
of Speed Zones, which are
ranges of speed that you can
store in the Edge. For more
information, or to set your Speed
Zones, see page 60.
To set a speed alert:
1. Press mode to access the
Main Menu.
2. Select Training > Alerts >
Speed Alert.
3. In the Fast Speed Alert field,
select a Speed Zone from the
menu or select Custom to
enter your own alert value.
4. Repeat for the Slow Speed
Alert.
Edge™ 205/305 Owner’s Manual
25
TRAINING
Using Heart Rate Alerts
NOTE: Heart rate alerts are a feature
of the Edge 305 only.
Similar to speed alerts, the heart
rate alert notifies you if your heart
rate exceeds or drops below
a specific number of beats per
minute (bpm).
Heart rate alerts can also notify
you if your heart rate exceeds
or drops below a certain heart
rate zone—a range of beats
per minute. The five commonly
accepted heart rate zones can
help you determine the intensity
of your workout. For more about
setting your heart rate zones, see
page 61. For more information
about training with heart rate
zones, see page 71.
26
To set a heart rate alert:
1. Press mode to access the
Main Menu.
2. Select Training > Alerts >
HR Alert.
3. In the Min HR Alert field,
select a zone from the menu
or select Custom to specify
your own alert value.
Edge™ 205/305 Owner’s Manual
TRAINING
4. Repeat for the Max HR Alert.
The maximum value allowed
is 235 bpm.
NOTE: When entering custom
heart rate values, you must set your
minimum and maximum alerts at
least 5 bpm apart.
Using Cadence Alerts
NOTE: Cadence alerts are a feature
of the Edge 305 only.
Similar to speed alerts, the
cadence alert notifies you if your
cadence exceeds or drops below
a specific number of revolutions
of the crank arm per minute
(rpm). For more information about
training with cadence, see page
76.
Edge™ 205/305 Owner’s Manual
To set a cadence alert:
1. Press mode to access the
Main Menu.
2. Select Training > Alerts >
Cadence Alert.
3. In the Fast Cadence Alert
field, select On.
4. Enter a value in the Alert
Above field. The maximum
cadence value allowed is 255.
5. Repeat for the Slow Cadence
Alert.
27
TRAINING
Virtual Partner™
Your Virtual Partner is a
unique tool designed to help
you meet your training goals.
The Virtual Partner competes
with you during quick workouts
and courses. The Virtual Partner
“rides” alongside (top bike
graphic) of you. Your current time,
speed, distance, and distance
from the Virtual Partner appears
on the Workout page. If you are
ahead of the Virtual Partner, the
bottom field background is white.
If you are behind, the background
is black (as shown).
28
To see Virtual Partner data:
1. Set up a quick workout or
course.
2. Press mode to see the
Workout or Course page.
3. Press start.
4. Press enter to scroll through
the workout or course data
pages.
Virtual Partner
You
Edge™ 205/305 Owner’s Manual
TRAINING
To turn off Virtual Partner:
1. Press mode to access the
Main Menu.
2. Select Training > Virtual
Partner.
3. In the Virtual Partner field,
select Off.
Workouts: Quick,
Interval, and Advanced
From the Main Menu, select
Training > Workouts to choose
the type of workout right for you.
Quick and interval workouts are
replaced each time you create
a workout of the same type.
Advanced workouts can be
saved, edited, and transferred
between Garmin Training Center
and your Edge.
Edge™ 205/305 Owner’s Manual
29
TRAINING
Using Workouts
During your workout, press mode
to see the Workout data page.
When you complete all steps
in your workout, the “Workout
Finished!” message appears.
To end a workout early:
1. Press mode to access the
Main Menu.
2. Select Training > Stop
Workout.
Quick Workouts
For quick workouts, you enter
your time, distance, or pace
goals, and the Edge displays
the Virtual Partner to help you
achieve them. It is easy to set
up one of the following quick
workouts with your Edge:
• Distance and time
• Time and speed
• Distance and speed
To end an interval or advanced
workout step early:
Press the lap/reset button.
30
Edge™ 205/305 Owner’s Manual
TRAINING
To set up a quick workout:
1. Press mode to access the
Main Menu.
2. Select Training > Workouts
> Quick Workouts.
3. Select the type of quick
workout.
4. Enter values in the first and
second fields.
5. Check the third field to
ensure that calculation seems
reasonable. If not, make
changes to the top two fields.
6. Select Done?.
Edge™ 205/305 Owner’s Manual
7. Press start to begin your
quick workout.
31
TRAINING
Interval Workouts
You can create simple and
challenging interval workouts with
your Edge based on the following
criteria:
• Ride a certain distance and
rest for a certain amount of
time.
• Ride for a certain distance
and rest for a certain
distance.
• Ride for a certain amount
of time and rest for a
certain amount of time.
• Ride for a certain amount
of time and rest for a
certain distance.
32
To create an interval workout:
1. Press mode to access the
Main Menu.
2. Select Training > Workouts
> Interval.
3. Select an option from the
Interval Workout page.
4. Enter distance or time values
into the appropriate fields.
5. In the Reps field, enter
number of times you want to
repeat each interval.
Edge™ 205/305 Owner’s Manual
TRAINING
6. To add an extra lap for warm
up and for cool down, select
Warmup & Cooldown.
7. Select Done?.
lap. When you are finished
cooling down, press lap to end
your workout.
As you approach the end of each
lap, an alarm sounds, and a
message appears, counting down
the time until a new lap begins.
At any time during the interval
workout, you can press the lap
button to end a step early.
Advanced Workouts
8. Press start to begin your
interval workout.
If you selected Warmup &
Cooldown, press lap at the
end of your warm up lap to start
your first interval. At the end of
your last interval, the Forerunner
automatically starts a cooldown
Edge™ 205/305 Owner’s Manual
Use the Edge to create and save
advanced workouts that include
goals for each workout step and
varied distances, times, and
rest laps. Once you create and
save a workout, you can use the
Garmin Training Center software
to schedule the workout for a
particular day. Scheduling allows
you save setup time by planning
33
TRAINING
workouts in advance and storing
them on your Edge. For more
information about Garmin
Training Center, see page 79.
Otherwise, the workout will be
overwritten when you load workouts
from Garmin Training Center to your
unit.
Creating Advanced
Workouts
To create an advanced workout
using the Edge:
1. Press mode to access the
Main Menu.
2. Select Training > Workouts
> Advanced > <Create
New>.
3. Enter a descriptive workout
name in the top field (for
example, 40KHILLS).
4. Select “1. Open No Target.”
Select Edit Step.
Garmin recommends that you
use the Garmin Training Center
software to create workouts
and transfer them to your Edge.
However, you can also create
and save an advanced workout
directly on your Edge. Note that
you cannot use the Edge to
schedule workouts; you must use
Garmin Training Center.
NOTE: Garmin Training Center
serves as the “master list” of
advanced workouts. If you create
a workout on the Edge, be sure to
transfer it to Garmin Training Center.
34
Edge™ 205/305 Owner’s Manual
TRAINING
NOTE: Heart rate and cadence
targets are for the Edge 305 only.
5. In the Duration field, select
how long you want the step to
last. If you select Open, you
can end the step during your
workout by pressing lap.
6. Below Duration, enter the
value where you want the
step to end.
7. In the Target field, select your
goal during the step (Speed,
Heart Rate, Cadence, or
None).
Edge™ 205/305 Owner’s Manual
8. Enter a target value from the
menu. For example, if your
target is heart rate, select a
heart rate zone or enter a
custom range. Select None
if you do not want to set a
target for this step.
9. Below Target, enter a
goal value for this step (if
necessary).
10. If this is a rest lap, select
the Rest Lap field, and then
select Yes. (Creating rest
laps affects your workout
history; see “Viewing Workout
History.”)
11. Press mode to continue
setting up this workout.
35
TRAINING
12. To enter another step, select
<Add New Step>. Then
repeat steps 5–11.
To repeat steps:
1. Select <Add New Step>.
2. In the Duration field, select
Repeat.
3. In the Back to Step field,
select the step you want to
return to.
4. In the Number of Reps
field, enter the number of
repetitions.
36
5. Press mode to continue.
Starting Advanced
Workouts
Once you begin an advanced
workout, the Edge displays each
step of the workout, including
the name of the step, the goal (if
any), and current workout data.
Edge™ 205/305 Owner’s Manual
TRAINING
To start an advanced workout:
1. Press mode to access the
Main Menu.
2. Select Training > Workouts
> Advanced.
3. Select the workout you want
to start.
4. Select Do Workout.
5. Press start to begin your
advanced workout.
NOTE: From the Workout page,
press enter to view more data.
Edge™ 205/305 Owner’s Manual
An audible alarm sounds when
you are about to finish a workout
step. A message appears,
counting down the time or
distance until a new step begins.
At any time during the advanced
workout, you can press the lap
button to end a step early.
Editing Advanced
Workouts
You can edit workouts within
Garmin Training Center or directly
in the Edge. However, if you
edit workouts in the Edge, your
changes may be temporary.
Garmin Training Center serves
as the “master list” of advanced
workouts: if you edit a workout
in the Edge, the changes will be
overwritten the next time you
transfer workouts from Garmin
37
TRAINING
Training Center. To make a
permanent change to a workout,
edit the workout in Garmin
Training Center and then transfer
it to your Edge.
To edit an advanced workout:
1. Press mode to access the
Main Menu.
2. Select Training > Workouts
> Advanced.
3. Select the workout you
want to change. Select Edit
Workout.
4. Select the step you want to
edit. Select Edit Step.
5. Make any necessary
changes, and press mode.
6. Edit other steps as necessary.
7. Press mode to exit.
38
To delete an advanced
workout:
1. Press mode to access the
Main Menu.
2. Select Training > Workouts
> Advanced.
3. Select the workout you want
to delete. Select Delete
Workout.
4. Select Yes to delete the
workout.
Edge™ 205/305 Owner’s Manual
TRAINING
Courses
Another way you can use the
Edge for custom training is to
create and edit courses based
on a previously recorded activity.
You can follow the course trying
to match or exceed previously set
goals. You can also race against
the Virtual Partner when training
with courses. To turn on Virtual
Partner, see page 28.
Creating Courses
Garmin recommends that you
use the Garmin Training Center
software to create courses and
course points. Then you can
transfer them to your Edge. For
more information, see the Garmin
Training Center Help system.
Edge™ 205/305 Owner’s Manual
You can also create a course
(without course points) on your
Edge.
To create a course on your
Edge:
1. Press mode to access the
Main Menu.
2. Select Training > Courses >
<Create New>.
3. From the History page, select
a previous ride on which to
base your course.
4. Enter a descriptive course
name in the top field (for
example, 10KFLAT).
5. Press mode to exit.
39
TRAINING
Adding Course Points
You can mark course points, or
places on your course that you
want to remember, such as water
stops or distance goals. You must
use Garmin Training Center to
add course points to any course.
For more information, refer to
the Garmin Training Center Help
system.
Using a Course
To start a course:
1. Press mode to access the
Main Menu.
2. Select Training > Courses.
3. Select a course from the list.
4. Select Do Course.
5. Press start. History is
recorded even if you are not
on the course.
40
Course Data Pages
From the Course page, press
enter to view additional course
data on the bottom half of the
screen including the course
map, elevation graph, and Virtual
Partner data. You can customize
the top half of the Course page
(up to four data fields). See
pages 54–55.
Press mode to see your course
on the map.
Edge™ 205/305 Owner’s Manual
TRAINING
Course
point
Your current
position
Your previous
performance
The gray triangle shows your
previous performance.
The black triangle shows your
current position.
Press mode again to see the
Compass page. If you have not
entered the course, the compass
points you toward the course and
the fields display your current
distance from the course and the
estimated time to arrival.
Edge™ 205/305 Owner’s Manual
Off Course Options
You can include a warmup
before you actually begin your
course. Press start to begin the
course, and then warm up as
normal. Be sure to stay away
from your course path as you
warm up. When you are ready to
begin, head toward your course.
When you are on any part of the
course path, the Edge displays
an “On Course” message and
synchronizes the gray and
black triangles.
41
TRAINING
If you stray away from the
course, the Edge displays an
“Off Course” message. The gray
triangle continues on the course
without you. Use the Compass
page or Map page to find your
way back to the course.
To end a course manually:
1. Press mode to access the
Main Menu.
2. Select Training > Stop
Course.
4. Edit the course name.
5. Press mode to exit.
To delete a course:
1. Press mode to access the
Main Menu.
2. Select Training > Courses.
3. Select the course you want to
delete. Select Delete Course.
4. Select Yes to delete the
course.
5. Press mode to exit.
To edit a course name:
1. Press mode to access the
Main Menu.
2. Select Training > Courses.
3. Select the workout you
want to change. Select Edit
Course.
42
Edge™ 205/305 Owner’s Manual
HISTORY
HISTORY
Your Edge automatically saves
all training data (when the timer
is started) and can hold up to
two years (1000 laps) of data
in memory. When the memory
is full, your oldest Edge data is
overwritten. Load your history
into the Garmin Training Center
software periodically to keep
track of all of your workouts. You
can view the data on your Edge
or transfer the history to the
Garmin Training Center software,
where you can analyze your data.
History data includes time,
distance, calories, average
speed, maximum speed, altitude,
and detailed lap information.
Edge 305 history data also
includes heart rate and cadence.
Edge™ 205/305 Owner’s Manual
NOTE: No data is recorded while the
timer is stopped.
Viewing History
After you have finished a ride,
you Edge stores history data that
you can view by day, week, or
totals.
To view history by day:
1. Press mode to access the
Main Menu.
2. Select History > By Day.
3. Press to scroll through the
list. As you scroll, summary
details appear below the list.
4. Select an entry to view
details. Select View Laps for
additional lap detail.
43
HISTORY
About Lap Detail
The Edge displays history details
differently, depending on the
type of training you did. Details
of a quick workout appear on
one summary page. Details of
Virtual Partner, interval workouts,
advanced workouts, and courses
appear with tabs, which organize
information into sections. To view
information on different tabs,
press the and arrows.
To view laps on map:
1. While viewing details for a
history entry, select View
Laps.
2. Select a lap in the list.
3. Select View on Map.
4. Press the and arrows
to zoom in and out on the
map. When you are finished
viewing the lap, select Next
to view the next lap. Press
mode to exit.
44
Edge™ 205/305 Owner’s Manual
HISTORY
To delete laps or entire trips
from history:
1. While viewing details for a
history entry, select View
Laps.
2. Select the lap you want to
delete.
3. Select Delete Lap or Delete
Entire Trip. Select Yes to
confirm.
To view history by weeks:
1. Press mode to access the
Main Menu.
2. Select History > By Week.
3. Press to scroll through the
list of weeks. As you scroll,
totals for each week appear
below the list.
4. Select a week to view details
in that week by day.
NOTE: To delete more or all of your
Edge history, see “Deleting History”
on page 46.
Edge™ 205/305 Owner’s Manual
45
HISTORY
To view history totals:
1. Press mode to access the
Main Menu.
2. Select History > History
Totals. Totals appear for
distance, time, and calories
for all of your saved workouts.
3. Select View Weeks to see a
list of weeks.
To delete workout history:
1. Press mode to access the
Main Menu.
2. Select History > Delete.
Deleting History
After you have transferred
several months of Edge data to
Garmin Training Center, you may
want to delete the history from
your unit.
46
3. Select Keep 1 Month, Keep
3 Months, or Delete All.
Select Yes to confirm.
Edge™ 205/305 Owner’s Manual
NAVIGATION
NAVIGATION
Use the GPS navigation features
of your Edge to view your ride on
a map, mark and save locations
you want to remember, and
create routes.
NAVIGATION
you exactly where you have
traveled. This dotted line is called
a track. At the bottom of the map,
you can view the zoom level.
To zoom in or out on the map,
press the and arrows. At
the top of the map, you can view
the direction you are traveling. At
the top of the map, you can add
custom data fields. See page 54.
points to
North
Navigating with the
Map
Press mode to see the Map
page. When you start the timer
and begin to move, a tiny dotted
line appears on the map, showing
Edge™ 205/305 Owner’s Manual
zoom
level
you
47
NAVIGATION
Marking and Finding
Locations
A location is a point on the map
that you store in memory. If you
want to remember landmarks or
return to a certain spot, mark a
location. The location appears on
the map with a name and symbol.
You can find, view, and return to
locations at any time.
To mark your location:
1. Go to a place where you want
to mark a location.
2. Press mode to access the
Main Menu.
3. Select Navigation > Mark
Location.
4. Select a symbol.
5. Enter a descriptive location
name in the top field.
48
symbol
location
name
coordinates
To mark a location using
coordinates:
1. Press mode to access the
Main Menu.
2. Select Navigation > Mark
Location.
3. Use the
arrows to select
the coordinates. Enter the
latitude and longitude of the
location you want to mark.
3. Make other changes as
necessary, and select OK.
Edge™ 205/305 Owner’s Manual
NAVIGATION
To find and go to a location:
1. Press mode to access the
Main Menu.
2. Select Navigation > Find.
3. Select List All or Nearest
(locations near your current
location).
4. Use the
arrows to find
a location in the list. Direction
and distance information for
each location appears below
the list.
6. Select Go To. Follow the line
on the map to the location.
7. Press mode to view the
Compass page. The arrow
points toward the location.
5. Select the location.
Edge™ 205/305 Owner’s Manual
49
NAVIGATION
To stop navigating to a
location:
1. Press mode to access the
Main Menu.
2. Select Navigation > Stop Go
To.
To edit a location:
1. Press mode to access the
Main Menu.
2. Select Navigation > Find >
List All.
3. Select the location.
4. Select the name or symbol,
and make changes.
5. Press mode to exit.
To delete a location:
1. Press mode to access the
Main Menu.
2. Select Navigation > Find.
50
3. Select List All to find and
delete a specific location or
select Delete All.
4. Select Yes to confirm.
Navigating with
Routes
A route provides straight line
directions between two or more
points on the map. After you
create locations, you can use
these points to build routes. Then
you can save the routes and use
them to navigate at any time. The
Compass page also appears for
routes.
To create a route:
1. Press mode to access the
Main Menu.
2. Select Navigation > Routes.
3. Select New.
Edge™ 205/305 Owner’s Manual
NAVIGATION
4. Select the dotted line, and
press enter to add a location.
5. Select the location from the
list, and then select Use.
6. Repeat steps 4 and 5 to add
more locations to your route.
7. When you are finished adding
locations, select Navigate.
8. Press start/stop. Your route
appears on the Map page as
a dark line connecting each
location.
To find and follow a route:
1. Press mode to access the
Main Menu.
2. Select Navigation > Routes.
3. Select the route you want to
follow. Select Navigate.
4. Press start/stop. Your route
appears on the Map page as
a dark line connecting each
location.
To stop navigating a route:
1. Press mode to access the
Main Menu.
2. Select Navigation > Stop
Route.
To edit a route:
1. Press mode to access the
Main Menu.
2. Select Navigation > Routes.
Edge™ 205/305 Owner’s Manual
51
NAVIGATION
3. Select the route you want to
edit. A menu appears.
4. Select Edit. Then select a
point to edit.
Review–view it on the map.
Insert–insert a point before
this point.
Remove–remove it from the
route.
Change–replace it with
another point
Move–move it to another
place in the route.
5. When you are finished making
changes, select Navigate or
press mode to exit.
3. Select the route you want to
delete. A menu appears.
4. Select Delete. Select Yes to
confirm.
Viewing GPS
Information
The Satellite page displays
information about the GPS
signals the Edge is currently
receiving. Press mode to access
the Satellite page.
To delete a route:
1. Press mode to access Menu
mode.
2. Select Navigation > Routes.
52
Edge™ 205/305 Owner’s Manual
NAVIGATION
Each GPS satellite in space has
a specific number that identifies
it. The numbers of several GPS
satellites appear on the circular
graphic in the middle of the page.
The number corresponds to the
current position of that satellite in
space. Each highlighted number
on the graphic corresponds to a
satellite from which the Edge is
currently receiving signals. The
black bars under the graphic
represent the strength of each
satellite signal received (the
number of the satellite appears
below each bar).
About GPS
The Global Positioning System
(GPS) is a satellite-based
navigation system made up of a
network of 24 satellites placed
into orbit by the United States
Department of Defense. GPS
was originally intended for military
applications, but in the 1980s,
the government made the system
available for civilian use. GPS
works in any weather conditions,
anywhere in the world, 24 hours
a day. There are no subscription
fees or setup charges to use
GPS.
For more information, visit
www.garmin.com/aboutGPS.
Edge™ 205/305 Owner’s Manual
53
CUSTOMIZING
CUSTOMIZING
You can customize data fields,
general settings, bike and user
profiles, heart rate and speed
zones, and data recording.
TIP: When finished selecting options
or entering values on your Edge,
press the mode button to exit.
To open the Setup Menu page:
Press mode to access the Main
Menu. Select Settings.
Setting Up Custom
Data Fields
You can set up custom data fields
for the following Edge pages:
• Bike Computer 1
• Bike Computer 2
• Map
• Workouts
• Courses
For a complete listing of the
available data fields for your
Edge, see pages 64–69.
To set data fields:
1. Press mode to access the
Main Menu.
2. Select Settings > Data
Fields.
3. Select one of the pages listed.
54
Edge™ 205/305 Owner’s Manual
CUSTOMIZING
4. Select the number of data
fields you want to see on this
page.
5. Use the and arrows
and enter key to change the
data fields. Press mode when
done.
Sample Data Field
Configurations
Default data fields for Bike
Computer 1 page
6. Repeat for each page you
wish to customize.
Edge™ 205/305 Owner’s Manual
Optional data fields for Bike
Computer 1 page
55
CUSTOMIZING
Changing System
Settings
System settings you can
configure to suit your training
preferences include general Edge
setup, display, map, units, time,
and accessories.
To change general setup:
1. Press mode to access the
Main Menu.
2. Select Settings > System >
General. From this page, you
can change the GPS mode,
Text Language, Tones, and
Page Mode Options.
About Edge
From the General Setup page,
select About Edge to to view
your software version, GPS
version, and unit ID.
56
To use the Edge indoors:
1. Press mode to access the
Main Menu.
2. Select Settings > System >
General > GPS.
3. Select GPS Off.
NOTE: When GPS is off, speed
and distance data are not available,
unless you are using the Edge 305
with the GSC10. The next time you
turn on the Edge, it will search for
satellite signals again.
Edge™ 205/305 Owner’s Manual
CUSTOMIZING
To change display setup:
1. Press mode to access the
Main Menu.
2. Select Settings > System >
Display.
3. From this page, you can
change the Backlight
Timeout and Contrast.
2. Select Settings > System >
Map.
3. Select the map Orientation:
North Up–display the map
with North at the top.
Track Up–display the map
with your direction of travel at
the top.
4. You can also choose to show
or hide User Locations on
the Map page. For more
about locations, see page 48.
To change map setup:
1. Press mode to access the
Main Menu.
Edge™ 205/305 Owner’s Manual
57
CUSTOMIZING
To change units setup:
1. Press mode to access the
Main Menu.
2. Select Settings > System.>
Units.
3. Select units of measure for
distance and elevation.
4. (Edge 305 only). Select Beats
per Minute or % Max HR for
your heart rate data. For more
infomation on heart rate data,
see pages 71–75.
58
To change time setup:
1. Press mode to access the
Main Menu.
2. Select Settings > System >
Time.
3. From this page, you can
change the Time Format,
Time Zone, and Daylight
Saving Time.
Edge™ 205/305 Owner’s Manual
CUSTOMIZING
To manage Edge 305
accessories:
1. Press mode to access the
Main Menu.
2. Select Settings > System >
Accessories.
3. From this page, you can
activate accessories and
select Restart Scan if you
are having trouble receiving
sensor data. Make sure there
are no other sensors around
you.
Edge™ 205/305 Owner’s Manual
Updating User Profile
To update your user profile, see
page 19.
Changing Bike Profile
You can save up to three bike
profiles on the Edge.
To change your bike profile:
1. Press mode to access the
Main Menu.
2. Select Settings > Bike
Profile.
3. Select the bike profile you
wish to use.
4. Make changes to the profile, if
necessary. See page 20.
5. Press mode to exit.
59
CUSTOMIZING
Setting Zones
From the Main Menu, select
Settings > Zones to set up Edge
speed and heart rate zones.
Speed Zones
Your Edge contains several
different speed zones, ranging
from very slow (Climb 4) to very
fast (Max Speed). The values for
these speed zones are entered
by default and may not match
your personal abilities. After you
enter appropriate speed zones,
you can use these zones to set
your speed alerts or use them as
targets in advanced workouts.
For more about alerts, see pages
24–27. For more about advanced
workouts, see pages 33–38.
60
To change your speed zones:
1. Press mode to access the
Main Menu.
2. Select Settings > Zones.
Edge 305 users must also
select Speed Zones.
3. Select the zone you want to
change. Enter a minimum
speed for that zone. Then
enter a maximum speed for
that zone.
Edge™ 205/305 Owner’s Manual
CUSTOMIZING
4. Repeat step 2 for each zone
you want to change.
5. Press mode to exit.
Heart Rate Zones
(Edge 305 only.) A heart rate
zone is a specified range of heart
beats per minute. Heart rate
zones are generally based on
a percentage of your maximum
heart rate. These zones are
numbered from 1 to 5 based on
intensity (1–lowest, 5–highest).
If you know your maximum heart
rate, you can enter it and allow
the Edge to calculate your heart
rate zones automatically. You can
also enter your heart rate zones
manually.
Edge™ 205/305 Owner’s Manual
To base heart rate zones on
your max HR:
1. Press mode to access the
Main Menu.
2. Select Settings > Zones >
HR Zones.
3. Select the Max field, and
enter your maximum heart
rate.
4. Select the Zones field, and
select Based on Max.
61
CUSTOMIZING
To change your heart rate
zones manually:
1. Press mode to access the
Main Menu.
2. Select Settings > Zones >
HR Zones.
3. Select the Zones field, and
select Custom.
4. Select any heart rate zone,
and select a heart rate value
you want to change. Enter a
heart rate value.
5. Repeat step 3 for each heart
rate zone you want to change.
6. Press mode to exit.
NOTE: For more information about
training with heart rate zones, see
page 71.
Data Recording
Data recording controls how the
Edge records detailed data for
your rides. By default, the Edge
uses Smart Recording to record
your movements and create
detailed history. Smart Recording
picks up key points where you
change direction, speed, or heart
rate.
You can also record data every
second. Doing so creates the
most accurate record possible
of your ride. However, with this
62
Edge™ 205/305 Owner’s Manual
CUSTOMIZING
setting, the Edge can only record
up to 3.5 hours of detailed data.
WARNING: When the history is
full, older history data is overwritten
automatically. Be sure to transfer
history to Garmin Training Center
often.
To change data recording
setup:
1. Press mode to access the
Main Menu.
2. Select Settings > Data
Recording.
Edge™ 205/305 Owner’s Manual
3. In the Record Data Points
field, select Every Second or
Smart Recording.
4. Press mode to exit.
63
APPENDIX
APPENDIX
Edge Data Fields
The following table lists all of the Edge data fields and descriptions.
* Denotes a field showing statute or metric units. To change your Edge
unit settings, select Main Menu > Settings > System > Unit.
Data Field
Description
Cadence
Revolutions of the crank
arm per minute.
Cadence - Avg
Average cadence for the
duration of your current
ride.
Cadence - Lap
Average cadence for
current lap.
Calories
Amount of calories burned.
Distance *
Distance traveled on
current ride.
64
Edge
205
Edge
305
•
•
•
•
•
•
•
Edge™ 205/305 Owner’s Manual
APPENDIX
Data Field
Description
Dist – Lap *
Distance traveled in
current lap.
Dist – Last
Lap *
Distance of last completed
lap.
Dist – Paused *
Distance covered while
timer in Auto Pause.
Elevation *
Distance above/below sea
level.
GPS Accuracy * Margin of error for your
exact location. For
example, your GPS
location is accurate to
within +/- 19 ft.
Edge™ 205/305 Owner’s Manual
Edge
205
Edge
305
•
•
•
•
•
•
•
•
•
•
65
APPENDIX
Data Field
Description
Grade
Calculation of rise over
run. For example, if for
every 10 foot you climb
(elevation) you travel 200
feet (distance), your grade
is 5%.
Heading
Current direction you are
traveling.
Heart Rate
Heart beats per minute
(bpm).
Heart Rate
– Avg
Average heart rate for the
duration of your current
ride.
Heart Rate
– Lap
Average heart rate in
current lap.
66
Edge
205
Edge
305
•
•
•
•
•
•
•
Edge™ 205/305 Owner’s Manual
APPENDIX
Data Field
Description
Heart Rate
Zone
Current range of heart
rate (1–5). The default
zones are based on your
maximum heart rate and
user profile.
Laps
Number of laps completed.
Speed *
Current speed.
Speed – Avg *
Average speed (mph or
kph) for the duration of
your current ride.
Speed – Lap *
Average speed in current
lap.
Speed – Last
Lap *
Average speed during the
last full lap.
Speed – Max *
Top speed achieved during
current ride.
Edge™ 205/305 Owner’s Manual
Edge
205
Edge
305
•
•
•
•
•
•
•
•
•
•
•
•
•
67
APPENDIX
Data Field
Description
Speed Zone
Current range of speed
based on default or
custom settings: Climb
1–4, Flat 1–3, Descent,
Sprint, and Max Speed.
Sunrise
Time of sunrise based on
your GPS position.
Sunset
Time of sunset based on
your GPS position.
Time
Stopwatch time.
Time – Avg Lap
Average time to complete
the laps so far.
Time – Lap
Amount of time in current
lap.
Time – Last Lap Length of time to complete
the last full lap.
68
Edge
205
Edge
305
•
•
•
•
•
•
•
•
•
•
•
•
•
•
Edge™ 205/305 Owner’s Manual
APPENDIX
Data Field
Description
Time – Paused
Time elapsed while timer
in Auto Pause.
Time of Day
Current time of day based
on your time settings
(format, time zone, and
daylight saving time).
Total Ascent *
Total elevation gain for
current ride.
Total Descent *
Total elevation lost for
current ride.
Edge™ 205/305 Owner’s Manual
Edge
205
Edge
305
•
•
•
•
•
•
69
APPENDIX
Edge Accessories
Accessory
Part Number
GSC10 speed and cadence sensor
010-10644-00
Heart rate monitor and strap
010-10645-00
Cigarette lighter adapter
010-10563-00
HRM elastic strap replacement
010-10714-00
Carry case
010-10718-00
Mount replacement kit
010-10725-00
GSC10 magnet replacement kit
010-10729-00
AC wall brick charger (Americas)
010-10635-00
AC wall brick charger (Europe)
010-10635-01
USB cable replacement
010-10477-03
To purchase additional accessories for your Edge, go to the Garmin
Web site: http://shop.garmin.com.
70
Edge™ 205/305 Owner’s Manual
APPENDIX
Viewing Heart Rate
Data
You can configure your Edge
to display different heart rate
data: current heart rate, average
heart rate, and heart rate zone,
which can help you determine
the intensity of your training. For
example, you can add heart rate
to your Bike Computer page or
heart rate zone to your Workout
page.
To add or modify data fields, see
page 54.
For a complete listing of available
data fields, see page 64.
Heart rate information is also
displayed as history data. Read
more about history on page 43.
Edge™ 205/305 Owner’s Manual
Training with Heart
Rate Zones
Many cyclists and other athletes
are using heart rate zones to
measure and increase their
cardiovascular strength and
improve their level of fitness.
What are heart rate zones?
A heart rate zone is simply a
range of heartbeats per minute
(bpm). The five commonly
accepted heart rate zones are
numbered from 1–5 according to
increasing intensity. Generally,
heart rate zones are calculated
based on percentages of your
maximum heart rate. See Table 1
on page 73 to learn some of the
effects of exercise as your heart
rate reaches each of these zones
during a workout.
71
APPENDIX
How do heart rate zones
impact your fitness goals?
Knowing your heart rate
zones can help you measure
and improve your fitness by
understanding and applying these
principles:
• Your heart rate is a good
measure of exercise
intensity.
• Training in certain heart
rate zones can help you
improve cardiovascular
capacity and strength.
• Knowing your heart rate
zones can prevent you
from overtraining and
decrease your risk of injury.
72
See Table 1 on page 73 to learn
about the benefits of training in
each heart rate zone.
How can I determine my
heart rate zones?
If you know your maximum
heart rate, you can enter it and
allow the Edge to calculate your
heart rate zones based on the
percentages shown in Table 1 on
page 73. For more information on
setting your heart rate zones, see
page 61.
Edge™ 205/305 Owner’s Manual
APPENDIX
Table 1
Zone
% of Max.
Heart Rate
1
50%–60%
Relaxed, easy pace;
rhythmic breathing
Beginning-level aerobic
training; reduces stress
2
60%–70%
Pace comfortable;
slightly deeper breathing,
conversation possible
Basic cardiovascular
training; good recovery
pace
3
70%–80%
Pace moderate;
more difficult to hold
conversation
Improved aerobic
capacity; optimal
cardiovascular training
4
80%–90%
Pace fast and a bit
uncomfortable;
breathing forceful
Improved anaerobic
capacity and threshold;
improved speed
5
90%–
100%
Pace a sprinting effort,
Anaerobic and
unsustainable for long period muscular endurance;
of time; labored breathing
increased power
Perceived Exertion
Edge™ 205/305 Owner’s Manual
Benefits
73
APPENDIX
Sensor Pairing
What is pairing?
Pairing is the process of matching
sensors, like your heart rate
monitor and GSC10, with your
Edge 305. This process occurs
automatically when you turn on
the Edge and only takes a few
seconds when the sensors are
on and functioning correctly.
Once paired, your Edge will only
receive data from your sensor.
How does it work?
Upon power up, the Edge
will automatically scan for the
sensors you have enabled during
intial setup (see page 12) or
accessories setup (see page 59).
Each sensor has a unique ID.
The Edge learns and saves this
unique ID while pairing the first
74
time. The next time you turn the
Edge on, it will only pair with the
unique sensor ID. If the Edge
does not find the sensor, you
should restart the scan to find
your sensor ID.
Interference
Strong electromagnetic fields
can interfere with your heart rate
monitor and cause your heart
rate to appear unusually high,
freeze, or disappear. Common
sources of interference include
high voltage power lines, electric
motors, computers, televisions,
and mobile phones. After you
move away from the source of
interference, your heart rate
reading should return to normal.
Edge™ 205/305 Owner’s Manual
APPENDIX
Pairing Tips
If you have trouble pairing, or if
the readings are erratic, try the
following suggestions:
• Position the Edge within 3
meters of the sensor while
pairing.
• Stay far away from any
other sensors while pairing.
• Restart scan if your Edge
appears to be paired with
another sensor (see page
59).
• Make sure to enable the
sensors on the Edge (see
page 59).
• Make sure the sensors are
functioning correctly.
• Replace the sensor battery.
Edge™ 205/305 Owner’s Manual
• Clean the sensors. Dirt
and sweat build-up on
the sensors can weaken
signals.
For heart rate monitor only:
• Reapply moisture. Use
electrode gel, water, or
saliva.
• Make sure the heart
rate monitor is snug
against your body. If you
have trouble with erratic
readings, position the
transmitter on your back.
• Wear a cotton shirt, or wet
your shirt. Synthetic fabrics
that rub or flap against
the heart rate monitor can
create static electricity that
interferes with heart rate
signals.
75
APPENDIX
Training with Cadence
Barometric Altimeter
There are two sensors on the
GSC10: one for cadence and one
for speed. Cadence data from
the GSC10 is always recorded.
The speed data from the GSC10
is only recorded and used for
distance calculation when GPS
signal is weak or GPS is turned
off.
Press mode to view the Altimeter
page. Once you start the timer
and begin to move, a black line,
shaded gray below, appears
on the page, plotting elevation
during your ride. At the bottom
of the page, you can view the
zoom level. To zoom in or out
on the page, press the and
arrows. At the top of the map
page, your elevation and total
ascent data appears.
Cadence is your rate of pedaling
or “spinning” measured by the
amount of revolutions of the
crank arm per minute (rpm).
For information about setting and
using cadence alerts, see page
27.
The Edge 305 contains a
barometric altimeter for extremely
accurate elevation and vertical
profile data.
NOTE: You cannot customize the
data fields on the Altimeter page.
76
Edge™ 205/305 Owner’s Manual
APPENDIX
Tire Size and
Circumference
The tire size is marked on both
sides of the tire. To modify your
bike profile, see page 20.
Tire Size
L (mm)
12 x 1.75
935
14 x 1.5
1020
14 x 1.75
1055
16 x 1.5
1185
16 x 1.75
1195
18 x 1.5
1340
18 x 1.75
1350
20 x 1.75
1515
20 x 1-3/8
1615
22 x 1-3/8
1770
22 x 1-1/2
1785
24 x 1
1753
Edge™ 205/305 Owner’s Manual
Tire Size
L (mm)
24 x 3/4 Tubular
1785
24 x 1-1/8
1795
24 x 1-1/4
1905
24 x 1.75
1890
24 x 2.00
1925
24 x 2.125
1965
26 x 7/8
1920
26 x 1(59)
1913
26 x 1(65)
1952
26 x 1.25
1953
26 x 1-1/8
1970
26 x 1-3/8
2068
26 x 1-1/2
2100
26 x 1.40
2005
26 x 1.50
2010
26 x 1.75
2023
77
APPENDIX
Tire Size
L (mm)
Tire Size
L (mm)
26 x 1.95
2050
700 x 23C
2096
26 x 2.00
2055
700 x 25C
2105
26 x 2.10
2068
700 x 28C
2136
26 x 2.125
2070
700 x 30C
2170
26 x 2.35
2083
700 x 32C
2155
26 x 3.00
2170
700C Tubular
2130
27 x 1
2145
700 x 35C
2168
27 x 1-1/8
2155
700 x 38C
2180
27 x 1-1/4
2161
700 x 40C
2200
27 x 1-3/8
2169
650 x 35A
2090
650 x 38A
2125
650 x 38B
2105
700 x 18C
2070
700 x 19C
2080
700 x 20C
2086
78
Edge™ 205/305 Owner’s Manual
APPENDIX
Garmin Training
Center
The Garmin Training Center
software is included in the Edge
product box. Locate the Garmin
Training Center installation
disk and use it to install Garmin
Training Center on your personal
computer.
Garmin Training Center software
allows you to overlay your
ride data onto a map. It offers
interactive analysis tools that
measure your speed, distance,
climb, and descent against
varying terrain, elevation and
more. Create and schedule
custom courses and workouts
or use workout templates and
download them to the Edge.
Edge™ 205/305 Owner’s Manual
To install Garmin Training
Center:
1. Insert the Garmin Training
Center installation disk
into your computer’s disk
drive. Your computer should
automatically run the start-up
file and display a welcome
screen.
2. If the welcome screen does
not appear, click Start and
then click Run…. Type in the
drive letter of your disk drive
followed by “setup” (example:
D:\setup). Then press Enter.
3. When the welcome screen
appears, follow the on-screen
instructions to install Garmin
Training Center.
79
APPENDIX
Using Garmin Training Center
Use the USB cable from the
product box to connect your Edge
to your computer. From the Start
menu, open Garmin Training
Center. For help using Garmin
Training Center, click the Help
menu and select Contents, or
press F1 on your keyboard.
Caring for the Edge
The Edge is constructed of high
quality materials and does not
require user maintenance other
than cleaning. Clean the unit
and the heart rate monitor using
a cloth dampened with a mild
detergent solution and then wipe
dry. Avoid chemical cleaners and
solvents that may damage plastic
components.
80
Storage
Do not store the Edge where
prolonged exposure to
temperature extremes may occur
(such as in the trunk of a car),
as permanent damage may
result. User information, such as
workout history, locations, and
tracks, is retained indefinitely
in the unit’s memory without
the need for external power.
It is always a good practice to
back up important user data
by manually recording it or
downloading it to a personal
computer. Software for the Edge
is included in the product box.
Edge™ 205/305 Owner’s Manual
APPENDIX
Water Immersion
The Edge is waterproof to IEC
Standard 60529 IPX7. It can
withstand immersion in 1 meter of
water for 30 minutes. Prolonged
submersion can cause damage
to the unit. After submersion, be
certain to wipe dry and air dry the
unit before using or charging.
Specifications
Physical
Case: Fully-sealed, high-impact
plastic alloy, waterproof to IEC
60529 IPX7 standards
(waterproof to 1 m for 30
minutes)
Size: 1.75”W x 3.7”H x 0.9”D
(44 mm x 94 mm x 23 mm)
Weight: Approx. 88 g
Edge™ 205/305 Owner’s Manual
Display: 128 x 160 pixels,
1.17”W x 1.44”H (29.65 mm x
36.69 mm)
Antenna: Internal patch
Power
Input: 910 mAh rechargeable,
built-in, lithium-ion battery
Battery Life: 12 hours, typical
use
Performance
Receiver: High-sensitivity
integrated GPS receiver by SiRF
Acquisition Time:
Hot Start: < 1 second
Warm Start: < 38 seconds
Cold Start: < 45 seconds
Update Rate: 1/second,
continuous
81
APPENDIX
GPS Position Accuracy*:
< 10 meters 50%, typical
GPS Velocity Accuracy*:
< 0.05 m/s
Dynamics: Performs to
specifications to 6 g’s
Operating Temperature Range:
-4° F to 140° F (-20° C to 60° C)
Weight: 21 g
Accuracy may be degraded by poor
sensor contact, electrical interference,
and receiver distance from transmitter.
GSC10 Speed and
Cadence Sensor
Physical size: 2.0”W x 1.2”H x
0.9”D (not including adjustable
speed sensing arm)
*Accuracy depends on view of the sky.
99%–clear view; 95%–typical.
Transmission range:
approximately 3 m
Heart Rate Monitor
Battery: CR2032 (3 volts)
Physical size: 13.7”W x 1.4”H x
0.5”D
Transmission range:
approximately 3 m
Battery: CR2032 (3 volts)
Battery life: approximately 3
years (1 hour per day)
82
Battery life: approximately 1.4
years (1 hour per day)
Weight: 25 g
NOTE: Specifications subject to
change without notice.
Edge™ 205/305 Owner’s Manual
APPENDIX
Replacing the Battery
The heart rate monitor and
GSC10 (shown) contain a userreplaceable CR2032 battery.
NOTE: Dispose of the used battery
properly.
4. Use a coin to twist the cover
back into place (arrow points
to locked).
battery cover
To replace the battery:
CR2032
1. Locate the circular battery
battery
cover on the back of the heart
rate monitor or the side of the
GSC10.
2. Use a coin to twist the cover
GSC10 Battery Installation
counter-clockwise until it
is loose enough to remove
(arrow points to unlocked).
battery
cover
3. Remove the cover, and
replace the battery positive
side up. Be careful not to
arrow
damage or lose the o-ring
locked
gasket on the cover.
unlocked
Edge™ 205/305 Owner’s Manual
83
APPENDIX
Product Registration
Help us better support you by
completing our online registration
today! Have the serial number of
your Edge handy and connect to
our Web site (www.garmin.com).
Click the Product Registration
link.
Use this area to record the serial
number (8-digit number located
on the back of the unit) in case
your Edge is lost, stolen, or
needs service. Be sure to keep
your original sales receipt in a
safe place or attach a photocopy
inside the manual.
Serial Number: ___ ___ ___
___ ___ ___ ___ ___
84
Contact Garmin
If you should encounter any
difficulty while using your Edge,
or if you have any questions,
in the U.S.A. contact Garmin
Product Support by phone:
913/397.8200 or 800/800.1020,
Monday–Friday, 8 am–5 pm
Central Time; or go to
www.garmin.com/support/.
In Europe, contact
Garmin (Europe) Ltd. at
44/0870.8501241.
Tell us how you like this
manual! Fill out the Product
Documentation Survey. Go to
www.garmin.com/contactUs/ and
click Product Documentation
Survey.
Edge™ 205/305 Owner’s Manual
APPENDIX
Warning
Failure to avoid the following
potentially hazardous situations
could result in an accident or
collision resulting in death or
serious injury.
When navigating, carefully compare
information displayed on the Edge
to all available navigation sources,
including information from visual
sightings and maps. For safety,
always resolve any discrepancies
or questions before continuing
navigation.
The Edge contains a non-user
replaceable, rechargeable lithium-ion
battery. The GSC10 sensor and heart
rate monitor contain a replaceable
CR2032 battery. The battery may
present a risk of fire or chemical burn
if mistreated.
Edge™ 205/305 Owner’s Manual
•
Do not recharge out of the unit,
disassemble, heat above 140°F
(60°C), or incinerate.
• Keep used battery away from
children.
• Dispose of used battery or unit
properly. Contact your local
waste disposal department for
information on properly disposing
of lithium-ion batteries.
The Edge has no user-serviceable
parts. Should you ever encounter a
problem with your unit, please take
it to an authorized Garmin dealer for
repairs.
Always consult your physician before
beginning or modifying any exercise
program. If you have a pacemaker
or other implanted electronic device,
consult your physician before using a
heart rate monitor.
85
APPENDIX
Caution
Failure to avoid the following
potentially hazardous situations
may result in injury or property
damage.
Use the Edge only as a navigational
aid. Do not attempt to use the
Edge for any purpose requiring
precise measurement of direction,
distance, location, or topography.
This product should not be used to
determine ground proximity for aircraft
navigation.
The Global Positioning System
(GPS) is operated by the United
States government, which is solely
responsible for its accuracy and
maintenance. The government’s
system is subject to changes which
could affect the accuracy and
performance of all GPS equipment,
including the Edge. Although the
Forerunner is a precision navigation
device, any navigation device can
be misused or misinterpreted and,
therefore, become unsafe.
The Edge, GSC10 sensor, and heart
rate monitor are consumer devices,
not medical devices, and could
suffer from interference from external
electrical sources. The heart rate
readings are for reference only and
no responsibility can be accepted for
the consequences of any erroneous
readings.
WARNING: This product, its packaging, and its components contain chemicals
known to the State of California to cause cancer, birth defects, or reproductive harm.
This Notice is being provided in accordance with California’s Proposition 65. If you
have any questions or would like additional information, please refer to our Web site
at www.garmin.com/prop65.
86
Edge™ 205/305 Owner’s Manual
APPENDIX
Limited Warranty
This Garmin product is warranted to
be free from defects in materials or
workmanship for one year from the date
of purchase. Within this period, Garmin
will at its sole option repair or replace
any components that fail in normal
use. Such repairs or replacement will
be made at no charge to the customer
for parts or labor, provided that the
customer shall be responsible for any
transportation cost. This warranty does
not cover failures due to abuse, misuse,
accident, or unauthorized alteration or
repairs.
THE WARRANTIES AND REMEDIES
CONTAINED HEREIN ARE
EXCLUSIVE AND IN LIEU OF ALL
OTHER WARRANTIES EXPRESS
OR IMPLIED OR STATUTORY,
INCLUDING ANY LIABILITY ARISING
UNDER ANY WARRANTY OF
MERCHANTABILITY OR FITNESS
FOR A PARTICULAR PURPOSE,
STATUTORY OR OTHERWISE. THIS
WARRANTY GIVES YOU SPECIFIC
Edge™ 205/305 Owner’s Manual
LEGAL RIGHTS, WHICH MAY VARY
FROM STATE TO STATE.
IN NO EVENT SHALL GARMIN BE
LIABLE FOR ANY INCIDENTAL,
SPECIAL, INDIRECT OR
CONSEQUENTIAL DAMAGES,
WHETHER RESULTING FROM THE
USE, MISUSE, OR INABILITY TO USE
THIS PRODUCT OR FROM DEFECTS
IN THE PRODUCT. Some states do
not allow the exclusion of incidental or
consequential damages, so the above
limitations may not apply to you.
Garmin retains the exclusive right to
repair or replace the unit or software
or offer a full refund of the purchase
price at its sole discretion. SUCH
REMEDY SHALL BE YOUR SOLE
AND EXCLUSIVE REMEDY FOR ANY
BREACH OF WARRANTY.
To obtain warranty service, contact your
local Garmin authorized dealer or call
Garmin Product Support for shipping
instructions and an RMA tracking
number. The unit should be securely
87
APPENDIX
packed with the tracking number
clearly written on the outside of the
package. The unit should then be sent,
freight charges prepaid, to any Garmin
warranty service station. A copy of the
original sales receipt is required as the
proof of purchase for warranty repairs.
Garmin International, Inc.
Tel. 913/397.8200, Fax. 913/397.8282
Garmin (Europe) Ltd.
Tel. 44/0870.8501241, Fax
44/0870.8501251
Online Auction Purchases: Products
sold through online auctions are not
eligible for rebates or other special
offers from Garmin. Online auction
confirmations are not accepted for
warranty verification. To obtain warranty
service, an original or copy of the
sales receipt from the original retailer
is required. Garmin will not replace
missing components from any package
purchased through an online auction.
International Purchases: A separate
warranty is provided by international
88
distributors for units purchased outside
the United States. This warranty
is provided by the local in-country
distributor, and this distributor provides
local service for your unit. Distributor
warranties are only valid in the area of
intended distribution. Units purchased
in the United States or Canada must be
returned to the Garmin service center in
the United Kingdom, the United States,
Canada, or Taiwan for service.
The Edge is fastened shut with screws.
Any attempt to open the case to change
or modify the unit in any way will
void your warranty and may result in
permanent damage to the equipment.
FCC Compliance
The Edge complies with Part 15 of the
FCC interference limits for Class B
digital devices FOR HOME OR OFFICE
USE. These limits are designed to
provide more reasonable protection
against harmful interference in a
residential installation, and are more
Edge™ 205/305 Owner’s Manual
APPENDIX
stringent than “outdoor” requirements.
Operation of this device is subject to
the following conditions: (1) This device
may not cause harmful interference,
and (2) this device must accept any
interference received, including
interference that may cause undesired
operation.
This equipment generates, uses, and
can radiate radio frequency energy
and may cause harmful interference to
radio communications if not installed
and used in accordance with the
instructions. However, there is no
guarantee that interference will not
occur in a particular installation. If
this equipment does cause harmful
interference to radio or television
reception, which can be determined
by turning the equipment off and on,
the user is encouraged to try to correct
the interference by one of the following
measures:
•
•
Increase the separation between
the equipment and the receiver.
• Connect the equipment into an
outlet on a circuit different from that
to which the receiver is connected.
• Consult the dealer or an
experienced radio/TV technician
for help.
The Edge does not contain any userserviceable parts. Repairs should only
be made by an authorized Garmin
service center. Unauthorized repairs or
modifications could result in permanent
damage to the equipment, and void
your warranty and your authority to
operate this device under Part 15
regulations.
Reorient or relocate the receiving
antenna.
Edge™ 205/305 Owner’s Manual
89
APPENDIX
Software License
Agreement
BY USING THE EDGE, YOU AGREE
TO BE BOUND BY THE TERMS AND
CONDITIONS OF THE FOLLOWING
SOFTWARE LICENSE AGREEMENT.
PLEASE READ THIS AGREEMENT
CAREFULLY.
Garmin grants you a limited license
to use the software embedded in
this device (the “Software”) in binary
executable form in the normal operation
of the product. Title, ownership rights,
and intellectual property rights in and to
the Software remain in Garmin.
You acknowledge that the Software
is the property of Garmin and is
protected under the United States
of America copyright laws and
international copyright treaties. You
further acknowledge that the structure,
organization, and code of the Software
are valuable trade secrets of Garmin
and that the Software in source
code form remains a valuable trade
90
secret of Garmin. You agree not to
decompile, disassemble, modify,
reverse assemble, reverse engineer,
or reduce to human readable form the
Software or any part thereof or create
any derivative works based on the
Software. You agree not to export or
re-export the Software to any country
in violation of the export control laws of
the United States of America.
CE Compliance
Hereby, Garmin International
declares that this GPS equipment
is in compliance with the essential
requirements and other relevant
provisions of Directive 1999/5/EC. To
view the full Declaration of Conformity,
visit the Garmin Web site: www
.garmin.com/products/edge305 or
www.garmin.com/products/edge205.
Click Manuals and then select the
Declaration of Conformity.
Edge™ 205/305 Owner’s Manual
INDEX
INDEX
A
accessories 70
advanced workouts 33
creating 34, 39
editing 37
starting 36
alerts 24
cadence 27
distance 24
heart rate 26
speed 25
time 24
altimeter 76
Auto Lap 22
Auto Pause 22
B
backlight 21, 57
turning on and off 8
barometric altimeter 76
battery
charging 6
GSC10 83
heart rate monitor 83
lithium-ion 6
replacing 83
battery icon 9
bike profile 20
buttons 8
C
cadence
alerts 27
data fields 64
icon 9
sensor 20
training 76
calories 46, 64
charging the battery 6
cleaning and care 80
Compass page 41,
49, 50
configure the Edge 12
contact Garmin 84
contrast 21, 57
courses 39
Edge™ 205/305 Owner’s Manual
creating 39
deleting 42
editing 42
starting 40
custom pages 54
D
data fields 54, 64
data recording 62
daylight saving time 58
distance
alerts 24
data fields 64
E
elevation
barometric altimeter
76
course 40
data fields 65, 66,
69
enter button 9
91
INDEX
G
Garmin Training Center
33, 34, 37, 39
installing 79
GPS 53
accuracy 65
turning on and
off 56
GPS version 56
grade 66
GSC10 16, 76
pairing 74
replacing the battery 83
H
heart rate
alert 26
data fields 66
icon 9
zones 26, 61, 71
heart rate monitor
pairing 15, 74
positioning 14
92
replacing the battery 83
viewing data 71
history
deleting 45, 46
totals 46
viewing 43
viewing laps 44
I
icons 9
indoor use 56
installation
Edge 10
GSC10 16
heart rate monitor
14
interference 74
interval workouts 32
L
language 56
lap button 8
locations 48
deleting 50
editing 50
finding 49
marking 48
navigating to 49
M
map 47
zooming 47, 76
map orientation 57
maximum heart rate
61
mode button 8
N
navigation 47
P
pairing 74
pedal magnet 17
power button 8
product support 84
Q
quick workouts 30
Edge™ 205/305 Owner’s Manual
INDEX
R
register your product
84
reset button 8
reset Edge 9
rest time 22
routes 50
creating 50
deleting 52
finding 51
S
satellite icon 9
Satellite page 52
satellite signals
acquiring 13
serial number 84
setup screens 12
Smart Recording 62
software license agreement 90
software version 56
specifications 81
speed
alerts 25
data fields 67
zones 60, 68
spoke magnet 17
storage 80
V
T
warranty 87
waterproof 81
workouts 30
time
changing 58
data fields 68
timer icon 9
time alert 24
time zone 58
setting 19
tire size 20, 77
tones 56
training features 22
viewing history 43
Virtual Partner 28, 30
W
U
unit ID 56
up and down buttons 9
USB 6, 80
user profile
setting 19
Edge™ 205/305 Owner’s Manual
93
For the latest free software updates (excluding map data)
throughout the life of your Garmin products, visit the Garmin
Web site at www.garmin.com.
© Copyright 2005–2006 Garmin Ltd. or its subsidiaries
Garmin International, Inc.
1200 East 151st Street, Olathe, Kansas 66062, U.S.A.
Garmin (Europe) Ltd.
Unit 5, The Quadrangle, Abbey Park Industrial Estate,
Romsey, SO51 9DL, U.K.
Garmin Corporation
No. 68, Jangshu 2nd Road, Shijr, Taipei County, Taiwan
Part Number 190-00580-00 Rev. D