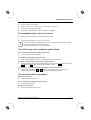
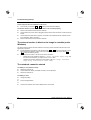
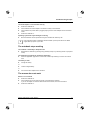
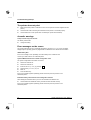
1
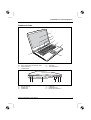
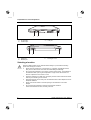
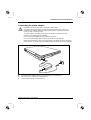
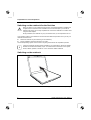
Professional Notebook
Getting Started
AMILO Pro V2030
English
Are there ...
... any technical problems or other questions which you would like to be clarified?
Please contact:
●
our Hotline/Help Desk
(see the included Help Desk list or go to: www.fujitsu-siemens.com/helpdesk)
●
your sales partner
●
your sales outlet
Additional information is provided on the Help Desk list and in the "Warranty" manual. The
"Warranty" manual is included on the "Drivers & Utilities" CD/DVD provided.
The latest information on our products, tips, updates, etc., can be found on the internet under:
www.fujitsu-siemens.com
This manual was produced by
cognitas. Gesellschaft für Technik-Dokumentation mbH – www.cognitas.de
Dieses Handbuch wurde auf Recycling-Papier gedruckt.
This manual has been printed on recycled paper.
Este manual ha sido impreso en papel reciclado.
Ce manuel est imprimé sur du papier recyclé.
Questo manuale è stato stampato su carta da riciclaggio.
Dit handboek werd op recycling-papier gedrukt.
Este manual foi impresso em papel reciclado.
Published by
Fujitsu Siemens Computers GmbH
Printed in the Federal Republic of Germany
AG 08/05
Edition 2
Order No.: 10600630097
Order No.: A26391-K183-Z100-1-7619
10600630097
AMILO Pro V2030
Getting Started
August 2005 edition
Microsoft, MS, MS-DOS, Windows, and Windows NT are registered trademarks of Microsoft
Corporation.
VESA and DPMS are trademarks of Video Electronics Standards Association.
PS/2 is a registered trademark of International Business Machines, Inc.
Pentium is a registered trademark of Intel Corporation, USA.
Acrobat Reader is a trademark of Adobe Systems Incorporated.
All other trademarks referenced are trademarks or registered trademarks of their respective
owners, whose protected rights are acknowledged.
Copyright © Fujitsu Siemens Computers GmbH 2005
All rights, including rights of translation, reproduction by printing, copying or similar methods,
in part or in whole, are reserved.
Offenders will be liable for damages.
All rights, including rights created by patent grant or registration of a utility model or design,
are reserved.
Delivery subject to availability. Right of technical modification reserved.
Contents
Innovative technology ... .................................................................................................................... 1
Notational conventions ......................................................................................................................... 1
Important notes .................................................................................................................................. 2
Declarations of Conformity ................................................................................................................... 2
The "EasyGuide" manual and other sources of information................................................................. 2
Safety notes.......................................................................................................................................... 3
Drivers and utilities ............................................................................................................................... 3
Preparation for use and operation .................................................................................................... 4
Unpacking and checking your notebook............................................................................................... 4
Notebook views .................................................................................................................................... 5
Selecting a location .............................................................................................................................. 6
Connecting the mains adapter.............................................................................................................. 7
Switching on the notebook for the first time.......................................................................................... 8
Switching on the notebook ................................................................................................................... 8
Switching off the notebook ................................................................................................................. 10
Touchpad and touchpad buttons ........................................................................................................ 10
Battery ................................................................................................................................................ 12
Easy Launch keys .............................................................................................................................. 12
Wireless LAN...................................................................................................................................... 13
Switching wireless LAN module on and off ................................................................................ 13
BIOS Setup Utility............................................................................................................................... 13
Troubleshooting and tips................................................................................................................. 14
Reinstalling Windows XP.................................................................................................................... 14
The notebook's date or time is incorrect............................................................................................. 15
The LCD screen of the notebook remains blank ................................................................................ 15
The external monitor stays blank........................................................................................................ 15
The external monitor is blank or the image is unstable (under Windows) .......................................... 16
The notebook cannot be started......................................................................................................... 16
The notebook stops working............................................................................................................... 17
The mouse does not work .................................................................................................................. 17
The printer does not print ................................................................................................................... 18
Acoustic warnings............................................................................................................................... 18
Error messages on the screen ........................................................................................................... 18
Are you missing information?
The detailed operating manual for this device is provided as a PDF file on the included
"Drivers & Utilities" CD/DVD.
A26391-K183-Z100-1-7619, edition 2
Innovative technology ...
and ergonomic design make your AMILO Pro the ideal user-friendly and reliable mobile PC. Your
operating system is already pre-installed and optimally configured. That means you're ready to start
when you switch on your AMILO Pro for the first time.
This "Getting Started" manual tells you how to put your AMILO Pro into operation. If a technical
problem should arise, helpful information can be found in the "Troubleshooting and tips" chapter.
Notational conventions
The meanings of the symbols and fonts used in this manual are as follows:
!
i
Indicates information which is important for your health or for preventing
physical damage. Failure to follow the instructions may lead to loss of
data, invalidate your warranty, destroy the notebook, or endanger your life.
Indicates important information which is required to use the system
properly.
►
Text which follows this symbol describes activities that must be performed
in the order shown.
This font
indicates screen outputs.
This font
indicates programme names, commands, or menu items.
"Quotation marks"
indicate names of chapters, data carriers, and terms that are being
emphasised.
A26391-K183-Z100-1-7619, edition 2
1
Important notes
Important notes
This chapter contains references to other sources of information. It is essential that you observe the
safety information for your notebook.
Declarations of Conformity
You will find the Declaration of Conformity for this device on the Internet at: www.fujitsu-siemens.com.
Hereby, Fujitsu Siemens Computers, declares that the AMILO Pro is in compliance with the essential
requirements and other relevant provisions of Directive 1999/5/EC.
The "EasyGuide" manual and other sources of information
In this "Getting Started" manual you will find information you require to operate your notebook.
Detailed instructions and technical information for your notebook are contained in the "EasyGuide"
manual. This manual is only available as a PDF file. If you connect a printer to your notebook, you
can print out the "EasyGuide" manual.
The programme Adobe Acrobat Reader must be installed to be able to open the "EasyGuide" manual.
If the installation file can be found in the menu Start - All Programs - AddOn, install the programme by
double-clicking on the installation file. If you cannot find the installation file, the programme Adobe
Acrobat Reader has already been preinstalled.
Information Source
Type of Information
Where?
"EasyGuide" manual
(PDF file)
Detailed instructions for
commissioning, operation and
technical information
"Drivers & Utilities" CD/DVD
"Wireless LAN" manual
(PDF file)
Detailed instructions on using
wireless LAN and technical
information
Folder C:\AddOn\EasyGuide
"Drivers & Utilities" CD/DVD
"Safety" manual (printed
and PDF file)
Safety notes
"Drivers & Utilities" CD/DVD
"Warranty" manual (PDF
file)
General guarantee conditions
"Drivers & Utilities" CD/DVD
information files (e.g.
*.TXT, *.DOC, *.CHM,
*.HLP)
Information on utilities and
programs
"Drivers & Utilities" CD/DVD
2
The latest version of the manual
is available for downloading from
the manual server on the Internet:
manuals.fujitsu-siemens.com
A26391-K183-Z100-1-7619, edition 2
Important notes
Safety notes
!
It is essential that you observe the following safety information, as well as safety
information provided in the "Safety" manual.
●
When cleaning the notebook, observe the relevant notes in the "EasyGuide" manual.
●
Your notebook is equipped with numerous security functions that offer you a high level of
security according to a multi-level concept. Details are contained in the "Safety functions"
chapter in the "EasyGuide" manual.
●
If you have a notebook with wireless LAN, you must also observe the additional safety
precautions for devices with wireless LAN in the "Safety" manual.
●
Keep this operating manual together with the device.
If you pass this device on to others, you should also give them the operating manual.
Drivers and utilities
If there is a Windows operating system installed on your notebook the "Drivers°&°Utilities" CD/DVD
is included in the delivery scope.
The "Drivers & Utilities" CD/DVD contains useful software and all drivers required for the optimum
configuration of your notebook. Additional information for your notebook and Readme files for the
software provided are also included in the CD/DVD.
If you need to reinstall your operating system, you can reload the original software and the original
drivers of your notebook onto the hard disk using the "Drivers & Utilities" CD/DVD. You will always
find the drivers available when the device was shipped on the "Drivers & Utilities" CD/DVD.
Driver updates are available at: www.fujitsu-siemens.com.
A26391-K183-Z100-1-7619, edition 2
3
Preparation for use and operation
Preparation for use and operation
!
Please take note of the safety information in the "Important notes" chapter.
This chapter presents the individual hardware components and describes the basics of operating
your notebook.
Upon delivery, the battery can be found in the battery compartment and is not charged. Before
putting the notebook into operation, the battery must be completely charged.
The operating system Windows°XP and drivers required are preinstalled. Before you can use your
notebook for the first time you need to install the supplied software.
Unpacking and checking your notebook
►
Unpack all the individual parts.
►
Check your notebook for damage incurred during transportation.
!
i
4
Should you discover damages incurred during transportation, notify your local sales outlet
immediately!
Do not discard the original packing material of the devices. You may need the packaging
in the future if you need to transport your device.
A26391-K183-Z100-1-7619, edition 2
Preparation for use and operation
Notebook views
1
2
3
4
5
6
4
7
1=
2=
3=
4=
LCD screen
Easy Launch keys and ON/OFF switch
Status indicators
Loudspeakers
1
1=
2=
3=
2
DC jack (DC IN)
Modem port
Optical drive
A26391-K183-Z100-1-7619, edition 2
5=
6=
7=
3
Keyboard
Touchpad
Touchpad buttons
4
4=
5=
6=
5 6
USB ports
Headphone port
Microphone port/Line In
5
Preparation for use and operation
1
1=
2=
PC card slot
FireWire port
3
3=
1
1=
2=
2
LAN port
2
USB ports
Monitor port
3
3=
Kensington Lock
Selecting a location
!
6
Select a suitable location for the notebook before setting it up. Consider the following
points when looking for a location:
●
Never place the notebook on a soft surface (e.g. carpeting, upholstered furniture,
bed). This can block the air vents and cause overheating and damage.
●
Do not place the notebook on your legs for a longer period of time. The underside of
the notebook heats up during normal operation. Longer contac with the skin can
become unpleasant or even result in burns.
●
Place the notebook on a stable, flat, nonslippery surface. Please note that the rubber
feet may mark certain types of surfaces.
●
Keep other objects 100 mm away from the notebook and its mains adapter to ensure
adequate ventilation.
●
Never cover the fan intake or exhaust openings of the notebook or the mains
adapter.
●
Do not expose the notebook to extreme environmental conditions.
Protect the notebook from dust, humidity, and heat.
A26391-K183-Z100-1-7619, edition 2
Preparation for use and operation
Connecting the mains adapter
!
Please take note of the information in the section "Safety notes".
The power cable supplied conforms to the requirements of the country in which you
purchased your notebook. Make sure that the power cable is approved for use in the
country in which you intend to use it.
The mains adapter's AC cable should only be connected to a mains socket if the
notebook is connected to the mains adapter.
Do not use the mains adapter for other notebooks or devices.
Do not use a mains adapter that is not specially intended for this notebook.
Make sure that the rated current of the mains adapter is not higher than that of the power
system to which you connect the mains adapter (see technical data of the mains adapter).
1
3
2
►
Connect the mains adapter cable to the DC jack (DC IN) of the notebook (1).
►
Connect the power cable to the mains adapter (2).
►
Plug the power cable into a mains outlet (3).
A26391-K183-Z100-1-7619, edition 2
7
Preparation for use and operation
Switching on the notebook for the first time
!
When you switch on your notebook for the first time, the supplied software is installed and
configured. Due to the fact that this installation must not be interrupted, you should set
aside enough time for it to be fully completed and connect the notebook to the mains outlet
using the mains adapter.
During installation, the notebook may only be rebooted when you are requested to do so!
Your operating system is pre-installed on the hard disk to facilitate the procedure when you use your
notebook for the first time.
►
Switch the notebook on (see "Switching on the notebook").
►
During installation, follow the instructions on screen.
Consult the operating system manual if there is anything unclear about the requested input data.
i
If there is a Windows operating system installed on your notebook the "Drivers°&°Utilities"
CD/DVD is included in the delivery scope. You will find further information on the system,
drivers, utilities, updates, manuals etc. on this "Drivers & Utilities" CD/DVD.
Switching on the notebook
2
1
1
►
8
Slide the release button in the direction of the arrow (1) and unfold the LCD screen upward (2).
A26391-K183-Z100-1-7619, edition 2
Preparation for use and operation
►
Press the ON/OFF switch
The power-on indicator
to switch the notebook on.
on the notebook is on.
A26391-K183-Z100-1-7619, edition 2
9
Preparation for use and operation
Switching off the notebook
►
Shut down the operating system Windows°XP properly in the Start menu via the Turn off
Computer function.
i
If the notebook is not switched off automatically, press the ON/OFF switch for approx. five
seconds.
1
►
Close the LCD screen so that it locks into place.
Touchpad and touchpad buttons
The touchpad enables you to move the mouse pointer on the screen.
The touchpad buttons allow the selection and execution of commands. They correspond to the
buttons on a conventional mouse.
!
Keep the touchpad clean. Protect it from dirt, liquids, and grease.
Do not use the touchpad if your fingers are dirty.
Do not rest heavy objects (e.g. books) on the touchpad or the touchpad buttons.
10
A26391-K183-Z100-1-7619, edition 2
Preparation for use and operation
1
2
1=
Touchpad
2=
Touchpad buttons
Moving the pointer
►
Move your finger on the touchpad.
The pointer will move accordingly.
Selecting an item
►
Move the pointer to the item you wish to select.
►
Tap the touchpad once or press the left button once.
The item will be selected.
Executing a command
►
Move the pointer to the field you wish to select.
►
Tap the touchpad twice or press the left button twice.
The command will be executed.
Dragging an object
►
Select the desired object.
►
Press and hold the left button and drag the object to the desired position with the finger on the
touchpad.
The item will be moved.
A26391-K183-Z100-1-7619, edition 2
11
Preparation for use and operation
Battery
!
The battery in the notebook is not fully charged at the time of delivery. You must first
charge the battery completely with the mains adapter connected to the power socket (see
the section "Connecting the mains adapter").
The battery supplies your notebook with the necessary power during mobile use. You can increase
battery life by enabling the system's power management features.
Information on how to install and remove the battery, how to maintain and service it, and how to
optimise the battery operating time can be found in the "EasyGuide" manual.
Easy Launch keys
Your notebook is equipped with three Easy Launch keys. You can start the following applications or
functions by pressing a single key.
E-mail
Use this button to start the standard e-mail programme for your system.
Internet
With this button you can start the standard internet browser.
Wireless LAN
With this button you can switch on or off the wireless LAN module.
12
A26391-K183-Z100-1-7619, edition 2
Preparation for use and operation
Wireless LAN
!
The installation of a wireless LAN module not approved by Fujitsu Siemens
Computers GmbH voids the permits (CE!, FCC) issued for this device.
A wireless LAN is integrated in your notebook.
Switching wireless LAN module on and off
►
Press the Easy Launch button
The indicator wireless LAN
i
to switch on or off the wireless LAN module.
light, if the wireless LAN modulw is switched on.
More detailed information on the use of Wireless LAN can be found in the "Wireless LAN"
manual. This manual is provided as PDF file on the "User Documentation" or
"Drivers & Utilities" CD/DVD.
BIOS Setup Utility
With the BIOS Setup Utility you can change a number of parameters and therefore the configuration of
your notebook. For example, you can use the BIOS Setup Utility to set the date and time. The BIOS
Setup Utility can also be used to assign passwords. The "EasyGuide" manual describes how to run
and end the BIOS Setup Utility.
A26391-K183-Z100-1-7619, edition 2
13
Troubleshooting and tips
Troubleshooting and tips
Take note of the safety notes in the "Safety" manual, when you connect or disconnect
cables.
!
If a fault occurs, try to correct it as described. If you fail to correct the problem, proceed as follows:
►
Make a note of the steps and the circumstances that led to the fault. Also make a note of any
error messages displayed.
►
Switch the notebook off.
►
Please contact the Hotline/Help Desk.
The telephone numbers are contained in the supplied help desk list. Please have the following
information ready when you call:
–
–
–
–
–
–
The model name and serial number of the notebook. The serial number is located on a
sticker on the underside of the notebook.
Notes of any messages that appear on the screen and information on acoustic signals.
Any changes you have made to the hardware or software after receiving the notebook.
Any changes you have made to the BIOS Setup Utility settings after receiving the
notebook.
Your system configuration and all peripheral devices connected to your system.
Your sales contract.
Reinstalling Windows XP
You can reinstall the Windows XP operating system with the "Windows XP Recovery CD" and the
"Drivers & Utilities" CD/DVD.
The instructions are provided on the case of the Recovery CD.
!
During the reinstall process your personal files and any installed programs will be deleted.
We advise that you backup your files to an external hard drive, or CD / DVD disk before
you start.
►
Switch the notebook on.
►
Press the F12 key when the message F2: Setup F12: Boot Menu appears on the
screen.
►
Insert the "Windows XP Recovery CD" into the optical drive.
►
Select the CD-ROM and press the Enter key.
►
Follow the instructions on the screen.
After the installation you must install all the drivers again. Some installed hardware components will
not be correctly supported until this has been done.
► Insert the "Drivers & Utilities" CD/DVD into the optical drive.
The CD/DVD starts automatically.
14
A26391-K183-Z100-1-7619, edition 2
Troubleshooting and tips
►
Click on the Desk Update button.
►
Select Automatic driver installation (Express) and click Start installation.
►
Follow the instructions on the screen.
►
Restart your notebook when the driver installation is completed.
The notebook's date or time is incorrect
►
Double-click on the clock in the task bar and adjust the time.
or
►
Set the time and/or date in the BIOS Setup menu Main.
i
If the date and time are repeatedly incorrect when you switch on the notebook, the buffer
battery that supplies the internal clock is dead.
Contact your sales outlet or our hotline/help desk.
The LCD screen of the notebook remains blank
The screen power-management feature may be active.
►
Press any key to activate the display.
The notebook is in Standby or Suspend mode.
►
Press the Suspend/Resume button to end the Standby or Suspend mode.
The display angle or brightness may not be properly adjusted.
►
Change the display angle and set the brightness by pressing the key Fn together with the key
F8 (darker) or F9 (brighter) until the picture appears correct.
The notebook is set so that the picture only appears on the external screen.
►
Press the key combination Fn + F3 to switch over the display to the LCD screen or to
specify the simultaneous display on the LCD screen and the external screen.
The external monitor stays blank
Monitor is switched off
►
Switch the external monitor on.
Power saving has been activated (screen is blank)
►
Press any key to continue.
Brightness is set too dark
►
Adjust the brightness of the monitor.
A26391-K183-Z100-1-7619, edition 2
15
Troubleshooting and tips
Screen output is set to the notebook’s LCD screen
►
Press the key combination Fn + F3 (selecting internal/external display).
The external monitor's power cable or data cable is not connected properly
►
Switch off the external monitor and the notebook.
►
Check whether the power cable is plugged properly into the external monitor and into the power
socket.
►
Check whether the data cable is properly connected to the notebook and the external monitor
(if it is plugged in with a connector).
►
Switch on the external monitor and the notebook.
The external monitor is blank or the image is unstable (under
Windows)
The wrong external monitor has been selected or the wrong screen resolution has been set for the
application programme.
►
►
End the application programme under Windows with Alt + F4 . If the fault continues to occur
after ending the programme, switch over to the notebook's internal LCD screen with Fn +
F3 . Change the following setting:
Select the correct monitor or set the correct screen resolution.
–
Setting the screen resolution: Select Start - (Settings) - Control Panel - Display - Settings and
then the screen resolution you require in the Resolution field.
–
Selecting the monitor: Select the correct monitor under Start - (Settings) - Control Panel Display - Settings - Advanced Properties - Monitor - Modify.
The notebook cannot be started
The battery is not installed correctly.
►
Switch the notebook off.
►
Check whether the battery is installed correctly in its compartment.
►
Switch the notebook on.
The battery is dead.
►
Charge the battery.
or
►
Install a charged battery.
or
►
16
Connect the notebook via its mains adapter to the mains outlet.
A26391-K183-Z100-1-7619, edition 2
Troubleshooting and tips
The mains adapter is not connected correctly.
►
Switch the notebook off.
►
Check whether the mains adapter is connected correctly to the notebook.
►
Check whether the power cable is plugged properly into the mains adapter and into the mains
outlet.
►
Switch the notebook on.
Operating system files may be damaged or missing.
►
Boot the notebook via the optical drive using the "Windows XP Recovery CD".
i
If the operating system is reinstalled, all data created up to that point will be lost. Make
regular back-up copies of your data.
The notebook stops working
The notebook is in Standby or Suspend mode.
►
Reactivate the notebook by pressing a key (Standby mode) or by switching it back on (Suspend
mode).
The application programme has caused the malfunction.
►
Close the application programme or restart the notebook by switching it on/off or with a warm
boot.
The battery is dead.
►
Charge the battery.
or
►
Install a charged battery.
or
►
Connect the mains adapter to the notebook.
The mouse does not work
Mouse is not connected
►
Switch the notebook off.
►
Check whether the mouse cable is correctly connected to the notebook.
If you use an adapter or extension lead with the mouse cable, check the connections.
►
Switch the notebook on.
A26391-K183-Z100-1-7619, edition 2
17
Troubleshooting and tips
The printer does not print
►
Make sure that the printer is switched on and is on-line (see the manuals supplied with the
printer).
►
Check that the cable connecting the notebook and the printer is connected properly.
►
Check whether the correct printer driver is loaded (see printer documentation).
Acoustic warnings
A beep sounds every few seconds.
The battery is almost flat.
►
Charge the battery.
Error messages on the screen
This section describes the error messages generated by the BIOS Setup Utility. Error messages
displayed by the operating system or programmes are described in the relevant documentation.
CMOS Battery Bad
If the error message occurs repeatedly, the buffer battery in the notebook is flat.
Contact your sales outlet or our hotline/help desk.
System CMOS checksum bad - Default configuration used
The system configuration information is incorrect.
►
Switch the notebook off.
►
Switch the notebook on.
►
Enter the BIOS Setup Utility by pressing F2 .
►
Select the entry Load Setup Defaults.
►
Mark OK.
►
Press the Enter key.
If the error message appears repeatedly, please contact the place of purchase or our
hotline/help desk.
Extended memory failed at offset: xxxx Failing Bits: zzzz zzzz
When testing the extended memory an error has resulted at the address xxxx.
►
Check whether the additional memory module has been inserted correctly.
If the error message appears repeatedly, please contact the place of purchase or our
hotline/help desk.
18
A26391-K183-Z100-1-7619, edition 2
Troubleshooting and tips
Keyboard controller error
►
Switch the notebook off with the ON/OFF switch.
►
Wait 3 - 5 seconds and switch on the notebook again.
If the error message appears repeatedly, please contact the place of purchase or our
hotline/help desk.
Keyboard error
If you use an external keyboard:
►
Check the connection and reboot the notebook.
If the error message appears repeatedly, please contact the place of purchase or our
hotline/help desk.
nn Stuck key
►
Make sure that no key is pressed.
If the error message appears repeatedly, please contact the place of purchase or our
hotline/help desk.
Press <F1> to resume, <F2> to SETUP.
This error message appears if an error occurs during the self-test before starting the operating
system.
►
Press the F1 function key to start the operating system.
►
Enter the BIOS Setup Utility by pressing F2 .
Real Time clock error
►
Please contact your sales outlet or our Hotline/Help Desk.
nnnnK Shadow RAM failed at offset: xxxx Failing Bits: zzzz
►
Please contact your sales outlet or our Hotline/Help Desk.
System battery is dead - Replace and run SETUP
►
Please contact your sales outlet or our Hotline/Help Desk.
System cache error - Cache disabled
►
Please contact your sales outlet or our Hotline/Help Desk.
nnnnK System RAM failed at offset: xxxx Failing Bits: zzzz
If the error message appears repeatedly, please contact the place of purchase or our
hotline/help desk.
System timer error
►
Please contact your sales outlet or our Hotline/Help Desk.
A26391-K183-Z100-1-7619, edition 2
19