1
8288681100
VF-16 Owner’s Manual
<Supplement>
Save/Load using CD-RW
The VF-16 software has been upgraded
to Version 2.0 which allows save/load of
song data using a CD-RW drive.
This supplementary manual only describes the operations and notes regarding the save/load functions of song data
using a CD-RW drive.
See "Chapter 6 Save/Load of song data"
on the main manual about details for
save/load using SCSI, S/P DIF and adat.
Please read this first!
<Caution on CD-RW drive>
Check by either of the following methods the model number and manufacturer of CD-R/RW
drives which we confirmed the SAVE/LOAD operation of song data.
With a CD-R/RW drive other than we confirmed the operation, SAVE/LOAD of song data cannot be
properly executed.
<Customers who are accessible to Fostex internet web site>
Confirm the model number and manufacturer of operation-confirmed CD-R/RW drive by accessing the following URL.
<http://www.fostex.co.jp/int/pages/sets/faqset.htm>
<Customers who are not accessible to Fostex internet web site>
Contact your local Fostex distributor.
<Care and handling of CD-RW/CD-R discs>
With a CD-RW drive, you can use not only CD-RW discs but also CD-R discs. Note that CD-R discs
has some restrictions as shown below.
CD-RW disc
CD-R disc
You can save (record) data to a disc as
many times required. Note that when
saving new data, it is recorded after the
previously recorded data is erased.
In other words, every time you save new
data, all disc data is rewritten. (See "Saving data" described later.)
You can save (record) data to a disc only
once. You cannot save data to a recorded
disc. You can, of course, load data as
many times as required.
<Note>
Do not playback a CD-RW/CD-R disc which has been recorded VF-16 data by other devices than
FOSTEX machines. Otherwise, the drive or system used may be damaged.
<About data writing and reading speeds for data save/load>
The writing and reading speeds for data save and load of the VF-16 are automatically set as
below.
• Writing speed: according to a CD-RW drive, used however the maximum speed is 8 times.
• Reading speed: according to a CD-RW drive used
The writing speed depends on a CD-RW drive but it is limited to 8 times.
For save/load of the VF-16 data, use discs that can be written at 4 times or higher speed. Do not
use discs that only can be written at realtime or twice speed.
2
Save/load of Song Data Using a CD-RW drive
Unlike save/load using other SCSI devices (zip, MO, etc.), save/load using a CD-RW drive is took
place as illustrated below. Read the following description together with the description on page
80 in the main manual.
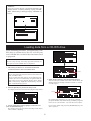
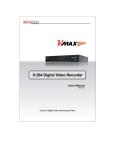
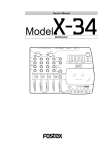
• Save
You can only a single selected program data to a
disc regardless of the program data amount.
You cannot save more than one program data
even if there are enough disc space.
However, you can save a program data to more
than one disc if the data amount is larger than a
disc space.
As shown on the right, you can save almost all
necessary information such as song data of all
tracks (real and additional tracks) and mixer
scene data, as with using other SCSI devices.
Trk 1 & 2 & 3 & 4 & 5 & 6 &7
& 8 & 9 & 10 & 11 & 12 & 13
& 14 & 15 & 16 & 17 & 18 &
19 & 20 & 21 & 23 & 24
Program 1 (P01)
Save
Program 2 (P02)
Program 99 (P01)
Current drive of the VF-16
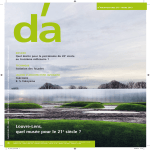
• Load
Trk 1 & 2 & 3 & 4 & 5 & 6 &7
& 8 & 9 & 10 & 11 & 12 & 13
& 14 & 15 & 16 & 17 & 18 &
19 & 20 & 21 & 23 & 24
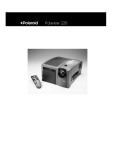
Unlike data load using other SCSI drives, data
loading using a CD-RW drive is took place after a
"new program" is created in the current drive
(the load destination). You cannot overwrite an
existing program with the loaded data.
The newly created program is numbered the next
number to the highest existing program number.
Load
Program 1 (P01)
Program 2 (P02)
New Program
Current drive of the VF-16
<Note>
You can save or load data using a CD-RW drive only with the FDMS-3 (Fostex Digital Management System-3) format. Note that, unlike other SCSI devices, you cannot save or load data with
the WAV file format. See the main manual for saving/loading a WAV file.
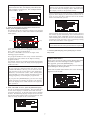
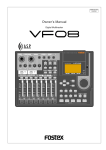
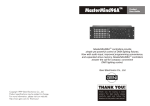
<Notes for using a CD-RW drive>
• Use a high-impedance SCSI cable for connection between the VF-16 and a CD-RW drive. The
cable length should be as short as possible.
• Only a single SCSI device can be connected to the VF-16 SCSI port. Attach an active terminator to
the CD-RW drive used. If you attach a terminator that is not active, you may not be able to save
or load data correctly.
• When a CD-RW drive connected to the VF-16 is turned on, only the eject switch of the drive can
be used. Other controls such as the level control and the play button are not effective.
DIGITAL
WARNING:
CAUTION
RISK OF ELECTRIC SHOCK
DO NOT OPEN
AVIS:
RISQUE DE CHOC ELECTRIQUE NE PAS OUVRIR
AUX SEND
TO REDUCE THE RISK OF FIRE OR ELECTRIC
SHOCK, DO NOT EXPOSE THIS EQUIPMENT
TO RAIN OR MOISTURE.
ST OUT
MIDI
IN
R
MULTITRACKER
DIGITAL / DATA
FOOT SW
SCSI
POWER
AC-IN
OUT
IN
L
OUT
CD-RW
Half pitch 50-pin type
connector
High impedance SCSI cable
Attach an active
terminator
3
Saving data using a CD-RW drive
In the following procedure, we assume that a CDRW drive is connected to the VF-16 SCSI port
and a non-recorded CD-RW disc is used.
<Note>
Do not carry out any VF-16 key operation until the access process to the CD-RW disk is completed.
1. After turning on both the VF-16 and the CD-RW drive
connected, insert a disc to the CD-RW drive.
5. After selecting a program, press the [ENTER/YES] key.
The display shows a screen as below.
2. Press the [SETUP] key of the VF-16 to enter the setup
mode.
The display shows the screen for selecting the setup menu.
Flashing
In the example above, the selected program data will be
saved to a CD-RW disc with the backup number "B01".
The program title is copied to the backup title (you can
not edit it).
By rotating the [JOG] dial when the above screen is shown,
you can also select "Eject", besides "B01."
If you select "Eject" and then press the [ENTER/YES] key,
the disc will be ejected.
3. Use the [JOG] dial to select (highlight) "Save PGM" and
press the [ENTER/YES] key.
The display shows the screen for selecting a save device,
where "SCSI" is flashing.
6. While "B01" is shown, press the [ENTER/YES] key.
The VF-16 starts the save operation. The recorded space
shown on the display is counted down while the save
operation progresses. It will take some time for saving
all data. The following display example shows that the
data of the selected program number is being saved to
the backup number "B01."
Flashing
When completing the save operation, "Save Completed!"
appears on the display (as shown below) and the VF-16
stops access to the drive, while the disc in the CD-RW
drive is automatically ejected.
4. While "SCSI" is flashing, press the [ENTER/YES] key.
After showing the model name of the CD-RW drive, the
display shows the screen for selecting a program to be
saved (the program number of the selected program
flashes).
Flashing
Recorded
space
When saving data to more than one disc, the first disc
will be ejected when it is full (i.e. there is no more
recording space on the disc), while "Insert Disk!" appears
on the screen. After inserting the second disc, the VF-16
automatically resumes the save operation.
After completing the save operation, the final disc is
ejected and the above screen appears. (See <Note> on the
next page.)
By rotating the [JOG] dial, you can select a desired
program number/title from among available programs
in the VF-16 current drive. The recorded space of the
selected program is also shown.
If you select a program which requires more than one
disc for saving, the display shows the required number
of discs (see the screen example below).
7. Press the [EXIT/NO] key (or the [STOP] key) to exit the
setup mode.
4
<Note for saving data to more than one disc>
If you save data to more than one disc, we recommend to put a number on each disc in the saving
order (such as DISC-1, DISC-2, etc.) so that you will
easily know the order for inserting discs when loading data.
<Note>
You cannot abort the save operation before completed. Especially during the save operation to more
than one disc, if you happen to press the [EXIT/NO]
key while removing or inserting a disc, you have to
redo the save operation from the beginning with
the first disc.
Flashing
Flashing
<About save error>
If an error occurs for some reason during the
save operation, the error message as below
appears.
• To erase the existing (recorded) data
Press the [ENTER/YES] key while both "ERASE" and
"Sure?" are flashing.
The display shows the screen below and the VF16 starts erasing the disc.
If it appears, press the [EXIT/NO] key.
The display returns to the previous screen
before performing the save operation.
As the erase process progresses, the number of
flashing "*" increases from left to right.
Note that saved data before the error message
appears is all invalid.
Flashing
Flashing
<Note>
If the message above appears while saving data
to a CD-R disc, you can no longer use the disc.
<Hint 1>
Increases as the process progresses.
In the description for saving data above, we
assume to use a non-recorded CD-RW disc.
If you use a recorded disc (including a disc
on which computer data is recorded), also
note the following.
Immediately after completing erasing the disc, the
display shows the same screen (for selecting a program to be saved) which appears after step 4 is
performed. Hereafter, perform the same procedure as described above.
By performing step 4 in the save operation
procedure shown above ("While "SCSI" is
flashing, press the [ENTER/YES] key.") when
a recorded disc is inserted, the display shows
a warning message, followed by the confirmation screen (where "Sure?" flashes).
• To eject the disk
Use the [JOG] dial to highlight "Eject" (flashing)
and press the [ENTER/YES] key.
The disc is ejected while the display shows "Insert
Disk!."
By inserting a disc, you can start the save operation again from the beginning.
With this screen, you can choose whether erasing the recorded data or ejecting the disc.
5
<Hint 2>
If you try to save data to a recorded CD-R disc, the
display shows a warning message saying "Not Writable!", followed by a message saying "Insert Disk" as
below.
Loading data from a CD-RW drive
In the following procedure, we assume that a CDRW drive is connected to the VF-16 SCSI port
and a CD-RW disc to which data has been saved
is prepared.
<Note>
Do not carry out any VF-16 key operation until the access process to the CD-RW disc is completed.
1. After turning on both the VF-16 and the CD-RW drive
connected, insert the disc to the CD-RW drive.
Flashing
<Note>
If you load song data which is saved to more than one
disc, set DISC-1 first.
If you set the other disc and go on the following procedure, the VF-16 automatically recognized that the
disc order is not correct and the display shows "Wrong
Disk", followed by "Illegal No!" momentarily, and the
disc is automatically ejected.
4. While "SCSI" is flashing, press the [ENTER/YES] key.
After showing the model name of the CD-RW drive, the
display shows the backup number and title, as well as
recorded space.
2. Press the [SETUP] key to enter the setup mode.
The display shows the screen for selecting the setup menu.
Flashing
By rotating the [JOG] dial, you can select a desired
program number/title from among available programs
in the VF-16 current drive. You can also select "Eject."
3. Use the [JOG] dial to select (highlight) "Load PGM" and
press the [ENTER/YES] key.
If you select "Eject" and press the [ENTER/YES] key, the
disc is ejected.
The display shows the screen for selecting a load device,
where "SCSI" is flashing.
6
<Note>
When you load song data which is saved to
more than one disc, the display also shows the
disc number currently set. The example below
shows DISC-1 is set.
If there is not enough available space for loading on
the current drive, the display shows "Disk Full!" and
the display returns to the previous screen.
When completing the load operation, "Load Completed!"
appears on the display (as shown below) and the VF-16
stops access to the drive, while the disc in the CD-RW
drive is automatically ejected.
Flashing
Lighting
5. While the desired backup number/title is shown on the
display, press the [ENTER/YES] key.
The display shows the screen for creating a new program
on the current drive, to which data will be loaded ("New
PGM" lights).
When loading data from more than one disc, the first
disc will be ejected immediately after all disk data has
been loaded, while "Insert Disk!" appears on the screen.
After inserting the second disc, the VF-16 automatically
resumes the load operation. After completing loading
all the discs, the above screen appears.
Lighting
Flashing
<Note>
You cannot abort the load operation before completed.
As described earlier, when loading data from a CD-RW
drive, the VF-16 creates a new program on the current
drive, which is the load destination.
Therefore, "New PGM" is shown on the right of the
flashing program number.
7. Press the [EXIT/NO] key (or the [STOP] key) to exit the
setup mode.
The program number for the newly created destination
program is the next number to the highest existing
program number.
For example, if there are 8 existing programs (P01 through
P08) on the current drive, the newly created program is
numbered "P09."
<About load error>
If an error occurs for some reason during the load
operation, the error message as below appears.
If it appears, press the [EXIT/NO] key.
The display returns to the previous screen before
performing the load operation.
<Note>
If you rotate the [JOG] dial while the above screen
("Destn PGM Select") is shown, you can select an existing program on the current drive as the destination.
However, as mentioned earlier, when loading data
using CD-RW you cannot actually load data to the existing program by overwriting the program data.
Note that loaded data before the error message
appears is all invalid.
If you press the [ENTER/YES] key (see the next step)
while selecting an existing program as the destination, the display shows "Void!" and the VF-16 ignores
the operation.
6. While "New PGM" is shown, press the [ENTER/YES] key.
The VF-16 starts the load operation. The recorded space
shown on the display is counted down while the load
operation progresses. It will take some time for loading
all data. The following display example shows that the
data of the backup number "B01" is being loaded to "P08"
which is newly created on the current drive.
<Display example for loading>
7
FOSTEX CORPORATION
3-2-35 Musashino, Akishima-shi, Tokyo, Japan 196-0021
FOSTEX AMERICA
15431 Blackburn Ave., Norwalk, CA 90650, U. S. A.
© PRINTED IN JAPAN JAN. 2001 8288 681 100 FX