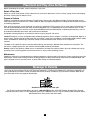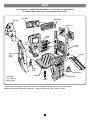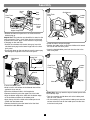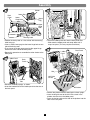
1
®
Fisher-Price
Instructions
Backyard Treehouse
™
Model Number: 75972
If you experience a problem with this product, or are missing a part, please call us
at 1-800-432-KIDS, rather than return this product to the store.
Please save these instructions for future reference.
Adult assembly is required.
No tools needed for assembly.
Weight Limit: 300 lbs.
The Fisher-Price® Backyard Treehouse™ is designed to easily attach to other
Fisher-Price ® outdoor playsets equipped with a connecting feature. Do not attach other
manufacturer’s playsets to this Fisher-Price® product.
Ages: 11/2 to 6 years.
WARNING
Falls onto hard surfaces could result in head or other serious injuries.
Never put on concrete, asphalt, wood, packed earth or any other hard surface.
Carpet over hard floors may not prevent injury.
CAUTION
Please keep small parts and plastic bags out of children’s reach.
Dispose of plastic bags properly.
Important Safety Information
• Do not climb on the Backyard Treehouse™ until it has been properly assembled by an adult.
• Only five children should use the Backyard Treehouse™ at one time.
• The total weight limit for the Backyard Treehouse™ is 300 lbs.
• As with any climbing equipment, adult supervision is essential to ensure that children play safely.
• Be sure children are dressed appropriately to avoid potential hazards while using the Backyard Treehouse™. Children
should not wear loose clothing such as ponchos or scarves. Attire should include well-fitting shoes.
• Do not climb on the Backyard Treehouse™ when it is wet.
• Do not use the Backyard Treehouse™ in a manner that is unintended.
• Do not attach other manufacturer’s playsets to this Fisher-Price® product.
2
Placement and Play Area Surfacing
Before assembling this product, select and prepare a play area.
Select a Play Area
Select an area on level ground at least 6 feet from any structure or obstruction such as a fence, garage, house, overhanging
branches, washing lines or electrical lines.
Prepare a Surface
Following are guidelines from the Consumer Product Safety Commission’s Handbook for Public Playground Safety to minimize injuries that can result from falls. These guidelines apply to playground equipment including but not limited to swing sets
and climbing equipment.
Hard surfacing materials are not suitable for use under this equipment. Earth surfaces such as soils and hard packed dirt are
also not recommended because their shock absorbing properties can vary depending on climatic conditions such as moisture and temperature. Grass and turf are not recommended because their effectiveness in absorbing shock during a fall can
be reduced considerably due to wear and environmental conditions.
Acceptable surfacing materials are available in two basic types: loose-fill and unitary.
Loose-fill materials can have acceptable shock absorbing properties when installed at a sufficient uncompressed depth of at
least 6 inches. These materials include sand (fine and coarse), gravel (fine and medium) and shredded wood products (wood
mulch, shredded bark, wood chips). Loose-fills should not be installed over hard surfaces such as asphalt or
concrete.
The depth of any loose-fill material could be reduced during use resulting in different shock-absorbing characteristics. For
this reason, a depth greater than the minimum recommended should be considered.
Unitary materials are generally rubber mats or a combination of rubber-like materials held in place by a binder that may be
poured in place at the playground site and cures to form a unitary shock absorbing surface.
Maintenance
Periodically check to be sure equipment has adequate protective surfacing under and around it. Inspect surfacing material for
deterioration. Check loose surfacing material for foreign objects or debris. Also look for compaction and reduced depth, with
special attention to heavy use areas such as those under swings and slide exit regions.
Message to Parents
Thank you for purchasing the Fisher-Price® Backyard Treehouse™. The Backyard Treehouse™ should be assembled by an
adult, preferably by two adults. Please read these instructions carefully and identify all parts before assembly. Refer to the
parts illustration on the next page for identification.
Questions? We’d like to hear from you!
Call Fisher-Price® Consumer Affairs, toll-free at 1-800-432-KIDS, 8 AM - 6 PM EST Monday through Friday. Hearingimpaired consumers using TTY/TDD equipment, please call 1-800-382-7470. Or, write to: Fisher-Price® Consumer Affairs,
636 Girard Avenue, East Aurora, New York 14052.
3
Parts
If you experience a problem with this product, or are missing a part, please call us
at 1-800-432-KIDS, rather than return this product to the store.
Left Roof
Right Roof
Tree Top
Shutter- 2
Fish
e
r-Pri
c
e
®
Ladder
Panel
Table
Top
Back
Panel
Front
Trunk
Panel
Ramp
Safe
Door
Mailbox Door
Not Shown:
Vinyl Label - 2
Box of Chalk
Platform
Wall Panel
Phone
• Please save all packaging material until assembly is complete to ensure that no parts are discarded.
• Before assembling the Backyard Treehouse™, please wipe each part with a clean, dry cloth.
4
Assembly
Upper
Peg
Chalkboard
Safe
Door
Front Trunk
Panel
Front Trunk
Panel
Ladder
Panel
Lower
Peg
Lower
Hinge
Hole
Slots
Upper Hinge Hole
• Position the front trunk panel on a flat surface with the
inside facing up.
Helpful Hint: The safe door may be difficult to attach to the
front trunk panel. Place a cloth under the front trunk panel
to protect the surface. Apply a small amount of liquid soap
to the pegs on the safe door.
• Position the safe door with the dial facing up. Insert the
safe door lower peg into the lower hinge hole in the front
trunk panel.
• Firmly push down on the safe door to snap the upper peg
into the upper hinge hole in the front trunk panel.
Chalkboard
Label
Hooked
Tabs
Safe
• Stand the front trunk panel upright.
• Position the ladder panel so that the chalkboard is toward
the safe on the front trunk panel.
• Insert the hooked ladder panel tabs into the slots in the
front trunk panel.
Upper Half
Front Trunk
Panel
Label
Ladder
Panel
Ladder
Panel
Bottom
Edge
Slots
• Locate the ladder panel.
• Make sure the area where the chalkboard label will be
applied is clean and dry.
• Bend the chalkboard label in half lengthwise.
• Remove the backing from the upper half of the label.
• Align the bottom edge of the label with the bottom edge
of the chalkboard outline on the ladder panel.
• Apply the top half of the label to the ladder panel and
smooth the label downward.
• Remove the backing from the lower half of the label.
• Smooth the label downward.
Tabs
Helpful Hint: You may need the help of another person with
this assembly step.
• Turn the assembly upside down so that the ladder panel
rests on a flat surface.
• Lift the assembly up and pound the ladder panel onto the
surface to lock the tabs on the ladder panel into the slots
in the front trunk panel.
5
Assembly
Mailbox Label
Front Trunk
Panel
Mailbox Door
Pegs
Hinge
Holes
Table
Top
Wall
Panel
Supports
Tab
Ladder
Panel
• Make sure the area where the mailbox label will be
applied is clean and dry.
• Bend the mailbox label in half and remove the backing.
• Apply the mailbox label to the mailbox door.
• For best adhesion, try to avoid applying the label more
than once.
Please Note: The mailbox label may already be applied to
the mailbox door.
• Position the wall panel on a flat surface with the outside
facing up.
• Insert one of the mailbox door pegs into one of the hinge
holes in the wall panel.
• Fit and snap the other mailbox door peg into the other
hinge hole in the wall panel.
• Position the assembly so that the ladder panel is laying on
a flat surface.
Helpful Hint: Push the front trunk panel back, to allow for
easier assembly.
• With the table top at an angle, completely insert the tab
on the table top into the slot above the supports on the
ladder panel.
• Rotate the table top toward the supports.
Table Top
Table Top
Ladder
Panel
Wall
Panel
Ladder
Panel
Ladder
Panel
Telephone
Receiver
Tabs
Incorrect
Correct
Front Trunk
Panel
• Check to be sure the table top is properly attached to the
ladder panel. There should be no gap between the table
top and the ladder panel.
• Position the assembly so that the front trunk panel is
laying on a flat surface.
• Position the wall panel so that the telephone receiver faces
the ladder panel.
• Insert the tabs on the wall panel into the slots in the front
trunk panel.
• Push down firmly on the wall panel to snap the tabs
in place.
6
Assembly
Shutter
Back
Panel
Lower Peg
Lower
Hinge Hole
Upper
Peg
Upper
Hinge
Hole
Warning Label
• Position the back panel on a flat surface with the warning
label facing up.
• Insert a shutter lower peg into the lower hinge hole on one
side of the back panel.
• Fit and snap the shutter upper peg into the upper hinge
hole on the same side of the back panel.
• Repeat this procedure to assemble the other shutter to the
back panel.
Ladder Panel
Back
Panel
Ladder
Panel
• To lock the ladder panel tabs into the back panel slots:
-Climb onto the ladder panel and stomp down until it
snaps into place. (This may require alot of force.)
Ladder
Panel
Back Panel
Back
Panel
Slots
Slot
Half Circle
Cut-out
Hooked
Tabs
Slots
Long Tabs
• Stand the assembly upright, as shown.
• Insert the hooked tabs on the ladder panel into the slots in
the back panel.
Platform
• Position the platform with the wood grain surface upright.
• Insert the long tab next to the half circle cut-out in the
platform into the slot in the ladder panel.
• Insert the two long tabs on the side of the platform into the
slots in the back panel.
7
Assembly
Push Here
Ladder Panel
Long Tab
Hooked Tab
Hooked Tab
Top View
• Insert and snap the hooked tabs and long tab on the
platform into the panel assembl, as shown.
Wall Panel
Helpful Hint: You may need the help of another person
with this assembly step.
• Turn the panel assembly so that the wall panel is laying on
a flat surface.
• Push down on the ladder panel, as shown, to snap the
platform hooked tab into the slot in the ladder panel.
Push Here
Left Roof
Tabs
Slot
Treetop
Slot
Top of Tree
• Position the treetop on a flat surface with the slots facing
up and the top toward you.
Helpful Hint: You may need the help of another person with
this assembly step.
• Locate the left roof (labeled L).
• Turn the panel assembly so that the ladder panel is laying
• Position the left roof so that the flatter side is toward you.
on a flat surface.
• Insert the left roof tabs into the slot in the treetop.
• Push down on the wall panel, as shown, to snap the platform hooked tab and long tab into the slots in the wall
panel.
8
Assembly
Push
Here
Right
Roof
Treetop
Pull
Here
Tabs
Front Trunk
Panel
Slot
Treetop
Ladder
Panel
• Position the right roof (labeled R) so that the flatter side is
toward you.
• Insert the right roof tabs into the slot in the treetop.
Helpful Hint: You will need the help of another person with
this assembly step.
• Lift the roof/treetop assembly and lower it onto the panel
assembly. The treetop should be over the front trunk panel.
• Hold the roof/treetop assembly in place.
• Grasp the ladder panel with one hand and the treetop with
the other hand.
• Pull the ladder panel toward the treetop while pushing the
treetop toward the ladder panel until the treetop snaps
into place.
Push
Here
Treetop
Pull
Here
• Fit the hooked tab and the long tab on the left roof into the
slot and groove in the right roof.
Wall Panel
• Grasp the wall panel with one hand and the treetop with
the other hand.
• Pull the wall panel toward the treetop while pushing the
treetop toward the wall panel until the treetop snaps into
place.
9
Assembly
Push Here
Roof
Back
Panel
Long Tab
Back
Panel
• Firmly push down on the roof to insert the long tab on the
wall panel into the slot in the roof.
• Firmly push down on the roof to snap the back panel into
the slot in the roof.
• Push and pull the back panel, as shown to secure the
back panel in the roof.
• Check to be sure the roof is securely attached to the
panel assembly. Push up on the roof on all four sides.
If the roof can be removed from one of the panels,
re-read and repeat steps
.
Push Here
Phone
Back
Panel
Receiver
Long Tab
• Fit the phone into the receiver on the wall panel.
• Firmly push down on the roof to insert the long tab on the
ladder panel into the slot in the roof.
• Firmly push down on the roof to snap the tabs on the back
panel into the slot in the roof.
10
Connecting
Maintenance
Helpful Hint: There are two connecting areas to attach the
ramp to the Backyard Treehouse™. You can connect the
ramp to either of these areas and switch it whenever you
like! You can also attach other Fisher-Price® outdoor playsets to these two areas on the Backyard Treehouse™. If the
Fisher-Price® outdoor playset is equipped with a slide or
walkway use the instructions below to attach it to the
Backyard Treehouse™.
• Inspect the Backyard Treehouse™ twice monthly during
the usage season for wear or damage and tighten any
screws as needed. It is particularly important that this
procedure be followed at the beginning of each usage
season.
Ramp to Wall Panel
• Periodically check to be sure the Backyard Treehouse™
has adequate protective surfacing under and around it.
Inspect surfacing material for deterioration.
• To clean or to remove static electricity use a mild soap and
water solution and a clean cloth. Rinse clean with water to
remove soap residue.
• Check loose surfacing material for foreign objects or
debris. Also look for compaction and reduced depth, with
special attention to heavy use areas such as those under
swings and slide exit regions.
Back
Panel
Three (3) Year Limited Warranty
Slot
Fisher-Price, Inc., 636 Girard Avenue, East Aurora,
New York 14052, warrants to the original owner that the
Backyard Treehouse™ is free from all defects in material
and workmanship when used under normal conditions for
a period of three (3) years from the date of purchase. This
warranty does not cover color fading of the product or product parts, or damage from excessive abuse or Acts of God.
Peg
Groove
Ramp
Wall
Panel
Should the product fail to perform properly, we will repair or
replace it, free of charge. Purchaser is responsible for shipping the product to the address indicated above and for all
associated freight and/or insurance cost. Fisher-Price, Inc.
will bear the cost of shipping the repaired or replaced item
to you. This warranty is void if the owner repairs or modifies
the product. This warranty excludes any liability other than
the above mentioned, including but not limited to any
incidental or consequential damages.
• Locate the connecting area on the wall panel.
• Insert the thin peg on the ramp into the slot in the wall
panel.
• Firmly push down on the other ramp peg to fit it into the
groove in the back panel.
SOME STATES DO NOT ALLOW THE EXCLUSION OR
LIMITATION OF INCIDENTAL OR CONSEQUENTIAL
DAMAGES, SO THE ABOVE LIMITATION OR EXCLUSION MAY NOT APPLY TO YOU.
Ramp to Ladder Panel
THIS WARRANTY GIVES YOU SPECIFIC LEGAL
RIGHTS, AND YOU MAY ALSO HAVE OTHER RIGHTS
WHICH MAY VARY FROM STATE TO STATE.
Back
Panel
Ladder
Panel
Peg
If you have any questions about this product:
In Canada, call 1-800-567-7724, or write to: Mattel/Fisher-Price, 6155
Freemont Blvd., Mississauga, Ontario L5R 3W2.
In Great Britain, telephone 01734 770488.
In Australia, call the Fisher-Price Australian Consumer Advisory Service
toll-free at 1-800-800-812, or write to: Fisher-Price, Mattel Pty. Limited,
461 Plummer Street, Port Melbourne, Victoria 3207.
Slot
Groove
Ramp
• Locate the connecting area on the ladder panel.
• Insert the thick peg on the ramp into the slot in the ladder
panel.
• Firmly push down on the other ramp peg to fit it into the
groove in the back panel.
11
Fisher-Price knows . . . .
little kids become big kids.
E
veryone knows little kids don’t stay
that way for long. They grow out of
things every day and into something
else. But a backyard playset is one
thing that needs to hold your child’s
interest for more than a season. To
make sure ours will be enjoyed for a
long time, we’ve given them special
features that make them toddler
friendly as well as challenging for
preschoolers. And of course, all of
our playsets are built playground
tough of double-walled plastic so
they’ll survive years of outdoor
adventures.
75996
Grow-With-Me Slide
11/2 - 6 yrs.
31"
Two slides in one!
Adjusts from a toddler slope to a
more challenging preschool angle.
21"
75990
72097
Grow-With-Me
Playhouse Gym
Grow-With-Me
Picnic Table
15 mos. - 6 yrs.
Combines playhouse
features with gym
activities. Slide adjusts
from 18" for toddlers
to 30" for preschoolers.
2 yrs. & up
Both the table top and seats adjust in
height with your growing children.
75961
Grow-With-Me Teeter
11/2 - 6 yrs.
Combines gentle
rocking for toddlers
with teetering
excitement for
preschoolers.
©1996 Fisher-Price, Inc. East Aurora, New York 14052
12
75972 1 75972-0920