1
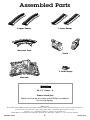
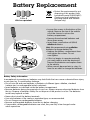
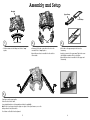
R2771
www.fisher-price.com
Please keep this instruction sheet for future reference, as it contains important information.
Requires three button cell batteries (included) for operation.
Adult assembly is required.
Tool required for assembly: Phillips screwdriver (not included).
1
Assembled Parts
2 Upper Ramps
2 Lower Ramps
Mountain Track
Trestle
2 Small Ramps
Mountain
#4 x ½” Screw - 4
Shown Actual Size
Tighten and loosen all screws with a Phillips screwdriver.
Do not over-tighten.
©Disney/Pixar
Disney/Pixar elements ©Disney/Pixar, not including underlying vehicles owned by third parties: Hudson Hornet™, Chevrolet Impala™,
Porsche™, Mercury™, and Jeep®. Sarge’s rank insignia design used with the approval of the U.S. Army
Fisher-Price, Inc., a subsidiary of Mattel, Inc., East Aurora, NY 14052 U.S.A.
©2009 Mattel, Inc. All Right Reserved. ® and ™ designate U.S. trademarks of Mattel, Inc., unless otherwise indicated.
PRINTED IN CHINA
2
R2771pr-0920
Battery Replacement
• Protect the environment by not
disposing of this product with
household waste (2002/96/EC).
Check your local authority for
recycling advice and facilities
(Europe only).
1.5V x 3
LR44 or equivalent
• Loosen the screws in the bottom of the
vehicle. Remove the top of the vehicle
off of the chassis to access the
battery compartment.
• Remove the exhausted batteries and
throw them away.
• Insert three, new button cell (LR44)
alkaline batteries.
Hint: We recommend using alkaline
batteries for longer battery life.
• Replace the battery compartment door
and tighten the screws. Do not
over-tighten.
• If this toy begins to operate erratically,
you may need to reset the electronics.
Remove the batteries and replace them
in the vehicle.
• When sounds become faint or stop, it’s
time for an adult to change the batteries.
Battery Safety Information
In exceptional circumstances, batteries may leak fluids that can cause a chemical burn injury
or ruin your toy. To avoid battery leakage:
• Do not mix old and new batteries or batteries of different types: alkaline, standard
(carbon-zinc) or rechargeable (nickel-cadmium).
• Insert batteries as indicated inside the battery compartment.
• Remove batteries during long periods of non-use. Always remove exhausted batteries from
the toy. Dispose of batteries safely. Do not dispose of the product in a fire. The batteries
inside may explode or leak.
• Never short-circuit the battery terminals.
• Use only batteries of the same or equivalent type, as recommended.
• Do not charge non-rechargeable batteries.
• Remove rechargeable batteries from the toy before charging.
• If removable, rechargeable batteries are used, they are only to be charged under
adult supervision.
3
Consumer Information
FCC Statement (United States Only)
This equipment has been tested and found
to comply with the limits for a Class
B digital device, pursuant to Part 15 of the
FCC Rules. These limits are designed to
provide reasonable protection against
harmful interference in a residential
installation. This equipment generates, uses
and can radiate radio frequency energy
and, if not installed and used in accordance
with the instructions, may cause harmful
interference to radio communications.
However, there is no guarantee that
interference will not occur in a particular
installation. If this equipment does cause
harmful interference to radio or television
reception, which can be determined by
turning the equipment off and on, the user is
encouraged to try to correct the interference
by one or more of the following measures:
• Reorient or relocate the receiving antenna.
• Increase the separation between the
equipment and receiver.
• Consult the dealer or an experienced
radio/TV technician for help.
Note: Changes or modifications not expressly
approved by the manufacturer responsible for
compliance could void the user’s authority to
operate the equipment. This device complies
with Part 15 of the FCC Rules.
Operation is subject to the following two
conditions: (1) This device may not cause
harmful interference and (2) this device must
accept any interference received, including
interference that may cause
undesired operation.
Care
• Wipe this toy with a clean, damp cloth. Do
not immerse the vehicle.
• This toy has no consumer serviceable parts.
Do not take this toy apart.
ICES-003
• This Class B digital apparatus complies with
Canadian ICES-003.
• Operation is subject to the following two
conditions: (1) this device may not cause
harmful interference and (2) this device
must accept any interference received,
including interference that may cause
undesired operation.
NMB-003
• Cet appareil numérique de la classe B est
conforme à la norme NMB-003 du Canada.
• L’utilisation de ce dispositif est autorisée
seulement aux conditions suivantes : (1) il
ne doit pas produire de brouillage et (2)
l’utilisateur du dispositif doit être prêt à
accepter tout brouillage radioélectrique reçu,
même si ce brouillage est susceptible de
compromettre le fonctionnement du dispositif.
4
Assembly and Setup
Mountain
Upper Ramp
Lower Ramp
1
Mountain Track
2
• Fit the mountain onto the bridge track. Push to “snap”
in place.
Trestle
• At an angle, fit the tab on a trestle into the slot on the
mountain. Push to “snap” in place.
• Repeat this procedure to assemble the other trestle to
the mountain.
3
• Fit the tabs on the upper ramp into the slots in the
lower ramp.
• Insert two screws into the upper ramp. Tighten the screws
with a Phillips screwdriver. Do not over-tighten.
• Repeat this procedure to assemble the other upper and
lower ramps.
4
• Track pieces easily snap together.
• Place the vehicle on the track.
• Long straight track pieces sold separately and subject to availability.
Hint: We do not recommend using the engine on carpets. For best performance, use on the
track provided or hard, flat surfaces.
• Push down on Sherriff to hear fun phrases!
5
6