1
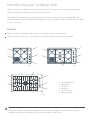
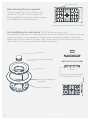
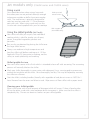
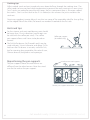
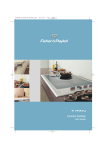
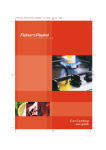
JET: CG602Q, CG602M, CG902Q, CG902M
TITAN: CG912T, CG912TM
Gas cooktop
User guide NZ & AU
Contents
Introducing your cooktop/hob
Temperature control
Flame Failure safety feature
Titan models only
Jet models only
Cleaning
Safety & warnings
Frequently asked questions
Trouble shooting
Warranty
Customer care
Recipe
2
3
4
5
7
9
10
12
13
14
15
16
Important!
It is important that the User Guide should be retained with the appliance for future reference.
Should the appliance be sold or transferred to another owner, always ensure that the User
Guide is left with the appliance in order that the new owner can familiarise themselves with
the appliance and the relevant warnings.
1
Introducing your cooktop/hob
Now that your new cooktop is installed and ready to use, you will want to know everything
about it to ensure excellent results right from the start.
This booklet will introduce you to the features and special talents of your cooktop/hob. We
recommend you read the whole book before you start using your cooktop, for the sake of safety
as well as success.
First use
Before using your cooktop clean it with warm soapy water to remove dust.
Check that the electricity is switched on in order for the electronic ignition to work.
1
1
4
5
1
1
5
4
6
6
Jet 6
3
Jet 9
4
1
2
5
2
6
1.
2.
3.
4.
5.
6.
Semi-Rapid burner
Rapid burner
Fish burner
Wok burner
Auxiliary burner
Cooktop controls
Titan
Inspiration
Wrap tasty morsels of oysters, smoked mussels or spicy sausage in strips of bacon. Secure
bundles with skewers and lightly fry to serve as nibbles with drinks.
2
Temperature control
1 Choose the control knob for the burner you want to use.
2 Press down and turn the knob anti-clockwise
all the way to the high symbol. Hold down
the knob for 5 seconds until the burner lights.
All the igniters will spark until the gas ignites
on the selected burner.
3 The flame can be adjusted anywhere between
the high symbol and the low symbol. Do
not regulate the flame between high and off.
Flame adjust
(Titan knob shown)
If the cooktop/hob does not light
Check that you know how the flame failure device works (refer to page 4).
Check that the power is switched on allowing the electronic ignition to work.
Check the gas is turned on and coming out.
Check that the burner rings are placed correctly.
Clean electrode tips with a toothbrush and methylated spirits.
If the burner has not ignited with 15 seconds, stop operating the igniter and wait at least
one minute before attempting a further ignition of the burner.
In the event of the burner flames being accidently extinguished, turn off the burner control and
do not attempt to re-ignite the burner for at least 1 minute.
Power failure
In the event of a power failure, the burners can be lit by holding a match close to the side of the
burner and turning the control knob to the high flame symbol . Wait until the flame is burning
all the way around the burner cap before adjusting.
Heating tips
When you need to boil, simmer or fry your food, first set the temperature to the high flame symbol .
Once your pan is boiling, reduce the temperature setting to maintain a steady heat to cook your food
through. This will reduce cooking time.
3
Flame failure safety feature
Your cooktop has a flame failure safety device fitted.
A metal probe behind the burner generates electricity when a flame is present.
After 5 seconds the metal probe gets hot enough to hold a valve open and maintain the gas
supply.
If the flame is blown out then the gas to the burner is cut off.
To operate the flame failure you need to hold the burner knob down for 5 seconds after the
burner has ignited.
Letting go of the burner knob too soon will extinguish the flame.
Your cooktop has two probes at the back of the burners, one will be the spark electrode and the
other is the flame failure probe.
Using Saucepans
Generally, larger saucepans are more efficient. It is a good idea to match the size of your
pan with the cooking zone of the burner and always make sure pans are stable. Do not let
large saucepans or frying pans overlap the bench as this can defect heat onto your benchtop
and damage the surface.
Hints and tips
To get the best out of your cooktop follow these simple suggestions.
Do not use an asbestos mat between the flame and the saucepan as this may cause serious
damage to your cooktop.
Never use plastic or aluminium foil dishes on the burners.
Saucepans should have thick flat bottoms. Food in a saucepan with an uneven bottom will take
longer to cook. Heavy saucepans may bend the pan support or deflect the flame.
Match the bottom of your saucepans with the cooking zone and see that it is stable. This will
give you the most efficient cooking. Do not let large saucepans or frying pans overlap the bench
as this can deflect heat onto your benchtop and damage the surface.
Inspiration
Make a delicious fruit compote by simmering rhubarb in sugar and water until tender. When
cool, add fresh strawberries. Serve chilled.
4
Titan models only (CG912 series)
Using a wok
Care should be taken when using a large wok that other pots are not pushed sideways enough
to become unstable or deflect heat onto nearby walls.
Using the simmermat
The Simmermat helps you control the temperature
of your cooking surface to ensure the long slow
simmering that is needed for successfully cooking
delicate foods. Use at low heat only. Always
remember it is a simmering utensil and exposure
to extreme heat may distort it.
To use the simmermat
1 First cook the food, or bring to a boil, over high heat.
2 Then reduce the heat and carefully place the Simmermat over the flame with the points facing
upward. Put your saucepan on top of the points and simmer on the low flame setting.
WARNING!
Always turn the burner off before moving the Simmermat and handle the hot Simmermat
with tongs and/or pot holders to prevent burns.
5
Rounded corners
Repositioning the pan supports
The wok support goes in the centre over the
wok burner. The other two pan supports are
interchangeable but need to be rotated to match
the rounded corners of the base insert.
Correct pan support orientation - Titan models
Re-assembling your wok burner (CG912TM Iridium models only)
Each part of your wok burner has locating pins to help you to assemble it correctly after cleaning.
Incorrect assembly can cause dangerous irregular flames and ignition problems. Refer to this
diagram for the correct order of assembly. Note: The brass parts of your wok burner will change
colour with use. This is normal and will not affect performance.
Inner cap
Outer cap (small holes)
Trim ring
Side view
Rotate vent ring to align locator
pin with hole in burner base.
Vent ring with locator pins
(large holes)
Align and insert pin
6
Titan models only (CG912 series)
Jet models only (CG602 series and CG902 series)
Using a wok
Care should be taken when using a large wok
that other pots are not pushed sideways enough
to become unstable or deflect heat onto nearby
walls. The wok burner is primarily designed for
woks but may be used with 17- 23cm diameter
pots with care. When using a wok only use the
circular wok stand supplied with your Jet cooktop.
Wok on raised
area of trivets
Wok support
(Jet models only)
Using the skillet/griddle (Jet 9 only)
Your skillet will offer you a quick, hot method of
cooking which is ideal for tender cuts of meat,
panini, chargrilled vegetables, pikelets and
pancakes.
Best results are obtained by placing the skillet over
the large skillet burner.
Always use medium to high temperatures and
heat the skillet well before cooking on it. Oil the
food with Olive Oil Spray prior to cooking, not the
skillet, to avoid splattering and smoking.
Skillet/griddle first use
Your new skillet comes with a finish which is intended to burn off with seasoning. The seasoning
process will naturally blacken the skillet.
Wash your skillet thoroughly in warm water with detergent. Use a scouring pad to remove any
residue that might be on the skillet. Rinse thoroughly and dry. This may be helped by warming
the skillet on a burner.
Coat the skillet, including handles, liberally with vegetable oil and place in oven at 150°C for 1
hour. Remove from the oven and allow to cool. Wipe excess oil from skillet with a paper towel.
Cleaning your skillet/griddle
Place in hot water with a small amount of detergent while still warm. If there is food residue
left on the plate, scrub with a wire barbeque brush to remove it. Make sure that the skillet is
completely dry. Do not use abrasive cleaners on your skillet/griddle.
7
Cooking tips
Skillet cooked steaks are best turned only once about halfway through the cooking time. The
skillet needs to have reached a high temperature to prevent the meat stewing in its own juices.
Test if steaks are cooked by pressing with tongs, the less movement there is, the more cooked
the steak is. Don’t cut the steak to see if it is cooked, as this releases the juices and dries the
steak out.
Capsicums, eggplant, tomato halves & zucchini are some of the vegetables ideal for char grilling
on the ridged side of the skillet, flat breads are wonderful cooked on the flat side.
Hints and tips
For the simmer and semi rapid burners pots should
be larger than 12cm in diameter (smaller pots can
be used with the coffee pot trivet). The coffee
pot support allows small items to be placed on
burners.
Coffee pot support
(Jet models only)
The fish/skillet burner (Jet 9 models only) may be
used with pots 18cm in diameter and above. A fish
kettle on the fish burner is not only useful for fish,
but for steaming long vegetables like cobs of corn,
Chinese broccoli, long beans and asparagus.
Repositioning the pan supports
raised area on wok support
The pan supports above the wok burner are
different from the other burners. Note the raised
area for the wok on the pan support.
Correct pan support orientation - Jet models
8
Jet models only (CG602 series and CG902 series)
Cleaning
Apply soapy water with a soft sponge or cloth only when the cooktop is cool.
Soaking stubborn stains under the soapy cloth for a few minutes will help make them easier to
remove.
Do not use steel soap pads as this may dull the appearance of the appliance over time.
Pan supports are dishwasher safe.
The burner parts can be cleaned in hot water, it is important that the holes/slots are kept clear.
When replacing the burner rings after cleaning, turn the rings until the positioning teeth are
placed correctly.
Clean electrodes with a toothbrush and methylated spirits.
Important!
Do not use harsh/abrasive cleaning agents to clean your cooktop as they may damage the
stainless steel finish and the knobs.
Important!
‘Antibacterial’ cleaners or those containing chlorine compounds are corrosive and may
damage the appearance of your cooktop.
Iridium (Matt) and Brushed Stainless Steel
Iridium and Brushed Stainless Steel cooktops can be cleaned with a stainless steel cleaner
(see ‘Important’) or wiped with a clean damp cloth and dried with a lint free cloth.
Occasional use of a stainless steel polish will reduce fingerprints and other marks.
Do not use abrasive cleaners on stainless steel, as they will permanently damage the surface.
Cleaning the pan supports
Pan supports are best cleaned immediately after use - before spills get burnt on.
They are dishwasher safe and can be cleaned with a cream cleaner and a nylon scourer.
For stubborn stains, soaking in a solution of biological clothes washing detergent eg. Drive for a
couple of hours will help.
Replace the pan supports carefully to avoid marking the cooktop surround.
9
Safety & warnings
WARNING!
Hot Surface Hazard
During use this appliance becomes hot.
Care should be taken to avoid touching cooktop components, burner, pan
supports, stainless steel base.
WARNING!
Household appliances are not intended to be played with by children. Children, or
persons with a disability which limits their ability to use the appliance, should have a
responsible person to instruct them in its use. The instructor should be satisfied that they
can use the appliance without danger to themselves or their surroundings.
WARNING!
This appliance should be connected to a circuit that incorporates an isolating switch
providing full disconnection from the power supply.
WARNINGS:
Do not stand or place heavy objects on this appliance.
Do not use an asbestos mat between the flame and the saucepan as this may cause
serious damage to your cooktop.
Do not place aluminium foil or plastic dishes on the cooktop burners.
Do not let large saucepans or frying pans overlap the bench as this can deflect heat onto
your benchtop and damage the surface.
Do not spray aerosols in the vicinity of this appliance while it is in operation.
Do not place aerosol containers near or on the cooktop.
Do not use a steam cleaner for cleaning this cooktop.
CAUTION!
Handles of saucepans may be hot to touch. Check saucepan handles do not overhang
other gas burners that are on. Keep handles out of reach of children.
10
Electrical supply cord
If the electrical supply cord is damaged, it must only be replaced by an authorised person.
Ensure that the electrical connection plug is accessible after installation.
Marine craft & caravan installation
Where this appliance is installed in marine craft or in caravans, it shall not be used as a space
heater.
Ventilation
The use of a gas cooking appliance results in the production of heat and moisture in the room in
which it is installed. Ensure the kitchen is well ventilated. Keep natural ventilation holes open or
install a mechanical ventilation device (mechanical extractor hood).
Prolonged intensive use of the appliance may call for additional ventilation, for example opening
of a window, or more effective ventilation, for example increasing the level of mechanical
ventilation where present.
Abnormal operation
Abnormal operation which requires the appliance to be serviced include such things as:
Very yellow flame tips
Objectionable odours
The burner flames appearing to lift off the burners
Inspiration
Poach whole pears in white wine, sugar, orange zest, water and a vanilla bean. When tender,
serve with whipped cream and caramel sauce.
11
Frequently asked questions
Q What is the best way to clean stainless steel?
A See cleaning instructions on page 9.
Q How do I clean the pan supports and burners?
A Supports can be washed in the dishwasher or alternatively with a cream cleaner (such as Jif ) and
a nylon scourer. Burners are best washed in warm water (see cleaning instructions on page 9).
Q All the burners spark at once when I go to light one, is this ok?
A Yes, they are designed to do this.
Q Why doesn’t my cooktop light?
A Firstly, check it is plugged in and the gas is turned on. Alternatively, the gas ignitors may be dirty.
These are easily cleaned with a toothbrush and methylated spirits. (Also check Trouble shooting
on page 13).
Q Will the graphics on my cooktop come off?
A No, these are etched by laser (see stainless steel cleaning instructions, page 9).
Q My burner flames are yellow / slow to start, is something wrong?
A Yes, there are a number of factors which could be causing this
1. If you use bottled gas this may indicate you are getting near the end of the bottle.
2. Your cooktop may not be suited to the gas you are using, check with your service
person/installer.
3. The gas pressure may not be at the correct level, check with your service person/installer.
4. See Trouble shooting on page 13.
Q One of my burners has an uneven flame, what can I do?
A Check the burner parts are clean and assembled correctly (see pages 6 and 9).
Q What size pots should I use?
A Generally larger pots are more energy efficient, see page 5 and 7 for further details.
Q Do I need special pans for a gas cooktop?
A Regular pans are fine. We recommend thick based pans for efficient, even heat.
12
Trouble shooting
Problem
Possible solutions
My cooktop does not
light
Check it is plugged in and there is power to the wall socket.
The gas igniters may be dirty. These can be easily cleaned
with a toothbrush and methylated spirits.
The burner parts may not be located properly. Check the
assembly and make sure the burner cap is sitting flat.
Check the gas supply valve is turned on and the supply to
the house is working. Gas should be heard when you turn a
burner on.
My burner flames are
yellow/slow to start
The burner parts may not be located properly. Check the
assembly and make sure the burner cap is sitting flat.
If you use bottled gas this may indicate you are getting near
the end of the bottle.
Check that the burner parts are not blocked with water.
The gas pressure may not be at the correct level, check with
your service person/installer.
One of my burners
has an uneven flame
Check the burner parts are clean, dry and assembled correctly
and that the burner cap is sitting flat on the burner.
My cooktop goes out
when I let go of the
knob
Your cooktop has a safety feature called ‘flame failure’. When
lighting a burner, it is necessary to hold down the knob for 5
seconds until it is properly engaged. See page 4 for more on
flame failure.
The flame goes out at
low settings
Gas supply pressure may be low, check with service person/
installer.
Low setting may have been adjusted incorrectly, check with
your service person/installer.
13
Warranty
When you purchase any new Fisher & Paykel whiteware Product you automatically receive a 2
year Manufacturer’s Warranty covering parts and labour for servicing.
Fisher & Paykel undertakes to
Repair or, at its option, replace without cost to the owner either for material or labour any part of
the Product, the serial number of which appears on the Product, which is found to be defective
within TWO YEARS of the date of purchase.
This warranty DOES NOT cover
A. Service calls to which are not related to any defect in the Product. The cost of a service call will
be charged if the problem is not found to be a Product fault. For example:
1. Correct the installation of the product.
2. Instruct you how to use the product.
3. Replace house fuses or correct house wiring or plumbing.
4. Correcting fault(s) caused by the user.
B. Defects caused by factors other than:
1. Normal domestic use or
2. Use in accordance with the Product’s User Guide.
C. Defects to the Product caused by accident, neglect, misuse or Act of God.
D. The cost of repairs carried out by non-authorised repairers or the cost of correcting such
unauthorised repairs.
E. Normal recommended maintenance as set out in the Product’s User Guide.
F. Repairs when the appliance has been dismantled, repaired or serviced by other than a
Fisher & Paykel Authorised Customer Service Centre or the selling dealer.
G. Pick up and delivery.
H. Transportation or travelling costs involved in the repair when the product is installed outside
the Fisher & Paykel Authorised Customer Service Centre’s normal service area.
Service under this Manufacturer’s Warranty must be provided by an Authorised Service Centre,
please refer to the Customer care section for contact details. Such service shall be provided
during normal business hours. This warranty certificate should be shown when making any
claim.
Note: This Warranty is an extra benefit and does not affect your legal rights.
Please keep this User Guide in a safe place.
Do not return to Fisher & Paykel.
14
Customer care
Before you call for service or assistance ...
Check the things you can do yourself. Refer to your User Guide and check...
1 Your product is correctly installed
2 You are familiar with its normal operation
If after checking these points you still need assistance, please refer to the following or contact us
through our website:
www.fisherpaykel.com
In New Zealand if you need assistance ...*
Call your Fisher & Paykel retailer who is trained to provide information on your product, or if we
can be of any further help, please contact our Customer Care Centre,
Toll Free: 0800 FP CARE or 0800 37 2273
Fax: (09) 273 0656
Email: [email protected]
Postal Address: PO Box 58732, Greenmount, Auckland.
If you need service ...*
Fisher & Paykel has a network of independent Fisher & Paykel Authorised Service Centres whose
fully trained technicians can carry out any service necessary on your product. Your dealer or our
Customer Care Centre can recommend an Authorised Service Centre in your area.
In Australia if you need assistance ...*
Call the Fisher & Paykel Customer Care Centre and talk to one of our consultants.
Toll Free: 1300 650 590 from anywhere within Australia
Fax: (07) 3826 9298
Email: [email protected]
Postal Address: PO Box 798 Cleveland, QLD 4163.
If you need service ...*
Fisher & Paykel Australia Pty Ltd has a network of independent Fisher & Paykel Authorised Service
Centres whose fully trained technicians can carry out any service necessary on your
product. Your State Office or our Customer Care Centre can recommend an Authorised Service
Centre in your area.
* If you call or write, please provide: name, address, model number, serial number, date of
purchase and a complete description of the problem. This information is needed in order to
better respond to your request for assistance.
15
Recipe
Beef bourginon (Serves 2 - 4)
The Simmermat is perfect for stews and soups. Long slow cooking at a gentle simmer gives meat
dishes that are tender and full of flavour. Try this variation on a French classic.
450g chuck or stewing steak, cubed
4 tbsp oil
200g tiny onions or 2 large onions, chopped
200g carrot, peeled and cut into large slices
2 tbsp oil
4 cloves of garlic, crushed
4 tbsp flour
2 cups good red wine
2 cups beef stock
2 bay leaf
2 tsp thyme
1 Place beef in a bowl and sprinkle with salt and pepper. Toss.
2 Heat 2 tbsp of the oil in a medium sized saucepan on high. Add half of the steak cubes and
brown quickly turning with a wooden spoon to sear all the sides. This is an excellent way to give
stews great flavour and a rich brown colour. It should only take a couple of minutes but the
meat may spit so take care.
3 Remove the first batch and repeat with the remaining steak and two more tablespoons of oil.
4 Add onions, carrot and the last 2 tbsp of oil to the empty pan and cook on medium flame until
beginning to brown.
5 Add garlic and flour and cook until lightly coloured, stirring constantly.
6 Stir in the wine and stock, then add bay leaves, thyme and steak. Bring to the boil.
7 Reduce the flame to low and carefully place the Simmermat over the flame with the points
facing upward. Put the pan on the mat and a lid on the pan and simmer for an hour or two; until
the meat is tender and the liquid is full of flavour.
8 Serve with creamy mashed potatoes and garnish with lots of chopped fresh parsley.
16
Copyright Reserved © Fisher & Paykel 2004.
The product specifications in this booklet apply to the
specific products and models described at the date
of issue. Under our policy of continuous product
improvement, these specifications may change at any
time. You should therefore check with your Dealer to
ensure this booklet correctly describes the product
currently available.
www.fisherpaykel.com
NZ AU
Gas cooktop user guide
Published: 06/2004
Part No. 599200 A