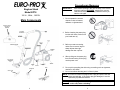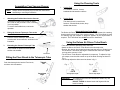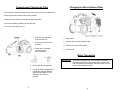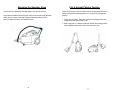
1
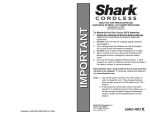
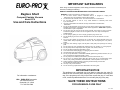
IMPORTANT SAFEGUARDS
When using an electrical appliance, basic safety precautions should always be
observed, including the following:
READ ALL INSTRUCTIONS BEFORE USING YOUR VACUUM CLEANER.
Bagless Shark
Compact Canister Vacuum
Model EP78
Use and Care Instructions
WARNING: To reduce the risk of fire, electrical shock, or injury:
1. Do not leave vacuum cleaner unattended when it is plugged in. Unplug from
outlet when not in use and before changing bags or filters.
2. To reduce the risk of electric shock – do not use outdoors or on wet surfaces.
3. Do not allow children to use as a toy. Close attention is necessary when used
by or near children.
4. Use only as described in this manual. Use only manufacturer’s recommended
attachments.
5. Do not use with damaged cord or plug. Do not use vacuum cleaner if it has been dropped,
damaged, left outdoors, or dropped into water. Return appliance to EURO-PRO Corporation
for examination, repair or adjustment.
6. Do not pull or carry by cord. Do not use cord as a handle, close a door on cord, or pull cord
around sharp edges or corners. Do not run appliance over cord. Keep cord away from
heated surfaces.
7. Do not unplug by pulling on cord. To unplug, grasp the plug, not the cord.
8. Do not handle plug or vacuum cleaner with wet hands. Do not use outdoors or on wet
surfaces.
9. Do not put any objects into openings. Do not use with any opening blocked and do not
restrict airflow. Keep all openings free of dust, lint, hair, and anything that may reduce
airflow.
10. Keep hair, loose clothing, fingers, and all parts of body away from openings and moving
parts.
11. Do not pick up hot coals, cigarette butts, matches or any hot, smoking, or burning objects.
12. Do not pick up hard or sharp objects such as glass, nails, screws, coins, etc.
13. Do not use without dust bag and/or filters in place.
14. Turn off all controls before plugging or unplugging vacuum cleaner.
15. Use extra care when vacuuming on stairs.
16. Do not pick up flammable or combustible materials (lighter fluid, gasoline, kerosene, etc.) or
use in the presence of explosive liquids or vapor.
17. Do not pick up toxic material (chlorine bleach, ammonia, drain cleaner, etc.).
18. Do not use in an enclosed space filled with vapors given off by oil based paints, paint
thinner, moth proofing substances, flammable dust, or other explosive or toxic vapors.
19. Always unplug this appliance before connecting or disconnecting vacuum hose.
Do not allow plug to whip when rewinding.
20. Use only on dry, indoor surfaces.
21. Do not use for any purpose other than described in this user’s guide.
IMPORTANT NOTICE
For information or assistance:
USA: EURO-PRO Corporation
178 West Service Rd.
Champlain, NY 12919
Tel.: 800-798-7398
This appliance has a polarized plug (one blade is wider than the other).To
reduce the risk of electric shock, this plug will fit in a polarized outlet only one
way. If the plug does not fit fully in the outlet, reverse the plug. If it still does
not fit, contact a qualified electrician. Do not modify the plug in any way.
SAVE THESE INSTRUCTIONS
FOR HOUSEHOLD USE ONLY
1
Rev. 06/01
Precautionary Measures
IMPORTANT:
Bagless Shark
Model EP78
If the suction opening in the unit, the hose or the chrome
telescopic tube are BLOCKED, switch off the vacuum
cleaner and remove the blocking substance before you
start the unit again.
120 V~, 60Hz., 1200 W.
1. Do not operate the vacuum
cleaner to close to heaters,
radiators or cigarette butts.
Main Components
Deluxe Air Driven
Turbo Brush
(Optional)
2. Before inserting the power plug
into the wall outlet, make sure that
your hands are dry.
3. Before you start vacuuming,
make sure to remove large or
sharp objects that might
damage the dust cup filter.
4. When pulling out the power plug
from the wall outlet, pull the plug
not the power cord.
Dust Brush
Crevice Tool
Strap
5. Do not pick up anything that is burning or smoking such as cigarettes,
matches or hot ashes.
6. Do not use without dust bag and / or filters in place.
NOTE: This vacuum cleaner is equipped with a plug and power cord that
retract automatically. If the cord or plug get damaged, it must be
replaced by a qualified technician.
Warning: Hold the plug when rewinding the cord. Do not allow the
cord to whip when rewinding.
2
3
Using the Cleaning Tools
Assembling Your Vacuum Cleaner
1.
For radiators, crevices, corners,
baseboards and between cushions.
NOTE: Always remove the power plug from the wall outlet before
assembling or removing accessories.
1.
2.
Attaching the Flexible Hose into the Vacuum
Connect the flexible hose into the air intake
duct. Push in until you hear a “click”, indicating
it is in its position.
Deluxe Air Driven Turbo Brush
The Deluxe Air Driven Turbo Brush is a deluxe floor attachment with a rotating
brush turned by the air flow of the vacuum cleaner. The Turbo Brush is used
for cleaning high pile carpets or whenever agitation of the carpet fibers is
required. The Turbo Brush should NOT be used on hard floors.
Fitting the Chrome Telescopic Tube to the
Curved Wand / Hose Extension
Push the chrome telescopic tube into the
curved wand / hose extension, as shown in the
illustration.
3.
Using the Deluxe Air Driven Turbo Brush
Extending the Chrome Telescopic Tube
Push forward the plastic knob and pull the
smaller tube outward.
Plastic Knob
Fitting the Floor Brush to the Telescopic Tube
Push the telescopic tube into the Floor brush,
as shown in the illustration.
Dusting Brush
The dusting brush is used for the
furniture, venetian blinds, books, lamp
shades and shelves.
To remove the flexible hose, reverse the
operation.
2.
Crevice Tool
• Turn off the vacuum and unplug from wall outlet.
• Attach the Deluxe Air Driven Turbo Brush to the telescopic tube.
• Re-plug the vacuum into the wall outlet and start the vacuum. Beater bar on
the Air Driven Turbo Brush will begin to rotate and will continue to operate
as long as the vacuum is “ON”.
• The Air Driven Turbo Brush is adjustable for carpet nap. To adjust for high
pile carpet, move the slide control on top of the brush housing as shown in
Fig. 1.
• For low nap adjust the slide control as shown in fig. 2.
Fig. 2
Fig. 1
Slide
Slide
For high pile carpet
WARNING:
4
For low nap carpet
The beater brush of this floor attachment rotates very fast.
To avoid injury,
DO NOT TOUCH the beater brush with fingers while the
brush is rotating.
5
Instructions for Use
NOTE: Before using the appliance, unwind a sufficient length of cable and
Insert the plug into the wall socket. A yellow mark on the power
cord shows the ideal cable length. Don’t pull the power cord
beyond the red mark.
Removing the Dust Cup Filter
1.
Push the Power On/Off switch to disconnect the power.
2.
Remove the flexible hose (see page 5).
3.
Push the dust cup lock and open the dust cup.
1. Insert the power plug into the wall outlet.
Dust Cup Filter
2. Press the Power On/Off Switch to
activate the vacuum cleaner.
3. To rewind the power cord, press the
cable rewind button with one hand and
guide the power cord with the other
hand to ensure that it does not whip
causing damage.
6
4.
Pull up the dust cup filter and shake down and
up. Take the dust cup filter out of the dust
cup, do not let the dust fall out.
5.
Take out the dust cup and dispose of the dust
inside.
Caution:
If the dust is tightly packed and difficult to
remove, lightly tap the front cover.
6.
Insert the dust cup filter into the dust cup.
7.
Attach the dust cup to the vacuum by pressing
together until it is locked.
8.
Reassemble the unit.
7
Dust Cup
Changing and Cleaning the Filter
Changing the Micro-Exhaust Filter
• Filter should be cleaned at least twice a year or when it becomes visible solid.
• Always operate the cleaner with the filter installed.
• Disconnect from electrical outlet before cleaning the filter.
• Do not use a washing machine to rinse the filter.
• Do not use a hair dryer to dry it.
1. Push the dust cup lock to
open the dust cup.
2. Remove the filter from the
grill-filter.
3. Rinse filter in lukewarm
water and dry the
filter completely.
1. Open the lid.
2. Remove the used micro-exhaust filter.
3. Insert a new micro-exhaust filter.
4. Close the lid.
Motor Thermostat
4. Put the filter into the grill-filter.
IMPORTANT: This motor is equipped with a heat sensitive thermostat. If
for some reason the vacuum cleaner will overheat, it will
then stop working automatically. When the motor will cool
off, the unit will restart by itself.
5. A severely solid or clogged filter
should be thoroughly washed
with fresh tepid water. A mild
detergent can be used if
required.
8
9
Attaching the Shoulder Strap
Use the hooks to attach the shoulder strap to the vacuum cleaner.
First pass the flexible hose through the loop of the shoulder strap and then
attach the two hooks to the strap hookup holes at the bottom of the
vacuum cleaner as shown in illustration below.
Flat & Upright Parking Position
Please note that your vacuum cleaner can be conveniently placed in a
space saving vertical parking position or in a convenient flat parking
position.
1. Place unit on its side. Slide floor nozzle into locking position with
receptacle which rests on top of unit.
2. While laying flat on 3 wheels, slide floor nozzle into locking position
with receptacle which rests on the rear side of the unit.
10
11
TO ORDER REPLACEMENT DUST CUP FILTERS,
FILTERS OR DELUXE TURBO BRUSH
Model EP78
To order additional Dust Cup Filters , Filters, Deluxe Turbo Brush or any
other accessories or for Customer Service:
Call EURO-PRO Customer Service:
In U.S.: 800-798-7398
In Canada:
THREE (3) YEAR LIMITED WARRANTY
EURO-PRO CORPORATION warrants this product to be free from defects in material and
workmanship for a period of three (3) years from the date of the original purchase, when utilized for
normal household use, subject to the following conditions, exclusions and exceptions.
If your appliance fails to operate properly while in use under normal household conditions within the
warranty period, return the complete appliance and accessories, freight prepaid to EURO-PRO
Corporation, 178 West Service Rd., Champlain, N.Y. 12919. If the appliance is found by EUROPRO to be defective in material or workmanship, EURO-PRO will repair or replace it free of charge.
Proof of purchase date and $9.85 to cover the cost of return shipping and handling must be
included. *
Non-durable parts including, without limitation, dust cup filters, filters, brushes and electrical parts
which normally require replacement are specifically excluded from warranty.
514-842-8691
Monday to Friday 8:30 A.M. - 5:00 P.M. Eastern Standard Time
Please Note:
The Dust Cup Filters and the filter for the grill-filter are washable.
The liability of EURO-PRO Corporation is limited solely to the cost of the repair or replacement of
the unit at our option. This warranty does not cover normal wear of parts and does not apply to any
unit that has been tampered with or used for commercial purposes. This limited warranty does not
cover damage caused by misuse, abuse, negligent handling or damage due to faulty packaging or
mishandling in transit. This warranty does not cover damage or defects caused by or resulting from
damages from shipping or repairs, service or alterations to the product or any of its parts, which
have been performed by a repair person not authorized by EURO-PRO.
This warranty is extended to the original purchaser of the unit and excludes all other legal and/or
conventional warranties. The responsibility of EURO-PRO Corporation if any, is limited to the
specific obligations expressly assumed by it under the terms of the limited warranty. In no event is
EURO-PRO Corporation liable for incidental or consequential damages of any nature whatsoever.
Some states do not permit the exclusion or limitation of incidental or consequential damages, so the
above may not apply to you.
Important:
This warranty gives you specific legal rights, and you may also have other rights which vary from
state to state.
Make sure that both the Dust Cup Filter and the Filter for the GrillFilter are completely dry before inserting back in the vacuum.
*Important: Carefully pack item to avoid damage in shipping. Be sure to include proof of
purchase date and to attach tag to item before packing with your name, complete address
and phone number with a note giving purchase information, model number and what you
believe is the problem with item. We recommend you insure the package (as damage in
shipping is not covered by your warranty). Mark the outside of your package “ATTENTION
CUSTOMER SERVICE”.
IMPORTANT
PLEASE NOTE THAT THE MICRO-EXHAUST
FILTER IS NOT WASHABLE
yyyyyyyyyyyyyyyyyyyyyyyyyyyyyyyyyyyyyyyyyyyyyyyyyyyyyyyyyyyyyyy
yy
OWNERSHIP REGISTRATION CARD
Please fill out and mail the product registration card within ten (10) days of purchase in order to
validate the foregoing Limited Warranty. The registration will enable us to contact you in the unlikely
event of a product safety notification. By returning this card you acknowledge to have read and
understood the instructions for use, and warnings set forth in the accompanying instructions.
RETURN TO EURO-PRO CORPORATION, 178 WEST SERVICE RD., CHAMPLAIN, N.Y. 12919
IN CANADA: 4400 BOIS FRANC, ST. LAURENT, QUEBEC, H4S 1A7
12
_______________________________________________________________________
Appliance model
_______________________________________________________________________
Date purchased
Name of store
_______________________________________________________________________
Owner’s name
_______________________________________________________________________
Address
City
Prov./State
Postal code/Zip Code
Printed in China