1
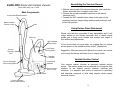
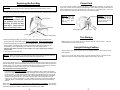
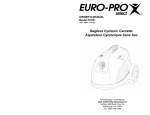
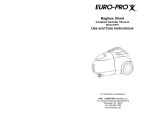
IMPORTANT SAFEGUARDS
When using an electrical appliance, basic safety precautions should always be
observed, including the following:
READ ALL INSTRUCTIONS BEFORE USING YOUR VACUUM CLEANER.
At om ic Ant
Canister Vacuum
Model EP044
Use and Care Instructions
WARNING: To reduce the risk of fire, electrical shock, or injury:
1. Do not leave vacuum cleaner when it is plugged in. Unplug from outlet
when not in use and before servicing.
2. To reduce the risk of electric shock – do not use outdoors or on wet surfaces.
3. Do not allow children to use as a toy. Close attention is necessary when
used by or near children.
4. Use only as described in this manual. Use only manufacturer’s recommended
attachments.
5. Do not use with damaged cord or plug. Do not use vacuum cleaner if it has
been dropped, damaged, left outdoors, or dropped into water. Return it to an
authorized service center.
6. Do not pull or carry by cord. Do not use cord as a handle, close a door on
cord, or pull cord around sharp edges or corners. Do not run appliance over
cord. Keep cord away from heated surfaces.
7. Do not unplug by pulling on cord. To unplug, grasp the plug, not the cord.
8. Do not handle plug or vacuum cleaner with wet hands. Do not use outdoors
or on wet surfaces.
9. Do not put any objects into openings. Do not use with any opening blocked
and do not restrict airflow. Keep all openings free of dust, lint, hair, and
anything that may reduce airflow.
10. Keep hair, loose clothing, fingers, and all parts of body away from openings
and moving parts.
11. Do not pick up hot coals, cigarette butts, matches or any hot, smoking, or
burning objects.
12. Do not pick up hard or sharp objects such as glass, nails, screws, coins, etc.
13. Do not use without dust bag and/or filters in place.
14. Turn off all controls before plugging or unplugging vacuum cleaner.
15. Use extra care when cleaning on stairs.
16. Do not pick up flammable or combustible materials (lighter fluid, gasoline,
kerosene, etc.) or use in the presence of explosive liquids or vapor.
17. Do not pick up toxic material (chlorine bleach, ammonia, drain cleaner, etc.).
18. Do not use in an enclosed space filled with vapors given off by oil base
paints, paint thinner, some moth proofing substances, flammable dust, or
other explosive or toxic vapors.
19. Always unplug this appliance before connecting or disconnecting vacuum
hose. Hold plug when rewinding onto reel. Do not allow plug to whip when
rewinding.
20. Use only on dry, indoor surfaces.
21. Do not use for any purpose other than described in this user’s guide.
IMPORTANT NOTICE
For information or assistance, call 514-842-8691
EURO-PRO Corporation
178 West Service Rd.
Champlain, NY 12919
This appliance has a polarized plug (one blade is wider than the other).To reduce
the risk of electric shock, this plug will fit in a polarized outlet only one way. If the
plug does not fit fully in the outlet, reverse the plug. If it still does not fit, contact a
qualified electrician. Do not modify the plug in any way.
SAVE THESE INSTRUCTIONS
FOR HOUSEHOLD USE ONLY
EURO-PRO Atomic Ant Canister Vacuum
Rated 1200 watts, 120 V / 60HZ
1. Slide the narrow end of the chrome telescopic tube inside the
deluxe, automatic floor to carpet nozzle tube.
2. Connect the curved hose/wand extension to the chrome
telescopic tube.
3. Connect the 360° rotatable hose clamp to the main unit by
squeezing on hose clamp locking switches and pushing in until
locked into position.
Main Components
Curved Hose/Wand Extension
Manual Variable
Suction Control
Assembling the Vacuum Cleaner
Hose
Using Deluxe Floor Attachment
Main Unit
360° Rotatable
Hose Clamp
Hose Clamp
Locking Switch
Chrome
Telescopic
Tube
Dust Bag
Indicator
Chrome Telescopic
Tube Locking Switch
Cord Rewind
Button
Electronic Variable
Suction Control
Power Switch
Please note that the convenient 3-way adjustability and 6 soft
rubber wheels on the deluxe, automatic floor to carpet nozzle
enable you to freely move forward and reverse from carpet to
floor without any adjustments.
If floor nozzle does not move easily, we suggest that you reduce
suction power on the variable suction control. (See below.)
Suggestion: After vacuuming with deluxe floor nozzle, use crevice
tool to clean the deluxe, automatic floor to carpet nozzle.
Variable Suction Control
Your vacuum cleaner includes an electronic variable suction
control. The suction power can be adjusted by moving the slide
regulator to the desired position between minimum and
maximum. For example, less suction is required on upholstery
and draperies compared to thick shag carpets, which require
maximum suction.
Deluxe Automatic
Floor to Carpet Nozzle
2
3
Replacing the Dust Bag
Power Cord
Warning: To reduce the risk of electric shock, the hose and power cord must be disconnected
before changing the bag or performing maintenance/trouble shooting checks.
Your vacuum cleaner includes a power cord, which is automatically retractable. To extend your
power cord, pull from rear and extend to desired length. When cleaning is finished, first switch off
power and disconnect plug from electrical outlet. Then press on cord rewind button. If the cord
does not fully retract, pull it out again and then press on cord rewind button.
1. To open main unit, press with 2 middle fingers on center of opening lever, squeeze to unlock and lift.
Suggestion:
Vacuuming
new carpet or carpet with
fine powders may clog the
dust bag, so check the bag
more often. Never operate
without dust bag in place.
Opening Lever
Warning: Hold plug
when rewinding the
cord.
Do not allow
cord to whip when
rewinding.
Crevice Tool
the power cord beyond
the red mark on the
cord as doing this will
damage the cord.
Side Lever
Dusting Brush
Hinges
Caution: Do not pull
Filter Cover
Side of Bag Holder
Tool Storage
2. Remove dust bag by pulling up on the plastic collar (if using cloth bag) or cardboard collar
(if using paper bag). Empty cloth bag or dispose of paper bags. Never reuse Paper Bags.
3. Insert a new paper bag or re-insert an empty cloth bag as far as it can go noting the direction
arrow on plastic or cardboard collar. By sliding in the cloth or paper bag, the side lever will
automatically go to the right allowing you to close the cover of the vacuum cleaner.
Note: Vacuum cleaner cover will not close if there is no cloth or paper bag is inserted in
the bag holder.
Note:A crevice tool and dusting brush are included with the vacuum cleaner.
assembled handily on the rear of your unit.
They are
Upright Parking Position
Please note that your vacuum cleaner can be conveniently placed in a space saving vertical
parking position.
4. Close vacuum cleaner main cover.
Warning: Before closing main unit, make certain that sides of bag holder are pushed inside and
do not get caught between the hinges while closing the main unit.
Place unit on its side and reduce length of chrome telescopic tube to a minimum length.
Slide floor nozzle into locking position with receptacle which rests on top of unit.
Full Dust Bag Indicator
The red dust indicator may turn on while you are cleaning to indicate that the paper bag is full and
requires replacement. Note: Full Dust Bag Indicator only functions at maximum suction power from
variable control. You can test the Full Dust Bag Indicator by placing your hand over the end of the
Curved Hose/Wand Extension when vacuum is on – Indicator Should Turn Red.
Note: Regarding Cloth Dust Bag (Reusable)
If you are using the washable cloth bag, it should be emptied for reuse. Please note however
that the cloth bag will require periodic washing, especially while vacuuming fine dust particles that
can block suction. To wash cloth bag, first remove plastic bag collar attachment by removing all
four (4) screws. (Be careful not to lose any parts.) We suggest washing by hand in warm water
with laundry detergent until clean. Do not dry in electric dryer, cloth should be laid out or left
hanging to dry and then reassembled. To order additional cloth bags or paper bags, please call
1-800-798-7398 or 1-514-842-8691. Please see end of instruction book for costs and mailing
address.
Please note your vacuum cleaner includes both a Paper Bag and a Cloth Bag. The cloth bag
offers convenience for reusability, however, please note that paper bags will offer the best cleaning
performance and clean air results. Select the one most suitable to your needs.
4
5
Replace Dust Filters
Pre-Motor Filter
Your vacuum cleaner is equipped with a filtration system to reduce
dust and pollen in your home as you clean. The white pre-motor
filter is located inside the vacuum body behind the dust bag. Check
when changing the dust bag and replace when dirty.
To replace, lift vacuum body cover, then pull the white polyfoam
straight up and out of the vacuum body, dispense of old filter. Hold
new filter with narrow round side down and slide into position
between the two posts and the motor intake.
Post-Motor Filter
1.
Remove rear filter by grasping edge, squeezing and pulling
towards you. The top of the cover will become loose and you
can remove it by pulling at a slight angle.
2.
Remove filter and dispose of filter.
3.
Insert new filter, making certain to position it over entire air
vent area.
4.
Replace rear filter cover by placing the four tabs into the four
slots at the bottom of the filter opening. Push top of cover
until it snaps into place.
or Fax to:
EURO-PRO CORPORATION warrants this product to be free from defects in material and workmanship for a
period of three (3) years from the date of the original purchase, when utilized for normal household use, subject to
the following conditions, exclusions and exceptions.
If your appliance fails to operate properly while in use under normal household conditions within the warranty
period, return the complete appliance and accessories, freight prepaid to EURO-PRO Corporation, 178 West
Service Rd., Champlain, N.Y. 12919. If the appliance is found by EURO-PRO to be defective in material or
workmanship, EURO-PRO will repair or replace it free of charge. Proof of purchase date and $9.85 to cover the
cost of return shipping and handling must be included. *
Non-durable parts including, without limitation, dust bags, filters, bulbs, brushes and electrical parts which normally
require replacement are specifically excluded from warranty.
The liability of EURO-PRO Corporation is limited solely to the cost of the repair or replacement of the unit at our
option. This warranty does not cover normal wear of parts and does not apply to any unit that has been tampered
with or used for commercial purposes. This limited warranty does not cover damage caused by misuse, abuse,
negligent handling or damage due to faulty packaging or mishandling in transit. This warranty does not cover
damage or defects caused by or resulting from damages from shipping or repairs, service or alterations to the
product or any of its parts, which have been performed by a repair person not authorized by EURO-PRO.
This warranty is extended to the original purchaser of the unit and excludes all other legal and/or
conventional warranties. The responsibility of EURO-PRO Corporation if any, is limited to the specific obligations
expressly assumed by it under the terms of the limited warranty. In no event is EURO-PRO Corporation liable for
incidental or consequential damages of any nature whatsoever. Some states do not permit the exclusion or
limitation of incidental or consequential damages, so the above may not apply to you.
This warranty gives you specific legal rights, and you may also have other rights which vary from state to state.
To order additional bags and filters or for customer service:
Call EURO-PRO Customer Service at:
THREE (3) YEAR LIMITED WARRANTY
800-798-7398
514-842-8691
514-842-6985
Monday to Friday 8:30 AM – 5:00 PM Eastern Standard Time
*Important: Carefully pack item to avoid damage in shipping. Be sure to include proof of purchase date
and to attach tag to item before packing with your name, complete address and phone number with a note
giving purchase information, model number and what you believe is the problem with item. We
recommend you insure the package (as damage in shipping is not covered by your warranty). Mark the
outside of your package “ATTENTION CUSTOMER SERVICE”.
yyyyyyyyyyyyyyyyyyyyyyyyyyyyyyyyyyyyyyyyyyyyyyyyyyyyyyyyyyyyyyy
OWNERSHIP REGISTRATION CARD
Please fill out and mail the product registration card within ten (10) days of purchase in
order to validate the foregoing Limited Warranty. The registration will enable us to contact
you in the unlikely event of a product safety notification. By returning this card you
acknowledge to have read and understood the instructions for use, and warnings set forth
in the accompanying instructions.
RETURN TO EURO-PRO CORPORATION, 178 WEST SERVICE RD., CHAMPLAIN, N.Y. 12919
IN CANADA: 3445 PARK AVE., MONTREAL, QUEBEC, H2X 2H6
_______________________________________________________________________
Appliance model
_______________________________________________________________________
Date purchased
Name of store
_______________________________________________________________________
Owner’s name
_______________________________________________________________________
Address
City
State
Postal code