1
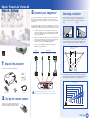
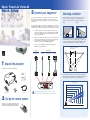
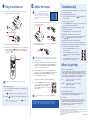
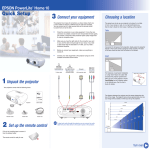
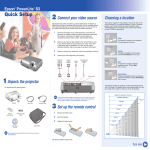
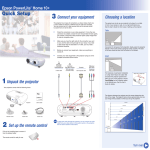
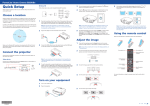
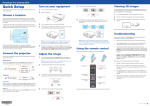
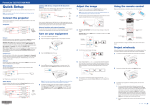
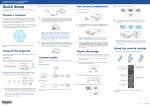
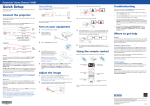
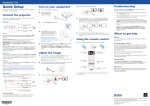
Epson PowerLite Home 20
®
®
Quick Setup
3 Connect your equipment
You can connect the projector to a computer or video source such as a DVD
player, VCR, HDTV tuner, cable or satellite box, camcorder, or video game
console. Check the specifications in the projector User’s Guide for compatible
video formats.
Choosing a location
The easiest way to set up your projector is to place it on a table
in front of your screen or wall, or on a high shelf behind you.
See the User’s Guide for other ways of setting up the projector.
Table
Shelf
The projector has four types of connections, as shown below. Each one is colorcoded and requires a different type of cable (not included). You can connect up
to four video sources and use the remote control to switch from one to the other.
Check the connectors on your video equipment. If more than one
connection is available, choose the one that provides the best quality.
For example, component video produces higher quality images than
S-video or composite video.
Make sure you have the right cable for the connection you want to use,
and the cable is long enough for your setup. For longer cable lengths,
use a high quality cable to minimize signal degradation and
interference, or consider using a distribution amplifier.
Connect your video equipment to the projector using any of the
available connections shown below.
Projector can be offset from
center by up to 25 percent of
the image’s width
Video equipment
Computer
VGA computer cable
The projector does not have to be aligned with the middle of the
screen. Just make sure it faces straight ahead (at a 90-degree angle
to the screen), and then use the horizontal lens shift dial to position
the image (see “Adjust the image” on the back of this sheet).
S-video cable
RCA video cable
(composite video)
Component
video cable
90º
1 Unpack the projector
Your projector comes with the following items:
The distance between the projector and the screen determines the
size of the image. The diagram below shows approximately how big
your image will be, based on where you set up the projector.
User’s Guide
Distance from projector to screen
Projector
25-37'
16.5-25'
8-12'
Remote control
Batteries
Power cord
NOTE
To play audio through the projector, you can connect an audio
cable from your video device to the audio-in ports on the projector.
5-7.5'
200"
3-5'
100"
2 Set up the remote control
2.5-4'
80"
300"
Screen size (diagonal)
6.5-10'
60"
40"
30"
Open the cover on the back of the remote control
and insert two AA batteries (included). Make sure
their positive (+) ends point down in the remote.
Turn over
Epson PowerLite Home 20
®
®
Quick Setup
3 Connect your equipment
You can connect the projector to a computer or video source such as a DVD
player, VCR, HDTV tuner, cable or satellite box, camcorder, or video game
console. Check the specifications in the projector User’s Guide for compatible
video formats.
Choosing a location
The easiest way to set up your projector is to place it on a table
in front of your screen or wall, or on a high shelf behind you.
See the User’s Guide for other ways of setting up the projector.
Table
Shelf
The projector has four types of connections, as shown below. Each one is colorcoded and requires a different type of cable (not included). You can connect up
to four video sources and use the remote control to switch from one to the other.
Check the connectors on your video equipment. If more than one
connection is available, choose the one that provides the best quality.
For example, component video produces higher quality images than
S-video or composite video.
Make sure you have the right cable for the connection you want to use,
and the cable is long enough for your setup. For longer cable lengths,
use a high quality cable to minimize signal degradation and
interference, or consider using a distribution amplifier.
Connect your video equipment to the projector using any of the
available connections shown below.
Projector can be offset from
center by up to 25 percent of
the image’s width
Video equipment
Computer
VGA computer cable
The projector does not have to be aligned with the middle of the
screen. Just make sure it faces straight ahead (at a 90-degree angle
to the screen), and then use the horizontal lens shift dial to position
the image (see “Adjust the image” on the back of this sheet).
S-video cable
RCA video cable
(composite video)
Component
video cable
90º
1 Unpack the projector
Your projector comes with the following items:
The distance between the projector and the screen determines the
size of the image. The diagram below shows approximately how big
your image will be, based on where you set up the projector.
User’s Guide
Distance from projector to screen
Projector
25-37'
16.5-25'
8-12'
Remote control
Batteries
Power cord
NOTE
To play audio through the projector, you can connect an audio
cable from your video device to the audio-in ports on the projector.
5-7.5'
200"
3-5'
100"
2 Set up the remote control
Open the cover on the back of the remote control
and insert two AA batteries (included). Make sure
their positive (+) ends point down in the remote.
2.5-4'
80"
60"
40"
30"
300"
Screen size (diagonal)
6.5-10'
4 Plug in and turn on
1
Remove the lens cover. Then connect the power cord to the
projector and plug it into an electrical outlet.
5 Adjust the image
NOTE
1
If you see a No signal message instead of
your video image, make sure your video
equipment is turned on. Press the Source
button on the projector or remote control to
select the port to which your equipment is
connected.
Troubleshooting
If you don’t find the answer to your problem here, see the User’s Guide
for more troubleshooting tips.
No picture appears on the screen.
Make sure the projector is turned on (the
and not flashing).
Make sure the lens cover is off.
Press the A/V Mute button on the remote control to make sure the
picture hasn’t been turned off temporarily.
No signal
Rotate the focus ring to sharpen the image. Rotate the zoom
ring to reduce or enlarge it.
Focus and zoom rings
Focus ring
The
power light is green
The image doesn’t fit on the screen correctly, or it is
stretched or compressed.
Press the Aspect button to select a different aspect ratio.
power light turns orange.
The picture is wider at the top of the screen.
Power light
You’ve extended the feet, causing the image to become “keystoned.”
Use the
or
Keystone button to correct the problem.
Zoom ring
2
2
Turn on your connected video equipment.
3
Aim the remote control at the projector or the screen and press the
On button (or press the
Power button on the projector). You
hear a beep, the
power light flashes green, and the projector
lamp starts to come on.
If the image is not centered on the screen, use the lens shift
dials to adjust its position.
The picture is taller on the left or right side.
The projector is set at an angle to the screen. Face it squarely toward
the screen, and use the horizontal lens shift dial to center the image.
The colors on the screen don’t look right.
Up
Make sure the Setup Level is set to 7.5% (see
“Adjust the image”).
Press the Color Mode button on the remote
control to select the best setting for your viewing
environment.
Use the Picture buttons on the remote control to
adjust the brightness, contrast, and color.
Down
Left
Right
On button
NOTE
3
To make the best use of this feature, keep the projector level and
do not extend its feet. Face the the projector squarely toward the
screen (not angled).
If the image is stretched or cut off, you may need to change the
aspect ratio. Press the Aspect button and select Normal for
standard TV or computer images (4:3 aspect ratio), or Zoom for
widescreen or letterbox format (16:9).
Where to get help
Telephone Support Services
4
NOTE
The lamp reaches maximum brightness in about 45 seconds.
5
Turning off the projector
1
When you’re finished using the projector, press the Off button on
the remote control.
The
To use the Epson PrivateLine® Support service, call (800) 637-7661 and
enter the PIN on the included Epson PrivateLine Support card. This
service is available 6 AM to 6 PM Pacific Time, Monday through Friday,
for the duration of your warranty period. You may also speak with a
projector support specialist by dialing one of these numbers:
Exit the menu system when done (press the Menu button).
U.S.:
(562) 276-4394, 6 AM to 6 PM, Pacific Time,
Monday through Friday
Canada:
(905) 709-3839, 6 AM to 6 PM, Pacific Time,
Monday through Friday
Use the Color Mode button on the remote
control to optimize the image for your viewing
environment. Then use the other Picture
buttons to adjust the brightness, contrast, and
color as needed.
power light flashes orange as the projector cools down.
When the
power light is a steady orange, unplug the projector.
Caution: Never unplug the projector when the
green or flashing orange.
power light is
Toll or long distance charges may apply.
Electronic Support Services
NOTE
2
To prevent dark areas of the image from looking washed-out,
change the Setup Level. Press the Menu button, and then select
Settings > Screen > Setup Level. Highlight 7.5%, and then
press the Enter button to select it.
See your User’s Guide for more information about adjusting the
image.
Register today to get product updates, special promotions, and
customer-only offers. You can use the registration card included in
your Start Here kit, or register online at www.epson.com/webreg.
Epson provides technical assistance through electronic support
services 24 hours a day at http://support.epson.com.
Accessories
You can purchase screens, carrying cases, or other accessories
from an Epson authorized reseller. To find the nearest reseller, please
call 800-GO-EPSON (800-463-7766). To purchase online, visit
www.epsonstore.com (U.S. sales only). In Canada, please call
(800) 463-7766 for reseller referral.
Epson is a registered trademark of Seiko Epson Corporation. PowerLite and PrivateLine are registered
trademarks and Epson Store is a service mark of Epson America, Inc.
General Notice: Other product names used herein are for identification purposes only and may be trademarks
of their respective owners. Epson disclaims any and all rights in those marks.
© 2005 Epson America, Inc. 6/05
Printed in XXX
CPD-20174