1
ASK Proxima C90 and C100 (DP6100 – DP6150) Projectors
Frequently Asked Questions: Computer
The image will not focus but I can make it larger or smaller.
Make sure that you are turning the focus ring. The zoom ring is larger and more prominent, but the focus ring is on the
outside, at the front of the lens.
What resolutions is this projector capable of displaying?
VGA, SVGA, XGA, SXGA.
640x480, 720x400, 800x600, 832x624, 1024x768, 1152x864, 1152x870, 1280x1024.
The projected image reverts to the logo screen or to a blank screen during periods of computer inactivity.
1.
2.
This may be caused by a power saving utility on the computer that disables the video output signal after a specified
period of inactivity. Disable all power saving programs and screen savers on the computer to prevent signal
interruption. Refer to the computer documentation to disable power saving utilities.
If you have disabled the computer power savers and screen savers, and the issue persists, it may be due to a setting
in the projector called DPMS Enable. The power button will blink green slowly when the projector is in DPMS mode or
is entering DPMS mode.
DPMS Enable turns on the Display Power Management System (DPMS). When it is on, the projector turns the lamp
off after 3 minutes of not detecting an active source. The projector will return to normal activity immediately if it
detects an active source. After 5 additional minutes, the projector turns off. You must press the Power button to turn
the projector back on. The LED blinks green when in DPS mode.
To disable or enable DPMS, press the Menu button on the keypad. Navigate to Basic > Setup > System. Select the
DPMS Enable checkbox to enable the function, or clear the checkbox to turn it off.
The image appears to be stretched vertically or horizontally.
1.
2.
3.
Make sure the Aspect Ratio is set to 4:3. Press the Menu button. Then navigate to Basic > Advanced > Picture. Make
sure 16:9 is not checked.
You can also adjust the picture width in the Picture menu. Select Width, and then use the arrow keys to adjust how
wide the picture is.
Reset the projector to the factory default settings. Press the Menu button. Then navigate to Basic > Advanced >
Service. Select Factory Reset. Note that if you have created special settings (for example, colors and sources), these
will be reset to the original defaults.
I am playing a DVD on my laptop, but the projector displays a blank screen.
If the DVD plays satisfactorily on your laptop, you should be able watch it with the projector. However, some laptops do not
have the resources to play the movie on both its own screen and through the projector. When this happens, you will probably
just see a blank screen. To solve this issue, press and hold the FN key on the laptop, then press the appropriate function key
(F1, F2, F3, etc.). The function key should be labeled “LCD/CRT” or will have a monitor icon on it. You may need to press the
function key a couple times. When you do this, you cycle through three settings: the image only on the laptop, the image on
both the laptop and projector, and the image only on the projector. You want to set it so the movie appears only on the
screen.
The LED on the projector keypad is red (or orange). No image may be projected. What is wrong?
This projector has a power button that lights and an alarm LED on the keypad. The power button shines green or orange,
depending on the state of the projector. The Alarm LED is not lit under normal circumstances. Your User Guide contains a
guide to LED status and behavior.
Copyright © 1997-2004 InFocus Corporation.
All Rights Reserved.
The projector does not display the computer image.
1.
2.
3.
4.
5.
6.
7.
Press the Computer button on the projector keypad, or the Source button on the remote control to select the active
computer source. You may need to press the button several times.
Make sure the VGA cable is tightly connected to either of the blue VGA Computer ports on the projector. Or ensure
that the DVI cable tightly connected to the DVI connector. Check the connections to the computer. Make sure the
other end of the cable connects to the either the DVI or the Monitor connector on the computer.
Verify that the power cable is correctly connected to the projector and that the power button on the keypad is solid
green (not blinking).
Restart both the computer and projector. Turn on the projector first, then the computer.
Reset the projector to the factory default settings. Press the Menu button. Then navigate to Basic > Advanced >
Service. Select Factory Reset. Note that if you have created special settings (for example, colors and sources), these
will be reset to the original defaults.
Verify that the computer resolution is set to 1024x768 (XGA resolution).
If you're using a laptop and the computer image still does not display on the projector, try activating the computer's
external video port with special keystrokes. Press and hold the FN key on the laptop and then press the appropriate
function key (F1, F2, F3, etc.) that's marked LCD/CRT or marked with a picture of a monitor. (Refer to the laptop
activation chart or your laptop documentation for further video port activation instructions.)
You may need to press the Function key more than once. Many laptops cycle through a series of configurations at
each key press, including image on the screen, but not on the laptop, image on both the screen and laptop, image
on laptop only. Be sure to wait five seconds or so after pressing the function key. Sometimes it takes the projector a
few seconds to communicate with the laptop.
The image is not perfectly rectangular. ("Keystoning")
When a projected image is wider at the top or the bottom, or taller on the right or left side, we say that the image is
'keystoned'. Keystoning happens when your projector is not perpendicular to the screen, either in the vertical plane or the
horizontal plane.
Correcting vertical keystoning
If you use the elevator to tilt the front of the projector up so you can get the image higher on the wall, the image will suffer
from vertical keystoning. Likewise, if you mount the projector on the ceiling and need to tilt it to get the image on the
screen, you'll also get a keystoned image.
or
1.
Try raising or lowering the projector. You can correct for keystoning by making sure the projector is placed
perpendicular to the viewing screen. For example, it may be necessary to place the unit on a higher surface to
correct the image. Or you can add an extension to a ceiling mount that allows you to mount the projector lower.
2.
Finally, change the Keystone setting. For most models, you can use the Keystone function on the projector keypad
or in the menu of the projector to adjust the keystone digitally.
Copyright © 1997-2004 InFocus Corporation.
All Rights Reserved.
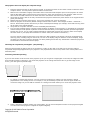
Correcting horizontal keystoning
If you place the projector so that the lens is not perpendicular to the screen in the horizontal plane, the image can suffer
from horizontal keystoning.
If your image looks like the one above, slowly rotate the projector until the image is rectangular.
The image on the computer monitor and/or projection screen flickers.
Make sure that the refresh rate on your computer is set between 60 Hz and 75 Hz, or Adapter Default. If you are using a
laptop, always use AC power, not the battery.
"Signal out of range" or "Setting up image" message periodically appears.
The computer refresh rate is either too high or too low for the projector to synchronize with. For PC’s, go to Start > Control
Panel > Display > Settings > Advanced > Adapter (This varies by operating system and by video card. See your
computer/video card documentation for more information). If the adapter allows you to select a profile, choose 1024x768,
High Color, 60Hz. You might also be able to change the refresh rate on the Monitor tab.
For Macintosh, go to Apple Menu > Control Panel > Display or Monitor and Sound to change your resolution and refresh rate.
The image is tinted or the color is distorted.
1.
2.
Reset the projector to the factory default settings. Press the Menu button. Then navigate to Basic > Advanced >
Service. Select Factory Reset. Note that if you have created special settings (for example, colors and sources), these
will be reset to the original defaults.
Change sources. Try connecting the projector to another computer.
Copyright © 1997-2004 InFocus Corporation.
All Rights Reserved.
3.
4.
5.
6.
NOTE
Try different cables. It could be a faulty cable.
If the color problem persists, check the cables for bent or broken pins. If any pins are damaged, the cable will need
to be replaced with an ASK Proxima-approved cable. Please contact ASK Proxima Technical Support for part
information.
Upgrade the projector system software. Click here for more information about software upgrades.
If the projector still will not display the image, it is possible that there is an internal problem that requires repair.
Take the projector to your dealer or contact ASK Proxima Technical Support.
Color adjustment settings in the Basic > Advanced > Picture menu work only with video sources, and do not apply to
computer sources.
The image is cut in half or is cropped on one side.
1.
2.
Make sure the image is not digitally magnified. Press the Magnify button on the remote control to confirm the image
is the normal size.
Check your computer's resolution. This projector runs in XGA resolution (1024x768 pixels), and offers intelligent
compression for resolutions up to 1280 x 1024 (SXGA). It also can expand images at 640 x 480. Some desktop
computers run at a higher resolution than this, which can cause display problems.
For best results, make sure your computer is set to 1024 x 768 resolution. If you're using a laptop, disable the
internal display so the image appears on the projection screen only.
The image appears split or scrambled when coming back from Standby or Video mode into a PowerPoint
slideshow.
When bringing the projector out of Standby or Video mode, make sure that PowerPoint is not in the full-screen slideshow
mode. The projector is unable to establish a signal lock on the non-standard resolution of a PowerPoint slideshow.
Copyright © 1997-2004 InFocus Corporation.
All Rights Reserved.