1
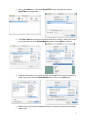
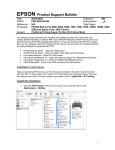
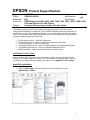
EPSON
Product Support Bulletin
Date:
PSB #:
Reference:
Product(s):
Originator:
09/25/2002
MS
Authorization:
PSB.2002.09.004
Total Pages:
N/A
EPSON Stylus Pro 9000, 9500, 9600, 7000, 7500, 7600, 10000, 10600, 5000,
5500 and Stylus Color 3000 Printers
Subject:
PostScript Printing Support for Mac OS X Native Mode
This bulletin provides instructions for installing and configuring a Mac OS X Client with your
existing EPSON hardware or software RIP. If your EPSON Professional Wide Format printer was
bundled with one of the RIP packages listed below, or if you had purchased the RIP as an option,
then you can configure a Mac OS X Client with OS Version 10.2 and above for PostScript printing
by simply installing the appropriate RIP PPD.
•
•
•
•
•
•
EFI RS 5000 LX Series – Stylus Pro 5000 printer
EFI RS 5100 X2 Series - Stylus Pro 9000, 7000, 9500 and 7500 printers
Fiery Spark Designer – Stylus Pro 5500 printer
Fiery Spark Professional 1.0 – Stylus Pro 5500 and Stylus Pro 10000ARC/DYE printers
Fiery Spark Professional 2.0 – Stylus Pro 9600UCM/7600UCM printers
EPSON StylusRIP - Stylus Color 3000 and Stylus Pro 5000 printers
Installation Instructions:
Setup your existing RIP Server as per the instructions provided in the User’s Guide that came
with your RIP. To setup a Mac OS X Version 10.2 Client follow the instructions below. There are
two ways you can add a PPD and configure your printer in OS X, AppleTalk or IP Printing.
AppleTalk Installation:
1. Open the Print Center, which can be found on your hard disk driver under
Applications - Utilities
1
2. Click on the Add button. Then select AppleTalk from the top sub-menu and your
AppleTalk zone if applicable.
3. The Print Center should scan the network and find all your devices. Select your printer
from the list and click on the Printer Model sub-menu. Select Other to continue.
4. Navigate to the location of your PPD file. After selecting the PPD file it should reflect the
name of the printer under the Printer Model section. Click on the Add button.
5. Repeat the process to add your additional queues. Your Mac OS X Client should now be
ready to print.
2
IP Printing Installation:
1. Open the Print Center, which can be found on your HDD under Applications Utilities
2. Click on the Add button and select IP Printing from the sub-menu.
3. Enter the IP Address of the Postscript Server under Printer’s Address. Uncheck the
Use default queue on server and type in the queue you wish to add. Click on the
Printer Model sub-menu and select Other.
3
4. Navigate to the location of your PPD file. After selecting the PPD file it should reflect the
name of the printer under the Printer Model section. Click on the Add button.
5. The Print Center should now show the Queue that you typed along with the IP address.
6. Repeat the process to add your additional queues. Your Mac OS X Client should now be
ready to print.
Note: The StylusRIP does not have a separate folder on the CD to select the printer’s PPD. In
order to select the PPD it must be copied from another client’s Printer Description folder as
shown below (HDD - System folder - Extensions folder - Printer Description folder).
4