1
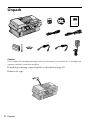
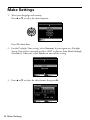
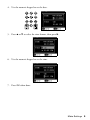
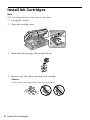
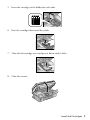
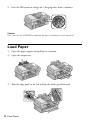
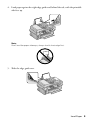
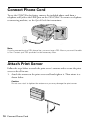
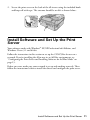
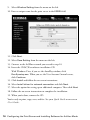
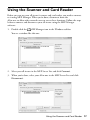
®
Epson Stylus CX9475Fax
Start Here
Unpack
Caution:
Do not open ink cartridge packages until you are ready to install the ink. Cartridges are
vacuum packed to maintain reliability.
If anything is missing, contact Epson® as described on page 20.
Remove the tape.
2 Unpack
Turn On
1. Connect the power cable.
Caution:
Do not connect to your computer yet.
2. Press the P On button.
Turn On 3
Make Settings
1. Select your language and country.
Press u or d to select the desired option:
Press OK when done.
2. For the Daylight Time setting, select Summer if your region uses Daylight
Saving Time and it’s currently in effect. (DST is effective from March through
November.) Otherwise, select Winter to turn off the setting.
3. Press u or d to select the date format, then press r.
4 Make Settings
4. Use the numeric keypad to set the date.
5. Press u or d to select the time format, then press r.
6. Use the numeric keypad to set the time.
7. Press OK when done.
Make Settings 5
Install Ink Cartridges
Note:
Don’t load paper before installing the ink cartridges.
1. Lift up the scanner.
2. Open the cartridge cover.
3. Shake the ink cartridges, then unpack them.
4. Remove only the yellow tape from each cartridge.
Caution:
Don’t remove any other seals from the cartridges.
6 Install Ink Cartridges
5. Insert the cartridges in the holder for each color.
6. Press the cartridges down until they click.
7. Close the ink cartridge cover and press it down until it clicks.
8. Close the scanner.
Install Ink Cartridges 7
9. Press the OK button to charge ink. Charging takes about 2 minutes.
Caution:
Don’t turn off the CX9475Fax while the On light is flashing or you’ll waste ink.
Load Paper
1. Open the paper support and pull up its extension.
2. Open the output tray.
3. Slide the edge guide to the left and flip the feeder guard forward.
8 Load Paper
4. Load paper against the right edge guide and behind the tab, with the printable
side face up.
Note:
Don’t load the paper sideways; always load it short edge first.
5. Slide the edge guide over.
Load Paper 9
Connect Phone Cord
To use the CX9475Fax for faxing, connect the included phone cord from a
telephone wall jack to the LINE port on the CX9475Fax. To connect a telephone
or answering machine, see the Quick Guide for instructions.
Note:
If you’re connecting to a DSL phone line, you must use a DSL filter or you won’t be able
to fax. Contact your DSL provider for the necessary filter.
Attach Print Server
Follow the steps below to attach the print server’s antenna and to secure the print
server to the all-in-one.
1. Attach the antenna to the print server and hand-tighten it. Then orient it as
shown below.
Caution:
Do not use a tool to tighten the antenna or you may damage the print server.
10 Connect Phone Cord
2. Secure the print server to the back of the all-in-one using the included hookand-loop self stick tape. The antenna should be on left as shown below:
Install Software and Set Up the Print
Server
Your software works with Windows® XP, XP Professional x64 Edition, and
Windows Vista® 32- and 64-bit.
Follow the instructions in this section to set up the CX9475Fax for use on a
network. If you’re installing the all-in-one in an Ad Hoc environment, see
“Configuring the Print Server and Installing Software for Ad Hoc Mode” on
page 15.
Before you start, make sure your network is set up and working correctly. Then
follow the instructions below to install the drivers and configure the print server.
Install Software and Set Up the Print Server 11
Installing Software and Connecting the Print
Server
You need to install the drivers and other software for the all-in-one and print
server. Follow the on-screen instructions to connect and power on the print server.
Note:
ABBY® Fine Reader Sprint is not included with the Epson Stylus CX9475Fax.
1. Insert the CX9475Fax software installation CD.
With Windows Vista, if you see the AutoPlay window, click
Run Epsetup.exe. When you see the User Account Control screen,
click Continue.
2. Click Install and follow the on-screen instructions.
3. Select Install driver for network connection and click Next.
Note:
If you want to install your all-in-one on a single computer using a USB cable, select
Install driver for USB. Follow the on-screen instructions. When installation is
complete, you’re ready to print.
4. Select the correct option for setting up your all-in-one for the first time, or
for an additional computer. Then click Next and follow the on-screen
instructions.
5. Follow the on-screen instructions to plug the included USB cable into the
print server and your all-in-one. Then click Next.
6. Plug one end of the included Ethernet cable into any available port on your
network access point or router. Then plug the other end into the Ethernet
port on the print server and click Next.
7. Plug the print server power adapter into the print server and an electrical
outlet. Then click Next.
8. Make sure your all-in-one is plugged in and turned on. Then click Next.
The print server software is installed.
Follow the instructions in one of these sections to configure the print server:
■
Configuring for Easy Installation: If you want to use the all-in-one on a
wireless network using standard settings
■
Configuring for Advanced Installation: If you want to configure the IP
address manually or use the print server in a wired network environment
12 Install Software and Set Up the Print Server
Configuring the Print Server with Easy
Installation
Follow these steps to configure the print server and connect to your wireless
network using standard settings:
1. When you see this window, select Easy Installation and click Next.
You see a list of the wireless networks that the print server finds:
2. Select your wireless network, then click Next.
3. If you see the Network Security settings screen, enter your security key and
click Next.
4. Follow the on-screen instructions to disconnect the Ethernet cable from the
print server and your network access point or router.
5. Follow the on-screen instructions to complete the installation.
6. When you’re done, remove the CD.
You’re ready to print, copy, scan, and fax. See your Quick Guide or on-screen
User’s Guide.
Install Software and Set Up the Print Server 13
Configuring the Print Server with Advanced
Installation
Follow these steps to configure the print server using custom settings:
Note:
If you’re installing the all-in-one in an Ad Hoc environment, see “Configuring the Print
Server and Installing Software for Ad Hoc Mode” on page 15.
1. When you see this window, select Advanced Installation and click Next.
2. Select Wireless or Wired and click Next.
3. Select Easy Installation to configure the IP address automatically (using
DHCP) or Advanced Installation to configure it manually, and click Next.
4. Do one of the following:
■
If you chose to configure the address manually, you see a configuration
window. Enter the IP address, subnet mask, and default gateway.
■
If you chose to configure the address automatically, continue with the
next step.
5. Select your wireless network, then click Next.
6. If you see the Network Security settings screen, enter your security key and
click Next.
7. Confirm your network settings, then click Next.
8. Follow the on-screen instructions to complete the installation.
9. When you’re done, remove the CD.
You’re ready to print, copy, scan, and fax. See your Quick Guide or on-screen
User’s Guide.
14 Install Software and Set Up the Print Server
Configuring the Print Server and
Installing Software for Ad Hoc Mode
Follow the instructions in this section to set up the CX9475Fax for Ad Hoc mode.
1. Plug the included USB cable into the print server and your all-in-one.
2. Plug one end of the included Ethernet cable into your computer. Then plug
the other end into the Ethernet port on the print server.
3. Plug the print server power adapter into the print server and an electrical
outlet.
4. Make sure your all-in-one is plugged in and turned on.
5. Configure your computer with a static IP address of 192.168.2.xxx (where xxx
is any number between 3 and 254).
6. Open a web browser and type 192.168.2.2 into the address bar.
7. Log into the print server using admin as the User name and 1234 as the
Password.
You see a screen like this one:
8. Select Setup Wizard from the navigation bar at the top.
Configuring the Print Server and Installing Software for Ad Hoc Mode 15
9. Select Wireless Setting from the menu on the left.
10. Enter a unique name for the print server in the ESSID field.
11. Click Next.
12. Select Save Setting from the menu on the left.
13. Connect to the Ad Hoc network you created in step 10.
14. Insert the CX9475Fax software installation CD.
With Windows Vista, if you see the AutoPlay window, click
Run Epsetup.exe. When you see the User Account Control screen,
click Continue.
15. Click Install and follow the on-screen instructions.
16. Select Install driver for network connection and click Next.
17. Select the option for setting up an additional computer. Then click Next.
18. Follow the on-screen instructions to complete the installation.
19. When you’re done, remove the CD.
You’re ready to print, copy, scan, and fax. See your Quick Guide or on-screen
User’s Guide.
16 Configuring the Print Server and Installing Software for Ad Hoc Mode
Using the Scanner and Card Reader
Before you can use your all-in-one’s scanner and card reader, you need to connect
to it using MFP Manager. When you’re done, disconnect from the
all-in-one to allow other network users to access these functions. Follow the steps
below to connect and disconnect your all-in-one using the MFP Manager
software:
1. Double-click the
MFP Manager icon in the Windows taskbar.
You see a window like this one:
2. Select your all-in-one in the MFP Server List and click Connect.
3. When you’re done, select your all-in-one in the MFP Server List and click
Disconnect.
Using the Scanner and Card Reader 17
Solving Problems
Check the solutions below if you’re having trouble installing your all-in-one.
The print server can’t be found
■
Make sure that the print server is turned on and connected correctly.
■
Make sure the antenna is connected to the print server and that it is upright.
■
Make sure that your computer and print server are connected to the wireless
access point. If the print server finds another access point with the same SSID
as your access point, you should personalize your SSID to avoid potential
conflicts.
■
Make sure that the print server is connected to your network with the
included Ethernet cable during the installation.
■
If you have a software firewall installed on the computer you want to print
from, you need to grant full network access to the Edimax software. If
necessary, open TCP port 14135 and UDP ports 69, 13364, 13621, 13878,
and 14135 in your firewall software. See your firewall documentation for
details.
The print server doesn’t find a wireless network
■
Make sure your access point is set to broadcast its SSID. If it is hidden, you
will not be able to select it when installing the print server.
■
Make sure the antenna is connected to the print server and that it is oriented
correctly.
■
Make sure that the print server is within range of the wireless access point.
The print server can see the network, but can’t connect to it
■
Make sure that your computer and print server are connected to the same
wireless access point. If the print server finds another access point with the
same SSID as your access point, you should personalize your SSID to avoid
potential conflicts.
■
Make sure that your wireless access point is set to use one of the print server’s
supported security settings: None, WEP 64, WEP 128, or WPA-PSK.
■
If your wireless access point has security enabled, make sure that you entered
the correct security key or passphrase.
18 Solving Problems
■
If your wireless access point has MAC address filtering enabled, make sure you
added the print server’s MAC address to the list of allowed devices to connect
to the access point.
The computer can see the print server, but can’t connect to it
■
Make sure that the print server is connected to your access point using an
ethernet cable during the installation.
■
If you have a software firewall installed on the computer you want to print
from, you need to grant full network access to the Edimax software. If
necessary, open TCP port 14135 and UDP ports 69, 13364, 13621, 13878,
and 14135 in your firewall software. See your firewall documentation for
details.
Printing, scanning, or card reading is slow
■
Try moving the computer and print server closer to your wireless access point.
■
Don’t place the computer, print server, or wireless access point near
microwaves, cordless telephones, or other sources of wireless interference.
■
If your wireless access point and print server are located next to each other,
you can try connecting them with an ethernet cable.
The software installation failed
Remove and reinsert the software installation CD. Then follow the steps
on page 11.
Solving Problems 19
Where to Get Help
Epson Technical Support
Internet Support
Visit Epson’s support website at epson.com/support and select your product for
solutions to common problems. You can download drivers and documentation,
get FAQs and troubleshooting advice, or e-mail Epson with your questions.
Speak to a Support Representative
Before you call Epson for support, please have the following information ready:
■
Product name (Epson Stylus CX9475Fax all-in-one)
■
Product serial number (located on the label in back)
■
Proof of purchase (such as a store receipt) and date of purchase
■
Computer configuration and description of the problem
Then call:
■
U.S.: (562) 276-4382, 6 AM to 6 PM, Pacific Time, Monday through Friday
■
Canada: (905) 709-3839, 6 AM to 6 PM, Pacific Time, Monday through
Friday
Days and hours of support are subject to change without notice. Toll or long
distance charges may apply.
20 Where to Get Help
Epson and Epson Stylus are registered trademarks, and Epson Exceed Your Vision is a
trademark of Seiko Epson Corporation.
General Notice: Other product names used herein are for identification purposes only
and may be trademarks of their respective owners. Epson disclaims any and all rights in
those marks.
The contents of this manual are subject to change without notice.
© 2008 Epson America, Inc. 1/08
CPD-25134
Printed in USA