1
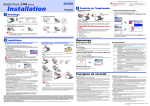
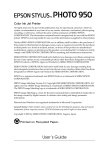
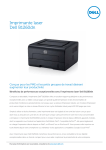
Read This First
for Macintosh OS X Users
If your Apple® Macintosh® is running the OS X operating system, first set up your
EPSON Stylus® printer as described on the Start Here sheet. Then follow the
instructions in this booklet to install and use your printer software. You’ll find
instructions here on:
■
Installing your printer software, below
■
Adding your printer to the Print Center, on page 3
■
Printing from an OS X application, on page 5
■
Monitoring your print job, on page 8
■
Using the printer utilities, on page 9
The screens shown in this booklet may differ slightly from the ones you
see on your Macintosh, depending on which printer you have.
Installing Your OS X Printer Software
When the Start Here sheet instructs you to install your printer software, follow these
steps:
1. Make sure your printer is turned on and connected to your Macintosh. Then start
up your Macintosh in OS X.
2. When you see your Macintosh icons, put the EPSON® CD-ROM in your
CD-ROM or DVD drive.
3. Double-click the
EPSON CD-ROM icon to open its window.
4. Double-click the
OS X Driver Installer.dmg file. The Disk Copy Utility
places a drive icon for your printer on your desktop.
5. Double-click the
drive icon named for your printer (such as SP820) to open
it. (You may need to close or move the CD-ROM window to see the drive icon.)
6. Double-click the
Installer.pkg file for your printer, such as
SP820Series_Installer.pkg. If you set up an administrator password when you
installed OS X, you see this screen:
Click this icon to
enter your password
Click the
lock icon, enter your administrator password, and click OK. You
must enter this password to install your printer software.
7. At the next screen, click Continue.
8. Read the license agreement and click Continue, then click Agree.
9. Select the OS X drive on which you want to install your printer software, then
click Continue. You see this screen:
Click Install
10. Click Install, then click Continue Installation. The printer driver and utilities
are installed.
2
11. At the last screen, click Restart to restart your system.
12. Start up your Macintosh in OS 9 and follow the instructions on your Start Here
sheet to install the Macintosh OS 9 printer driver, optional software, and
electronic documentation.
You must install the printer driver on OS 9 separately so you can print from
your Macintosh Classic applications in addition to OS X applications.
Adding Your Printer to the Print Center
After you’ve installed your printer software, you need to add your printer to the OS X
Print Center. Follow these steps:
1. Double-click the Applications folder on your drive.
2. Double-click the Utilities folder.
3. Double-click Print Center.
4. If you don’t have any other printers added to Print Center, you see the screen
below. Click Add.
If you don’t see this screen, go to step 5.
Click Add
3
5. When you see the Printer List screen, click Add Printer.
Click Add Printer
6. Select EPSON USB in the Directory Services list at the top of the screen. Then
click your printer in the list that appears and click Add.
Make sure EPSON USB is
shown here. . .
click your printer . . .
then click Add
7. Your printer appears in the Printer List. Close Print Center.
4
Printing From an OS X Application
If you’re using an OS X compatible printing application, such as TextEdit, follow the
steps below to print a document.
If you’re using an application that’s compatible only with Macintosh
Classic mode, follow the steps on your Start Here sheet or in your Printer
Basics book (if available) to print your document.
1. From the File menu, select Page Setup. You see a screen like this:
Select your
printer from
the Format for
pop-up menu
2. Select your printer from the Format for menu.
3. Select the Paper Size, Orientation, and any other settings you want to use and
click OK.
4. Select Print from the File menu. You see a screen like this:
Click here and
select Print
Settings
5
5. Select Print Settings from the pull-down menu. You see a group of settings like
this:
Select the type of
paper you loaded
Select the Ink color
Select Automatic
mode
Select higher
quality, faster
printing, or an
in-between setting
(if available)
Click Print
Depending on your printer, the settings you see may be different from the
ones shown here.
Select the following settings:
■
Choose the paper you’re printing on in the Media Type list. If you’re not
sure which setting to choose, see your Printer Basics book or on-screen
Reference Guide.
■
Set the Ink option to Color to print a color document. To print a black text
document, click Black.
■
Set the Mode option to Automatic. It’s the easiest way to get good printing
results for most projects.
■
Set the slider to Quality or Speed to select high-quality printing, faster
printing, or an in-between setting (if available). (The slider may not be
available for some paper types.)
For details on the other available print settings, click Help or see your
Printer Basics book or on-screen Reference Guide. The OS X printer driver
contains a subset of the settings available with the Macintosh printer
driver described in the rest of your documentation.
6
6. You can also choose other print settings by selecting these options in the
pull-down menu:
■
Copies & Pages, to select the number of copies or a page range
■
Layout, to select page layout options
■
Output Options, to save your print job as a PDF file
■
Color Management, to select ColorSync® or adjust the color controls or
gamma setting
■
Summary, to view a list of all your selections
■
Save Custom Setting, to save your selections for future use.
7. When you’re ready to print, click Print. The Print Center icon appears in the
dock on the bottom of your desktop.
See the next section for instructions on monitoring your print job.
7
Monitoring Your Print Job
After you click Print, you can monitor the progress of your print job using the Print
Center. Follow these steps:
1. Click the Print Center icon when it appears in the dock on the bottom of your
desktop. You see a screen like this:
2. From here you can monitor the progress of your print job or do one of the
following:
■
click the print job, then click Delete to delete the job
■
click the print job, then click Hold to pause printing
■
click a print job marked “Hold” and click Resume to resume printing
■
if multiple print jobs are listed, click a print job, then click the Priority arrow
as necessary to reorder the jobs
3. When you’re finished, close Print Center.
8
Using the Printer Maintenance Utilities
When you need to run a nozzle check, clean or align the print head, or check the level
of ink in the ink cartridges, follow the instructions in this section.
1. Double-click the Applications folder on your drive.
2. Double-click EPSON Printer Utility. You see the Printer List:
Select your
printer, then . . .
Click OK
3. Select your printer and click OK. You see the EPSON Printer Utility screen:
9
4. Double-click one of the following utility icons:
■
EPSON StatusMonitor, to check the level of ink in your ink cartridges
■
Nozzle Check, to print a test pattern and check to see if you need to clean
your print head
■
Head Cleaning, to clean your print head and check the results by printing a
nozzle check page
■
Head Alignment, to correct vertical misalignment of your print head
5. Follow the on-screen instructions to run the utility. For details, see your Printer
Basics book or on-screen Reference Guide.
6. When you’re finished, close the EPSON Printer Utility and any open windows on
your screen.
10
Copyright Notice
All rights reserved. No part of this publication may be reproduced, stored in a retrieval system, or transmitted in
any form or by any means, electronic, mechanical, photocopying, recording, or otherwise, without the prior
written permission of SEIKO EPSON CORPORATION. The information contained herein is designed only for
use with this EPSON printer. EPSON is not responsible for any use of this information as applied to other
printers.
Neither SEIKO EPSON CORPORATION nor its affiliates shall be liable to the purchaser of this product or third
parties for damages, losses, costs, or expenses incurred by purchaser or third parties as a result of: accident, misuse,
or abuse of this product or unauthorized modifications, repairs, or alterations to this product, or (excluding the
U.S.) failure to strictly comply with SEIKO EPSON CORPORATION’s operating and maintenance instructions.
SEIKO EPSON CORPORATION shall not be liable for any damages or problems arising from the use of any
options or any consumable products other than those designated as Original EPSON Products or EPSON
Approved Products by SEIKO EPSON CORPORATION.
A Note Concerning Responsible Use of Copyrighted Materials
Digital cameras and scanners, like photocopiers, conventional cameras, and ink jet printers, can be misused by
improper copying and reprinting of copyrighted material. While some countries’ laws permit limited copying of
copyrighted material in certain circumstances, those circumstances may not be as broad as some people assume.
EPSON encourages each user to be responsible and respectful of the copyright laws when using digital cameras,
scanners, and ink jet printers.
Trademarks
EPSON and EPSON Stylus are registered trademarks of SEIKO EPSON CORPORATION.
General Notice: Other product names used herein are for identification purposes only and may be trademarks of
their respective owners. EPSON disclaims any and all rights in those marks.
11
Printed on recycled paper
Printed in USA
Copyright © 2001 by Epson America, Inc.
CPD-13115
4020236-00
10/01