1
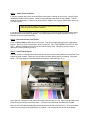
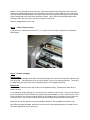
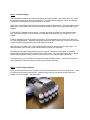
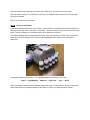
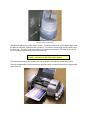
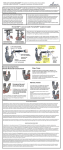
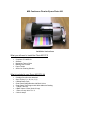
MIS Continuous Flow for Epson Photo 900
Installation Instructions
What you will need to Install the Photo 900 CFS
•
•
•
•
•
•
Complete CFS-900P Kit
Scissors
Measuring Tape or Ruler
Marking Pen or Pencil
Paper Towels
Alcohol or Cleaning Solution
What is included in your Photo 900 CFS Kit
•
•
•
•
•
•
•
•
•
Cartridge Set with tubes attached
Set of 6 Inks (C, Lc, M, Lm, Y, K)
6 Drilled Bottle Caps
Clear Plastic Bridge Bracket with Black Velcro
Clear Plastic Tube Support with White Adhesive Backing
1 Beige Tube Clip
6 Black Velcro Circles (Hook & Loop)
1 Piece of Loop Velcro ¾ x ¾
2 thin tie wraps.
Step 1 - Check Printer Condition
If you have a brand new printer, follow the Epson instructions for setting up your printer. Use the Epson
cartridges that came with the printer. Follow normal installation instructions for the software. Test the
printer by printing pictures. Learn how to use the Epson utilities to run a Nozzle pattern check and to run
a Cleaning Cycle.
Make sure that the printer can produce a perfect nozzle pattern before
proceeding with Permaflow installation.
If you have been using the printer in the past, just make sure it produces a perfect nozzle pattern before
proceeding with the Permaflow installation. If the Nozzle pattern has any gaps whatsoever, then run
cleaning cycles until it prints perfectly.
Step 2 – Disconnect Power From Printer
Push, but do not hold the INK button on the printer. This will move the cartridges to the “replacement”
position. After they move to this position, which is on the left, PULL THE POWER PLUG OUT OF THE
WALL. Now the cartridges can be moved from side to side by hand. We will tell you later when to
reattach the printer power plug (step 9).
Step 3 – Install Tube Supports
Use your alcohol or cleaning solution and clean the top of the printer housing where the clear plastic Tube
Support is going to attach. Make sure you wipe this area clean and dry before proceeding. See photo
below. (The Tube Support is the clear plastic piece with the white foam tape on it.)
Use a pencil or marking pen, and mark a line on the printer housing, at 3 1/8 inches from the edge of the
printer housing as shown in the above photo. This photo was taken after the tubes were installed.
Next, you will notice that the Bridge Bracket has both the Hook and Loop Velcro on it. The Hook portion
of the Velcro is going to end up attached to your printer. The Loop portion will remain on the Bridge
Bracket. Do not separate the Hook and Loop, Keep them together just like they were when delivered.
Remove the adhesive backing from the Hook portion of the Velcro. Keep it attached to the Loop portion.
Carefully install the Bridge Bracket in its proper location at the left edge of the housing, as shown above.
Keep it straight and press down firmly all along the edges. When you lift up the Bridge Bracket, after
pressing it down, the Hook Velcro will remain in place on the printer.
Keep the Bridge Bracket off for now.
Step 4 - Install Protective Velcro
In the kit there is a small piece of Velcro ¾ x ¾ . Install it on the left edge of the printer in the position
shown below
Step 5 – Prepare Cartridges
Prefilled Carts
On the end of the cartridge tubes, there is a black steel paper clip. Remove this clip and unfold the tubes
so they lay flat. The black paper clip is no longer needed, it was just for shipping purposes. The ends of
the tubes should be split so they can be separated easily. Don’t separate them now.
Empty Carts
The ends of the tubes should be split so they can be separated easily. Separate them back about 6
inches, no more.
If you ordered an empty cartridge set, you must put ink in it before it can be used. There are two ways to
put ink into the carts. Fill from bottom with syringe and bottom fill adapter, or use a vacuum pump. If you
fill from the bottom, then inject ink into the bottom of the cartridge until you just begin to see in at the top
of the cartridge. If you are vacuum filling, follow the instructions that came with the vacuum pump.
Make sure you get the right inks in the right cartridge chambers. The cartridges are marked on top.
After filling the empty cartridges, let them sit on your bench in their installed position for at least 2 hours,
so that any trapped air can rise to the top.
Step 6 – Install Cartridges
Use a flat blade screwdriver and remove the Epson cartridge hold down clamps, black and color. Insert
the screwdriver blade at the hinge point and twist. The clamps will come right off, without any damage.
Keep these in a safe place, you may need them in the future.
Remove the original Epson cartridges from the printer (power is disconnected). Set them aside on some
paper towel. Do not throw away, you may need them someday. Wrap in a zip-lock plastic bag for safe
keeping.
Put the MIS CFS cartridges into the printer. Carefully align them and make sure they go down all the
way. They should fit tight. Once you put them in and they are down all the way, DO NOT LIFT UP
AGAIN.
Push the cartridges to the far right side of the printer. Put some alcohol on the tubes so they will fit into
the Tube Support Bracket. Adjust the tubing so that all excess slack is taken up, but not to the point that
it starts to pull the cartridges away from the far right hand position.
After the tubing is in place in the Tube Support Bracket, move the carts by hand from left to right. You
should be able to get to the far right and far left positions without any restrictions.
Re-install the clear plastic bridge bracket and try moving the carts back an forth again. It should be
smooth and the tubes should not touch the bottom of the printer. They will make contact with the Bridge
Bracket and the printer housing, but there is Velcro there to prevent any damage to the tubes.
For extra security, you can install the tie wraps to hold the cartridges in place. Long term this is a good
way to prevent the carts from rising up and giving you red light problems.
Step 7 – Finish Tubing Installation
Move the ends of the tubes to the right side of the printer so theyextend over the end of the printer. Clean
the right end of the housing with alcohol. Install the beige tube clip in a position so the tubes come
straight off, not at an angle. See photo below.
Insert the tubing into the tube clip and close it until it snaps shut. Don’t pinch any of the tubes.
Next, separate the tubes, or un-web them, so that they are separated all the way back to the beige tube
clip you just installed.
Now you are ready for the ink bottles.
Step 8 – Set up the Ink Bottles
Find the ink bottles and the black Velcro Circles. Clean the back of each bottle with alcohol and wipe dry.
Attach a Velcro Loop circle to the back of each bottle. Attach the mating Velcro circle to the piece on the
bottle. Peal off the backing on the mating Velcro so the adhesive is exposed.
Take off the shipping caps and install the drilled caps. Each cap should have a hole in the center and a
small vent hole in the Nalgene logo. Make sure the vent hole is there and that it is not blocked or
obstructed.
Arrange the bottles as shown above. From front to back they should be in this order…..
Yellow – Light Magenta – Magenta – Light Cyan – Cyan – Black
When you press the exposed Velcro adhesive against the printer, the hook portion will stick to the printer
and this becomes the permanent position for the bottle, so choose your bottle positions carefully.
Velcro attaches bottles to printer
(This is photo from a 2200 printer)
Hold the tube against the outside of the ink bottle. Cut off the excess tube at a 45 degree angle. Insert
the tube into the bottle. Make sure that you insert 3 ½ to 4 inches of tube length into the center hole in
the bottle cap. This will put the end of the tube on the bottom of the bottle. Put a little alcohol on the
tube so it slips through the center hole in the bottle cap.
Make sure the correct color tube goes into the correct color
ink bottle. A mistake here will ruin the whole system.
The tubes should make a nice smooth curve into the bottles. It should look like the photo above.
The fully installed system should now look like the photo below, except the tubes will be empty and the
power is still off.
Step 9 – Testing the System
Push the cartridges to the far right and reattach the printer power. Turn on the power on the front of the
printer if needed. Have you computer and graphics program up an ready to go.
The printer should come on and move back an forth a few times and do a cleaning cycle. When it stops
moving, only the green light should be on.
A red light at this point is not a good thing. It indicates the one of the cartridges is not seated all the way
down. Go back to Step 6 and make sure that all the cartridges have seated properly. Lift them just
slightly, if needed and reseat them.
After the cleaning cycle is over, bring up an image on your favorite graphics program and get set to make
a print. Be sure to put paper in the printer. Before printing, use the printer properties and Epson utilities
to check the nozzles. The nozzle pattern may not be perfect at this point.
Run 3 or 4 cleaning cycles if necessary to achieve a perfect nozzle pattern. When all the nozzles are
present, make a print. You should now see ink coming up the tubes. As long as the print is satisfactory
and all the nozzles are present, there is no need to do any further cleaning cycles.
Don’t worry about the inks, it will take several (20 or more) prints for the inks to reach the cartridge. There
is no particular order in which they will get there.
Maintenance Suggestions
•
Try to make a print every day to keep the system fresh. These systems do not like to be left for
days at time without printing.
•
Don’t let your ink levels get below 1/4 empty. Add additional ink when this happens. The tube
can be lifted out of the ink to add more. Don’t leave the tube out of the ink for a long period of
time. The cartridge can drip ink into the printer when the tube is out, but it happens slowly.
•
Once you have installed the cartridges, do not lift them up. Lifting up the cartridges lets air into
the ink inside the cartridge and it can become foamy. Foamy ink will not print.
•
After you do cleaning cycles or after the printer has been off and then turned back on, the Auto
Reset chips on the cartridges will reset themselves to full. When this happens, you have to
acknowledge a message from Epson indicating that the chips are not authentic Epson chips.
Just click the YES button to continue.
•
If you get a red light when printing. Shut the printer off, cancel your print job and wait 10
seconds. Then turn the printer power back on, the Auto Reset chips will reset themselves back
to full and you can continue printing.
For additional technical assistance, visit the MIS website troubleshooting guide ….
http://www.inksupply.com/index.cfm?source=html/cobratrouble.html