1
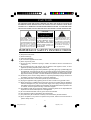
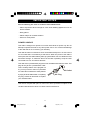
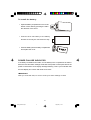
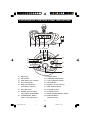
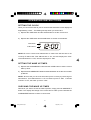
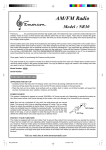
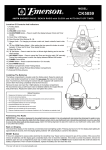
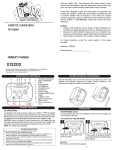
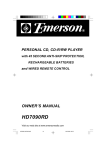
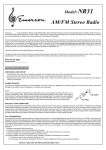
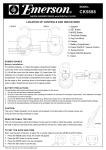
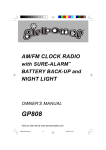
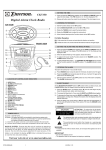
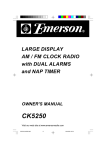
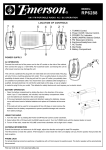
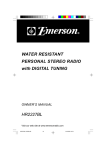
“TEA CUP”
AM / FM CLOCK RADIO
with NIGHT LIGHT
OWNER'S MANUAL
GP815
Visit our web site at www.emersonradio.com
GP815_ib082003.p65
14
20/8/2003, 11:43
CAUT I ON
TO PREVENT FIRE OR SHOCK HAZARD, DO NOT USE THIS PLUG WITH AN
EXTENSION CORD, RECEPTACLE OR OTHER OUTLET UNLESS THE BLADES
CAN BE FULLY INSERTED TO PREVENT BLADE EXPOSURE. TO PREVENT FIRE
OR SHOCK HAZARD, DO NOT EXPOSE THIS APPLIANCE TO RAIN OR MOISTURE.
C AU T I O N
RISK OF ELECTRIC SHOCK
DO NOT OPEN
The lightning flash with arrowhead symbol, within an equilateral triangle is intented to
alert the user to the presence
of uninsulated ‘dangerous voltage’
within the product’s enclosure
that may be of sufficient
magnitude to constitute a risk
of electric shock to persons.
WARNING: TO REDUCE THE
RISK OF ELECTRIC SHOCK
DO NOT REMOVE COVER
(OR BACK), NO USER
SERVICEABLE PARTS INSIDE
REFER SERVICING TO
QUALIFIED SERVICE
PERSONNEL.
!
The exclamation point within
an equilateral triangle is intended to alert the user to
the presence of important
operating and maintenance
(ser vi ci ng) instr ucti ons in
the liter ature accompanying the appl iance.
IMPORTANT SAFETY INSTRUCTIONS
1.)
2.)
3.)
4.)
5.)
6.)
7.)
8.)
9.)
10.)
11.)
12.)
13.)
14.)
15.)
16.)
17.)
18.)
Read these instructions.
Keep these instructions.
Heed all warnings.
Follow all instructions.
Do not use this apparatus near water.
Clean only with dry cloth.
Do not block any ventilation openings. Install in accordance with the manufacturer’s
instructions.
Do not install near any heat sources such as radiators, heat registers, stoves, or other
apparatus (including amplifiers) that produce heat.
Do not defeat the safety purpose of the polarized or grounding-type plug. A polarized plug has
two blades with one wider than the other. A grounding type plug has two blades and a third
grounding prong. The wide blade or the third prong are provided for your safety. If the provided
plug does not fit into your outlet, consult an electrician for replacement of the obsolete outlet.
Protect the power cord from being walked on or pinched particularly at plugs, convenience
receptacles, and the point where they exit from the apparatus.
Only use attachments / accessories specified by the manufacturer.
Unplug this apparatus during lightning storms or when unused for long periods of time.
Refer all servicing to qualified service personnel. Servicing is required when the apparatus
has been damaged in any way, such as power-supply cord or plug is damaged, liquid has
been spilled or objects have fallen into the apparatus, the apparatus has been exposed to rain
or moisture, does not operate normally, or has been dropped.
This appliance shall not be exposed to dripping or splashing water and no object filled with
liquids such as vases shall be placed on the apparatus.
Do not overload wall outlet. Use only power source as indicated.
Use replacement parts as specified by the manufacturer.
The product may be mounted to a wall only if recommended by the manufacturer.
Upon completion of any service or repairs to this product, ask the service technician to
perform safety checks.
1
GP815_ib082003.p65
1
20/8/2003, 11:43
Thank you for purchasing the Girlpower AM/FM Clock Radio with Sure-Alarm
from Emerson. This unique product has been designed to provide you with many
years of exceptional performance with a minimum of care and maintenance.
The Sure-Alarm battery back up system will remember the time and alarm settings
of course, but it can do more than that. As long as there is a fresh 9-volt battery
installed, the Sure-Alarm system will operate the radio or buzzer alarm to wake
you up even if the power is off at your normal wake up time.
We have taken great care to make sure that your Clock Radio was in perfect
working order when it left our factory. It has been designed to give you many years
of enjoyment and trouble free operation. Read this manual before operating this
unit to become familiar with its features and obtain the performance that will bring
you continued enjoyment for many years. In the event you require technical
assistance, please contact my friends at the Emerson Radio Consumer Affairs
Department at: 1-800-898-9020.
For future reference, record the serial number in the space provided.
Model : GP815
Serial Number:
2
GP815_ib082003.p65
2
20/8/2003, 11:43
IMPORTANT NOTES
Avoid installing the unit in locations described below:
• Places exposed to direct sunlight or close heat radiating appliances such as
electric heaters.
• Dusty places.
• Places subject to constant vibration.
• Humid or moist places.
POWER SOURCE
This radio is designed to operate on normal 120V 60Hz AC power only. Do not
attempt to operate the radio on any other power source. You could cause damage
to the radio that is not covered by your warranty.
This radio should be connected to an AC outlet that is always ‘live’. Do not connect
it to an outlet that is controlled by a wall switch. When the power to the radio is
interrupted, the Sure Alarm battery back up system takes over to maintain the time
and alarm settings. To maximize the life of the back up battery, keep the radio
connected to a ‘live’AC outlet at all times.
This radio uses a polarized AC plug which has one blade wider than the other. This
plug will only fit into a polarized AC outlet.
This is a safety feature. If the plug will not
fit, you may have an older non-polarized
AC Outlet
AC outlet. Do not defeat the safety feature
by trying to file the wider blade, or replacing
AC Plug
the plug. Contact an electrician to replace
your outdated outlet.
This device complies with part 15 of the FCC rules. Operation is subject to the
condition that this device does not cause harmful interference.
3
GP815_ib082003.p65
3
20/8/2003, 11:43
PREPARATION FOR USE
UNPACKING AND SET UP
• Remove the clock radio from the carton and remove all packing material from
the clock radio. We suggest that you save the packing material, if possible, in
the unlikely event that your radio ever needs to be returned for service. The
original carton and packing material is the only safe way to pack your radio to
protect it from damage in transit.
• Remove any descriptive labels or stickers on the front or top of the cabinet. Do
not remove any labels or stickers from the back or bottom of the cabinet.
• Note the serial number on the bottom of your radio and write this number in the
space provided on Page 2 of this manual.
• Place your clock radio on a level surface such as a table, desk or shelf, convenient
to an AC outlet, out of direct sunlight, and away from sources of excess heat,
dirt, dust, moisture, humidity, or vibration.
• Unwind the AC power cord and extend it to its full length. The FM antenna is
built in to this cord. It must be fully extended to provide the best FM reception.
SURE-ALARM BATTERY BACK UP SYSTEM
The Sure-Alarm battery back up system in this clock radio will maintain the time
and alarm settings in the event of a temporary power interruption. When the power
is restored the time and alarm settings will be correct. If the power is off at your
wake up time, the Sure-Alarm system will use the battery power to turn on the
radio or buzzer alarm as usual, as long as the back up battery is installed and has
sufficient power remaining.
The Sure-Alarm battery back up system requires one 9-volt battery, not included.
We recommend that you install an alkaline battery for longest life and best
performance.
4
GP815_ib082003.p65
4
20/8/2003, 11:43
To install the battery:
• Open the battery compartment cover on the
bottom of the radio by pressing the tab in
the direction of the arrow.
• Connect the 9-volt battery to the battery
terminal. It can only be connected one way.
• Push the battery into the battery compartment
and replace the cover.
POWER FAILURE INDICATOR
If no battery is installed in the radio, or if the battery in the compartment is weak or
dead, the time and alarm settings will be lost if the power is interrupted. When the
power is restored the clock display will begin flashing. This is your indication that
the time display is incorrect and needs to be reset.
IMPORTANT:
After you reset the time, be sure to reset your alarm settings as well.
5
GP815_ib082003.p65
5
20/8/2003, 11:43
LOCATION OF CONTROLS AND INDICATORS
1
2
3
6
4
5
11 12 1314
10
15
9
8
16
7
17
18
1.) Night Light.
9.) SLEEP Button.
2.) AM Indicator.
10.) TIME Adjustment Button.
3.) ALM (Alarm) ‘On’Indicator.
11.) LIGHT (ON/OFF) Switch.
4.) Time LED Display.
12.) HOUR Button.
5.) Battery Compartment.
13.) Speaker. (At rear cabinet)
(At bottom of cabinet)
14.) MIN. (Minute) Button.
6.) AC Power Cord.
15.) VOLUME Control.
7.) ALARM Selector Switch.
16.) TUNING Control.
(OFF/ON/AUTO/BUZZER)
8.) ALARM/RESET Button.
17.) BAND (AM/FM) Selector Switch .
18.) SNOOZE Button.
(Alarm Time Adjustment)
(Girlpower Doll)
6
GP815_ib082003.p65
6
20/8/2003, 11:43
OPERATING INSTRUCTIONS
SETTING THE CLOCK
When you connect the radio to your AC outlet for the first time the clock display will
begin flashing “12:00” . The flashing will stop when you set the time.
1.) Depress the TIME button and the HOUR button to set the correct Hour.
2.) Depress the TIME button and the MIN button to set the correct Minute.
AM indicator
ALM indicator
NOTE: Be sure to observe the AM indicator to make sure that the time is set
correctly for AM or PM. If the AM indicator is ‘On’, the time displayed is “AM”.
If the AM indicator is ‘Off’, the time displayed is “PM”.
SETTING THE WAKE UP TIMES
1.) Depress the ALARM/RESET button and the HOUR button to set the correct
wake up Hour.
2.) Depress the ALARM/RESET button and the MIN button to set the correct wake
up Minute.
NOTE: Be sure that you have set the wake up time correctly by observing the
AM indicator. If the AM indicator is ‘On’ the wake up time is “AM”. If the AM
indicator is ‘Off’, the wake up time is “PM”.
CHECKING THE WAKE UP TIMES
Whenever you want to check the wake up times, simply press ALARM/RESET
button. The display will change from correct time to wake up time. Release the
ALARM/RESET buttons to return to correct time.
7
GP815_ib082003.p65
7
20/8/2003, 11:43
LISTENING TO THE RADIO
1.) Set the BAND selector to the desired band, AM or FM.
2.) Set the VOLUME control to a low setting.
3.) Slide the ALARM switch to the ON position.
4.) Select your desired station with the TUNING control.
5.) Adjust the VOLUME control to the desired setting.
6.) When you are finished listening, slide the ALARM selector to OFF position to
turn the radio ‘Off’.
ANTENNA INFORMATION
AM – The AM bar antenna is inside the cabinet. If AM reception is weak, change
the position of cabinet until the internal antenna picks up the strongest signal.
FM – The FM antenna is built in to the AC power cord. If FM reception is weak try
varying the position and direction of the power cord until you find the strongest
signal.
8
GP815_ib082003.p65
8
20/8/2003, 11:43
WAKE TO RADIO
1.) Slide the ALARM selector to ON and select the band, station, and volume level
that you wish to hear when the alarm comes ‘On’, then slide the ALARM selector
to AUTO position.
2.) Reconfirm the wake up time settings by pressing the ALARM/RESET button.
3.) At the selected wake up time the radio will turn ‘On’. It will play for one hour and
then shut off automatically.
4.) To stop the radio sooner, press ALARM/RESET button. The radio will stop but
the alarm remains set and will turn the radio on again at the same time on the
following day.
5.) If you do not want the alarm to turn the radio on the following day, set the
ALARM selector to the ‘OFF’position.
WAKE TO BUZZER
1.) Set the ALARM selector to the BUZZER position. The ALM indicator will light
up to confirm that the alarm is set.
2.) At the selected wake up time the buzzer will sound. It will continue for one hour
and then shut off automatically.
3.) To stop the buzzer sooner, press the ALARM/RESET button. The buzzer will
stop but the alarm remains set and will turn the buzzer on again at the same
time on the following day.
4.) If you do not want the alarm to turn the buzzer on the following day, set the
appropriate ALARM selector to the ‘OFF’position.
SNOOZE ALARM
After the radio or buzzer alarm sounds in the morning you may press the SNOOZE
button (Girlpower Doll) for a few more minutes sleep. The alarm will stop for
approximately 9 minutes and then turn on again. You may repeat the Snooze
operation up to seven times if desired, but after the seventh time the alarm will not
turn on again.
9
GP815_ib082003.p65
9
20/8/2003, 11:43
SLEEP TO MUSIC TIMER
You can program the sleep timer to play the radio for up to 1 hour 59 minutes and
then shut off automatically.
Note: The sleep timer can be activated when the ALARM switch is set to the
'OFF', 'AUTO', or 'BUZZER' positions.
1.) Press the SLEEP button. The display will briefly show “0: 59”. While holding
the SLEEP button press the HOUR button, the display shows “1: 59” and the
radio will begin to play. After 1 hour 59 minutes the radio will shut off
automatically.
2.) To adjust the amount of time that the radio will play before shutting off, hold the
SLEEP button. Then press MIN (Minute) button to adjust the desired sleep
time. When the desired amount of sleep time appears on the display, release
the buttons.
3.) To cancel the sleep timer before it counts down to “00” and shut the radio ‘Off’
immediately, press the SNOOZE button (Girlpower Doll).
IMPORTANT:
Remember that the station and volume settings you choose for the Sleep To
Music operation are the same settings you will hear if you set the alarm for
wake to radio the following morning.
NIGHT LIGHT OPERATION
The “Lemon Slice” on the side of the tea cup also functions as a Mini Night Light to
provide a soft, yet reassuring amber ‘glow’on a desk or bedside table. Turn the
Night Light ‘On’or ‘Off’with the slide switch located on the back of the cabinet.
NOTE: The long life LEDs inside the Night Light should last for the life of the
clock radio. They are not consumer replaceable.
10
GP815_ib082003.p65
10
20/8/2003, 11:43
CARE AND MAINTENANCE
There are no user serviceable parts inside this clock radio. Please refer all service
problems to a qualified service facility. See the Warranty page of this manual for
further details.
If the cabinet becomes dusty, wipe the exterior with a soft dust cloth only. Never
use dusting sprays or polishes on the cabinet.
If the cabinet becomes dirty or smudged with fingerprints it may be wiped with a
soft cloth that has been slightly dampened with a mild soap and water solution.
Always disconnect the power cord from the AC outlet before cleaning, and never
allow any liquid to get inside the cabinet.
NOTE: If there is no battery in the back-up battery compartment, the Time
and Alarm settings will be lost when the AC power cord is disconnected for
cleaning. Reset the clock and wake up times after reconnecting the AC power
cord.
TO FIND THE LOCATION AND PHONE NUMBER
OF Y OUR NEA RES T SERVI CE CE NT ER
PERMITTED TO PERFORM WARRANTY...
SERVICE
CALL TOLL FREE: 1-800-695-0098
FOR ADDITIONAL SET-UP OR OPERATING ASSISTANCE
PLEASE CALL:
1-800-898-9020
FOR CUSTOMER SERVICE, PLEASE WRITE TO:
Emerson Radio Corp.
Consumer Affairs Dept.
1901 Diplomat Drive,
Farmers Branch, TX 75234.
11
GP815_ib082003.p65
11
20/8/2003, 11:43
LIMITED WARRANTY
Emerson Radio Corp. warrants manufacturing defects in original material, including
original parts and workmanship, under normal use and conditions, for a period of
ninety (90) days from the date of original purchase in the U.S. With your dated
proof of purchase, we will provide repair service at no charge for labor and parts
at an authorized Depot Repair Facility, or replace the product in our discretion.
For repair or replacement, pack your unit in a padded box, enclose your check or
money order payable to Emerson Radio Corp. in the amount of $5.00 (not required
by California residents) to cover shipping and handling costs, and enclose a copy
of your proof of purchase. Send your unit to:
Emerson Radio Corp.
1901 Diplomat Drive,
Farmers Branch, TX 75234.
This warranty does not cover damage from negligence, misuse, abuse, accident,
failure to follow operating instructions, commercial use, rental, repairs by an
unauthorized facility, or products purchased, used, serviced or damaged outside
of the United States.
THIS WARRANTY GIVES YOU SPECIFIC LEGAL RIGHTS, AND YOU MAY
ALSO HAVE OTHER RIGHTS WHICH VARY FROM STATE TO STATE.
AU898H
12
GP815_ib082003.p65
12
20/8/2003, 11:43
BY
EMERSON
Part No. : 21-2052
308-02
GP815_ib082003.p65
Printed in China
13
20/8/2003, 11:43