1
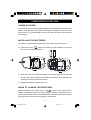
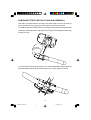
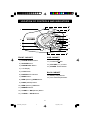
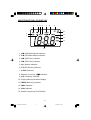
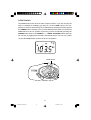
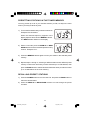
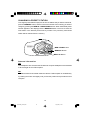
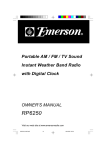
WATER RESISTANT
PERSONAL STEREO RADIO
with DIGITAL TUNING
OWNER’S MANUAL
HR2227BL
Visit our web site at www.emersonradio.com
HK2227BL_120203.p65
18
2/12/2003, 14:21
Thank you for purchasing this Emerson Water-Resistant Personal stereo
FM/AM radio with digital tuner.
Our engineers have included many useful and convenient features in this
product. Please be sure to read this Owner’s Manual completely to make
sure you are getting the maximum benefit from each feature.
This product was manufactured using the highest quality components and
standards of workmanship. It was tested by Emerson inspectors and found
to be in perfect working order before it left our factory. However, there is
always the chance that some problem may occur because of rough handling
during shipment to the retail store or to the final consumer.
If, after reading this Manual, you experience any problems with the operation
of this product, please refer to the instructions for obtaining service at the
end of this Manual. Emerson and Emerson retailers are committed to your
satisfaction.
Once again, thanks for purchasing this Emerson audio product.
Model No: HR2227BL
Serial N0:
1
HK2227BL_120203.p65
1
2/12/2003, 14:20
IMPORTANT NOTES
This equipment has been tested and found to comply with the limits for a Class B
digital device, pursuant to Part 15 of the FCC Rules. These limits are designed to
provide reasonable protection against harmful interference in a residential
installation. This equipment generates, uses and can radiate radio frequency energy
and, if not installed and used in accordance with the instructions, may cause harmful
interference to radio communications.
However, there is no guarantee that interference will not occur in a particular
installation. If this equipment does cause harmful interference to radio or television
reception, which can be determined by turning the equipment off and on, the user
is encouraged to try to correct the interference by one or more of the following
measures:
• Reorient or relocate the receiving antenna.
• Increase the separation between the equipment and receiver.
• Connect the equipment into an outlet on a circuit different from that to which
the receiver is needed.
• Consult the dealer or an experienced radio/TV technician for help.
Warning: Changes or modifications to this unit not expressly
approved by the party responsible for compliance could void the
user authority to operate the equipment.
2
HK2227BL_120203.p65
2
2/12/2003, 14:20
PREPARATION FOR USE
POWER SOURCES
This personal stereo radio with AM/FM digital tuner is designed to operate on two
alkaline “AAA” batteries, not included. Attempting to operate this unit on any other
power source may cause damage to the unit and such damage is not covered by
your warranty.
INSTALLING THE BATTERIES
The battery compartment is located on the back-side of the radio cabinet.
1.) Press down on the
mark on the battery cover and slide the cover in the
direction of the arrow and lift it up.
2.) Insert two fresh “AAA” alkaline batteries in the battery compartment. Be sure
to follow the polarity making in the battery compartment. If the batteries are
inserted incorrectly the unit will not work.
3.) Replace the battery compartment cover.
WHEN TO CHANGE THE BATTERIES
When the batteries are getting weak, the
indicator starts flashing in the
display, the batteries are almost exhausted and should be changed as soon as
possible. Do not leave weak or exhausted batteries in the radio as they will eventually
leak and cause corrosion inside the battery compartment.
3
HK2227BL_120203.p65
3
2/12/2003, 14:21
ARM-BAND STRAP INSTALLATION AND REMOVAL
This radio is supplied with an accessory arm-band strap to secure the radio on
your arm while you are jogging or performing other strenuous activities.
To install the arm-band strap, slide the arm-band strap bracket into bracket holder
on the back cabinet as shown. Adjust the Velcro® strap to fit comfortably but securely
around your arm.
To remove the arm-band strap, press on the “PUSH RELEASE” tab and slide the
arm-band strap bracket out of bracket holder on the back cabinet as shown.
4
HK2227BL_120203.p65
4
2/12/2003, 14:21
LOCATION OF CONTROLS AND INDICATORS
14
4
15
5
6
7
17
8
3
10
9
16
2
11
1
12
AL
ON A R M
/O
FF
13
18
SIDE CABINET
FRONT CABINET
1.) ALARM ON/OFF Button.
14.) PHONES
2.) SNOOZE Button.
Jack.
15.) VOLUME (+ / –) Control.
3.) BASS BOOST Button.
16.) POWER “On/Off” Button.
4.) LCD Display.
5.) LOCK Switch.
BACK CABINET
6.) BASS ON LED Indicator.
17.) Battery Compartment.
7.) MODE Button.
18.) Arm-band Strap Brackets.
8.) MEM. (Memory) DOWN Button.
9.) BAND (AM/FM) Button.
10.) MEM. (Memory) UP Button.
11.) MEMORY Button.
12.) TUNING + / MIN (Minute) Button.
13.) TUNING – / HOUR Button.
5
HK2227BL_120203.p65
5
2/12/2003, 14:21
MULTIFUNCTION LCD DISPLAY
4
3
5
7
6
8
9
10
2
1
11
12
13
14
1.) AM (AM Radio Band) Indicator.
2.) FM (FM Radio Band) Indicator.
3.) AM (AM Time) Indicator.
4.) PM (PM Time) Indicator.
5.) AL (Alarm) Indicator.
6.) FM ST (Stereo) Indicator.
7.) LOCK Indicator.
8.) Battery Level Low
Indicator.
9.) CH (Channel) Indicator.
10.) Preset Memory Number Display.
11.) MEM (Memory) Indicator.
12.) MHz Indicator.
13.) KHz Indicator.
14.) Radio Frequency/Time Display.
6
HK2227BL_120203.p65
6
2/12/2003, 14:21
OPERATING INSTRUCTIONS
• Make sure the batteries are installed correctly.
• Set the VOLUME control to a low level.
• Fully unwind the headphone cord and connect the headphone plug to
the PHONES
jack. The plug must be fully inserted into the jack,
otherwise the sound may be intermittent.
• Make sure that the LOCK switch is in the ‘Off’position.
IMPORTANT INFORMATION
This personal stereo radio is designed to be “water-resistant”. Jogging
in the rain with this radio will cause no problems. However this radio is
not “water-proof” and should never be fully or partially immersed in water,
or any other liquid. Water should never be allowed to get inside the
cabinet when changing the battery. Keep the rubber headphone jack
cover in place when the unit is not in use. If the cabinet does become
wet after jogging in the rain, wipe away any excess moisture with a soft
dry towel before putting the radio away.
SPORTS STYLE LIGHTWEIGHT STEREO HEADPHONES
The lightweight stereo headphones supplied with this personal stereo radio have
earpieces designed to fit directly into your ear. Be sure to observe the “L” (Left)
and “R”(Right) markings on the earpieces to make sure that you put the headphones
on correctly. Always set the VOLUME control to a low level before putting on the
earphones, and then gradually increase the volume to a comfortable listening level.
Headphone Jack
VOLUME Control
7
HK2227BL_120203.p65
7
2/12/2003, 14:21
LOCK Switch
The LOCK switch locks all of the other controls buttons. If you are carrying the
radio in a backpack, handbag, gym bag, etc, set the LOCK switch to the ‘On’
position to prevent it from turning ‘On’accidentally by something pressing against
the POWER button. Likewise, once you start listening to the radio you can set the
LOCK switch to the ‘On’ position to prevent you from accidentally pressing the
POWER button again or the TUNING + / – or MEM. UP/DOWN buttons while you
are carrying or jogging with the radio. Remember that to use any of the other
controls the LOCK switch must be set to the ’Off’position.
LOCK Switch
AL
O N AR M
/O
FF
8
HK2227BL_120203.p65
8
2/12/2003, 14:21
SETTING THE CLOCK
Note: The clock can be set with the radio ‘Off’. Or if the radio is ‘On’, press the
MODE button once to the clock mode.
1.) Press the MODE button for at least two seconds. The time display begins to
flash.
2.) While the display is flashing press the TUNING – /HOUR button to adjust the
hour. Be sure to set correctly for AM or PM.
3.) Press the TUNING + /MIN button to adjust the minutes.
4.) When the display shows the correct time, press the MODE button once more
or after 5 seconds, the display stops flashing and the clock begins to run.
Note: The correct time will always appear on the display when the radio is ‘Off’.
9
HK2227BL_120203.p65
9
2/12/2003, 14:21
LISTENING TO RADIO
BASS BOOST Button
Press the BASS BOOST button for added Bass response. The BASS ON LED
indicator lights. Press again to cancel Bass Boost and resume normal sound. The
BASS ON LED indicator goes off.
OPERATION
1.) Make sure that the LOCK button is in the ‘Off’position. (The LOCK indicator
does not appear in the display.)
2.) Press the POWER button to turn the radio ‘On’. An AM or FM Band frequency
will appear in the display.
3.) If necessary press the BAND button to switch between AM, FM bands. The
appropriate band indicator appears in the display to confirm your selection.
4.) Press the TUNING + or TUNING – buttons to select the desired station as
follows:
• Manual Tuning
Repeatedly press the TUNING + or TUNING – buttons until the display shows
the frequency of the desired radio station.
• Automatic Tuning
Depress and hold either the TUNING + or TUNING – button until the display
begins to move then release the button. The tuner will search up or down until
it finds the next strong station and stops on that station. Repeat this procedure
until it stops on your desired station.
If you tune to an FM Stereo station the ST indicator will appear in the display.
5.) Adjust the VOLUME and BASS BOOST controls as desired.
6.) When you are finished listening press the POWER button to turn the power
‘Off’. The display will return to the correct time of day.
10
HK2227BL_120203.p65
10
2/12/2003, 14:21
PRESETTING STATIONS IN THE TUNER MEMORY
You may preset up to 20 of your favorite stations (10 FM, 10 AM) in the tuner
memory for easy recall at any time.
1.) Tune to the first station that you wish to memorize.
Example: FM 103.5 MHz.
When the desired frequency appears in the
display depress and hold the MEMORY button.
The MEM indicator flashes in the dispaly.
2.) Within 5 seconds press the MEM UP or MEM
DOWN buttons to select a desired preset memory
number. Example: CH 7.
3.) Press the MEMORY button again to enter your station in the selected preset
memory.
4.) Repeat steps 1 through 3, selecting a different station and a different preset
memory number each time until you have entered up to 10 FM stations, then
press the BAND button to switch band and follow the same procedure to enter
up to 10 AM stations in the tuner memory.
RECALLING PRESET STATIONS
1.) Press the POWER button to turn the radio ‘On’and press the BAND button to
select the desired band.
2.) Press the MEM UP or MEM DOWN buttons to scroll through the preset
numbers.
11
HK2227BL_120203.p65
11
2/12/2003, 14:21
CHANGING A PRESET STATION
To change a preset station simply tune to the new station that you wish to memorize,
press the MEMORY button, and then select the number of the memory you wish to
change by pressing the MEM UP or MEM DOWN buttons. When the desired preset
number appears in the display press the MEMORY button once more to enter the
new station in the desired preset memory number. The previously memorized
station will be deleted from the memory.
MEM. DOWN Button
MEMORY Button
AL
ON A RM
/O
FF
MEM. UP Button
Antenna Information
FM
The headphone wire serves as the FM antenna. Keep the headphone wire extended
to its full length for best FM reception.
AM
The AM bar antenna is located inside the cabinet. If AM reception is unsatisfactory
try rotating the entire unit slightly until you find the position that provides the best
reception.
12
HK2227BL_120203.p65
12
2/12/2003, 14:21
SETTING THE ALARM TIMER
You can set the Alarm Timer to turn the Buzzer ‘On’automatically. However you
must have the headphones on to hear the Buzzer sound.
1.) Press the MODE button once while the radio is
‘Off’. Or press the MODE button twice if the radio
is ‘On’to enter the Alarm Time. The “AL” indicator
will flash in the display.
2.) While the “AL” indicator is flashing, press and
hold the MODE button for least 2 seconds. The
whole display will flash.
3.) Press the TUNING – button to set the desired
alarm hour, AM or PM.
Press the TUNING + button to set the desired
alarm minute.
4.) When the desired alarm time appears on the
display, press the MODE button once more. The
alarm time display stops flashing but the “AL”
indicator continues to flash.
5.) Press the MODE button again. The display
changes from alarm time to current time and the
“AL” indicator disappears.
13
HK2227BL_120203.p65
13
2/12/2003, 14:21
6.) Press the ALARM ON/OFF button to activate the
alarm. The “AL” indicator appears in the display.
7.) At the selected alarm time the buzzer will turn ‘On’automatically. The buzzer
will sound for 1 hour and then shut off automatically. To shut the buzzer off
sooner press the ALARM ON/OFF button once. The buzzer stops but the
alarm remains active and the buzzer will turn on each day at the same time
until the alarm is deactivated.
To deactivate the alarm press the ALARM ON/OFF button once more. The “AL”
indicator disappears and the alarm is now deactivated. Repeat this same procedure
to activate the alarm again.
SNOOZE/REPEAT ALARM
After the buzzer turns ‘On’automatically you may press the SNOOZE button to
stop the buzzer for a few more minutes. The buzzer stops but the “AL” indicator
remains. After 8 minutes the buzzer turns ‘On’again.
14
HK2227BL_120203.p65
14
2/12/2003, 14:21
CARE AND MAINTENANCE
There are no user serviceable parts inside this radio. Please refer all service
problems to a qualified service facility.
If the cabinet becomes dusty, wipe the exterior with a soft dust cloth only. Never
use dusting sprays or polishes on the cabinet.
If the cabinet becomes dirty or smudged with fingerprints it may be wiped with a
soft cloth that has been slightly dampened with a mild soap and water solution. and
never allow any liquid to get inside the cabinet.
R
SERVICE
TO FIND THE LOCATION AND PHONE
NUMBER OF YOUR NEAREST SERVICE
CENTER PERMITTED TO PERFORM
WARRANTY...
CALL TOLL FREE: 1-800-695-0098
FOR ADDITIONAL SET-UP OR OPERATING ASSISTANCE
PLEASE CALL:
1-800-898-9020
FOR CUSTOMER SERVICE, PLEASE WRITE TO:
Emerson Radio Corp.
Consumer Affairs Dept.
1901 Diplomat Drive,
Farmers Branch, TX 75234.
15
HK2227BL_120203.p65
15
2/12/2003, 14:21
LIMITED WARRANTY
Emerson Radio Corp. warrants manufacturing defects in original material, including
original parts and workmanship, under normal use and conditions, for a period of
ninety (90) days from the date of original purchase in the U.S. With your dated
proof of purchase, we will provide repair service at no charge for labor and parts
at an authorized Depot Repair Facility, or replace the product in our discretion.
For repair or replacement, pack your unit in a padded box, enclose your check or
money order payable to Emerson Radio Corp. in the amount of $5.00 (not required
by California residents) to cover shipping and handling costs, and enclose a copy
of your proof of purchase. Send your unit to:
Emerson Radio Corp.
1901 Diplomat Drive,
Farmers Branch, TX 75234.
This warranty does not cover damage from negligence, misuse, abuse, accident,
failure to follow operating instructions, commercial use, rental, repairs by an
unauthorized facility, or products purchased, used, serviced or damaged outside
of the United States.
THIS WARRANTY GIVES YOU SPECIFIC LEGAL RIGHTS, AND YOU MAY
ALSO HAVE OTHER RIGHTS WHICH VARY FROM STATE TO STATE.
AU898H
16
HK2227BL_120203.p65
16
2/12/2003, 14:21
EMERSON
Part No. 16-2915
PRINTED IN CHINA
312-01
HK2227BL_120203.p65
17
2/12/2003, 14:21