1
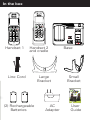
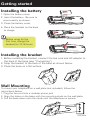
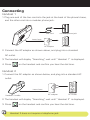
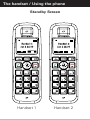
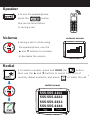
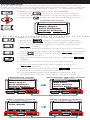
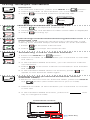
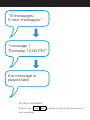
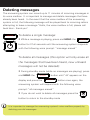
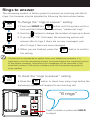
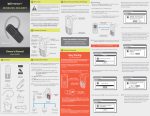
_
Digital Cordless Phone
Includes
2 handsets
Speakerphone
Lighted Display
User Guide
EM6120-2
Digital
In the box
rings to
answer
Handset 1
Handset 2
and cradle
Line Cord
(2) Rechargeable
Batteries
Large
Bracket
AC
Adapter
security
code
Base
Small
Bracket
User
Guide
Getting started
Installing the battery
1. Open the battery cover.
2. Insert the battery. Be sure to
insert exactly as shown.
3. Close the battery cover.
4. Place the handset on the base
to charge.
Before using for the
first time, charge the
handset for 12-16 hours
Installing the bracket
1. Before installing the bracket, connect the line cord and AC adaptor to
the back of the base (see “Connecting”).
2. Snap the bracket to the back of the base as shown below.
3. Place the base on a flat surface.
Wall Mounting
To mount your telephone on a wall plate (not included), follow the
instructions below:
1. Plug the line cord into a modular phone jack.
2. Align the holes on the base with the mounting studs on the wall plate.
3. Pull the base down onto the studs until the telephone is secure.
wall plate
Rechargeable battery warning
● This equipment contains a rechargeable battery.
● Rechargeable batteries are known to the State of California to cause cancer.
● Do not short-circuit the battery.
● The rechargeable batteries contained in this equipment may explode if
disposed of in a fire.
● Do not charge the battery used in this equipment in any charger other
than the one designed to charge this battery as specified in the owner’s
manual. Using another charger may damage the battery or cause it to explode.
Telephone jack requirements
To use this phone, you must have an RJ11C modular
telephone jack. If you do not have a modular jack,
please call your local telephone company to find out
how to get one installed.
Modular Telephone
Line Jack
Important installation information
● Never install telephone wiring during a lightning storm.
● Never touch uninsulated telephone wires or terminals, unless the
telephone line has been disconnected at the network interface.
● Use caution when installing or modifying telephone lines.
● Never install telephone jacks in wet locations unless the jack is specifically
designed for wet locations.
● Temporarily disconnect any equipment connected to the phone, such as
faxes,other phones, or modems.
CAUTION: Disconnect the phone cord from the
wall outlet before installing or replacing the
batteries. (Only for telephones which require
batteries)
Connecting
Handset 1
1. Plug one end of the line cord into the jack at the back of the phone’s base,
and the other end into a modular phone jack.
line cord
modular phone jack
insert here
AC adapter
AC Outlet
2. Connect the AC adaptor as shown above, and plug into a standard
AC outlet.
3. The handset will display “Searching”, wait until “Handset 1” is displayed.
4. Press
on the handset and confirm you hear the dial tone.
Handset 2
1. Connect the AC adaptor as shown below, and plug into a standard AC
outlet.
insert here
Handset 2 cradle
AC adapter
AC Outlet
2. The handset will display “Searching”, wait until “Handset 2” is displayed.
3. Press
on the handset and confirm you hear the dial tone.
Handset 2 does not require a telephone jack
The handset / Using the phone
Standby Screen
Handset 1
Handset 2
Speaker
• to use the speakerphone,
press the
button,
this can be done before
or during a call
Volume
volume screen
• during a call or while using
the speakerphone, use the
▲ and ▼ buttons to increase
or decrease the volume
Redial
• to redial a number, press and HOLD the
button,
then use the ▲ and ▼ buttons to select from a list of
recently dialed numbers, and press
redial screen
555-555-1111
555-555-2222
555-555-3333
555-555-4444
Option
to make the call
Phonebook
The phone can store up to 50 names and numbers in its phonebook.
Caller information may be saved from the received calls in the Caller ID
memory (see "Reviewing Caller ID information"), or entered manually.
Dialing a number from the phonebook:
1. Press the
button to open the phonebook.
2. Use the ▲ and ▼ buttons to navigate up or down.
3. Press the
button to dial the selected number.
phonebook screen
John Smith
Mike Hayes
Paul Williams
Angela Dotson
Adding numbers to the phonebook:
1. Press the
open phonebook
button to open the phonebook.
2. Press the
softkey, and select “New Entry”
from the phonebook options screen and press the
multi-press
for a,b, or c
softkey.
3. Use the handset keypad to enter a name for the entry
by multi-pressing a key until the desired letter is displayed.
4. Press
add space
to add a space and the
softkey to
to make a correction.
5. When finished entering the name, press the
softkey.
small letters /
capital letters
6. Enter the number using the handset keypad.
7. When finished entering the number, press the
softkey.
8. Select a ring tone and press the
softkey to
save the number in the phonebook.
9. It is possible to edit and delete numbers in the
phonebook from the phonebook options screen.
phonebook screen
phonebook options screen
John Smith
Mike Hayes
Paul Williams
Angela Dotson
New Entry
Edit Entry
Show Details
Delete Entry
Option
spk
spk
Soft Keys
entry screen (name)
entry screen (number)
Name:
abc
John Smith
Number:
spk
spk
Soft Keys
Answer calls
• answer a call
• start a call
• dial a number from the phonebook or Caller ID history
End calls
• end a call
• in the menu, escape to
the standby screen
talk screen
Press the
soft key
to mute or disable mute
00:30
spk
Mute Soft Key
Call Waiting / Flash
The Flash feature is used to activate calling services available through your local phone
company, such as Call Waiting, and Three Way Calling. To use the features below you
must subscribe to these services from your local telephone company.
To answer an incoming call while having a conversation:
After you hear the Call Waiting tone, press and release the
button. The first call is placed on hold and the second
press to
flash
call is answered.
To return to the first call and put the second call on hold:
Press and release the
button again to return to the
first call, the second call will be put on hold.
To activate Three Way Calling:
Press and release the
button while on the first call,
you will hear a dial tone. Dial a second number, and press
the
button again to connect the two calls.
Caller ID / Call Waiting Caller ID
IMPORTANT: In order to use this unit’s Caller ID features, you must subscribe to
either the standard Name/Number Caller ID Service or Call Waiting Caller ID Service
from your local telephone company.
This telephone automatically displays an incoming caller’s name and telephone
number, as well as the date and time of the call. It can record and store the
information of up to 30 calls into the phone’s Caller ID memory.
Reviewing Caller ID information:
• In the standby mode, use the ▲ and ▼ buttons to
review the Caller ID history
• you can select a number and press
to dial it
• to save a number to the phonebook, press the
softkey and then select “Save Number” and press the
softkey to confirm and save
Caller ID screen
EMERSON
877-768-8483
Aug 20 12:30
New
Caller ID options screen
Save Number
Delete
Delete All
Option
spk
spk
Soft Keys
You can delete a number, or all numbers from the Caller ID history in
the Caller ID options screen
Using multiple handsets
Intercom
1. To use the intercom, press and HOLD the
button.
2. Dial the number of the handset you would like to call.
3. Press
to end the intercom (internal) call.
intercom screen
Handset 2
Jan 1 12:00
Internal_
Receiving an intercom (internal) call
1. Press
to accept the internal call.
2. During the call, the handset number of the caller is displayed.
3. Press
to hang up.
Receiving an external call during an intercom
(internal) call
If you receive an external call during an internal call, a call
waiting tone (double beep) will be heard on both handsets.
1. Press
to end the internal call.
2. Press
to accept the external call.
Transferring a call to another handset
1. Press and HOLD the
button.
2. Dial the number of the handset you would like to transfer
the call to.
3. If the handset dialed answers, you can have an internal
conversation.
4. Press
to end the internal conversation and transfer
the call.
5. If the handset dialed does not answer, press
to
speak to the external caller again.
Conference call (2 internal handsets and an
external caller)
1. While on the line with an external caller, press and HOLD
the
button (the external line is put on hold).
2. Dial the number of the handset you would like to include
in the call.
3. If the handset dialed answers, press the
CONF
key to merge the calls.
conference screen
Handset 1
CONF
spk
Soft Key
soft
Copy a phonebook entry to another handset
1. Press the
button to open the phonebook.
2. Search by entering the first letter of the desired name
or use the ▲ and ▼ buttons to navigate up or down.
3. Press the
softkey and select “Copy Entry” and
press the
softkey.
or
Select “Copy All” to copy all entries from one handset to
another (this will erase all the information on the destination
handset).
or
Select “Copy-Merge” to copy all entries from one handset
to another (the information on the destination handset is
not deleted).
4. The available handsets are displayed, use the ▲ and ▼
buttons to select the correct handset and press the
softkey to confirm.
5. “Copying to Handset” is displayed, and “Receive Phone
book Record?” appears on the display of the destination
handset.
6. On the destination handset, press the
to confirm.
softkey
Additional handsets
It is possible to register up to 5 handsets to the base (2 handsets are
included) additional handsets may be purchased separately. If you
would like to purchase additional handsets, please contact our customer
service department at: 1-877-768-8483 (Toll Free) or [email protected]
Adding a new handset
The two handsets that are included in this package are
already registered, use the steps below to register new
handsets only.
1. Press the
button to enter the menu.
2. Use the ▲ and ▼ buttons and select “Handset” and
press the
softkey.
3. Use the ▲ and ▼ buttons and select “Registration” and
press the
softkey.
4. Select “Register” and press the
5. Select “Base 1” and press the
softkey.
softkey.
6. When “System PIN:” appears on the display enter 0000
and press the
softkey.
7. When “Press And Hold Page Key On Base” appears on
the display, press and HOLD the
button on the
base (approximately 30 seconds) until “Handset 3, 4, or 5”
appears on the display.
8. Press
on the handset and confirm you hear the dial tone.
rings to
answer
security
code
press and hold to register the handset
Removing a handset
Use to remove handsets that are damaged.
1. Follow steps 1-3 (above).
2. Select “De-register”and press
3. Enter system pin 0000 and press the
the softkey.
softkey.
4. When “Select HS” appears enter the handset number
of the handset you would like to remove (it must be a
handset other then the one you are using) and press the
softkey. “Not Registered” will appear on the
removed handset.
Menu
Use the menu to customize various settings such as ringer volume, ring
tones, language, display settings and more.
1. Press the
button to enter the menu.
2. Use the ▲ and ▼ buttons to navigate from the following
menu selections:
Phonebook - Access the phonebook
Handset - “Ring Tone”(incoming calls/intercom), “Ringer
Volume”, “Handset Name”, “Keypad Beep” (on/off),
“Contrast”, “Auto Talk”, “Confirm Beep”, “Select Base”,
“Language”, “Registration”, and “Area Code”
Base Settings - “Ring Tone”, “Ringer Volume”, “Dial Mode”
Time - “Set Alarm”, “Date & Time”(the date and time will
be set automatically after your first incoming Caller
ID call), “Set Time Format”
Tools - “Appointment”, “Stop Watch”
3. Press the
softkey to select an option.
4. Press the
softkey to go back.
menu screen
Phonebook
Handset
Base Settings
Time
spk
Soft Keys
The base
rings to
answer
Security
code
Volume
• Adjust the volume of the base
• Adjust the “rings to answer” option (how many rings until
the answering system picks up the call)
• Adjust the “security code” option (the security code is
factory set to 000)
From the handset’s menu you can adjust the base’s ringer volume or select
ringtones - select menu > “Base Settings” > “Ring Tone” or “Ringer Volume”
Paging
• Press
and the handset will emit an alarm
making it easy to find
volume
• Press any key on the
handset to stop the
paging alarm
rings to
answer
security
code
delete
page handset
Answering system
Power on/off
To turn the answering machine on or off:
• Press the
button to turn the answering system
on or off
Outgoing message
The answering system includes the following factory pre-recorded
message: “Hello, your call cannot be taken at the moment, so please
leave a message after the tone.” To record your own personal outgoing
message follow the steps below:
Recording an outgoing message:
1. Press and HOLD the
button until you hear the tone.
2. Record a brief outgoing message and press the
delete
button. Your outgoing message will be saved and played
back for your confirmation.
3. To listen to your outgoing message press the
4. To delete your outgoing message, press the
button.
delete
button while your outgoing message is playing.
You can then record another outgoing message, or the
factory pre-recorded outgoing message will be used by the
answering system.
Playback messages
When new messages are recorded on the answering system, the display
will flash with the number of new, unheard messages recorded. After all
the new messages have been played back, the number of messages
played back but not deleted (old messages) will appear on the display but
will not flash.
Playback messages:
• Press the
button, the answering system will announce
the total number of messages (old and new), the message
number, and the time and date the message was recorded
followed by the message
rings to
answer
• Press the
press the
security
code
button, to pause or resume playback, or
button to stop
“8 messages,
5 new messages”
“message 1
Thursday, 12:00 PM”
the message is
played back
To skip messages:
• Press the
next message
buttons to skip to the previous or
Deleting messages
The answering system can record up to 11 minutes of incoming messages in
its voice mailbox. It is important to manage and delete messages that have
already been heard. In the event that the voice mailbox of the answering
system is full, the following message will be played back to incoming callers
attempting to leave a message “Hello, the voice mailbox is full, please call
back later - thank you”.
delete
To delete a single message:
• While a message is playing, press and HOLD the
delete
button for 2 full seconds until the answering system responds
with the following voice prompt: “message erased”
To delete all messages (this option will only erase all
the messages that have been heard, new unheard
messages will not be deleted):
• During standby mode (while no messages are playing), press
and HOLD the
delete
display and press the
button until “dL” appears on the
delete
button once again, the
answering system will respond with the following voice
prompt: “all messages erased”
• If you do not wish to delete all messages press the
button to return to the standby mode
It is important to manage the answering system’s voice mailbox properly by
deleting your old messages
“message erased”
rings to
answer
security
code
delete
Press and HOLD while a message is
playing to delete it
“all messages erased”
rings to
answer
security
code
delete
Press and HOLD during standby mode
(while no messages are playing)
When “dL” appears on the display,
press the
delete
all messages
button to delete
Rings to answer
The answering system is factory preset to answer an incoming call after 6
rings, this however may be adjusted by following the instructions below:
To change the “rings to answer” setting:
rings to
answer
1. Press and HOLD the
rings to
answer
button until the system emits a
tone and the following voice prompt, “please set rings”.
2. Use the
buttons to change the number of rings up or down
3. If you select “TS” (toll saver) the answering system will
answer after 5 rings if there are no new messages, and
after 2 rings if there are new messages.
rings to
answer
4. When you are finished, press the
rings to
answer
button to confirm
the setting.
If voicemail is included as an option from your telephone company, it is
important to set the answering system to answer before the voicemail system
of the phone company, otherwise your messages will be recorded in the
voicemail system of the phone company and not the answering system’s
voice mailbox
To check the “rings to answer” setting:
rings to
answer
• Press the
rings to
answer
button to check how many rings before the
answering system will respond to an incoming call
“6 rings”
rings to
answer
security
code
delete
Press to check or press and HOLD
to adjust
n.
e
Remote access
It is possible to access your messages and control the answering system
from anywhere using a standard telephone and the factory preset security
code (000), or you can select your own security code.
To remotely access your answering system:
1. Call the answering system.
2. After the outgoing message is played followed by a beep tone, slowly dial
the security code (000).
3. The answering system will confirm with two short beeps and will playback the remote voice guide.
4. Enter the correct code for the desired function (follow the chart below for
details regarding the remote voice commands).
Remote Code
1
2
3
4
5
6
7
8
9
0
*
Function
Rewind
Play / Pause
Fast Forward
OGM Playback
OGM Recording (Press 6 to stop)
Stop
Delete Current Message
Answering Off
Answering On
Delete All Old Messages
Skip Announcement
To turn on the answering system from a remote location:
1. Call the answering system, the system will pick up after ten rings.
2. Dial the security code (000) after the message and beep tone.
3. Press “9”, a long beep confirmation will follow and the answering system
will be turned on.
To change the security code:
security
code
1. Press and HOLD the
security
code
button until the system emits a
tone and the following voice prompt, “please set security code”.
2. Use the
press the
security
code
buttons to change the number up or down, and
button to confirm.
security
code
3. Repeat step number 2 until all three digits of the security
code are set and the answering system confirms the code
with a voice prompt of the new security code.
To check the security code:
security
code
• Press the
button to check the security code
security
code
“000”
rings to
answer
security
code
delete
Press to check or press and HOLD
to adjust
Important safety instructions
When using your telephone equipment, basic safety precautions should
always be followed to reduce the risk of fire, electric shock and injury to
persons, including the following:
1. Do not use this product near water, for example, near a bath tub, wash
bowl, kitchen sink or laundry tub, in a wet basement or near a swimming
pool.
2. Avoid using a telephone (other than a cordless type) during an electrical
storm. There may be a remote risk of electric shock from lightning.
3. Do not use the telephone to report a gas leak in the vicinity of the leak.
4. Use only the power cord and batteries indicated in this manual. Do not
dispose of batteries in a fire. They may explode. Check with local codes for
possible special disposal instructions.
Warning! The cords on this product and / or accessories contain lead, a
chemical known to the State of California to cause birth defects or other
reproductive harm. Wash hands after handling.
CAUTION:
RISK OF EXPLOSION IF BATTERY IS REPLACED BY AN
INCORRECT TYPE. DISPOSE OF USED BATTERIES
ACCORDING TO THE INSTRUCTIONS.
USE ONLY WITH EMERSON MODEL NO.EM6120-2
SAVE THESE INSTRUCTIONS
WARNING:
TO PREVENT FIRE OR ELECTRICAL SHOCK HAZARD, DO NOT EXPOSE THIS PRODUCT TO
RAIN OR MOISTURE.
CAUTION
RISK OF ELECTRIC SHOCK
DO NOT OPEN
The lightning flash with
arrowhead symbol, within
an equilateral triangle, is
intended to alert the user
to the presence of uninsulated “dangerous voltage”
within the product’s
enclosure that may be of
sufficient magnitude to
constitute a risk of electric
shock to persons.
WARNING: TO REDUCE THE RISK
OF ELECTRIC SHOCK, DO NOT
REMOVE COVER (OR BACK).
NO USER SERVICEABLE PARTS
INSIDE. REFER SERVICING TO
QUALIFIED SERVICE PERSONNEL.
See marking on bottom / back of product.
The exclamation point
within the equilateral
triangle is intended to alert
the user to the presence of
important operating and
maintenance (servicing)
instructions in the literature
accompanying the product.
Compliance information
Your telephone equipment is approved for connection to the Public Switched Telephone
Network and is in compliance with parts 15 and 68, FCC Rules and Regulations and the
Technical Requirements for Telephone Terminal Equipment published by ACTA.
FCC Part 68 information
1. Notification to the Local Telephone Company
On the bottom of this equipment is a label indicating, among other information, the US
number and Ringer Equivalence Number (REN) for the equipment. You must, upon
request, provide this information to your telephone company. The REN is useful in
determining the number of devices you may connect to your telephone line and still
have all of these devices ring when your telephone number is called. In most (but not
all) areas, the sum of the RENs of all devices connected to one line should not exceed
5. To be certain of the number of devices you may connect to your line as determined
by the REN, you should contact your local telephone company.
A plug and jack used to connect this equipment to the premises wiring by the ACTA. A
compliant telephone cord and modular plug is provided with this product. It is designed
to be connected to a compatible modular jack that is also compliant. See installation
instructions for details.
Notes
• This equipment may not be used on coin service provided by the telephone company.
• Party lines are subject to state tariffs, and therefore, you may not be able to use your
own telephone equipment if you are on a party line. Check with your local telephone
company.
• Notice must by given to the telephone company upon permanent disconnection of
your telephone from your line.
• If your home has specially wired alarm equipment connected to the telephone
line, ensure the installation of this product does not disable your alarm equipment. If
you have questions about what will disable alarm equipment, consult your telephone
company or a qualified installer.
US Number is located on the cabinet bottom.
REN Number is located on the cabinet bottom.
2. Rights of the Telephone Company
Should your equipment cause trouble on your line which may harm the telephone
network, the telephone company shall, where practicable, notify you that temporary
discontinuance of service may be required. Where prior notice is not practicable and
the circumstances warrant such action, the telephone company may temporarily
discontinue service immediately. In case of such temporary discontinuance, the
telephone company must: (1) promptly notify you of such temporary discontinuance; (2)
afford you the opportunity to correct the situation; and (3) inform you of your right to
bring a complaint to the Commission pursuant to procedures set forth in Subpart E of
Part 68, FCC Rules and Regulations.
The telephone company may make changes in its communications facilities, equipment,
operations or procedures where such action is required in the operation of its business
and not inconsistent with FCC Rules and Regulations. If these changes are expected to
affect the use or performance of your telephone equipment, the telephone company
must give you adequate notice, in writing, to allow you to maintain uninterrupted
service.
FCC Part 15 information
This device complies with Part 15 of the FCC Rules. Operation is subject to the following two
conditions: (1) This device may not cause harmful interference; and (2) This device must accept
any interference received, including interference that may cause undesired operation.
This equipment has been tested and found to comply with the limits for a Class B digital device,
pursuant to Part 15 of the FCC Rules. These limits are designed to provide reasonable protection
against harmful interference in a residential installation.
Privacy of Communications may not be ensured when using this product.
This equipment generates, uses, and can radiate radio frequency energy and, if not installed and
used in accordance with the instructions, may cause harmful interference to radio communications. However, there is no guarantee that interference will not occur in a particular installation.
If this equipment does cause harmful interference to radio or television reception, which can be
determined by turning the equipment off and on, the user is encouraged to try to correct the
interference by one or more of the following measures:
• Reorient or relocate the receiving antenna (that is, the antenna for radio or
television that is “receiving” the interference).
• Reorient or relocate and increase the separation between the
telecommunications equipment and receiving antenna.
• Connect the telecommunications equipment into an outlet on a circuit
different from that to which the receiving antenna is connected.
If these measures do not eliminate the interference, please consult your dealer or an experienced radio/television technician for additional suggestions. Also, the Federal Communications
Commission has prepared a helpful booklet, “How To Identify and Resolve Radio/TV Interference
Problems.”
This booklet is available from the U.S. Government Printing Office, Washington, D.C. 20402.
Please specify stock number 004-000-00345-4 when ordering copies.
Notice: The changes or modifications not expressly approved by the party responsible for
compliance could void the user’s authority to operate the equipment.
FCC RF exposure information
This product complies with FCC radiation exposure limits under the following conditions:
● The base must be placed to allow a minimum of 20cm (8 inches) between
the antenna and all persons during normal operation.
● The base must not be collocated or operated in conjunction with any other
antenna or transmitter.
● The handset is designed for body-worn operation and meets FCC RF
exposure guidelines when used with any belt clip, carrying case, or other
accessory supplied with this product. (All necessary accessories are
included in the package; any additional or optional accessories are not
required for compliance with the guidelines.) Third party accessories
(unless approved by the manufacturer) should be avoided as these might
not comply with FCC RF exposure guidelines.
Hearing Aid Compatibility
This telephone meets FCC standards for Hearing Aid Compatibility.
Limited Warranty
90 Days Limited Warranty
In the unlikely event that this product is defective, or does not perform
properly, you may within ninety (90) days from your original date of purchase
return it to the authorized service center for repair or exchange.
TO OBTAIN WARRANTY SERVICE:
● Provide proof of the date of purchase within the package (Dated bill of sale).
● Prepay all shipping costs to the authorized service center, and remember to
insure your return.
● Include a return shipping address (no P.O. Boxes), a telephone contact
number, and the defective unit within the package.
● Describe the defect or reason you are returning the product.
Your product will be repaired or replaced, at our option, for the same or
similar model of equal value if examination by the service center determines
this product is defective. Products received damaged as a result of shipping
will require you to file a claim with the carrier.
The shipping address of the authorized service center is:
Southern Telecom Inc.
Attention: Returns Department
14-C 53rd Street
Brooklyn, NY 11232
Should you have any questions or problems concerning this product, please
contact our customer service department at:
1-877-768-8483 (Toll Free)
Monday - Thursday: 9AM - 5PM (EST)
Friday: 9AM - 3PM (EST)
or via e-mail at:
[email protected]
Warranty service not provided
This warranty does not cover damage resulting from accident, misuse,
abuse, improper installation or operation, lack of reasonable care, and unauthorized modification. This warranty is voided in the event any unauthorized
person opens, alters or repairs this product. All products being returned to
the authorized service center for repair must be suitably packaged.
Limitation of Warranty:
● THE WARRANTY STATED ABOVE IS THE ONLY WARRANTY APPLICABLE
TO THIS PRODUCT. ALL OTHER WARRANTIES, EXPRESS OR IMPLIED
(INCLUDING ALL IMPLIED WARRANTIES OF MERCHANTABILITY OR
FITNESS FOR A PARTICULAR PURPOSE) ARE HEREBY DISCLAIMED.
● REPAIR OR REPLACEMENT AS PROVIDED UNDER THIS WARRANTY IS
THE EXCLUSIVE REMEDY OF THE CONSUMER. SOUTHERN TELECOM
INC. SHALL NOT BE LIABLE FOR INCIDENTAL OR CONSEQUENTIAL
DAMAGES RESULTING FROM THE USE OF THIS PRODUCT OR ARISING
OUT OF ANY BREACH OF ANY EXPRESS OR IMPLIED WARRANTY ON THIS
PRODUCT. THIS DISCLAIMER OF WARRANTIES AND LIMITED WARRANTY
ARE GOVERNED BY THE LAWS OF THE STATE OF NEW YORK.
EXCEPT TO THE EXTENT PROHIBITED BY APPLICABLE LAW, ANY IMPLIED
WARRANTY OF MERCHANTABILITY OR FITNESS FOR A PARTICULAR
PURPOSE ON THIS PRODUCT IS LIMITED TO THE APPLICABLE WARRANTY PERIOD SET FORTH ABOVE.
Some states do not allow the exclusion nor limitation of incidental or consequential damages, or limitations on how long an implied warranty lasts so the
above limitations or exclusions may not apply to you. This warranty gives you
specific legal rights, and you also may have other rights that vary from state
to state.
Distributed by: AIT, Inc. Brooklyn NY 11232
© 2010 All rights reserved
Emerson and the G-Clef logo are registered trademarks of
Emerson Radio Corp. Parsippany, New Jersey USA
Information for DECT products
This telephone is compliant with the DECT 6.0 standard which operates in
the 1.92GHz to 1.93GHz frequency range.
Installation of this equipment is subject to notification and coordination
with UTAM.
Any relocation of this equipment must be coordinated through and
approved by UTAM.
UTAM may be contacted at 1-800-429-8826.