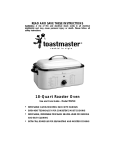
1
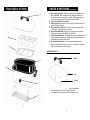
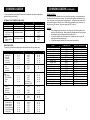
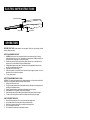
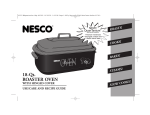
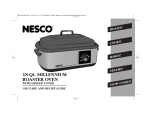
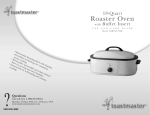
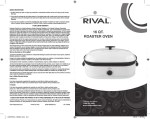
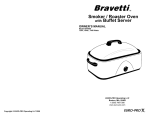
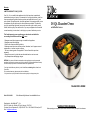
Warranty:
LIMITED WARRANTY* ONE (1) YEAR:
Your Elite Platinum small kitchen appliance is built with precision, inspected and
tested before leaving our factory. It is warranted, to the original purchaser, to be free
from any manufacturing defects under normal use and conditions for one (1) year,
cord excluded. During that period, should the appliance fail to operate properly, return
the appliance with your sales receipt to the store where purchased. This warranty
gives you special legal rights and you may also have other rights to which you are
entitled, which may vary from state to state. If you use your appliance for household
use and according to instructions, it should give you years of satisfactory service.
18 Qt. Roaster Oven
with Buffet Server
This limited warranty covers appliances purchased and used within the
surrounding United States and does NOT cover:
- Damages caused from improper usage or installation of appliance.
- Damages caused from shipping.
- Defects other than manufacturing defects.
- Breakage caused by misuse, abuse, accident, alteration, lack of proper care and
maintenance, or incorrect current or voltage.
- The loss or missing parts of the appliance. Parts will need to be purchase
separately.
- Damage from service by other than an authorized dealer or service center.
- Any transportation and shipping charges.
RETURNS: Any return of defective merchandise to the manufacturer must be processed
accordingly by contacting customer service first to obtain RA # (Return Authorization Number).
We will not accept any returns of merchandise without an applicable RA #.
*One Year Limited Warranty valid only in the United States, excluding Alaska, Hawaii, and
Puerto Rico.
For international warranty, please contact the local distributor.
**Any instructions or policy included in this manual may subject to change at any time.
Model ERO-210BK
Model ERO-210BK
Elite Platinum 18 Qt. Roaster Oven with Buffet Server
Distributed by: MAXI-MATIC® , USA
18401 E. Arenth Ave. Building B. City of Industry, CA 91748
Customer Service Department: (626) 912-9877 Ext. 116/120 MON-FRI 9am-5pm PCT
Email: [email protected]
INSTRUCTION MANUAL
Before operating your new appliance, please read all instructions carefully and keep for future reference.
IMPORTANT SAFEGUARDS ..
When using electrical appliances, basic safety precautions should always be
followed, including the following:
1. Read all instructions before operating.
2. Do not touch hot surfaces. Use handles or knobs if applicable.
3. Remove all packaging plastics and other materials from unit before operating.
4. Wash all removable accessories before using for the first time.
5. To protect against electrical shock, do not immerse cord, plug or appliance itself
in water or other liquids.
6. Close supervision is necessary when appliance is used by or near children.
7. Unplug from outlet when not in use and before cleaning. Allow to cool before
putting on or taking off parts.
8. Do not operate any appliance with a damaged cord or plug or after the appliance
malfunctions or has been damaged in any manner. Return the appliance to the
nearest authorized service facility for examination, repair or adjustment.
9. The use of accessory attachments not recommended by the appliance
manufacturer may cause injuries.
10. Do not use outdoors.
11. Do not let cord hang over edge of table or counter or touch hot surfaces.
12. Do not place on or near a hot gas or electric burner, or in a heated oven.
13. Always attach plug to appliance first, then plug cord into wall outlet. To
disconnect, turn any control to OFF position, then remove plug from wall outlet.
14. Oversized foods or metal utensils must not be inserted in the appliance as they
may cause a fire or risk of electrical shock.
15. A fire may occur if the appliance is covered or touching flammable material
including curtains, draperies, walls and the like when in operation.
16. Do not clean with metal scouring pads. Pieces can break off the pad and touch
electrical parts, involving a risk of electrical shock.
17. Extreme caution should be exercised when using containers constructed of other
material other than metal or glass.
18. Do not store any materials other than manufacturer's recommended accessories
in this unit when not in use.
19. Do not place any of the following materials in the unit: Paper, cardboard, plastic
and the like.
SAVE THESE INTRUCTIONS
THIS PRODUCT IS FOR HOUSEHOLD USE ONLY!
1
2
Description of Parts
PARTS & FEATURES
..
A
B
C
continued…..
A)
High Dome Lid with Vent: Removable lid with built-in ventilation steam
vents. CAUTION: Take care when removing lid during cooking cycle.
Escaping hot steam may cause burns. Always tilt the lid open away from
you to divert the steam and avoid the steam ventilation holes.
B) 3-PC Set of Buffet Server Containers
C) Buffet Server Rack: Placed over the Cooking Pan, this will hold the 3-PC
individual Server containers.
D) Removable Main Cooking Pan: Porcelain coated cooking pan with an
18Qt. capacity. Removable for easy cleaning.
E) Roaster Oven Main Body: The body is surrounded by a wrap-around
heating coil to provide an ALL OVER heat distribution.
F) Temperature Control Knob: The temperature control knob also acts as the
On/Off switch for the roaster oven. The temperature always maintains the
desired temperature setting of up to 450°F.
G) Removable Roasting Rack: This chrome-plated rack helps make
placement and removal of food quick and easy. Also allows for grease to
drain from food during the cooking process.
ASSEMBLING THE LID
Handle
D
E
Lid
Screw
s
F
1.
2.
3.
4.
Locate the Lid and the Lid Handle.
The screws attached to the handle will need to be unscrewed.
Place the Handle on top of the Lid aligning the holes.
Use a screw driver to screw one end of the handle at a time.
G
3
4
BEFORE USING YOUR OVEN ..
3.
4.
1.
2.
3.
Remove all packaging materials such as cardboard and Styrofoam
Wash all the removable parts in hot, soapy water. Rinse thoroughly and dry.
The exterior of the oven can be cleaned with a soft damp cloth and warm
soapy water. Dry thoroughly. Do not use abrasive materials or cleaners.
DO NOT IMMERSE THE ROASTER OVEN BODY in water!
5.
6.
7.
Note: Due to the manufacturing process, some smoke and odor may be noticed
during the first use. This should disappear after the first heating of the Roaster Oven.
•
•
•
•
•
8.
Place the Buffet Server Frame onto the Cooking Pan. Make sure the frame
is secure and balanced.
Insert the three serving dishes into the frame. Make sure they are also
secure and balanced.
Place lid on and plug the roaster oven into a working outlet. Preheat at
350°F for 30 minutes or until the water inside is very hot.
Remove lid carefully and add hot, cooked food into the individual serving
dishes.
Place cover back on and set the temperature to 250°F to keep the food
warm. If necessary, the temperature can be adjusted.
Stir the food occasionally and keep food covered to maintain the
temperature.
Check periodically and carefully add more hot water if necessary.
****IMPORTANT POINTS WHEN USING YOUR ROASTER OVEN****
9.
Always use the Main Cooking Pan inside the Roaster Oven when cooking.
Warning: Never put food or liquids directly into the Roaster Oven Main Body.
Avoid the steam vents during the cooking process or when removing or lifting the
lid from the body of the roaster oven.
Always take care to lift the lid at an angle away from you so any hot steam is
directly in the other direction.
Avoid frequent removal of the lid to check on the cooking process or to stir the
food. Significant amount of heat is released whenever the lid is lifted, therefore
the cooking time may need to be extended.
****IMPORTANT POINTS WHEN USING THE BUFFET SERVER****
USING YOUR ROASTER OVEN ..
Note: When keeping food warm, temperatures should always be maintained above
150°F or above.
•
Make sure that all three serving trays need to be in place when using the
Buffet Server.
•
Use the Buffet Server only to keep food warm.
•
Do not use the Serving Dishes, and the Buffet Server Frame on the stove
top, in an oven or in a microwave oven.
•
It is recommended to spray the inside of the Serving Dishes with a non-stick
cooking spray or wipe the inside with a dab of oil if you will be serving foods
that have the tendency to stick.
1.
2.
3.
4.
5.
Make sure the roaster oven is plugged.
Make sure the Temperature Control Switch is set to the OFF position.
Place the Main Cooking Pan into the Roaster Oven.
Plug power cord into working outlet.
Preheat the Roaster Oven for 15-20 minutes by turning the Temperature
Control to the desired temperature.
6. Place the Roasting Rack into the bottom of the cooking pan. Put food onto
the rack. Cover Roaster Oven with lid.
Note: Some foods or recipes to not require the use of the roasting rack.
7. When the cooking cycle is complete. Turn the Temperature Control to the
OFF position and unplug the Roaster Oven from the outlet.
8. Remove the lid carefully using oven mitts.
9. Remove the Roasting Rack with the food.
10. Remove food from rack and complete any other preparations to the food and
serve.
USING THE BUFFET SERVER:
1.
2.
Wash all the parts to the Buffet Server with warm soapy water. Dry
thoroughly.
Place the Main Cooking Pan into the oven. Fill with enough water to fill up
approximately half way.
WARNING: Never add water to the Roaster Oven body directly.
5
6
.. COOKING GUIDE ..
.. COOKING GUIDE
It is recommended to use a Meat Thermometer to determine the internal temperature
when cooking meat or poultry.
SLOW COOKING:
If you wish to use the Roaster Oven in a Slow Cooking mode, it is recommended to
use best with less tender cuts of meat. The heat is more gradual with slow cooking.
It isn’t necessary to stir during the slow cooking cycle. Avoid removing the lid or this
may result in the loss of heat to cook. When using a standard recipe, slow cook 1½
hours for every 30 minutes. Slow cook using the 250°F setting.
INTERNAL FOOD TEMPERATURE GUIDE
MEAT
RARE
Beef
145°F
Not Recommended
Pork
Lamb
145°F
Smoking Ham
- Cook before eating
- Fully Cooked
MEDIUM
160°F
160°F
160°F
Not Recommended
160°F
140°F
180°F
180°F
Poultry
- Roasting Chicken
- Turkey
WELL DONE
170°F
170°F
170°F
Not Recommended
ROASTING GUIDE:
The cooking chart below is approximate and should be used as a guideline only.
MEAT
Beef Roasts
-
Standing Rib
Sirloin Tip
Tenderloin
Pot Roast
- Corned Beef
WEIGHT (lbs.)
TEMPERATURE
MINUTES per lbs.
4–6
3–5
3½ - 4
4–6
3–5
325°F
350°F
450°F
300°F
300°F
20 - 25
20 - 25
8 - 12
30 - 40
15 - 20
5–8
3–4
350°F
350°F
25
25
3–5
4–6
4–5
8 – 10
350°F
350°F
325°F
450°F to brown…
…decrease to 250°F
25 – 30
35 – 40
15 – 20
15 – 20
10 – 15
325°F
20 – 25
8 – 12
5 – 10
325°F
325°F
15 – 20
13-28
4–6
3–5
325°F
325°F
30 – 35
30 – 25
3½ - 5
6–8
6–8
10 – 14
14 – 22
10 – 14
350°F
350°F
350°F
375°F
375°F
350°F
15 – 17
18 – 20
8 – 10
12 – 17
13 – 18
15 – 20
Lamb
- Leg
- Shoulder
(boneless)
Pork
- Loin Roast
- Rolled Shoulder
- Chops
- Ribs
continued…
BAKING:
•
When baking inside the roaster oven, always use the Roasting Rack at the
bottom of the roaster oven. Always place any baking pans on top of the rack.
Never place directly on the bottom of the roaster oven.
•
It is recommended to use metal pans in the roaster oven for they provide
better heat transfer and browning.
•
It is recommended to preheat the roaster oven before baking.
FOOD
Muffins
Bread (yeast)
Bread Rolls
Cookies
Cupcakes
Sheet Cake
Bundt Cake
Pound Cake
Brownies
Cheesecake
Fruit Pie
Custard Pie
Pastry Shell
Pizza (9-inch)
Potatoes
Sweet Potatoes / Yams
Scalloped Potatoes
Apples
TEMPERATURE
425°F
400°F
400°F
350°F
350°F
350°F
350°F
350°F
350°F
325°F
425°F
350°F
425°F
425°F
350°F – 400°F
350°F – 400°F
350°F
350°F
Smoked Ham
- Bone-in
(Shankless)
- Boneless
- Fully Cooked
Veal
- Loin
- Shoulder
Poultry
-
Chicken (whole)
Chicken (whole)
Chicken (pieces)
Turkey (prebasted)
Turkey (prebasted)
Turkey, fresh
..
8
BAKING TIME (minutes)
15 – 20
40 – 45
18 – 20
11 – 13
25 – 30
40 – 45
50 – 60
50 – 60
25 – 30
50 – 60
45 – 50
50 – 60
10 - 13
20 – 25
50 – 60
55 – 65
75 – 90
35 – 45
.. CLEANING INSTRUCTIONS
\
CLEANING YOUR ROASTER OVEN:
*WARNING: NEVER IMMERSE YOUR ROASTER OVEN MAIN BODY IN WATER
OR OTHER LIQUIDS. DO NOT PUT THE COOKING PAN IN DISHWASHER.
1.
2.
3.
4.
5.
Turn the Temperature Control setting to the OFF position.
Unplug the Roaster Oven from the wall outlet.
Always allow the Roaster Oven to cool down completely before handling.
Wash the Cooking Pan, the Lid and the Roasting Rack in hot soapy water
using a sponge or soft cloth. Rinse thoroughly and dry.
Wipe the inside and outside of the Roaster Oven body with a damp cloth.
CLEANING YOUR BUFFET SERVER:
*WARNING: THE BUFFET SERVER IS HOT. ALWAYS LET IT COOL DOWN
COMPLETELY BEFORE HANDLING.
1.
2.
Always allow the buffet server to completely cool before cleaning.
Wash the Serving Dishes and the Buffet Frame in hot soapy water or in the
dishwasher. Rinse and dry thoroughly.
…POLARIZED PLUG …
If this appliance has a polarized plug (meaning one blade is wider than the other
one), please follow the below instructions:
To reduce the risk of electric shock, this plug is intended to fit into a polarized outlet
only in one direction. If the plug does not fit fully into the outlet, reverse the plug. If it
still does not fit, contact a qualified electrician. Do not attempt to modify the plug in
any way.
This appliance is intended for Household Use Only.
9
ELECTRIC KNIFE INSTRUCTIONS: .
Blade Release Button
Plastic Guard
On/Off Button
OOPERATION..
BEFORE FIRST USE: Wash blades in hot, soapy water. Rinse, then dry thoroughly. Handle
carefully. Blades are sharp.
HOW TO ASSEMBLE AND USE
1.
2.
3.
4.
5.
6.
CAUTION: Be sure cord is not connected to electric outlet when removing or inserting
blades and when knife is not in use. The blades are extremely sharp. Always handle by the
side opposite the cutting edge, or by the plastic guards.
If blades are separated, pick up by the plastic guard. Slide the rivet on one blade into the
keyhole slot in the other blade until they are locked together.
Holding blades together at the base of the blade with cutting edge down, slide into motor
housing until both blades click into place.
Plug cord into 120 volt AC outlet.
Hold knife by handle. Pull ON/OFF button back and up like a trigger to operate. You must
hold the button on for the knife to operate.
To stop, release button.
HOW TO DISASSEMBLE AND CLEAN
WARNING: To reduce risk of personal injury, always disconnect cord from electric outlet before
inserting or removing blades. Blades are sharp; handle carefully.
1. Unplug cord from electric outlet.
2. Firmly press blade release button. Grasp blades from top dull edge near plastic guard and
carefully pull until blades release.
3. Carefully separate blades by sliding apart to disengage rivet from keyhole.
4. Wash blades in hot, soapy water. Rinse and dry thoroughly.
5. After washing and drying, immediately place blades into the plastic sheath for storage.
6. To clean motor housing and cord, wipe with a damp cloth and then dry thoroughly.
HINTS FOR BEST RESULTS
1.
2.
3.
4.
5.
Move knife through the food. Do not use a back and forth sawing motion.
Let meat stand about 15 minutes after cooking and before slicing.
Slice down to and around bone. Do not attempt to slice through bone.
Do not cut through frozen foods.
Do not attempt to sharpen the serrated blades at home.