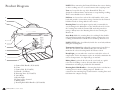
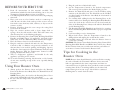
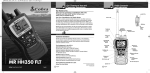
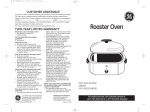
1
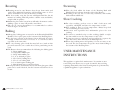
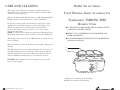
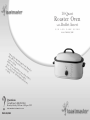
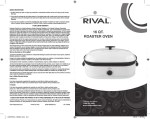
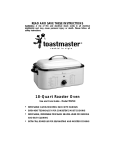
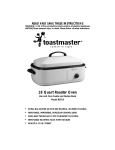
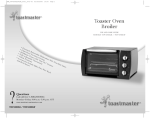
18-Quart
Roaster Oven
with
U S E
•R
e
• E mova
ven
b
mo -Hea le Roa
• R ist co t tec sting
em
hn
o
R
line ovab king ology ack w
it
for
• D r fo le, im
r se
om
con h Han
m
d
sist
coo ed L r vin ersib
ent les
id f g an
kin
le p
,
g
or
self d easy orcela
-ba
i
stin clean n ena
me
g a ing
l
nd
mo
iste
r
?
Questions
Call toll free 1-800-233-9054
Monday – Friday, 9:00 a.m. - 5:00 p.m. CST
www.maxim-toastmaster.com
TMR18W/WBF
Buffet Insert
A N D
C A R E
G U I D E
Model TMR18W/WBF
IMPORTANT SAFEGUARDS
When using electrical appliances, basic safety precautions should
always be followed including the following:
◆ Read all instructions.
◆ Do not touch hot surfaces. Use handles or knobs.
◆ To protect against electrical shock, do not immerse cord, plug
or appliance in water or other liquid.
◆ Close supervision is necessary when any appliance is used by or
near children.
◆ Unplug from outlet when not in use and before cleaning. Allow
to cool before putting on or taking off parts.
◆ Do not operate any appliance with a damaged cord or plug or
after the appliance malfunctions or has been damaged in any
manner. Contact Consumer Relations for examination, repair
or adjustment.
◆ The use of accessory attachments not recommended by the
appliance manufacturer may cause injuries.
◆ Do not use outdoors.
◆ Do not let cord hang over edge of table or counter, or touch
hot surfaces.
◆ Do not place on or near a hot gas or electric burner, or in a
heated oven.
◆ Extreme caution must be used when moving an appliance
containing hot oil or other hot liquids.
◆ To disconnect, turn Temperature Control to “OFF”, then
remove plug from wall outlet.
◆ Do not use appliance for other than intended use.
◆ CAUTION: Steam escaping from under the Domed Lid,
Buffet Server Containers or Buffet Server Frame, is hot and
can cause burns.
◆ Use oven mitts to remove any cooking parts, pans, or cooked
food from the appliance.
◆ Do not use this appliance for deep - frying.
SAVE THESE INSTRUCTIONS
FOR HOUSEHOLD USE ONLY
1.
ADDITIONAL IMPORTANT
SAFEGUARDS
CAUTION: HOT SURFACES. This appliance generates heat
and escaping steam during use. Proper precautions must be
taken to prevent the risk of burns, fires, or other injury to
persons or damage to property.
◆ A person who has not read and understood all operating and
safety instructions is not qualified to operate this appliance. All
users of this appliance must read and understand this Owner’s
Manual before operating or cleaning this appliance.
◆ If this appliance falls or accidentally becomes immersed in water,
unplug it from the wall outlet immediately. Do not reach into the
water!
◆ When using this appliance, provide adequate air space above and
on all sides for air circulation. Do not operate this appliance
while it is touching or near curtains, wall coverings, clothing,
dishtowels or other flammable materials.
◆ To reduce the risk of fire, do not leave this appliance unattended
during use.
◆ If this appliance begins to malfunction during use, immediately
unplug the cord. Do not use or attempt to repair a
malfunctioning appliance!
◆ The cord to this appliance should only be plugged into a 120V
AC electrical wall outlet.
◆ Do not use this appliance in an unstable position.
◆ Lift off Lid carefully to avoid scalding and allow water to drip into
Roasting Liner.
◆ Never use the Roasting Liner on a gas or electric cooktop or an
open flame.
2.
TMR18W/WBF Use and Care Guide
Polarized Plug
This appliance has a polarized plug (one blade is wider than the
other). To reduce the risk of electric shock, this plug is intended to
fit into a polarized outlet only one way. If the plug does not fit fully
in the outlet, reverse the plug. If it still does not fit, contact a
qualified electrician. Do not attempt to modify the plug in any way.
Short Power Supply Cord
A short power-supply cord is provided to reduce the risk resulting
from becoming entangled in or tripping over a longer cord. Do
not use an extension cord with this product.
Electric Power
If the electrical circuit is overloaded with other appliances, your
appliance may not operate properly. It should be operated on a
separate electrical circuit from other appliances.
3.
Product Diagram
NOTE: When removing the Domed Lid from the roaster during
or after cooking, use care to avoid contact with escaping steam.
Vents are located in the top of the Domed Lid. They are
designed to allow moisture and steam to escape during cooking.
These vents should never be blocked.
A.
Lid Rests are located on each of the side handles of the oven
body and provide a convenient storage location for the Domed
lid when foods are being added to the roaster.
B.
C.
Roasting Liner has an 18-quart capacity and is removable for
easy cleaning in the dishwasher or the sink. Food can be left in
the roasting liner with the Domed Lid and refrigerated for
storage. Always insert the Roasting Liner before turning the
Roaster on.
Oven Body holds the roasting liner for cooking. It has doublewall construction with wrap-around heating elements for even
cooking and insulation to hold in heat and keep kitchen cool.
D.
NOTE: NEVER place food directly inside the oven body without
using the roasting liner.
E.
F.
Temperature Control has adjustable temperatures from 150° to
450°. The thermostat will automatically cycle on and off to
maintain the selected setting inside the Roaster Oven.
G.
H.
Ready Light goes out when the oven has reached the selected
temperature. As the thermostat cycles on and off to maintain the
selected temperature, the light will go on and off.
I.
J.
A. Domed Lid Handle (P/N 22681)
B. Vents
C. Domed Lid (P/N 22678)
D. Handle / Lid Rests
E. Roasting Liner (P/N 22679)
F. Oven Body
G. Ready Light
H. Temperature Control
I. Baking Chart
J. Roasting Rack With Handles (P/N 22680)
4.
TMR18W/WBF Use and Care Guide
Baking Chart is printed directly on the oven body as a quick
reference for baking a variety of foods. More detailed
information on baking is provided in this manual.
Roasting Rack With Handles — chrome-plated wire rack fits into
roasting liner for most cooking purposes. Handles are
convenient for removing large items from the roasting liner and
fold down for compact storage.
5.
BEFORE YOUR FIRST USE
1. Read all instructions in this manual carefully. The
information included in this book will help you to use your
Toastmaster 18-Quart Roaster Oven to its fullest.
2. Carefully unpack the Roaster Oven and remove all packaging
materials.
3. Place your oven on a level surface such as a countertop or
table. Be sure the sides, back, and top of the oven are at least
four inches away from any walls, cabinets, or objects on the
counter or table.
4. Remove all stickers from the oven except the rating label
located on the bottom.
5. Wipe the exterior surfaces with a clean, damp cloth or
sponge, then dry with another cloth. This will remove any
dust that may have settled during packaging.
6. Remove the Roasting Liner, Domed Lid, Roasting Rack With
Handles and Buffet Insert (if applicable) and wash in hot
sudsy water or in the dishwasher. Rinse and dry thoroughly.
7. Place the Roaster Oven in a well-ventilated area.
8. Plug the cord into a 120-volt AC outlet. Set the Temperature
Control to 450° to eliminate any protective substance or oil
that may have been used for packing and shipping. Operate
the Roaster Oven empty for about 30 minutes until odor and
smoke disappear. Turn the Temperature Control to OFF.
Unplug the unit and allow to cool.
9. This is a high-power appliance and should be the only
appliance operating on the circuit.
10. To avoid scratching, marring, discoloration, or fire hazard,
do not store anything on top of the oven, especially during
operation.
Using Your Roaster Oven
1. Always preheat the Roaster Oven and place the Roasting
Liner in the Roaster Oven Body. Place the Domed Lid on the
Roasting Liner.
NOTE: Always place the food in the Roasting Liner. Never
place food or liquid directly in the Oven Body.
2. Be sure that the Temperature Control is turned to the OFF
position.
6.
TMR18W/WBF Use and Care Guide
3. Plug the cord into a 120-volt AC outlet.
4. Set the Temperature Control to the desired temperature.
The oven is preheated when the Ready Light goes out.
5. Remove the Domed Lid and store it on the Lid Rest, using
caution as the lid will be hot. The lid will fit on the Lid Rest
on either handle of the Roaster Oven Body in a horizontal or
vertical position.
6. Use caution while adding food to the Roasting Liner as the
surfaces will be hot. If using the Roasting Rack With Handles,
center the food on the rack. Do not let the food touch the
sides of the Roasting Liner. Always cook with the Domed Lid
on the Roasting Liner.
7. The Roasting Rack With Handles is used for fat free roasting.
Do not use Roasting Rack With Handles to prepare soups and
stews.
8. Cook according to recipe instructions.
9. When food is done, turn the Temperature Control to the
OFF position and unplug the cord from the outlet.
10. Carefully remove the food and allow the Roaster Oven to
cool before cleaning.
CAUTION: The Roaster Oven Body, Roasting Liner, Domed Lid,
Roasting Rack With Handles and Buffet Insert will be hot. Always
lift the lid away from you to avoid steam and use pot holders or
oven mitts to remove food from the Roaster Oven.
Tips for Cooking in the
Roaster Oven
NOTE: Roaster Oven should always be preheated before roasting.
As a rule of thumb, the Toastmaster Roaster Oven roasts and
bakes at approximately the same temperature and time as a
conventional oven. A guide has been provided to assist you with
roasting times. If there is nothing similar, use the times and
temperatures given in your recipe. Check before estimated
finishing time to ensure desired results.
7.
Roasting
◆ Roasting meats in your Roaster Oven keeps them moist and
tender. For additional browning, add browning sauce to oil or
butter and brush it over the meat before cooking.
◆ For best results, roast dry. Do not add liquid until the last 30
minutes of cooking. This will produce a darker roast and darker,
crispier skin on poultry.
◆ Simmering less tender cuts of meat will make them more tender.
Adding a gravy or sauce will provide extra flavor.
◆ The use of a meat thermometer is recommended to achieve
desired degree of doneness.
Baking
◆ Always place baking pans or casseroles on the Roasting Rack With
Handles. Never place pans on the bottom of the Roasting Liner.
◆ Use the large capacity of the Roaster Oven efficiently. It is large
enough to bake two loaves of bread, or to cook meat and a
vegetable at the same time.
◆ For easy clean-up, place foods that may boil over (such as fruit
pies and casseroles) on a cookie sheet before positioning on the
rack.
◆ The Roaster Oven accommodates the following size baking pans:
1 - 12-cup muffin pan
1 - 6-cup jumbo muffin pan
2 - 12-cup mini muffin pan
1 - 8-, 9-, or 10-inch pie plate
1 - 14" x 8"x 1⁄2" baking sheet
1 - 13" x 9" x 2" baking dish
1 - 8- or 9-inch square baking pan
1 - 10-inch bundt pan or angel food pan
◆ Metal pans reflect and transfer heat better than glass pans. Glass
pans can be used if desired, but the bottom crust will not be as
brown.
8.
TMR18W/WBF Use and Care Guide
Steaming
◆ Place the food within the frame of the Roasting Rack with
Handles. Keep food away from the sides of the Roaster.
◆ Steaming is an easy way to cook tasty, nutritious, and healthy
foods without added fats.
Slow Cooking
◆ For slow cooking, preheat oven to 400°. Cook meat and
vegetables, add liquid, and lower the temperature to 250°.
◆ Slow cooking is done at a low temperature. Always keep food
covered. Stirring is not necessary.
◆ Cut meat and vegetables into uniform-size pieces for even
cooking.
◆ To convert a standard recipe to slow cooking, double or triple
the time and decrease the temperature to 225°– 275°.
◆ It is not necessary to cook meat and vegetables in a separate fry
pan. This can be done directly in the Roasting Liner.
◆ When slow cooking meats and poultry, it is not necessary to use
the rack. The low temperature keeps the meat from sticking to
the bottom of the Roasting Liner.
USER MAINTENANCE
INSTRUCTIONS
This appliance requires little maintenance. It contains no user
serviceable parts. Do not try to repair it yourself. Any servicing
requiring disassembly other than cleaning must be performed by
a qualified appliance repair technician.
9.
Buffet Server Insert
CARE AND CLEANING
After using, turn Temperature Control to OFF position and
unplug the power cord from the outlet. Before cleaning, allow
the unit to cool completely.
Food Warmer Insert Accessory for
Remove the Domed Lid, Roasting Liner, and Roasting Rack With
Handles. Wash in warm sudsy water or in the dishwasher.
Toastmaster TMR18W/WBF
Roaster Oven
Do not use scouring pads or harsh cleaners on any part of the
appliance. Cooked-on foods may be removed by using a nonabrasive cleaning pad or a nylon brush and non-abrasive
cleaners. Do not use abrasive cleaners or steel wool as they
may scratch the finish.
NOTE: To easily remove baked-on food from the Roasting Liner,
fill the liner with hot water. Cover and heat at 350° for 30 minutes.
◆ TURNS YOUR TOASTMASTER TMR18W/WBF ROASTER
OVEN INTO A BUFFET SERVER
Turn Temperature Control to the OFF position and allow to cool
before cleaning.
◆ CONTAINERS REMOVE INDIVIDUALLY FOR REFILLING
AND EASY CLEANING
Wipe the outside surfaces of the Roaster Oven with a damp cloth
and dry.
The Roasting Liner is coated with a finish that is easy to clean. It
may chip if dropped on a hard surface. Water spots or mineral
deposits (characterized by a white film on the surface) may be
removed with household vinegar or a non-abrasive cleaner.
◆ KEEPS UP TO 3 DIFFERENT FOODS SEPARATED AND
WARM FOR SERVING
A.
B.
CAUTION: Do not immerse the Oven Body or power cord in
water or other liquid.
A. Buffet Server Containers (P/N 22682)
B. Buffet Server Frame (P/N 22683)
10.
TMR18W/WBF Use and Care Guide
11.
Please refer to the following information and the TMR18W/WBF Use
and Care Guide for instructions.
ROASTING CHART
CAUTION: Appliance surfaces are hot during and after use.
CAUTION: Always wear protective insulated oven mitts on
hands when touching hot roaster, frame, containers or food.
Avoid escaping steam.
1. Place Roasting Liner in base of roaster and add 10 cups of hot
water.
2. Place Buffet Server Frame on the rim of the liner. Make sure
the frame is seated securely and is level.
3. Place Buffet Server Containers in the Buffet Server Frame.
4. Cover and plug roaster into a 120 V ~ 60 Hz outlet. Turn
Temperature Control to 400° to preheat for 20 minutes.
5. Uncover and carefully add hot, cooked foods to containers.
Turn Temperature Control to 325°.
6. Cover to keep foods warm. Adjust temperature setting if
necessary.
7. Stir occasionally and keep food covered to maintain temperature.
8. Ten cups of water in the liner should last approximately two
hours. Periodically check and carefully add more hot water if
necessary.
NOTE:
◆ All containers need to be in place when using the buffet server.
◆ Use only to keep cooked foods warm. Keep temperature of food
at 140° or above.
◆ Do not place containers on the stove top, in an oven or in a
microwave oven.
◆ Spray inside of containers with non-stick spray before filling with
foods that may stick.
◆ Add broth or juice to foods if needed to help keep warm.
◆ Each container holds approximately 5 cups of food or liquid.
Always leave at least one inch of space from top level of food to
rim of container.
CARE AND CLEANING
BEEF
LAMB
PORK
POULTRY
VEAL
Cut
Amount
Pounds
Preheat
Temp./Roast
Temp.
Minutes
Per
Pound
Chuck Pot Roast
2–5
450°/350°*
40 – 50
Sirloin Tip
4–5
350°
25 – 30
Tenderloin
3–4
450°
17 – 22
Leg (semi-boneless)
5–8
350°
18 – 23
Rolled Shoulder
4–5
350°
20 – 25
Country-Style Ribs
8 – 10
300°
20 – 25
Center-Cut Loin Roast
(single boneless)
5–6
325°
20 – 25
Rolled Shoulder
(boneless)
5–6
350°
32 – 37
Chicken (whole)
5–6
375°
12 – 17
Chicken (pieces)
4–5
375°
11 – 16
Cornish Hens
1 1⁄4 oz.
400°
14 – 19
Duck
6–7
425°
17 – 22
Turkey (prebasted)
10 – 14
400°/350°/400°**
10 – 15
Turkey (prebasted,
tie wings close to body) 14 – 20
400°/325°/400°**
11 – 16
Turkey Breast
(with bones)
4–7
325°
31 – 36
Loin
5 1⁄2 – 6 1⁄2
350°
26 – 31
* Preheat at 450°, add the meat, then cook at 350°.
**Preheat and roast turkeys at 400° for the first and last hour, roast at 350° (10 to
14 pounds) or 325° (14 to 20 pounds) for the remaining time.
1. Allow all parts to cool completely before cleaning.
2. Containers and frame are dishwasher safe or may be cleaned
in hot soapy water. Rinse and dry completely. A non-abrasive
cleaning pad or a nylon brush may be used if necessary.
12.
TMR18W/WBF Use and Care Guide
13.
SLOW COOKING CHART
BAKE CHART
1. Place Liner into Oven Body.
2. Place food on Rack and insert into Liner.
3. Add the amount of water in chart and cover with the Lid. Turn temperature
to the first cooking temperature and heat for time indicated.
4. Turn Temperature Control to cooking temperature in chart after preheating
and continue to cook until done.
1.
2.
3.
4.
BEEF
Cut
Amount Liquid/
Pounds Temperatures
Corned Beef
3–4
Round Rump
Roast
PORK Country Ham
4–6
Add enough cold water to
2 1⁄2 – 3 1⁄2 hrs.
cover the meat. Heat at 450°
for 30 minutes. Turn Temperature
Control to 350° and continue
to cook.
Add meat and 8 to 10 cups
hot broth. Heat at 450° for
30 minutes. Turn Temperature
Control to 275° and continue
to cook.
14 – 16 Add enough cold water to cover
the meat. Heat at 450° for
30 minutes. Turn Temperature
Control to 250° and continue
to cook.
Smoked Ham 9 – 11
(whole, boneless,
fully cooked)
Time
Add meat and 4 cups hot water.
Heat at 400° for 20 minutes.
Turn Temperature Control to
300° and continue to cook.
8 – 10 hrs.
5 – 7 hrs.
3 – 4 hrs.
Place Liner into Oven Body, cover with the Lid and preheat Roaster Oven.
Place food in a baking pan and place on the Rack.
Place Rack and food into preheated Roaster Oven. Cover with the Lid.
Bake until done.
Food
Preheat and
Bake Temperature
Approximate
Minutes
Baking Potatoes
400°
60 – 80
Biscuits
425°
15 – 20
Cake, 9” x 13”
325°
40 – 50
Cupcakes
350°
20 – 30
Quick Bread, loaf pan
375°
45 – 55
Sweet Potatoes
400°
50 – 60
Yeast Breads
350°
30 – 40
Yeast Rolls
400°
20 – 25
STEAM CHART
1.
2.
3.
4.
Trim and clean all vegetables.
Place Liner into Oven Body. Add 4 cups of hot water and cover with the Lid.
Preheat Roaster Oven at 400° for 20 minutes.
Place food on the Rack and insert into the Liner. Cover with the Lid. Keep
food away from the sides of the Roaster.
5. Steam until done.
Food
Approximate Minutes
Asparagus
10 – 15
Broccoli, stalks
10 – 15
Carrots, whole
30 – 40
Cauliflower, whole
30 – 45
Corn on the cob, husked
20 – 30
Squash, acorn or butternut,
halved, cut side down
25 – 35
Baste occasionally.
14.
TMR18W/WBF Use and Care Guide
15.
RECIPES
SLOPPY JOES
10 Pounds lean ground beef
4 Cups chopped onions
4 Cups chopped celery
3 (15-ounce) cans tomato sauce
2 (50-ounce) bottles catsup
11⁄2 Teaspoons salt
2 Tablespoons chili powder
2 Tablespoons dry mustard
11⁄2 Teaspoons paprika
11⁄2 Teaspoons garlic powder
6 Tablespoons brown sugar
1
⁄4 Cup vinegar
4 Ounces dry minute tapioca
1. Spray the bottom of the Roasting Liner with non-stick vegetable
spray. Place the Roasting Liner into the Roaster Oven Body and
cover with the Lid. Preheat at 400°.
2. Add the ground beef, onion, and celery, cover with the Lid
and cook at 400° for 45 to 60 minutes, stirring occasionally.
To eliminate over browning, keep food away from the sides of
the Roasting Liner. Drain grease if necessary.
3. Stir in the tomato sauce, catsup, salt, chili powder, dry mustard,
paprika, garlic powder, brown sugar, and vinegar. Place the Lid
onto the Roasting Liner and turn the Temperature Control to
300°. Cook for two hours, stirring occasionally.
4. Stir in the dry tapioca, cover with the Lid and continue to
cook at 300° for another 1 hour. Stir occasionally.
5. Serve on hamburger buns.
HEARTY VEGETABLE BEEF SOUP
5 Pounds stew meat, 1-inch cubes
5 Onion, chopped
8 Cups beef broth
5 Pounds potatoes, diced
5 Pounds carrots, sliced
1 Tablespoon salt
2 Tablespoons fresh minced garlic
2 Tablespoon dried thyme leaves
2 Tablespoons dried oregano
1 Teaspoon black pepper
1 (6-pound, 4-ounce) can diced tomatoes
1. Spray the bottom of the Roasting Liner with non-stick
vegetable spray. Place the Roasting Liner into the Roaster
Oven Body and cover with the Lid. Preheat at 400°.
2. Add the stew meat and onion cover with the Lid and cook at
400° for 45 to 60 minutes, stirring occasionally. To eliminate
over browning, keep food away from the sides of the Roasting
Liner.
3. Stir in the broth, potatoes, carrots, salt, garlic, thyme,
oregano, pepper, and tomatoes. Place the Lid onto the
Roasting Liner and continue to cook at 400° for 2 hours. Stir
occasionally.
4. Turn the Temperature Control to 350° and continue to cook
for an additional 2 to 3 hours or until meat is tender and the
vegetable are done. Stir occasionally.
Makes 40 cups
Makes 40 cups
16.
TMR18W/WBF Use and Care Guide
17.
OLD SETTLER’S BAKED BEANS
2 Pounds lean ground beef
4 Onions, chopped
2 Pounds cooked bacon, chopped
1 Cup brown sugar
1 Cup white sugar
1 Cup catsup
1 Cup barbecue sauce
1 Teaspoon salt
1
⁄4 Cup prepared mustard
4 16-ounce cans kidney beans, partially drained
4 16-ounce cans pork ‘n beans
4 16-ounce cans butter beans, partially drained
1. Spray the bottom of the Roasting Liner with non-stick
vegetable spray. Place the Roasting Liner into the Roaster
Oven Body and cover with the Lid. Preheat at 400°.
2. Add the ground beef and onion cover with the Lid and cook
at 400° for 45 to 60 minutes, stirring occasionally. To
eliminate over browning, keep food away from the sides of
the Roasting Liner. Drain grease if necessary.
3. Stir in the bacon, brown sugar, white sugar, catsup, barbecue
sauce, salt, mustard, kidney beans, pork ‘n beans, and butter
beans. Cover with the Lid and turn Temperature Control to
300°. Cook for 2 to 3 hours, stirring occasionally.
Makes 28 cups
HAM AND BEAN SOUP
4 Pounds dried Great Northern Beans
8 Cups cubed ham
4 Medium onions, chopped
11⁄2 Stalks (bunches) celery, sliced
7 Quarts water
3 Pounds carrots, sliced
1
⁄4 Cup chopped fresh parsley
2 Bay leaves
1
⁄2 Cup ham base bouillon
1 Teaspoons salt
1
⁄2 Teaspoon pepper
1. Soak beans according to package directions. Drain before
adding to the Roasting Liner.
2. Spray the bottom of the Roasting Liner with non-stick
vegetable spray. Place the Roasting Liner into the Roaster
Oven Body, cover with the Lid and preheat at 400°.
3. Add the onions and celery. Cover with the Lid and cook at
400° for 45 to 60 minutes, stirring occasionally. To eliminate
over browning, keep food away from the sides of the Roasting
Liner.
4. Stir in the drained beans, ham, water, carrots, parsley, bay
leaves and bouillon. Cover with the Lid and continue to cook
at 400° for 3 hours, stirring occasionally.
5. Turn the Temperature Control to 350° and continue to cook
for an additional 2 to 3 hours or until beans are done. Stir
occasionally.
6. Season with salt and pepper before serving.
Makes 48 cups
18.
TMR18W/WBF Use and Care Guide
19.
CHICKEN AND NOODLE SOUP
6 Cups cubed cooked chicken
3 Cups chopped onion
3 Cup sliced celery
3 Cup sliced carrots
8 Quarts chicken broth
1
⁄4 Cup chopped fresh parsley
1 Teaspoon pepper
2 (24 ounce) packages frozen noodles
1. Spray the Roasting Liner with non-stick vegetable spray. Place
the Roasting Liner into the Roaster Oven Body, cover with the
Lid and preheat at 400°.
2. Add the onion, celery, and carrots and cook at 400° for 30 to
45 minutes, stirring occasionally. To eliminate over browning,
keep food away from the sides of the Roasting Liner.
3. Stir in the chicken, broth, parsley, and pepper. Cover with the
Lid and turn the Temperature Control to 450°. Cook for 1
hour.
4. Stir in the noodles and cook at 450°, without the Lid for 1
hour or until the noodles are done, stirring occasionally.
CORNED BEEF AND VEGETABLES
2 (3 to 4 pounds each) corned beef briskets
4 Onions, chopped
4 Cloves garlic, minced
16 Potatoes, peeled and quartered
3 Pounds, carrots cut in half lengthwise
2 Head cabbage, cut in wedges
1. Place the Roasting Liner into the Roaster Oven Body, cover
with the Lid and preheat for 20 minutes at 450°.
2. Trim excess fat from briskets and place into Roasting Liner.
Add onions and garlic and enough water to cover meat.
Cover with the Lid.
3. Cook at 450° for 3 to 4 hours, or until corned beef is tender.
4. Add the potatoes and carrots. Cover with the Lid and
continue to cook at 450° for 30 minutes. Add the cabbage and
continue to cook for 1 hour or until the vegetables are done.
Makes to 12 to 16 servings
Makes 30 cups
20.
TMR18W/WBF Use and Care Guide
21.
IMPORTANT NOTICE
If any parts are missing or defective,
DO NOT return this product.
Please call our Customer Service Department for assistance.
800-233-9054 Monday - Friday 9:00 am - 5:00 pm CST
Thank You
LIMITED ONE-YEAR WARRANTY
Warranty Coverage: This product is warranted to be free from defects in
materials or workmanship for a period of one (1) year from the original purchase
date. This product warranty is extended only to the original consumer
purchaser of the product and is not transferable. For a period of one (1) year
from the date of original purchase of the product, our Repair Center will,
at its option, either (1) repair the product or (2) replace the product with a
reconditioned comparable model. These remedies are the purchaser's exclusive
remedies under this warranty.
Warranty Service: To obtain warranty service, you must call our warranty
service number at 1-800-233-9054 for return instructions on how to deliver the
product, in either the original packaging or packaging affording an equal degree
of protection to the Repair Center specified below. You must enclose a copy of
your sales receipt or other proof of purchase to demonstrate eligibility for
warranty coverage.
To return the appliance, ship to:
To contact us, please write to, call, or email:
ATTN: Repair Center
708 South Missouri Street
Macon, MO 63552 USA
Consumer Relations Department
PO Box 7366
Columbia MO 65205-7366 USA
1-800-233-9054
E-mail:[email protected]
What Is Not Covered: This warranty does not cover damage resulting from
misuse, accident, commercial use, improper service or any other damage
caused by anything other than defects in material or workmanship during
ordinary consumer use. This warranty is invalid if the serial number has been
altered or removed from the product. This warranty is valid only in the United
States and Canada.
LIMITATION ON DAMAGES: THERE SHALL BE NO LIABILITY FOR ANY
INCIDENTAL OR CONSEQUENTIAL DAMAGES FOR BREACH OF ANY
EXPRESS OR IMPLIED WARRANTY OR CONDITION ON THIS PRODUCT.
DURATION OF IMPLIED WARRANTIES: EXCEPT TO THE EXTENT
PROHIBITED BY APPLICABLE LAW, ALL IMPLIED WARRANTIES AND
CONDITIONS, INCLUDING, WITHOUT LIMITATION, IMPLIED WARRANTIES
AND CONDITIONS OF MERCHANTABILITY AND FITNESS FOR A PARTICULAR
PURPOSE OR USE ON THIS PRODUCT ARE LIMITED IN DURATION TO THE
DURATION OF THIS WARRANTY.
Some jurisdictions do not allow the exclusion or limitation of incidental or
consequential damages, or allow limitations on how long an implied warranty
lasts, so the above limitations or exclusions may not apply to you. This
warranty gives you specific legal rights and you may have other rights under
the laws of your jurisdiction.
For more information on our products, visit our website:
www.maxim-toastmaster.com.
©2005 All rights reserved.
Made in China
22.
TMR18W/WBF Use and Care Guide
P/N 61706
REV1 6/05
23.
Keep Dated Sales Receipts for Warranty Service.
Keep this booklet. Record the following for reference:
Date purchased _______________________________________________
Model number _______________________________________________
Date code (stamped on bottom)________________________________
EVERYBODY EATS. It’s a fact of life.
But sometimes preparing
meals can become a chore.
That’s why TOASTMASTER has been invited
into millions of kitchens just like yours
so we can HELP YOU MASTER your
mixing, baking, grilling, toasting,
brewing, heating and serving
tasks WITH EASE AND STYLE.
The TOASTMASTER name stands for a
CELEBRATION of INNOVATION designed
to serve your life and keep you
COOKIN’ IN STYLE.
24.
TMR18W/WBF Use and Care Guide
18-Quart
Roaster Oven
with
U S E
•R
e
• E mova
ven
b
mo -Hea le Roa
• R ist co t tec sting
em
hn
o
R
line ovab king ology ack w
it
for
• D r fo le, im
r se
om
con h Han
m
d
sist
coo ed L r vin ersib
ent les
id f g an
kin
le p
,
g
or
self d easy orcela
-ba
i
stin clean n ena
me
g a ing
l
nd
mo
iste
r
?
Questions
Call toll free 1-800-233-9054
Monday – Friday, 9:00 a.m. - 5:00 p.m. CST
www.maxim-toastmaster.com
TMR18W/WBF
Buffet Insert
A N D
C A R E
G U I D E
Model TMR18W/WBF