1
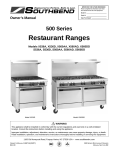
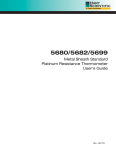
INSTRUCTION MANUAL
2 Doors Direct Cool Refrigerator
WRM2000_A-R
WRM2800_A-R
WRM3500_A-R
Thank you for choosing
refrigerator.
Please read this manual before operating your refrigerator.
It contains valuable information to help you maximize the use of the refrigerator
and to obtain total satisfaction for years.
2MK-6-P101-156-00-0
Printed : 18 Jan. 2008
F
E
A
T
U
R
E
S
1
2
3
4
5
14
1
2
3
4
5
12
13
12
13
12
12
6
11
10
7
8
9
WRM2000_A-R
7
11
8
9
10
WRM2800_A-R
1.
2.
3.
4.
5.
6.
7.
8.
9.
10.
11.
12.
13.
14.
14
1
2
3
4
5
12
6
12
13
12
6
7
11
8
9
10
WRM3500_A-R
2
Freezer Compartment
Ice Cube Tray
Freezer Shelf
Scraper
Temperature Control
Shelf
Crisper
Evaporation Tray
Adjustable Legs
Bottle Guard
Bottle Locker
Canned Food Rack
Egg Rack
Utility Rack
I
N
S
T
A
L
L
A
T
I
O
N
1. Install the unit on a strong and level surface.
Leveling can be obtained by using the adjusting
screws on the bottom of the unit. For proper
performance the front of the refrigerator “Cabinet”
should be slightly higher than the back.
2. Allow at least 30 cm. space above the unit, 15 and
10 cm. at the back and sides to allow air ventilation.
30 cm.
10 cm.
15 cm.
3. Place the unit away form direct sunlight or heat
from stoves.
4. Place the unit away from sinks and water faucets.
5. Provide the unit with its own electrical outlet
(230V, 60 Hz, single phase AC). Never plug your
refrigerator simultaneously with other appliances.
Never use multipurpose adapter.
6. Attach the ground wire (Green/yellow color wire
located at the lower left portion at the back of the
refrigerator) to any metal pipe or to a cover
screw of the wall receptacle or to a rod buried at
least 2.4 meters. in the ground.
3
O
P
E
R
A
T
I
O
N
Making a test run
1. Clean the Refrigerator thoroughly. Wipe the external surface with a soft dry
cloth, the interior with a damp cloth.
2. Keep the door open and plug the power cord into its own electrical outlet.
The interior lamp should lit.
3. Turn the thermostat dial to “7”. Close the door and allow the unit to operate
for 15-20 minutes. The evaporator should then show some traces of frost.
The compressor will run smoothly with just a soft humming sound.
4. lf the test run is not satisfactory, check your power supply (blown fuse).
Contact your appliance dealer or appliance authorized Service Center if the
source of trouble cannot be traced.
Temperature Control
You can control the inside temperature by turning the thermostat dial.
Turn the button to the left for warmer temperature.
Turn the button to the right for colder temperature.
Making Ice Cubes
Fill the ice cube tray 3/4-full with cold water and
place it on the bottom of the freezer compartment.
When the ice-cubes are ready they can easily be
removed by simply twisting the both ends of the
ice cube tray.
4
O
P
E
R
A
T
I
O
N
Food Storage
1. Refrigerated air goes down at the rear of the fresh food compartment and rises
up at the front. Then, store the foodstuffs such as fish and meats which require
quick refrigeration to the rear of the compartment.
2. Leave spaces among foodstuffs to help air circulation.
10 cm. at the back and sides to allow air ventilation.
3. Foodstuffs which are easily dried should be well wrapped with waxed paper,
aluminum foil or plastic film.
4. Wrap fish and smoked meats in moisture-vapour-proof material to prevent
transfer for odours.
5. pre-cool hot foods, wrap them with plastic film or put them in the airtight
receptacle.
6. Wipe the water on the surface of the bottles before storing them.
7. Be sure not to store bottles such as beer, cokes, etc. in the freezer
compartment.
8. Do not put vegetables which are liable to freezer at the rear part
of the shelves.
9. If planning to keep fresh fish and meats for a long period, wrap them
receptacle.
5
H
O
W
T
O
D
E
F
R
O
S
T
Refrigerator compartment
The cooling (evaporator) unit in the refrigerator compartment is automatically
defrosted whenever the compressor motor stops running. No manual control
is required. Frost may grow thick temporarily if the room temperature is high
or the door is opened frequently. Under normal condition, however, it will
disappear after a period of operation.
Freezer compartment
The freezer compartment should be kept free of the frost for good freezing
effects and economical operation at low power consumption. Frost should
not be allowed to grow thicker than 5 mm. (0.2 inches).
Scrape frost off the freezer compartment walls with the scraper supplied
with your refrigerator. This can be done without stopping operation.
After a long period operation, frost in the freezer compartment may
become too hard to be removed with a scraper. If it does, set the
temperature control dial to “0” or “OFF” leave the freezer compartment
door open for several minutes, and wipe the freezer compartment wall
clean of frost with a hot towel. After that, wipe the walls dry and reset
the control dial.
Defrosting (Only Model WRM3500_A-R)
1. While defrosting, pull the DRAIN CAP
out from the DRAIN BULB as illustrated.
The DRAIN CAP is inside the freezer
compartment.
2. When defrosting is completed, fit the
DRAIN CAP back to the place.
D
R
A
I
N
C
A
P
D
R
A
I
N
B
U
L
B
W
h
i
l
e
d
e
f
r
o
s
t
i
n
g
6
C
L
E
A
N
I
N
G
1. Before cleaning the refrigerator, you should always unplug it from the outlet and
remove all food.
2. Clean the external surfaces of the unit using only a damp cloth to wipe away dust
and dirt. Never use acids, thinner, gasoline, acetone nor benzene in cleaning and
removing stains.
3. Wash internal accessories using a mild detergent solution and dry it with a soft towel.
4. To remove odors from your unit, combine skin of a lemon and warm. Wipe thoroughly
on affected surface and dry with a soft cloth. Do not use cologne, air freshener or
any other perfume.
5. Clean inside of the refrigerator once a month. It is best to clean the freezer
compartment every time when it is defrosted.
6. Wipe the control box with a soft cloth. Never wash it with water because this
will cause an accident.
7. Replace door gasket when it shows signs of fatigue or wear. (Please contact
service centers for servicing.)
8. Prevent the external finish from being scratched and dented.
9. When transfering or relocating the unit, avoid lifting it front side downward.
Never lift the unit upside down. Lifting the unit upside down will displace the
compressor oil and cause malfunction. Also, protect the exterior of the
refrigerator with a blanket to prevent scratches.
Cleaning the evaporation tray
Since dust accumulated on the evaporation tray will decrease the evaporation
efficiency, remove the tray to clean.
W
R
M
2
0
0
0
_
A
R
W
R
M
2
8
0
0
_
A
R
W
R
M
3
5
0
0
_
A
R
7
C
L
E
A
N
I
N
G
A
N
D
M
A
I
N
T
E
N
A
N
C
E
Your refrigerator does not require any special maintenance. To clean the inside,
use a soft cloth with water, mild soap suds, or some mild detergent.
Wash ice cube tray, evaporation tray and shelves in a mild detergent solution
and dry with a soft towel. Stains on the outside can also be removed with a soft
cloth and some mild detergent.
Removable parts may be rinsed with water.
Don’t forget to clean the door gasket especially the bottom gasket is liable
to dirty.
Wipe the door with a dry cloth when water splasher or it rusts.
Occasionally remove dust and other particles which may collect at the back of
the refrigerator and the condenser under the cabinet to keep heat radiating
efficiency high. For safety, unplug the refrigerator before cleaning.
L
A
M
P
R
E
P
L
A
C
E
M
E
N
T
If the illuminating does not work properly. In case of the replacement bulb is
needed, it had better be replaced by its service agent or similarly qualified person
in order to avoid hazard.
PROCEDURE :
Disconnect the plug of the refrigerator from the outlet.
Take the lamp off by turning it counter-clockwise.
Change the bulb with 240V, 15W characteristic.
Replace lamp and turn it clockwise.
Caution: To prevent any breakage do not over tighten the lamp to socket.
It is highly recommended to have the service agent or qualified
person to do the lamp replacement.
8
C
A
U
T
I
O
N
1. Do not use inflammable sprays such
as lacquer and paint near the
refrigerator, because there is a
danger of igniting.
2. Do not operate the refrigerator in the
presence of explosive gas to avoid a
fire or an explosion by ignition of the
electric contact of the refrigerator.
8. If the supply cord is damaged, it must
be replaced by the manufacturer or its
service agent or a similarly qualified
person in order to avoid a hazard.
3. Be careful no to splash water on the
back of the refrigerator the insulation
of electric parts will be impaired by
water.
10. Do not use mechanical devices or other
means to accelerate the defrosting
process.
9. Keep ventilation openings, in the
appliance enclosure or in the built-in
structure, clear of obstruction.
11. Do not use electrical appliances inside
4. Do not touch the sides and back of
the food storage compartments of the
the refrigerator cabinet and the
appliance, unless they are of the type
mechanical parts at the back of the
recommended by the manufacturer.
refrigerator, because their temperature
is high.
12. Do not damage the refrigerant circuit.
5. If the unit is turned off or unplugged,
you must allow at least seven minutes 13. This fridge is Cyclopentane insulation,
should be kept away from heat or flame
before restarting or replugging the unit.
when it isn’t properly used.
6. Do not use acids, chemical thinner,
Be ensure this refrigerator is disposed
gasoline or benzine for cleaning any
off correctly, you will help prevent
part of the refrigerator. Boiling water
potential negative consequences of
and benzine are especially harmful for
environment and human health, which
plastic parts.
could otherwise be caused by
7. If the illuminating lamp does not work
inappropriate waste handling of this
properly. The replacement of lamp is
product. For more detail, please contact
able to do by disconnect the power
your local city office or your household
supply, detach the shield light cover
waste disposal service.
then remove the lamp from the lamp
socket, replace the lamp and
reassembly the lamp.
9
T
R
O
U
B
L
E
S
H
O
O
T
I
N
G
Before you call for service please check the table below. Your problems could be
easily rectified. If you still need service, please contact the store where you
purchased or the nearest service center.
When
Check if ...
not operating ...
Power supply cord is unplugged.
Temperature control in “0” position.
If home fuse blown or circuit breaker off ?
warmer than usual ...
Too frequent or too long door openings.
Check the temperature control dial setting.
Large amounts of food placed in refrigerator.
You put warm food in the refrigerator.
unusual sounds ...
The floor is weak or uneven.
Make sure the back of the refrigerator does
not touch the wall.
motor operates for long
periods ...
Normal when refrigerator is first delivered to
your home - usually requires 24 hours to
completely cool down.
Large amounts of food placed in refrigerator
to be cooled or frozen.
Hot weather - frequent door openings.
Door left open.
Temperature control is set too cold.
moisture collects
inside ...
Too frequent or too long door openings.
In humid weather, air carries moisture into
refrigerator when door is opened.
You put warm food in the refrigerator.
10
S
P
E
C
I
F
I
C
A
T
I
O
N
MODEL
DESCRIPTION
WRM2000_A-R WRM2800_A-R WRM3500_A-R
272
322
Net Volume (Litre)
177
Freezer Volume (Litre)
49
76
98
196
128
224
Refrigerator Volume (Litre)
Exterior Dimensions : W x D x H (mm.) 525x564x1355 605x638x1515 606x670x1700
59.0
69.0
45.0
Weight (kg.)
Power Source
230 V, 60 Hz; Single Phase
Cycle Defrost
Defrosting System
Insulation
Rigid Polyurethane Foam
Blowing Agent
Cyclopentane
Refrigerant
HFC-134a
150
Compressor Power (Watt)
150
175
Yes
Energy Saver (Hotline)
Evaporator
Pipe on Liner
Condenser
Pipe Condenser
Top Table
No
No
No
Magnetic Door Gasket
Yes
Yes
Yes
Lock
No
No
No
Egg Storage
8 Pcs.
10 Pcs.
10 Pcs.
Ice Cube Tray
2 Pcs.
2 Pcs.
2 Pcs.
Refrigerator Shelf
3 Pcs.
3 Pcs.
4 Pcs.
Crisper Glass
1 Pc.
1 Pc.
1 Pc.
Vegetable Crisper
1 Pc.
1 Pc.
1 Pc.
Note : With continuous improvement and quality upgrading of this product,
design and specifications are subject to change without prior notice.
11