1
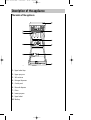
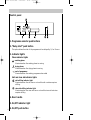
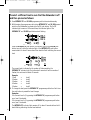
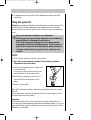
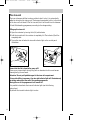
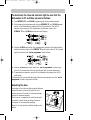
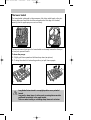
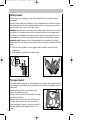
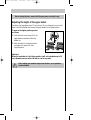
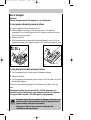
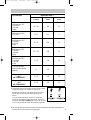
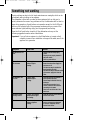
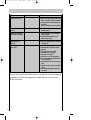
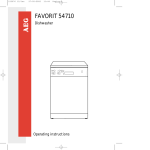
152973 62/1en/UK2
5-06-2003
16:28
Pagina 1
FAVORIT 54730
Dishwasher
Operating instructions
152973 62/1en/UK2
5-06-2003
16:28
Pagina 2
Dear customer
Please read these user instructions carefully.
Above all please observe the safety instructions on the first few pages of
these user instructions! Please keep these user instructions for later reference.
Pass them on to any subsequent owner of the appliance.
The warning triangle and/or specific words (Warning!, Caution!, Important!)
are used to highlight instructions that are important for your safety or for the
function of the appliance. It is imperative that these instructions are
observed.
Numbered instruction steps lead you step by step through the operation of
the appliance.
Next to this symbol you receive additional information and practical tips on
using the appliance.
Tips and instructions for the economical and environmentally conscious use
of the appliance are marked with a clover leaf.
In the event of a malfunction, these operating instructions contain
information on how to rectify faults yourself, see "Something not working"
section.
For further assistance contact your local AEG Service Force Centre, see the
chapter "Service & Spare Parts".
Printed on paper manufactured with environmentally sound processes.
He who thinks ecologically acts accordingly...
2
152973 62/1en/UK2
5-06-2003
16:28
Pagina 3
Contents
Safety instructions
4
Disposing of packaging and old machines
Disposing of the packaging
Disposing of your old machine
Economical and ecological dishwashing
5
5
6
6
Description of the appliance
The inside of the appliance
Control panel
Before using your dishwasher for the first time
Setting the water hardness range
Filling with special salt
The rinse aid
7
7
8
9
9
11
12
Loading cutlery and dishes
The lower basket
Cutlery basket
The upper basket
Adjusting the height of the upper basket
Use of detergent
50°C programmes and compact powders
14
15
16
16
17
18
19
Washing programmes
20
Operating instructions
22
Maintenance and cleaning
Internal and external cleaning
Cleaning the filters
25
25
25
Something not working
27
Service & Spare Parts
29
Guarantee Conditions
30
European Guarantee
31
Hints for test centres
32
Technical data
33
Installation and connection instructions
Fitting under a counter
Levelling
Connecting to the water supply
Water outlet connection
Extension hoses
Water protection system
Electrical connection
34
34
34
35
35
36
36
37
3
152973 62/1en/UK2
5-06-2003
16:28
Pagina 4
Safety instructions
The safety of AEG electrical appliances conforms to accepted rules of technology and
the Appliance Safety Act. We as manufacturers, however, see ourselves as being
obliged to familiarise you with the following safety instructions.
Using your dishwasher for its intended purpose
●
●
Only use your dishwasher for machine washing of household crockery. If your
machine is misused or used for any purposes other than that for which it is
intended, the manufacturer cannot be held liable for any damage caused.
For safety reasons, you should not convert or modify your dishwasher in any way.
Before using your dishwasher for the first time
●
●
●
Check your dishwasher for any transport damage. Never connect a damaged
machine. If your dishwasher is damaged, you should contact your supplier.
Your dishwasher must be correctly installed and connected. Please read the
section on "Installation" to make sure you know all about this.
Before using your dishwasher for the first time, do not forget that the nominal
voltage and current type indicated on the rating plate of your machine must be
the same as the nominal voltage and current type at the installation site. The
necessary electrical rating is also given on the rating plate.
Child safety
●
●
●
●
Packaging parts (e.g. foils, styrene foam) may be dangerous for children, who
could even be suffocated! You should therefore keep all packaging well away
from children.
Children may not recognise the dangers of improper use of electrical appliances.
You should therefore ensure proper supervision during operation and not allow
your children to play with your dishwasher.
Detergents may have a caustic effect on eyes, mouth and throat and may even
cause suffocation! Keep all detergents in a safe place out of children’s reach.
The water in your dishwasher should not be used for drinking. Detergent residues
may still be present in your machine. Keep children well away from your
dishwasher when its door is open.
Your dishwasher in day-to-day use
●
●
4
Never operate your dishwasher if the electrical supply lead, supply or drainhose,
control panel, worktop or plinth are damaged.
If there is a fault, first turn the water tap off. Then switch off your machine and
pull the plug out of the socket. If there is a fixed connection, switch off or
unscrew the fuse(s).
152973 62/1en/UK2
●
●
●
●
●
●
●
5-06-2003
16:28
Pagina 5
Never pull the plug out of the socket by the cable - always hold the plug.
Dishwasher repairs should only be performed by trained personnel. Improper
repairs may seriously endanger the user. If your dishwasher needs to be repaired,
you should contact your local AEG Service Force Centre or your retailer.
Never place any solvents in your dishwasher or you may cause an explosion!
Do not rest or sit on the open door as the machine could tilt.
Before using special dishwasher salt, detergent or rinse-aid, make sure that the
manufacturer of these products expressly specifies their use in domestic
dishwashers.
Always turn off the water tap when your dishwasher is left unattended for any
length of time, e.g. when you are away on holiday.
Only transport the dishwasher in an upright position. Tipping it upside down
during transport could cause salty water to leak into the internal compartment
and lead to the formation of rust.
Disposing of packaging and old machines
Disposing of the packaging
Our dishwashers require effective protective packaging in transit, though we always
confine ourselves to what is absolutely necessary.
Warning! Packaging parts (e.g. foils, styrene foam) may be dangerous
for children and can cause suffocation. You should therefore keep all
packaging well away from children.
All packaging materials used are environmentally compatible and reusable.
The cardboard parts are produced from recycled paper, and the wood is untreated.
The plastics are marked as follows:
>PE<
for polyethylene, e.g. packaging foils.
>PS<
for polystyrene, e.g. padding (essentially CFC-Free).
>POM<
for polyoxymethylene, e.g. plastic clamps.
Give the packaging for reuse to your local recycling centre. Your municipal or local
authority will give you its address.
5
152973 62/1en/UK2
5-06-2003
16:28
Pagina 6
Disposing of your old machine
When your machine finally reaches the end of its life and you withdraw it from
service, you should render it unserviceable before having it disposed of.
Warning! Children at play could lock themselves in your machine (and
suffocate) or otherwise endanger their lives. Therefore pull out the
main plug and detach and discard the electrical supply lead.
Disable the door lock so that the door no longer closes.
Marking of plastic parts for graded recycling: all plastic parts in your machine are
marked with internationally standardised abbreviations (e.g. <PS> for polystyrene).
When your machine is disposed of, this enables plastic waste to be sorted into
individual types for environmentally conscious recycling.
Check with your local Council or Environmental Health Office to see if there are
facilities in your area for recycling the appliance.
Economical and ecological dishwashing
●
Ensure that the water softener is correctly adjusted.
●
Do not pre-rinse under running water.
●
Select the wash programme to suit the nature and degree of the soiling on the
dishes.
Do not use more detergent, special salt or rinse aid than is recommended in these
operating instructions and by the manufacturer of the respective product.
●
6
152973 62/1en/UK2
5-06-2003
16:28
Pagina 7
Description of the appliance
The inside of the appliance
IN111
1. Upper basket stop
2. Upper spray arm
3. Salt container
4. Detergent dispenser
5. Control panel
6. Rinse aid dispenser
7. Filters
8. Lower spray arm
9. Upper basket
10. Worktop
7
152973 62/1en/UK2
5-06-2003
16:28
Pagina 8
Control panel
1. Programme selector push buttons
2. “Delay start” push button
This option allows the start of the programme to be delayed by 3, 6 or 9 hours.
3. Indicator lights
Phase indicator lights
washing phase
illuminates when the washing phase is running
drying phase
illuminates when the drying phase is running
end of programme
illuminates when the washing programme has ended
Salt and rinse aid indicator lights
salt refilling indicator light
illuminates when the salt has run out and the salt container requires
refilling.
rinse aid refilling indicator light
illuminates when the rinse aid has run out and the rinse aid container
requires refilling.
4. Door handle
5. On/Off indicator light
6. On/Off push button
8
152973 62/1en/UK2
5-06-2003
16:28
Pagina 9
Before using your dishwasher for the first time
1. Ensure that the electrical and water connections comply with the installation
instructions.
2. Remove all packaging from inside the appliance.
3. Set the water softener.
4. Pour 1 litre of water inside the salt container and then fill with salt.
5. Fill the rinse-aid dispenser.
Setting the water hardness range
The dishwasher is equipped with a water softener designed to remove minerals and
salts from the water supply, which would have a detrimental or adverse effect on the
operation of the appliance.
The higher the content of these salts, the harder your water is.
Water hardness is measured in equivalent scales, Clarke, French degrees and PPM
(parts per Million).
The softener should be adjusted according to the hardness of the water in your area.
Your local Water Authority can advise you on the hardness of the water in your area.
The dishwasher is factory set at level 3.
If this level is not suitable for your area the softener should be adjusted.
Water hardness
Level
1
2
3
4
5
Clarke
degrees
°TH
PPM
(french degrees)
(parts per million)
<6
6 - 21
22 - 35
36 - 49
50 - 63
<8
8 - 30
31 - 50
51 - 70
71 - 90
< 80
80 - 300
301 - 500
501 - 700
701 - 900
Use of salt
NO
YES
YES
YES
YES
If your water is level 1 it is already soft and therefore there is no need to use salt.
With the setting of the water softener at level 1 the salt indicator light on the
control panel will always remain off.
Use salt from level 2 upwards.
From level 2 upwards, if salt refilling is necessary, the salt indicator light will
illuminate only in setting mode and at the end of the washing programme.
While the programme is running it will remain off.
9
152973 62/1en/UK2
5-06-2003
16:28
Pagina 10
To select a different level be sure that the dishwasher is off
and then proceed as follows:
1. Press INTENSIV 70° and 30 MIN programme push buttons simultaneously.
2. While keeping the programme push buttons INTENSIV 70° and 30 MIN pressed
switch on the dishwasher by pressing the On/Off push button. The On/Off
indicator light comes on. At the same time, the indicator lights of the
INTENSIV 70° and 30 MIN push buttons start flashing.
SO417
Press the INTENSIV 70° push button, the indicator light of the 30 MIN push
button turns off, while the indicator light of the INTENSIV 70° push button
remains static for about 5 seconds and then starts to flash indicating the current
level.
SO418
The current level is indicated by the number of flashes made by the
INTENSIV 70° indicator light, that alternates 5 seconds off with a number of
flashes, this continues for about 60 seconds.
Example:
1 flash
=
level 1
2 flashes
=
level 2
3 flashes
=
level 3
4 flashes
=
level 4
5 flashes
=
level 5
3. To change the level, press the INTENSIV 70° programme push button. Each time
the push button is pressed the level changes.
Examples:
If the current level is 3, by pressing the INTENSIV 70° programme push button
once, level 4 is selected.
If the current level is 5, by pressing the INTENSIV 70° programme push button
once, level 1 is selected.
The INTENSIV 70° indicator light remains off for about 5 seconds after which it
starts flashing indicating the new level selected.
10
152973 62/1en/UK2
5-06-2003
16:28
Pagina 11
4. To memorise the new level, switch off the dishwasher by pressing the On/Off
push button.
Filling with special salt
Caution! The packaging of dishwasher salt and detergents are often very similar. The
accidental filling of the salt compartment with detergent would ruin the water
softener. Each time you add salt, make sure the carton you have in your hand really
is salt.
Only use salt specifically designed for use in dishwashers.
All other types of salt not specifically designed for use in a dishwasher,
especially table salt, will damage the water softener.
Only fill with salt just before starting one of the complete washing
programmes (not the Rinse and Hold programme). This will prevent any
grains of salt or salty water, which may have been spilled, remaining on
the bottom of the machine for any period of time, which may cause
corrosion.
To fill:
1. To fill with salt, unscrew the cap of the salt container.
2. Pour 1 litre of water inside the container (this is necessary only before
filling with salt for the first time).
LE
SA UT
ZO LT
SA LZ
SA L
SE
3. Using the funnel provided, pour in the salt until
the container is full.
Do not worry if water overflows from the unit
when filling with salt, this is quite normal.
4. Replace the cap making sure that there is no
trace of salt on the screw thread or on the
gasket.
5. Screw on the cap tightly.
SR14
When this has been done, all that is required is to periodically top up the container
with salt.
You are reminded of this by the salt indicator light on the control panel which will
illuminate when the salt has finished.
Important!
The salt refill indicator light on the control panel can remain illuminated for 2-6
hours after salt has been replenished, assuming the dishwasher remains on. If you are
using salts that take longer to dissolve then this can take longer, the function of the
dishwasher is not affected.
11
152973 62/1en/UK2
5-06-2003
16:28
Pagina 12
The rinse-aid
The rinse-aid ensures brilliant crockery and also helps it to dry. It is automatically
added in during the hot rinsing cycle. The storage compartment built in to the inside
of the door can hold about 110 ml of rinse-aid, which will be sufficient for between
16 and 40 dishwashing programmes, according to the dosage setting.
Filling up the rinse-aid
1. Open the container by turning the lid (A) anticlockwise.
2. Add the rinse aid until the container is completely full. The indicator (B) will be
completely dark.
3. Top up the rinse aid when the rinse aid indicator light on the control panel
illuminates.
BR01
BR03
Ensure that the lid is closed after every refill.
Clean up any rinse aid spilt during filling with an absorbent cloth to avoid excess
foaming during the next wash.
Attention! Do not put liquid detergent in the rinse aid compartment.
If rinse aid refilling is necessary, the rinse aid indicator light will illuminate only
in setting mode and at the end of the washing programme.
During the run of the programme it will remain off.
It is possible to deactivate the rinse aid indicator light (see the following
instructions).
By default the rinse aid indicator light is active.
12
152973 62/1en/UK2
5-06-2003
16:28
Pagina 13
To deactivate the rinse aid indicator light be sure that the
dishwasher is off and then proceed as follows:
1. Press INTENSIV 70° and 30 MIN programme push buttons simultaneously.
2. While keeping the programme push buttons INTENSIV 70° and 30 MIN pressed
switch on the dishwasher by pressing the On/Off push button. The On/Off
indicator light comes on. At the same time, the indicator lights of the
INTENSIV 70° and 30 MIN push buttons start flashing.
SO417
3. Press the 30 MIN push button, the correspondent indicator light keeps flashing
while the indicator light of the INTENSIV 70° push button turns off. At the same
time the indicator light "end of programme" starts to flash.
SO419
4. Press the 30 MIN push button again, the "end of programme" indicator light
turns off, this means that the rinse aid indicator light has been deactivated.
5. To memorise the operation, switch off the dishwasher by pressing the On/Off
push button.
To reactivate the rinse aid indicator light follow the same process until the "end of
programme" indicator light starts to flash.
Adjusting the dose
According to the finish and drying results obtained
adjust the dose of rinse aid by means of the 6
position selector (C) (position 1 minimum dosage,
position 6 maximum dosage).
Use the tip of a screwdriver to rotate the selector.
Increase the dose if there are drops of water or
lime spots on the dishes after washing.
Reduce it if there are sticky whitish streaks on the
dishes.
BR02
13
152973 62/1en/UK2
5-06-2003
16:28
Pagina 14
Loading cutlery and dishes
Sponges, household cloths and any object that can absorb water must
not be washed in the dishwasher.
Do not load very small items which can fall through the baskets.
For washing in the dishwasher the following cutlery/dishes
are not suitable:
●
Cutlery with wooden, horn, china or
mother of pearl handles.
●
Plastic items that are not heat
resistant.
●
Older cutlery with cement that is
not temperature resistant.
●
Bonded cutlery items or dishes.
●
Pewter or copper items.
●
Lead crystal glass.
●
Steel items subject to rusting.
●
Wooden platters.
●
Items made from synthetic fibres.
are of limited suitability:
●
●
●
●
Only wash stoneware in the
dishwasher if it is specifically
marked as being dishwasher-safe by
the manufacturer.
Glazed patterns may fade if machine
washed frequently.
Silver and aluminium parts have a
tendency to discolour during
washing.
Left-overs, e.g. egg white, egg yolk
and mustard often cause
discolouring and staining on silver.
Therefore always clean left-overs
from silver immediately, if it is not
to be washed straight after use.
Some types of glass can become dull
after a large number of washes.
Attention!
When buying new dishes, ensure that they are dishwasher proof.
Before placing dishes in the machine, remove any scraps of food, to avoid clogging
the filters and consequently reducing the performance.
Open the door and slide out the baskets.
14
152973 62/1en/UK2
5-06-2003
16:28
Pagina 15
The lower basket
The lower basket is designed to take saucepans, lids, plates, salad bowls, cutlery etc.
Serving dishes and large lids should be arranged around the edge of the basket,
ensuring that the upper spray arm can turn freely.
UI51
UI12
The two rear rows of prongs on the lower basket can be easily lowered to allow you
to load pots, pans and bowls.
To lower the prongs:
1. Slightly pull them upward and let them drop down (see picture).
2. To bring them back to the standing position, just pull them up again.
UI84
UI83
Long bladed knives stored in an upright position are a potential
hazard.
Long and/or sharp items of cutlery such as carving knives must be
positioned horizontally in the upper basket.
Take care when loading or unloading sharp items such as knives.
15
152973 62/1en/UK2
5-06-2003
16:28
Pagina 16
Cutlery basket
Place knives, forks and spoons in the cutlery basket with their handles pointing
downwards.
Arrange cutlery loosely and distribute it in all compartments so that each individual
article has good contact with washing water. Also do not arrange spoons and forks
with their dirty side in contact with each other.
Important! Exceptionally long cutlery, such as soup ladles, kitchen knives, or the like,
may obstruct the upper spray arm. Such cutlery can be placed in the upper basket.
To unload your dishwasher more easily, you can take the cutlery basket out of the
lower basket and unfold it. this makes it easier to remove small pieces of cutlery.
Important note! To prevent the full cutlery basket from inadvertently unfolding
when being taken out, place your hand right round the two-piece handle and hold it
firmly.
1. Place the cutlery basket on a firm support (table, worktop) and unfold both
handle parts.
2. After unloading, fold back both handle parts.
UI25
UI20
The upper basket
16
The upper basket is designed for plates (dessert plates, saucers, dinner plates up to 24
cm in diameter), salad bowls, cups and glasses; these should be arranged as shown in
the pictures.
Glasses with long stems can be placed upsidedown in the raised cup-racks.
The cup-rack on the left folds upwards to increase
your loading flexibility.
Arrange items on and underneath the fold-down
cup racks so that water can reach all surfaces.
Light items (plastic bowls etc.) must be loaded in
the upper basket and arranged so they do not
US69
move.
152973 62/1en/UK2
5-06-2003
16:28
Pagina 17
Before closing the door, ensure that the spray arms can rotate freely.
Adjusting the height of the upper basket
If washing very large plates (over 27 cm and up to 31 cm in diameter) you can load
them in the lower basket after moving the upper basket to the higher position.
To move to the higher position proceed
as follows:
1. Move the front runner stops (A) of the
upper basket outwards and slide the
basket out.
2. Refit the basket in the higher position
and replace the stops (A) in their
original position.
RC01
Attention!
When the top basket is in the higher position it will only take plates up to 20
cm in diameter and you will not be able to use the cup racks.
After loading your machine always close the door, as an open door
can be a hazard.
17
152973 62/1en/UK2
5-06-2003
16:28
Pagina 18
Use of detergent
Attention!
Only use detergents specifically designed for use in dishwashers.
If using powder detergents proceed as follows:
1. Open the dispenser lid by pulling the catch (D).
2. Add the detergent according to the instructions given in the “Washing
programmes” chart. As all detergents are not the same, you should also consult
the instructions on the packet.
3. Always close the lid.
4. If the programme has a prewash add the required detergent over the lid of the
dispenser, according to the instructions given in the “Washing programmes” chart
DE02
DE17
If using detergent in tablets proceed as follows:
1. For all programmes; place 1 tablet inside the detergent dispenser.
2. Always close the lid.
3. For all programmes with prewash; place a portion of a further tablet on the lid of
the detergent dispenser.
At the end of any washing programme the lid is always open, ready for the next
wash.
If detergents in tablet form are used with the “30 MIN“ programme, it is
advisable to put the tablet directly in the dishwasher and not in the dispenser
or in special tablet containers. This ONLY applies to this programme.
18
Remember that insufficient quantities of detergent will produce poor
washing results whereas an excessive amount of detergent does not
improve washing results and is also wasteful.
Using no more than the correct amount of detergent also
contributes to reducing pollution.
152973 62/1en/UK2
5-06-2003
16:28
Pagina 19
50°C programmes and compact powders
On the basis of their chemical composition, dishwasher detergents can be classified
into two groups:
-
conventional, alkaline detergents with caustic components:
low-alkaline compact powders with natural enzymes.
The enzymes in low-alkaline compact powders have a dirt-dissolving effect and are
also biodegradable. These enzymes deploy their full dirt-dissolving power within a
temperature range of 40-50°C. In 50°C washing programmes, the temperature range
and duration of the heating phases are precisely matched to the dirt-dissolving
properties of the enzymes.
In combination with low-alkaline compact powders, 50°C washing programmes, at a
temperature as low as 50°C, therefore achieve the same cleaning results that would
otherwise be achievable only with 65°C programmes.
The lack of any caustic components in low-alkaline compact powders and the lower
cleaning temperature of 50°C washing programmes are not only environmentally
friendly, but also care for your crockery.
19
152973 62/1en/UK2
5-06-2003
16:28
Pagina 20
Washing programmes
Programmes
Intensive
70°C
Type of soil
Type of load
Heavy soil.
Crockery, cutlery,
pots and pans
Required
push buttons
Recommended quantity of
detergent
wash
prewash
On/Off
+
INTENSIV 70°
15 g
10 g
30 minutes 60°C
(1)
Fresh soil.
Crockery and cutlery
On/Off
+
30 MIN
20 g
/
Normal 50°C
(2)
Normal soil.
Crockery and cutlery
On/Off
+
NORMAL 50°
20 g
5g
Eco 50°C
(3)
Normal soil.
Crockery and cutlery
On/Off
+
ECO 50°
20 g
5g
Light soil.
Delicate china and
glassware
On/Off
+
20 g
5g
Any.
Partial load (to be
completed later in
the day).
On/Off
+
INTENSIV 70°
/
/
Delicate 40°C
(2)
Rinse and Hold
for the setting of this
programme, follow the
instructions (4)
see instructions (4)
1. Ideal for washing crockery and cutlery of breakfast and dinner (fresh soil).
Characterised by a duration of about 30 minutes and a washing temperature of 60°C.
The time value is approximated and depends on the pressure and the temperature of the water and also by
the variations of the power supply. This is the perfect daily programme, made to meet the needs of a family
of 4 persons who only wish to load breakfast and dinner crockery and cutlery.
2. In these programmes the appliance is fitted with a special device “SENSORLOGIC”.
This device allows the dishwasher to automatically individuate if the baskets are full loaded or not and
consequently riduce the washing temperature and time duration of the programme.
This allows to obtain a saving in energy and time.
3. Testing programme for EN 50242 (see “Hints for Test Centres”).
This programme, developed for the use of detergents with enzymes, allows you to achieve, with reduced
consumption of energy the same cleaning results that would otherwise be obtained only with the 65°C
programmes and conventional detergents. To compensate for the lower temperature, the duration of the
programme has been prolonged.
20
152973 62/1en/UK2
5-06-2003
16:28
Pagina 21
Approximate values (5)
Cycle description
Programme duration
in minutes
Energy consumption Water consumption
in kWh
in litres
Hot prewash
Main wash up to 70°C
2 cold rinses
1 hot rinse
Drying
94 - 104
1,89
18
Main wash up to 60°C
1 hot rinse
35- 25
0,79
9
Cold prewash
Main wash up to 50°C
1 cold rinse
1 hot rinse
Drying
80 - 90
0,99
14
Cold prewash
Main wash up to 50°C
1 cold rinse
1 hot rinse
Drying
121 - 131
0,80
14
Cold prewash
Main wash up to 40°C
2 cold rinses
1 hot rinse
Drying
77 - 87
0,90
18
12
0,02
7
Programme Normal
50°C
with “SENSORLOGIC”
75 - 85
0,90
18
Programme Delicate
40°C
with “SENSORLOGIC”
73 - 83
1,89
18
1 cold rinse (to avoid
food scraps from sticking
together).
4. This dishwasher gives you the possibility to select a “Rinse and Hold”
programme by the use of the “Intensive 70°” push button.
By pressing the “Intensive 70°” push button only once, the phase
indicator lights of that programme (washing and drying) will
come on.
In this way you have selected the “Intensive 70°” programme.
To select the “Rinse and Hold” programme press the “Intensive 70°”
push button twice. Only the washing phase indicator light will come
on. In this way you have selected the “Rinse and Hold” programme.
SO526
5. The times and consumption values are intended as a guide, and depend on the pressure and temperature of
the water and also by the variations of the power supply.
21
152973 62/1en/UK2
5-06-2003
16:28
Pagina 22
Operating instructions
1. Check the filters
Ensure they are clean and properly positioned (see "Maintenance and
cleaning").
2. Press the On/Off push button
The On/Off indicator light will come on.
3. Check that there is rinse aid and salt
The corresponding indicator lights will illuminate if refilling is necessary.
4. Load the dishes
Remove any scraps of food.
Pull the lower basket out and arrange the saucepans, plates and cutlery in it.
Pull the upper basket out and arrange the plates, saucers, glasses and cups etc.
in it.
Slide the baskets back into the machine.
5. Ensure that the spray arms can rotate freely.
6. Measure out detergent
Add the required amount of detergent into the dispenser according to the
recommended quantity given in the Washing programmes chart.
Close the detergent dispenser lid.
7. Close the dishwasher door
8a. Setting and starting the programme without “Delay
Start”
Press the push button corresponding to the required programme: the indicator
light corresponding to the programme illuminates and the phase indicator
lights for that programme start flashing.
The start of the programme will occur after about 6 seconds from the last
pressure of a push button, in this time it is possible to change programme
simply pressing the push button of another programme.
Once the programme has started the phase indicator lights will turn off except
for the phase under way.
22
152973 62/1en/UK2
5-06-2003
16:28
Pagina 23
It is possible to interrupt the programme by:
● opening the door
● pressing the On/Off push button (in this case all the indicator lights turn off)
Close the door again or press the On/Off, the programme will start from the
point in which it was interrupted.
8b. Setting and starting the programme with “Delay Start”
The setting of the delay start occurs before selecting the programme.
Select the desired time (3, 6 or 9 hours) by pressing the “Delay Start“ push
button until the indicator light corresponding to the chosen hours flashes.
Press the push button corresponding to the required programme: the indicator
light corresponding to the programme illuminates and the phase indicator
lights for that programme start flashing.
The start of the countdown will occur after about 6 seconds from the last
pressure of a push button.
The countdown will decrease with step of 3 hours and you are informed of this
by the indicator lights of the “Delay Start“.
During the countdown the only indicator lights illuminated are the programme
light and the light of the number of hours to the start of the programme.
Once the delayed time has elapsed the programme will start automatically.
It is possible to stop a countdown in progress or before it starts, simply pressing
the “Delay Start” push button until the indicator lights of the hours are off.
9. To cancel a programme in progress
A programme in progress can be cancelled at any time.
Press for about 3 seconds the push button of the running programme until all
indicator lights are off.
Only the On/Off indicator light will remain on once the programme has been
cancelled.
It is now possible to select a new washing programme.
10. At the end of the washing programme
The dishwasher will automatically stop and the phase indicator light “end of
programme” will come on.
The indicator light of the programme just ended will remain on.
The dishwasher has finished the programme ONLY when the “end of
programme” indicator light is illuminated.
If you do not wait for the end of the programme it will not be possible to start
a new programme if first you do not cancel the previous. (For instructions on
how to cancel a programme see point 9).
23
152973 62/1en/UK2
5-06-2003
16:28
Pagina 24
If during the drying phase (drying phase indicator light illuminated) the
dishwasher door is opened or the On/Of push button is pressed, the running
programme is automatically cancelled.
In this case the machine returns to setting mode and it is possible to select a
new washing programme without cancelling the previous.
Switch off the dishwasher by pressing the On/Off push button.
Wait a few minutes before opening the dishwasher’s door; in this way they will
be cooler and the drying will be improved.
Empty the lower basket first and then the upper one; this will avoid water
dripping from the upper basket onto the dishes in the lower one.
Caution!
In general it is not advisable to open the door while the machine is working;
if the door is opened however, a safety device ensures that the machine
stops.
Care must be taken if the door is opened during the hot phase or
immediately after a programme has finished, as steam may escape.
When the washing programme has finished, it is recommended that
the dishwasher is unplugged and the water tap turned off.
24
152973 62/1en/UK2
5-06-2003
16:28
Pagina 25
Maintenance and cleaning
Internal and external cleaning
Do not under any circumstances use furniture care products or
aggressive cleaners.
If necessary, only clean the controls with a soft cloth and clean warm water.
The spray arms do not need cleaning.
Occasionally check the internal containers, door seal and water inlet for soiling,
clean if necessary.
We recommend every 3 months to run a 65°C wash programme without dishes using
detergent.
Cleaning the filters
The filters in the base of the washing compartment are to a large extent selfcleaning. Nevertheless the filters should be checked and cleaned from time to time.
Dirty filters will degrade the washing result.
1. Open the door, remove the lower basket.
2. The dishwasher filter system comprises a
coarse/fine filter, microfilter and a flat filter.
Unlock the filter system using a handle on the
microfilter, and remove.
3. Turn the handle about 1/4 a turn anticlockwise
and remove.
MA15
4. Take hold of the coarse/fine filter (1/2) by the
handle with the hole and remove from the
microfilter (3).
5. Clean all filters thoroughly under running water.
MA17
25
152973 62/1en/UK2
5-06-2003
16:28
Pagina 26
6. Remove the flat filter (4) from the base of the
washing compartment and clean both faces
thoroughly.
7. Put the flat filter back in the base of the washing
compartment.
8. Place the coarse/fine filter in the microfilter and
press together.
9. Put the filter combination in place and lock by
turning the handle clockwise to the stop.
During this process ensure that the flat filter does not
protrude above the base of the washing compartment.
MA16
4
The dishwasher must not be used without filters.
Incorrect repositioning and fitting of the filters will produce poor
washing results.
Cleaning the filters is vital to ensure correct operation of the machine.
26
152973 62/1en/UK2
5-06-2003
16:28
Pagina 27
Something not working
Certain problems are due to lack of simple maintenance or oversights, which can be
solved easily without calling out an engineer.
The dishwasher is fitted with a number of alarm systems which can help you to
quickly determine the cause of any problems such as; the dishwasher will not start or
stops during operation, all push buttons are inoperative except for the On/Off push
button or the indicator light of the programme underway and one or more of the
phase indicator lights (washing, drying, end of programme) are flashing.
Press the On/off push button to switch off the dishwasher and carry out the
following suggested corrective actions listed below.
Important: If you call out an engineer to a fault listed below or to repair a fault
caused by incorrect use or installation a charge will be made, even if the
appliance is in guarantee.
Symptom
Fault code
The machine will not
start
Solution
●
●
●
The machine does not
fill with water
“washing” phase
indicator light is
flashing
●
●
●
●
The dishwasher will
not drain
“drying” phase
indicator light is
flashing
●
●
●
●
The door has not been properly
closed.
The plug is not properly inserted in
the power socket.
There is a power failure.
Ensure the water tap is open.
Ensure the mains water supply has
not been cut off.
The inlet hose may be squashed or
bent. Reposition the hose.
The inlet hose may be blocked. Switch
off the water supply and clean the
filter.
The drain hose may be squashed or
bent. Reposition the hose.
The sink may be blocked. Clear any
blockages.
The drain hose extension is not
correct. Follow the instructions for
connecting to the waste.
There is no vent in the end of the
drain hose.
Protection against
flooding is active
“drying” and “washing”
phase indicator lights
are flashing
●
Close the water tap and contact the
Service Force Centre.
General
One or more phase
indicator lights are
flashing
●
Switch off the dishwasher, switch it
back on and start the programme.
If the alarm reappears, call the
Service Force Centre.
27
152973 62/1en/UK2
5-06-2003
Symptom
The machine is noisy
16:28
Fault code
Pagina 28
Solution
●
●
Dishes are rattling against each other.
Refer to “Loading cutlery and dishes”.
The spray arms are knocking against
the dishes.
Refer to “Loading cutlery and dishes”.
The door is difficult
to close
●
The dishwasher is not level, or not.
properly built-in.
Visible lime deposits or
white film on the dishes
●
Check that there is salt and that the
salt cap is tight.
Check that the right level of the
water softener is set.
●
The dishes are not
quite dry
●
The rinse aid has run out or too little
is being used.
The dishes are not clean
(poor wash)
●
The baskets are too full.
The dishes have not been arranged
properly.
The spray arms do not rotate.
The spray arms are clogged.
The filters are clogged.
The filters are not in right position.
Not enough detergent has been used
or it is unsuitable.
The detergent is too old or has gone
hard.
The salt container cap is not properly
closed.
The washing programme selected is
too gentle.
●
●
●
●
●
●
●
●
●
Once the checks have been carried out switch on the dishwasher and start a washing
programme, if the fault code reappears in the digital display, contact your local
Service Force Centre.
28
152973 62/1en/UK2
5-06-2003
16:28
Pagina 29
Service & Spare Parts
In the event of your appliance requiring service, or if you wish to purchase spare
parts, contact your local AEG Service Force Centre by telephoning
08705 929 929
Your call will be automatically routed to the Service Centre covering your post code
area.
For the address of your local Service Force Centre and further informations about
Service Force, please visit the website at www.serviceforce.co.uk
Help us to help you
Please determine your type of enquiry before writing or telephoning.
When you contact us we need to know,
Your name, address and post code
Your telephone number
Clear and concise details of the fault code
Date of purchase
Mod.
.
Prod.N
.......
1
2
3
4
5
o. .......
.
.......
..
E-NR (product number)
F-NR (serial number)
This information can be found on
the rating plate located on the right
inside edge of the door.
No.
●
Ser.
●
E- NR ...... F-NR ......
Customer Care
For general enquiries concerning your AEG appliance, or for further information on
AEG products, you are invited to contact our Customer Care Department by letter or
telephone at the address below or visit our website at www.aeg.co.uk
Customer Care Department
AEG Domestic Appliances
55-77 High Street
Slough
Berkshire
SL1 1DZ
Tel.: 08705 350350 (*)
* calls to this number may be recorded for training purposes
29
152973 62/1en/UK2
5-06-2003
16:28
Pagina 30
Guarantee Conditions
Standard Guarantee Conditions
We, AEG, undertake that if within 12 months of the date of purchase this AEG
appliance or any part thereof is proved to be defective by reason only of faulty
workmanship or materials, we will, at our option repair or replace the same FREE OF
CHARGE for labour, materials or carriage on condition that:
The appliance has been correctly installed and used only on the electricity or gas
supply stated on the rating plate.
● The appliance has been used for normal domestic purposes only, and in accordance
with the manufacturer’s instructions.
● The appliance has not been serviced, maintained repaired, taken apart or tampered
with by any person not authorised by us.
● All service work under this guarantee must be undertaken by a Service Force
Centre. Any appliance or defective part replaced shall become the Company’s
property.
● This guarantee is in addition to your statutory and other legal rights.
●
●
Home visits are made between 8.30am and 5.30pm Monday to Friday. Visits may
be available outside these hours in which case a premium will be charged.
Exclusions
This guarantee does not cover:
● Damage or calls resulting from transportation, improper use or neglect, the
replacement of any light bulbs or removable parts of glass or plastic.
● Costs incurred for calls to put right an appliance which is improperly installed or
calls to appliances outside the United Kingdom.
● Appliances found to be in use within a commercial environment, plus those which
are subject to rental agreements.
● Products of AEG manufacture which are not marketed by AEG.
30
152973 62/1en/UK2
5-06-2003
16:28
Pagina 31
European Guarantee
European Guarantee
If you should move to another country within Europe then your guarantee moves
with you to your new home subject to the following qualifications:
●
The guarantee starts from the date you first purchased your product.
The guarantee is for the same period and to the same extent for labour and parts
as exists in the new country of use for this brand or range of products.
● This guarantee relates to you and cannot be transferred to another user.
●
Your new home is within the European Community (EC) or European Free Trade
Area.
● The product is installed and used in accordance with our instructions and is only
used domestically, i.e. a normal household.
● The product is installed taking into account regulations in your new country.
●
Before you move please contact your nearest Customer Care centre, listed below, to
give them details of your new home. They will then ensure that the local Service
Organisation is aware of your move and able to look after you and your appliance.
France
Germany
Italy
Sweden
UK
Senlis
Nurnberg
Pordenone
Stockholm
Slough
+33 (0) 344 62 29 29
+49 (0) 800 234 7378
+39 (0) 800 117511
+46 (0) 8 672 53 60
+44 (0)1753 219899
31
152973 62/1en/UK2
5-06-2003
16:28
Pagina 32
Hints for test centres
Before starting any test it is necessary to fill completely with salt the salt container
and with rinse aid the rinse aid dispenser.
Test standard
EN 50242
Reference programme
- Eco 50°C
Load
9 standard place settings
Rinse aid selector
position 4
Detergent dosage
- 20 g in the dispenser
- 5 g on the dispenser lid
Arrangement upper basket
Arrangement cutlery
basket
Arrangement lower basket
32
152973 62/1en/UK2
5-06-2003
16:28
Pagina 33
Technical data
Technical specifications
Dimensions
Width
Height with worktop
Height without worktop
Max depth
Max depth with open door
Electrical connection
Motor rating during wash
Power of heating element
Overall power
Water supply pressure
Capacity
45 cm
85 cm
82 cm
61 cm
115,9 cm
220-240 V - 50 Hz
200 W
2100 W
2300 W
Minimum
Maximum
50 kPa (0.5 bar)
800 kPa (8 bar)
9 place settings
This appliance complies with the following E.E.C. Directives:
- 73/23/CEE of 19/02/73 (Low Voltage Directive) and subsequent
modifications;
- 89/336/CEE of 03/05/89 (Electromagnetic Compatibility Directive)
and subsequent modifications.
33
152973 62/1en/UK2
5-06-2003
16:28
Pagina 34
Installation and connection instructions
Fitting under a counter
(kitchen worktop or sink)
By removing the machine’s worktop, you can install it under a close fitting sink unit
or a pre-existing top, providing the dimensions of
the recess correspond to those shown in the
570picture.
600
820
Proceed as follows:
- Remove the machine’s worktop by unscrewing
the two front retaining screws, pull from the
front and slide out the rear slots, lifting the
worktop.
450
Insert the machine after adjusting height and
IN04
levelling with the adjustable feet. When inserting
the machine, ensure that the water inlet and drain hoses are not kinked or squashed.
Levelling
Good levelling is essential for correct closure and
sealing of the door.
When the appliance is correctly levelled, the door
will not catch on the levelling spacers on either
side of the cabinet.
If the door does not close correctly, loosen or
tighten the adjustable feet until the machine is
perfectly level.
IN06
IN07
34
152973 62/1en/UK2
5-06-2003
16:28
Pagina 35
Connecting the water supply
●
Your dishwasher should be connected to a cold water supply.
●
Never connect your dishwasher to open hot water appliances and continuous
flow heaters!
We advise you use a cold water supply because a hot water supply is not always
efficient with very soiled crockery as it shortens the washing programmes.
Do not use, for connection, old hoses which have been used in another
appliance.
Avoid bends or kinks in the hose which could prevent or slow down the water supply.
If the machine is connected to new pipes or pipes which have not been used for a
long time, you should run the water for a few minutes before connecting the inlet
hose. This will prevent deposits of sand or rust clogging the inlet hose.
The water pressure must be within the limits given in the technical specifications.
Your dishwasher has been built in accordance with the valid regulations governing
water-consuming appliances and is equipped with safety devices which prevent used
water from flowing back into the drinking water mains.
Water outlet connection
The end of the drain hose can be connected as follows:
1. To the sink outlet siphon, securing it if necessary with a clip.
2. Hooked over the edge of the sink using the special curved plastic guide provided.
3. To a wall outlet provided with vent-hole, minimum internal diameter 4 cm.
2
min 4 cm
3
Ø
min 30 cm
max 100 cm
max 100 cm
Ø
18
21
1
CS09
The waste connection must be at a height of between 30 cm (minimum) and 100 cm
(maximum) from the floor.
It makes no difference which way the drain hose faces, either to the right or left of
the dishwasher.
Avoid bending or kinking the hose as this could prevent or slow down the discharge
of water.
35
152973 62/1en/UK2
5-06-2003
16:28
Pagina 36
Extension hoses
min 30 cm
max 100 cm
+ 2 m max
max 100 cm
Ø 18
Ø 21
The necessary extension hoses can be obtained from specialist shops or from your
local Service Force Centre.
The extension hose must be no longer than 2 metres and its internal diameter must
be no smaller than the diameter of the hose provided.
CS10
Likewise the internal diameter of the couplings used for connection to the waste
outlet must be no smaller than the diameter of the drain hose.
Arrange the extension hose horizontally along the floor and allow it to rise only
where it is to be connected to the drain.
Water protection system
To protect your dishwasher from water damage, it is equipped with a water
protection system.
In case of malfunction the “washing” and “drying” phase indicator lights start
flashing (see Something not working). In this case turn off the water tap and call the
Service Force Centre.
36
152973 62/1en/UK2
5-06-2003
16:28
Pagina 37
Electrical connection
If the plug that is fitted to your appliance is not suitable for the socket, it must be
cut off and the appropriate plug fitted.
Important!
The wires on the mains lead are coloured in accordance with the following
code:
Green and Yellow
-Earth
Blue
-Neutral
Brown
-Live
If you fit your own plug, the colours of the wires in the mains lead of your appliance
may not correspond with the markings identifying the terminals in your plug.
Proceed as follows:
1. Connect the Green and Yellow (earth) wire to the terminal in the plug which is
marked with the letter "E" or the earth symbol
or coloured green and yellow.
2. Connect the Blue (neutral) wire to the terminal in the plug which is marked with
the letter "N" or coloured black.
3. Connect the Brown (live) wire to the terminal in the plug which is marked with
the letter "L" or coloured red.
13 A
E
N
L
CE04
37
152973 62/1en/UK2
5-06-2003
16:28
Pagina 38
The plug moulded onto the lead incorporates a 13amp BSI362 fuse. Only ASTA or BSI
fuses should be used.
The plug must not be used if the fuse cover/carrier is lost. The cover/carrier is
indicated by the coloured insert at the base of the product.
A replacement cover/carrier must be obtained from your local Service Force Centre.
This appliance must be earthed.
The manufacturer declines any responsibility should this safety measure
not be observed.
Warning!
A cut-off plug inserted into a 13amp socket is a serious safety (shock)
hazard. Ensure that the cut-off plug is disposed of safely.
38
152973 62/1en/UK2
5-06-2003
16:28
Pagina 39
152973 62/1en/UK2
5-06-2003
16:28
Pagina 40
From the Electrolux Group. The world’s No.1 choice.
The Electrolux Group is the world’s largest producer of powered appliances for kitchen,
cleaning and outdoor use. More than 55 million Electrolux Group products (such as
refrigerators, cookers, vacuum cleaners, chain saws and lawn mowers) are sold each year
to a value of approx. 14 billion USD in more than 150 countries around the world.
AEG Hausgeräte GmbH
Postfach 1036
D-90327 Nürnberg
http://www.aeg.hausgeraete.de
© Electrolux plc 2003
Subject to change without notice
UK
152973 62/1