1
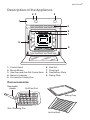
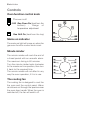
electrolux 1 user manual IE GB Built-in oven EOG 10000 electrolux 3 Welcome to the world of Electrolux Thank you for choosing a first class product from Electrolux, which hopefully will provide you with lots of pleasure in the future. The Electrolux ambition is to offer a wide variety of quality products that make your life more comfortable. You find some examples on the cover in this manual. Please take a few minutes to study this manual so that you can take advantage of the benefits of your new machine. We promise that it will provide a superior User Experience delivering Ease-ofMind. Good luck! 4 electrolux Contents Warnings and Important Safety Information ........................................................ 5 Description of the Appliance .............................................................................. 7 Controls............................................................................................................. 8 Before using the Oven for the first time .............................................................. 9 Using the Oven ............................................................................................... 10 Baking and Roasting Tables ............................................................................ 13 Cleaning and Maintenance .............................................................................. 15 If Something is Wrong ...................................................................................... 19 Technical Data ................................................................................................ 20 Important Safety Requirements ........................................................................ 21 Instructions for the Installer .............................................................................. 22 Gas Connection .............................................................................................. 24 Conversion from Natural to LPG Gas ............................................................... 27 Instructions fo Building In ................................................................................. 30 Guarantee/Customer Service ........................................................................... 32 European Guarantee ....................................................................................... 33 Guide to using the user instructions Safety instructions ) Step by step instructions Hints and Tips This appliance conforms with the following ECC Directives: 2006/95 (Low Voltage Directive); 89/336 (EMC Directive); 93/68 (General Directive); and subsequent modifications. MANUFACTURER: ELECTROLUX ITALIA S.P.A. C.so Lino Zanussi, 30 33080 Porcia (PN) - Italy electrolux 5 Warnings and Important Safety Information Always keep these user instructions with the appliance. Should the appliance be passed on to third persons or sold, or if you leave this appliance behind when you move house, it is very important that the new user has access to these user instructions and the accompanying information. These warnings are provided for the safety of the users and those living with them. You MUST read these warnings carefully before installing or using the oven. If you need assistance, contact our Customer Care Department on 08705 950950 Installation • • • • • • • This appliance must be installed and serviced by a competent person as stated in the Gas Safety (Installation and Use) Regulations Current Editions and the IEE Wiring Regulations. For appliances installed in the Republic of Ireland please refer to NSAI-Domestic Gas Installations I.S.813 Current Editions and the ETCI Rules for Electrical Installations. This oven is heavy. Take care when moving it. Remove all packaging, both inside and outside the oven, before using the oven. Do not attempt to modify the oven in any way. The use of a gas cooking appliance results in the production of heat and moisture in the room in which it is installed. Ensure that the kitchen is well ventilated: keep natural ventilation holes open or install a mechanical ventilation device (mechanical extractor hood). Prolonged intensive use of the appliance may call for additional ventilation, for example window, or more ventilation, for example the level of mechanical where present. opening a effective increasing ventilation Operation • • • • • • This oven is designed for cooking foodstuffs; never use it for other purposes. When opening the oven door during or at the end of cooking be careful of the stream of hot air, which comes out of the oven. Always cook with the oven door closed, even when grilling. Be very careful when using the cooker. The extreme heat of the heating elements makes the shelves and other parts very hot. If you should for whatever reason use aluminium foil to cook food in the oven, never allow it to come into direct contact with the floor of the oven. When cleaning the oven, proceed with care: never spray anything onto the grease filter (if fitted), the heating elements and the thermostat sensor. 6 electrolux • • • • • • • • • If is dangerous to make modifications of any kind to this appliance or to its specifications. During the baking, roasting and grilling process, the oven window and the other parts of the appliance get hot, so children should be kept away from the appliance. Take care, if connecting electrical appliances to sockets near the oven, that cables do not come into contact with hot rings or get caught in the oven door. Always use oven gloves to take hot ovenproof dishes or pots out of the oven. Regular cleaning prevents the surface material from deteriorating. Before cleaning the oven, either turn the power off or pull the mains plug out. Make sure that the oven is in the “OFF” position, when the oven is no longer being used. This oven was made as a single appliance or as a combination appliance with electrical hotplate, depending on the model, for singlephase connection to 230 V. The appliance must not be cleaned with a superheated steam cleaner or a steam jet cleaner. Do not use abrasive cleaners or sharp metal scrapers. These can scratch the glass in the oven door, which may result in the shattering of the glass. People Safety • This appliance is intended for use by adults. It is dangerous to allow children to use it or play with it. • Children should be kept away while the oven is working. Also, after you have switched the oven off, it remains hot for a long time. • This appliance is not intended for use by children or other persons whose physical, sensory or mental capabilities or lack of experience and knowledge prevents them from using the appliance safely without supervision or instruction by a responsible person to ensure that they can use the appliance safely. Customer Service • Have checks and/or repairs carried out by the manufacturer’s service department or by a service department authorised by the manufacturer and use only original spare parts. • Do not attempt to repair the appliance yourself in the event of malfunctions or damage. Repairs carried out by untrained persons may cause damage or injury. The symbol on the product or its packaging indicates that this product is not to be treated as normal household waste. Instead it must be handed over to a collection point for the recycling of electrical and electronic equipment. The correct disposal of this product will help to protect the environment and human health. Environment and health are endangered by incorrect disposal. For more detailed information about recycling of this product, please contact your local town hall, your household waste disposal service or the shop where you purchased the product. electrolux 7 Description of the Appliance 2 4 3 1 5 6 7 9 8 1. 2. 3. 4. 5. Control Panel Minute Minder Gas Oven and Gas Grill Control Knob Mains on Indicator Air Vents for Cooling Fan 6. 7. 8. 9. Gas Grill Oven Light Gas Bottom Plate Rating Plate Oven accessories Removable Handle Grill Pan Grid Baking Tray Grill / Roasting Pan Anti-tip Shelf 8 electrolux Controls Oven function control knob The oven is off - 240 Gas Oven On (heat from the bottom) Range of temperature adjustment Gas Grill On (heat from the top) Mains on indicator The mains on light will come on when the gas oven function control knob is set. Minute minder The minute minder will mark the end of a timed period with an acoustic alarm. The maximum timing is 60 minutes. Turn the minute minder knob clockwise to the maximum time position, then turn it back to the required time. The minute minder will not affect in any way the oven operation, if it is in use. The cooling fan The cooling fan is designed to cool the the oven and the control panel. Warm air is blown out through the aperture near the oven door handle. When the oven is switched off, the fan will switch off. electrolux 9 Before using the Oven for the first time Remove all packaging, both inside and outside the oven, before using the oven. Before using for the first time, the oven should be heated up without food. During this time, an unpleasant odour may be emitted. This is absolutely normal. It is caused by manufacturing residues. Ensure the room is well ventilated. 1. Light the gas oven burner (see “Using the Gas Oven”) and set the temperature to 240. 2. Open a window for ventilation. 3. Allow the oven to run empty for approximately 60 - 90 minutes. This procedure should be repeated with ) the gas grill function for approximately 5-10 minutes. Then let the oven cool down. Then dampen a soft cloth with warm water and a little mild washingup liquid and use this to clean the oven cavity. Before using for the first time, carefully wash the oven accessories as well. To open the oven door, always hold the handle in the centre. 10 electrolux Using the Oven The oven is supplied with an exclusive system which produces a natural circulation of air and the constant recycling of steam. This system makes it possible to cook in a steamy environment and keep the dishes soft inside and crusty outside. Moreover, the cooking time and energy consumption are reduced to a minimum. During cooking steam may be produced which can be released when opening the oven door. This is absolutely normal. However, always stand back from the oven when opening the oven door during cooking or at the end of it to allow any build up of steam or heat to release. Attention! - Do not place objects on the oven base and do not cover any part of the oven with aluminium foil while cooking, as this could cause a heat build-up which would affect the baking results and damage the oven enamel. Always place pans, heat-resisting pans and aluminium trays on the shelf which has been inserted in the shelf runners.When food is heated, steam is created, like in a kettle. When the steam comes into contact with the glass in the oven door, it condenses and creates water droplets. 4 3 2 1 Always cook with the oven door closed, even when grilling. Stand clear when opening the drop down oven door. Do not allow it to fall open support the door using the door handle, until it is fully open. The oven has four shelf levels, and is supplied with one shelf. The shelf positions are counted from the bottom of the oven as shown in the diagram. It is important that these shelves are correctly positioned. Do not place cookware directly on the oven base. How to use the Gas Oven During cooking, the door should be opened as little as possible to avoid heat loss, and excessive fuel consumption. To reduce condensation, always preheat the empty oven for 10 minutes. To ignite the oven gas burner: ) 1. Press the Gas Oven control knob, turn We recommend you wipe the water droplets away after every cooking process. it to 240 and wait for the flame to come on. This may take 10-15 seconds. Do not release the knob until electrolux 11 the burner ignites. It is possible to check the flame through the holes in the bottom of the oven. 2. Upon ignition, keep the knob pressed for about 5/10 seconds, then release it and turn it to the required setting. the oven burner does not light )evenIf after 15 seconds: 1. Release the control knob and turn it to the “Off position” 2. Open the oven door and wait for at least one minute before trying to light the oven burner again. If the oven burner accidentally goes out, turn the oven knob to the “Off” position and wait at least one minute before trying to light the burner again. Oven safety device The gas oven features a Safety Device (“Thermocouple”); if the flame should extinguish for any reason, the device will stop the gas flow. How to use the Gas Grill Grilling must be carried out with the oven door closed. The grill pan handles must be removed from the pan during grilling. Always use oven gloves to remove and replace the grill pan handles. Ensure that you support the grill pan when removing it from the oven. To ignite the gas grill burner: ) 1. Press the Gas Oven control knob, turn it to symbol and wait for the flame to come on. This may take 10-15 seconds. Do not release the knob until the gas grill burner ignites. Check the flame through the oven door window. 2. Upon ignition, keep the knob pressed for about 5/10 seconds before releasing it. If the gas grill burner does not light ) even after 15 seconds: 1. Release the control knob and turn it to the “Off position” 2. Open the oven door and wait for at least one minute before trying to light the gas grill burner again. If the gas grill burner accidentally goes out, turn the oven knob to the “Off” position and wait at least one minute before trying to light the gas grill burner again. Gas Grill safety device The gas grill features a Safety Device (“Thermocouple”); if the flame should extinguish for any reason, the device will stop the gas flow. Hints and Tips Cookware: • Use any oven proof cookware which will withstand temperatures of 240°C. • Baking trays, oven dishes, etc. should not be placed on the oven base. • Do not use baking trays larger than 30 cm x 35 cm (12 in x 14 in) as they will restrict the circulation of heat and may affect performance. 12 electrolux The effects of dishes on cooking results Dishes and tins vary in their thickness, conductivity, colour, etc. which affects the way they transmit heat to the food inside them. A Aluminium, earthenware, oven glassware and bright shiny utensils reduce cooking and base browning. B Enamelled cast iron, anodized aluminium, aluminium with non-stick interior and coloured exterior and dark, heavy utensils increase cooking and base browning. On Roasting: - Most foods should be placed on the grid in the grill pan to allow maximum circulation of air to lift the food out of the fats and juices. Food such as fish, liver and kidneys may be placed directly on the grill pan, if preferred. - Food should be thoroughly dried before grilling to minimise splashing. Brush lean meats and fish lightly with a little oil or melted butter to keep them moist during cooking. - Accompaniments such as tomatoes and mushrooms may be placed underneath the grid when grilling meats - When toasting bread, we suggest that the top runner position is used with the grid in its 'high' position. - The food should be turned over during cooking, as required. - Most foods should be placed on the grid in the grill pan to allow maximum circulation of air to lift the food out of the fats and juices. Food such as fish, liver and kidneys may be placed directly on the grill pan, if preferred. - Food should be thoroughly dried before grilling to minimise splashing. Brush lean meats and fish lightly with - - a little oil or melted butter to keep them moist during cooking. Accompaniments such as tomatoes and mushrooms may be placed underneath the grid when grilling meats When toasting bread, we suggest that the top runner position is used with the grid in its 'high' position. The food should be turned over during cooking, as required. Caution! Do not line the oven with aluminium foil and do not place a roasting pan or baking tray on the floor, as otherwise the oven enamel will be damaged by the heat build-up. Cooking times Cooking times can vary according to the different composition, ingredients and amounts of liquid in the individual dishes. Note the settings of your first cooking or roasting experiments to gain experience for later preparation of the same dishes. Based upon your own experiences you will be able to alter the values given in the tables. electrolux 13 Baking and Toasting Table Gas Oven Cooking Timings do not include pre-heating. The empty oven should always be pre-heated for 10 minutes. TYPE OF DISH MEAT & POULTRY Beef with bone Beef without bone Lamb Pork Chicken Duckling Turkey Casseroles YORKSHIRE PUDDING Small Large Baked vegetables PASTRY Fruit tart Fruit pie Sausage rolls Choux pastry Vol au vents Jam tarts PUDDINGS Egg Custard in a Bain Marie Pavlova Meringues CAKES Rich fruit Cake8'’ Plain fruit cake Victoria sandwich Madeira cake Small cake Ginger bread Flapjack YEAST MIXTURES Bread 1lb loaves Bread 2lb loaves Rolls and buns Tea rings Scones Shortbread Fan Cooking temp °C 4 3 2 1 Cooking time in minutes 160 190 160 175 225 190 180 135 2or3 2or3 2or3 2or3 2or3 2or3 2or3 2or3 20' per lb+20’ 25’ per lb+25’ 20'/25' per lb+20'/25' 25’ per lb+25’ 30’ per lb+30’ 40’ per lb+40’ 30’ per lb+30’ 150' 200 200 160 2or3 2or3 2 25’ 35’ / 175 175 200 190 200 200 2 2or3 2or3 2or3 2or3 2or3 35’ 35’ 20’ 25'-30’ 15’ 30’- 40’ 135 135 140 2or3 2or3 2or3 60'- 75' 90' 70’ - 80’ 150 160 175 2or3 2or3 2or3 150’ - 170’ 150' 50’ - 60’ 160 160 160 160 2or3 3 3 3 105'-120' 30’ - 40’ 35’ - 45’ 20’ - 25’ 200 200 200 190 200 160 2or3 2or3 2or3 2or3 2or3 2or3 40' 50’ 15’ 25’ 15’ 25’ NOTES varies according to the vegetable. - 50’ - 60’ - 20’ - 35’ - 20’ - 35’ mould 26cm of alluminium on the grid. in the alluminium tray. in mould of 20cm on the grid in two mould (left+right) of 20cm on the grid in the alluminium tray. in the alluminium tray. (*) If you cook more than one dish at the same time, we recommend you place them on the levels quoted between brackets. 14 electrolux Grilling Timings do not include pre-heating. The empty oven should always be pre-heated for 10 minutes. FOOD GRILL TIME (Min) Bacon rashers 2-3 each side Beefburgers 6-10 each side Chicken joints 10-15 each side Chops: lamb pork 7-10 each side 10-15 each side Fish: 8-12 each side 4-6 each side whole trout/herring fillets plaice/cod Kebabs 10-15 each side Kidneys:lamb/pig 4-6 each side lamb/pig 5-10 each side Liver: Sausages Steaks: rare medium well Browning only 10-15 turn as required 3-6 each side 6-8 each side 7-10 each side 3-5 The temperatures quoted are guidelines. The temperatures may have to be adapted to personal requirements. electrolux 15 Cleaning and Maintenance Before cleaning switch the oven off and let it cool down. The appliance must not be cleaned with a superheated steam cleaner or a steam jet cleaner. Important: Before carrying out any cleaning operation, the appliance must be disconnected from the power supply. To ensure a long life for your appliance, it is necessary to perform the following cleaning operations regularly: - Only perform when the oven has cooled down. - Clean the enamelled parts with soapy water. - Do not use abrasive cleaners. - Dry the stainless steel parts and glass with a soft cloth. - If there are stubborn stains, use commercially available for stainless steel or warm vinegar. The oven’s enamel is extremely durable and highly impermeable. The action of hot fruit acids (from lemons, plums or similar) can however leave permanent, dull, rough marks on the surface of the enamel. However such marks in the brightly polished surface of the enamel does not affect the operation of the oven. Clean the oven thoroughly after every use. This is the easiest way to clean dirt off. It prevents dirt being burnt on. Cleaning materials Before using any cleaning materials on your oven, check that they are suitable and that their use is recommended by the manufacturer. Cleaners that contain bleach should NOT be used as they may dull the surface finishes. Harsh abrasives should also be avoided. External cleaning Regularly wipe over the control panel, oven door and door seal using a soft cloth well wrung out in warm water to which a little liquid detergent has been added. To prevent damaging or weakening the door glass panels avoid the use of the following: • Household detergent and bleaches • Impregnated pads unsuitable for nonstick saucepans • Brillo/Ajax pads or steel wool pads • Chemical oven pads or aerosols • Rust removers • Bath/Sink stain removers Clean the outer and inner door glass using warm soapy water. Should the inner door glass become heavily soiled it is recommended that a cleaning product such as Hob Brite is used. Do not use paint scrapers to remove soilage. DO NOT clean the oven door while the glass panels are warm. If this precaution is not observed the glass panel may shatter. If the door glass panel becomes chipped or has deep scratches, the glass will be weakened and must be replaced to prevent the possibility of the panel shattering. Contact your local Service Force Centre who will be pleased to advise further. 16 electrolux Oven Cavity The enamelled base of the oven cavity is best cleaned whilst the oven is still warm. Wipe the oven over with a soft cloth soaked in warm soapy water after each use. From time to time it will be necessary to do a more thorough cleaning, using a proprietary oven cleaner. Oven Shelves and Shelf Supports To clean the oven shelves and the shelf supports, soak in warm soapy water and remove stubborn marks with a well wetted soap impregnated pad. Rinse well and dry with a soft cloth. The shelf supports can be removed for easy cleaning. 1. Undo the fixing nut which keep the shelf support in place. When carrying out this operation, keep the shelf support in position with the other hand. 2. Then, disengage the rear hook and take off the shelf support. Then, refit the shelf supports following the procedure in reverse. Please, ensure the retaining nuts are secure when refitting the shelf support. Cleaning the Oven Door Clean the oven door glass with warm soapy water and a softh cloth only. Never use harsh abrasives. Once the cleaning is carried out, refit the oven door, following the procedure in reverse. Stainless steel or aluminium appliances: We recommend that the oven door is only cleaned using a wet sponge and dried after cleaning with a soft cloth. 1 2 electrolux 17 Never use steel wool, acids or abrasive products as they can damage the oven surface. Clean the oven control panel following the same precautions. DO NOT clean the oven door while the glass panels are warm. If this precaution is not observed the glass panel may shatter. If the door glass panel becomes chipped or has deep scratches, the glass will be weakened and must be replaced to prevent the possibility of the panel shattering. Contact your local Service Centre who will be pleased to advise further. 18 electrolux Replacing The Oven Light Disconnect the appliance If the oven bulb needs replacing, it must comply with the following specifications: - Electric power: 15 W/25 W, - Electric rate: 230 V (50 Hz), - Resistant to temperatures of 300°C, - Connection type: E14. These bulbs are available from your local Service Force Centre. To replace the faulty bulb: 1. Ensure the oven is isolated from the electrical supply. 2. Push in and turn the glass cover anticlockwise. 3. Remove the faulty bulb and replace with the new one. 4. Refit the glass cover and restore the electrical supply. electrolux 19 If Something is Wrong If the appliance is not working correctly, please check the following before contacting the Electrolux Service Centre: PROBLEM SOLUTION The gas oven burner or the gas grill burner do not light. Check that the oven is switched on at the wall. or Check that the power supply has not been interrupted before the cooling fan has had time to cool the oven down or Check that there is not a problem with your gas supply. Food is cooking too quickly or too slowly Check that you are using the recommended temperature settings and shelf positions. The oven light does not come on. Check the light bulb, and replace it if The oven is not cooking evenly. Check that the oven is installed properly. or Check that you are using the recommended temperature settings and shelf positions. Steam and condensation settle on the food and in the oven cavity. When the cooking process is completed, do not leave the dishes standing in the oven for longer than 15-20 minutes. or Refer to the contents of this booklet, especially to the chapter “Using the Gas Oven”. If after all these checks, your appliance still does not operate correctly, contact your local Electrolux Service Force Centre. Please note that it will be necessary to provide proof of purchase for any inguarantee service calls. necessary (see "Replacing the Oven Light"). In-guarantee customers should ensure that the above checks have been made as the engineer will make a charge if the fault is not a mechanical or electrical breakdown. 20 electrolux Technical Data Heating element ratings Oven burner 2700 W (Natural Gas) 2500 W (LPG) Gas grill burner 1900 W Oven light 25 W Cooling fan motor 25 W Total gas rating 2700 W (Natural Gas) Total electric rating 50 W Operating voltage (50 Hz) 230 V Appliance gas supply Natural Gas G20 (2H) - 20 mbar Appliance gas category II2H3+ Appliance class 3 Dimensions of the recess Height under top mm 593 in column mm 580 Width mm 560 Depth mm 550 Oven Height mm 335 Width mm 395 Depth mm 410 Oven capacity 56 l electrolux 21 Important Safety Requirements This appliance must be installed in accordance with the Gas Safety (Installation and Use) Regulations (current addition) and the I.E.E. Wiring Regulations. Detailed recommendations are contained in the following British Standard Codes of Practice - B.S. 6172, B.S. 5440: Part 2 and B.S. 6891: Current Editions. For appliances installed in the Republic of Ireland please refer to NSAI- Domestic Gas Installation I.S. 813 Current Editions and the ETCI Rules for Electrical Installations. Provision for Ventilation This appliance is not connected to a combustion products evacuation device. It shall be installed and connected in accordance with the current installation regulations. Particular attention shall be given to the relevant requirements regarding ventilation. The room containing the appliance should have an air supply in accordance with BS. 5440: Part 2 Current Edition. All rooms require an openable window or equivalent and some rooms will require a permanent vent as well. For room volumes up to 5m3 an air vent 100cm2 is required; for room volumes between 5m 3 and 10m 3 , an air vent with a minimum area of 50cm2 is required. If the room has a door which opens directly to the outside, no air vent is required. For room volumes that exceed 11m3 no air vent is required. If there are other fuel burning appliances in the same room, B.S. 5440: Part. 2: Current Editions should be consulted to determine the requisite air vent requirements. For appliances installed in the Republic of Ireland please refer to the NSAIDomestic Gas Installation I.S. 813 Current Editions Table Four. Location of appliance The appliance may be located in a kitchen, a kitchen/diner or bedsitting room but not in a bathroom, shower room or bedroom. It is essential that there is a minimum clearance of 4mm between the top surface of the appliance and the inside top of the cabinet. The unit must be fitted into a cabinet conforming to dimensions given in these pages. For appliances installed in the Republic of Ireland please refer to NSAI- Domestic Gas Installation I.S 813 Current Edition Section 7- Permitted Locations of Appliance. This oven unit may be used in a Built-in or a Built-under situation (see relevant diagrams). If the appliance is to be builtunder a hob, it is recommended that the hob be installed before the oven unit. 22 electrolux Instructions for the Installer Installation and connection must be done in compliance with the regulations in force. Any interventions must be carried out when the appliance is switched off. Only accredited engineers may work on the appliance. The manufacturer disclaims any liability if the safety measures are not observed. Connecting to the electrical supply Before connecting to the electrical supply, please make sure: - The fuse and the domestic electrical installation must be designed for the max. load of the appliance (see rating plate). - The domestic electrical installation must be equipped with a proper earth connection in accordance with the regulations in force. - The socket or the multi-pole off switch must be easy to access after the appliance has been installed. It is necessary that you install a double pole switch between the oven and the electricity supply (mains), with a minimum gap of 3mm between the switch contacts and of a type suitable for the required load in compliance with the current rules. The switch must not break the yellowgreen earth wire at any point. The earth wire should be 2 cm longer than the live and neutral wires. Important After installation and connecting, the cable must be placed so that it cannot at any point reach a temperature of more Live wire Neutral wire Earth wire (yellow-green) at least 2 cm longer electrolux 23 than 60°C above the ambient temperature. Before the oven is connected, check that the main fuse and the domestic installation can support the load and that the power supply is properly earthed. The manufacturer disclaims any responsibility should these safety measures not be carried out. Terminal block The oven is fitted with an easily accessible terminal block which is designed to operate with a single-phase power supply of 230 V. Letter L Letter N or E - Live terminal Neutral terminal - Earth terminal This oven must be earthed The cable used to connect the oven to the electrical supply must comply to the specifications given below. For Uk use only Connection Min. size via Cable/flex Cable / flex type Fuse • 13 A socket 0.75 mm2 outlet • 13 A spurbox 3 core butyl insulated 13 A min. • Cooker Control Circuit 0.75 mm2 PVC/PVC 13 A twin and earth For Europe use only Min. size Cable/ flex Cable / flex type Fuse 0.75 mm2 H05 RR-F 13 A 24 electrolux Gas Connection The use of rubber flexible hoses is not permitted. A) View from above Connecting the to the gas supply The use of rubber flexible hoses is not permitted. The gas supply connection ramp is located in the upper side of the oven, right behind the control panel. To carry out the gas connection: 1. Partially insert the oven in the recess (about 30 cm.) and operate on the connection ramp from above. The gas connection can be carried out according to one of the following procedures: A) connection with flexible metallic pipes (*) (with maximum length up to 2 metres only) — screw the feed pipe to the 1/2“ connection ramp, inserting the supplied gasket between the pipe and the ramp; B) connection with rigid metallic pipe (soft copper - minimum diameter: 8 mm) — insert the copper pipe into the connection ramp after fitting the proper nut and olive onto the copper pipe using a male / female adapter (not supplied). 2. Tighten the nuts by means of a 22 mm spanner. Care must be taken to keep the ramp in position and not to cause any stress to the gas supply circuit. 3. Completely insert the oven in the recess and secure it as indicated in the relevant paragraph. 4. Check the perfect sealing of the connection using leak detection fluid. flexible metallic pipe(*) gasket gas supply ramp control panel (*) For mainland Europe only B)View rigid metallic pipe male/femaleadapter from above olive nut gas supply ramp control panel View from above nut gas supply ramp control panel electrolux 25 Never use a flame for the leakproof test ! Check the gas supply ramp and the gas connection pipe are not squeezed while the oven is positioned into the recess. The use of a gas cooking appliance results in the production of heat and moisture in the room in which it is installed. Ensure that the kitchen is well ventilated: keep natural ventilation holes open or install a mechanical ventilation device (mechanical extractor hood). Prolonged intensive use of the appliance may call for additional ventilation, for example opening a window, or more effective ventilation, for example increasing the level of mechanical ventilation where present. 26 electrolux Gas Oven Burner Data GAS TYPE Natural Gas (G20) LPG (G30/G31) INJECTOR NOMINAL NOMINALGAS REDUCED MARK GAS FLOWIN GAS 1/100 mm POWER POWER (1/100 mm) (kW) m3/h g/h . (kW) 114 2,7 0,257 - 078 2,5 - 182 - BY-PASS NEEDLE NOMINAL GAS PRESSURE (mbar) 1,0 Reg. 20 1,0 52 28-30 / 37 BY-PASS NEEDLE NOMINAL GAS PRESSURE (mbar) - - 20 - - 28-30 / 37 Gas Grill Burner Data GAS TYPE INJECTOR NOMINAL NOMINALGAS REDUCED MARK GAS FLOWIN GAS 1/100 mm POWER POWER (1/100 mm) (kW) m3/h g/h . (kW) Natural Gas (G20) 098 1,9 0,181 - LPG (G30/G31) 71 1,9 - 138 - electrolux 27 Conversion from Natural to LPG Gas IMPORTANT The replacement/conversion from Natural to LPG gas should only be undertaken by a competent and qualified engineer. It is important to note that this model is designed for use with natural gas but can be converted for use with LPG providing the correct injectors are fitted. The gas rate is adjusted to suit. Replacement of gas oven burner injector To replace the gas burner oven injector, follow this procedure: 1. Remove the bottom plate of the oven (“A”) to access the gas oven burner; 2. Undo the two fixing screws (“C”) which keep the gas oven burner in place 3. Gently slide the oven gas burner off the injector support (“D”) and slowly move it to the left hand side. Check that the burner bush does not slip off the burner mouthpiece, and take care not to cause stress to the spark plug connection wire (“E”) and the thermocouple (“F”) conductor; 4. With a 7 mm socket spanner unscrew and remove the gas burner injector (“D”), and replace it with the required one (see Injector Table); 5. Reassemble the burner following the same procedure backwards. The oven burner does not require any primary air regulation. 28 electrolux Replacement of gas grill burner injector To replace the gas grill burner injector, follow this procedure: 1. Undo the two fixing screws (“A”) which keep the oven gas burner in place 2. Gently slide the gas grill burner off its slot and slowly move it downwards, taking care not to cause stress to the spark plug connection wire (“B”) and the thermocouple (“D”) conductor; 3. With a 7 mm socket spanner unscrew and remove the gas grill burner injector (“C”), and replace it with the required one (see Injector Table); 4. Reassemble the burner following the same procedure backwards. The gas grill burner does not require any primary air regulation. Replacement of Gas Type Label Once both the injectors for the gas oven burner and the gas grill burner have been replaced, take the Gas Type Label which is relevant to the new gas type and place it over the old one (it is located near the gas connection ramp). The replacement label is supplied with the injector kit. B C D electrolux 29 Minimum level adjustment of gas oven burner This procedure must be undertaken by a competent and qualified engineer only. 1. Disconnect the appliance from the mains supply. 2. Remove all the knobs. 3. With a thin bladed screwdriver, completely tighten the minimum level adjustment screw (“A”). 4. Refit all the oven parts following the above described procedure backwards. 5. Restore the mains supply. Do not restore the mains supply if all the removed parts have not been fitted back in their original position. 6. Light the oven gas burner (see the relevant chapter), set the gas oven control knob on 240 and let the oven heat for 10 minutes at least. 7.Check that the oven gas burner flame does not fail when quickly turning the gas oven control knob from 240 to 150. 8. Should the oven gas burner flame fail when performing point 10, repeat the whole procedure from point 1 to point 10, until a small regular flame is obtained on the complete gas oven burner crown. A 30 electrolux Instructions for Building In For problem-free functioning of the builtin appliance, the kitchen unit or the recess into which the appliance is built must have suitable dimensions. In accordance with the regulations in force, all parts which ensure the shock protection of live and insulated parts must be fastened in such a way that they cannot be undone without tools. These also include the fixing of any end walls at the beginning or end of a line of built-in units. The shock protection must in any case be ensured by the building in of the appliance. The appliance can be placed with its back or a side wall against higher kitchen units, appliances or walls. However, only other appliances or units of the same height as the appliance can be placed against the other side wall. Fig. A Fig. B Oven dimensions (Fig. A) Instructions for Building In For problem-free functioning of the builtin appliance, the kitchen unit or the recess into which the appliance is built must have suitable dimensions (Fig. BC). Fig. C electrolux 31 Securing the Appliance to the Cabinet 1. Open the oven door. 2. Fasten the oven to the cabinet placing the four distance holders (Fig. D - A) which fit exactly into the holes in the frame and then fit the four wood screws (Fig. D - B) provided. Fig. D 32 electrolux Guarantee/Customer Service Standard guarantee conditions We, Electrolux, undertake that if within 12 months of the date of the purchase this Electrolux appliance or any part thereof is proved to be defective by reason only of faulty workmanship or materials, we will, at our option repair or replace the same FREE OF CHARGE for labour, materials or carriage on condition that: • The appliance has been correctly installed and used only on the electricity supply stated on the rating plate. • The appliance has been used for normal domestic purposes only, and in accordance with the manufacturer’s instructions. • The appliance has not been serviced, maintained, repaired, taken apart or tampered with by any person not authorised by us. • Electrolux Service Force Centre must undertake all service work under this guarantee • Any appliance or defective part replaced shall become the Company’s property. • This guarantee is in addition to your statutory and other legal rights. Exclusions • Damage or calls resulting from transportation, improper use or neglect, the replacement of any light bulbs or removable parts of glass or plastic. • Costs incurred for calls to put right an appliance which is improperly installed or calls to appliances outside the United Kingdom. • Appliances found to be in use within a commercial environment, plus those which are subject to rental agreements. • Products of Electrolux manufacturer that are not marketed by Electrolux Service and Spare Parts In the event of your appliance requiring service, or if you wish to purchase spare parts, please contact your local Service Force Centre by telephoning 0870 5 929 929 Your telephone call will be automatically routed to the Service Force Centre covering your postcode area. For the address of your local Service Force Centre and further information about Service Force, please visit the website at www.serviceforce.co.uk Before calling out an engineer, please ensure you have read the details under the heading “Something not working” When you contact the Service Force Centre you will need to give the following details: 1.Your name, address and postcode. 2.Your telephone number. 3. Clear concise details of the fault. 4. The model and Serial number of the appliance (found on the rating plate). 5.The purchase date. electrolux 33 Please note a valid purchase receipt or guarantee documentation is required for in guarantee service calls. Customer Care For general enquiries concerning your Electrolux appliance, or for further information on Electrolux products please contact our Customer Care Department by letter or telephone at the address below or visit our website at www.electrolux.co.uk Customer Care Department Electrolux Major Appliances Addington Way Luton Bedfordshire, LU4 9QQ Tel: 08705 950 950 (*) (*) Calls may be recorded for training purposes European Guarantee This appliance is guaranteed by Electrolux in each of the countries listed at the back of this user manual, for the period specified in the appliance guarantee or otherwise by law. If you move from one of these countries to another of the countries listed below the appliance guarantee will move with you subject to the following qualifications: • The appliance guarantee starts from the date you first purchased the appliance which will be evidenced by production of a valid purchase document issued by the seller of the appliance. • The appliance guarantee is for the same period and to the same extent for labour and parts as exists in your new country of residence for this particular model or range of appliances. • The appliance guarantee is personal to the original purchaser of the appliance and cannot be transferred to another user. • The appliance is installed and used in accordance with instructions issued by Electrolux and is only used within the home, i.e. is not used for commercial purposes. • The appliance is installed in accordance with all relevant regulations in force within your new country of residence. The provisions of this European Guarantee do not affect any of the rights granted to you by law. 36 electrolux www.electrolux.co.uk 35694-4802 10/08 R.A