1
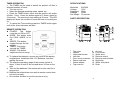
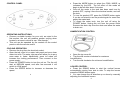
THANK YOU!
Congratulations on your purchase of this versatile EdgeStar
product that combines an evaporative air cooler and a
humidifier. To get the best cooling effect from your product
please read these instructions carefully.
For the best cooling performance from your unit, first fill it with
water. If ice is available, this will increase its cooling power.
Position the unit in a place such that air will be able to “flow
through” the area. The greatest cooling effect will be felt if the
unit is operated in a partly opened doorway or window with
the cooled air directed into the room. If the unit cannot be
positioned in an area that will allow the air to “flow through,” it
will still cool, but the effect will be lessened.
NOTE AND CAUTIONARY INFORMATION:
This appliance is intended for use in a home or small office
environment. Any other use (e.g., outdoors) is not
recommended by the manufacturer and may cause fire,
electrical shocks or other injury to person or property.
When using electrical appliances, basic safety precautions
should always be followed:
1. Extreme care should be taken when any product is used
by or near children and the elderly, and whenever the
product is left operating and unattended.
2. Before operating the product remove the unit from its
packaging and check to ensure it is in good condition.
3. DO NOT let children play with the packaging, especially
plastic bags.
4. DO NOT operate any product with a damaged power cord
or plug.
1
5. DO NOT attempt to repair or adjust any electrical or
mechanical functions on this unit as this may void the
warranty.
6. Check the household voltage to ensure it matches the
appliance’s rate specification.
7. DO NOT cover the air inlet or outlet.
8. Always unplug the product before refilling the water tank.
9. Always unplug the product when not in use. To disconnect
from the power supply, grip the plug and pull it from the
power socket. Never pull by the plug out by the cord.
10. This product is not intended for use in wet or damp
locations. Never locate the product where it may fall into a
bathtub or other water container. DO NOT use in
bathrooms or outdoors. When not in use always store in a
dry area.
11. DO NOT run the power cord under carpeting or cover with
rugs or runners. Keep the cord away from areas where it
may be tripped over.
12. Avoid the use of an extension cord.
13. DO NOT insert or allow objects to enter any ventilation or
exhaust opening as this may damage the product and
could cause an electrical shock or fire.
14. DO NOT use the product in areas near gasoline, paint, or
other inflammable goods or objects.
15. If the supply cord is damaged it must be replaced by the
manufacturer or an authorized service center.
16. Unplug or disconnect the appliance from the power before
servicing and cleaning.
2
MAINTENANCE
• Before you clean the appliance, switch it off, remove the
plug from the power socket and wait until the product has
cooled down.
• Use a damp cloth to clean the product housing.
• Do not use water, detergents, abrasive cleaning liquids or
chemical agents (e.g., Alcohol, Gasoline etc…) to clean the
appliance.
• Store the unit in its original packaging in a dry, dust free
area during the off season.
7
TIMER OPERATION
• The TIMER can be used to switch the product off after a
selected number of hours.
• Turn the unit on.
• Select the desired operating mode, speed, etc.
• Press the TIMER button once and the product will switch
off after 1 hour. Press the button again for 2 hours, again for
3 hours etc. The maximum timer setting is 8 hours. The LED
display will show the number of hours the timer is currently set
for.
• To cancel the Timer setting press the TIMER button again
until all the timer indicators are dark.
REMOTE OPERATION
POWER: This button
turns the unit ON or OFF.
MODE: This button turns
the COOL MODE on or
off.
SPEED: This button
toggles through the fan
speeds
TIMER: This button
controls the TIMER
SWING: This button
adjusts the louver swing.
a) To replace the batteries, remove the cover of the battery
compartment. Install two AAA 1.5V Batteries, and then
replace the cover.
b) The effective operating range of the remote control is
about 13 feet in front of the unit and about 10 feet on the
side.
c) Take out the batteries if the remote will not be used for a
long period.
d) Replace the batteries as soon as the remote control does
not work normally.
e) Do not allow children to use the remote as a toy.
6
SPECIFICATIONS
Model No.
Voltage
Frequency
Wattage
Net Weight
EAC420
120V
60Hz
250W
23 pounds
PARTS DESCRIPTION
1
2
3
4
5
6
7
8
Top cover
Handle
Horizontal louvers
Left side
Front cover ornament
Power cord hole
Caster wheels
Top cover lid
9
10
11
12
13
14
15
16
3
Air vent
Front cover
Water level
Remote control
Remote control holder
Right side
Water inlet panel
Drain
•
CONTROL PANEL
•
•
•
Press the MODE button to select the COOL MODE, as
indicated by the LED. The full effect of this mode will
begin to be felt after about 3 minutes.
Once all the water in the tank has been used turn the
product OFF, unplug it from the electrical socket, and refill
the tank.
To turn the product OFF press the POWER button again.
If you do not intend to use the product again for some time
empty the water tank.
To empty the water tank, turn the unit off using the
POWER button. Unplug the unit from the power outlet.
Remove the drain cap from the drain and allow the water
to drain out.
HUMIDIFICATION CONTROL
OPERATING INSTRUCTIONS
• Choose a suitable location for your unit; as noted in the
first section, the unit will produce greater cooling when
located in an area in which air can “flow through.”
• This unit can be operated by the controls on the control
panel or with the remote control
COOLING OPERATION
• Remove the plug from the electrical socket.
• Open the top cover lid or water inlet panel and pour clean
water into tank. The water inlet panel will allow you to pour
more water in, faster. Additionally, some ice cubes will
increase the cooling performance. Then connect to the
power supply.
• Press the POWER button to turn the unit on. The fan will
start at MEDIUM speed, and after few seconds it will
switch to LOW speed.
• Press the SPEED button to increase or decrease the
speed.
4
• Open the top cover lid
• Turn the dial counter-clockwise for maximum
humidification.
• Turn the dial clockwise for minimum humidification.
LOUVER CONTROL
• Press the SWING button to start the vertical louvers
automatically moving from side to side. To stop the louvers
press the SWING button again.
• You can change the air direction up or down by manually
adjusting the horizontal louvers.
5