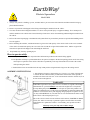
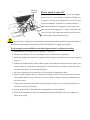
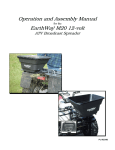
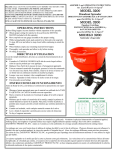
1
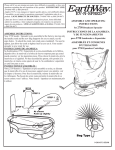
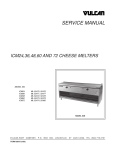
Operation and Assembly Manual
for the
EarthWay M30 12-volt
®
ATV Broadcast Spreader
www.EarthWay.com
EarthWay
®
Electric Spreaders
Model M30
1. Always wear protective clothing, eyewear, and dust mask to prevent contact with chemicals and other materials being applied with this machine.
2. Remove any material in the hopper before lifting or detaching this machine from the vehicle.
3. Care must be taken when lifting this machine so as not to cause personal injury or equipment damage. Never attempt to install this machine to the vehicle alone. Recruit the help of someone to assist when attaching and detaching this machine from
the vehicle.
4. Refer to the material packaging or the Material Safety Data Sheet for precautionary measures required when handling materials to be applied.
5. Before attaching this machine, consideration must be given to the load capacity of the vehicle. Refer to the owner’s manual
of the vehicle for rated load capacity. Be sure to take into account the weight of this machine 20 lbs. and the weight of the
material to be placed in the hopper when calculating the total load.
6.
Keep hands away from any spinning object.
How to operate safely:
A. Read, understand, and follow all product label information provided on the material being applied.
B. An adjustable solid stop is provided that allows the operator to adjust to the desired opening position on the rate setting
control prior to operation of the vehicle. This allows repeatability to the stop without the need to look at the control
while operating the vehicle.
C. Establish the correct rate and then lock the stop in that position using the thumb wing nut on the setting control.
ASSEMBLY INSTRUCTIONS
1. Attach frames to hopper as shown using (4) # 1/4-20 x 1-1/2” bolts with lock-nuts.
2. Position the rate control assembly to either frame rail based on if the spreader is
mounted to the front or the rear rack. If on front mount the control to the left rail, if on
the rear mount on the right rail.
WARRANTY
EARTHWAY guarantees this product to be free of defects in original workmanship
and materials for a period of 90 days from sale to the original user. If any defect
develops during this period EARTHWAY will repair or replace this product at no
charge provided the defect is not the result of mishandling or tampering and that this
product is received at the factory with shipping charges prepaid. For quicker service
you may call EARTHWAY at (574) 848-7491 or write and describe the nature of the
defect and we will send repair parts to you.
Due to the corrosive nature of most fertilizers and ice melters, EARTHWAY PRODUCTS, INC. makes no warranty or guarantee against corrosion failure on models
with plated steel or painted steel frames. Clean and dry your spreader well after
each use.
Warranty covers parts only, but not labor charges.
EarthWay Products, Inc.
P.O. Box 547
Bristol, Indiana 46507
USA
EC DECLARATION OF CONFORMITY
(Machinery Directive & Electromagnetic Compatibility Directives)
Herewith we declare that the machinery described below is in accordance with the relevant
health and safety requirements of the EC Council Directives concerned with Machinery and
Electromagnetic Compatibility. No alterations are to be made to the machine without prior consultation and approval of EarthWay Products, Inc. otherwise the Declaration may become invalid. This equipment must be commissioned, used and maintained strictly in accordance with the
operating and maintenance instructions issued with the machine. Operators must be trained in
accordance with the recommendations given in the operating and maintenance instructions issued with the machine.
Description of Machine: EarthWay M30 ATV 12-volt Broadcast Spreader
Serial Number: AS STAMPED ON MACHINE
Date of Supply: AS INVOICED DATE
Relevant EC Council Directives:
Machine Directives 89/392/EEC and subsequent amendments.
Electromagnetic compatibility Directive 89/336/EEC and subsequent amendments.
Issued by: Jeffrey Kendall on behalf of EarthWay Products, Inc.
Signed by:
Date: 19 November 2003
Position of Signatory: Vice President
Sales & Marketing
DO NOT RETURN TO DEALER FOR REPAIR
EARTHWAY PRODUCTS, INC.
1009 Maple Street
P.O. Box 547
Bristol, IN 46507
FOR YOUR RECORDS
Date Purchased:
Store Name:
Mounting
locations
How to attach to your ATV:
Position the M30 centered on either the front or rear luggage
rack on your ATV. Next using the 2 included “U-Bolts” connect the rear cross bars to the luggage rack cross bar closest to
the seat or handlebars. Using the two, included “Double J
Bolts” attach the M30 to the luggage rack securing it to the
outer most rail on the luggage rack. Tighten all fasteners and
cut any excessive bolt lengths that extend beyond the nuts on
the “U & J-Bolts” and smooth if necessary.
Prior to each use, inspect the mounting hardware for loosening and the spreader to ensure the rigidity of
the mount by tightening any loose hardware either on the Spreader or Luggage Rack mounts.
If rate settings are not available use the following procedure to calculate the setting:
1. Determine how much material is to be applied per 1,000 sq/ft.
2. Measure off a distance of 50 feet, preferably on a paved surface such as a parking lot.
3. Weigh out enough of the material to be applied to fill the hopper at least half full. Record the weight for
future use.
4. With the unit mounted on the vehicle and the hopper at least half full of the material to be spread, position the vehicle far enough before the beginning of the 50 foot test area so that the vehicle will achieve
the desired speed before you reach the starting line.
5. Set the rate setting stop at a position that you feel would be an appropriate setting.
6. Start the vehicle in motion and as you cross the starting line (of the 50 feet) move the rate lever to the
open position against the stop. Take care to be aware of what is going on around you maintaining control of the vehicle.
7. Continue from the starting line with the unit spreading the material. As you cross the finish line move
the rate lever to the closed position.
8. Stop the vehicle and note the width of the spread path that was just completed.
9. Return to the start point and empty the remaining material from the hopper into your weighing container and re-weigh.
EarthWay
Electric Spreaders
Rate Setting Worksheet
Desired Application Rate (lbs/1,000 sq ft) _____________
To determine the desired application rate divide the area (sq ft) the bag should cover by the weight of the bag, then
multiply by 1,000. (example: 5000 sq ft / 25 lbs = .005 x 1,000 = 5)
___________Weight of Material Placed in Hopper
- __________Weight of Material Left in Hopper
= __________Weight of Material Used
50
Length of Test Area
x ______ Width of Spread Area
= _______Total Spread Area
Divide the Weight of Material Used by the Total Spread Area = _________lbs\sq ft
Multiply the lbs\sq ft times 1,000 = ________lbs\1,000 sq ft
Compare the results of your test to the desired application rate.
Adjust the rate setting stop accordingly and run through the test again.
Repeat this process until you have achieved the desired application rate.
The settings furnished on the Rate Setting Chart are intended as a guide only. Variations in physical characteristics of material applied, brisk walking speed (3 mph.), and roughness of ground surface may require slightly different spreader settings. Due to the above conditions, EARTHWAY PRODUCTS INC. makes no warranty as to
the uniformity of coverage actually obtained from the setting listed.
EarthWay
®
Products, Inc.
P.O. Box 547
Bristol, Indiana 46507
(574) 848-7491
www.earthway.com
HOW TO ORDER SPARE PARTS
All spare parts listed herein may be ordered direct from the
manufacturer, EARTHWAY PRODUCTS, INC.
Be sure to give the following information when ordering.
1. Model Number
2. Part Number
3. Part Description
Call (574)848-7491 or write for current prices.
PARTS AND DESCRIPTIONS FOR MODEL M30
Key
Part#
1
77002
2
Description
Key
Part#
Description
Rain Cover
15
25117
Frame
77102
Electric Motor DC
16
60371
Wire Housing Assembly
3
60328
Motor Support
17
43050
“U” Bolt Strap
4
N/A
1/4-20 x 1-1/2” Hex Bolt
18
N/A
1/4-20 Hex Nut
5
33100
Hair Pin Clip (Agitator)
19
N/A
1/4-20 x 2” Flat Head Phillips Screw
6
12316
Hopper Assembly Includes Key# 19 & 20
20
N/A
1/4-20 Nylon Insert Locknut
7
12209
Hopper Bushing
21
N/A
1/8” x l” Cotter Pin
8
60511
Wire Harness Assembly
22
12109
9
44283
“U” Bolt 1/4-20
23
N/A
Impeller
10
12125
Lever
24
12221
11
12124
Gauge Assembly
25
N/A
#10-24 x 3/4” Pan Head Screw
12
N/A
1/4-20 Wing Nut
26
N/A
1/4-20 x 1/2” Hex Bolt
13
12319
Cable Housing Clip
27
42273
14
N/A
#8 x 3/4” Screw
28
N/A
29
44287
#8 x 3/8” Screw
Shut-off Plate
Cable Bracket
#10-24 Nylon Insert Locknut
“J” Bolt 1/4 –20
N/A ~ Fasteners available at any local hardware store.