1
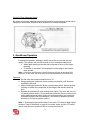
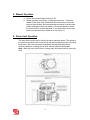
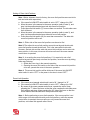
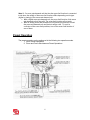
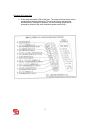
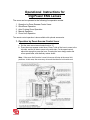
Operational Instructions for
DigiPower ENG Lenses
The zoom can be operated in the following five operation modes.
1.
2.
3.
4.
5.
Operation by Zoom Seesaw Control Lever
QuickZoom Operation
Auto Cruising Zoom Operation
Manual Operation
Zoom Limit Operation
The remote control operation is also available with optional accessories.
1. Operation by Zoom Seesaw Control Lever
a. Set the zoom servo/manual select knob to “S”.
b. Press the zoom seesaw control lever. Press T-side of the lever to zoom to the
tele side, and the W-side to zoom to the wide side. For the speed control,
adjust the strength to press the lever. Pressing the lever deeply makes the
zoom speed faster, and shallowly makes slower.
Note: If the zoom limit function is used, the zoom will stop at the zoom limit
positions. In this case, the zoom may not reach the tele end or the wide end.
1
Control of Zoom Maximum Speed
By means of the zoom maximum speed control knob the zoom maximum speed can be
changed in seven steps. Rotate the knob clockwise to increase the speed.
2. QuickZoom Operation
In quickzoom operation, pressing a switch moves the zoom to the tele end
quickly. The operator can use this function in such occasions listed below.
• When rapid zooming to the tele end is required to focus on the object
precisely.
• To confirm, in a moment, the composition of the image in the extreme
close up shot.
Note: If the zoom limit function is used, the zoom will stop at the zoom limit
positions. In this case, the zoom may not reach the tele end or the wide end.
Operation
a. Set the zoom servo/manual select knob to “S”.
b. Keep pressing the quickzoom & auto cruising zoom switch until the zoom
reached the tele end.
c. While pressing the quickzoom & auto cruising zoom switch, perform precise
focusing or confirm the composition of the image in the extreme close up
shot.
d. Release the quickzoom & auto cruising zoom switch. The zoom will move to
it’s former position quickly. (If you press the quickzoom & auto cruising zoom
switch again before the zoom returns to it’s former position, the quickzoom
movement restarts. After this operation, if the switch is released, the zoom
will move to it’s former position quickly.)
Note 1. By setting an appropriate switch in the area of “Function & Mode Select
Switches” (refer to illustration on page 8), the return switch and the VTR switch
can be used also as a quickzoom & auto cruising zoom switch.
2
Note 2. In quickzoom operation, the zoom moves at the maximum speed
irrespective of the setting position of the zoom maximum speed control knob.
Note 3. If you press the quickzoom & auto cruising zoom switch while pressing
the zoom seesaw control lever, the zoom moves in auto cruising zoom operation,
not in quickzoom operation.
3.Auto Cruising Zoom Operation
In auto cruising zoom operation, the zoom moves to the tele end or the wide end
at constant speed. This function is effective when a constant slow zoom speed is
required across the zooming range.
Note: If the zoom limit function is used, the zoom will stop at the zoom limit
positions. In this case, the zoom may not reach the tele end or the wide end.
Operation
a. Set the servo/manual select knob to “S”.
b. Press the zoom seesaw control lever and adjust the zoom speed.
c. While pressing the zoom seesaw control lever, press the quickzoom & auto
cruising zoom switch.
• The auto cruising zoom function will work.
d. Release your hand from the zoom seesaw control lever.
• The zoom will move to the tele end or the wide end at a constant
speed that is determined when the quickzoom & auto cruising zoom
switch is pressed.
Note: By setting an appropriate switch in the area of “Function & Mode Select
Switches” (refer to illustration on page 8), the return switch and the VTR switch
can be used also as a quickzoom & auto cruising zoom switch.
Releasing
There are three ways to release the auto cruising zoom operation mode.
1. Press the zoom seesaw control lever on the side of the direction of the
zoom movement.
• When the amount of displacement of the zoom seesaw control
lever exceeds that determined when the auto cruising zoom
operation is set, the auto cruising zoom operation mode will be
released. After released, the zoom will move continuously toward
the same direction as moved before releasing. (In this way, the
auto cruising zoom operation mode can be released maintaining
the smooth zoom movement.)
2. Press the zoom seesaw control lever on the reverse side of the
direction of the zoom movement.
• The auto cruising zoom operation mode will be released
immediately, and the zoom will move toward the reverse direction.
3. Press the quickzoom & auto cruising zoom switch. The auto cruising
zoom operation will be released immediately, and the zoom will stop.
3
4. Manual Operation
a. Set the servo/manual select switch to “M”.
b. Rotate the zoom ring directly or using the zoom lever. Clockwise
rotation of the zoom ring, viewed from the camera side, moves the
zoom to the wide side, and counterclockwise rotation to the tele side.
(When rotating the zoom ring directly, it is recommended to remove
the zoom lever for smooth operation. If you removed the zoom lever,
install it on the zoom lever holder so as not to lose it.)
5. Zoom Limit Operation
The zoom limit function can be used in the servo operation mode. (The setting of
the zoom limit positions can be set also in the manual operation mode.) By using
this function, the zoom movement toward both tele and wide side can be
confined; therefore, zooming can be done within the desired shot angles.
Note: While the zoom limit function is being used, the preset function cannot be
used.
4
Setting of Zoom Limit Positions
Note: Before shipment from the factory, the zoom limit positions were set at the
tele and wide ends respectively.
a. If the zoom limit ON/OFF select switch is set to “OFF,” change it to “ON.”
b. Move the zoom in the manual or the servo operation (refer to note 3), and
stop it at the position desired as a tele side zoom limit position.
c. Press the zoom limit switch (T) for more than one second. The tele side zoom
limit will be set.
d. Move the zoom in the manual or the servo operation (refer to note 3), and
stop it at the position desired as a wide side zoom limit position.
e. Press the zoom limit switch (W) for more than one second. The wide side
zoom limit position will be set.
Note 1: Either side of the zoom limit positions can be set at first.
Note 2: The wide side zoom limit position cannot be set beyond the tele side
zoom limit position toward the tele end. This is the same with the tele side.
However, the tele side and the wide side zoom limit positions can be set at the
same position. In this case, the zoom will not move even if the zoom seesaw
control lever is operated.
Note 3: In re-setting the zoom limit positions, if it is required to set a limit
position beyond the previously set zoom limit position, move the zoom by taking
either way following.
¾ Rotate the zoom ring in the manual operation.
¾ Pressing the zoom limit switch on the side of the new zoom limit position
to be set, operate the zoom in the servo operation.
Note 4: The zoom limit position will be held even if the zoom limit ON/OFF
select switch is set to “OFF” or the power to the lens is turned “OFF.”
Zoom Limit Operation
a. If the zoom servo/manual select knob is set to “M,” change it to “S.”
b. If the zoom limit ON/OFF select switch is set to “OFF,” change it to “ON.”
c. By means of the zoom seesaw control lever, operate the zoom. Keep
pressing the “T” side of the lever so that the zoom reaches the tele side zoom
limit position and stops. Keep pressing the “W” side of the lever so that the
zoom reaches the wide side zoom limit position and stops.
Note 1: Before performing a zoom limit operation, if the zoom position is not
within range of the tele and wide side zoom limit positions, when the seesaw
control lever is operated, the zoom will move only toward the zoom limit
positions, not toward the opposite side of them.
5
Note 2: If a zoom rate demand unit that has the zoom limit function is connected
to the lens, the validity of the zoom limit function differs depending on the type
(digital or analog) of the zoom rate demand unit.
¾ With a digital zoom rate demand unit, the zoom limit function of the zoom
rate demand unit will be valid. The zoom limit function will not work.
¾ With an analog zoom rate demand unit, the zoom limit functions of both
the zoom rate demand unit and the lens will be valid. To avoid a
confusion of the zoom limit positions, turn off the zoom limit function of
one of them.
Preset Operation
The preset operation can be performed in the following two operation modes.
1. Zoom Preset Operations
2. Zoom and Focus Simultaneous Preset Operations
6
Zoom Preset Operation
In this operation, the zoom moves to a predetermined position by pressing a
switch.
Setting Zoom Preset Operation Mode
a. Set the preset ON/OFF switch to ON. (The switch has been set to ON at the
factory.)
b. Set the function switch to OFF. (The function switch has been set to OFF at
the factory.)
c. Set the zoom servo/manual select knob to “S.”
Storing Preset Position
a. Set the zoom position by operating the zoom seesaw control lever.
b. While pressing the preset switch (MEMO), press the preset switch (ON).
Recalling Preset Shot
a. Press the preset switch (ON). The zoom will move to the predetermined
position then stops. (During this operation, the shot recalling speed can be
changed by means of the zoom maximum speed control knob.)
Zoom and Focus Simultaneous Preset Operation
In this operation, the zoom and focus move to their predetermined positions
simultaneously by pressing a switch.
Installing of Optional Accessories
For zoom and focus simultaneous preset operation, the following accessory is
required. Install it on the lens referring to it’s operation manual.
• Focus Position Demand Unit (EPD-4A-E01 or EPD-4A-E02)
Setting Zoom and Focus Simultaneous Preset Operation Mode
a. Set the preset ON/OFF switch to ON. (The switch has been set to ON at the
factory.)
b. Set the function switch to ON.
c. Set the zoom servo/manual select knob to “S.”
d. Set the focus servo/manual select knob to “S.”
Storing Preset Position
a. Setting Zoom Position – Set the zoom position by operation the zoom seesaw
control lever of the lens.
b. Setting Focus Position – Set the focus position by operation the focus control
knob of the Focus Position Demand Unit.
c. While pressing the preset switch (MEMO) of the lens, press the preset switch
(ON).
7
Recalling the Preset Shot
a. Press the preset switch (ON) of the lens. The zoom and focus move to their
predetermined positions then stop. The zoom and focus start and stop
simultaneously. (During this operation, the shot recalling speed can be
changed by means of the zoom maximum speed control knob.)
8